Home / Hanging
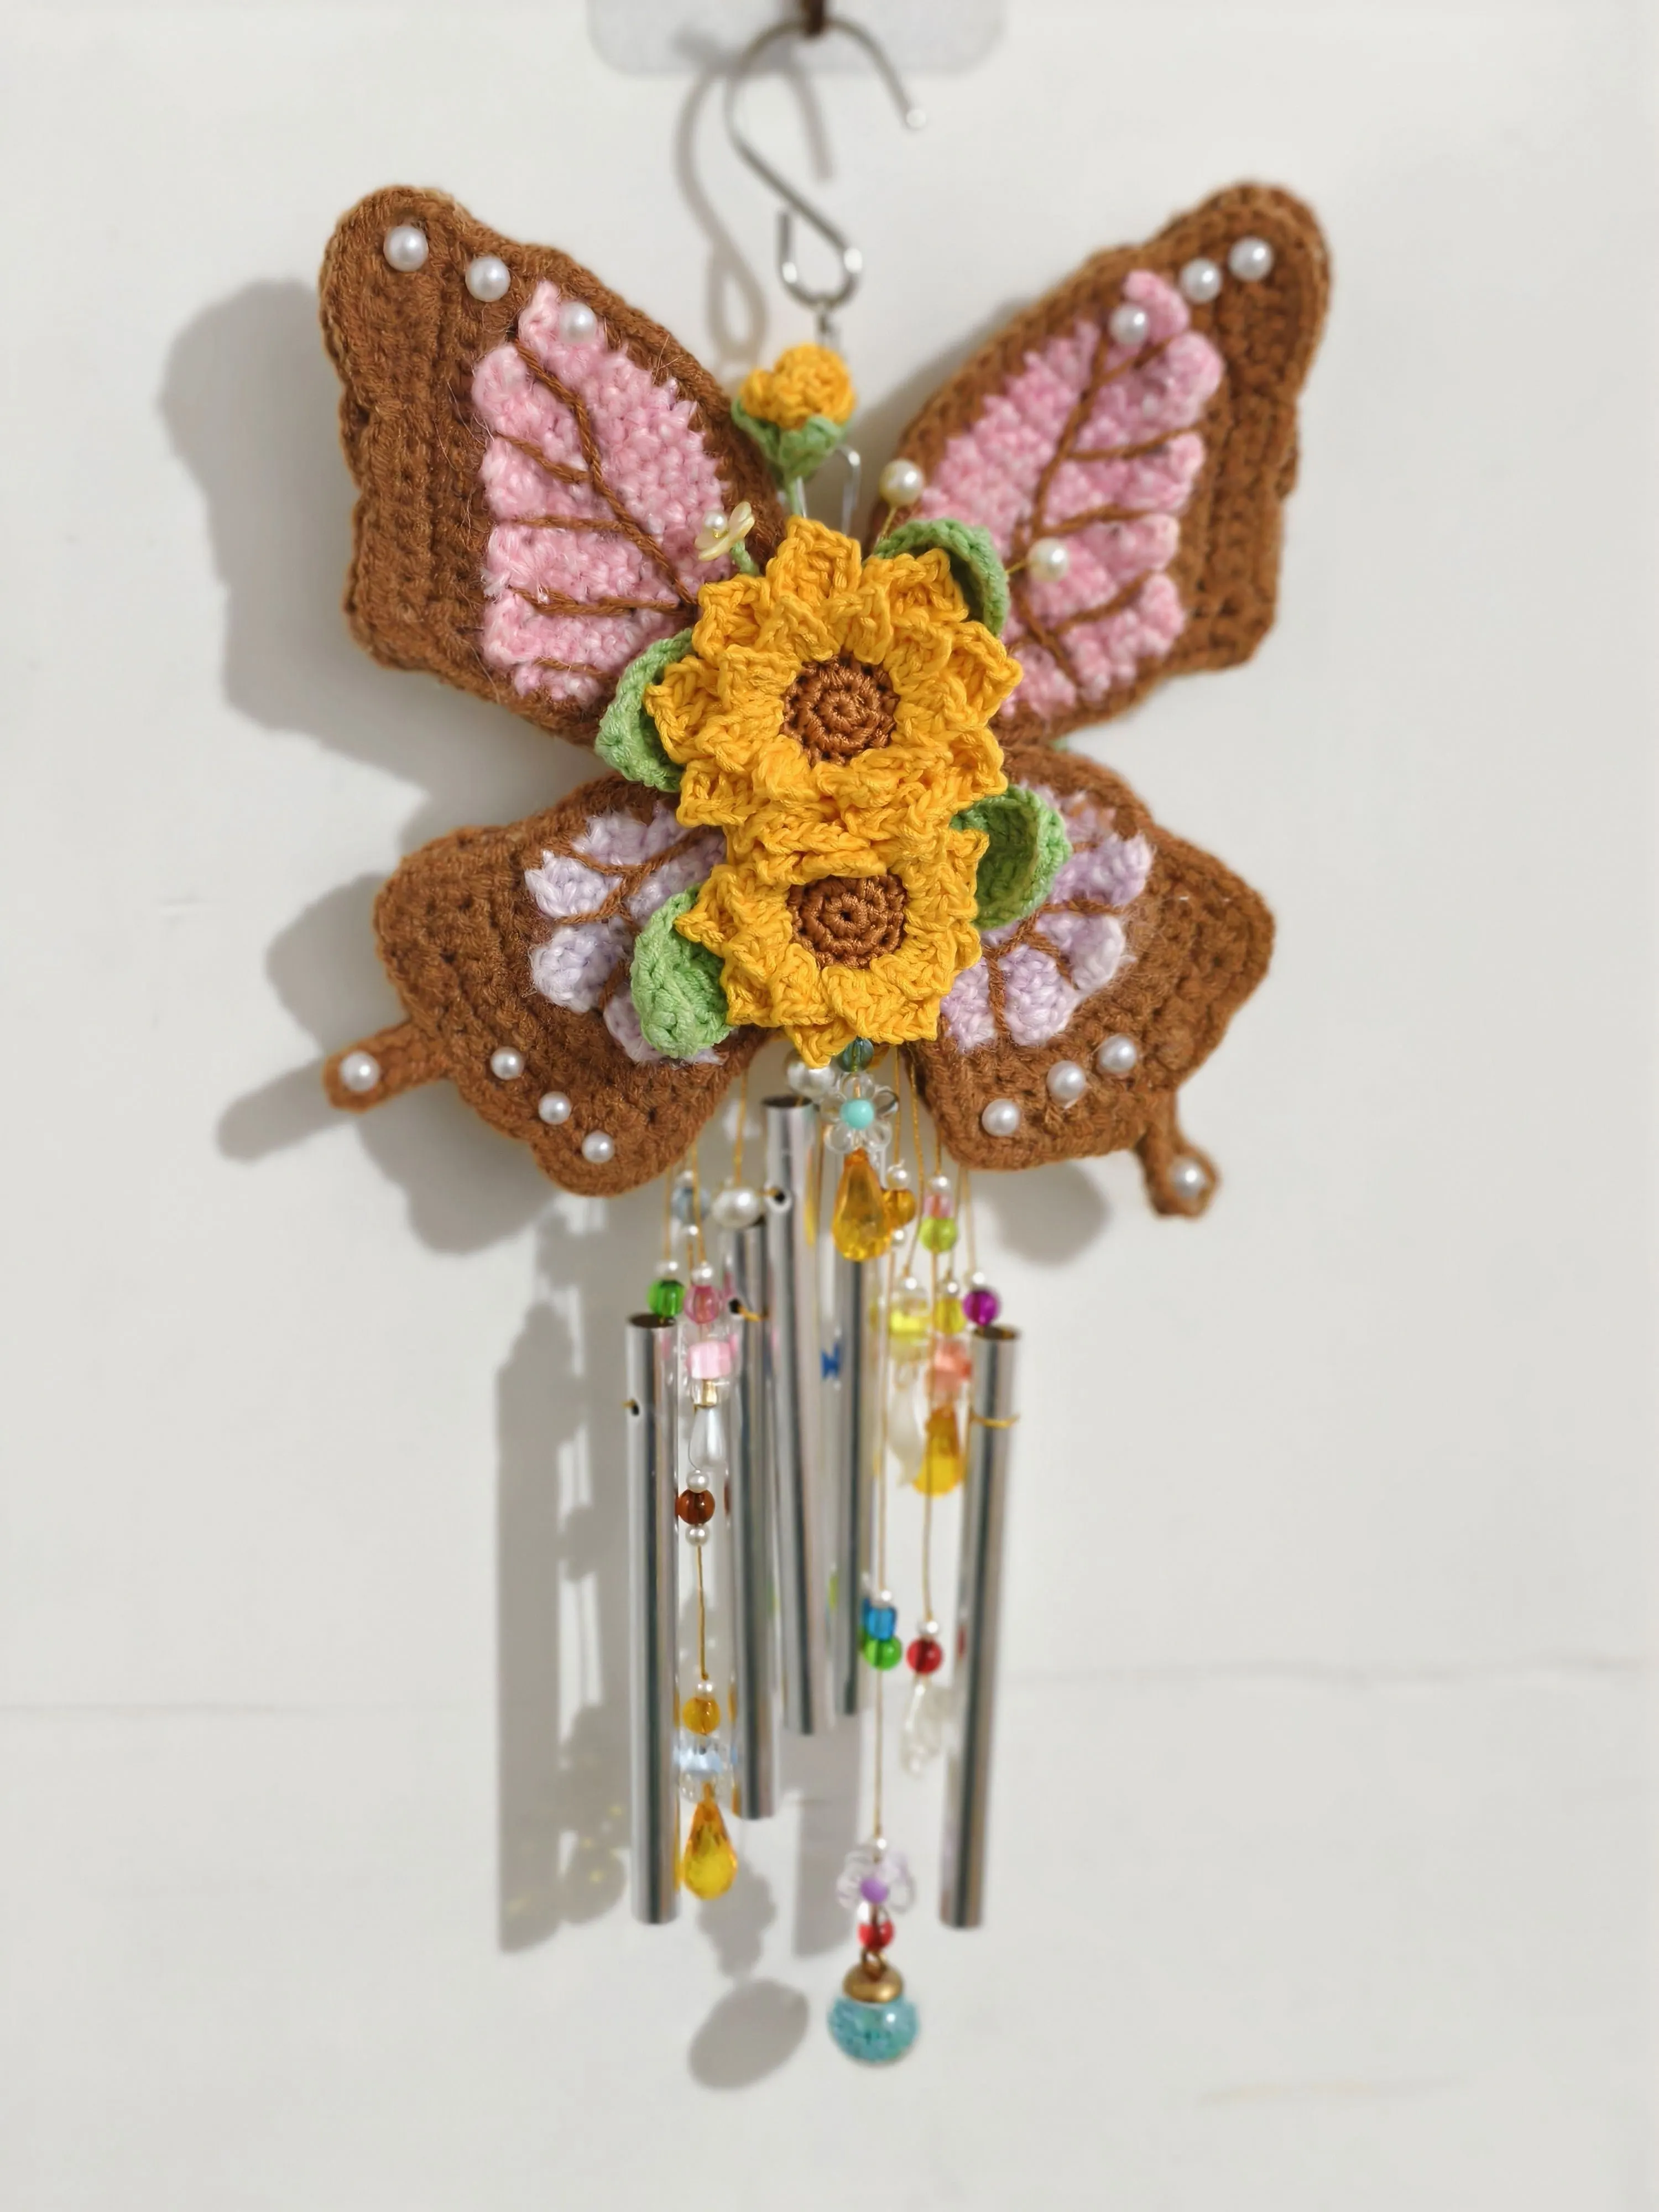
Butterfly Wind Chime
Project preview
See the finished project
Pattern format
Instructions
Watch and follow
Video tutorial
| Style | Yarn | Color |
|---|---|---|
| Cherry Blossom Version | Combed 3# Lace |  06#Crystal Pink x 1 06#Crystal Pink x 1 35#Fair Green x 1 35#Fair Green x 1 |
| 4-Ply Combed Cotton & Acrylic Fibre Hand Knitting Yarn |  72#Placid Blue x 1 72#Placid Blue x 1 | |
| Dawn Impression |  01#Morning Tue x 1 01#Morning Tue x 1 | |
| Golden thread | 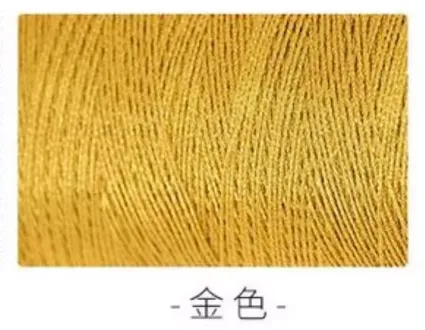 Gold x 1 Gold x 1 |
This wind chime is divided into three parts: butterfly, bouquet, and wind chime assembly. First, make the butterfly part, then the bouquet part, and finally assemble the wind chime.
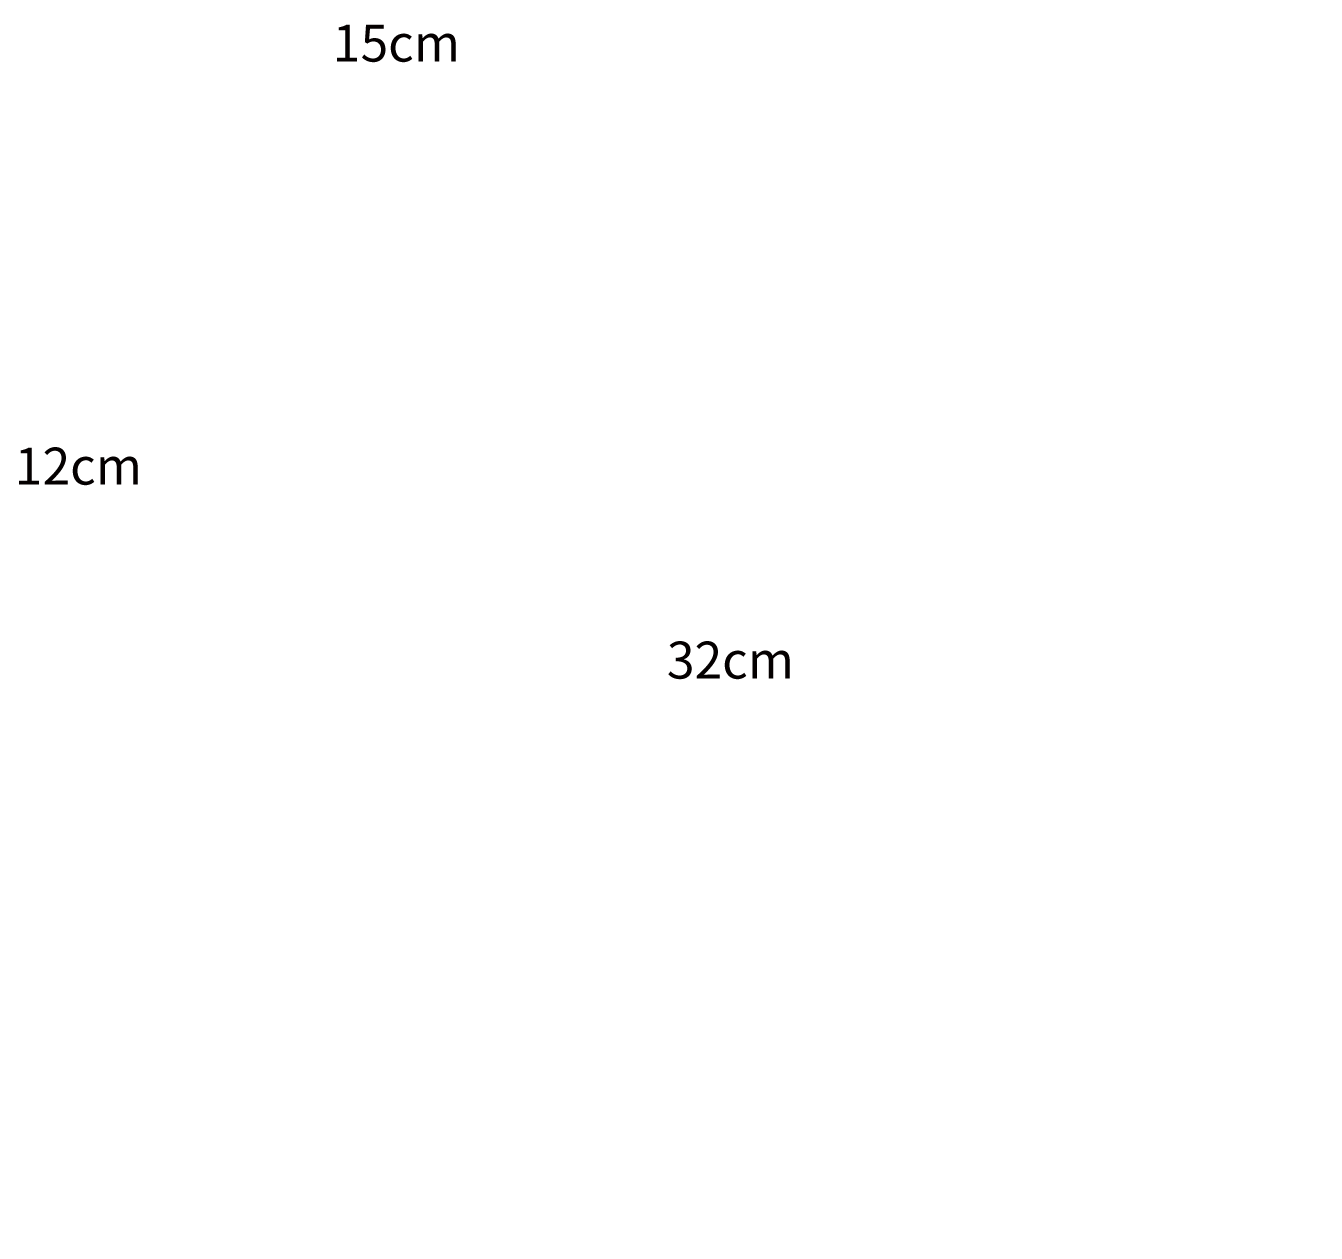
Note: Hand-measured, with a possible error of 1–2 cm. Due to differences in individual tension, the sample size is for reference only.
Materials: Susan's Family Dawn Impression, 4-ply cotton, Combed 3# Lace, Golden thread.
Tools: 2.00 mm crochet hook, Susan's Family 1.80 mm hook, or a regular 1.75 mm crochet hook.

Note: 1. Use a 2.00mm crochet hook for Dawn Impression and 4-Ply Combed Cotton; use Susan's Family 1.80mm hook or a regular 1.75mm hook for Combed 3# Lace thread. 2. The butterfly section uses variegated yarn, so starting at different color points will result in different appearances. Choose your starting point based on the finished sample or personal preference. Note that Dawn Impression is not easy to unravel, so it's recommended to practice first before crocheting.
Chart Key







Note:
1. This pattern is making in Chinese crochet pattern terms, and the stitch name is written using American terminology. All measurements in charts are in cm.
2. When crocheting in rounds without further guidance, working in closed rounds, start each round with a set number of beginning chains and close with a slip stitch. The beginning chain preceding a single crochet and the slip stitch used for joining rounds are not included in the total stitches.

PART 1 Butterflies A
There are two identical butterflies. Each butterfly is divided into the following parts: front wings, back wings, the body, and decorative assembly.
Note: When crocheting in the round, always start with a standing stitch and end with a slip stitch to join. The standing stitch for single crochet and the slip stitch used to join are not counted as stitches.
STEP 1 Front wings A1 01' 18''
The front wings consist of the main part and the edge. There are 2 main parts, both started with a foundation chain and worked back and forth in rows. For the left and right side edges, work back and forth on the main part first, then crochet along the edge at the end. Please refer to the video demonstration for more details.
| Front wing×2 | ||||
| Part | Row | Stitch Instructions | Total Stitches | Materials |
| main part | Cast on, H 1 | 2CH, Dao2, V | 2 | Dawn Impression |
| H 2 | CH, Turn, X, V | 3 | ||
| H 3 | CH, Turn, V, X, V | 5 | ||
| H 4 | CH, Turn, 4X, V | 6 | ||
| H 5 | CH, Turn, V, 4X, V | 8 | ||
| H 6 | CH, Turn, 7X, V | 9 | ||
| H 7 | CH, Turn, V, 7X, V | 11 | ||
| H 8 | CH, Turn, even 11X | |||
| H 9 | CH, Turn, SL, 9X, V | 12 | ||
| H 10 | CH, Turn, 10X, V, K | |||
| H 11 | CH, Turn, even 12X | |||
| H 12 | CH, Turn, 11X, SL, cut the yarn. | |||
| H 13 | Turn, join the yarn from the 4th stitch from the end of H 12, [X, 2T], 8X | 11 | ||
| H 14 | CH, Turn, 8X, K3 | 8 | ||
| H 15 | CH, Turn, V, 7X | 9 | ||
| H 16 | CH, Turn, A, 5X, K, SL, cut the yarn. | 7 | ||
| H 17 | Turn, join the yarn from the 3th stitch from the end of H 16 , V, 4X | 6 | ||
| H 18 | CH, Turn, 4X, A | 5 | ||
| H 19 | CH, Turn, X, 2SL, CH, T, CH, SL | |||
| Each pair of front wings has 2 identical main parts. The highlighted stitches indicate the join positions for the left and right side edges. Leave a yarn tail of about 5 centimeters before breaking the yarn at the end. |
||||
| left side edge | Cast on, H 1 | Position it with the wrong side of H 19 facing you.Join the yarn from the back of the marked red position on H 19 of the main part. (2CH, SL)×5 | / | 4-Ply Combed Cotton |
| H 2 | CH, Turn, 3X for each chain space. | 15 | ||
| H 3 | CH, Turn, 12X, A, K | 13 | ||
| H 4 | CH, Turn, 6X, 2SL, X, T, F, FV, [F, 2CH, SL] | / | ||
| H 5 | CH, Turn, X, V, W, V, 3X, SL, X, V, X, SL, 3X, W, 4X, 8X, W, 18X, 3X, cut the yarn. Fasten off. | 59 | ||
| right side edge | Cast on, H 1 | Position it with the right side of H 19 facing you.Join the yarn from the back of the marked red position on H 9 of the main part. (2CH, SL)×5 | / | |
| H 2 | CH, Turn, 3X for each chain space. | 15 | ||
| H 3 | CH, Turn, K, A, 12X | 13 | ||
| H 4 | [2CH, Turn, F], FV, F, T, X, 2SL, 6X | / | ||
| H 5 | CH, Turn, W, 3X, SL, X, V, X, SL, 3X, V, W, V, 4X, 18X, W, 8X, 4X, cut the yarn. Fasten off. | 59 | ||
| Note: Here, left and right refer to the butterfly's left and right as it lies flat in front of us. | ||||
STEP 2 Back Wings A2 31' 17''
The back wings are also divided into the main part and the edge. There are 2 main parts, both started with a foundation chain and worked back and forth in rows. For the left and right side edges, work back and forth on the main part first, then crochet along the edge at last. Please refer to the video demonstration for more details.
| Back wing×2 | ||||
| Part | Row | Stitch Instructions | Total Stitches | Materials |
| main part | Cast on, H 1 | 2CH, Dao2, V | 2 | Dawn Impression |
| H 2 | CH, Turn, 2V | 4 | ||
| H 3 | CH, Turn, V, X, 2V | 7 | ||
| H 4 | CH, Turn, 6X, V | 8 | ||
| H 5 | CH, Turn, 7X, V | 9 | ||
| H 6 | CH, Turn, 8X, V | 10 | ||
| H 7 | CH, Turn, 9X, V | 11 | ||
| H 8 | CH, Turn, A, 8X, V | |||
| H 9 | CH, Turn, X, T, 7X, V, K | |||
| H 10 | CH, Turn, X, 2T, 6X, K2 | 9 | ||
| H 11 | CH, Turn, X, 2T, 3X, K3 | 6 | ||
| H 12 | CH, Turn, K, T, CH, SL, K3 | 2 | ||
| Each pair of front wings has 2 identical main parts. The highlighted stitches indicate the join positions for the left and right side edges. Leave a yarn tail of about 5 centimeters before breaking the yarn at the end. | ||||
| left side edge | Cast on, H 1 | With H 12 right side facing you, join the yarn from the back loop on the right side of H 8 of the main part.(2CH, SL)×4 | / | 4-Ply Combed Cotton |
| H 2 | CH, Turn, 3X for each chain space. | 12 | ||
| H 3 | CH, Turn, even 12X | |||
| H 4 | CH, Turn, V, 11X | 13 | ||
| H 5 | CH, Turn, X, T, 9X, A | 12 | ||
| H 6 | CH, Turn, K, 2SL, X, TV, T, 2X, [T, X], SL, K2 |
11 | ||
| H 7 | CH, Turn, SL, V, X, SL, 7CH, Dao3, 2T, 3X, 2X, V, X, SL, X, W, V, X, V, 2X, 8X, W, 7X, 4X, W, [T, X], cut the yarn. Fasten off. | / | ||
| right side edge | Cast on, H 1 | With H 12 wrong side facing you, join the yarn from the back loop on the right side of H 9 of the main part. (2CH, SL)×4 | / | |
| H 2 | CH, Turn, 3X for each chain space. | 12 | ||
| H 3 | CH, Turn, even 12X | |||
| H 4 | CH, Turn, 11X, V | 13 | ||
| H 5 | CH, Turn, A, 11X | 12 | ||
| H 6 | CH, Turn, A, SL, X, TV, SL, X, [T, X], SL, K3 | 10 | ||
| H 7 | CH, Turn, SL, 2V, SL, 7CH, Dao3, 2T, 3X, X, V, X, SL, X, W, V, 4X, 7X, W, 8X, 2X, V, X, W, T, X, cut the yarn. Fasten off. | / | ||
STEP 3 Bodies A3 46' 12''
Make 2 bodies, both starting with a foundation chain and worked in the round from the beginning. Please refer to the video demonstration for more details.
| Body×2 | |||
| Round | Stitch Instructions | Total Stitches | Materials |
| Cast on, R 1 | 11CH, Dao2, 9X, W, 8X, V | 22 | 4-Ply Combed Cotton |
| R 2 | V, 8X, 3V, 8X, 2V | 28 | |
| Note: Slip stitch at the end, don't pull too tight, leave a yarn tail and fasten off. | |||
STEP 4 Assembly A4 49' 50''
Finally, decorate and assemble by doing the line embroidery, wing sewing, body attachment, and half beads.Please refer to the video demonstration for more details.
Embroidery thread: Use 4-Ply Combed Cotton, 2 strands for wing edges; for sewing the wings together: use 1 strand of 4-Ply Combed Cotton.
PART 2 Bouquet B
The bouquet is divided into small flower branches, flowers, leaves, and accessories assembly.
STEP 1 Small flower branches B1 64' 07''
Each small flower branch has 2 parts, and each small flower branch is divided into the bud, the calyx, and the assembly. Please refer to the video demonstration for more details.
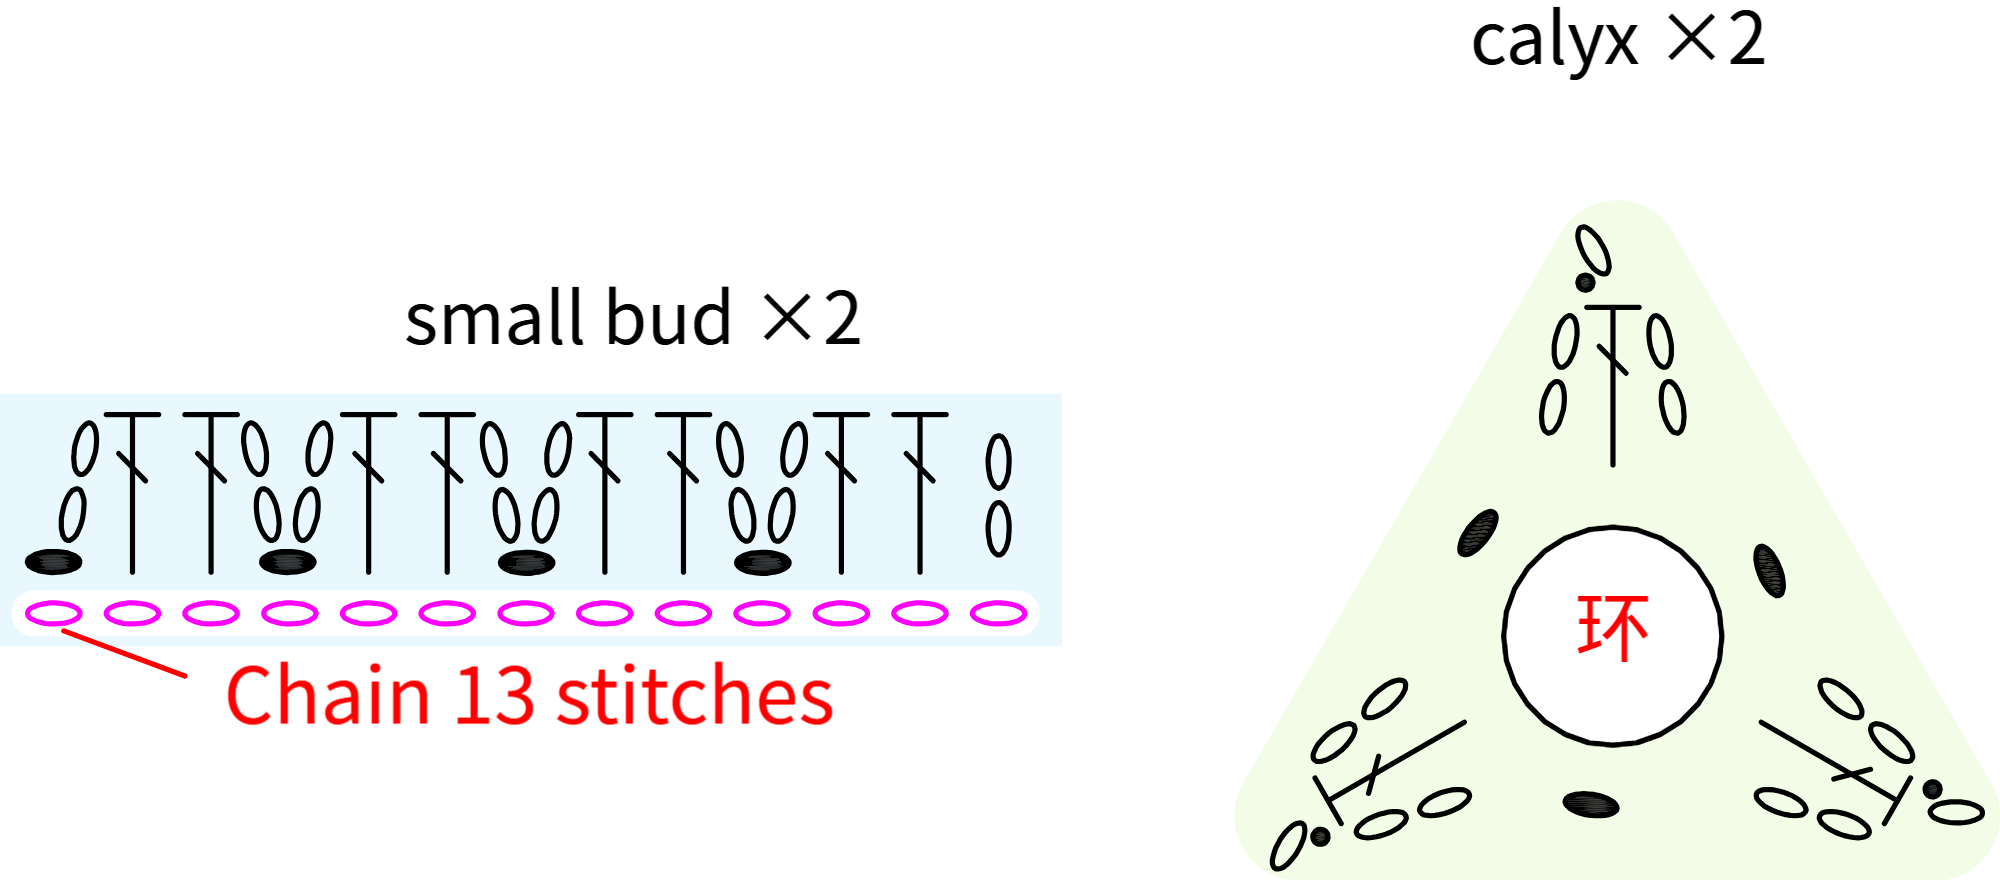
Note: Leave a yarn tail of about 20 centimeters at the end of the small bud for sewing and leave a yarn tail of about 40 centimeters at the end of the calyx for sewing.
STEP 2 Flowers B2 80' 33''
Make 8 flowers in total, all starting with a magic ring and crocheted counterclockwise. Add the pistil after completing each flower. Please refer to the video demonstration for more details.
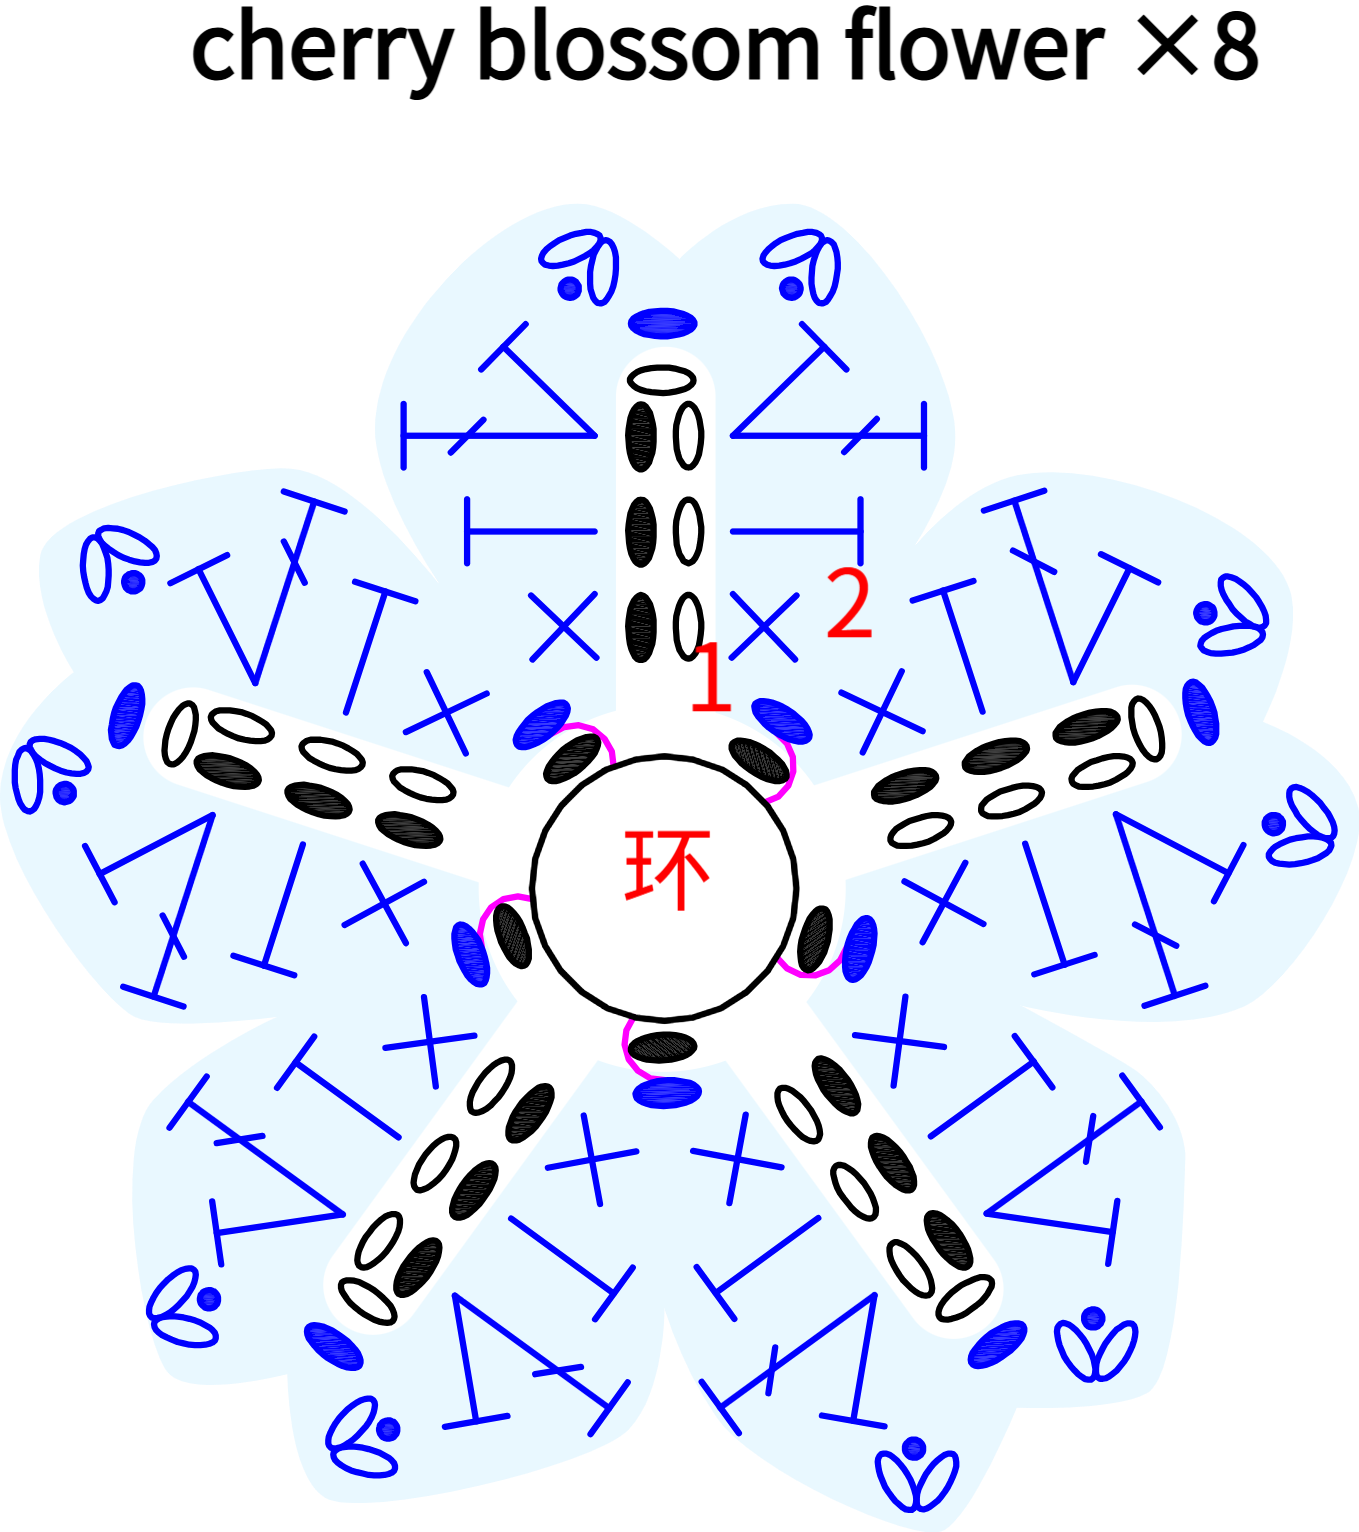
Note: Leave a yarn tail of about 30 centimeters at the end for sewing.
STEP 3 Leaves B3 91' 53''
Start the leaves with a foundation chain, then crochet counterclockwise in the round. Please refer to the video demonstration for more details.
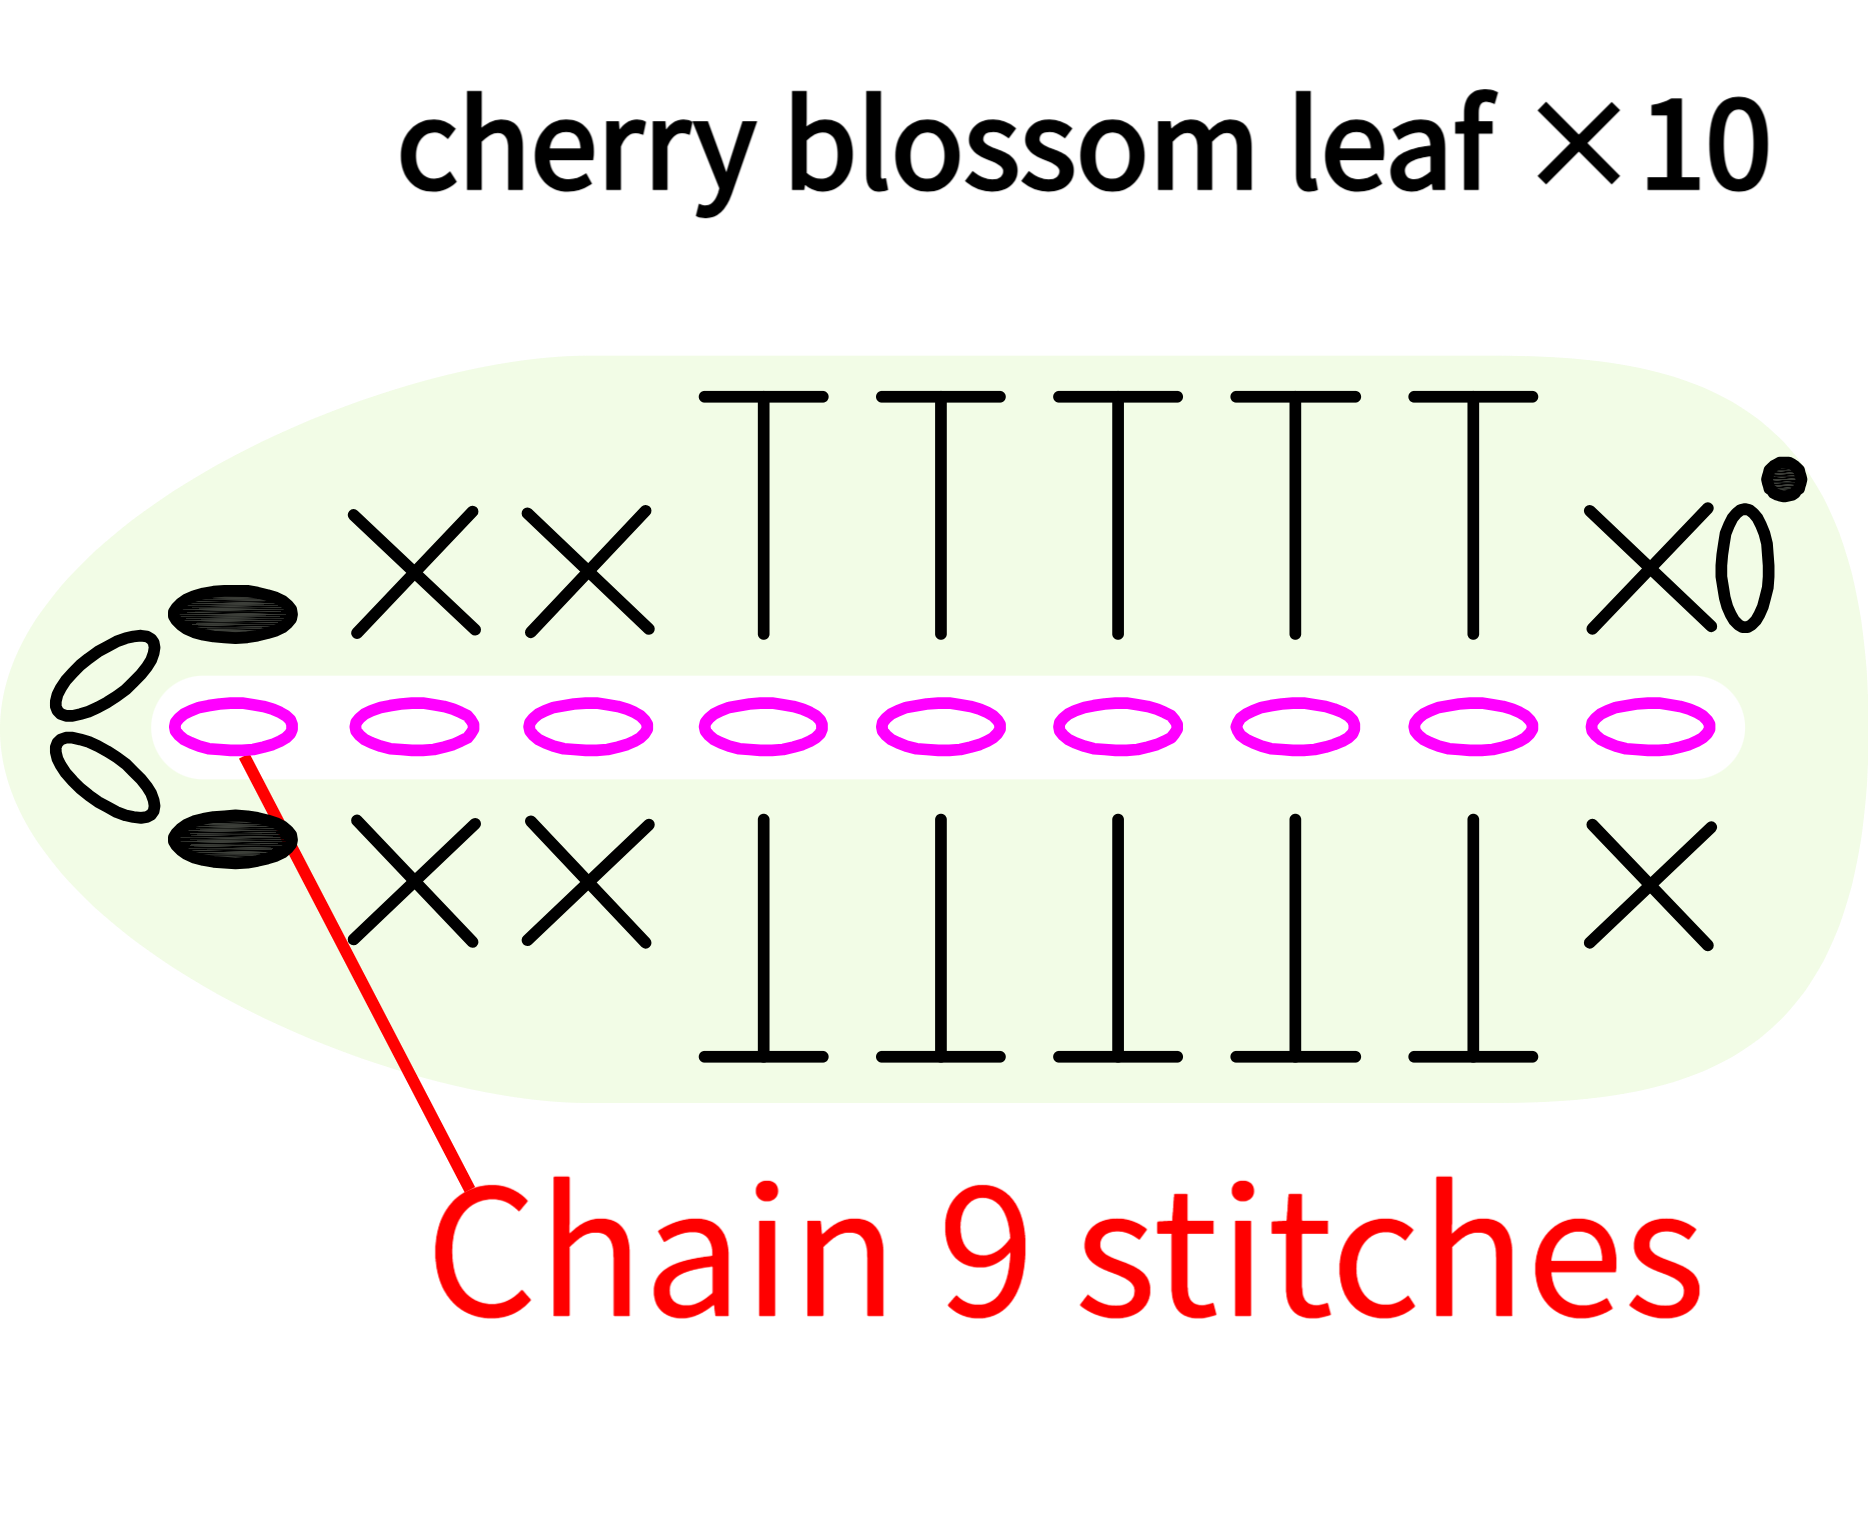
Note: Leave a yarn tail of about 30 centimeters at the end for sewing.
STEP 4 Accessories Assembly B4 94' 40''
The accessory assembly is divided into parts including large pearls and bouquet assembly. Please refer to the video demonstration for more details.
PART 3 Wind Chime Assembly C 102' 04''
Finally, assemble the wind chime, including the wind chime decorations, hook, and overall assembly. Please refer to the video demonstration for more details.
Wind chime accessory layout diagram
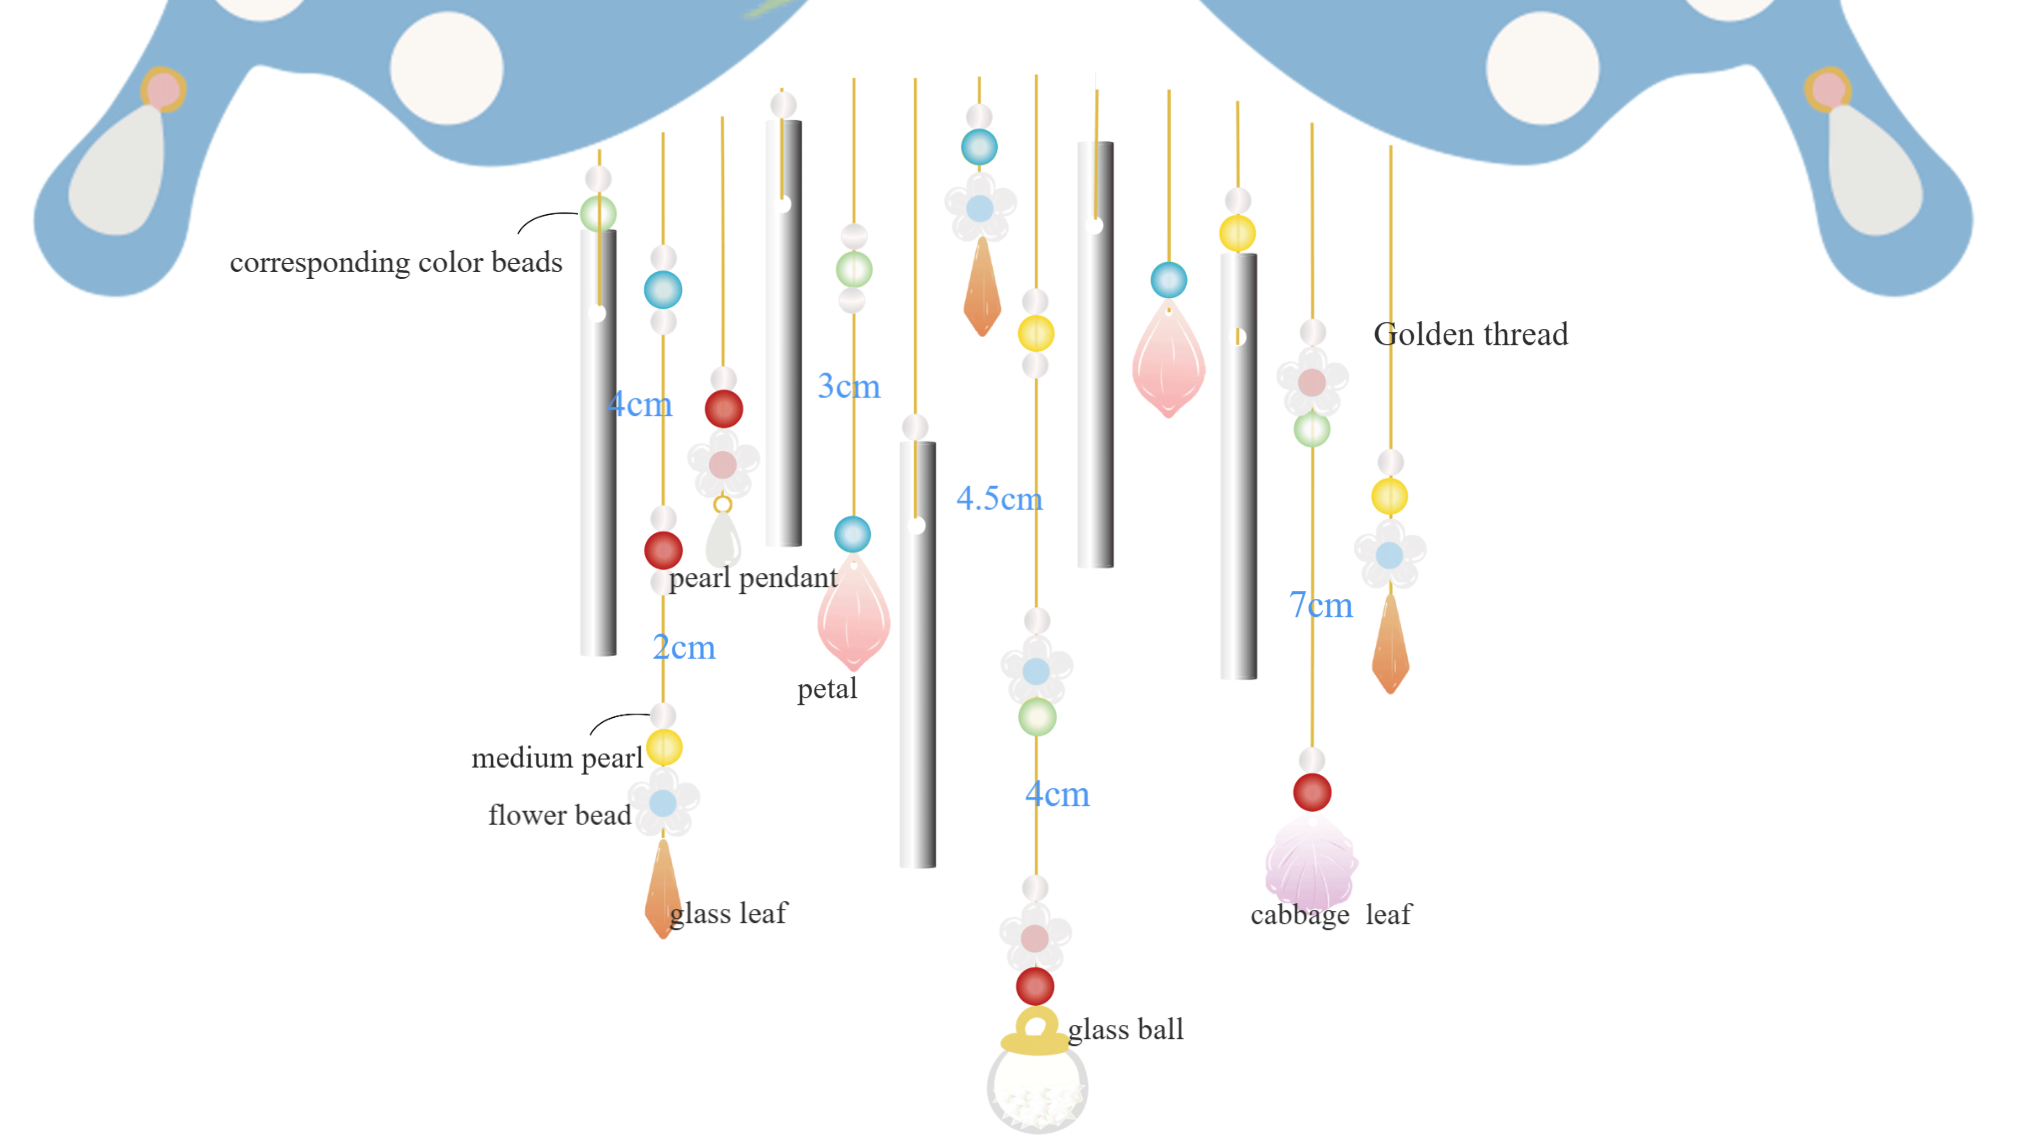
Note: The arrangement of the wind chime ornaments can follow the diagram, or you can adjust it freely.
Made by the community