
Clothes
Dancing Lion Top
Project preview
See the finished project
Pattern format
Instructions
Watch and follow
Video tutorial
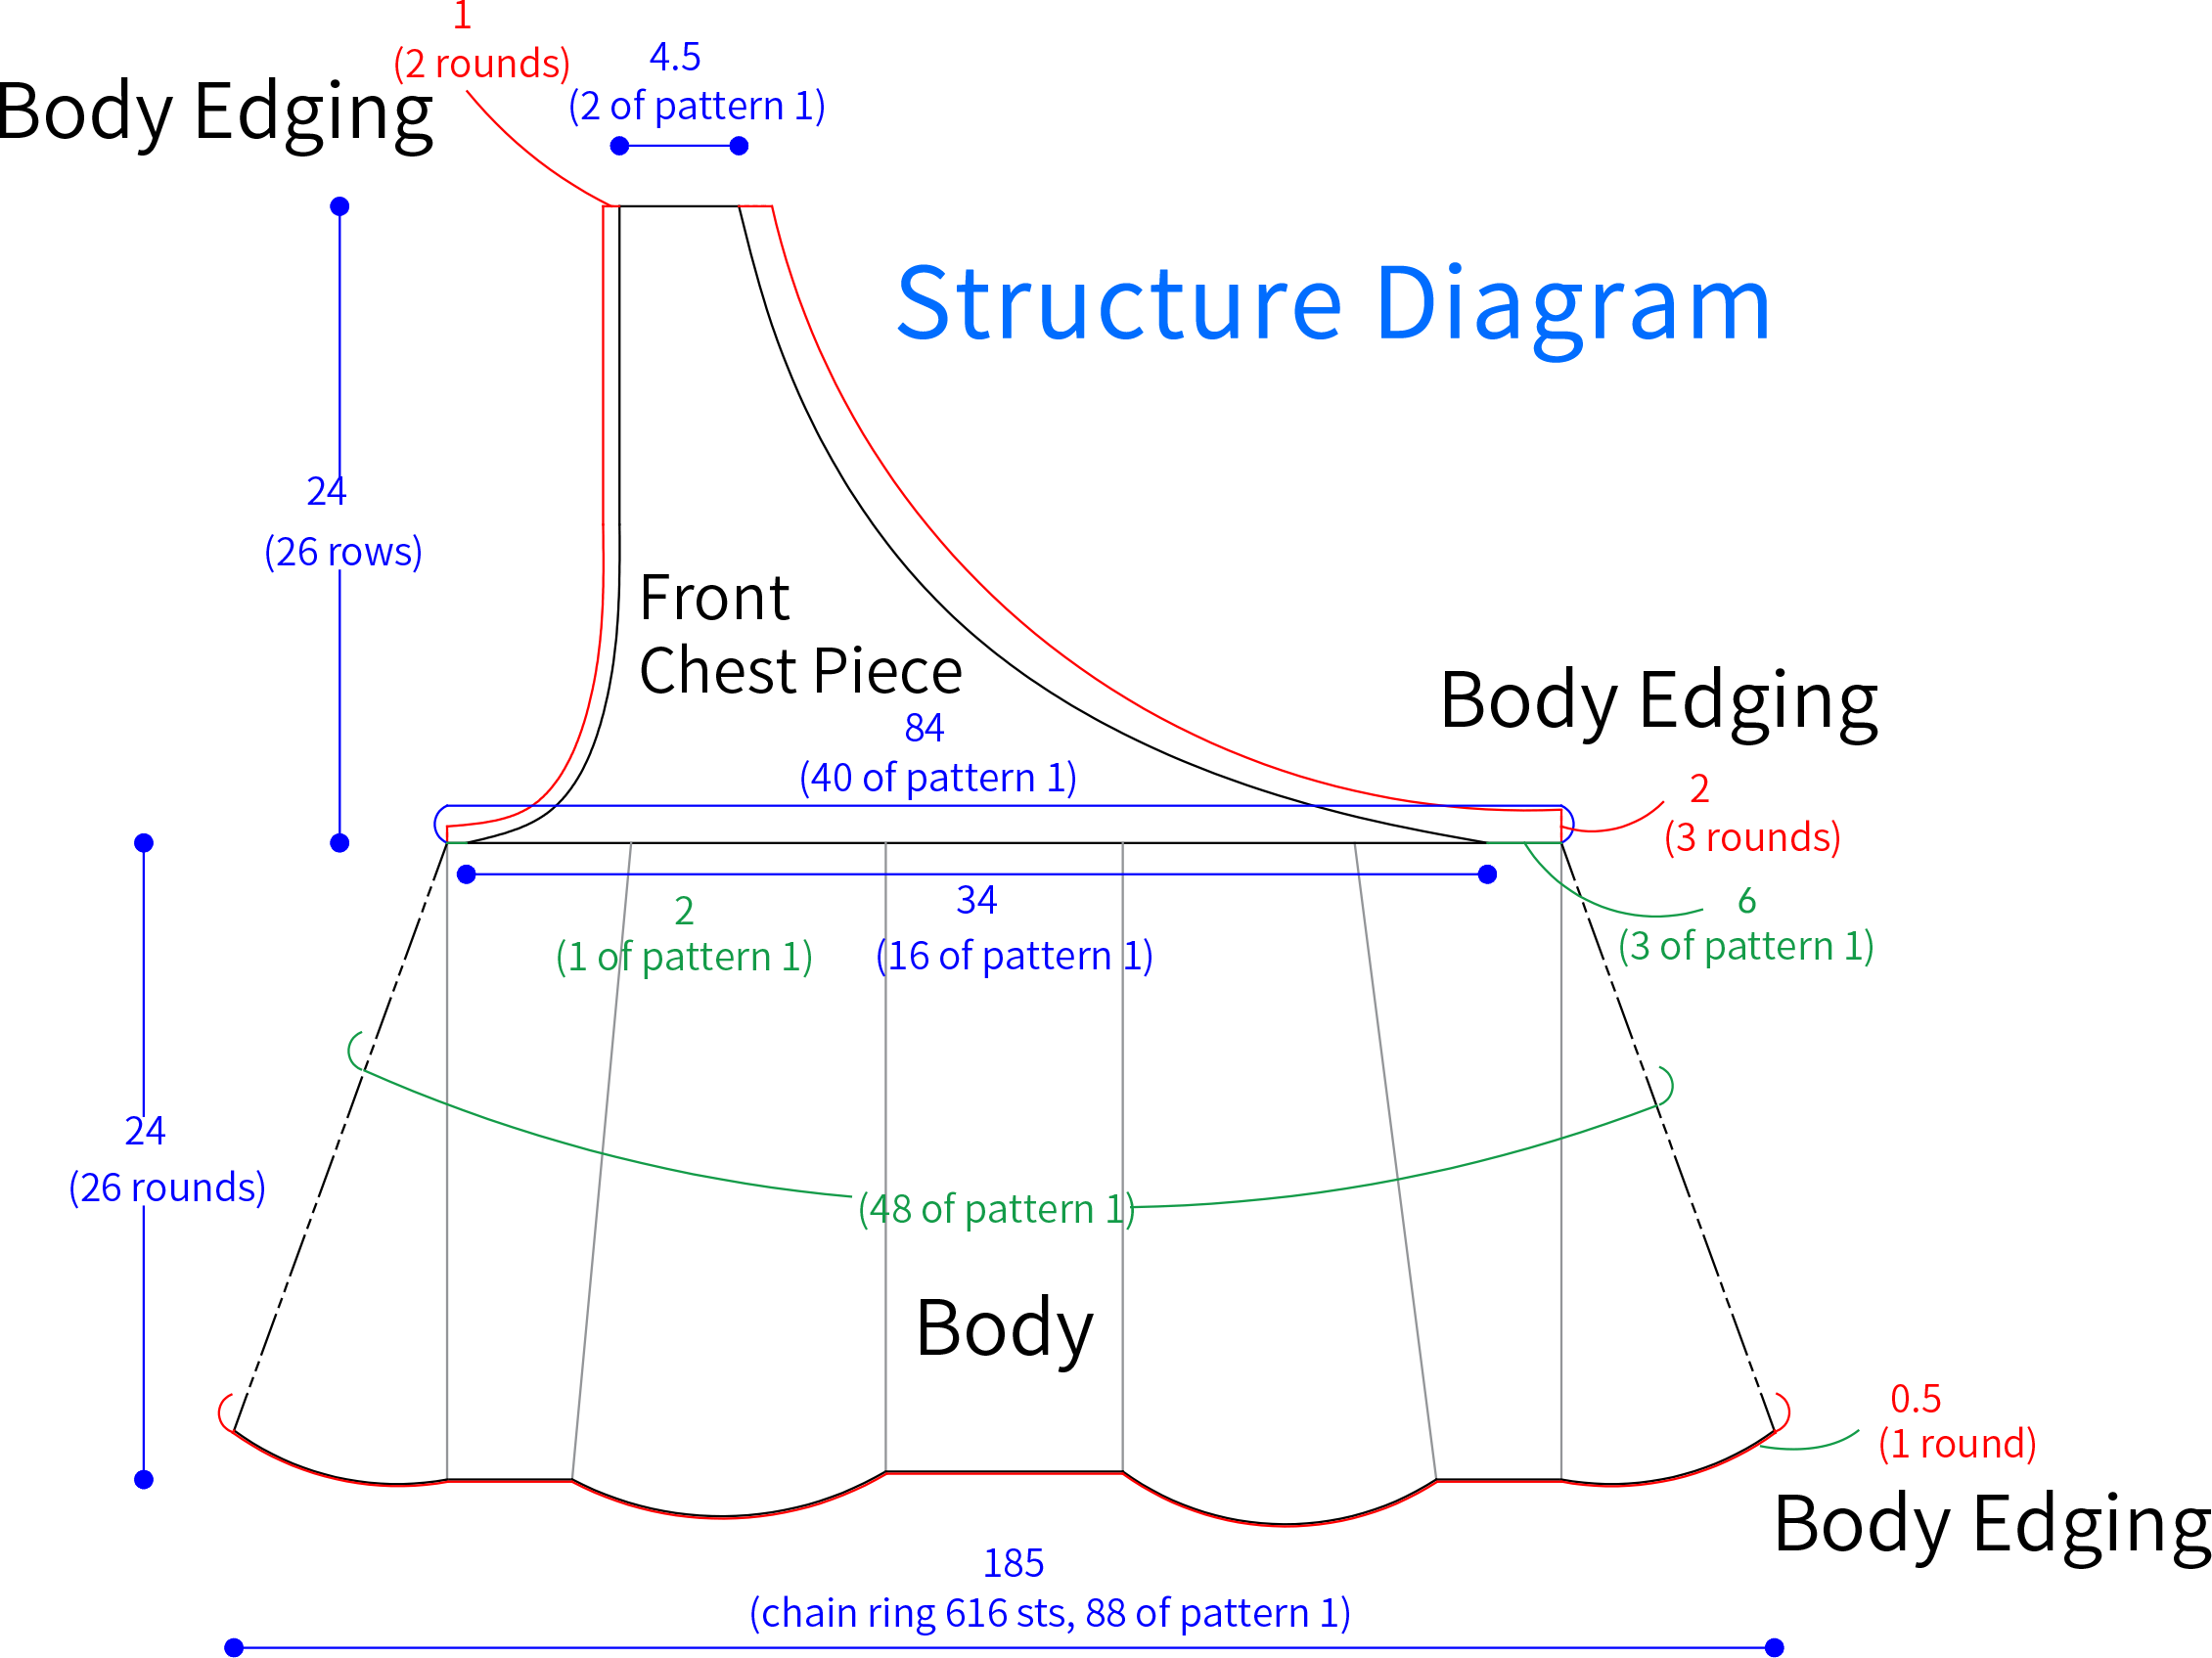
This vest consists of the body, the front chest piece, the back chest piece, the edging and the dancing lion decoration. First, crochet the body. Then, work the front and back chest piece. After that, do the edging. Finally, make the dancing lion decoration and attach it onto the corresponding position.
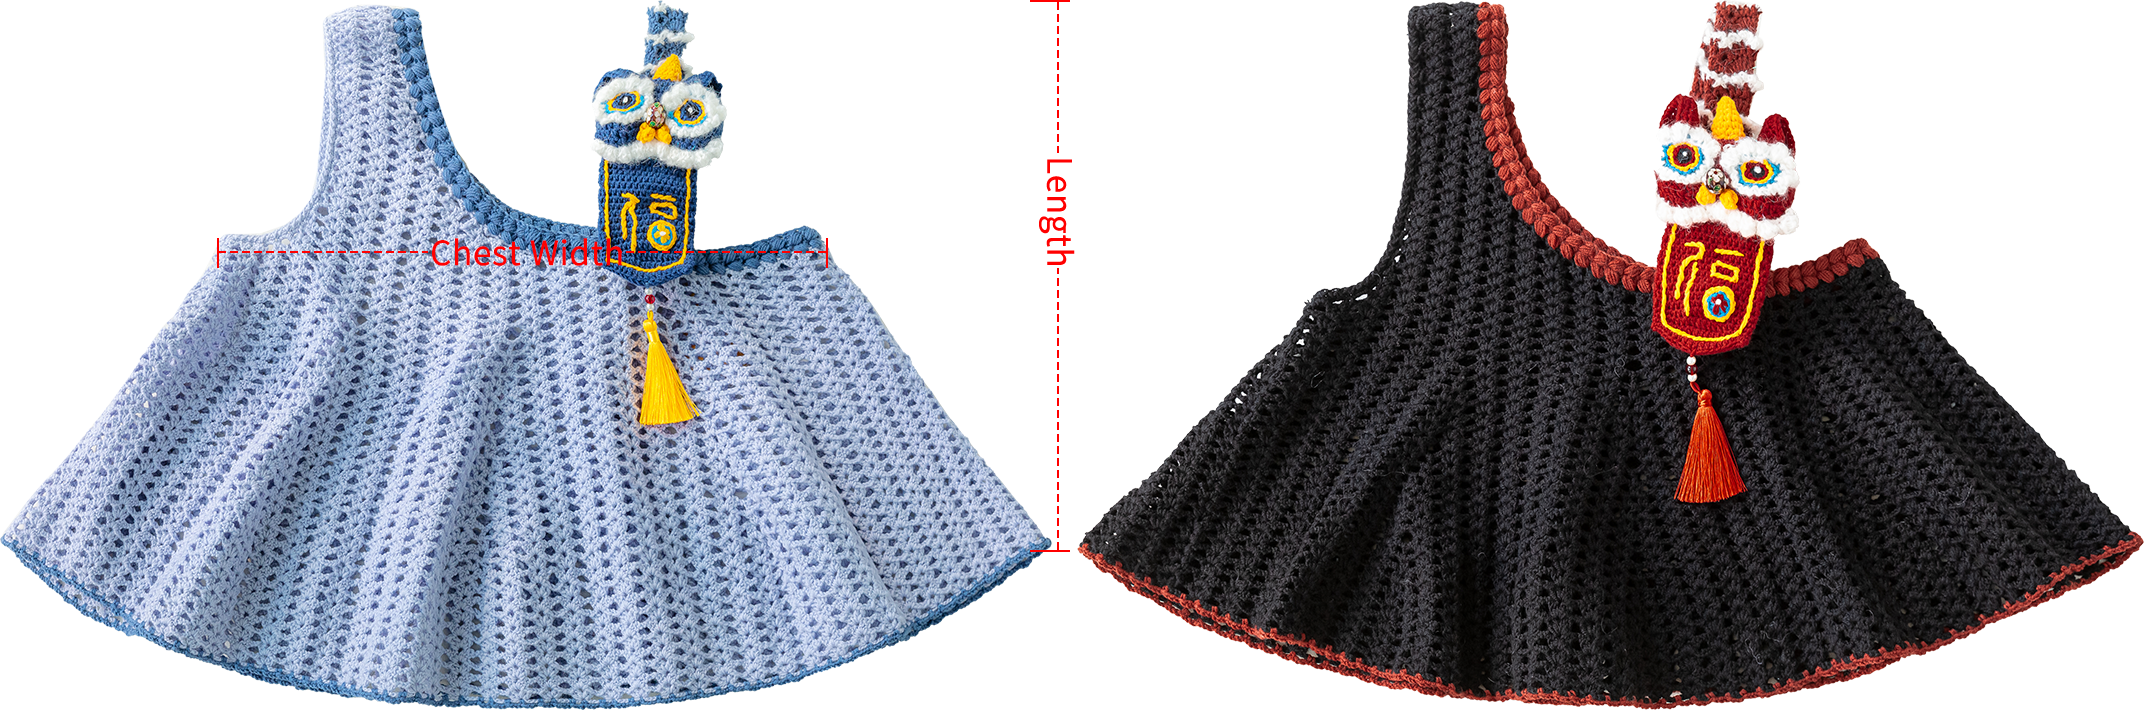
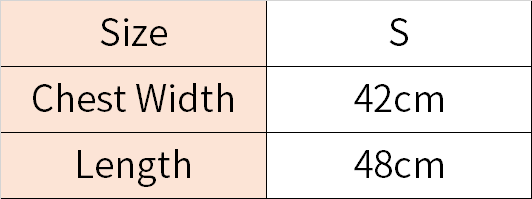
The handcrafted measurements may have an error of 1 to 2 cm. Due to variations in individual tension, the size of the sample is for reference only.

Materials: Morandi 4#
Phantom Luster Mohair
4-Ply Combed Cotton & Acrylic Fibre Hand Knitting Yarn
Hook: 3.00 mm crochet hook
Chart Key













Group Key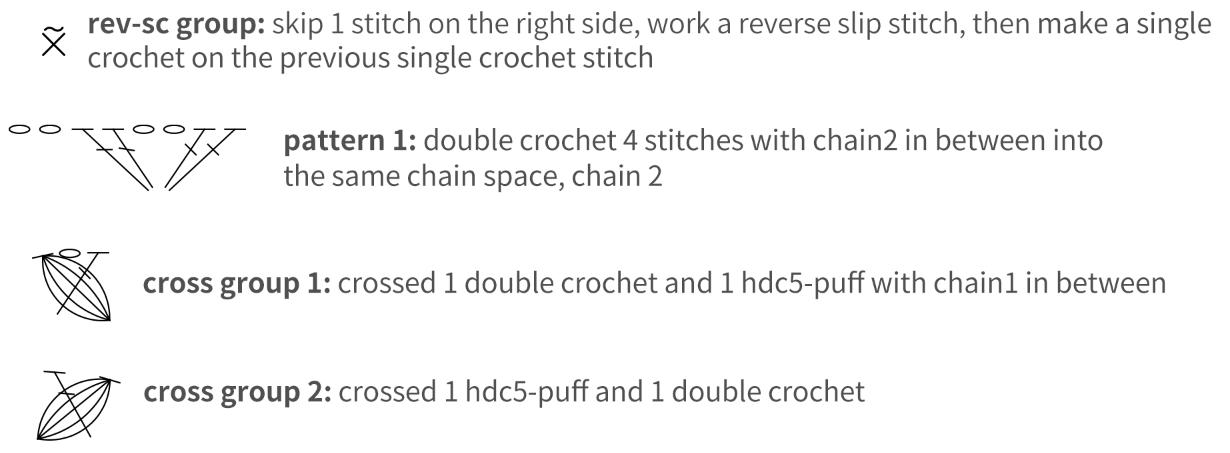
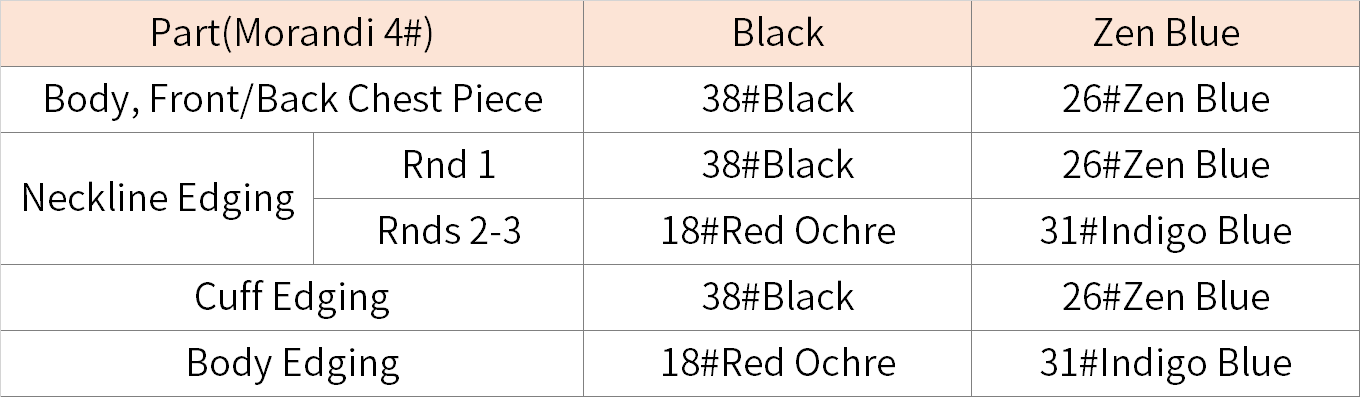
Note:
1. This pattern is making in Chinese crochet pattern terms, and the stitch name is written using American terminology. All measurements in charts are in cm.
2. Working in joined round
When crocheting in rounds without further guidance, working in closed rounds, start each round with a set number of beginning chains and close with a slip stitch. The beginning chain preceding a single crochet and the slip stitch used for joining rounds are not included in the total stitches.
3. The product stuffing is evenly and softly distributed, and it shouldn't be stuffed too tightly.
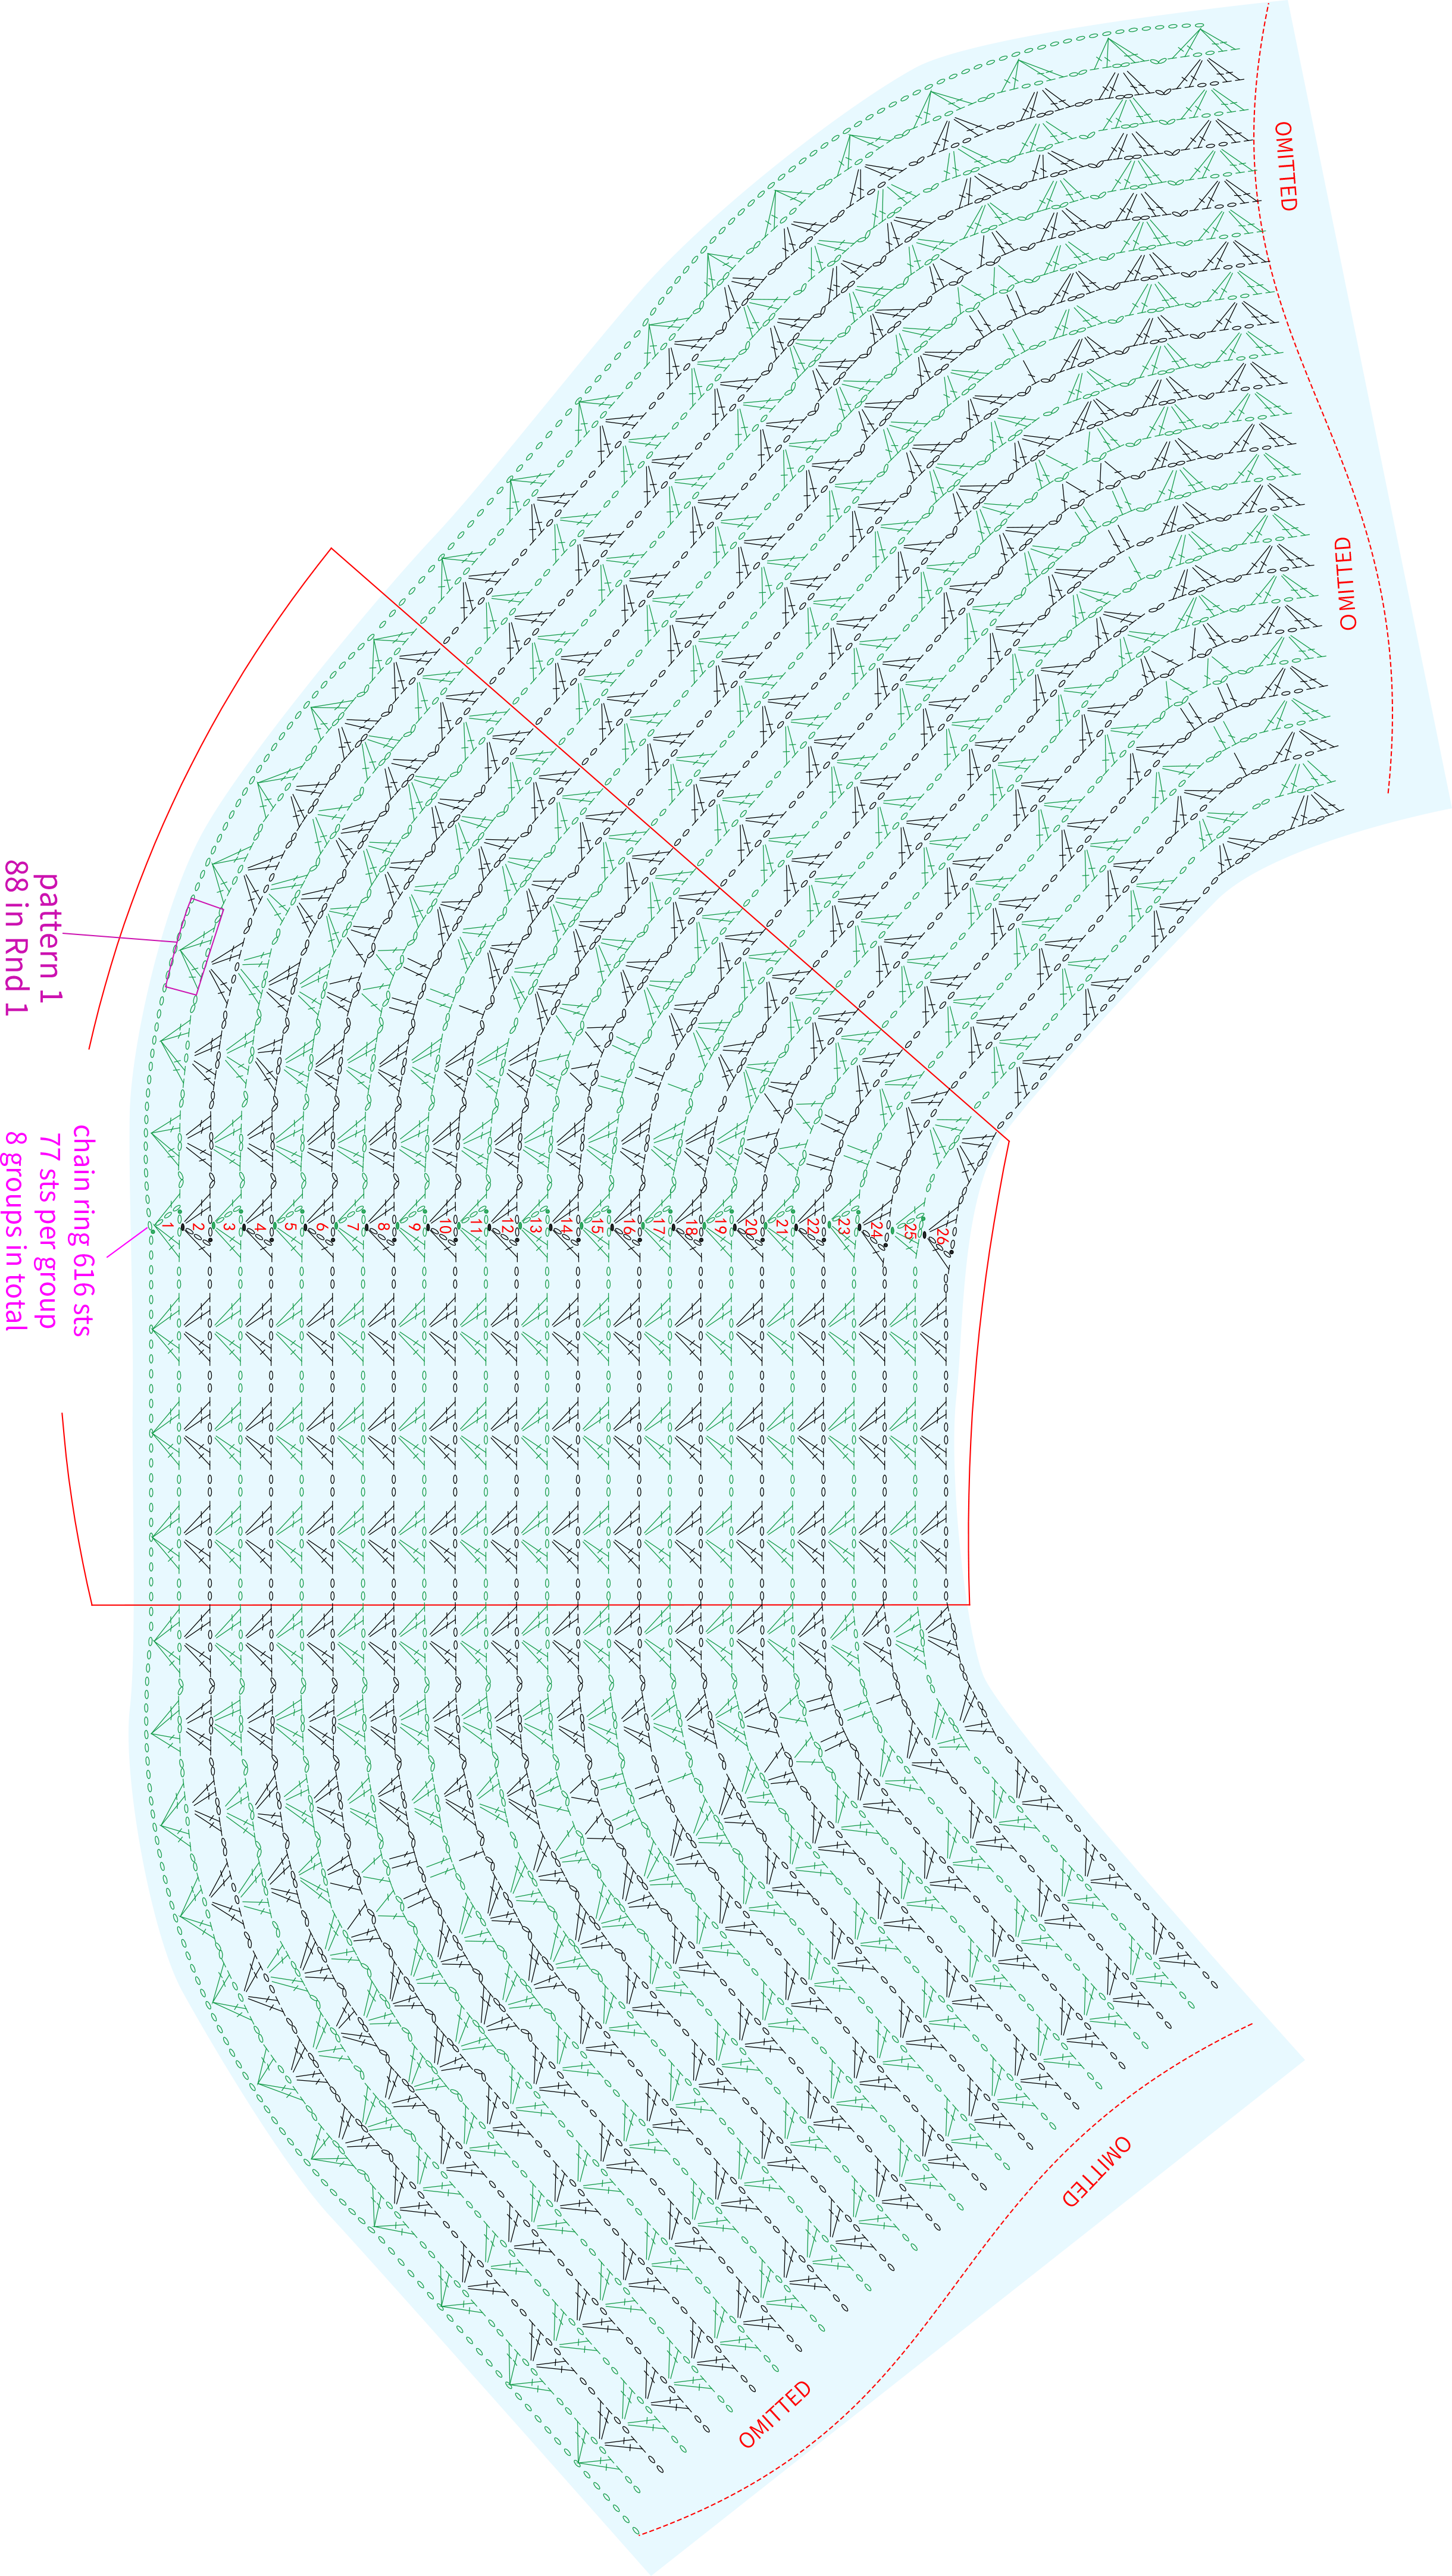
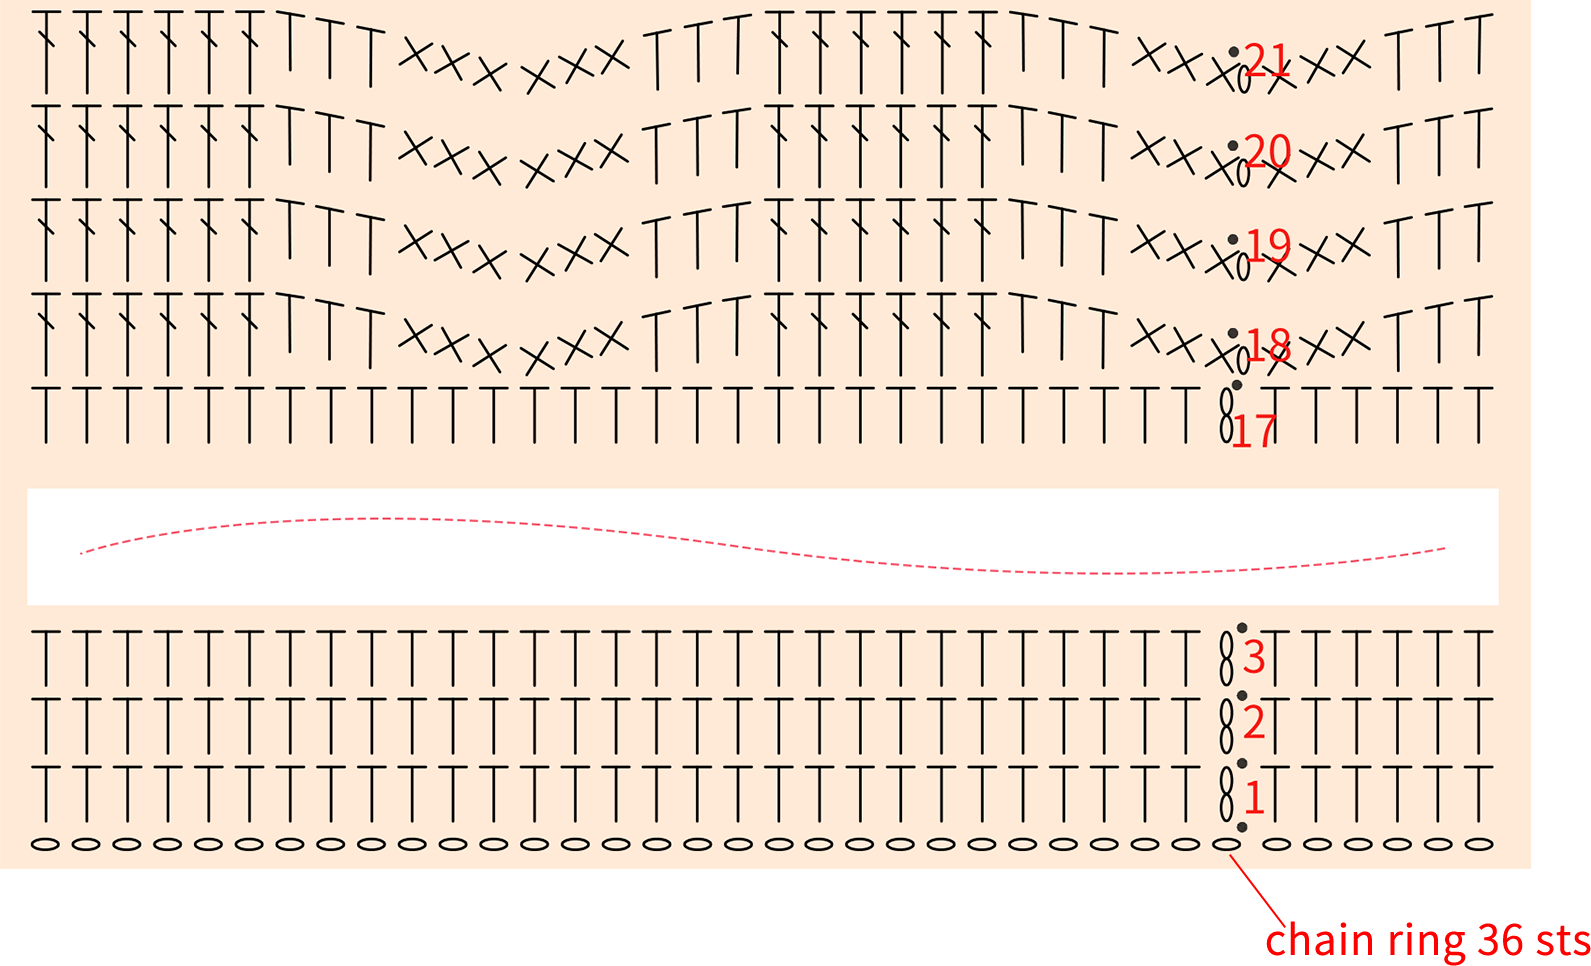
Part 1 BodyA 01' 12'' (Part 1)
Begin with a chain ring. Then work in rounds, back and forth. Please refer to the video demonstration for more details.
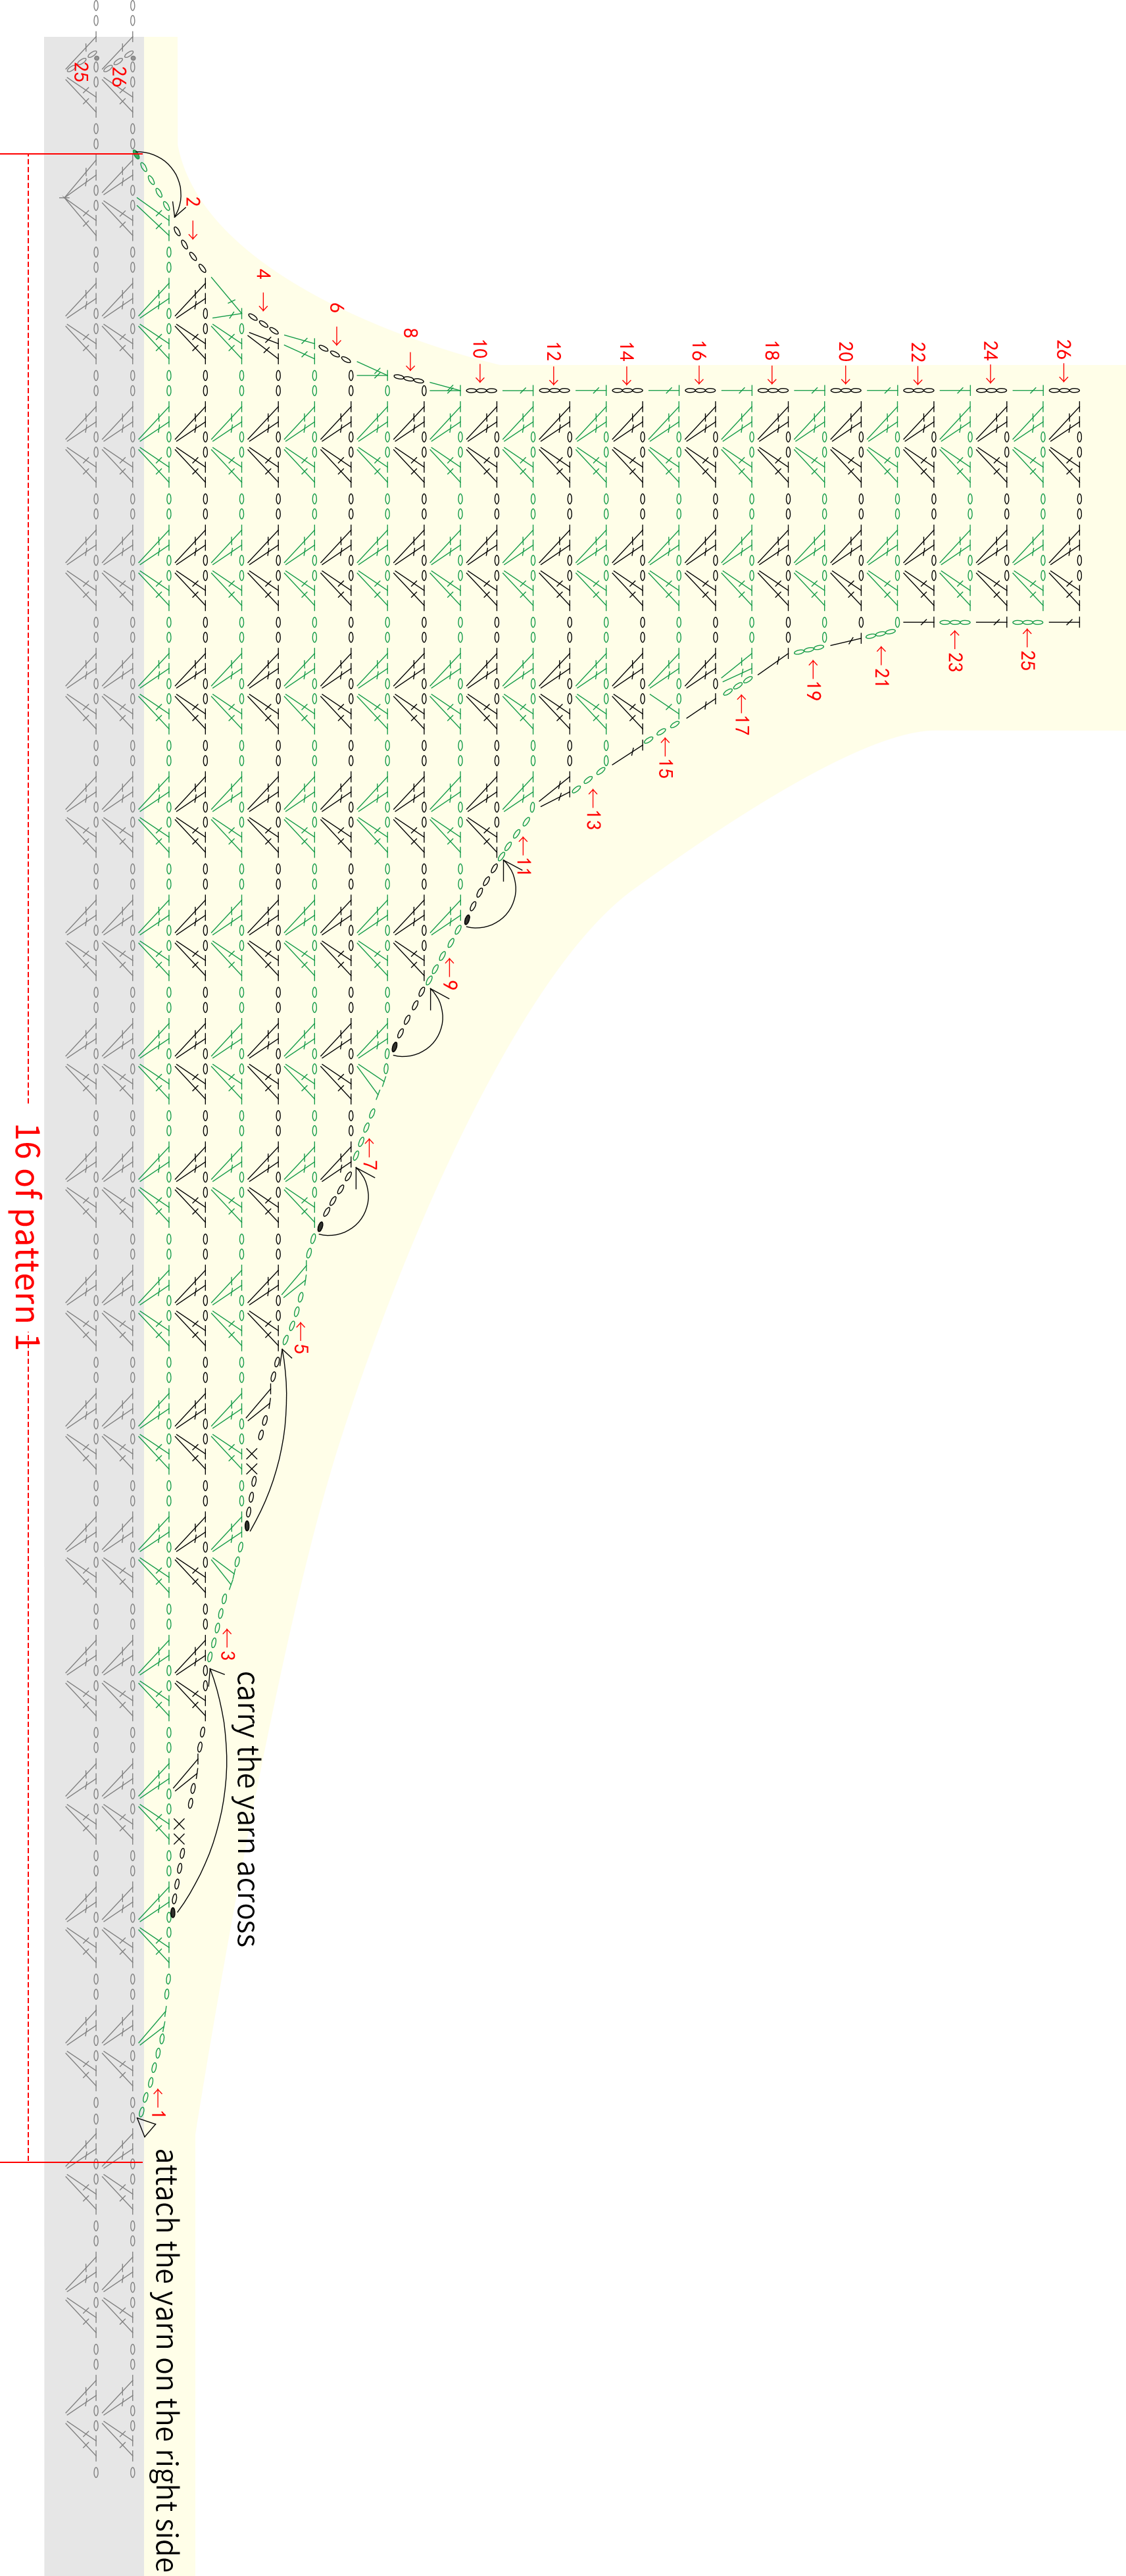
Part 2 Front Chest PieceB 13' 16'' (Part 1)
Part 3 Back Chest Piece and JoiningC 24' 14'' (Part 1)
After completing the front and back chest pieces, place the right sides of the pieces together and join them on the wrong side.
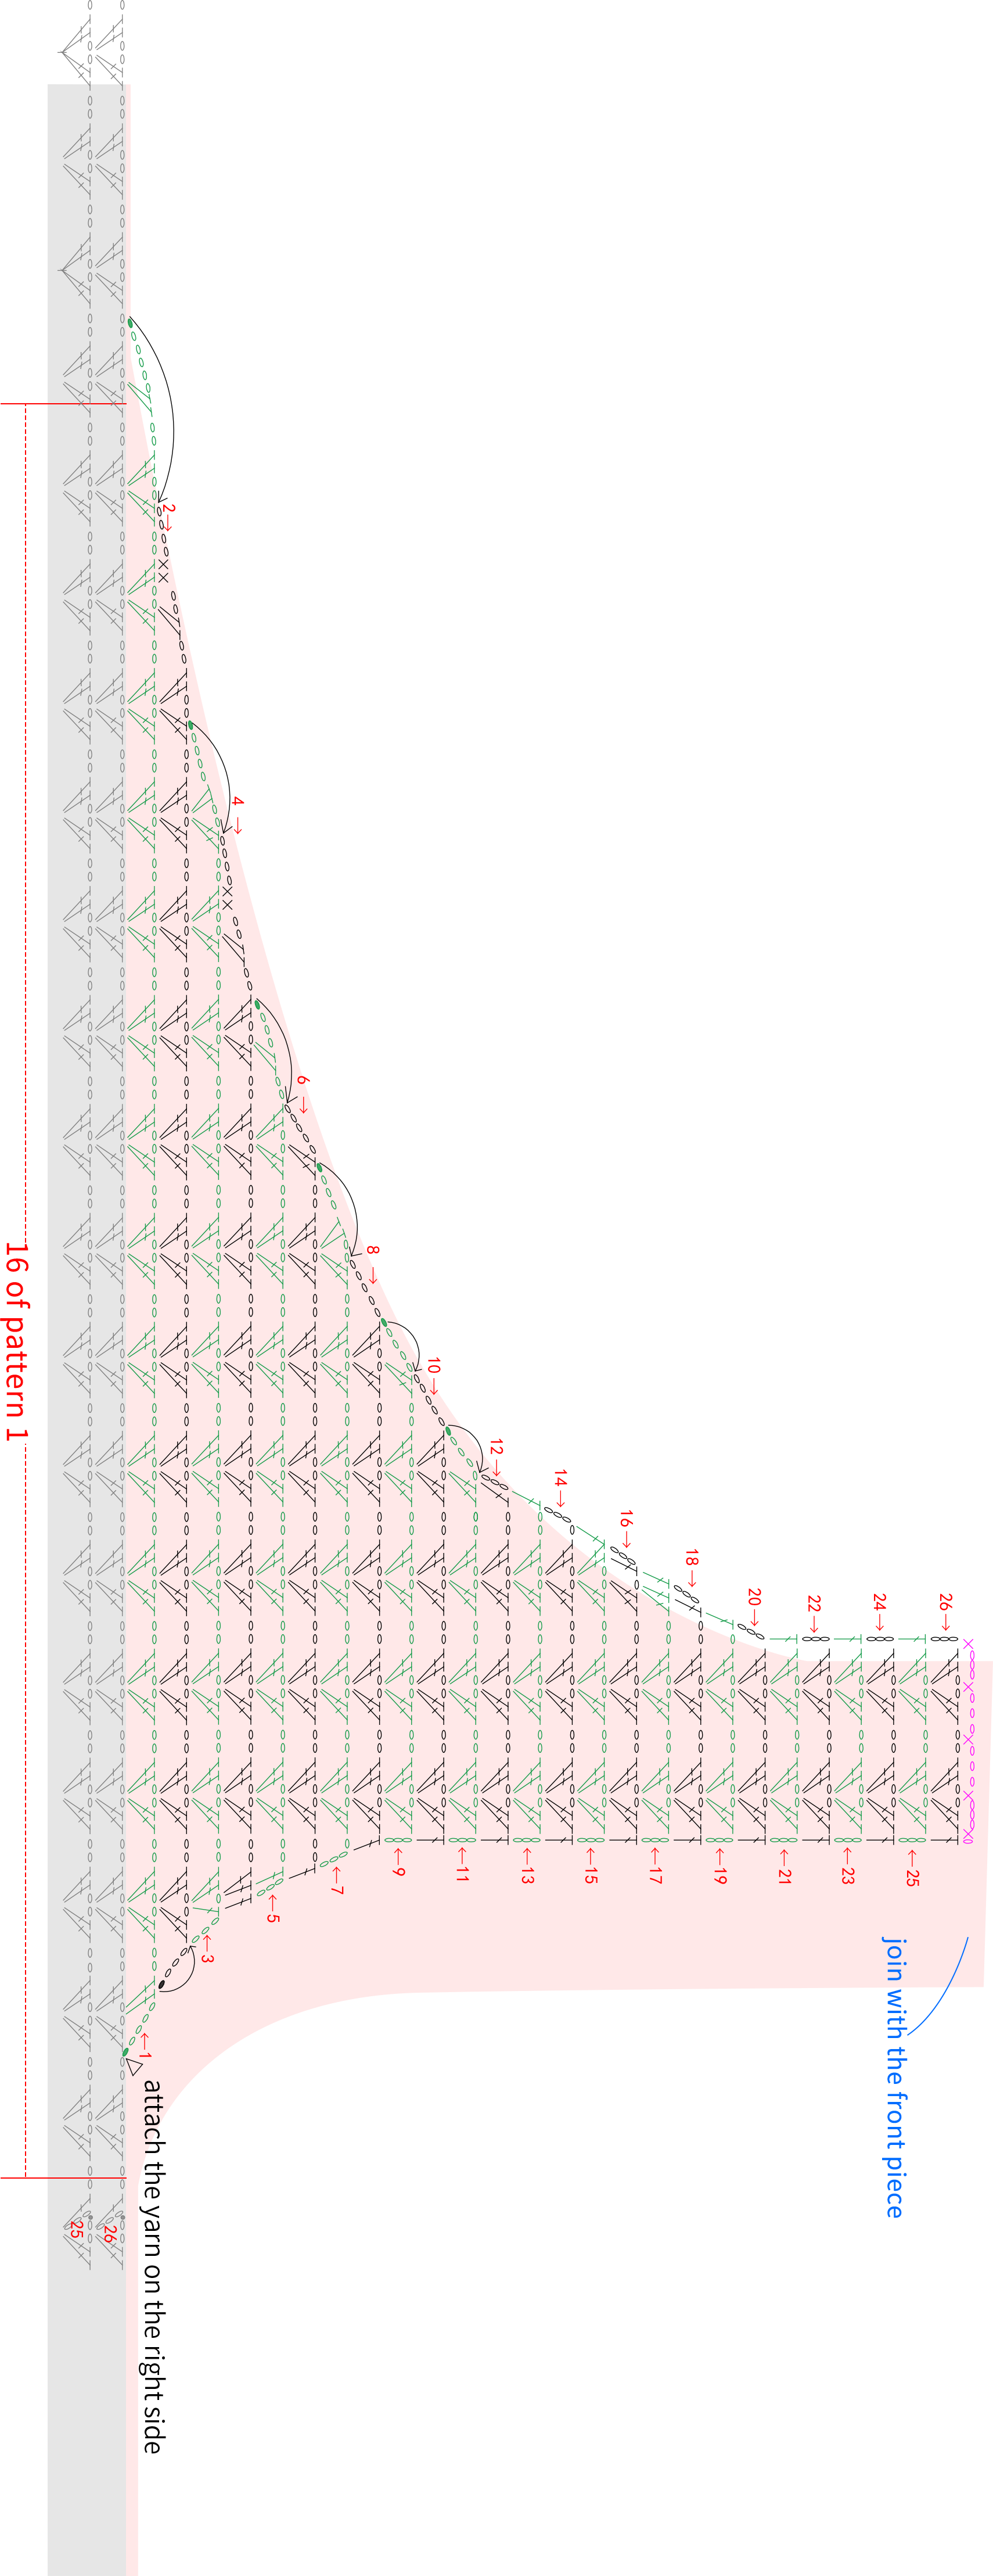
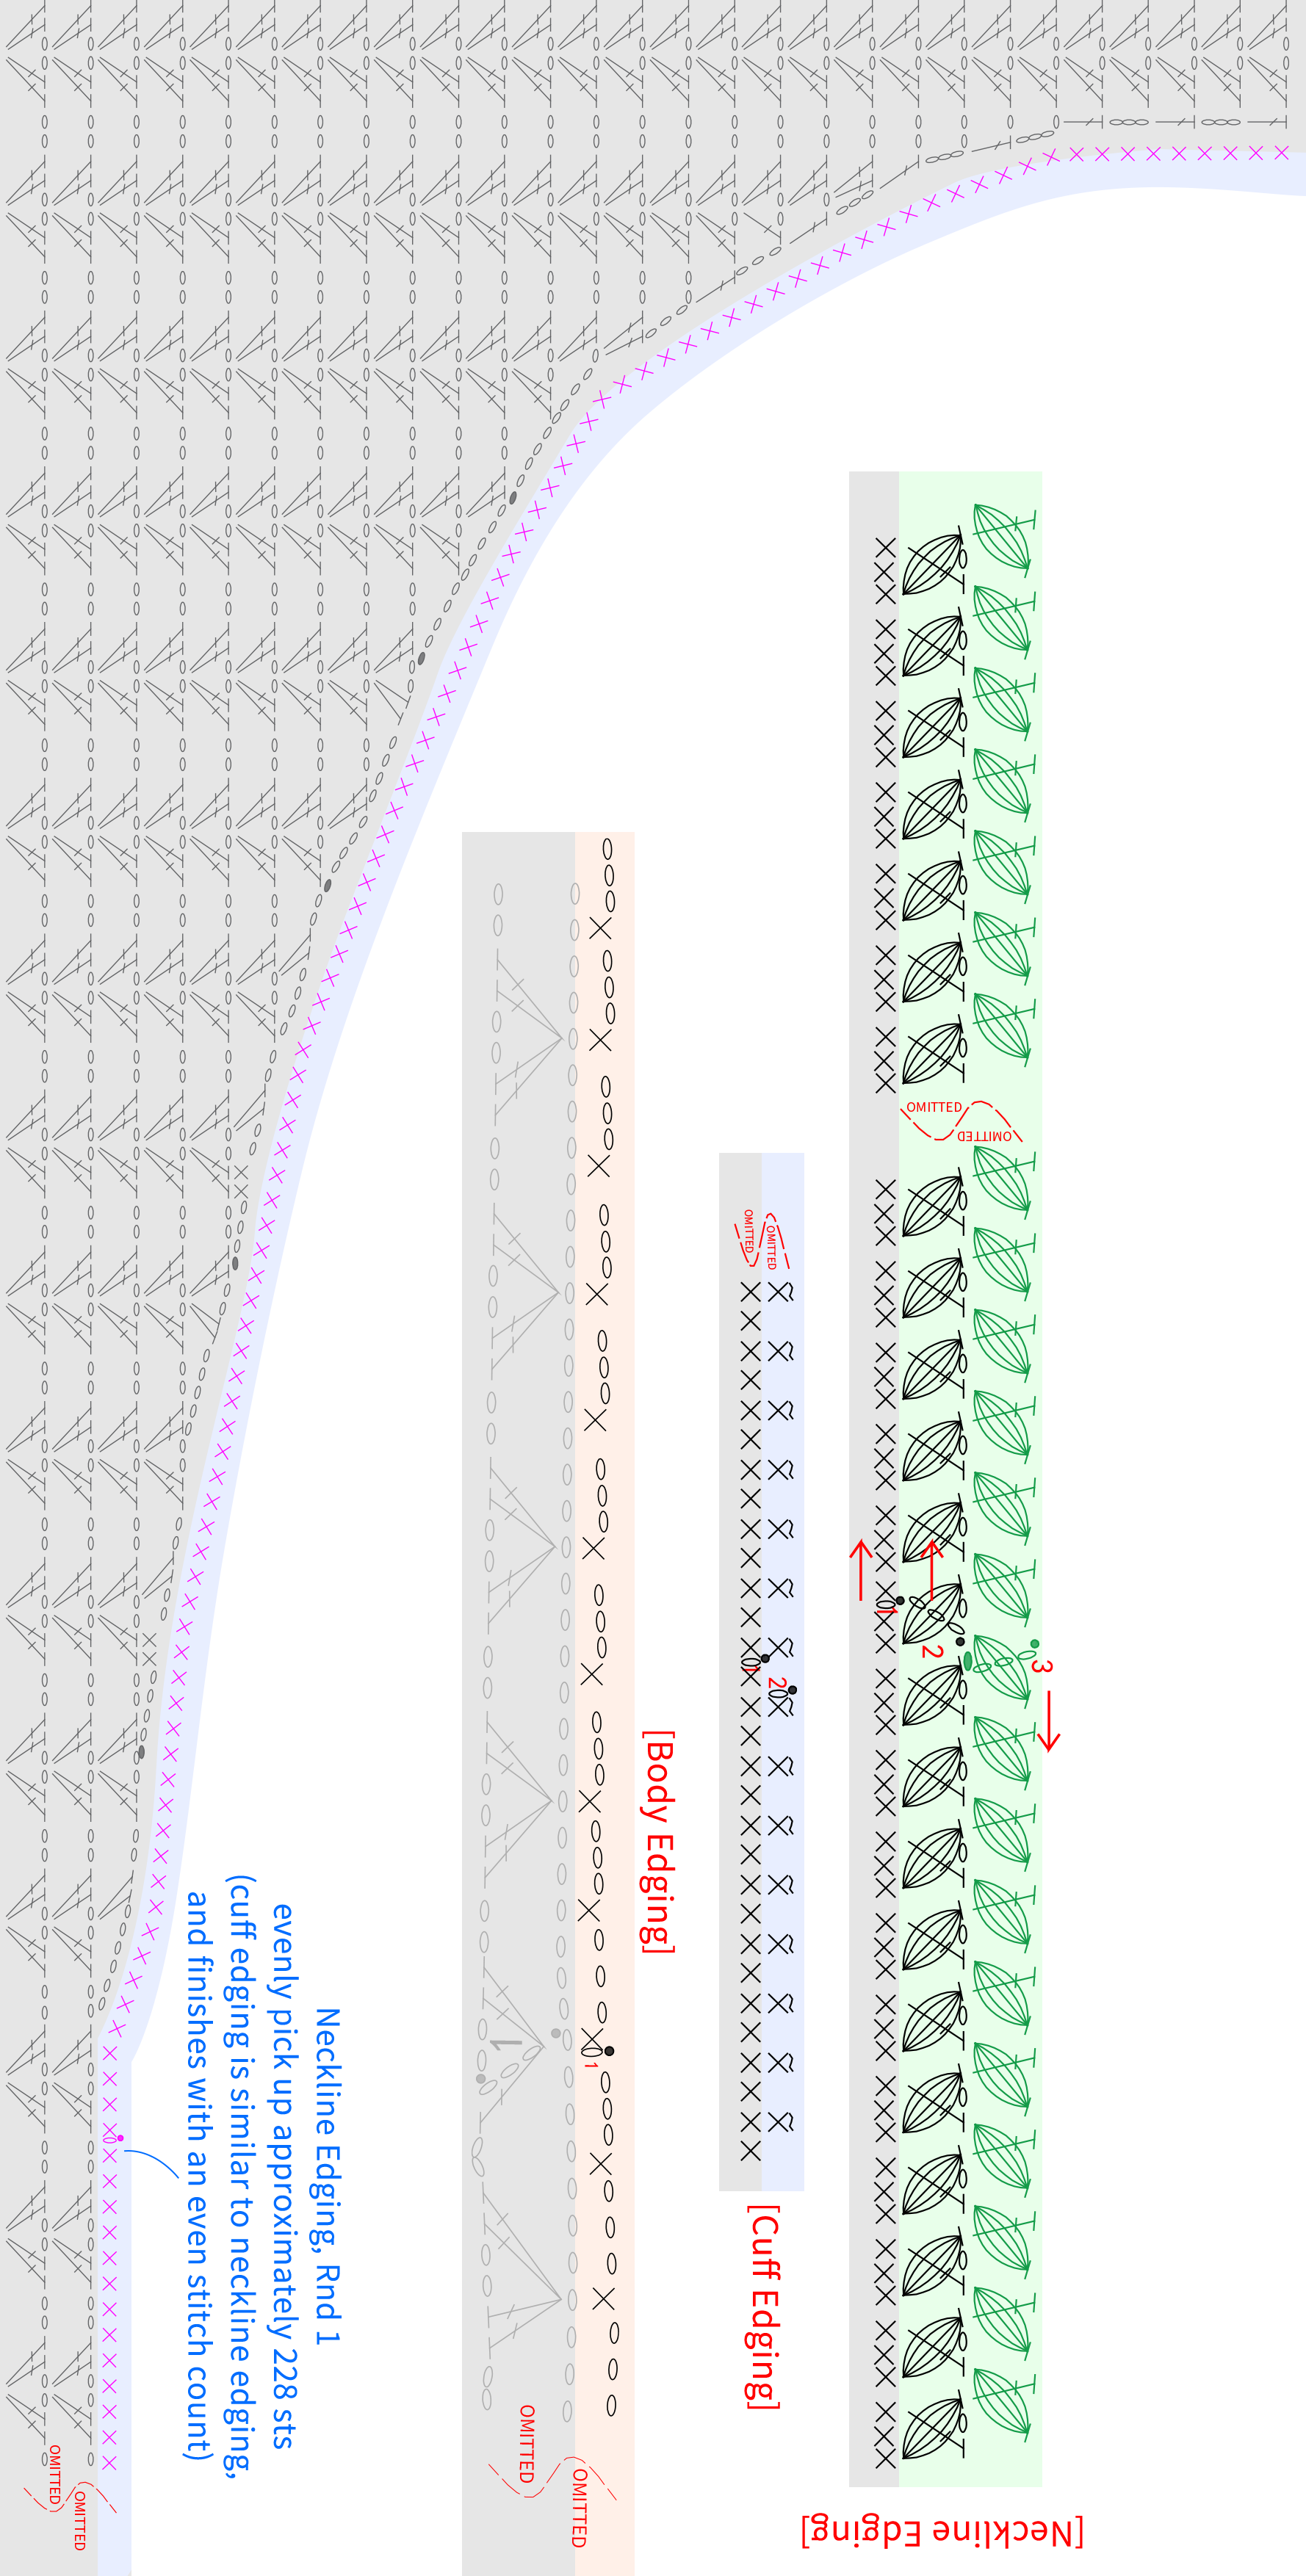
Part 4 EdgingD 28' 22'' (Part 1)
There is neckline edging, cuff edging, and body edging. Please refer to the video demonstration for more details.
Part 5 Dancing Lion DecorationE
It includes the main body and accessories. Once completed, attach them in a proper position on the neckline. The main body is divided into Section 1 and Section 2.

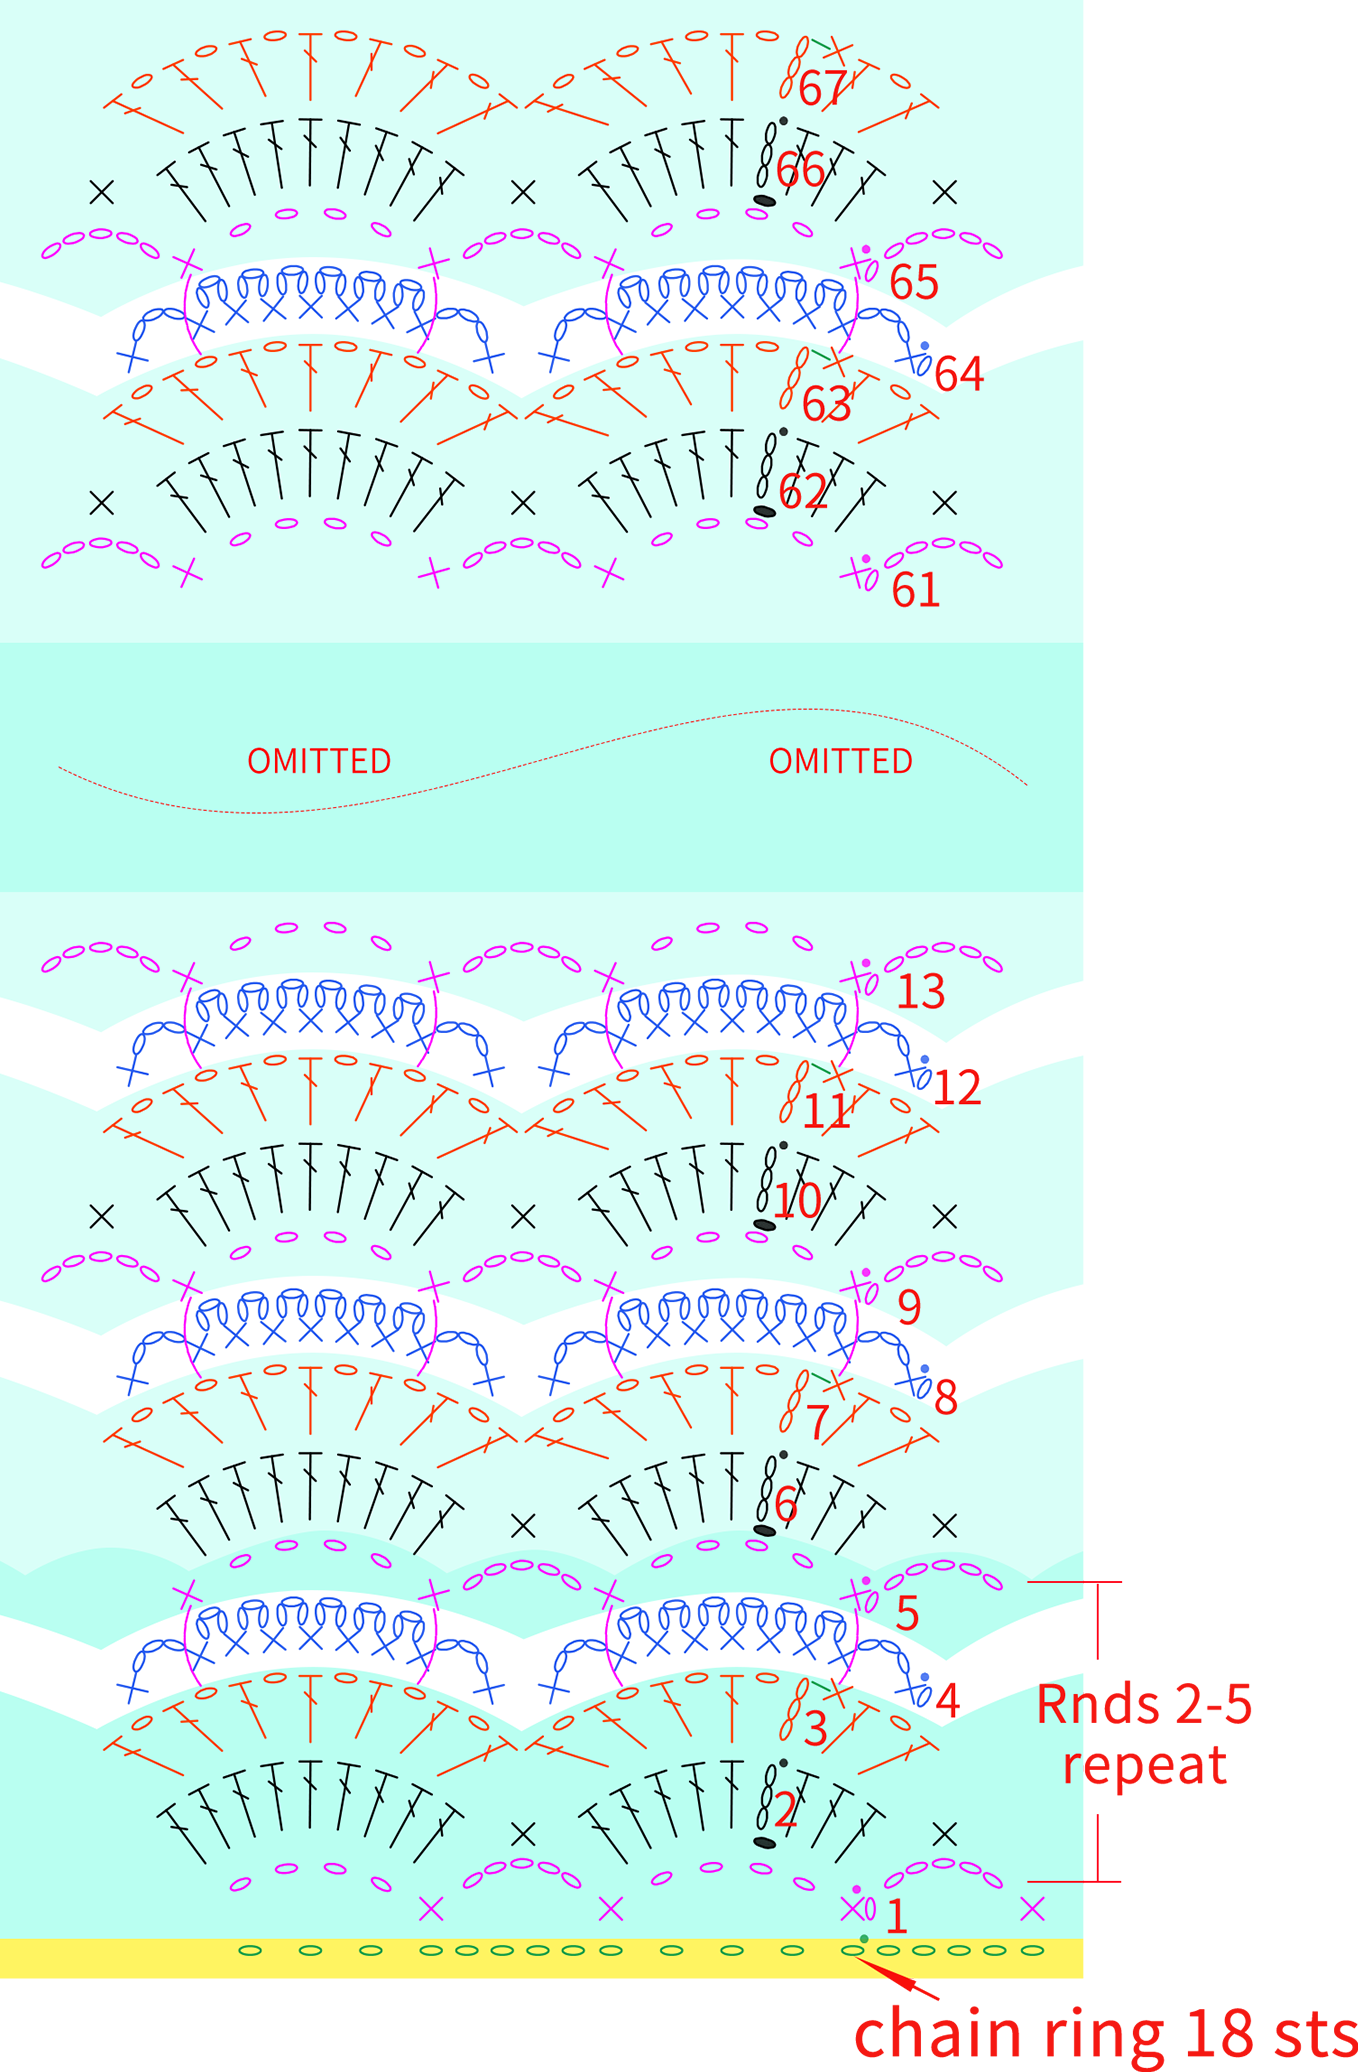
Step 1 Section 1E1 51' 54'' (Part 1)
Begin with a chain ring. Then crochet in rounds. Two yarns will be used. Please refer to the video demonstration for more details.
Note: The crocheting length is about 53 cm. After completing, leave a yarn tail of about 30 cm for sewing.
Step 2 Section 2E2 80' 42'' (Part 1)
Begin with a chain ring. Then crochet in rounds counter clockwise. Please refer to the video demonstration for more details.
Note: After completing, leave a yarn tail of about 30 cm for sewing.
Step 3 AccessoriesE3
Accessories include the head and the decorations. The head consists of the main piece, horn, facial features, and whisker.
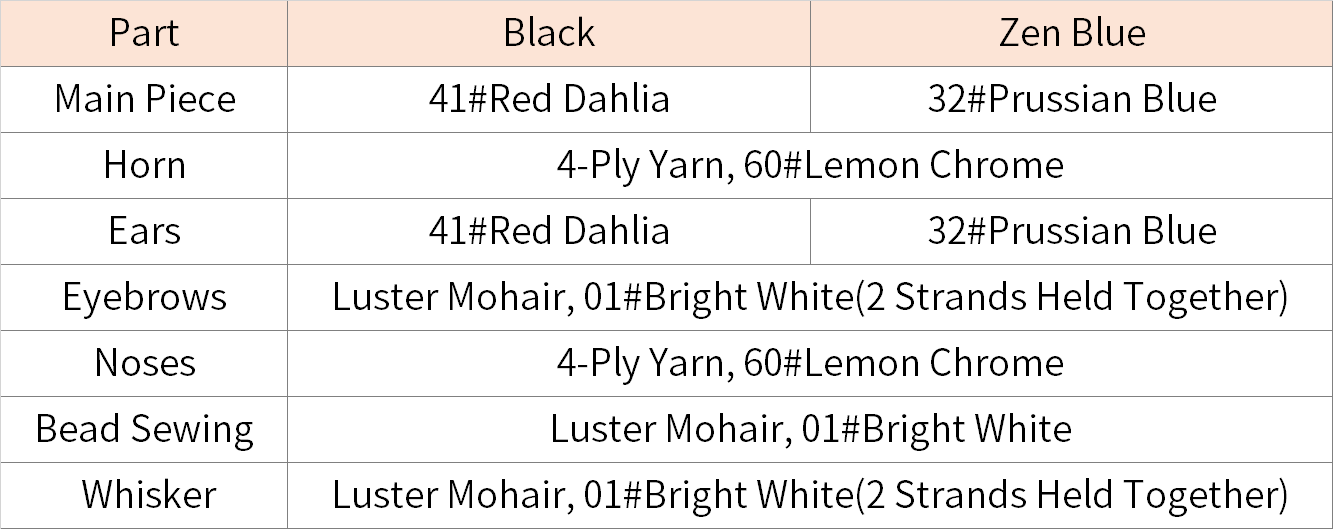
Main Piece 00' 25'' (Part 2)
Start with a foundation chain. Then crochet in rounds counter clockwise around the chain. After completing, do the sewing and stuffing. Please refer to the video demonstration for more details.
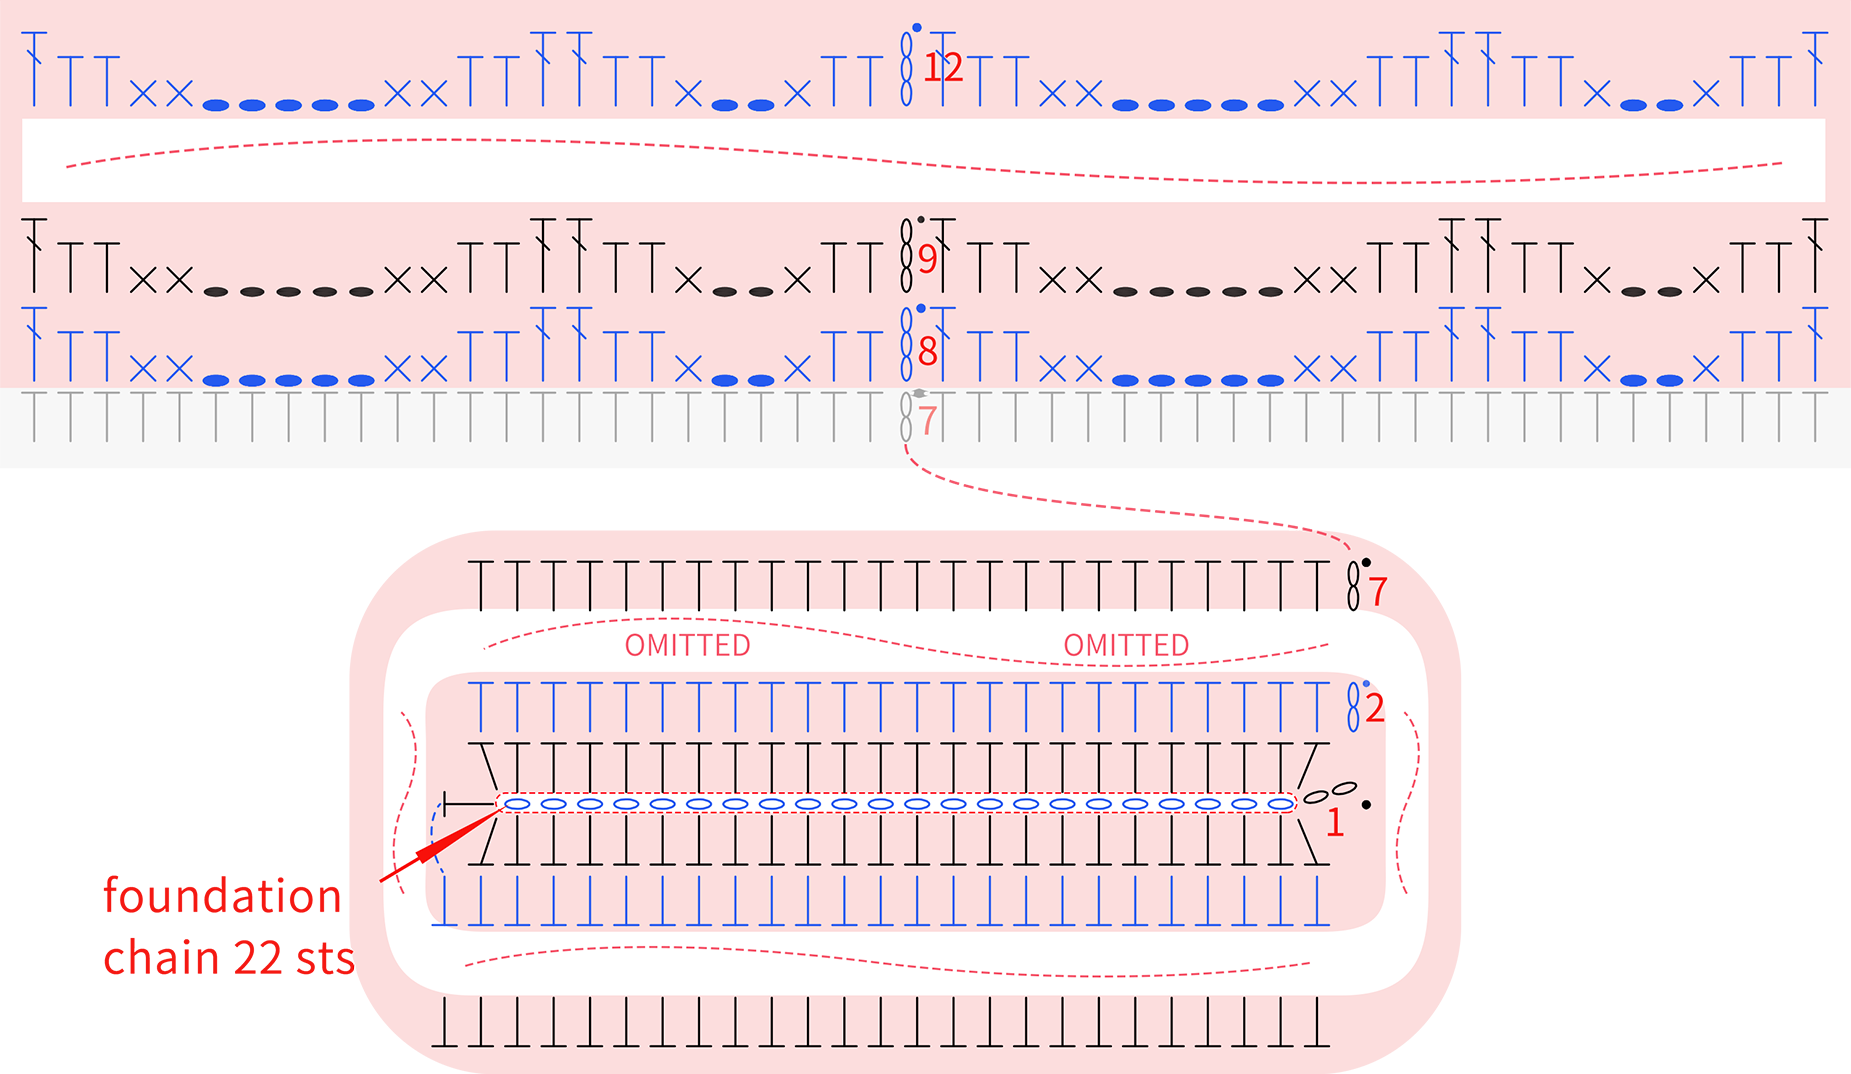
Note: 1. Rnds 2-7 are all worked evenly with half double crochets; 2. After completing, leave a yarn tail of about 30 cm for sewing.
Horn 12' 54'' (Part 2)
Start with a magic ring. Then crochet in rounds counter clockwise. After completing, sew it to the top of the head and stuff it with a small amount of fiberfill. Please refer to the video demonstration for more details.
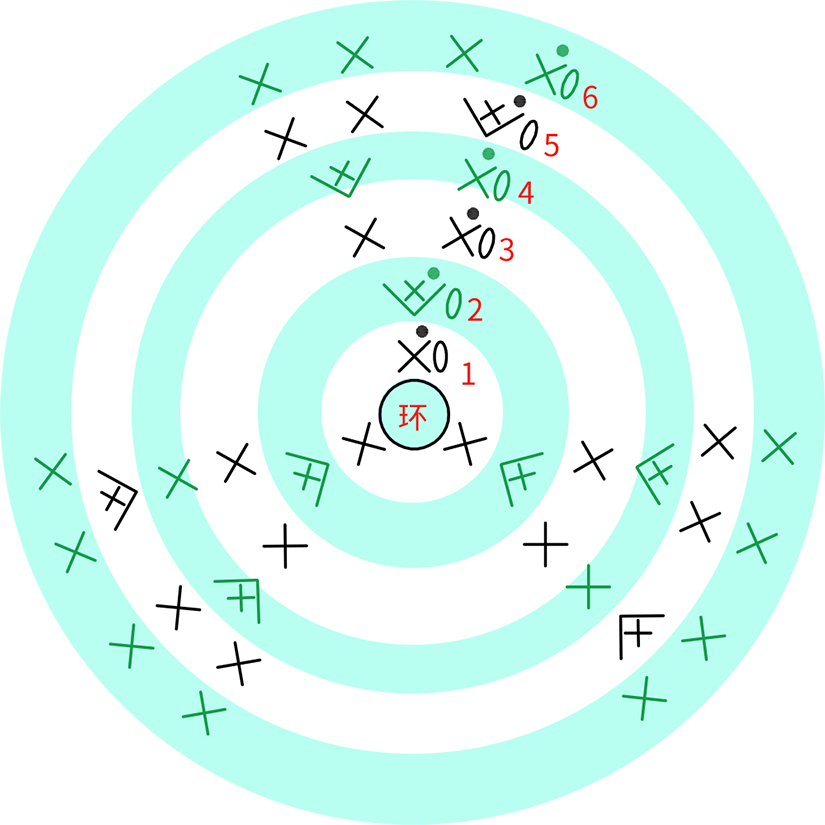
Note: After completing, leave a yarn tail of about 20 cm for sewing.
Facial Features 21' 13'' (Part 2)
Facial features include ears, eyes, eyebrows, and the nose. The nose consists of 2 parts and a bead. Please refer to the video demonstration for more details.
Note: After completing each ear, eyebrow and nose, leave a yarn tail of about 20 cm for sewing.
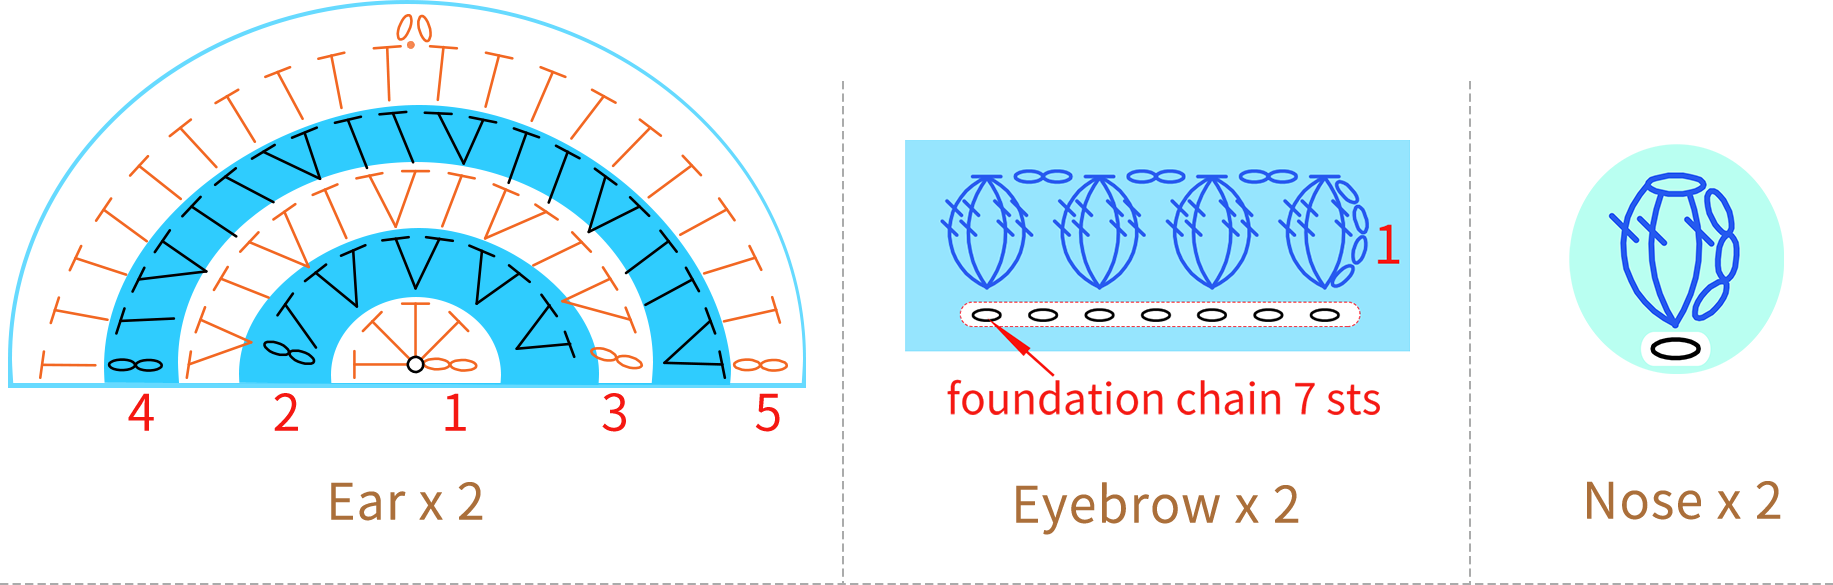
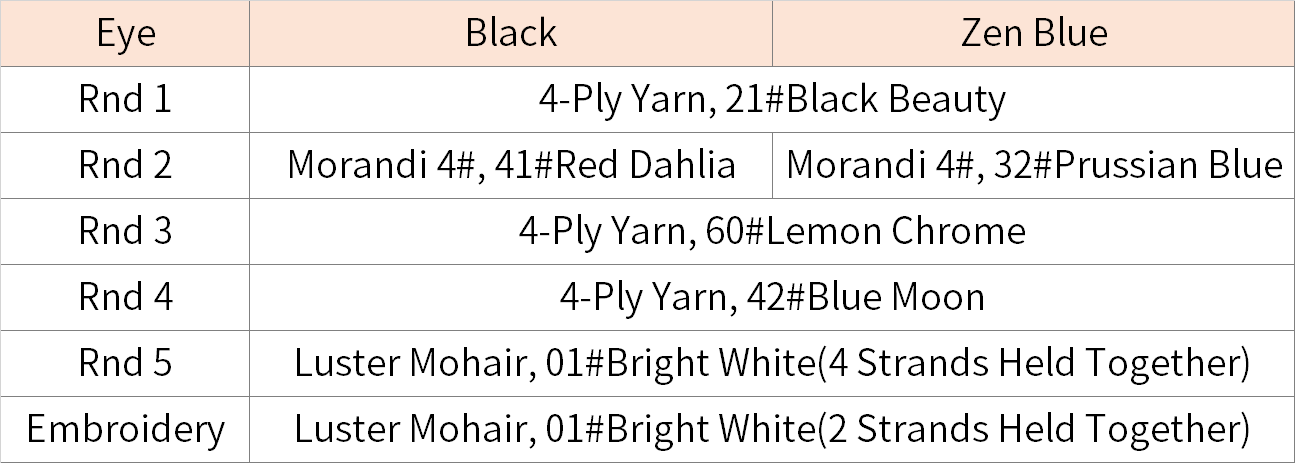
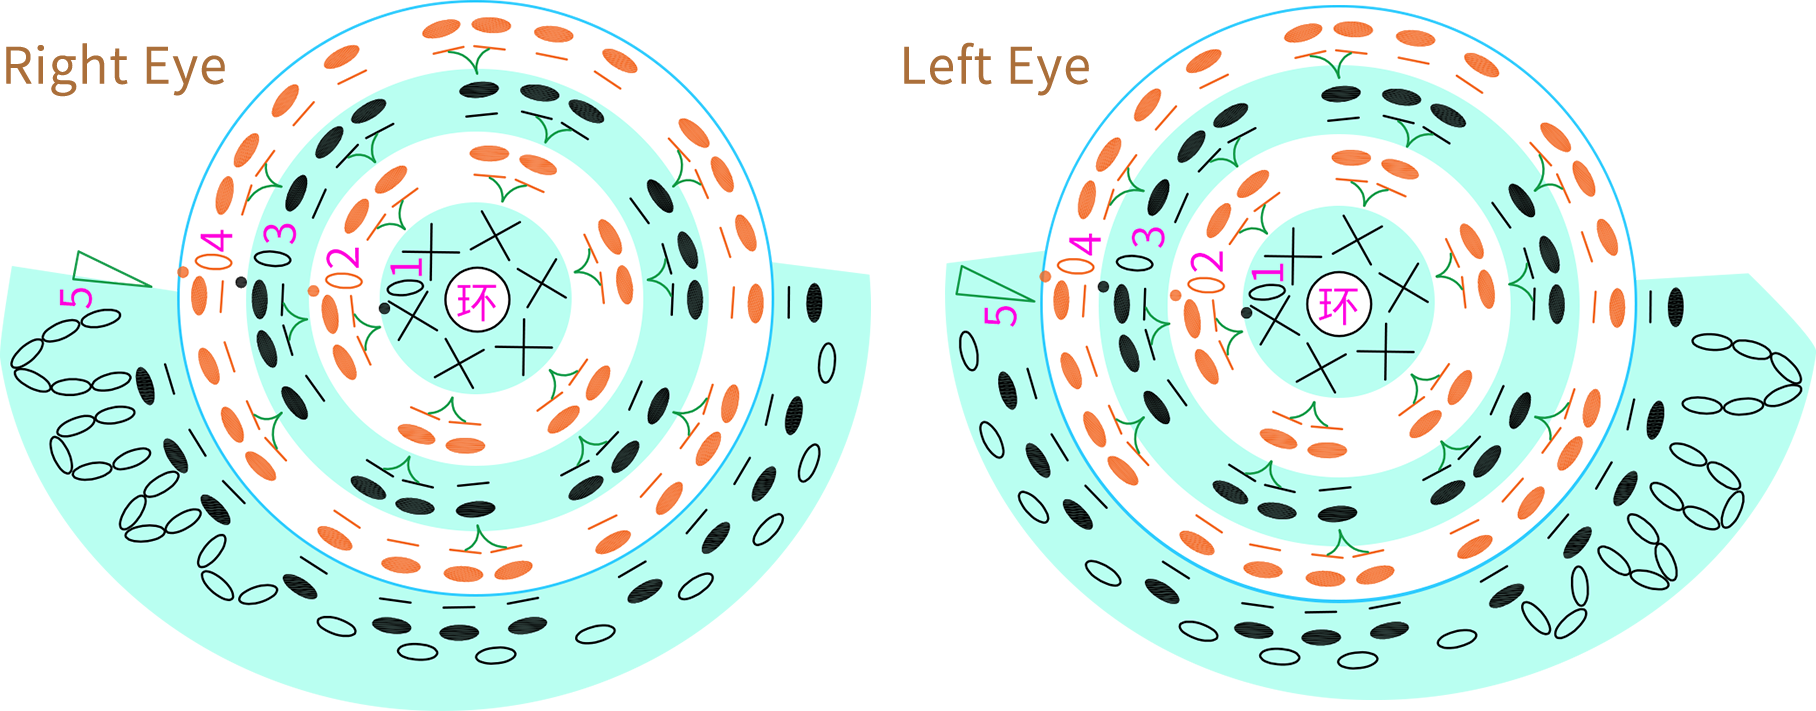
Whisker 55' 12'' (Part 2)
Work the same way as the eyebrows, just with a different stitch count. Please refer to the chart to finish it.

Note: After completing, leave a yarn tail of about 30 cm for sewing.
Decorations 59' 26'' (Part 2)
Decorations include the border, the character "Fu" and the pendant. First, embroider the border along the outer side of Section 2. The character "Fu" consists of a small motif and embroidered line segments. For the motif, start with a magic ring and crochet in rounds counter clockwise. After completing, embroider the flower and sew it onto Section 2. Then, embroider the remaining parts. Finally, make the pendant and sew it onto the corresponding position.
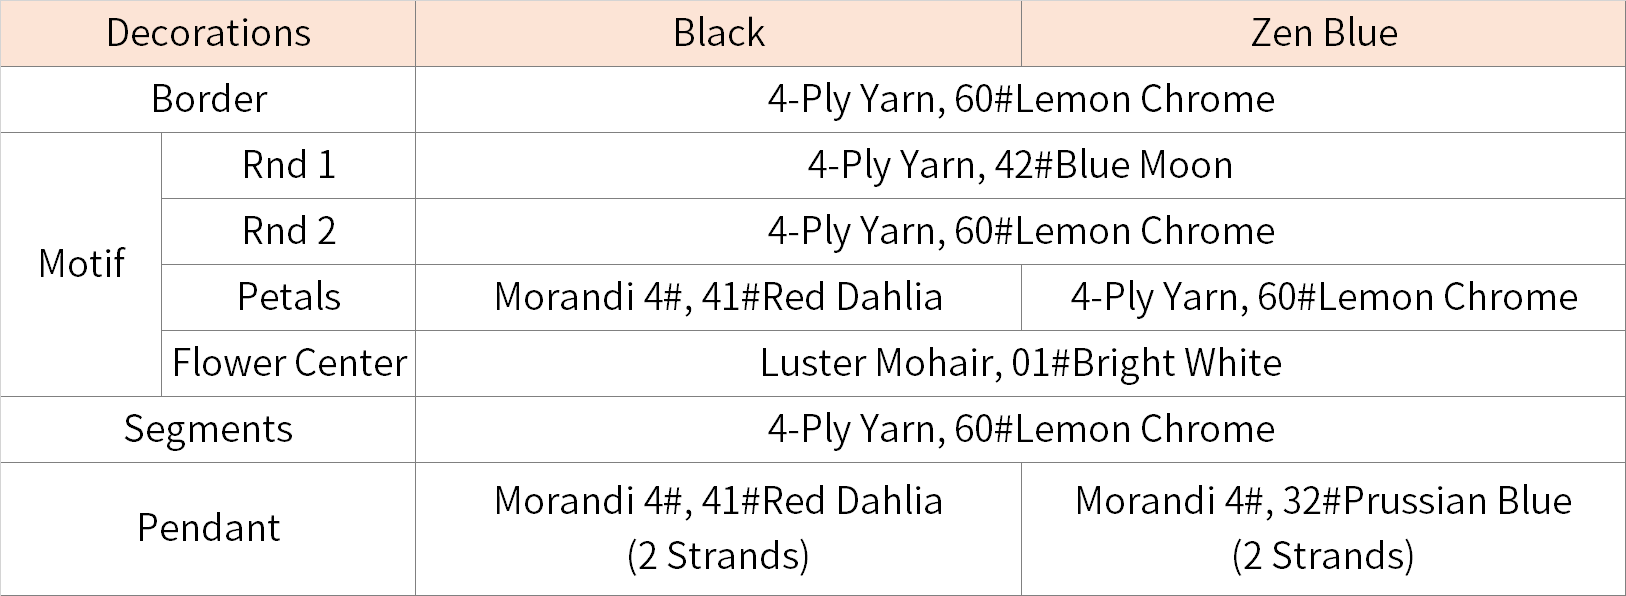
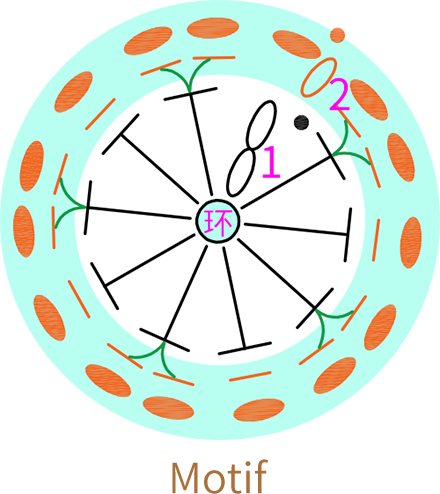
Step 8 AttachingE4 81' 30'' (Part 2)
First, attach Section 1. Then, sew the brooch clips on the horn, head, and the wrong side of Section 2. After that, clip it to the front of the vest at the proper position on Section 1.
Made by the community





