
Clothes
Dreamer
Project preview
See the finished project
Pattern format
Instructions
Watch and follow
Video tutorial
| Style | Yarn | Color |
|---|---|---|
| Pine Cone Version | Dawn Impression |  09#Sunset x 1 09#Sunset x 1 39#Pine Cone x 3 39#Pine Cone x 3 |
| Gardenia Summer Version | Dawn Impression |  14#Gardenia Summer x 3 14#Gardenia Summer x 3 22#Rainbow x 1 22#Rainbow x 1 |
This cardigan consists of the back body, front body, sleeves, joining together, edging, decorations and buttons. First, crochet the back body, front body and sleeves separately. Once completed, sew the corresponding parts together. Next, pick up the corresponding areas to crochet the edging. Then, crochet the decorative elements and attach them. Finally, sew on the buttons.
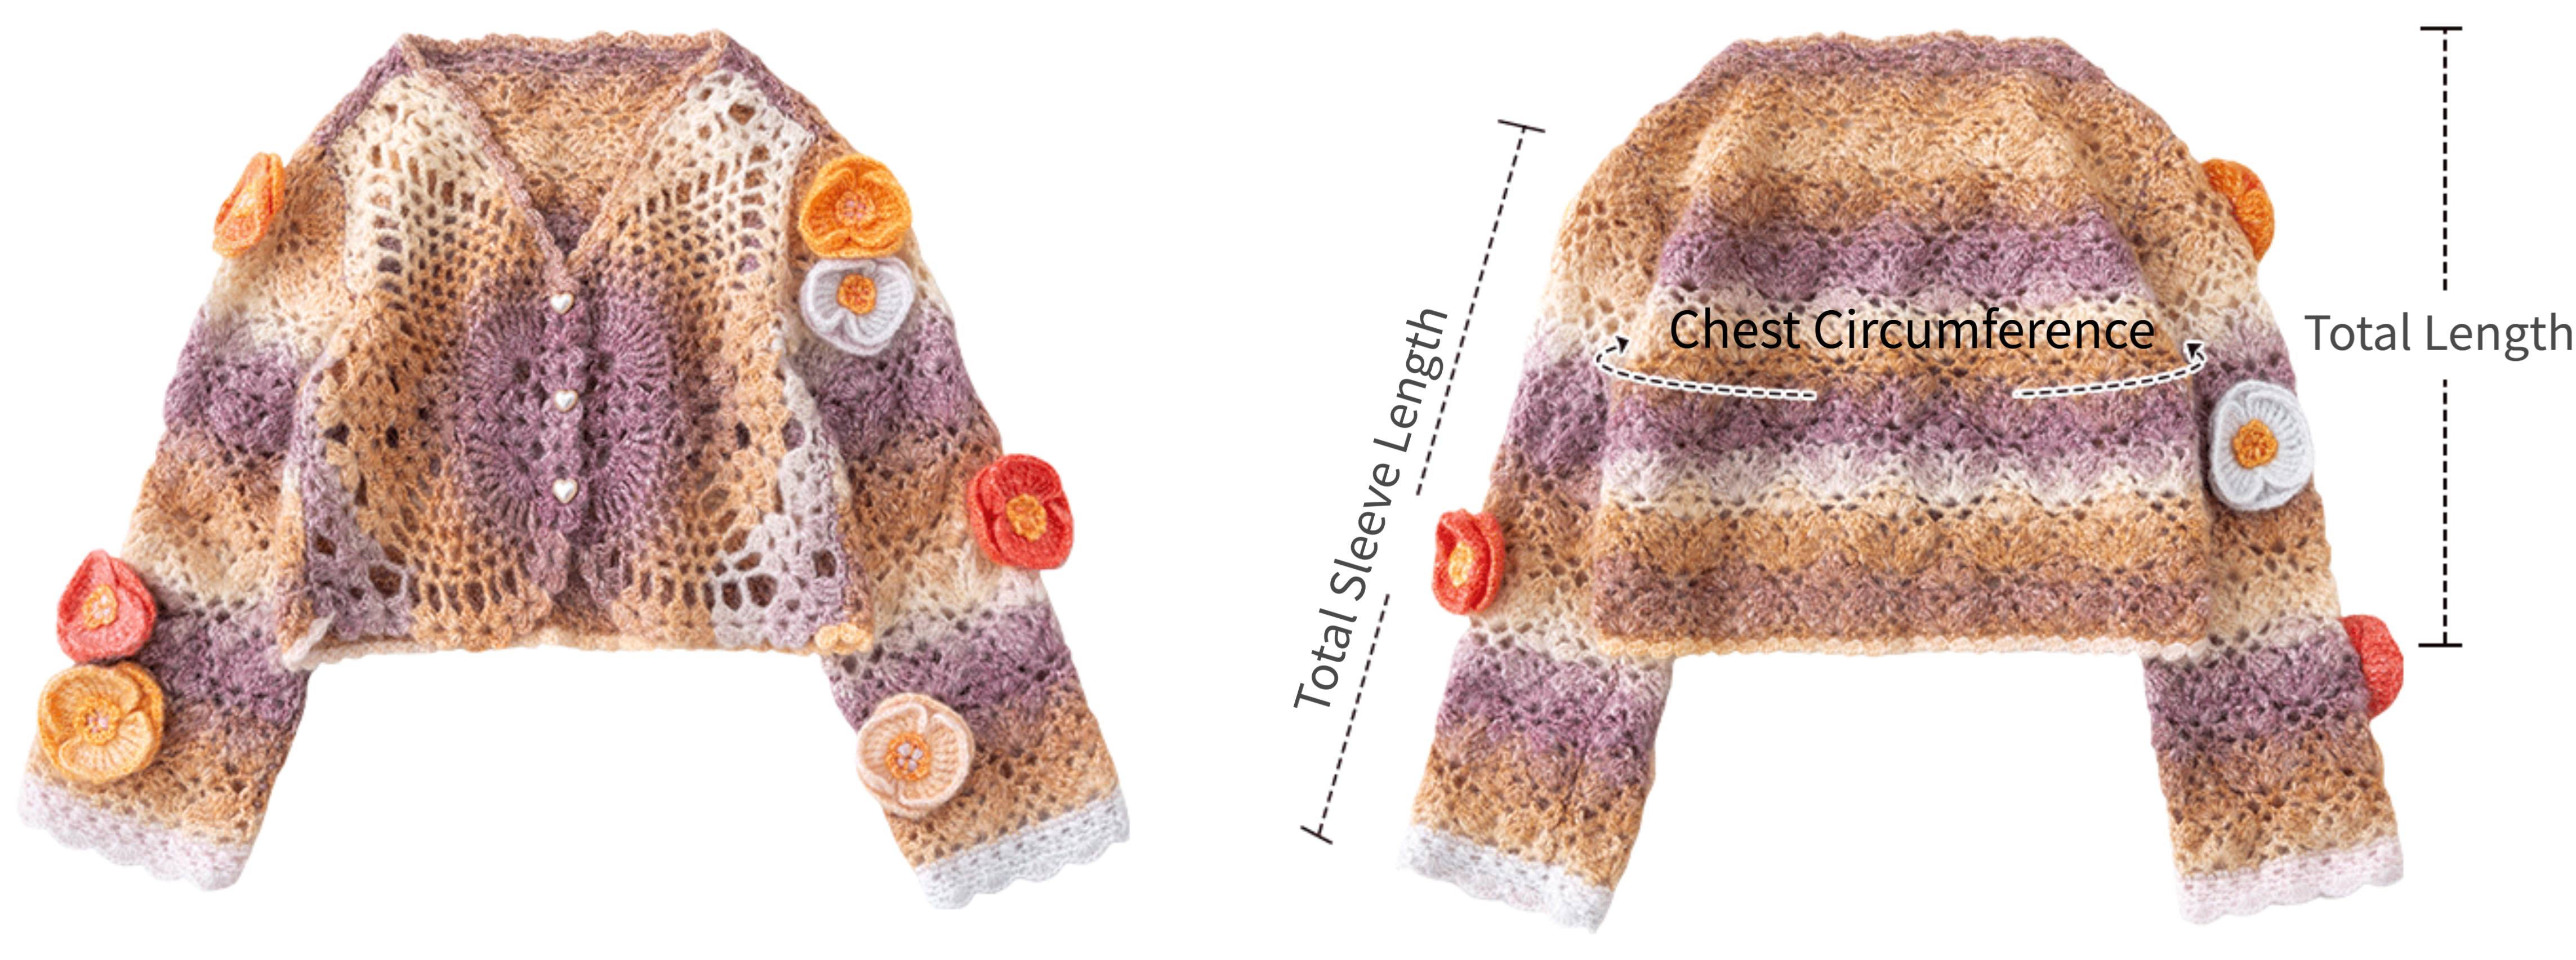
| Unit: cm | Chest Circumference | Total Length | Total Sleeve Length |
| Free Size | 92 | 46 | 45.5 |
Note: Hand-measured with a margin of error of 1-2 cm. Since everyone's tension varies, the sample size is for reference only.
Yarn: Dawn Impression
Tools: 4.0mm Crochet Hook

Note: Dawn Impression is a self-striping yarn. Since self-striping yarns have multiple color segments, the starting position of the color will affect the final look. You can refer to the finished sample or choose your preferred color section to start with. Also, please note that this yarn is special and not easy to unravel, so it's recommended to practice first before using the original yarn for crocheting.
Schematic Diagram
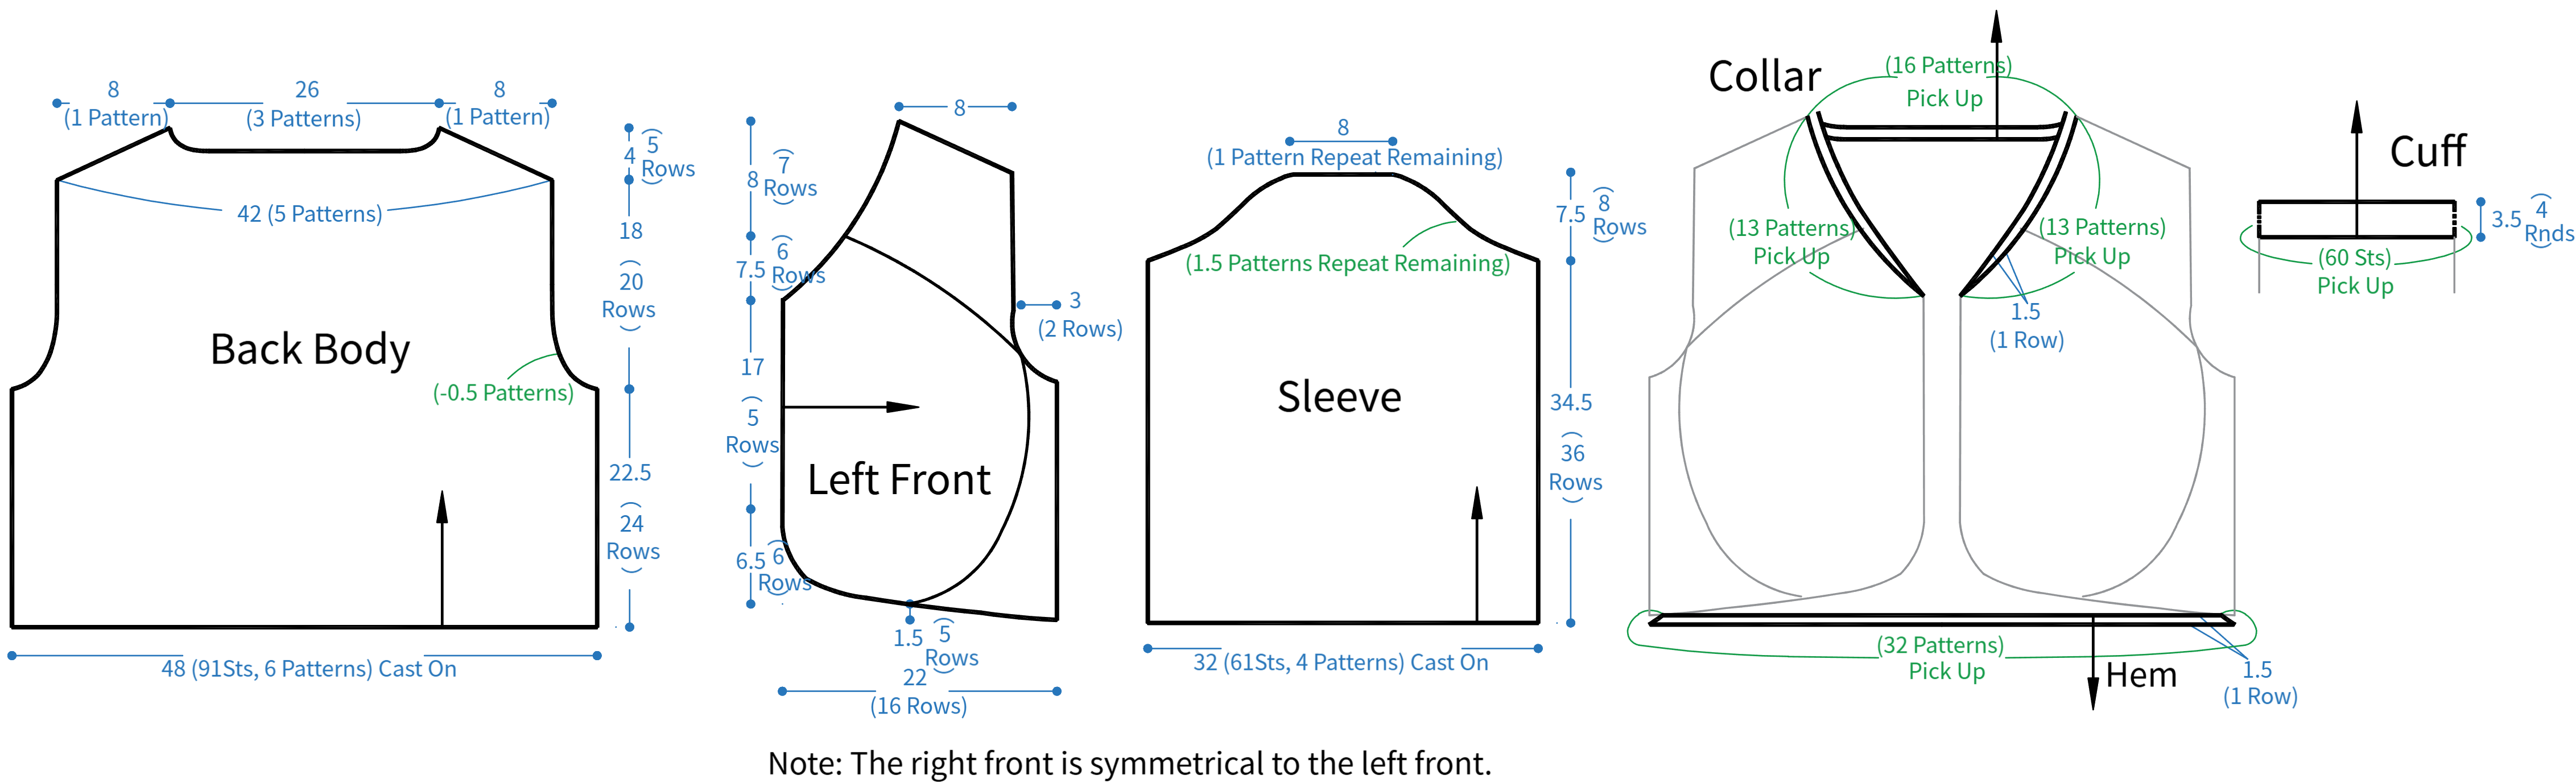
Gauge Swatch
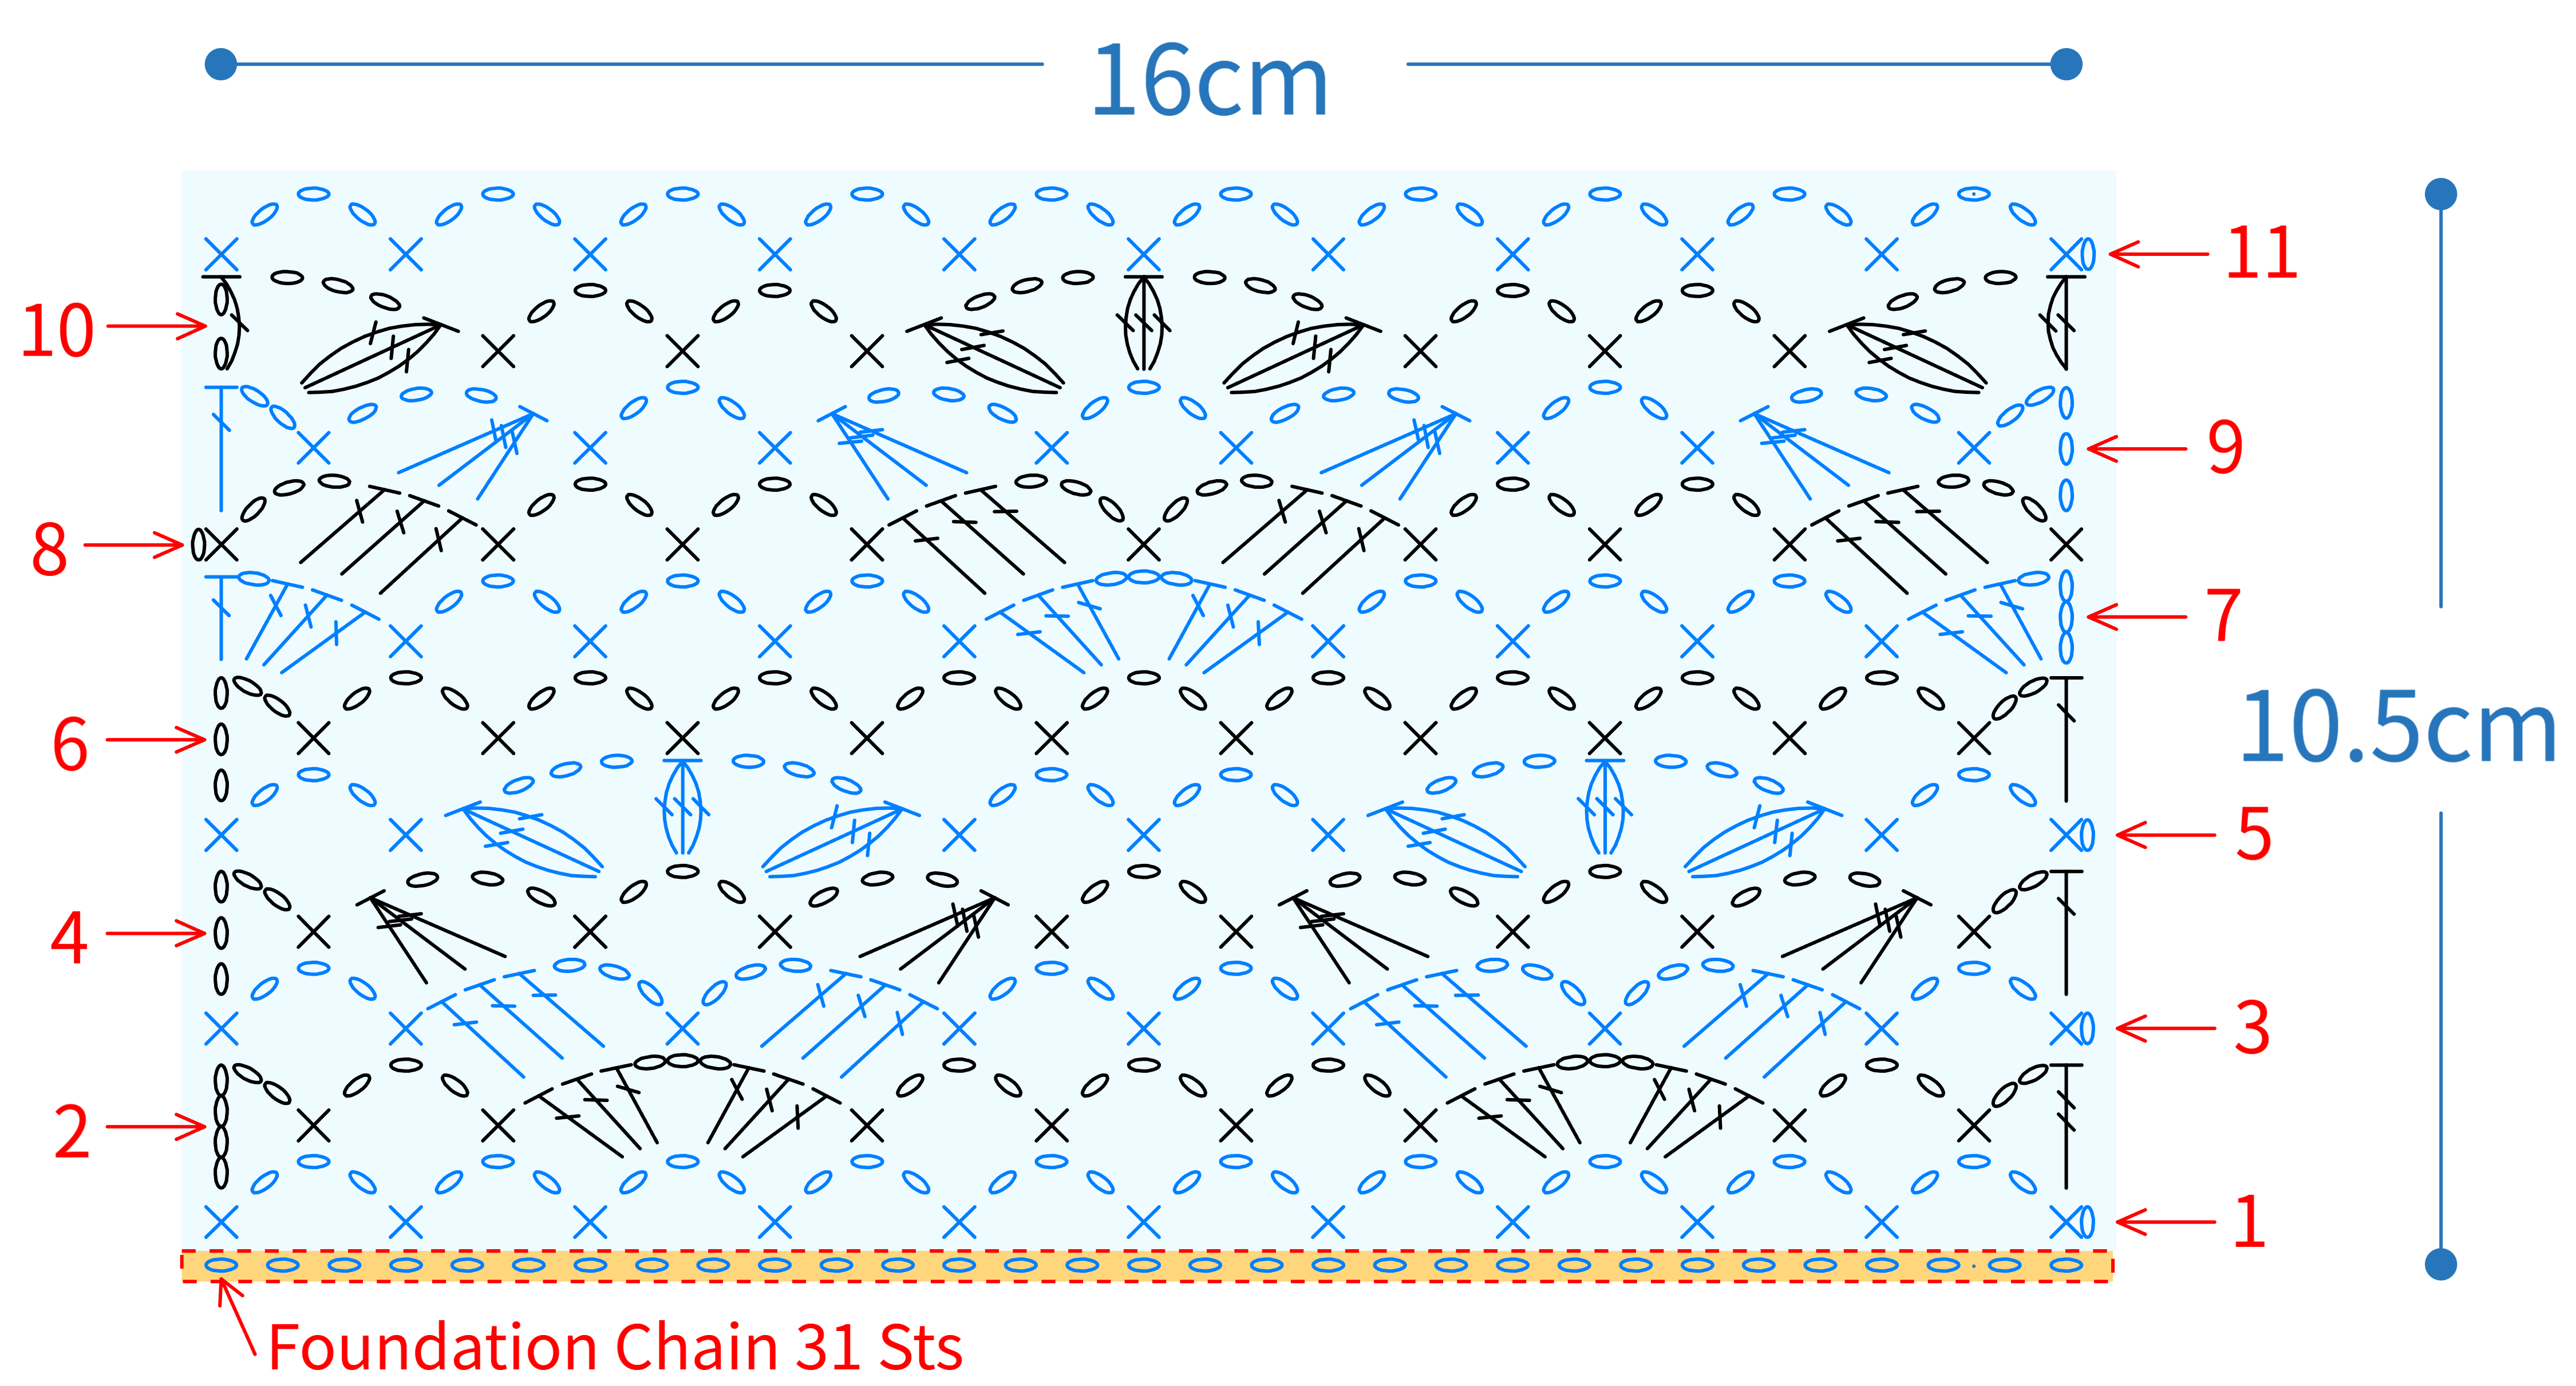





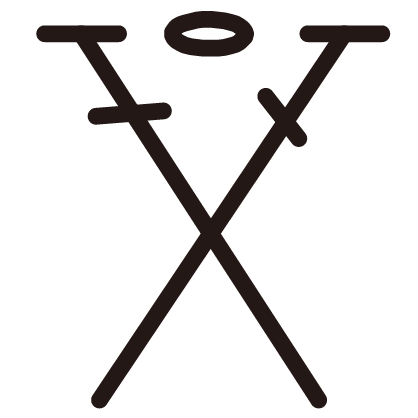


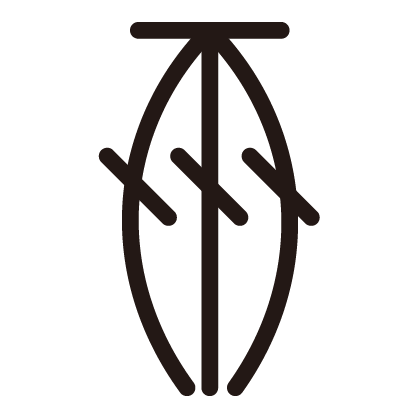



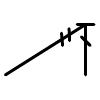



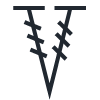


Note:
1. This pattern is making in Chinese crochet pattern terms, and the stitch name is written using American terminology. All measurements in charts are in cm.

| Part | Pine Cone Version | Gardenia Summer Version |
| Back Body, Left Front, Right Front, Sleeves & Joining | 39#Pine Cone | 14#Gardenia Summer |
Part 1 Back Body A 00' 58''
Back body is divided into body, chest piece, and shoulder-parts. Body is worked with foundation chain method, crocheting back and forth. Please refer to the video demonstration for details.
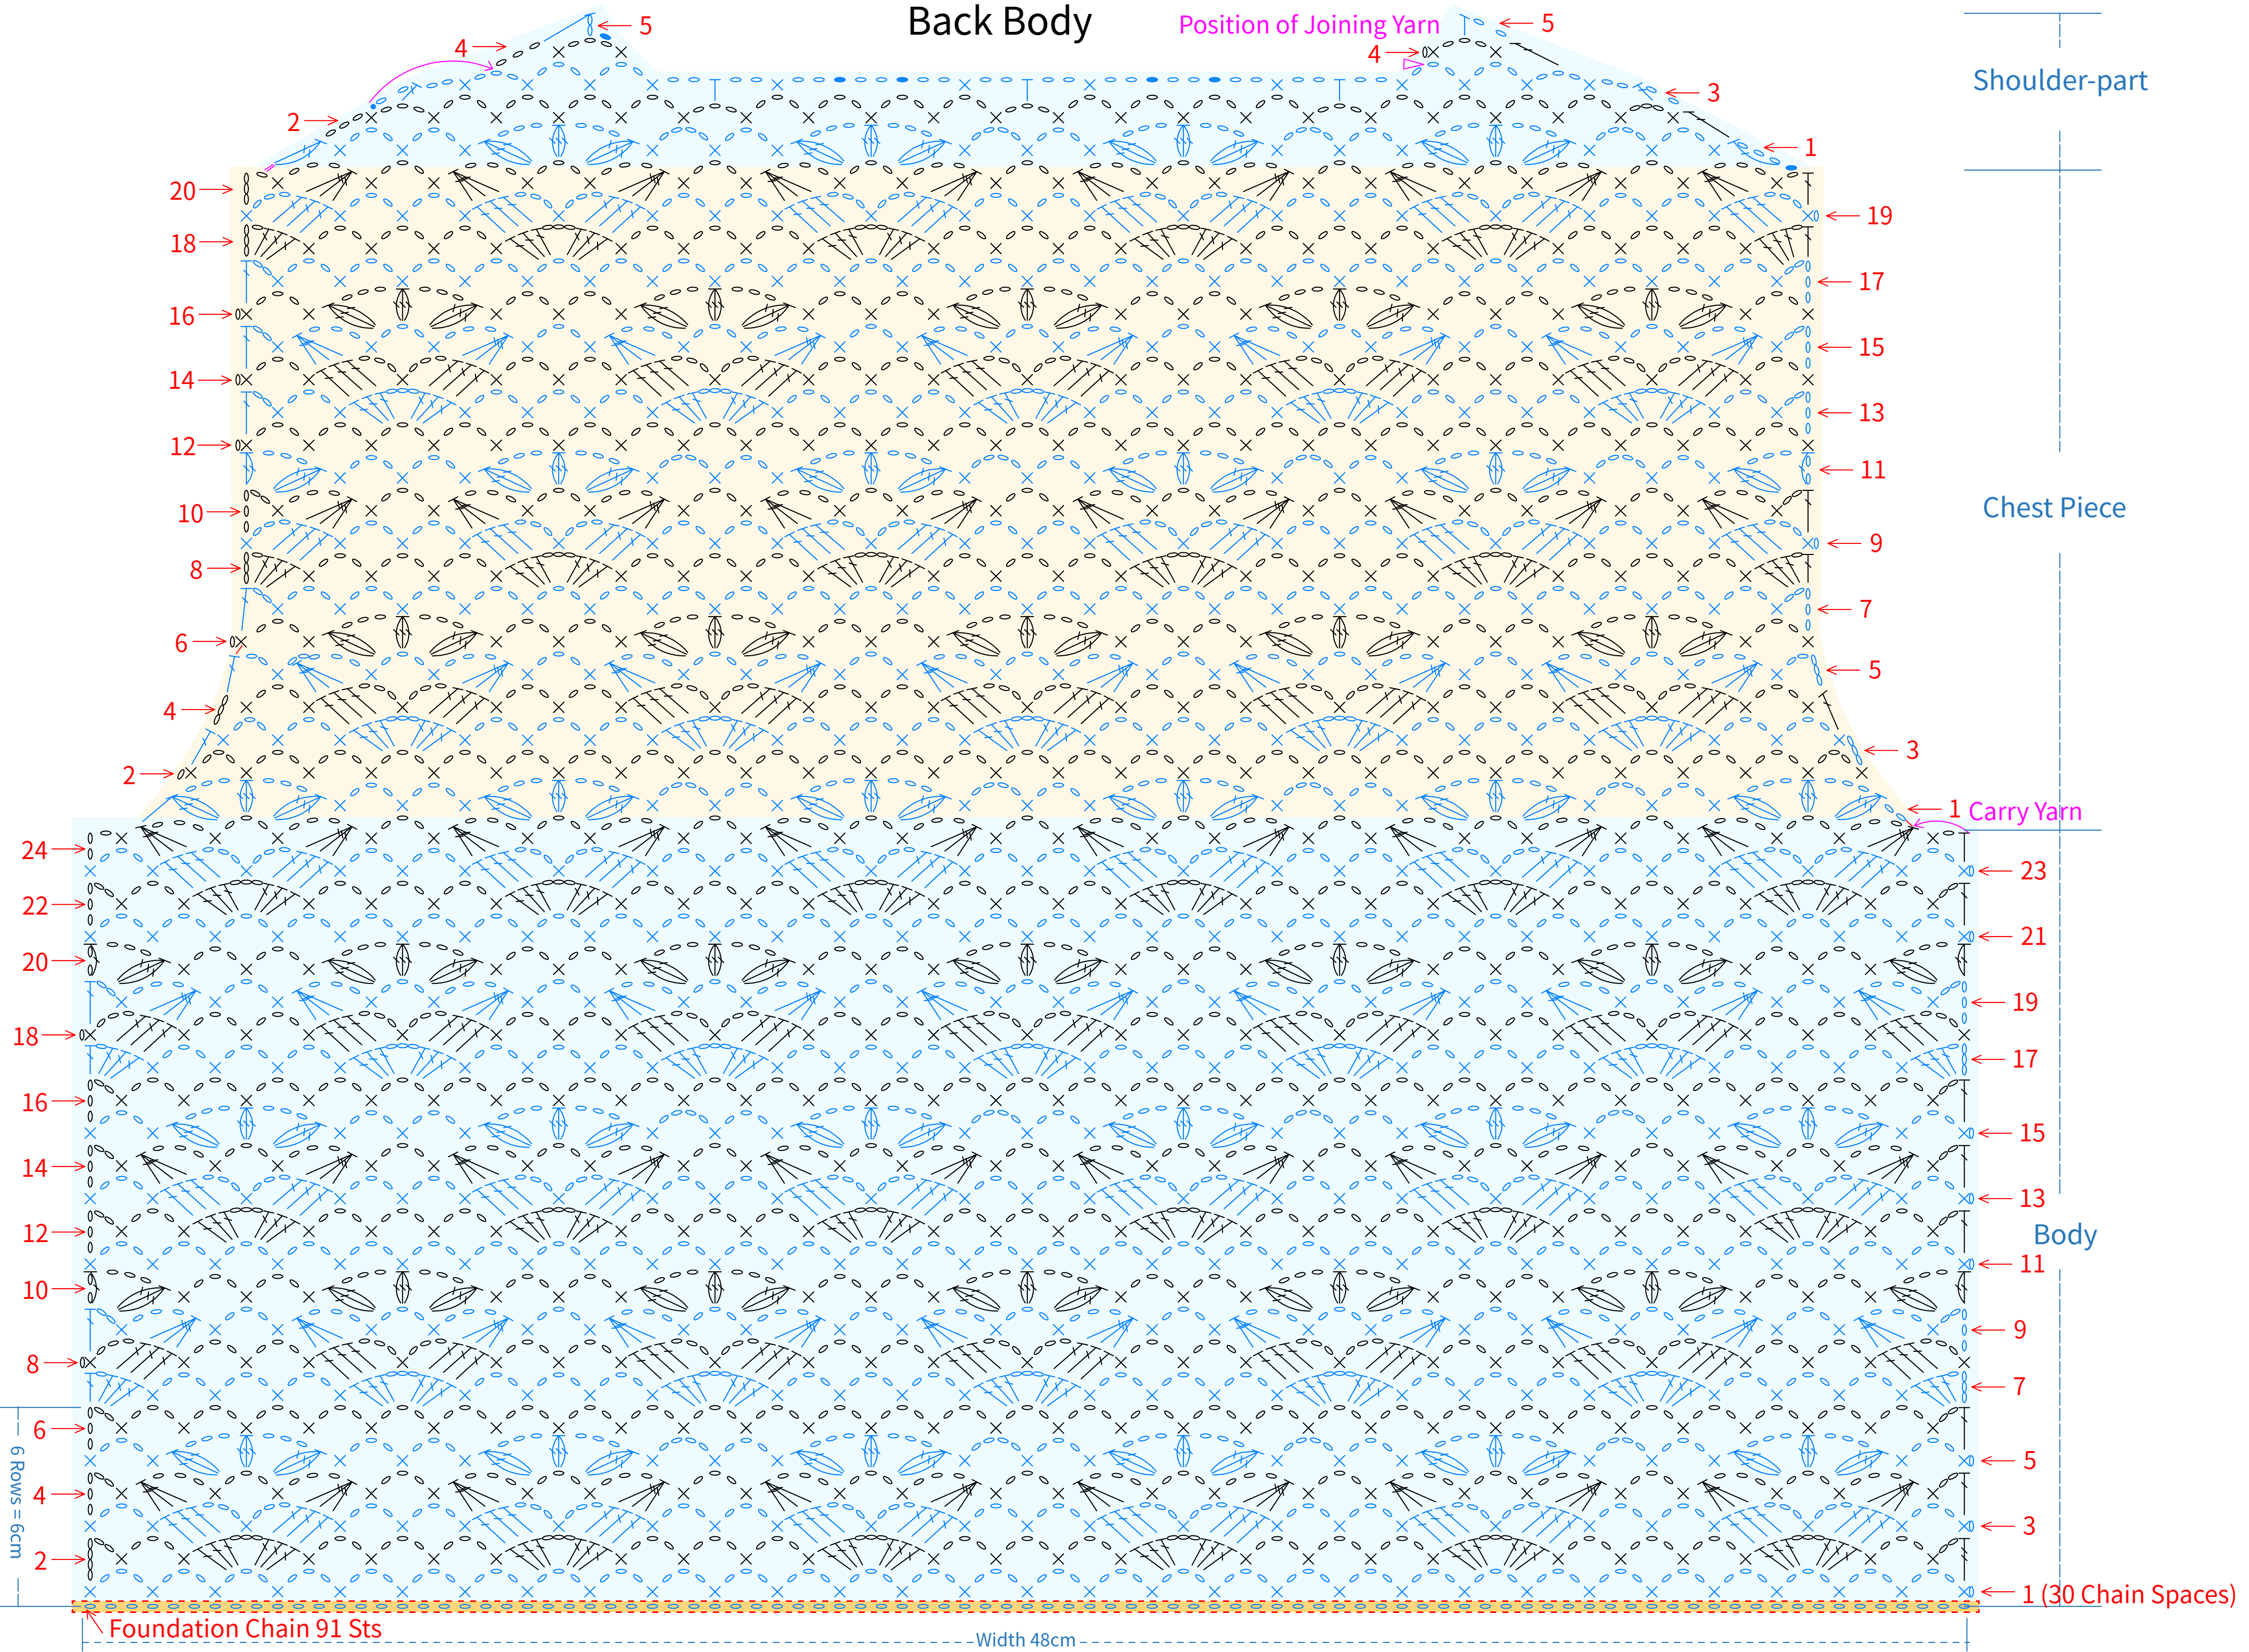
Note: After completing 6 rows, measure the dimensions. If there's a significant difference in size, adjust your tension and re-crochet.
Part 2 Front Body B 36' 30''
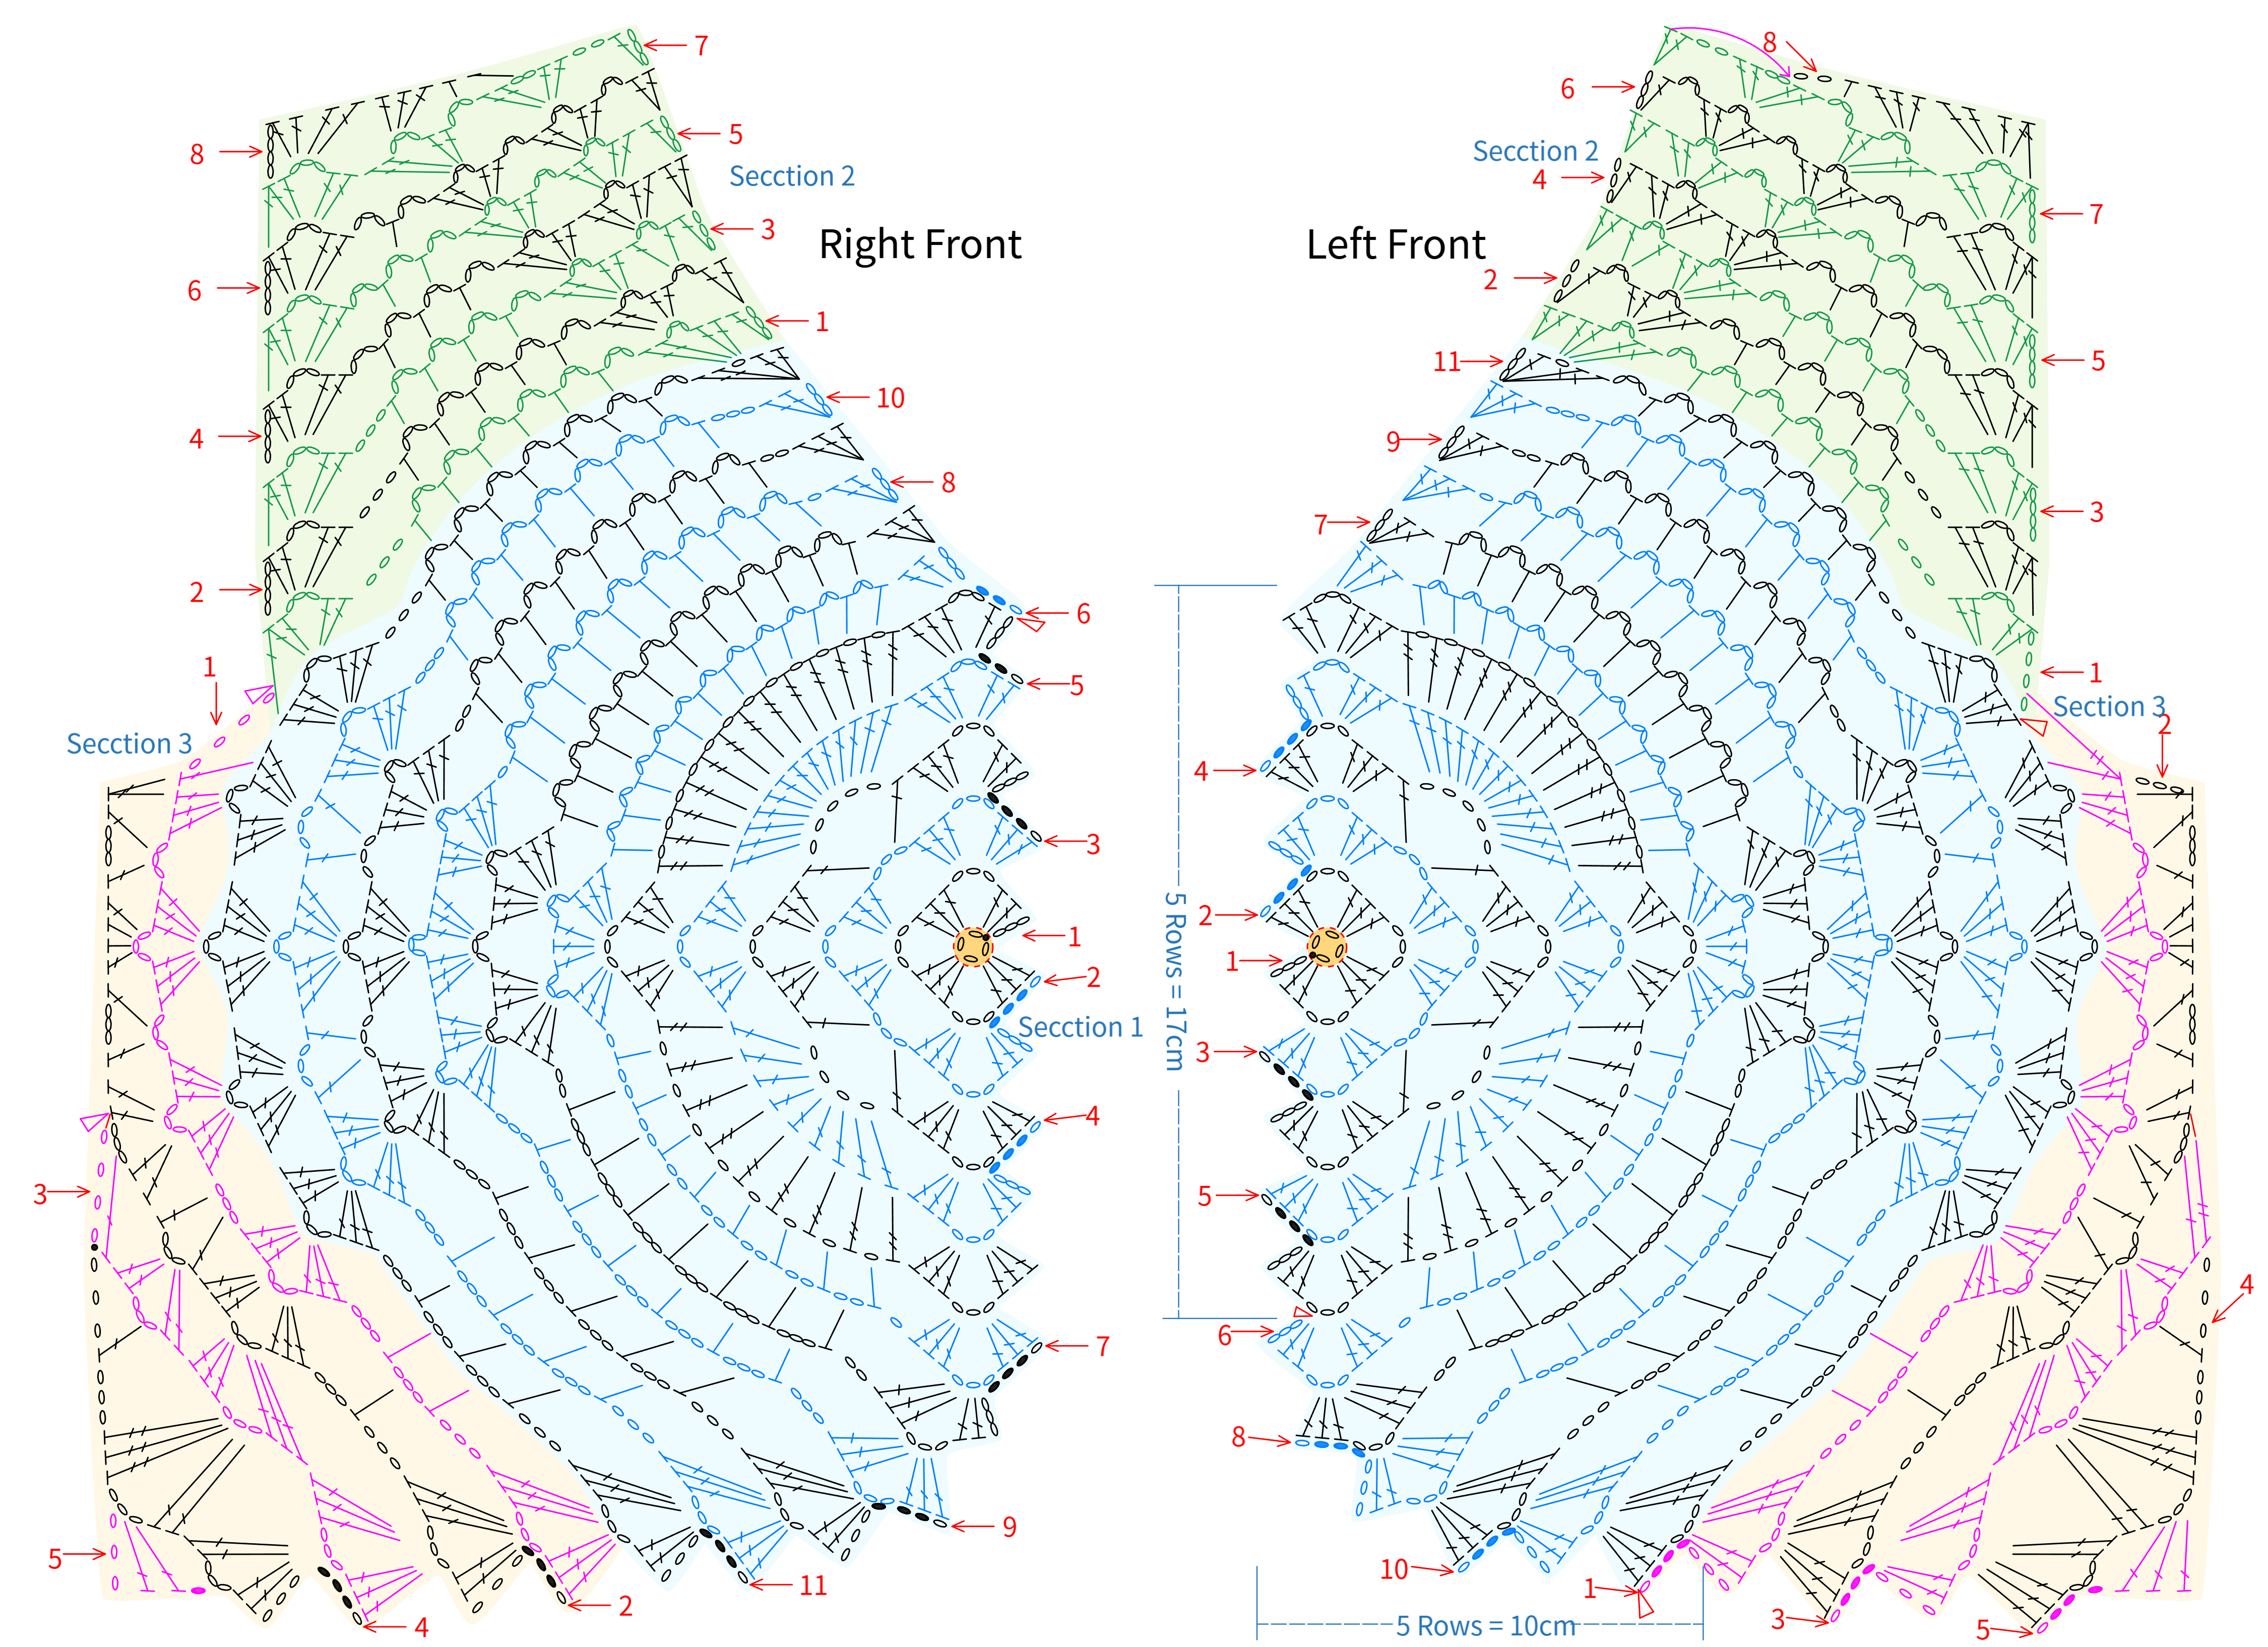
The front body is divided into the right front and left front. Both are divided into Section 1, Section 2, and Section 3, using the chain ring method with back and forth crocheting. Please refer to the video demonstration for details.
Note: 1. The left and right in the chart refer to the actual left and right when worn.
2. The color segments for the left and right fronts start the same. Find the same color segment in both skeins to begin crocheting, and ensure the color sequence is identical. This will make the color patterns on both fronts roughly match.
3. After completing the fifth row of the left front, refer to the chart to measure the dimensions. If there's a significant difference in size, adjust your tension and re-crochet to avoid affecting the finished measurement.
4. When crocheting the right front, fit well with the left front as you work to prevent large size differences that could affect the finished product's appearance.
Part 3 Sleeves C 60' 16''
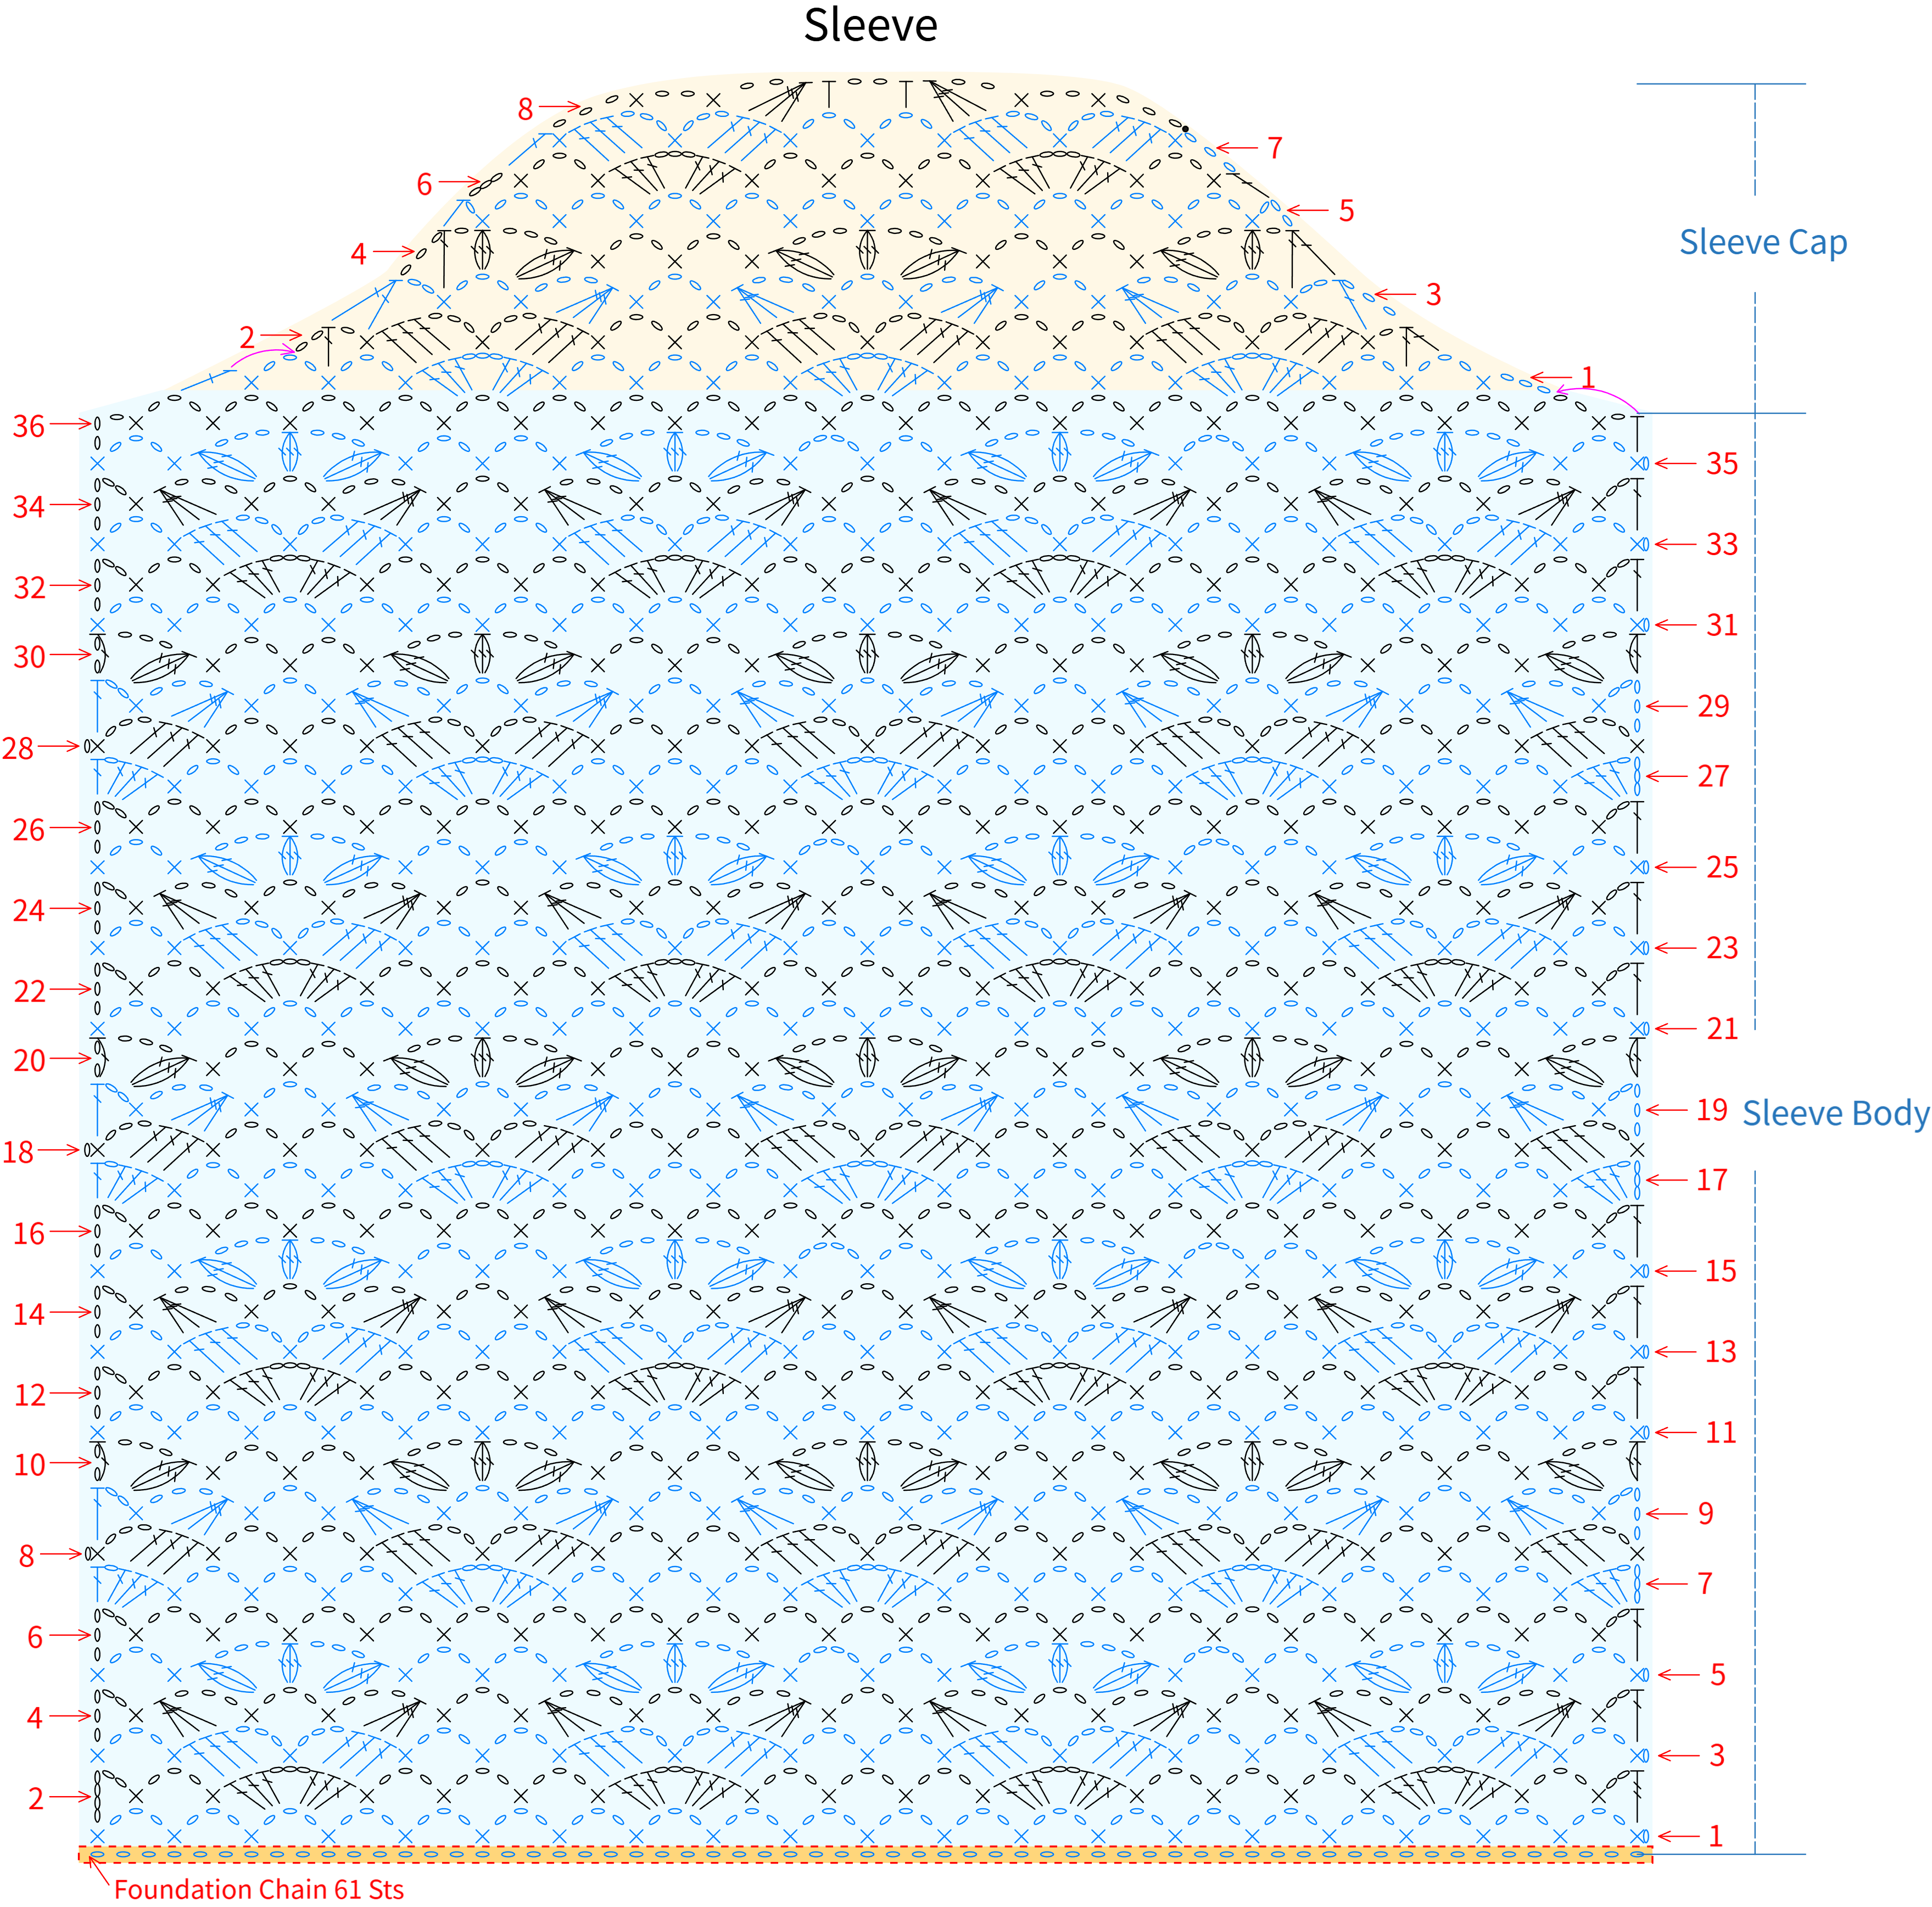
You'll have two identical sleeves, each divided into the sleeve body and sleeve cap. For the sleeve body, start with a foundation chain and work back and forth. Please refer to the video demonstration for details.
Note: The color segments for both sleeves should start identically. Find the same color segment in both skeins to begin crocheting, and ensure the sequence of color segments is also identical. This way, the color sequences for both sleeves will be roughly the same.
Part 4 Joining Together D 61' 18''
First, join the corresponding shoulders of the front and back bodies, then join the sides of the body. Once done, attach the sleeve bodies, and finally connect the sleeve caps to the armholes of the front and back bodies. For details, please refer to the video demonstration.

| Part | Pine Cone Version | Gardenia Summer Version |
| Cuff, Hem & Decorative Flowers | 09#Sunset | 22#Rainbow |
| Neckline | 39#Pine Cone | 14#Gardenia Summer |
Part 5 Edging E 67' 31''
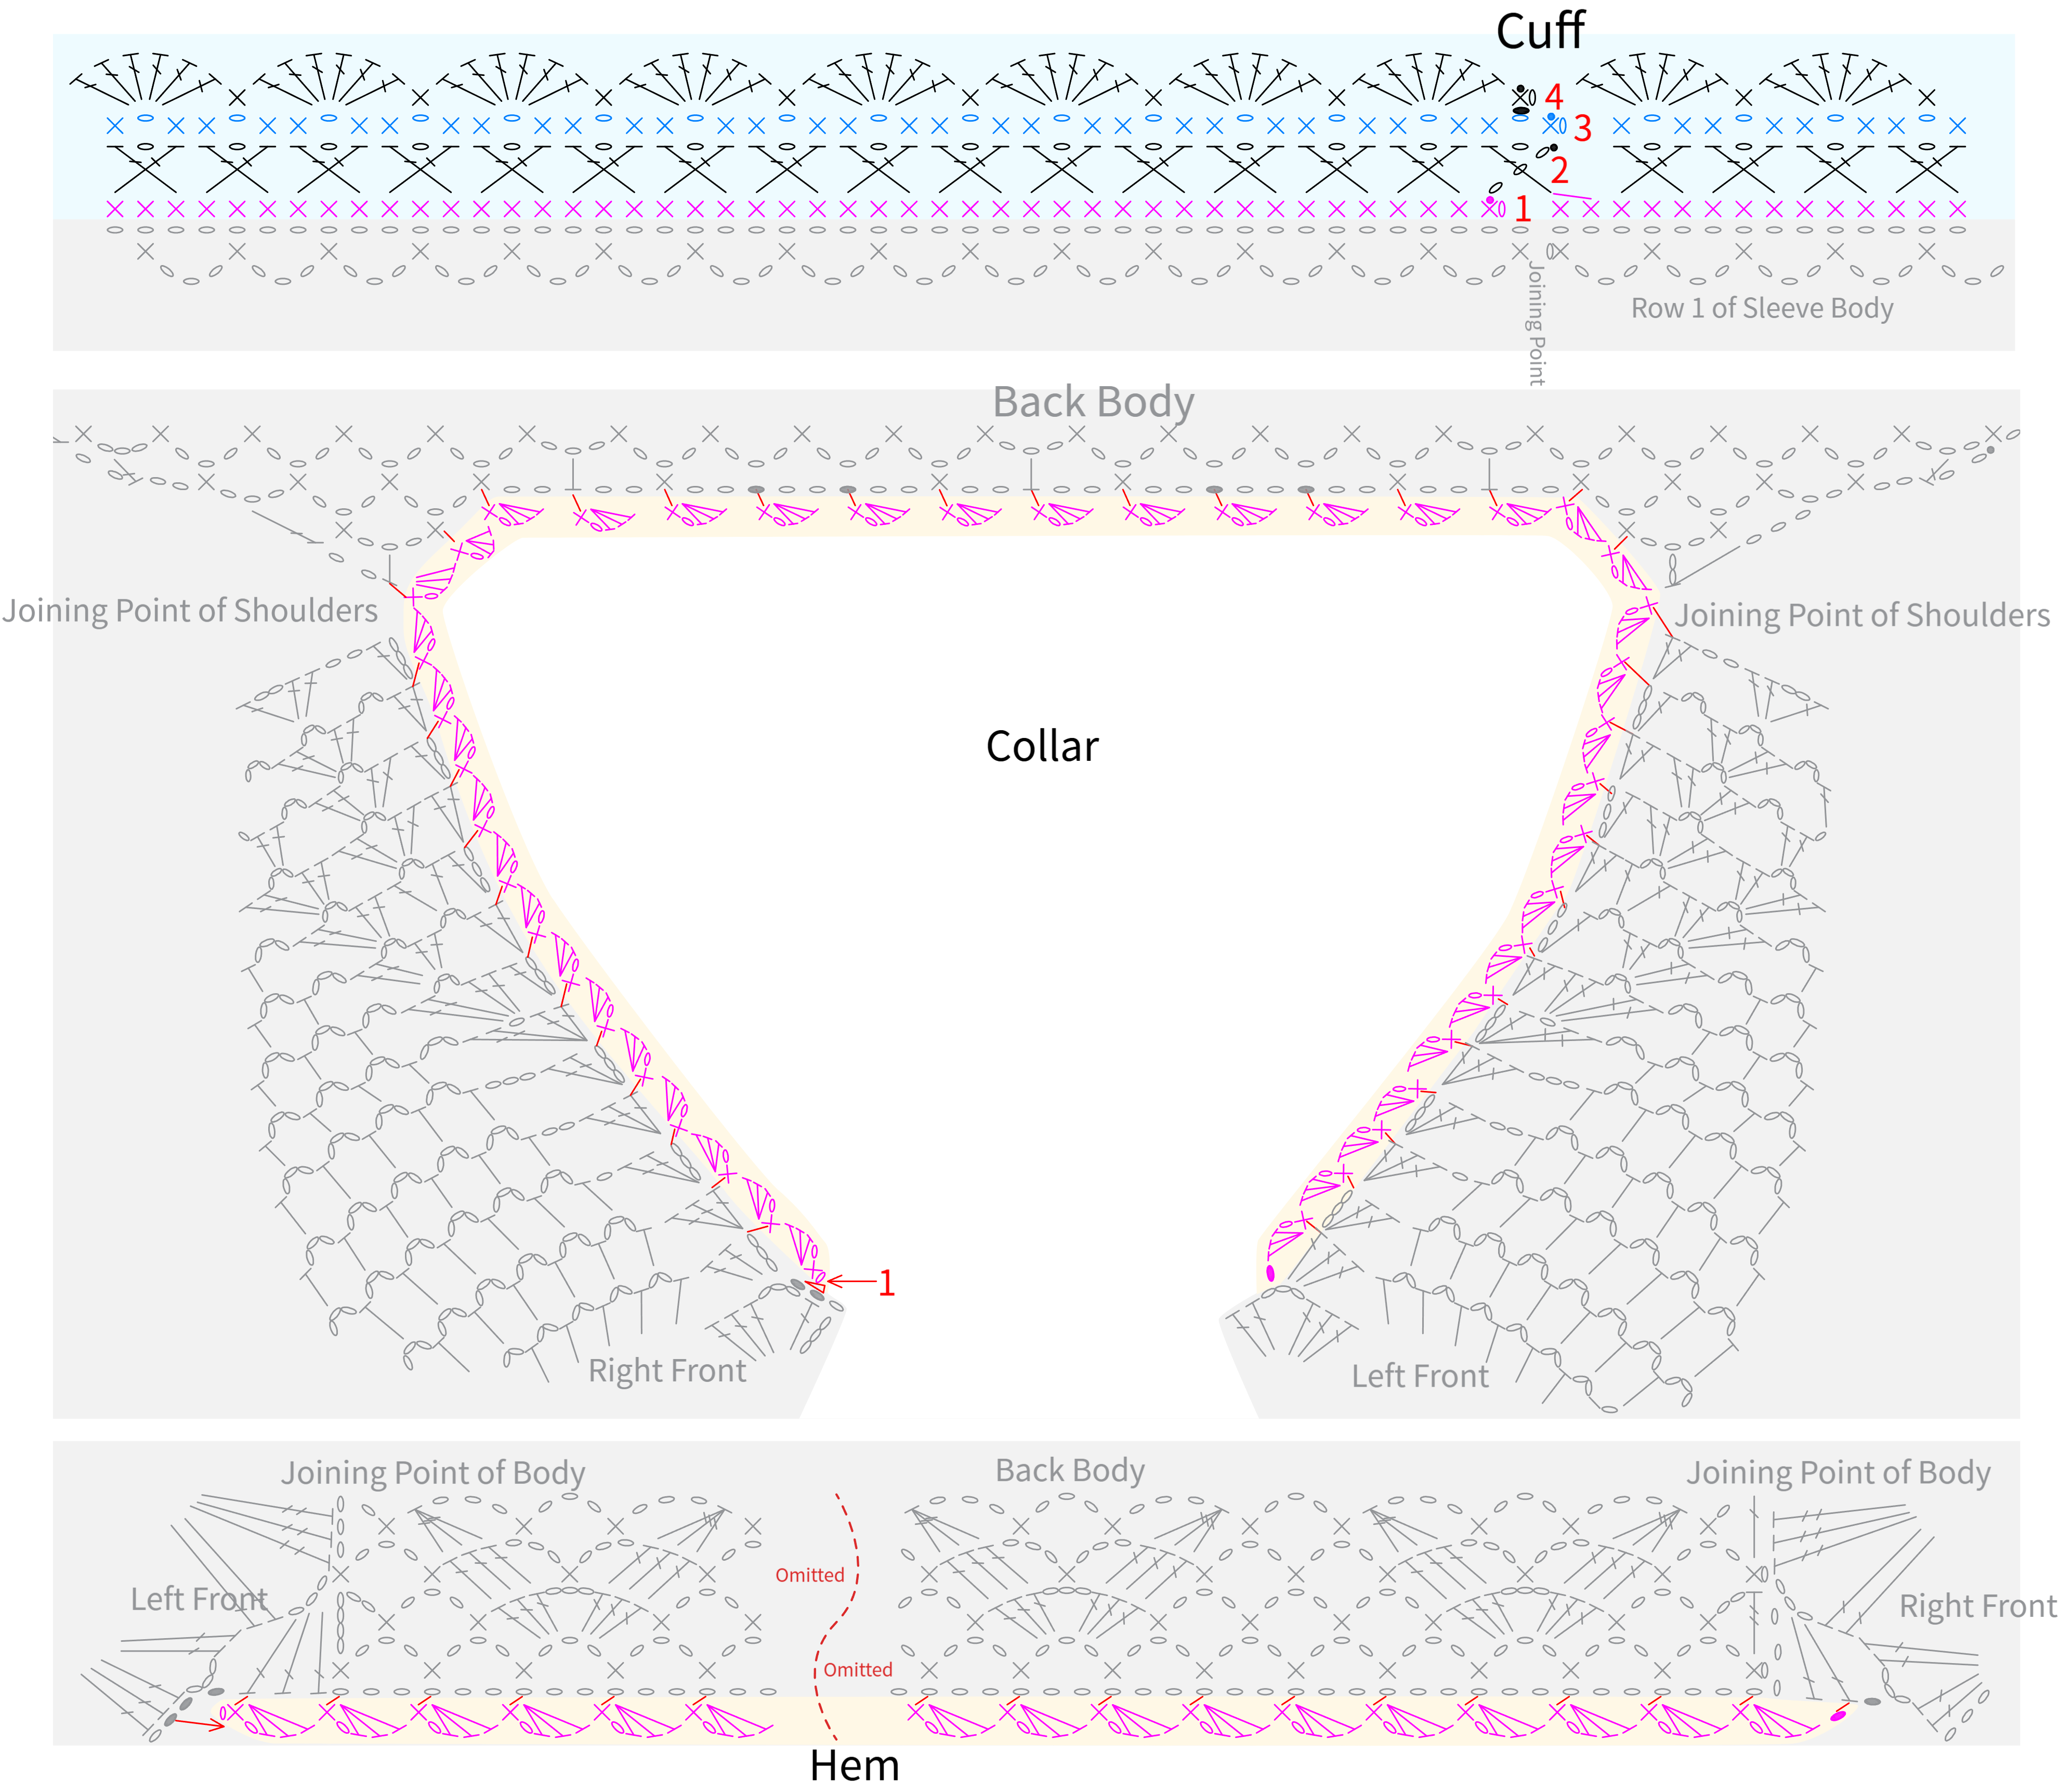
The edging is divided into the cuffs, collar, and bottom edge. First, work the cuff edging counterclockwise around the sleeve body cast on. Next, work the collar edging from right to left along the neckline edges of the front and back bodies. Finally, work the bottom edge from right to left along the front edge and back body cast on. For details, please refer to the video demonstration.
Note: The color segments of the two cuffs should also be roughly identical.
Part 6 Decorations F 79' 22''
Crochet and attach 8 flowers on the sleeves separately. Each flower is divided into the flower core, petals, and sewing. Please refer to the video demonstration for details.
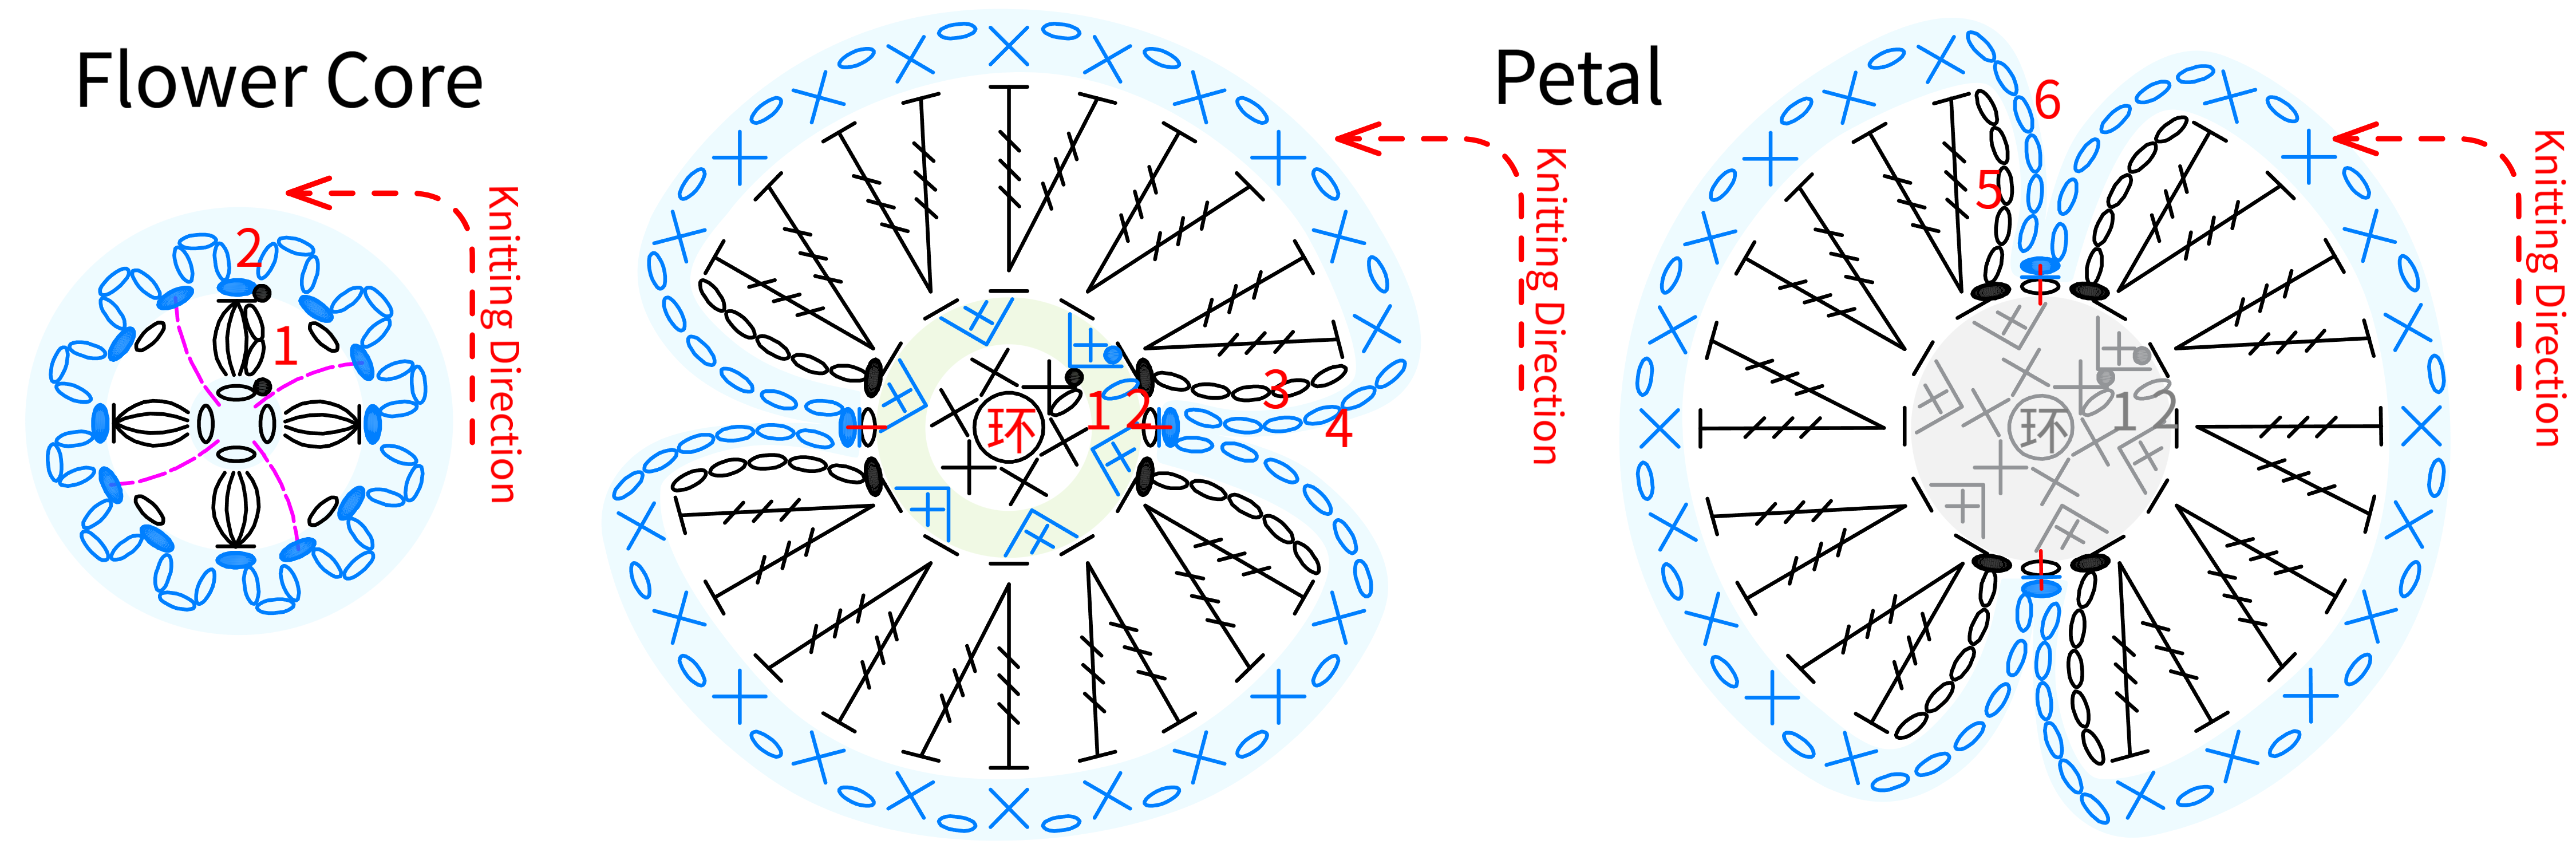
Note: 1. For the second round of the flower core, try to use a color different from the first round.
2. The colors of the petals should stagger with the color segments of the flower core, or adjust according to your preference.
3. For the third and fourth rounds of the petals, the horizontal lines below the stitch indicate to pick up the front loop of the second round stitches (the strand closer to you) when crocheting.
4. For the fourth and fifth rounds of the petals, the horizontal lines below the stitch indicate to pick up the back loop of the second round stitches (the remaining half stitch) when crocheting.
5. After completing, cut a 60cm piece of yarn and sew the flower together, being mindful not to sew the second round of the flower core or the last four rounds of the petals.
Part 7 Buttons G 102' 59''
Sew 3 buttons evenly along the edge of Section 1 on the left front. Please refer to the video demonstration for details.
Note: Cut a 30cm piece of yarn in a color segment similar to the left front for sewing on the buttons.
Made by the community




