
Home / Blanket
Floral Brocade Blanket
Project preview
See the finished project
Pattern format
Instructions
Watch and follow
Video tutorial
This blanket is divided into three parts: motifs, edging, and decorations. First, crochet the central motif. After sewing it together, work the inner edging. Then crochet the surrounding motifs. After sewing them together, make the outer edging. Finally, create and sew on the decorations. This design can also be made into a pillowcase. The pillowcase consists of a front piece and a back piece. Both are made up of motifs and edging. Crochet the front and back pieces separately. Connect them and attach a zipper.
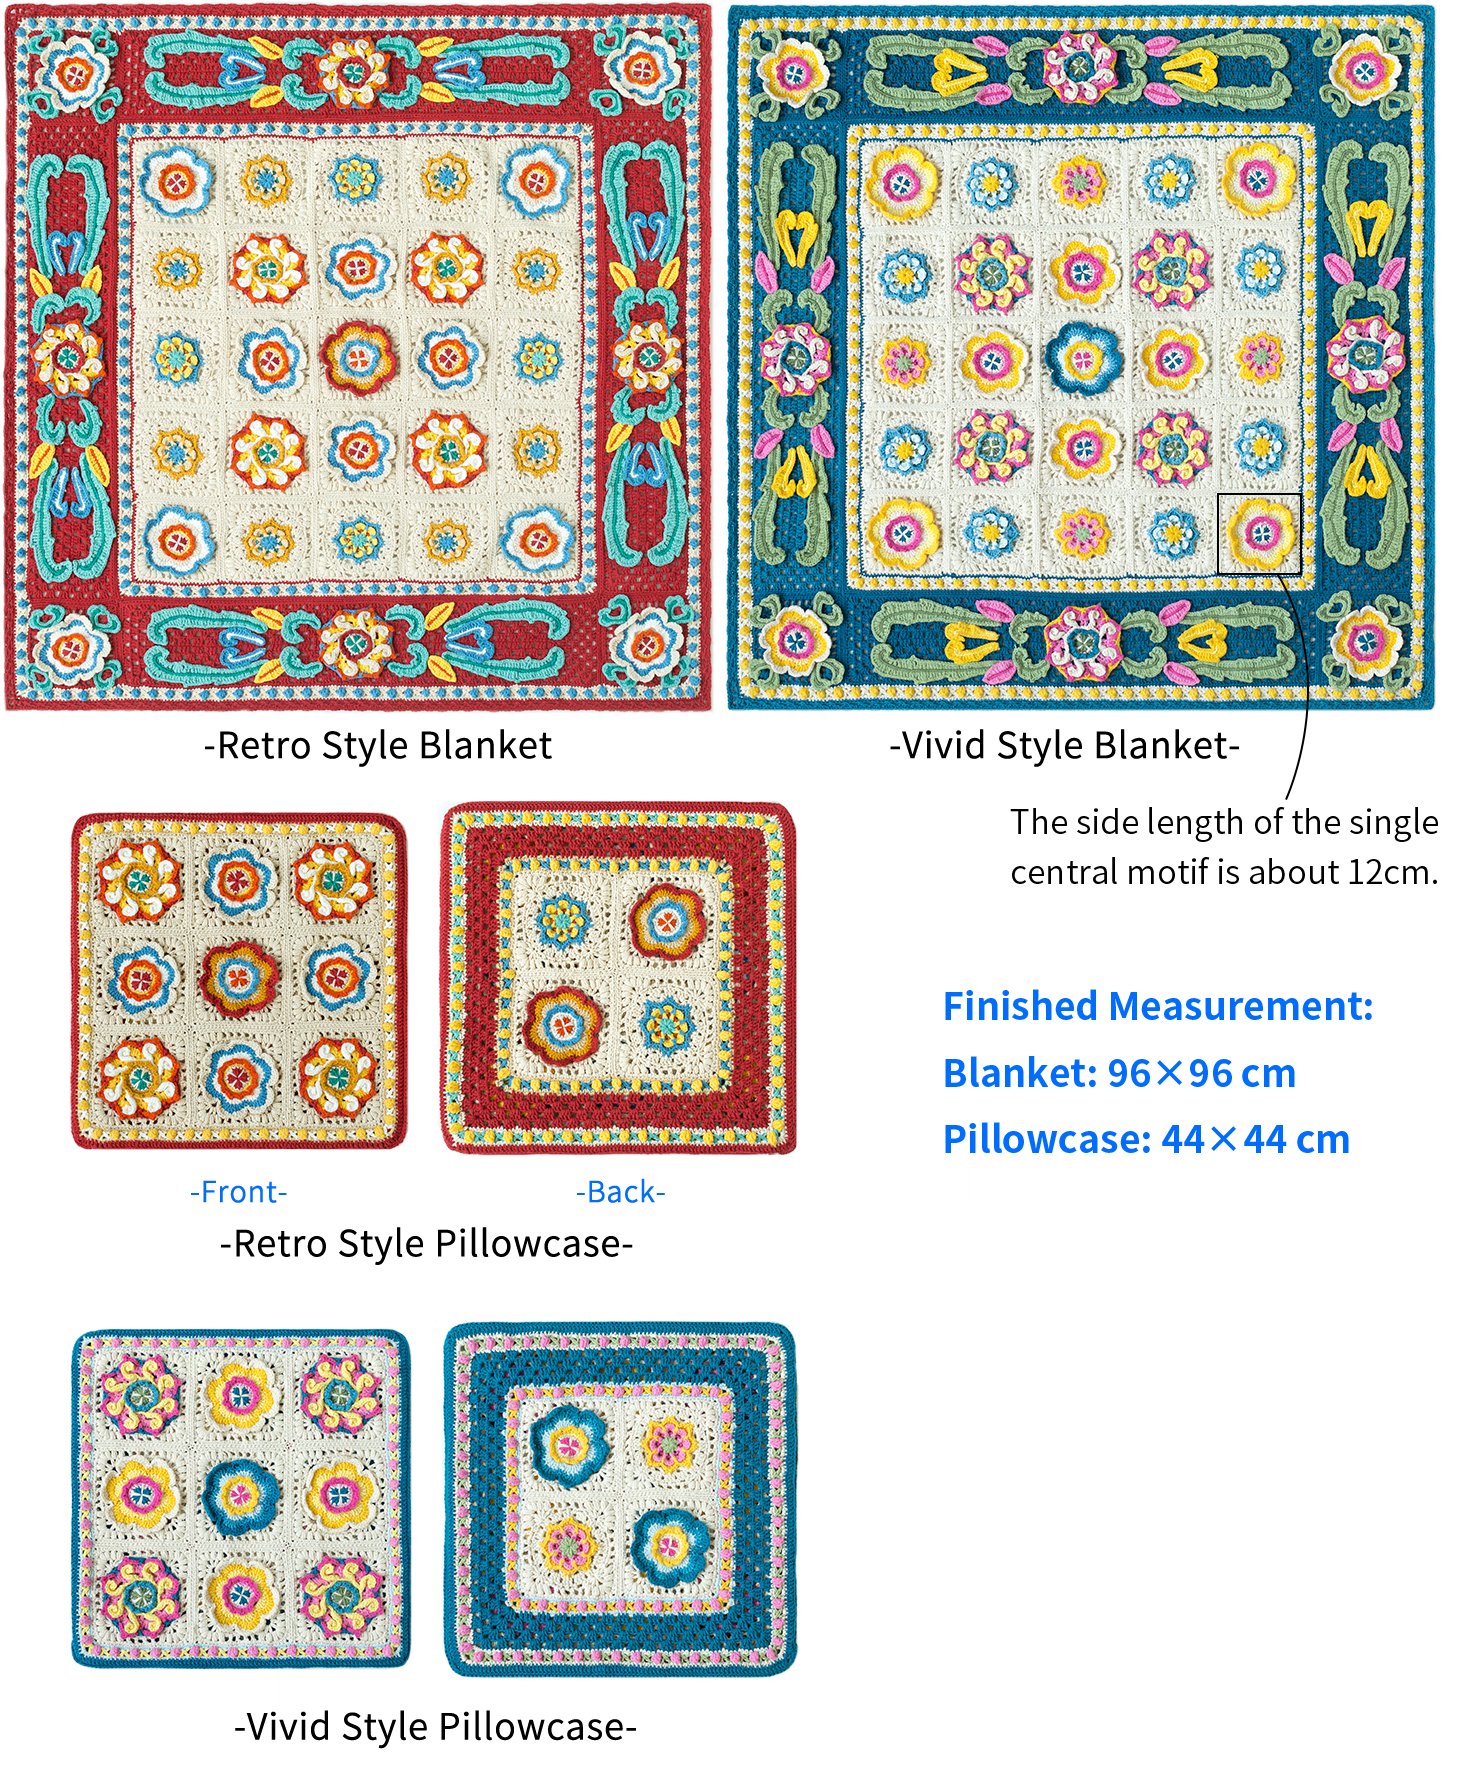
The handcrafted measurements may have an error, the size of the sample is for reference only.
Materials: 4-Ply Combed Cotton & Acrylic Fibre Hand Knitting Yarn
Tool: 7# - 3.00 mm Crochet Hook

Chart Key















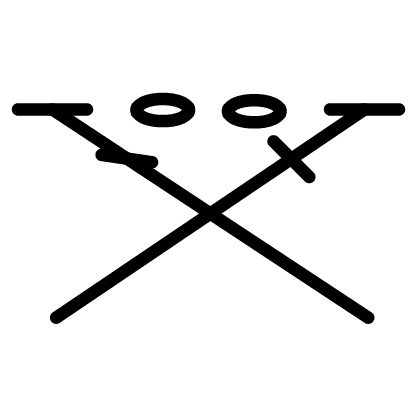

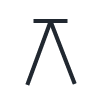
Note:
1. This pattern is making in Chinese crochet pattern terms, and the stitch name is written using American terminology. All measurements in charts are in cm.
Part 1 Central Motifs
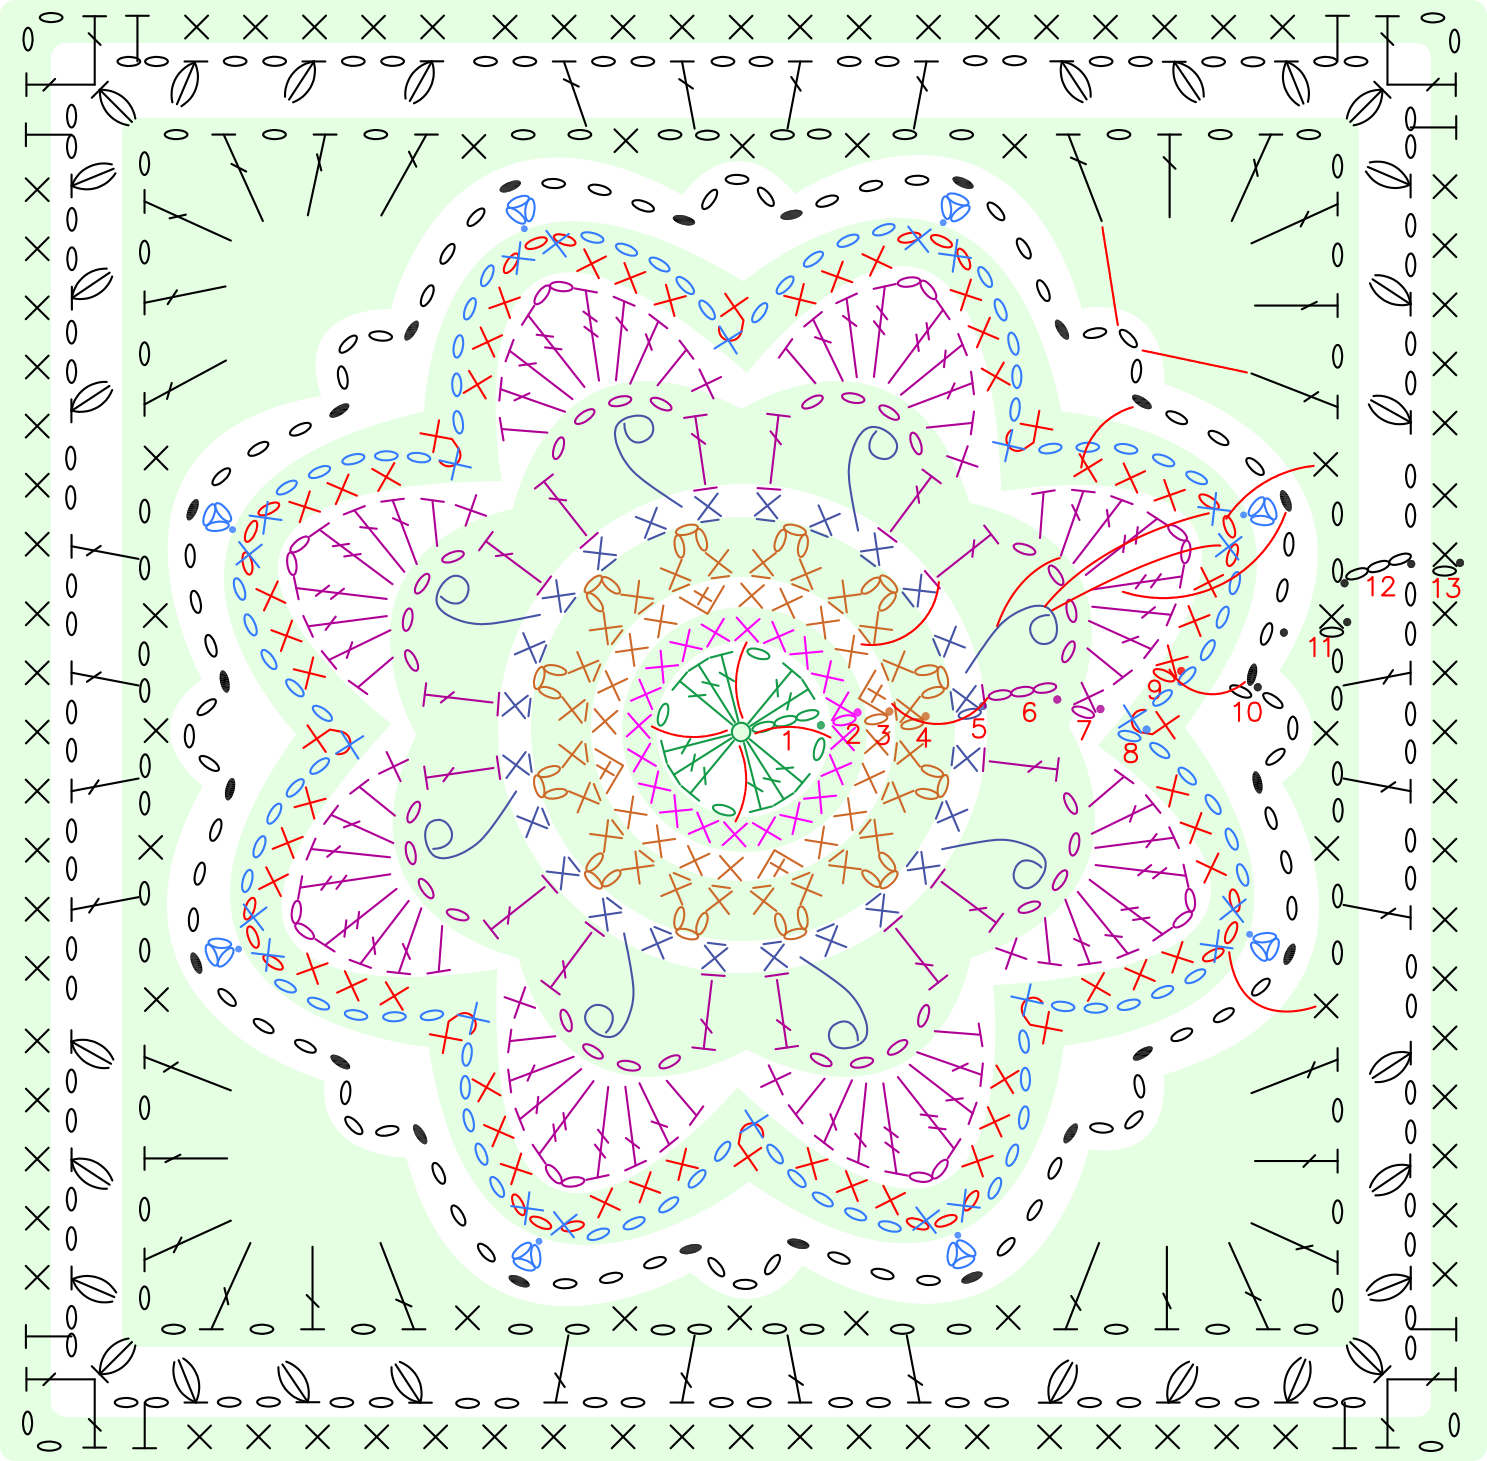
There are three kinds of central motifs: Motif One, Motif Two, and Motif Three.
Note:
① The insertion position for the motif section using the circular needle method is relatively special. To make the chart clearer, only one group of auxiliary lines is retained. Please refer to the video demonstration for the specific insertion position;
② Different letters on the motif indicate different color schemes, but the crocheting method is the same.
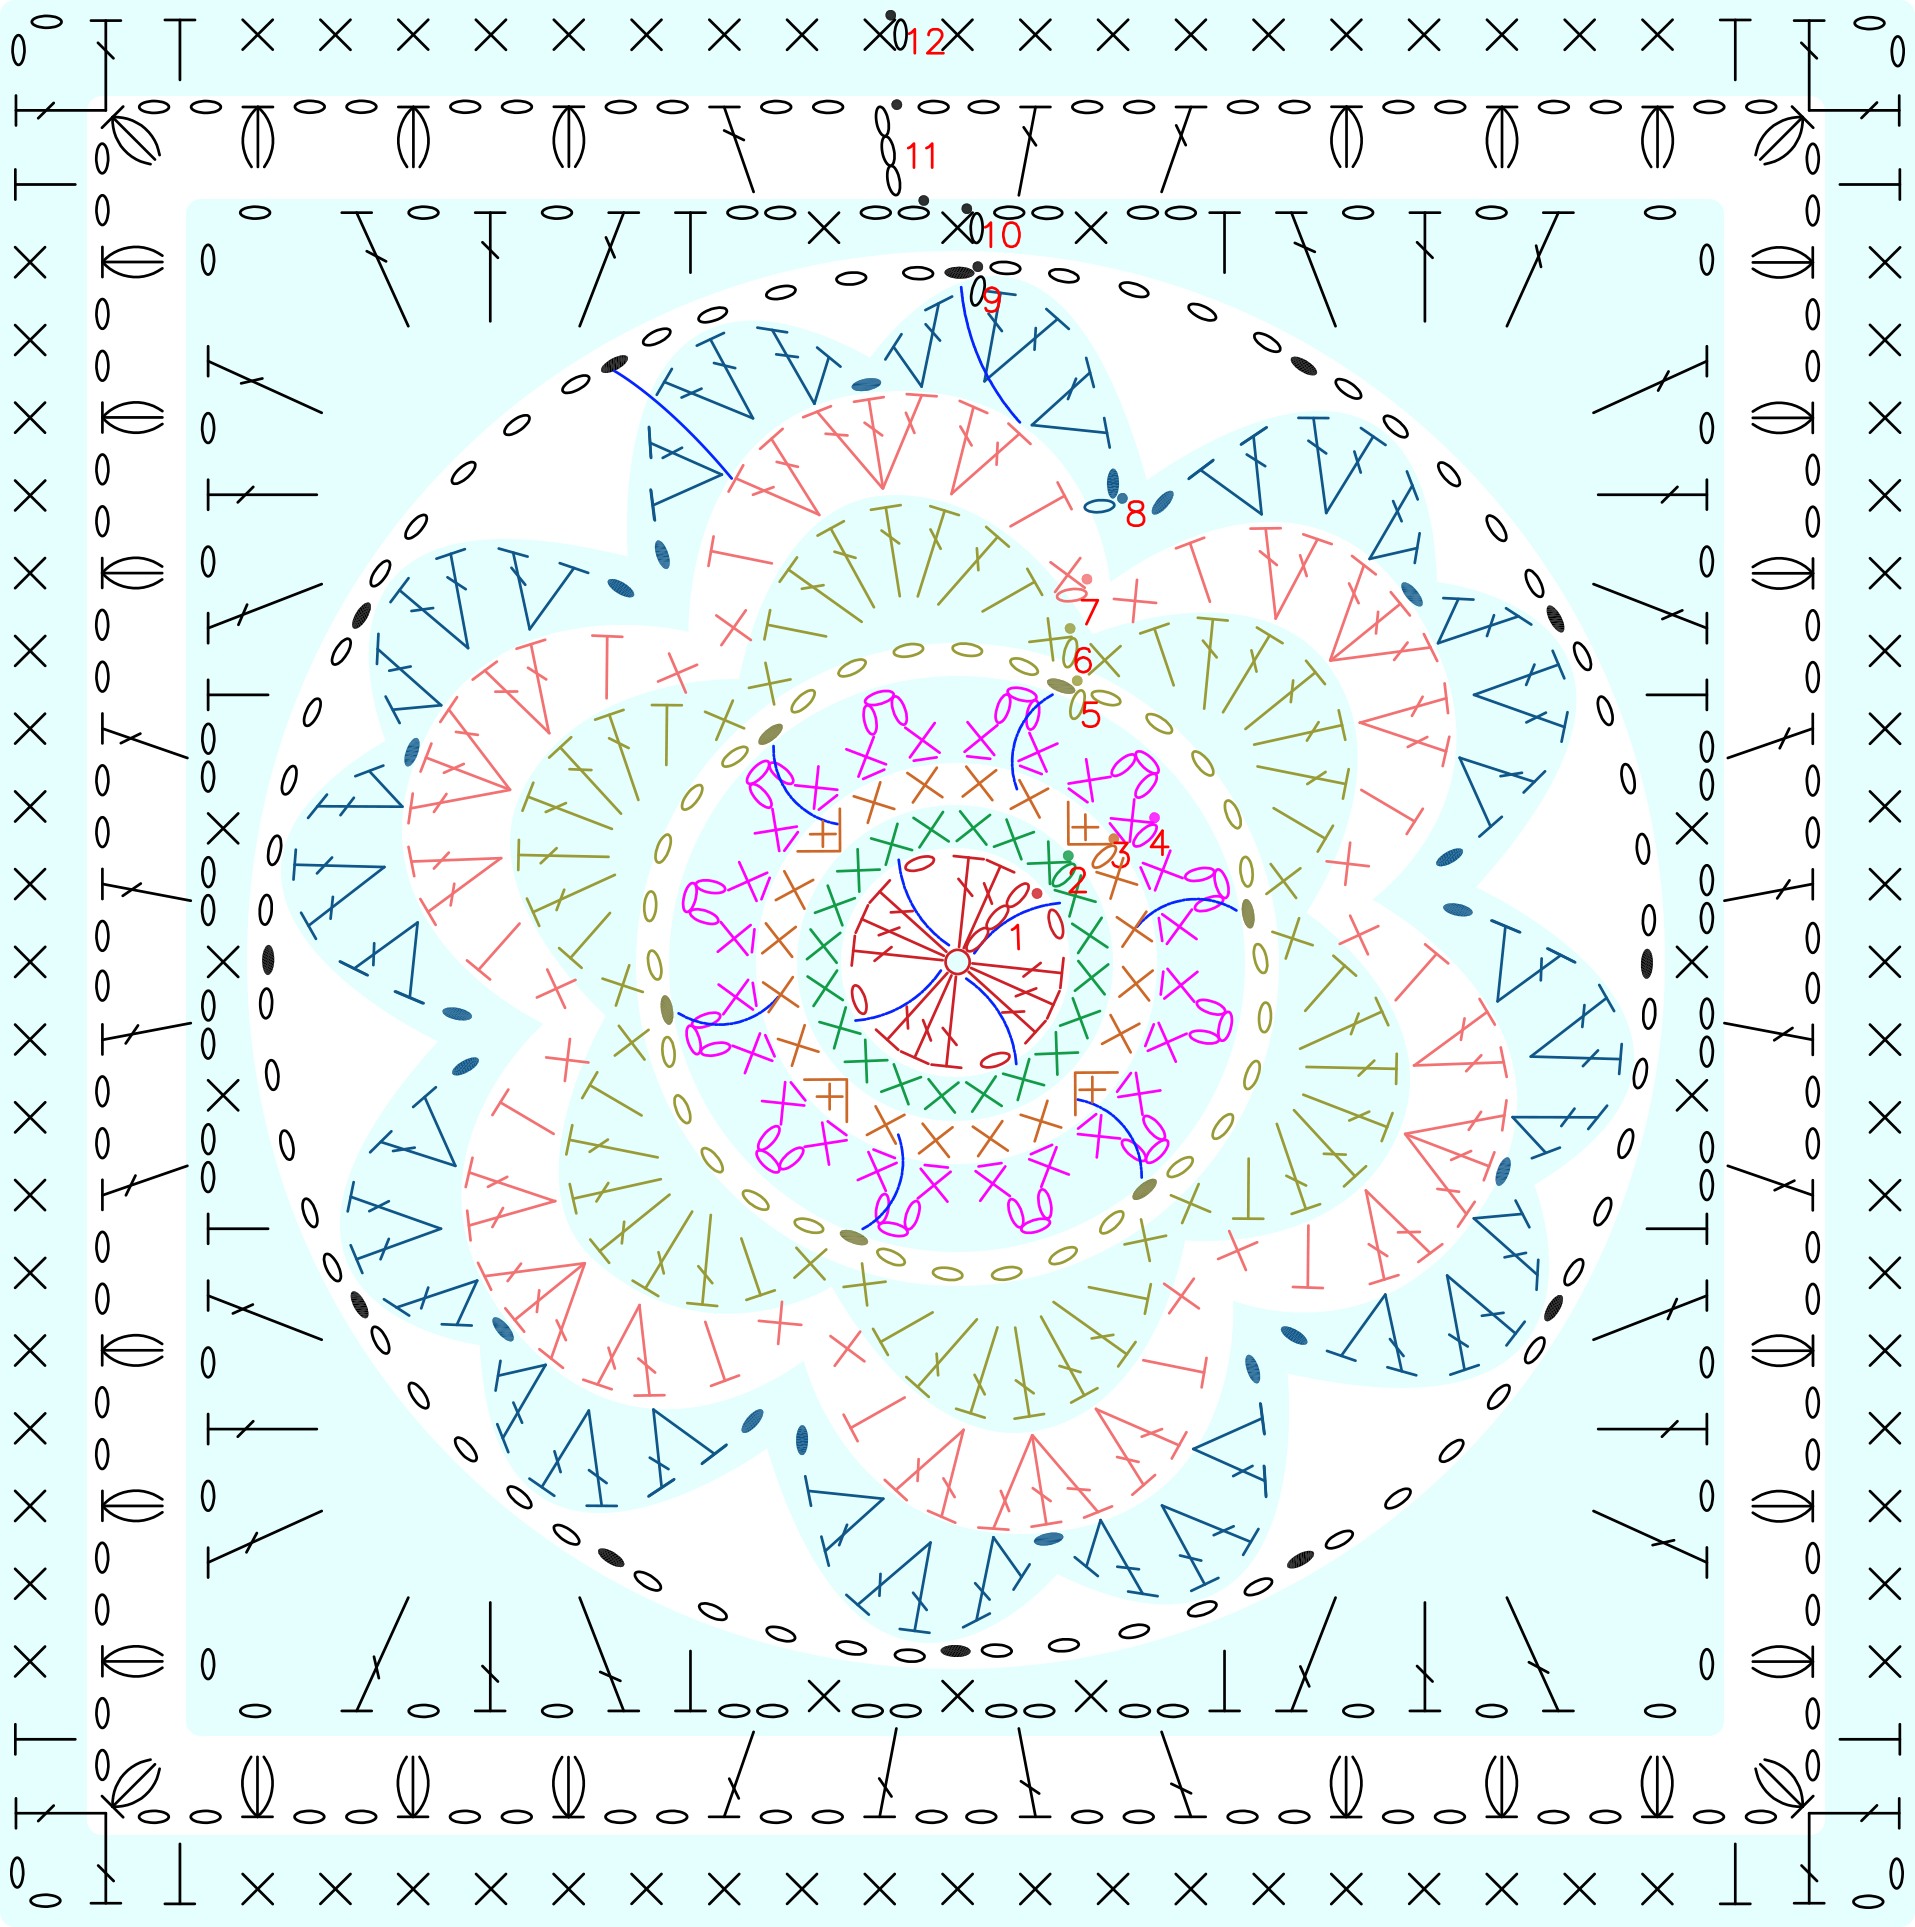
Step 1 Motif One A1 01' 35'' (Part1)
Motif One is started with the magic ring method, crocheting in rounds counterclockwise while switching colors as you go. Please refer to the video demonstration for specifics.
| Retro Style Motif One | |||
| Number of Rounds | Motif One a (Blanket × 1, Pillowcase × 3) | Motif One b (Blanket × 4, Pillowcase × 4) | Motif One c (Blanket × 4) |
| Rnd 1 | 45#Orangeade | 29#Aurora Red | 29#Aurora Red |
| Rnd 2 | 53#Cloud Cream | 53#Cloud Cream | 53#Cloud Cream |
| Rnd 3 | 06#Bright White | 09#Aspen Gold | 09#Aspen Gold |
| Rnd 4 | 42#Blue Moon | 45#Orangeade | 45#Orangeade |
| Rnd 5-6 | 18#New Wheat | 06#Bright White | 53#Cloud Cream |
| Rnd 7 | 40#Golden Rod | 42#Blue Moon | 06#Bright White |
| Rnd 8 | 29#Aurora Red | 53#Cloud Cream | 42#Blue Moon |
| Rnd 9-12 | 53#Cloud Cream | 53#Cloud Cream | 53#Cloud Cream |
| Vivid Style Motif One | |||
| Number of Rounds | Motif One a (Blanket × 1, Pillowcase × 3) | Motif One b (Blanket × 4, Pillowcase × 4) | Motif One c (Blanket × 4) |
| Rnd 1 | 63#Pink Yarrow | 46#Lyons Blue | 46#Lyons Blue |
| Rnd 2 | 19#Whisper White | 19#Whisper White | 19#Whisper White |
| Rnd 3 | 16#Lemonade | 38#Pink Carnation | 38#Pink Carnation |
| Rnd 4 | 09#Aspen Gold | 63#Pink Yarrow | 63#Pink Yarrow |
| Rnd 5-6 | 54#Baby Blue | 16#Lemonade | 19#Whisper White |
| Rnd 7 | 42#Blue Moon | 09#Aspen Gold | 16#Lemonade |
| Rnd 8 | 46#Lyons Blue | 19#Whisper White | 09#Aspen Gold |
| Rnd 9-12 | 19#Whisper White | 19#Whisper White | 19#Whisper White |
Step 2 Motif Two A2 32' 20'' (Part1)
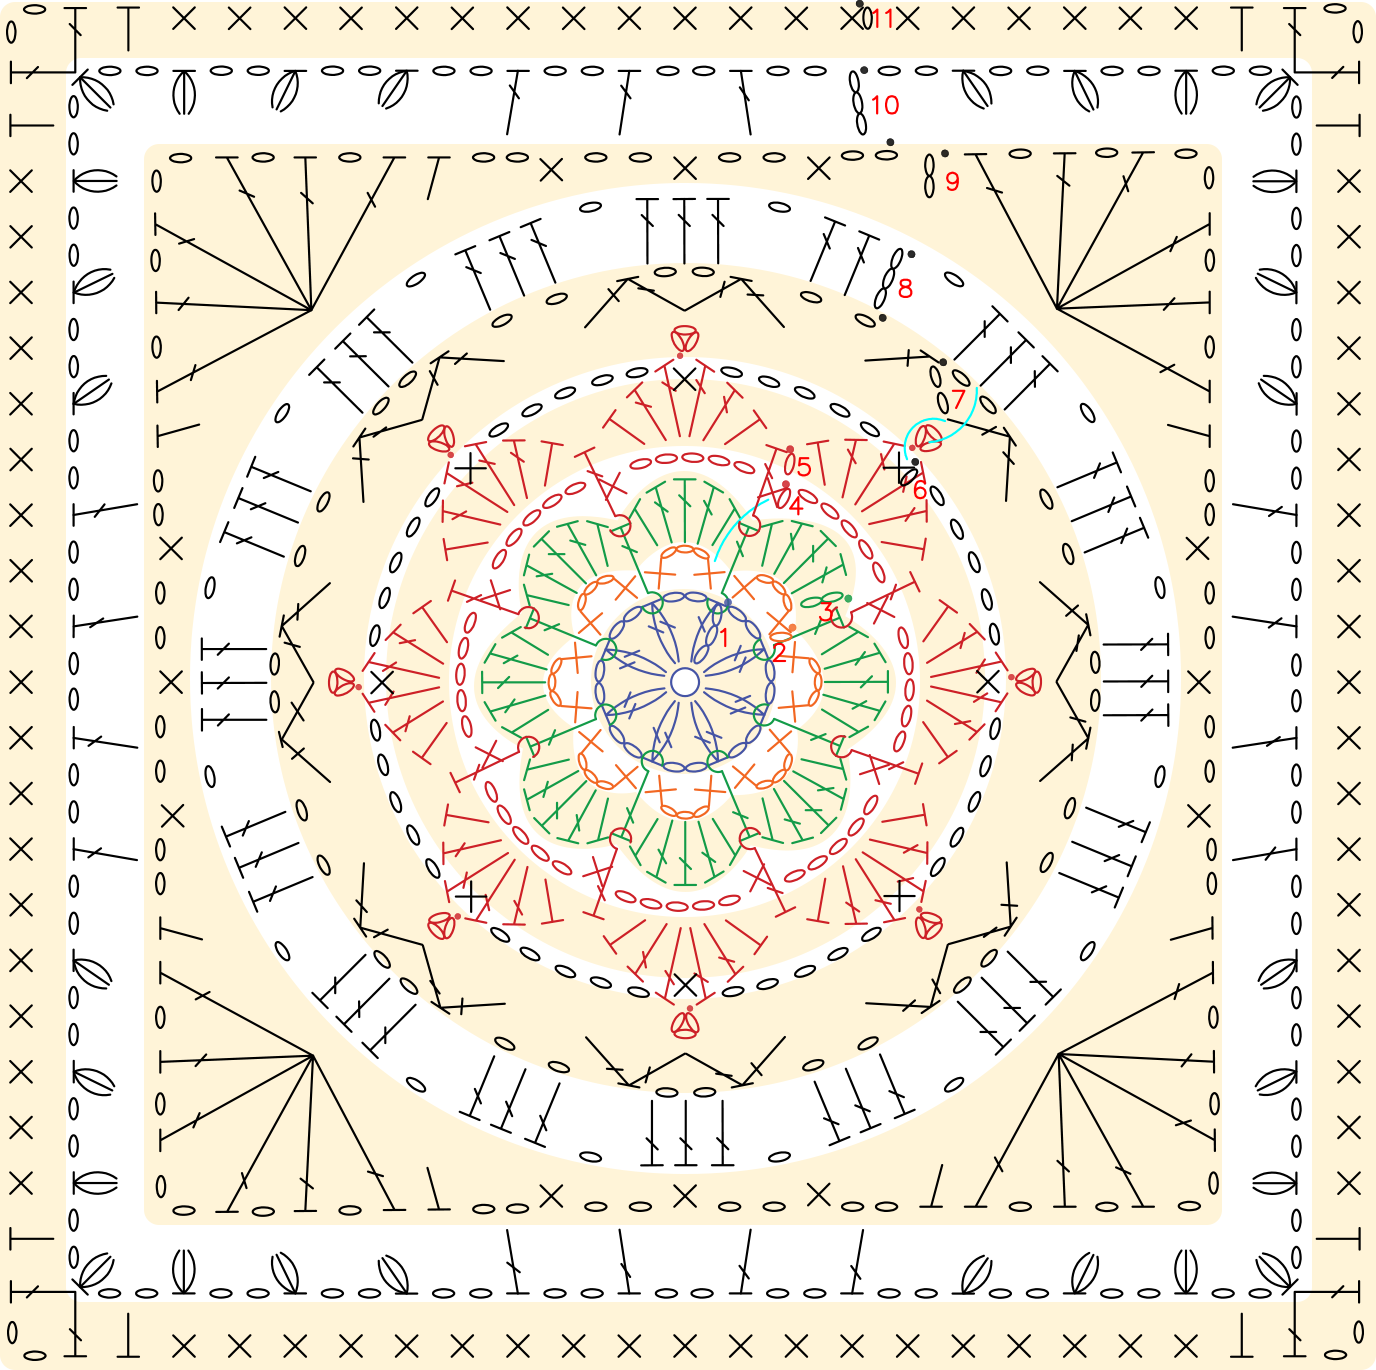
For Motif Two, start with a magic ring and crochet in rounds. You will also need to switch colors while crocheting. Please refer to the video demonstration for specifics.
| Retro Style Motif Two | ||
| Number of Rounds | Motif Two a (Blanket × 8) | Motif Two b (Blanket × 4, Pillowcase × 2) |
| Rnd 1 | 42#Blue Moon | 28#Turquoise |
| Rnd 2 | 22#Viridis | 45#Orangeade |
| Rnd 3 | 18#New Wheat | 09#Aspen Gold |
| Rnd 4-5 | 40#Golden Rod | 42#Blue Moon |
| Rnd 6-11 | 53#Cloud Cream | 53#Cloud Cream |
| Vivid Style Motif Two | ||
| Number of Rounds | Motif Two a (Blanket × 8) | Motif Two b (Blanket × 4, Pillowcase × 2) |
| Rnd 1 | 09#Aspen Gold | 25#Fair Green |
| Rnd 2 | 32#Aspen Green | 63#Pink Yarrow |
| Rnd 3 | 54#Baby Blue | 38#Pink Carnation |
| Rnd 4-5 | 42#Blue Moon | 09#Aspen Gold |
| Rnd 6-11 | 19#Whisper White | 19#Whisper White |
Step 3 Motif Three A3 50' 01'' (Part1)
Use the magic ring method and crochet in rounds. Please refer to the video demonstration for specifics.
| Motif Three (Blanket × 4, Pillowcasse × 4) | ||
| Number of Rounds | Retro Style | Vivid Style |
| Rnd 1 | 22#Viridis | 32#Aspen Green |
| Rnd 2 | 53#Cloud Cream | 19#Whisper White |
| Rnd 3-4 | 40#Golden Rod | 42#Blue Moon |
| Rnd 5 | 06#Bright White | 16#Lemonade |
| Rnd 6-7 | 09#Aspen Gold | 38#Pink Carnation |
| Rnd 8 | 45#Orangeade | 63#Pink Yarrow |
| Rnd 9 | 29#Aurora Red | 46#Lyons Blue |
| Rnd 10-13 | 53#Cloud Cream | 19#Whisper White |
Step 4 Sew Together A4 00' 12'' (Part2)
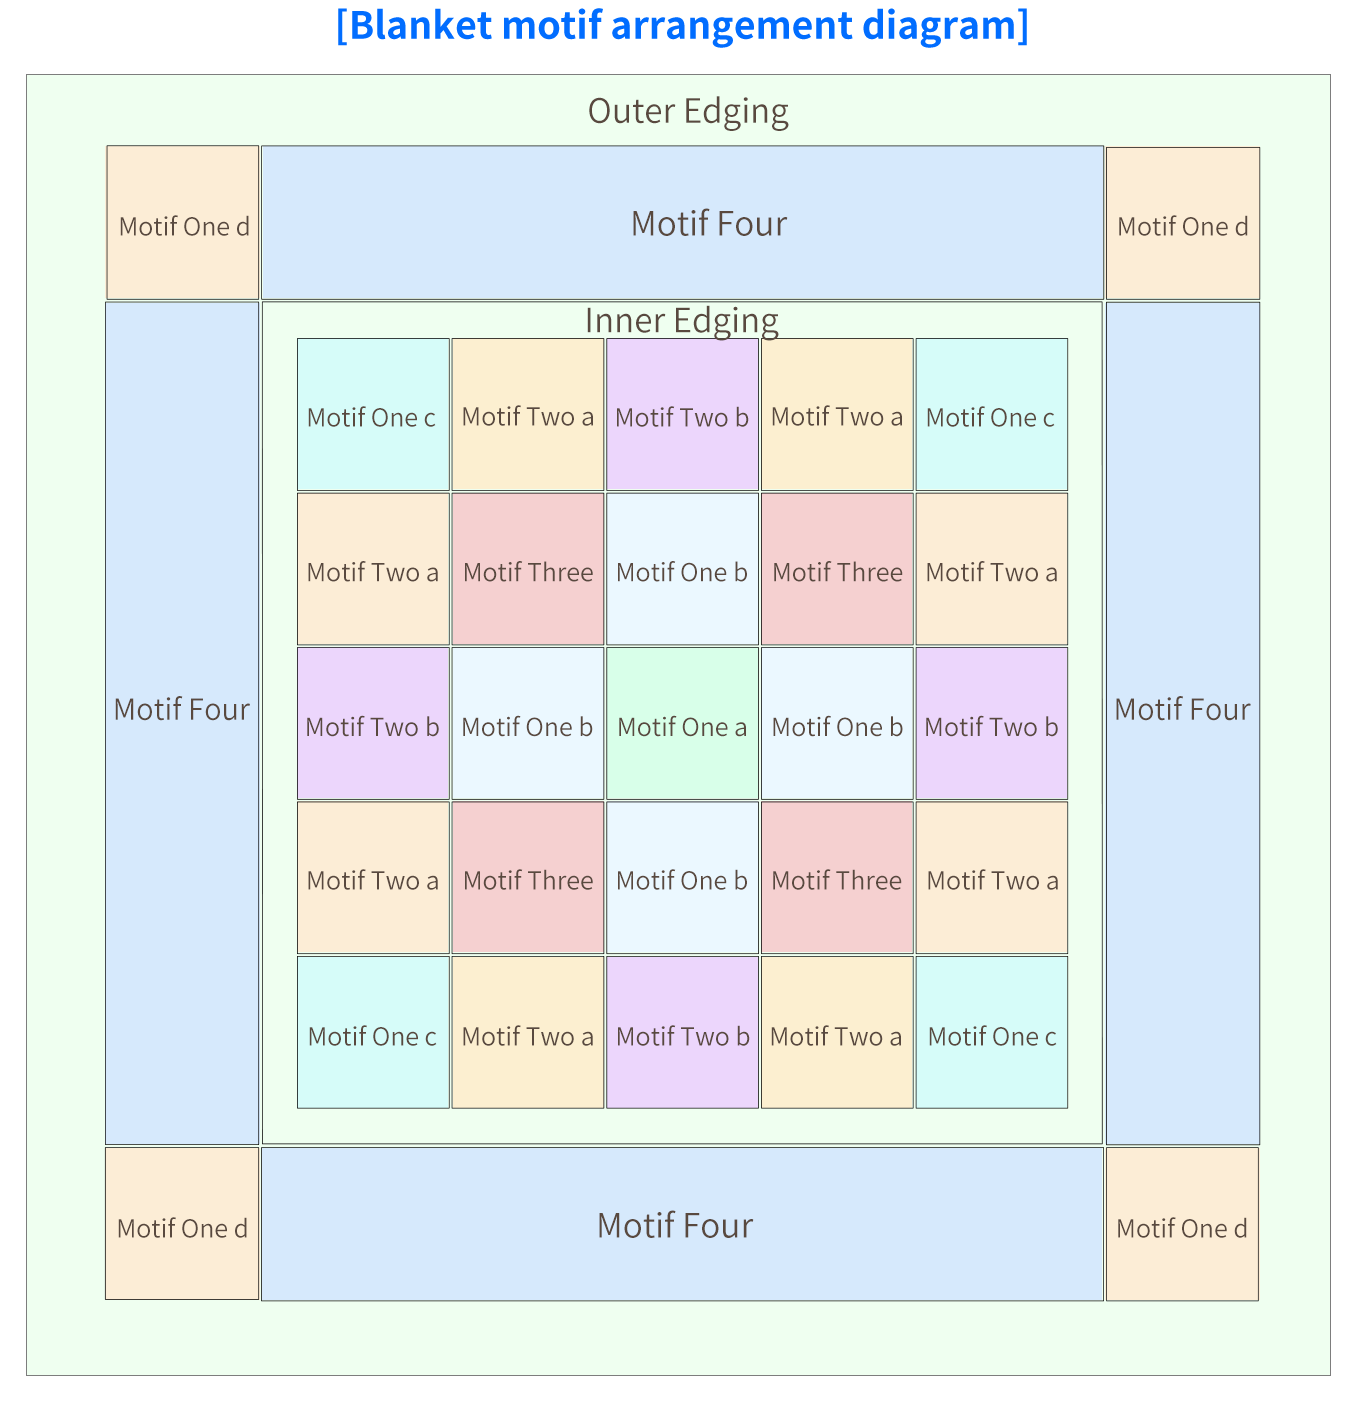
After all the motifs are completed, you can sew them together by referring to the finished product or the motif arrangement diagram. Place the 25 central motifs correctly, sew the horizontal edges first, and then sew the vertical edges. Please refer to the video demonstration for specifics.
| Color Chart of Sewing Together | |
| Retro Style | Vivid Style |
| 29#Aurora Red | 46#Lyons Blue |
Part 2 Inner Edging B 08' 19'' (Part2)
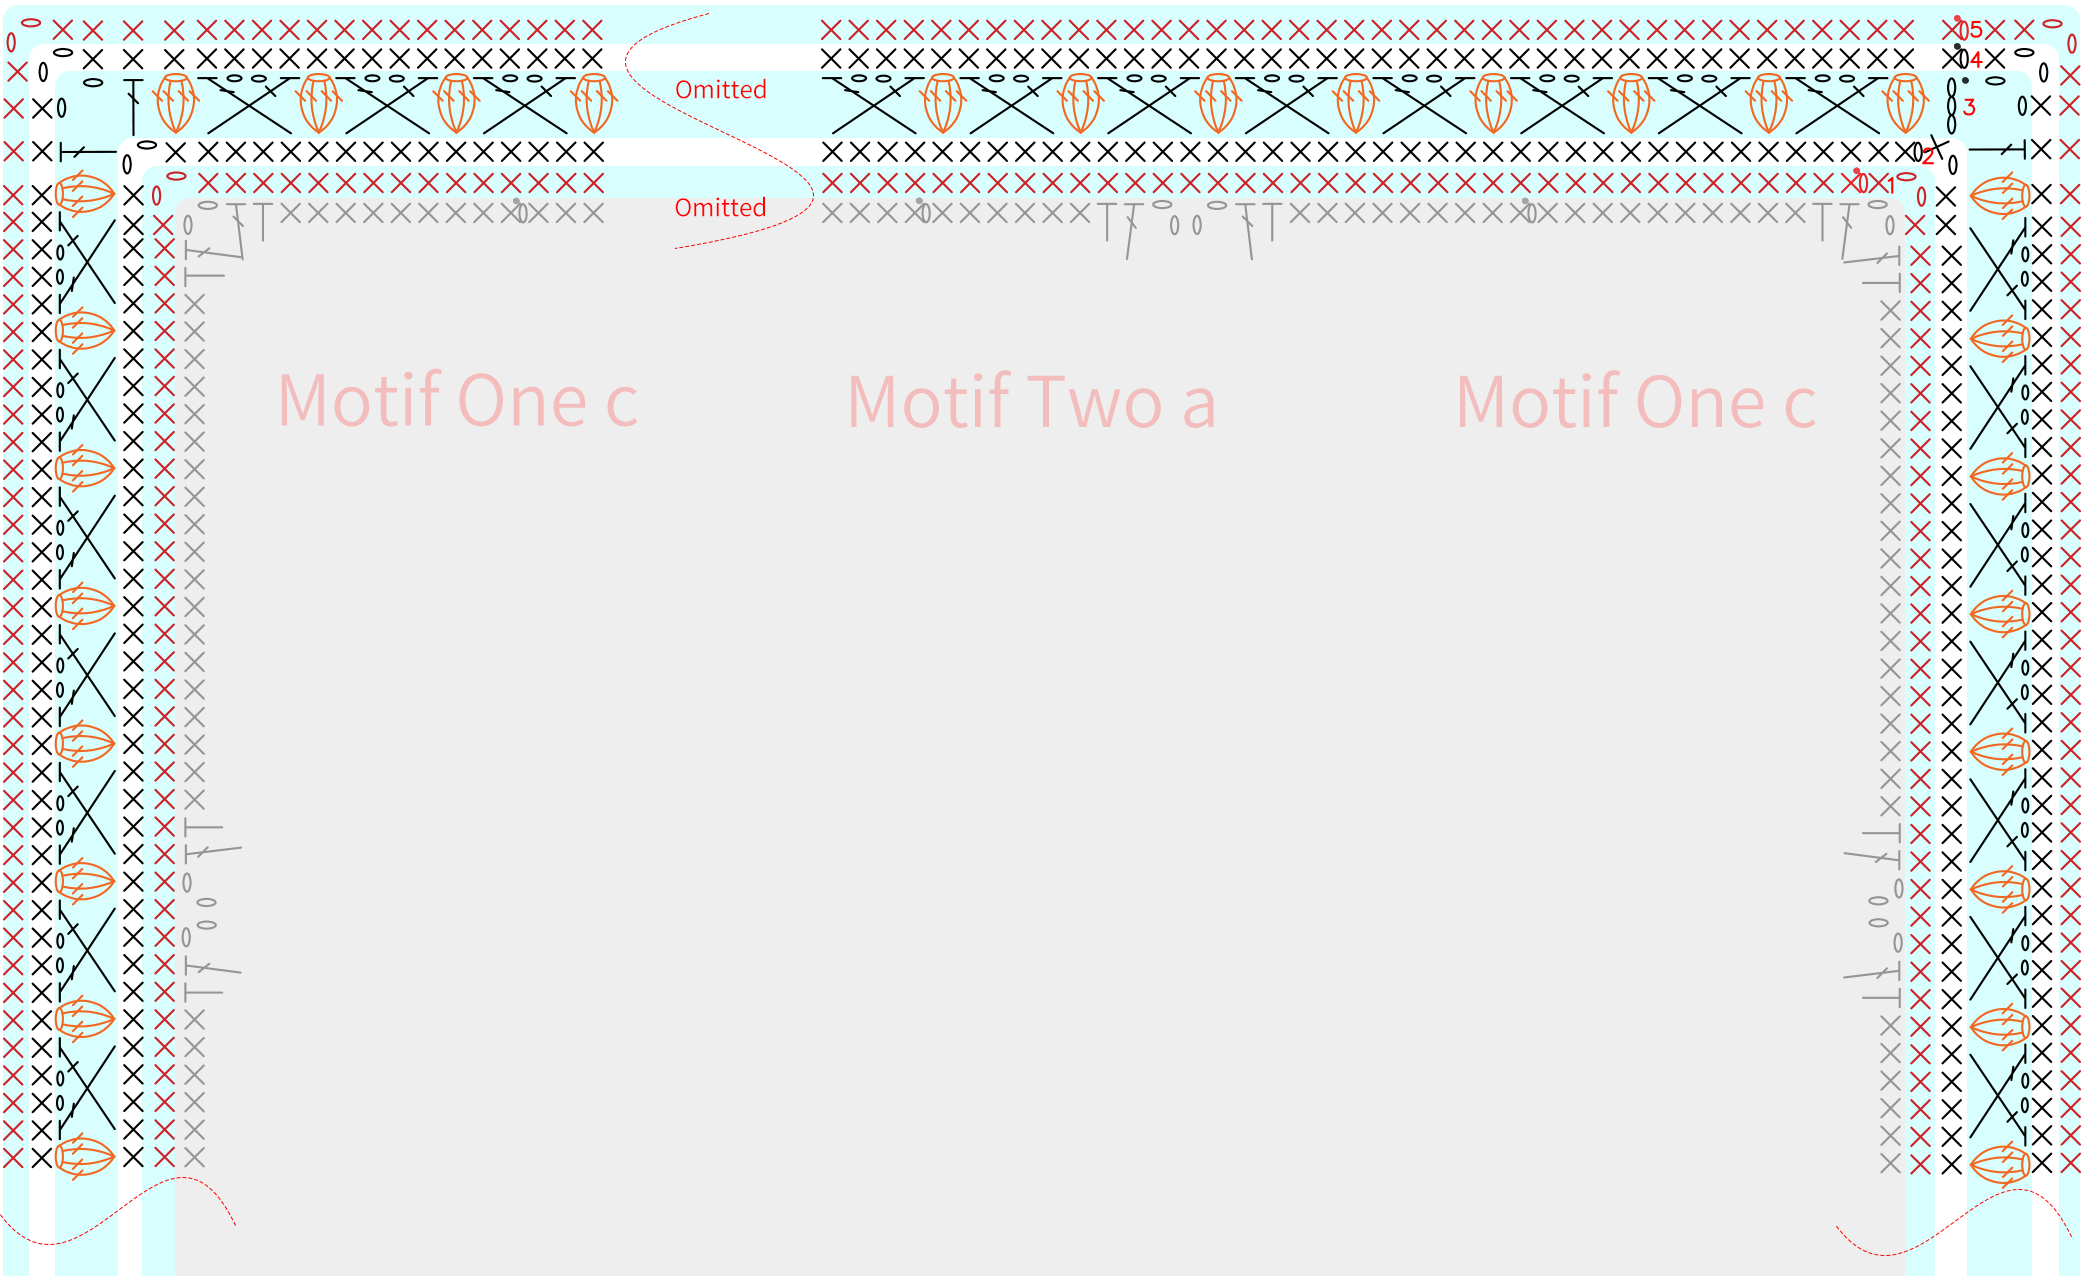
Crochet in rounds around the sewn-on central motif, and you need to switch colors while crocheting. Please refer to the video demonstration for details.
| Inner Edging | |||
| Number of Rounds | Retro Style | Vivid Style | |
| Rnd 1 | 29#Aurora Red | 46#Lyons Blue | |
| Rnd 2 | 53#Cloud Cream | 19#Whisper White | |
| Rnd 3 | Yarn 1 | 53#Cloud Cream | 19#Whisper White |
| Yarn 2 | 42#Blue Moon | 09#Aspen Gold | |
| Rnd 4 | 53#Cloud Cream | 19#Whisper White | |
| Rnd 5 | 29#Aurora Red | 46#Lyons Blue | |
Part 3 Surrounding Motifs C 20' 15'' (Part2)
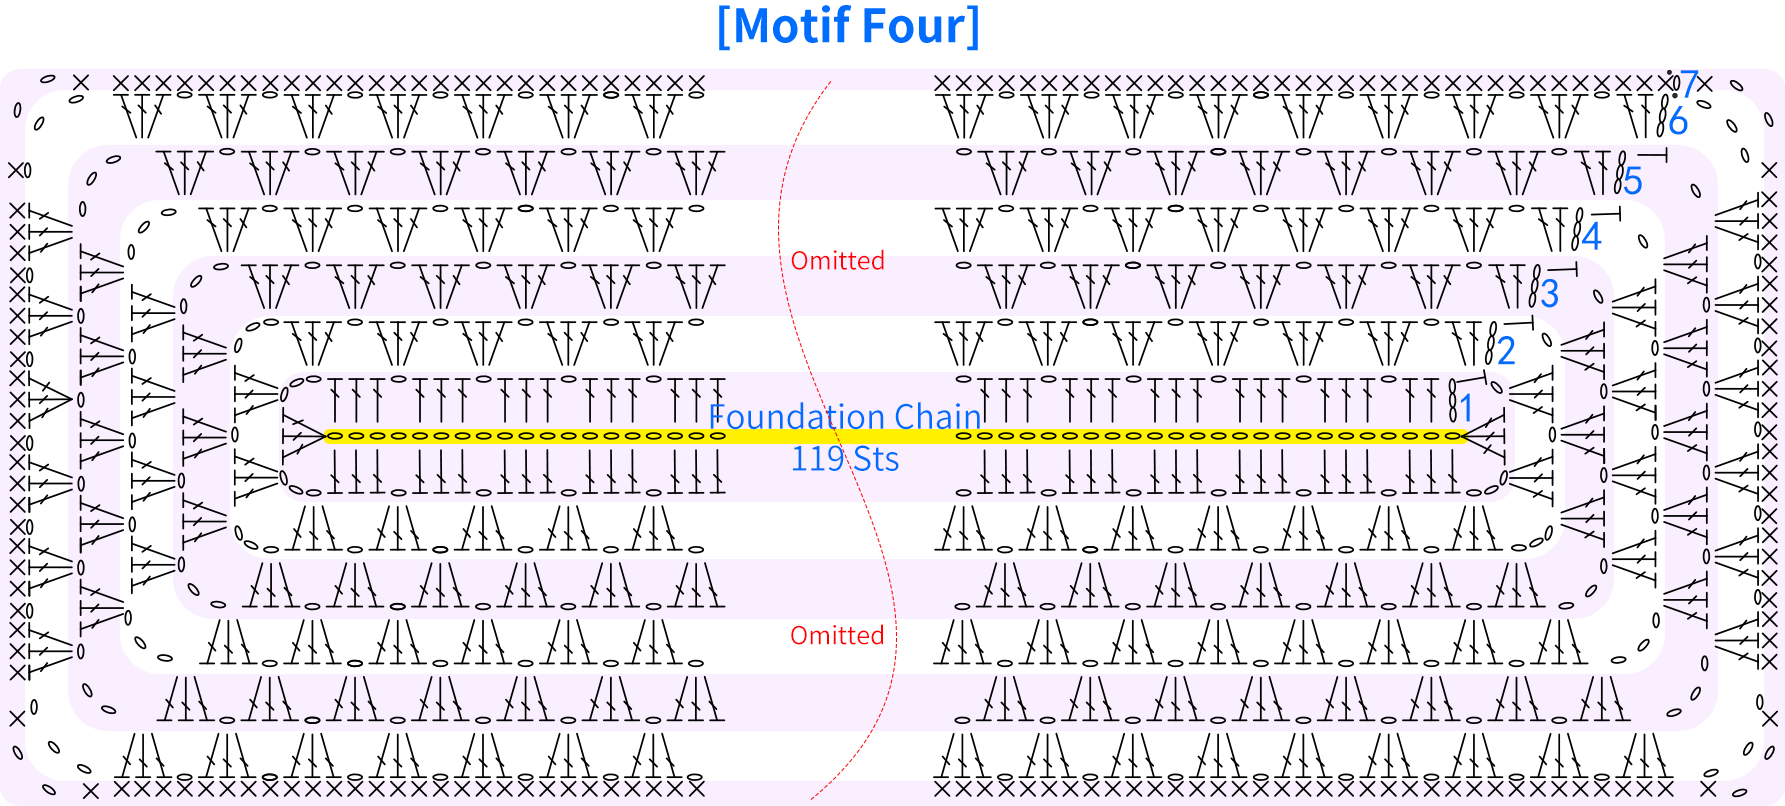
The surrounding motifs include Motif One D and Motif Four. The crocheting method of Motif One D is identical to Central Motif One, except for the contrasting color. Motif Four uses the chain cast on method and is crocheted in rounds around the starting point. After completion, refer to the finished product or motif arrangement diagram to sew it onto the inner border edges. For specifics, please refer to the video demonstration.
| Surrounding Motifs --- Motif One d (Blanket × 4) | ||
| Number of Rounds | Retro Style | Vivid Style |
| Rnd 1 | 29#Aurora Red | 46#Lyons Blue |
| Rnd 2 | 53#Cloud Cream | 19#Whisper White |
| Rnd 3 | 09#Aspen Gold | 38#Pink Carnation |
| Rnd 4 | 45#Orangeade | 63#Pink Yarrow |
| Rnd 5-6 | 06#Bright White | 16#Lemonade |
| Rnd 7 | 42#Blue Moon | 09#Aspen Gold |
| Rnd 8 | 53#Cloud Cream | 19#Whisper White |
| Rnd 9-12 | 29#Aurora Red | 46#Lyons Blue |
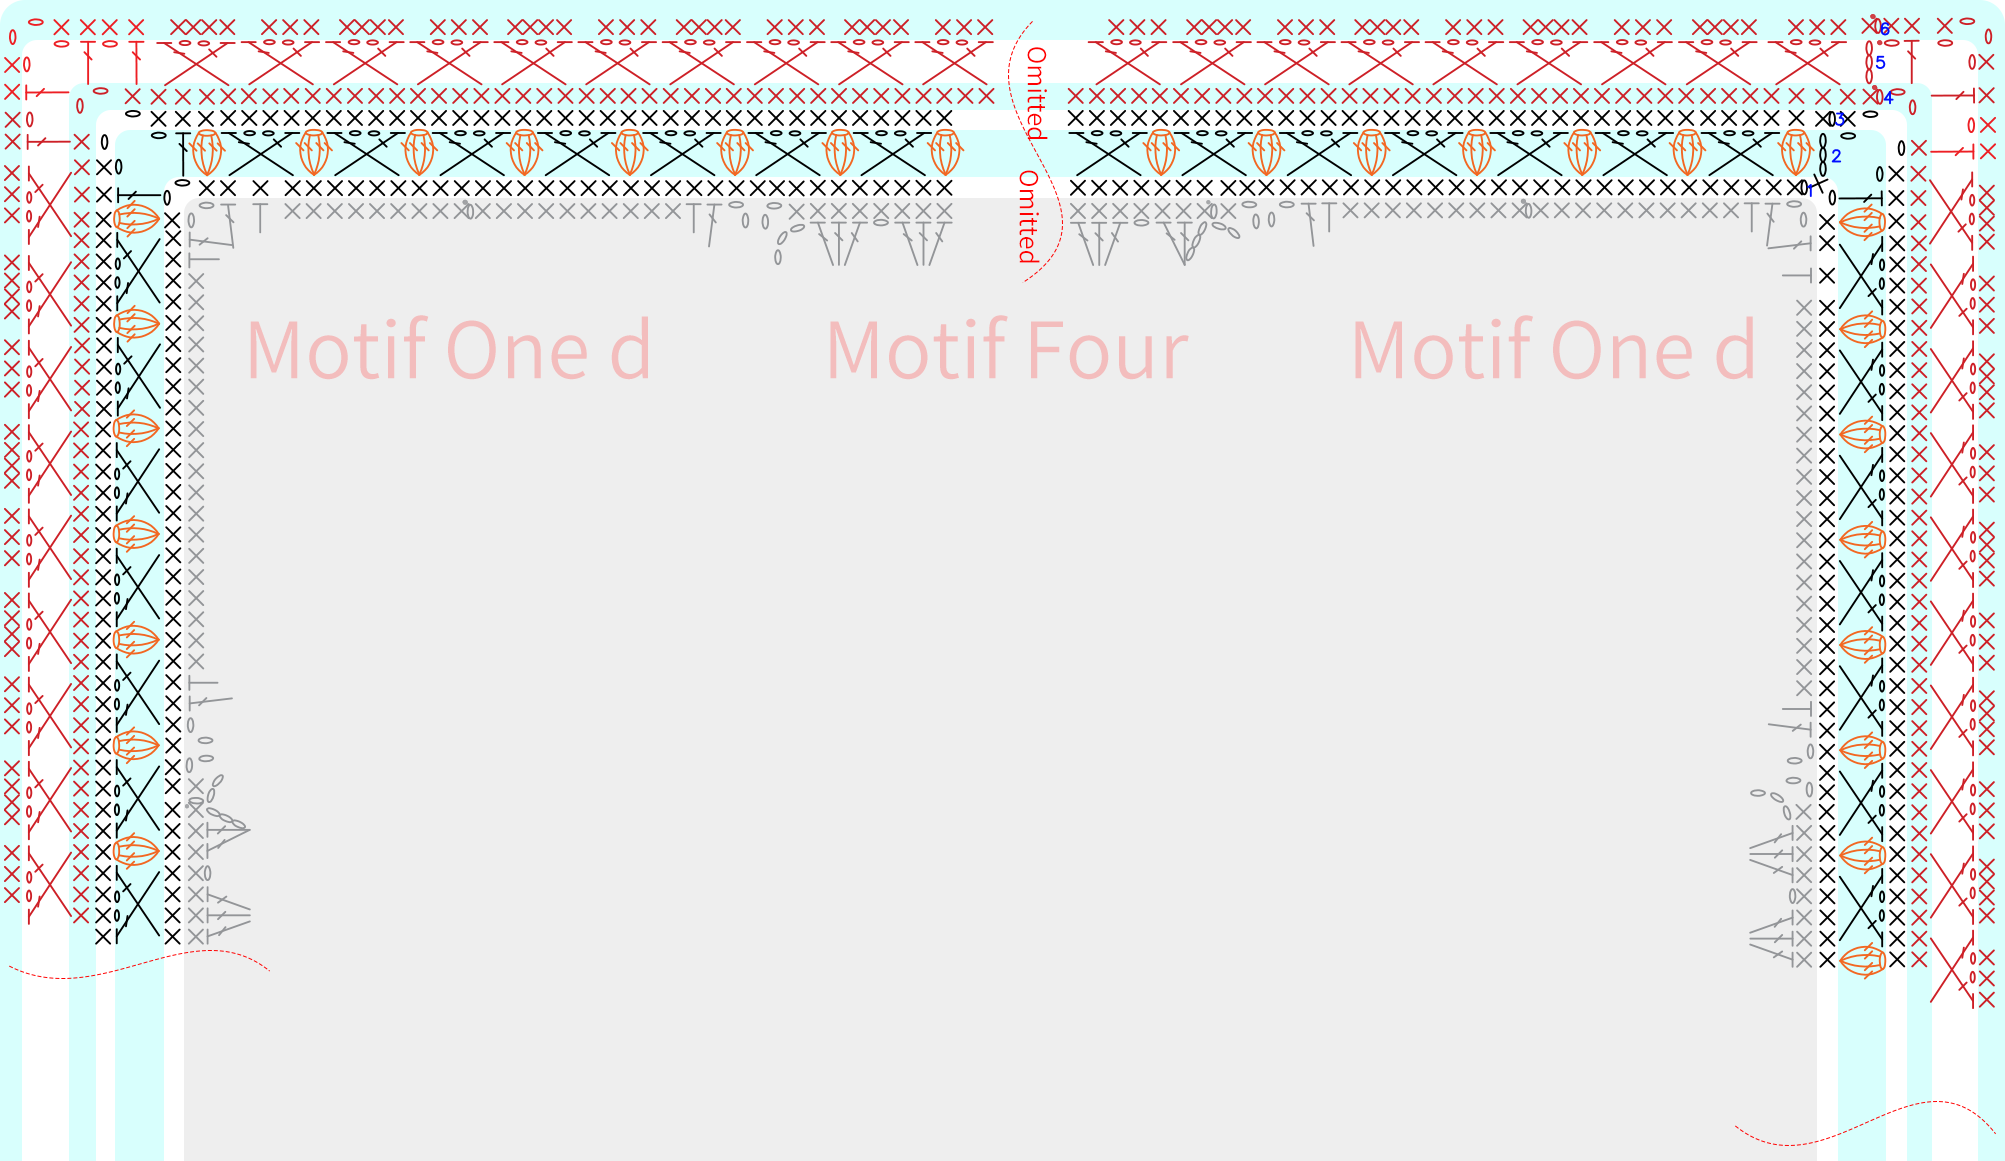
Part 4 Outer Edging D 29' 16'' (Part2)
The outer edging is crocheted around the edges of the motifs that have already been joined, in rounds. The method is similar to crocheting the inner motif edging. Please refer to the video demonstration for specifics.
| Outer Edging | |||
| Number of Rounds | Retro Style | Vivid Style | |
| Rnd 1 | 53#Cloud Cream | 19#Whisper White | |
| Rnd 2 | Yarn 1 | 53#Cloud Cream | 19#Whisper White |
| Yarn 2 | 42#Blue Moon | 09#Aspen Gold | |
| Rnd 3 | 53#Cloud Cream | 19#Whisper White | |
| Rnd 4-6 | 29#Aurora Red | 46#Lyons Blue | |
Part 5 Decorations E 29' 53'' (Part2)
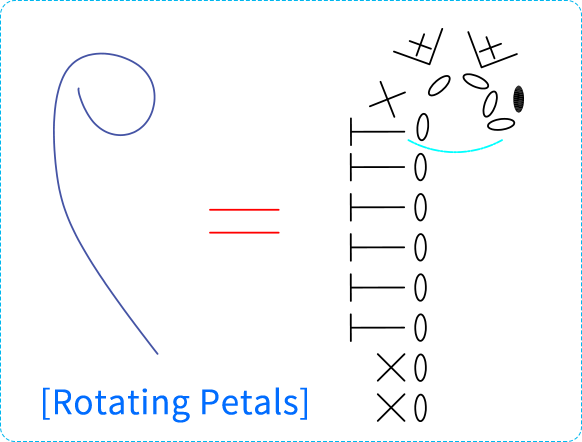
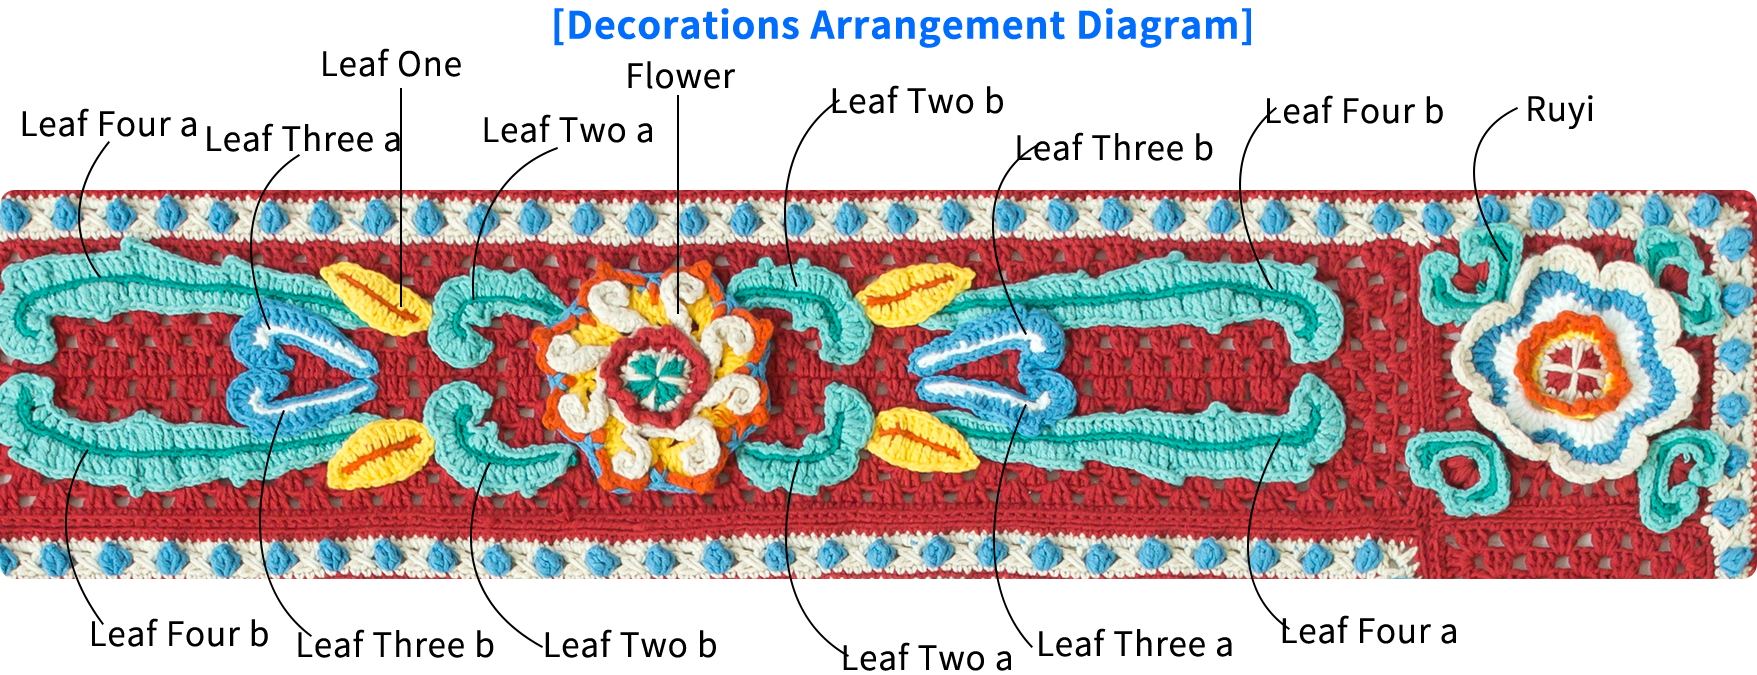
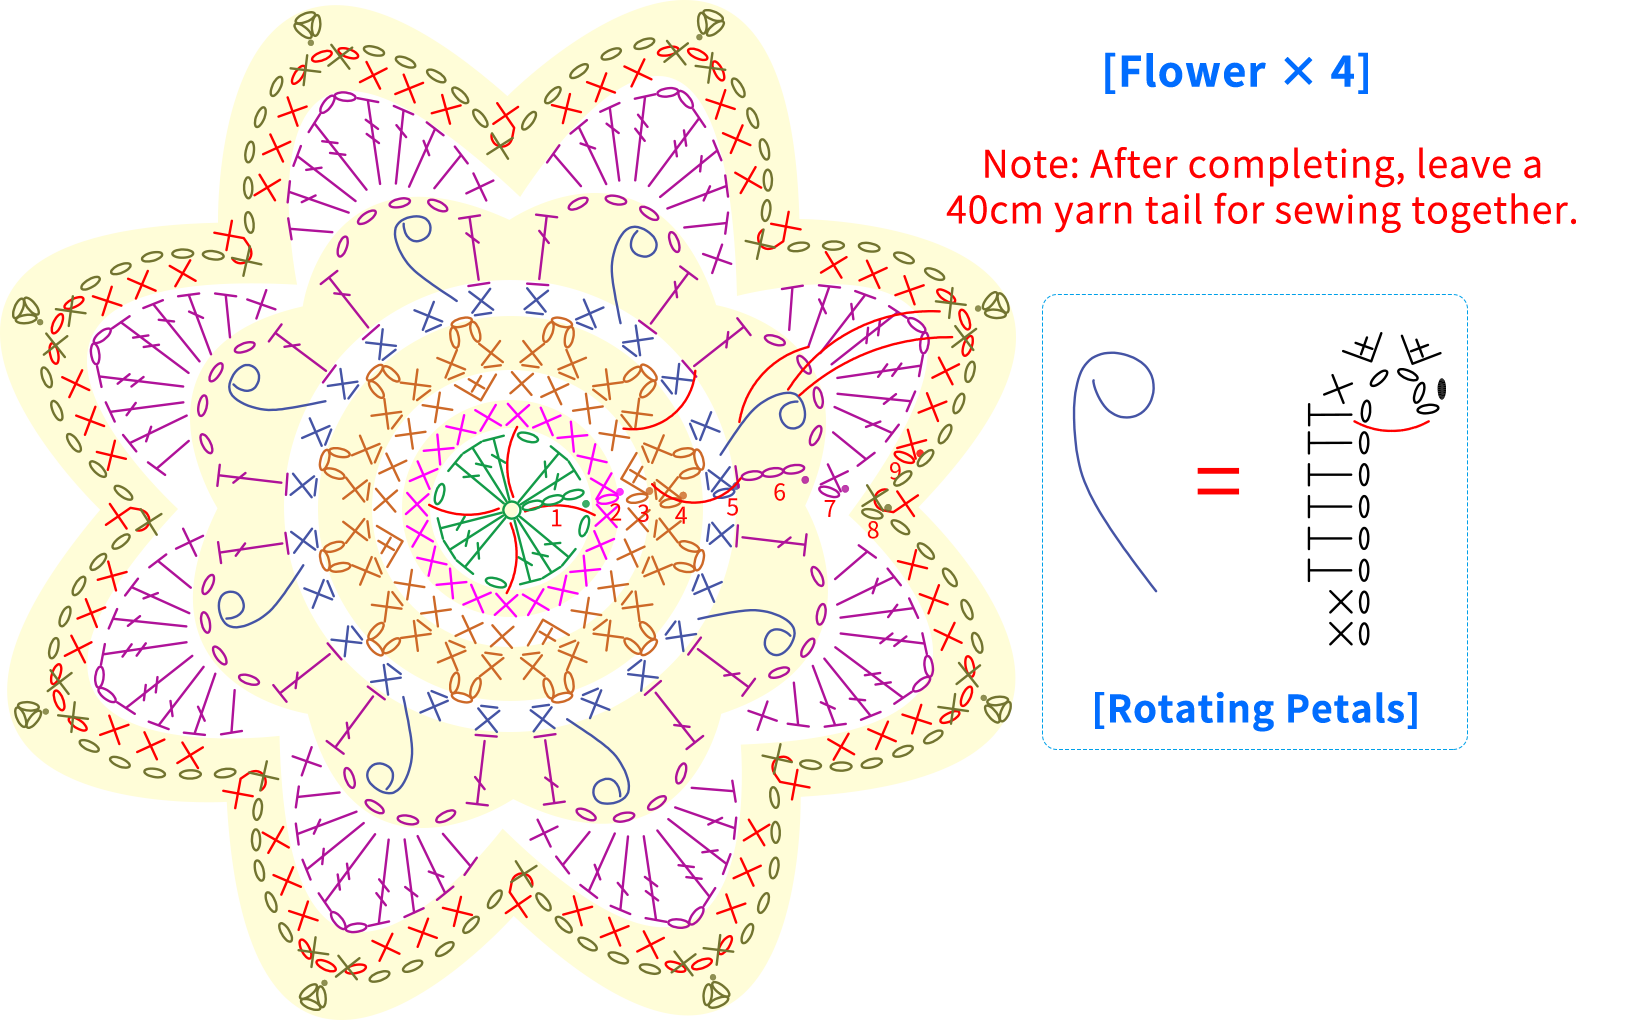
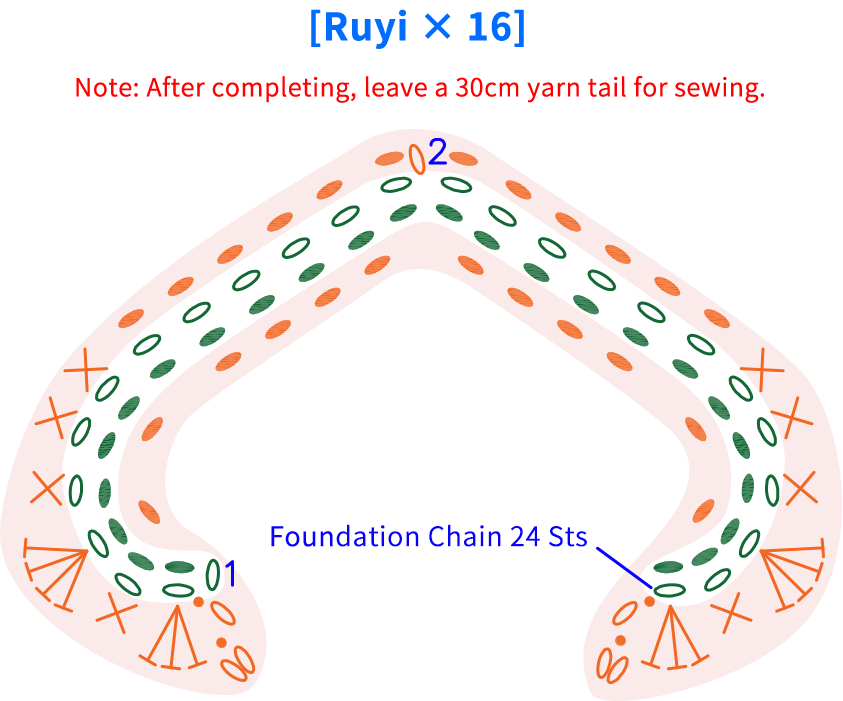
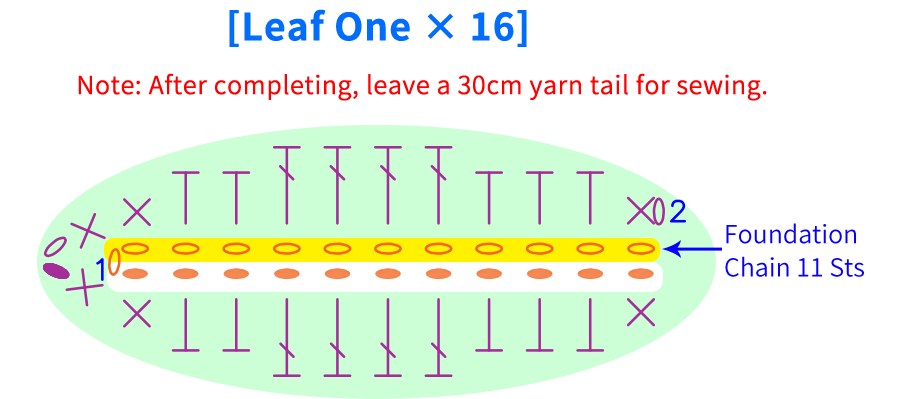
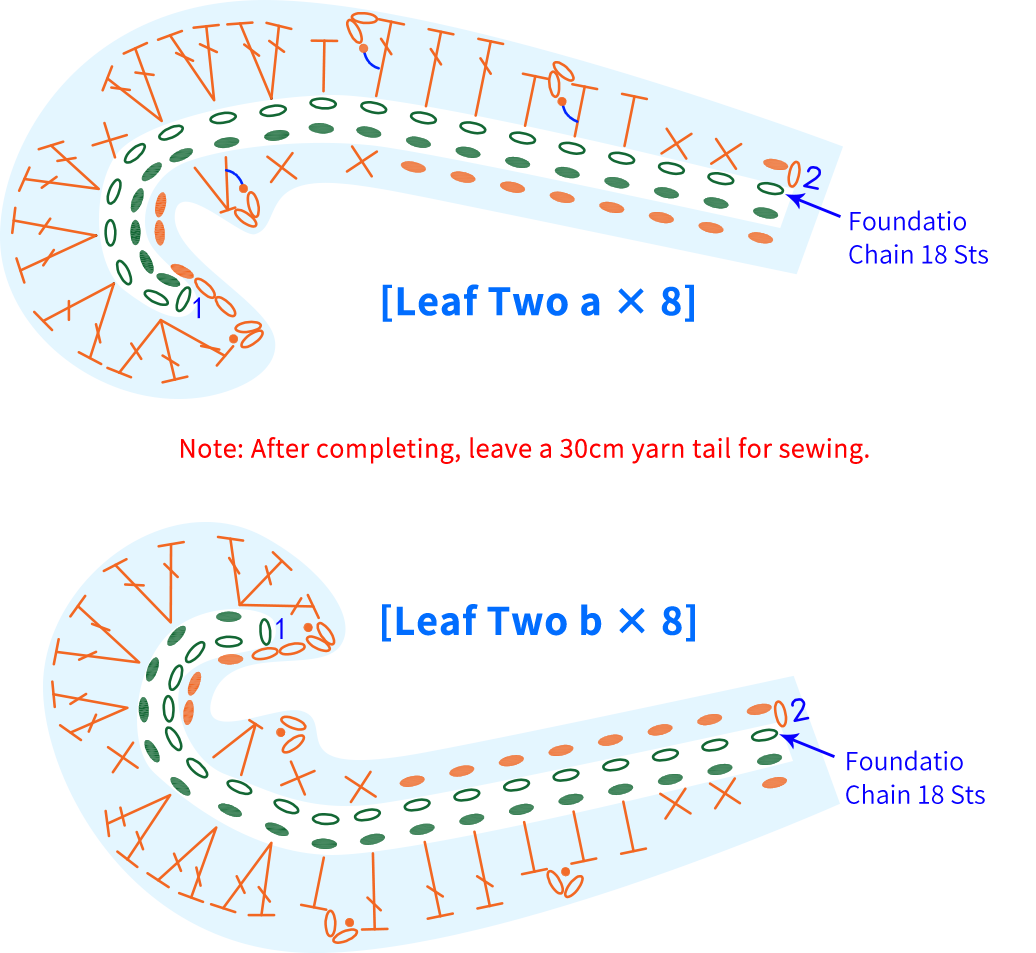
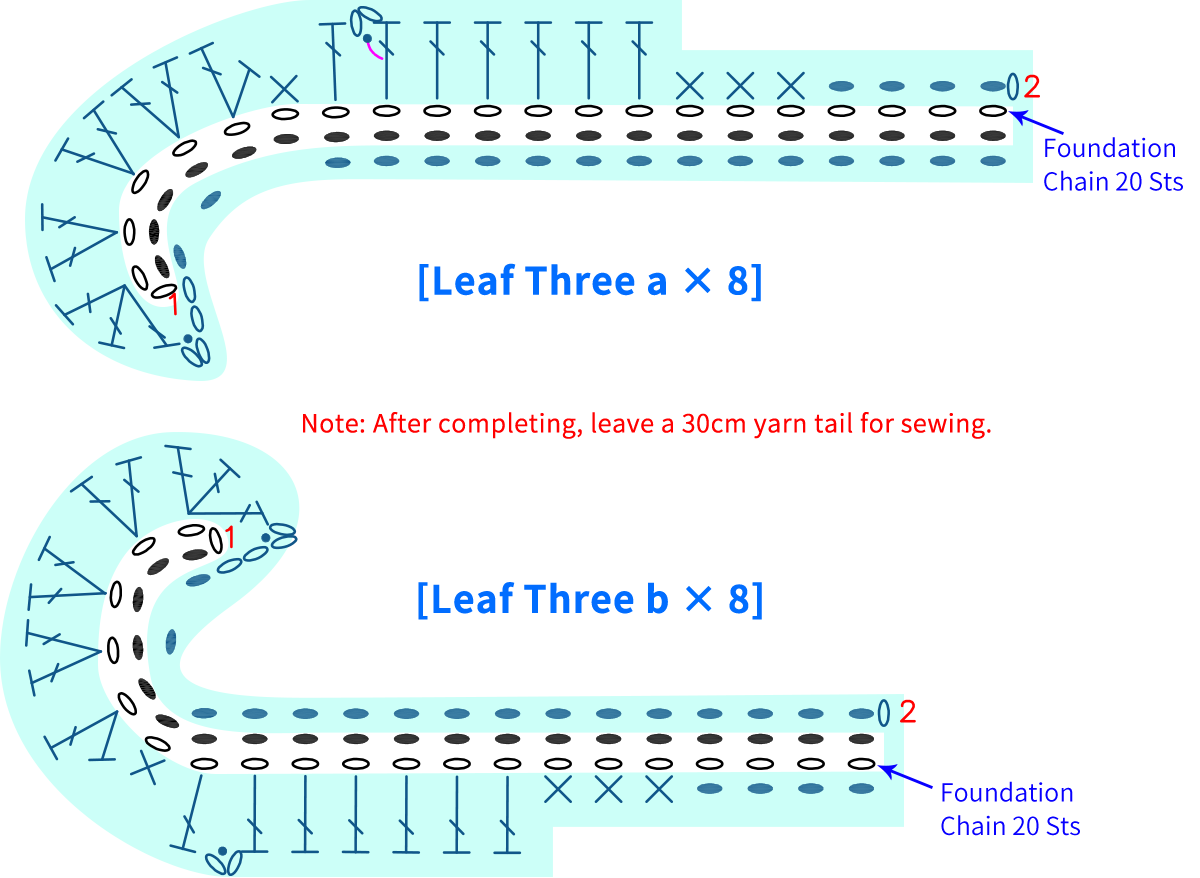
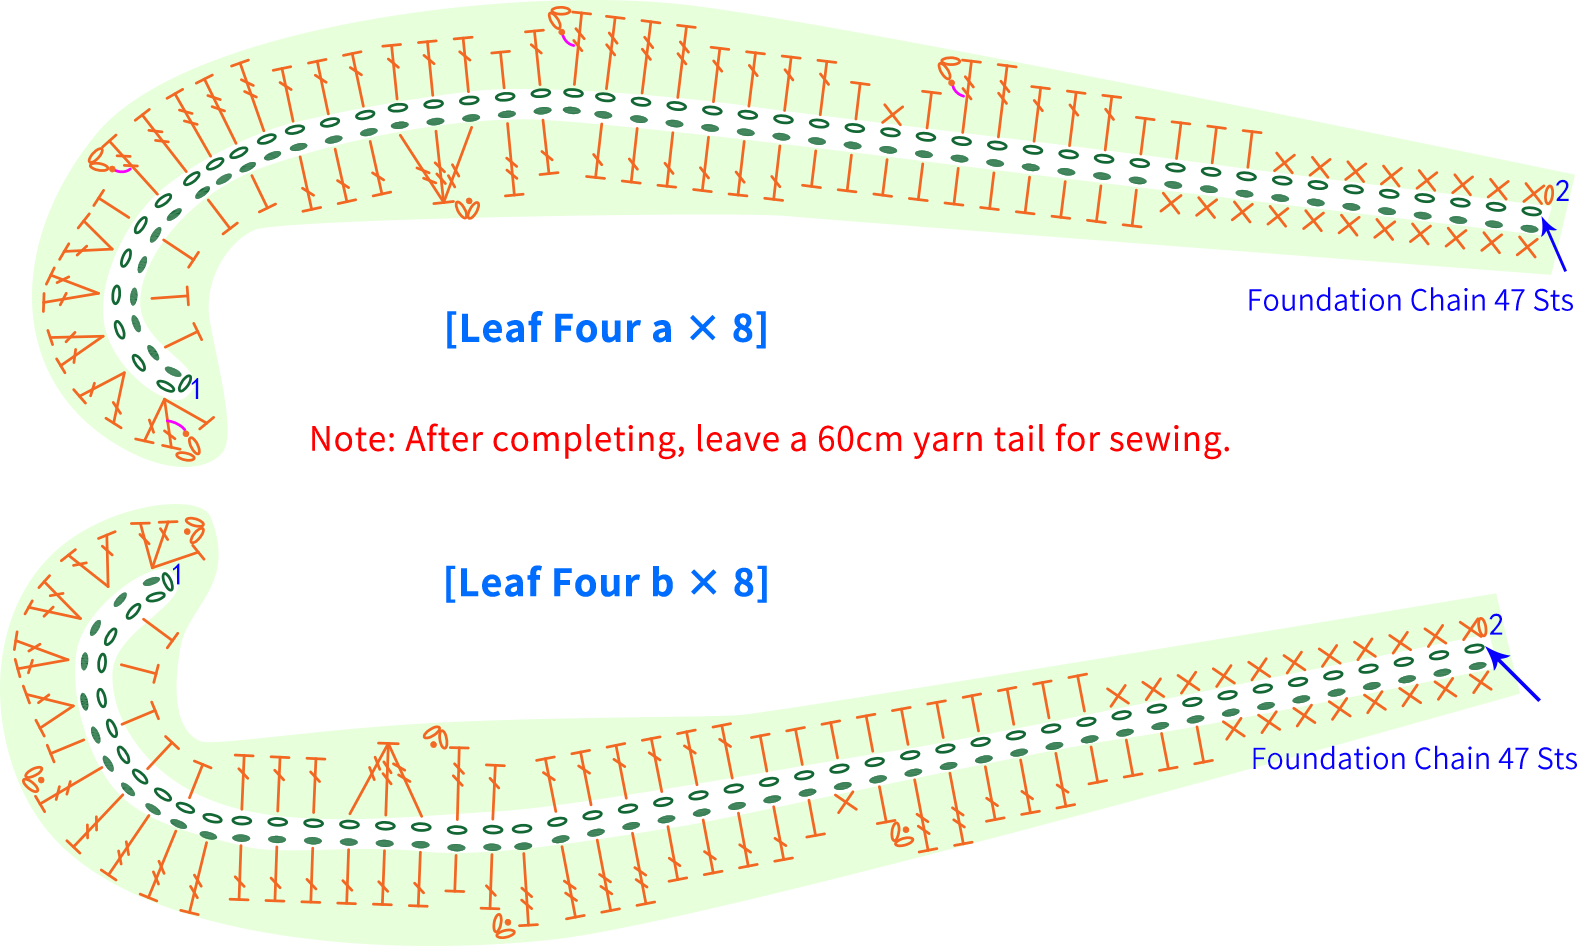
It includes flowers, ruyi, and four different kinds of leaves. The crocheting method for the flowers is identical to the first 9 rounds of motif three, except for the color scheme. The rest, including the leaves and ruyi, all start with a foundation chain and are worked back and forth. You will need to switch colors while crocheting. For more details, please refer to the video demonstration.
| Decorations | |||
| Flower | Number of Rounds / Rows | Retro Style | Vivid Style |
| Rnd 1 | 22#Viridis | 32#Aspen Green | |
| Rnd 2 | 53#Cloud Cream | 19#Whisper White | |
| Rnd 3-4 | 29#Aurora Red | 46#Lyons Blue | |
| Rnd 5 | 53#Cloud Cream | 19#Whisper White | |
| Rnd 6-7 | 09#Aspen Gold | 38#Pink Carnation | |
| Rnd 8 | 45#Orangeade | 63#Pink Yarrow | |
| Rnd 9 | 42#Blue Moon | 09#Aspen Gold | |
| Ruyi Fabric Piece Leaf Two Leaf Four |
Row 1 | 22#Viridis | 32#Aspen Green |
| Row 2 | 28#Turquoise | 25#Fair Green | |
| Leaf One | Row 1 | 45#Orangeade | 63#Pink Yarrow |
| Row 2 | 09#Aspen Gold | 38#Pink Carnation | |
| Leaf Three | Row 1 | 06#Bright White | 16#Lemonade |
| Row 2 | 42#Blue Moon | 09#Aspen Gold | |
Part 6 Pillowcase F 66' 40'' (Part2)
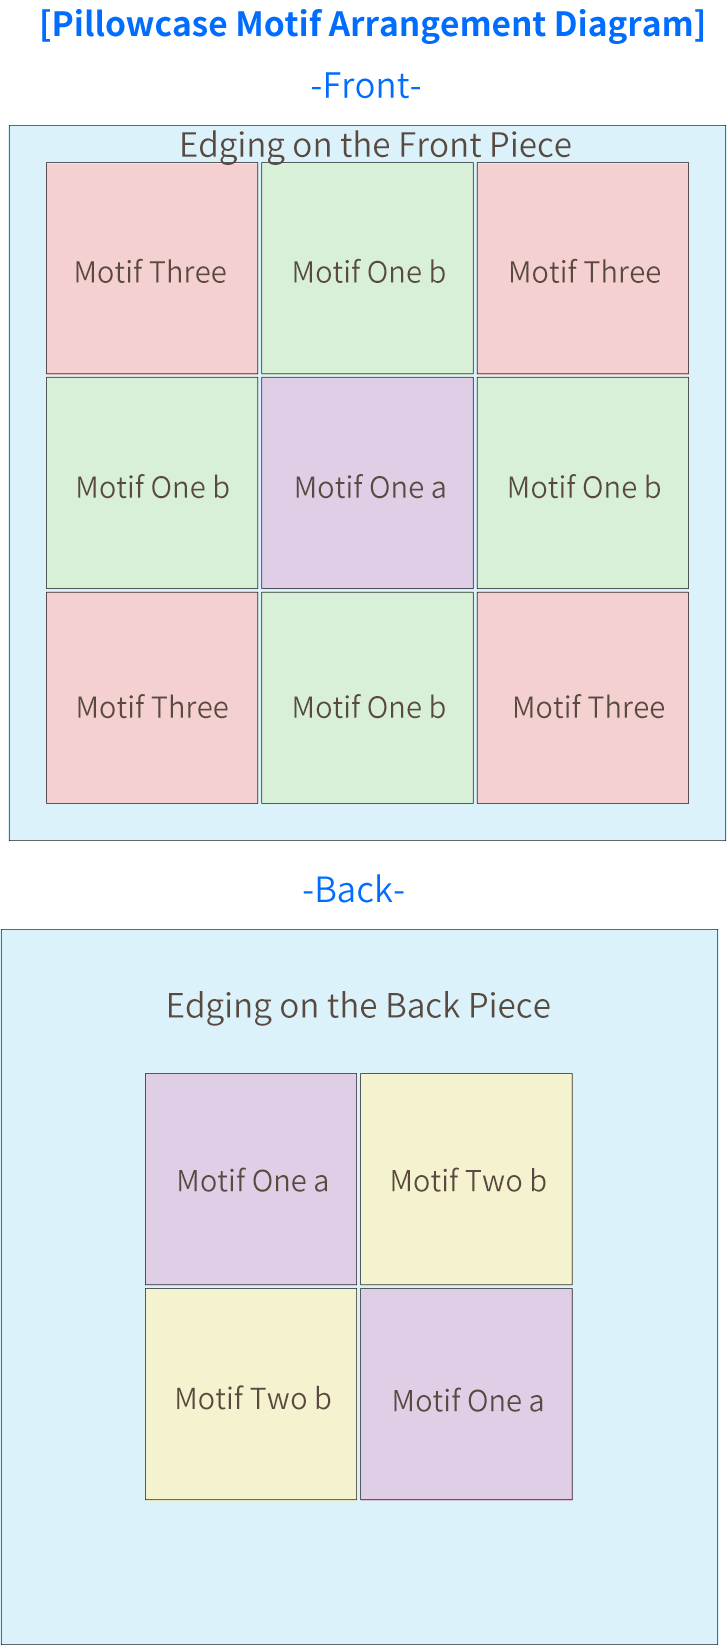
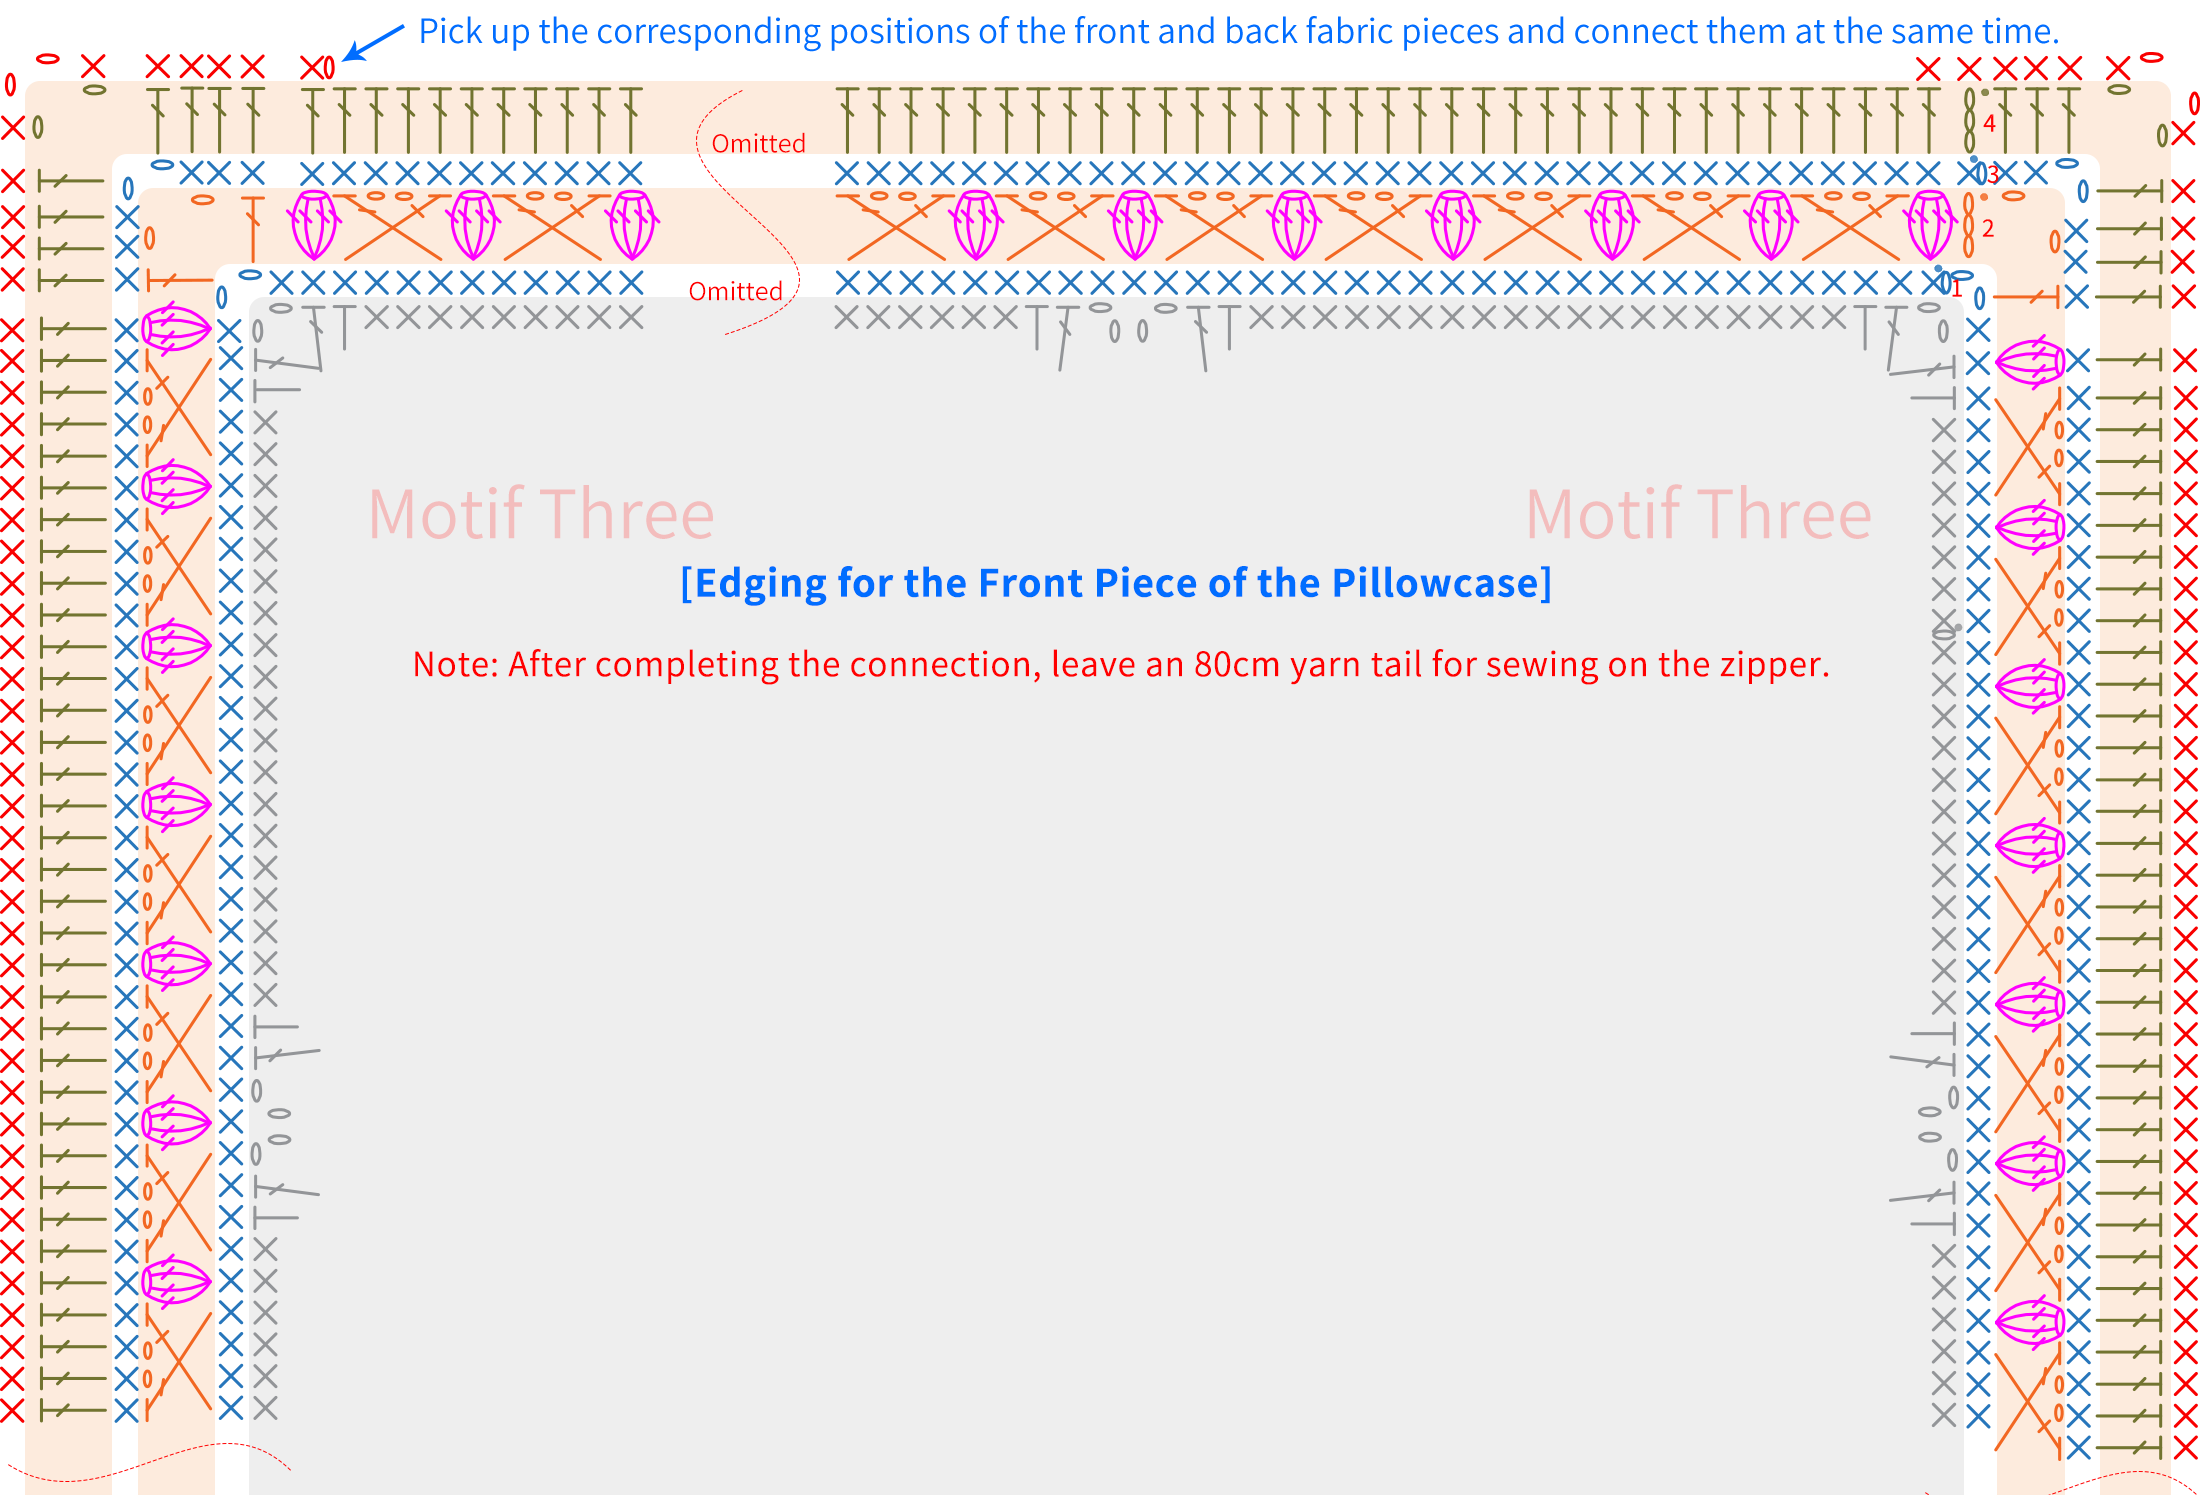
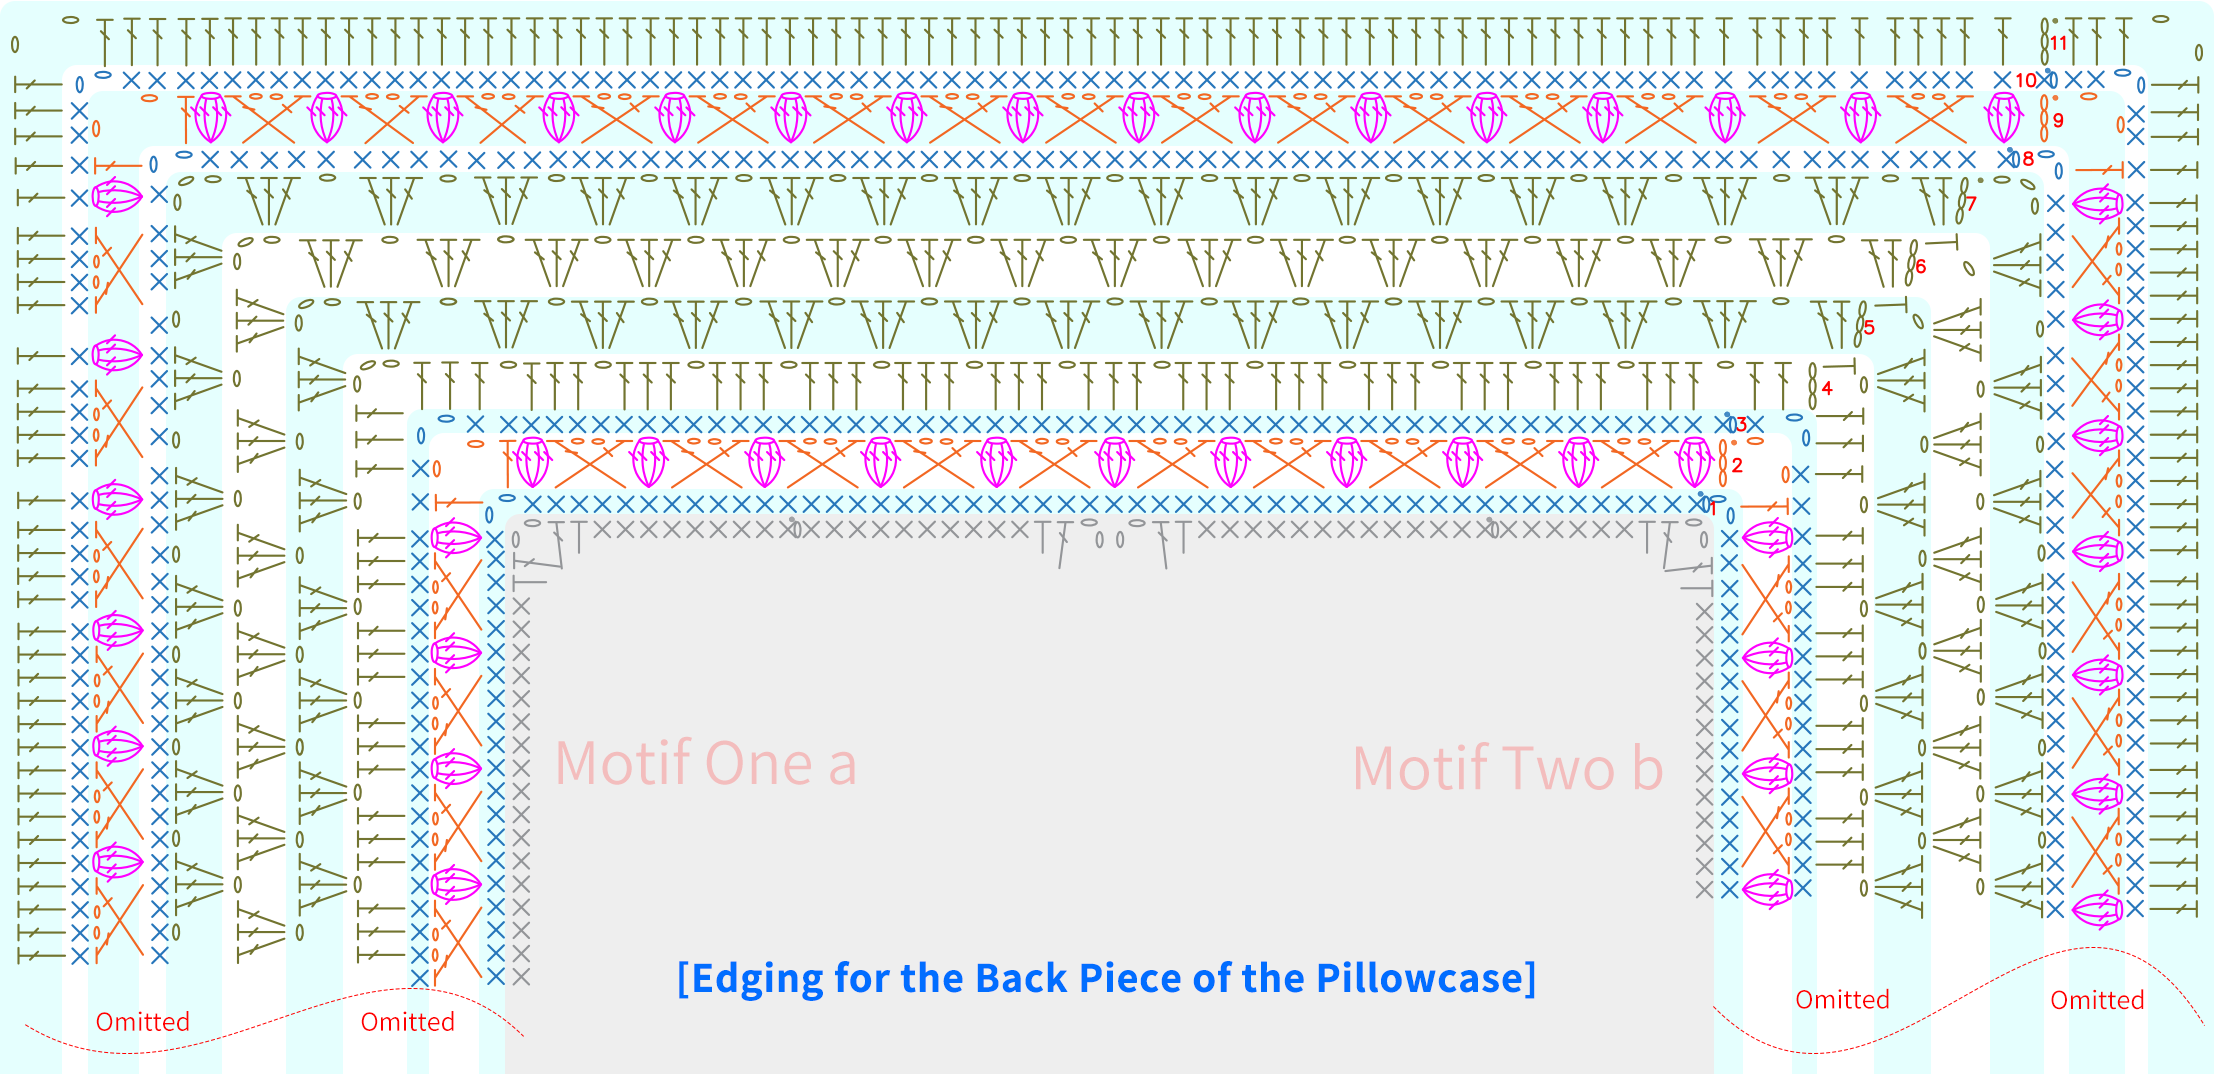
The pillowcase is divided into a front piece and a back piece, both consisting of motifs and edging. First, refer to the finished product or motif arrangement diagram separately, crochet the corresponding motifs, sew them together, then crochet the edging, connect them, and finally attach the zipper. For specifics, please refer to the video demonstration.
| Edging for the Front Piece of the Pillowcase | |||
| Number of Rounds | Retro Style | Vivid Style | |
| Rnd 1 | 18#New Wheat | 54#Baby Blue | |
| Rnd 2 | Yarn 1 | 06#Bright White | 16#Lemonade |
| Yarn 2 | 09#Aspen Gold | 38#Pink Carnation | |
| Rnd 3 | 18#New Wheat | 54#Baby Blue | |
| Rnd 4 | 29#Aurora Red | 46#Lyons Blue | |
| Edging for the Back Piece of the Pillowcase | |||
| Number of Rounds | Retro Style | Vivid Style | |
| Rnd 1 | 18#New Wheat | 54#Baby Blue | |
| Rnd 2 | Yarn 1 | 42#Blue Moon | 09#Aspen Gold |
| Yarn 2 | 09#Aspen Gold | 38#Pink Carnation | |
| Rnd 3 | 18#New Wheat | 25#Fair Green | |
| Rnd 4-7 | 29#Aurora Red | 46#Lyons Blue | |
| Rnd 8 | 53#Cloud Cream | 19#Whisper White | |
| Rnd 9 | Yarn 1 | 28#Turquoise | #Fair Green |
| Yarn 2 | 09#Aspen Gold | 38#Pink Carnation | |
| Rnd 10 | 53#Cloud Cream | 19#Whisper White | |
| Rnd 11 | 29#Aurora Red | 46#Lyons Blue | |
Made by the community




