Home / Blanket
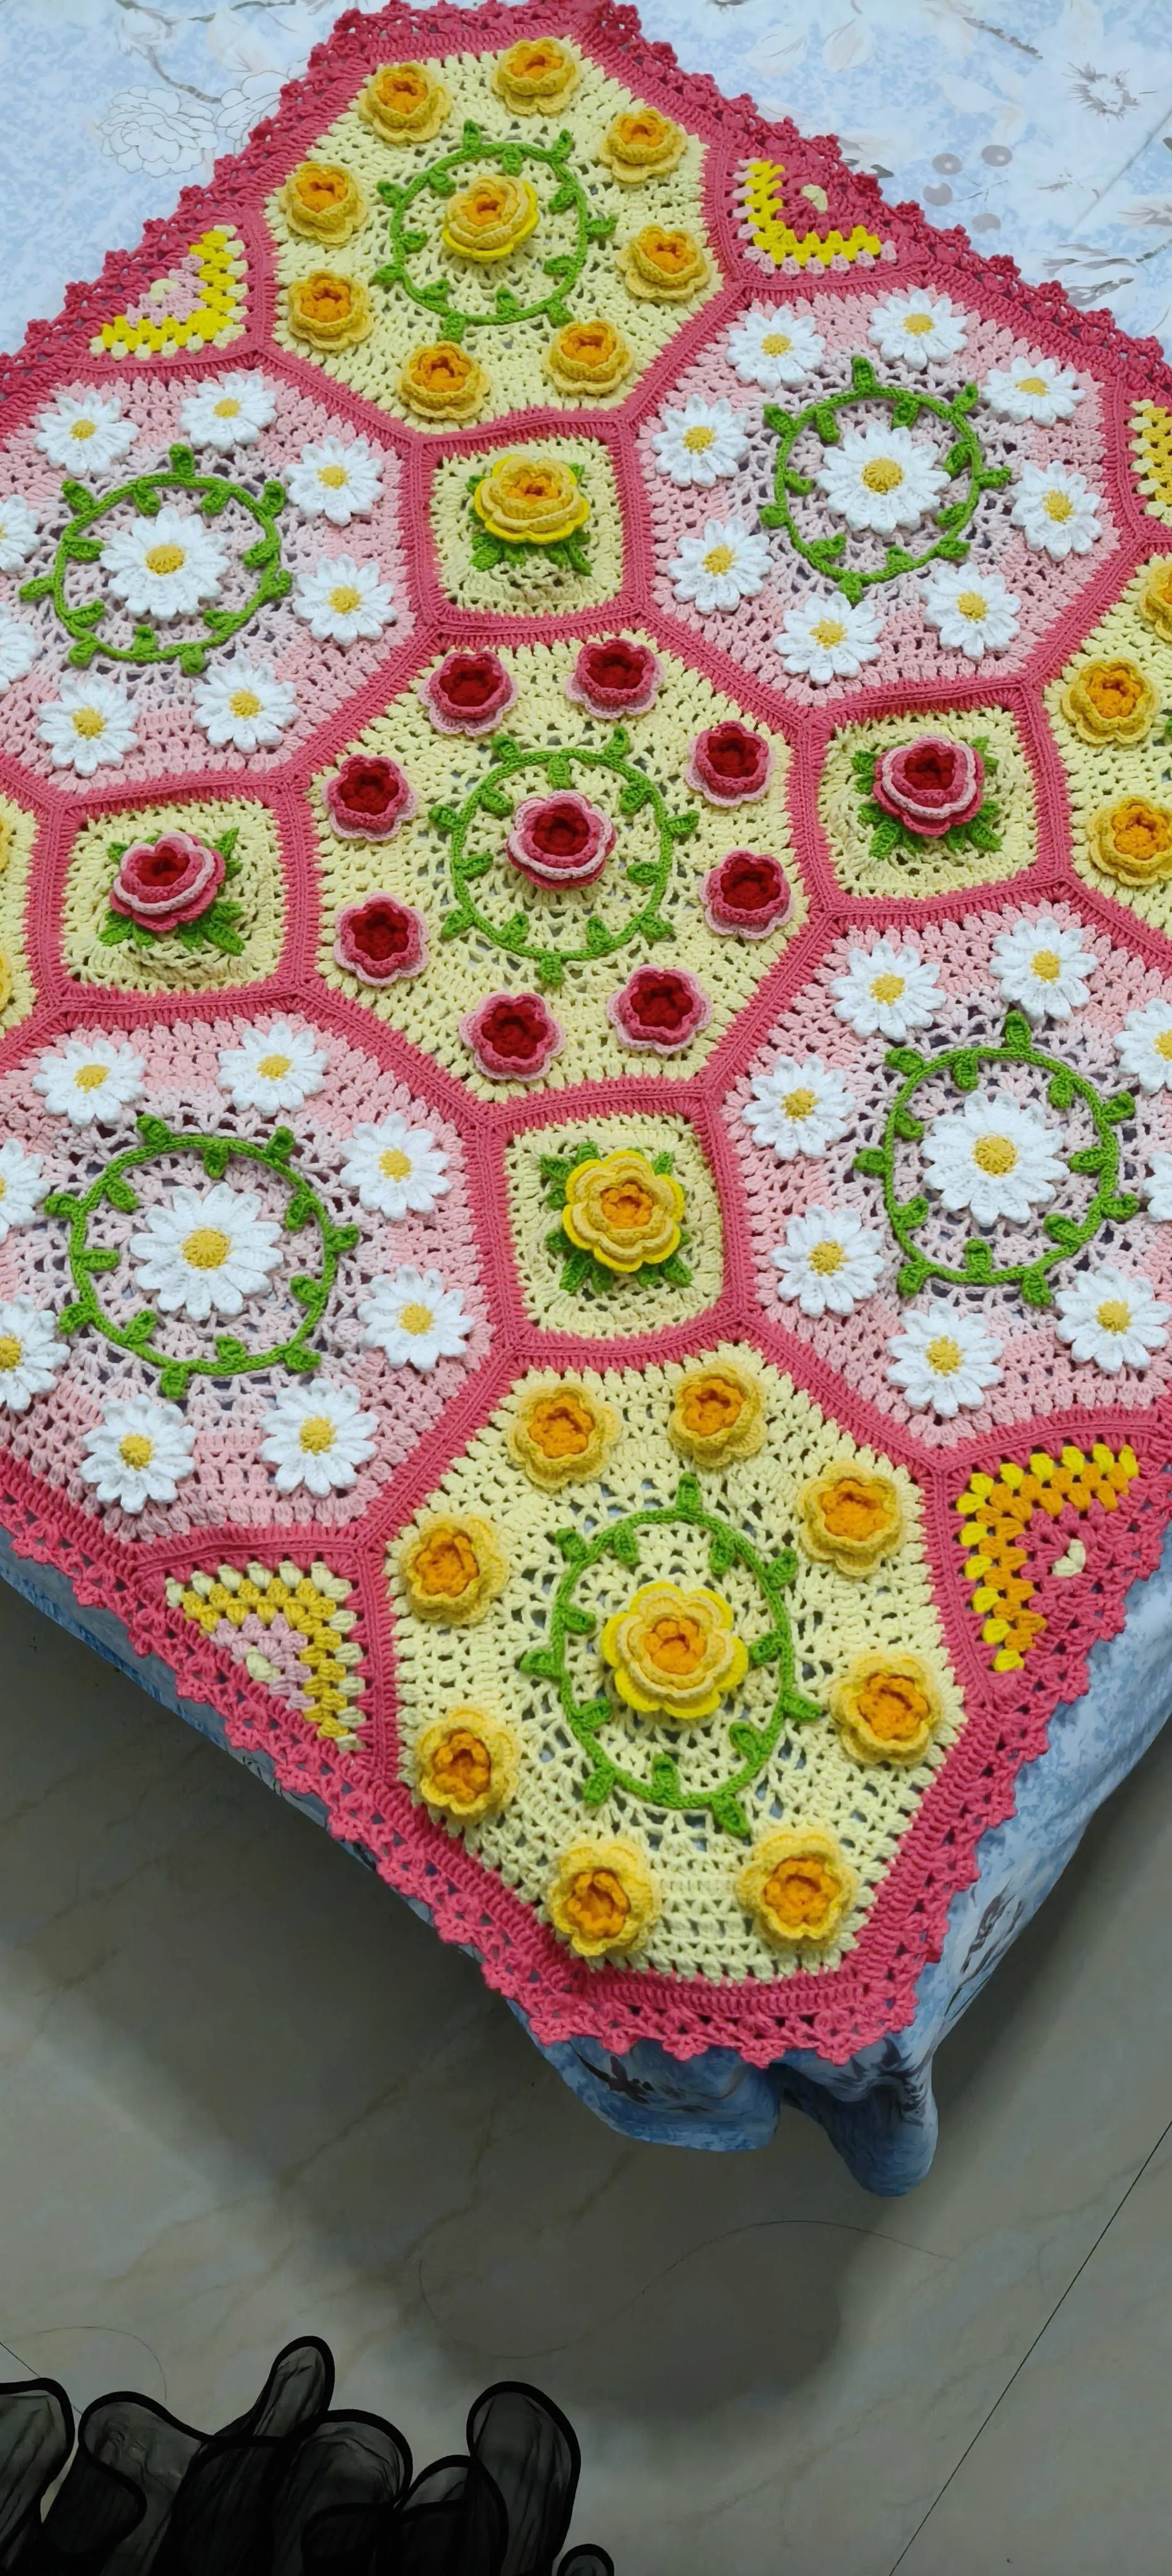
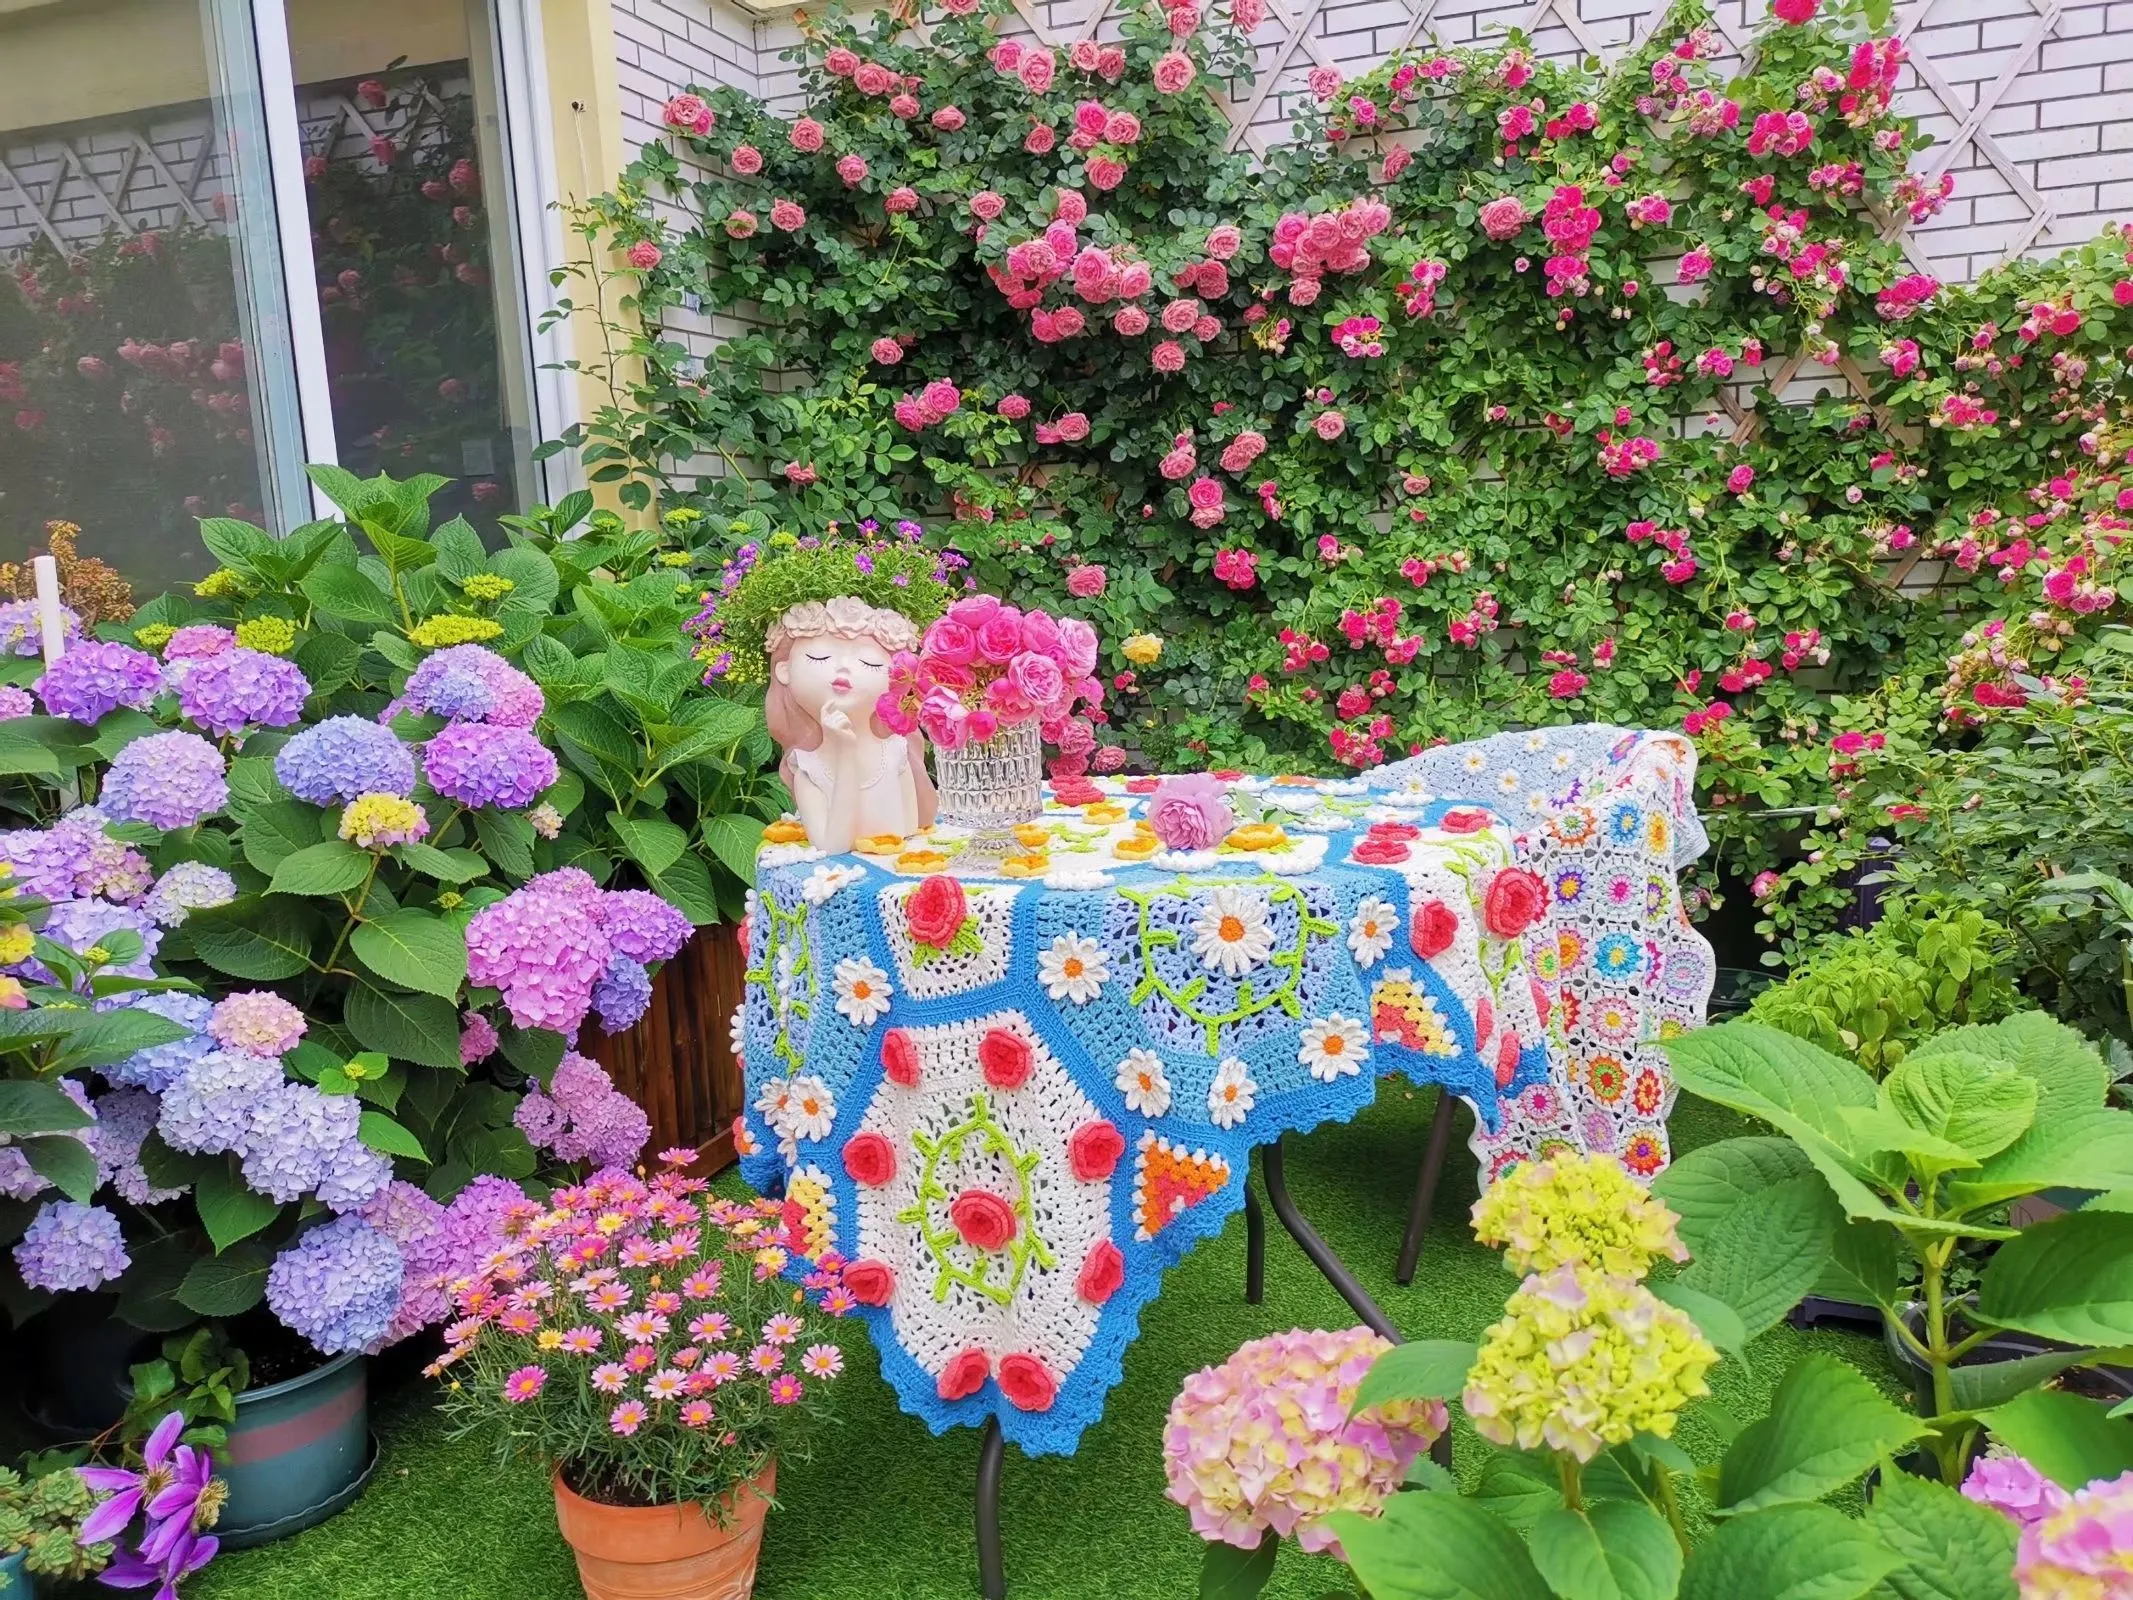
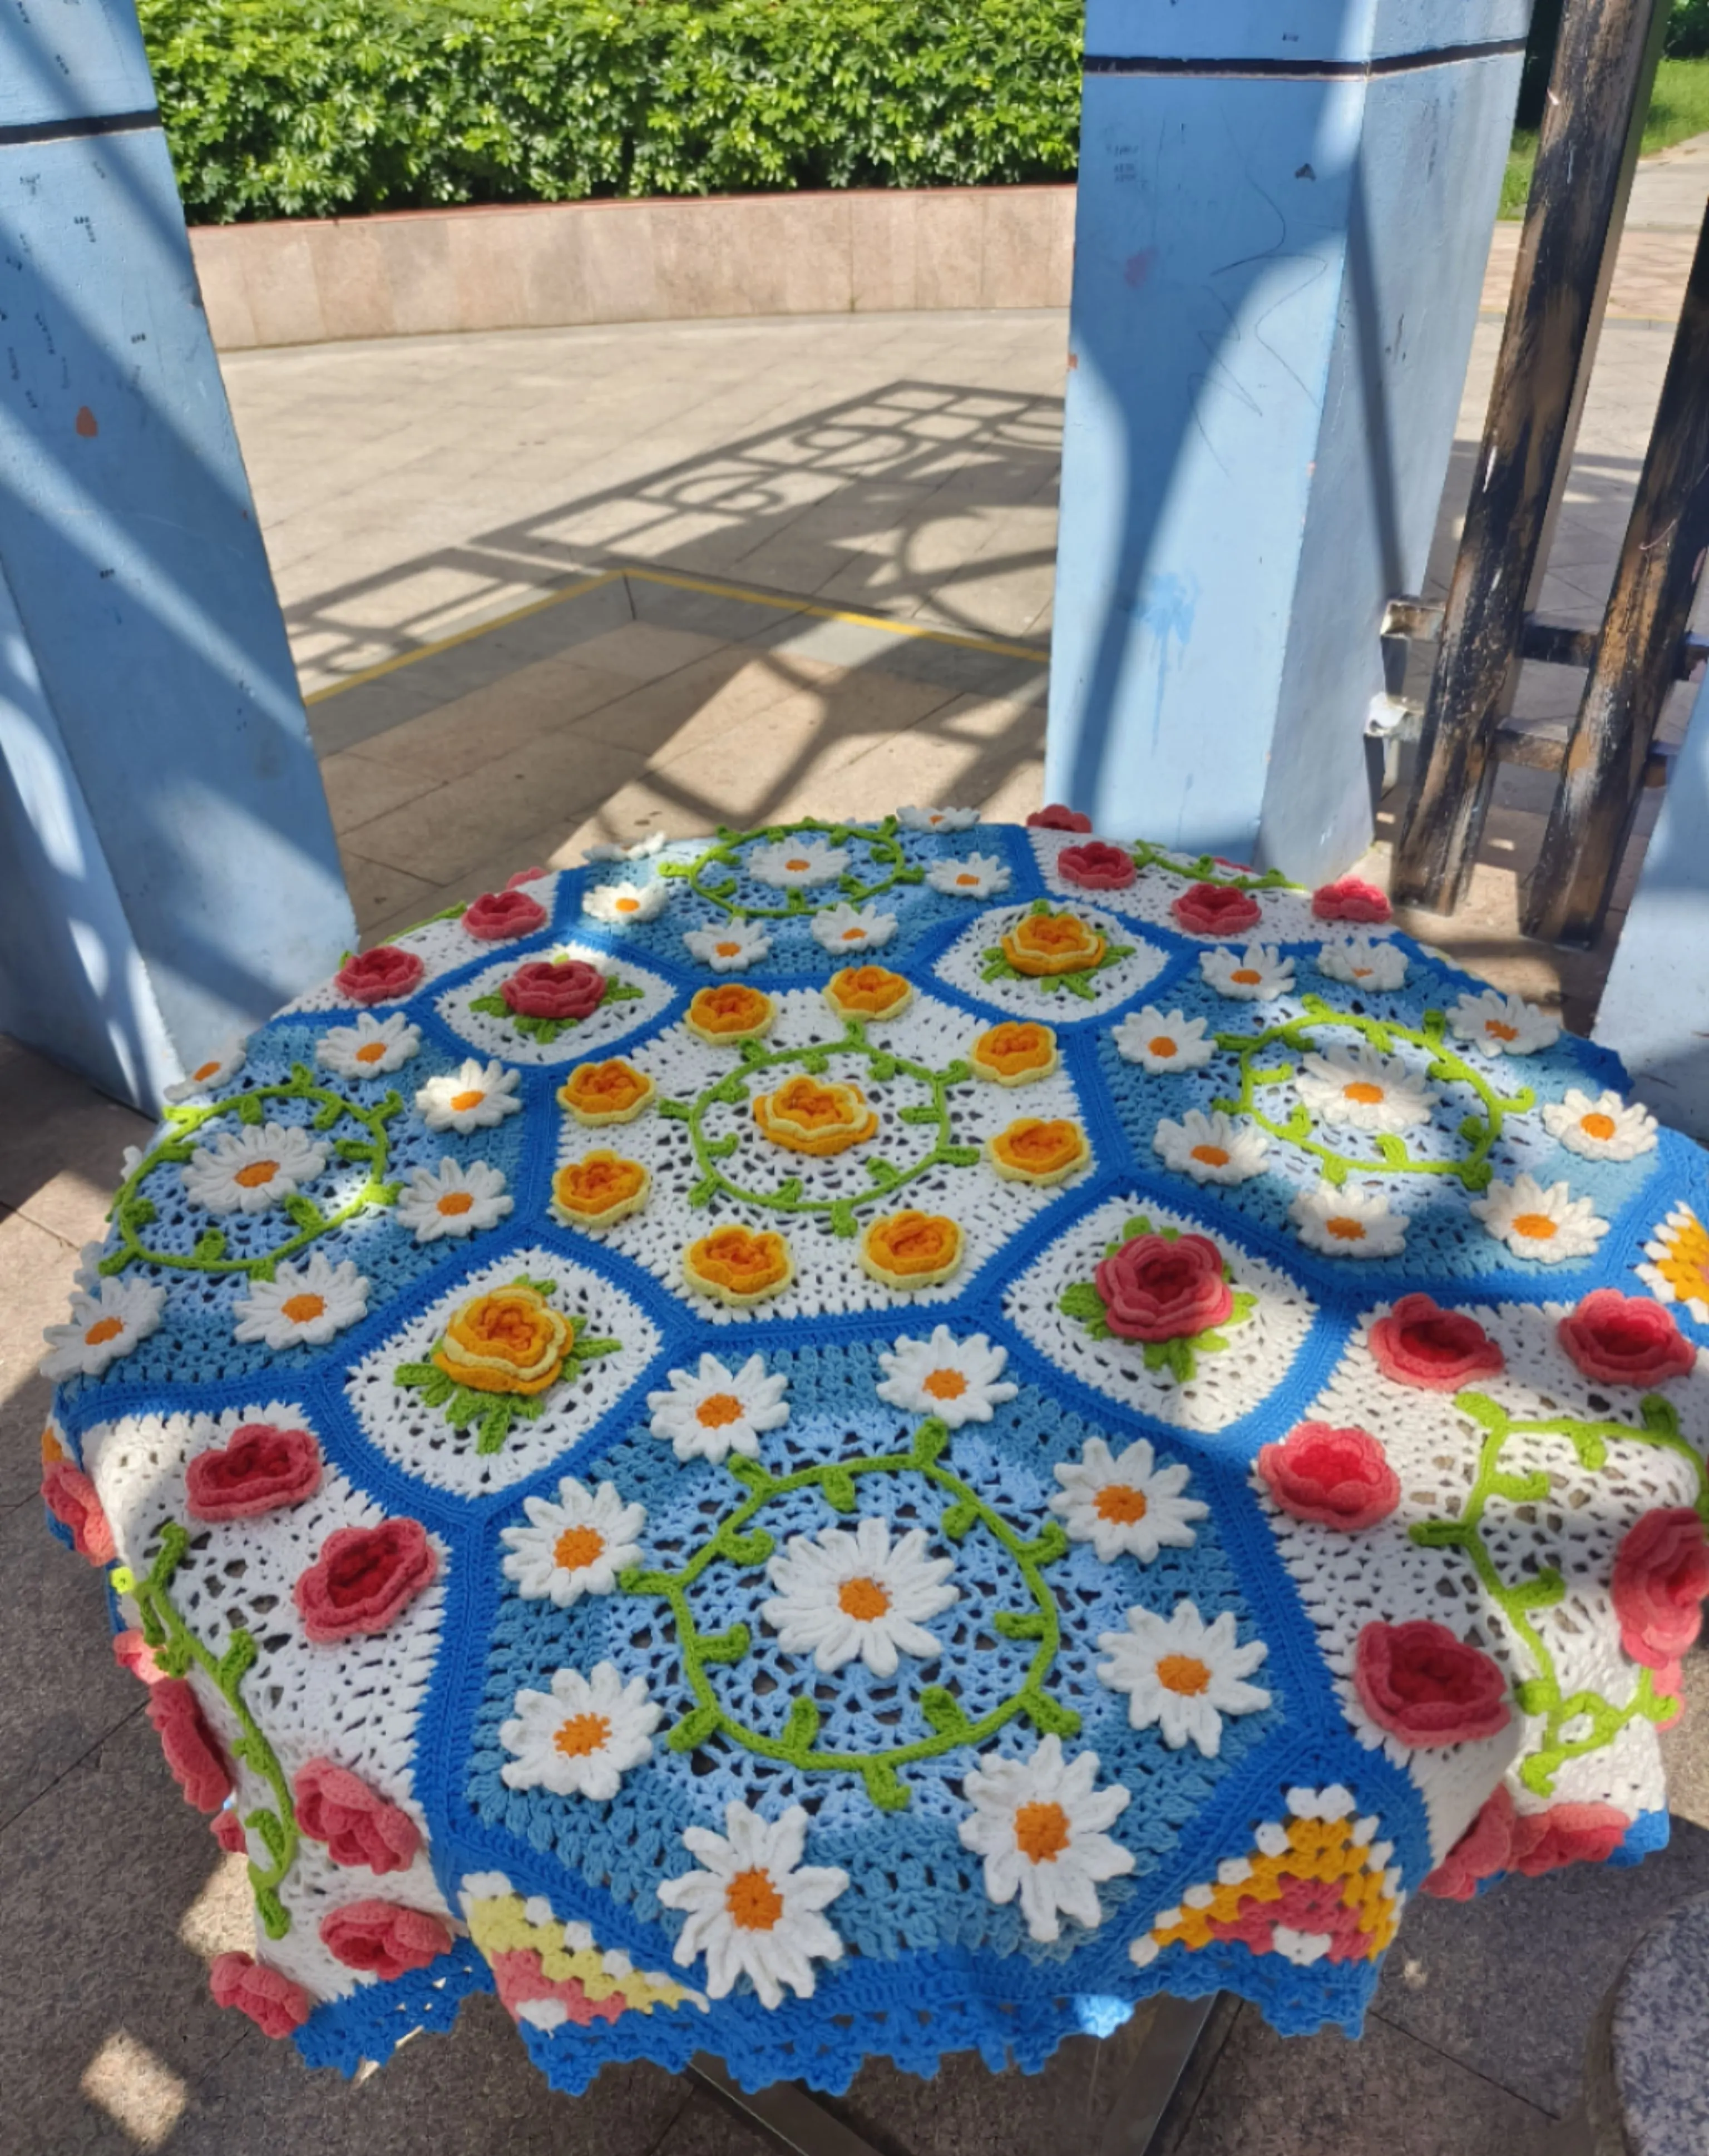
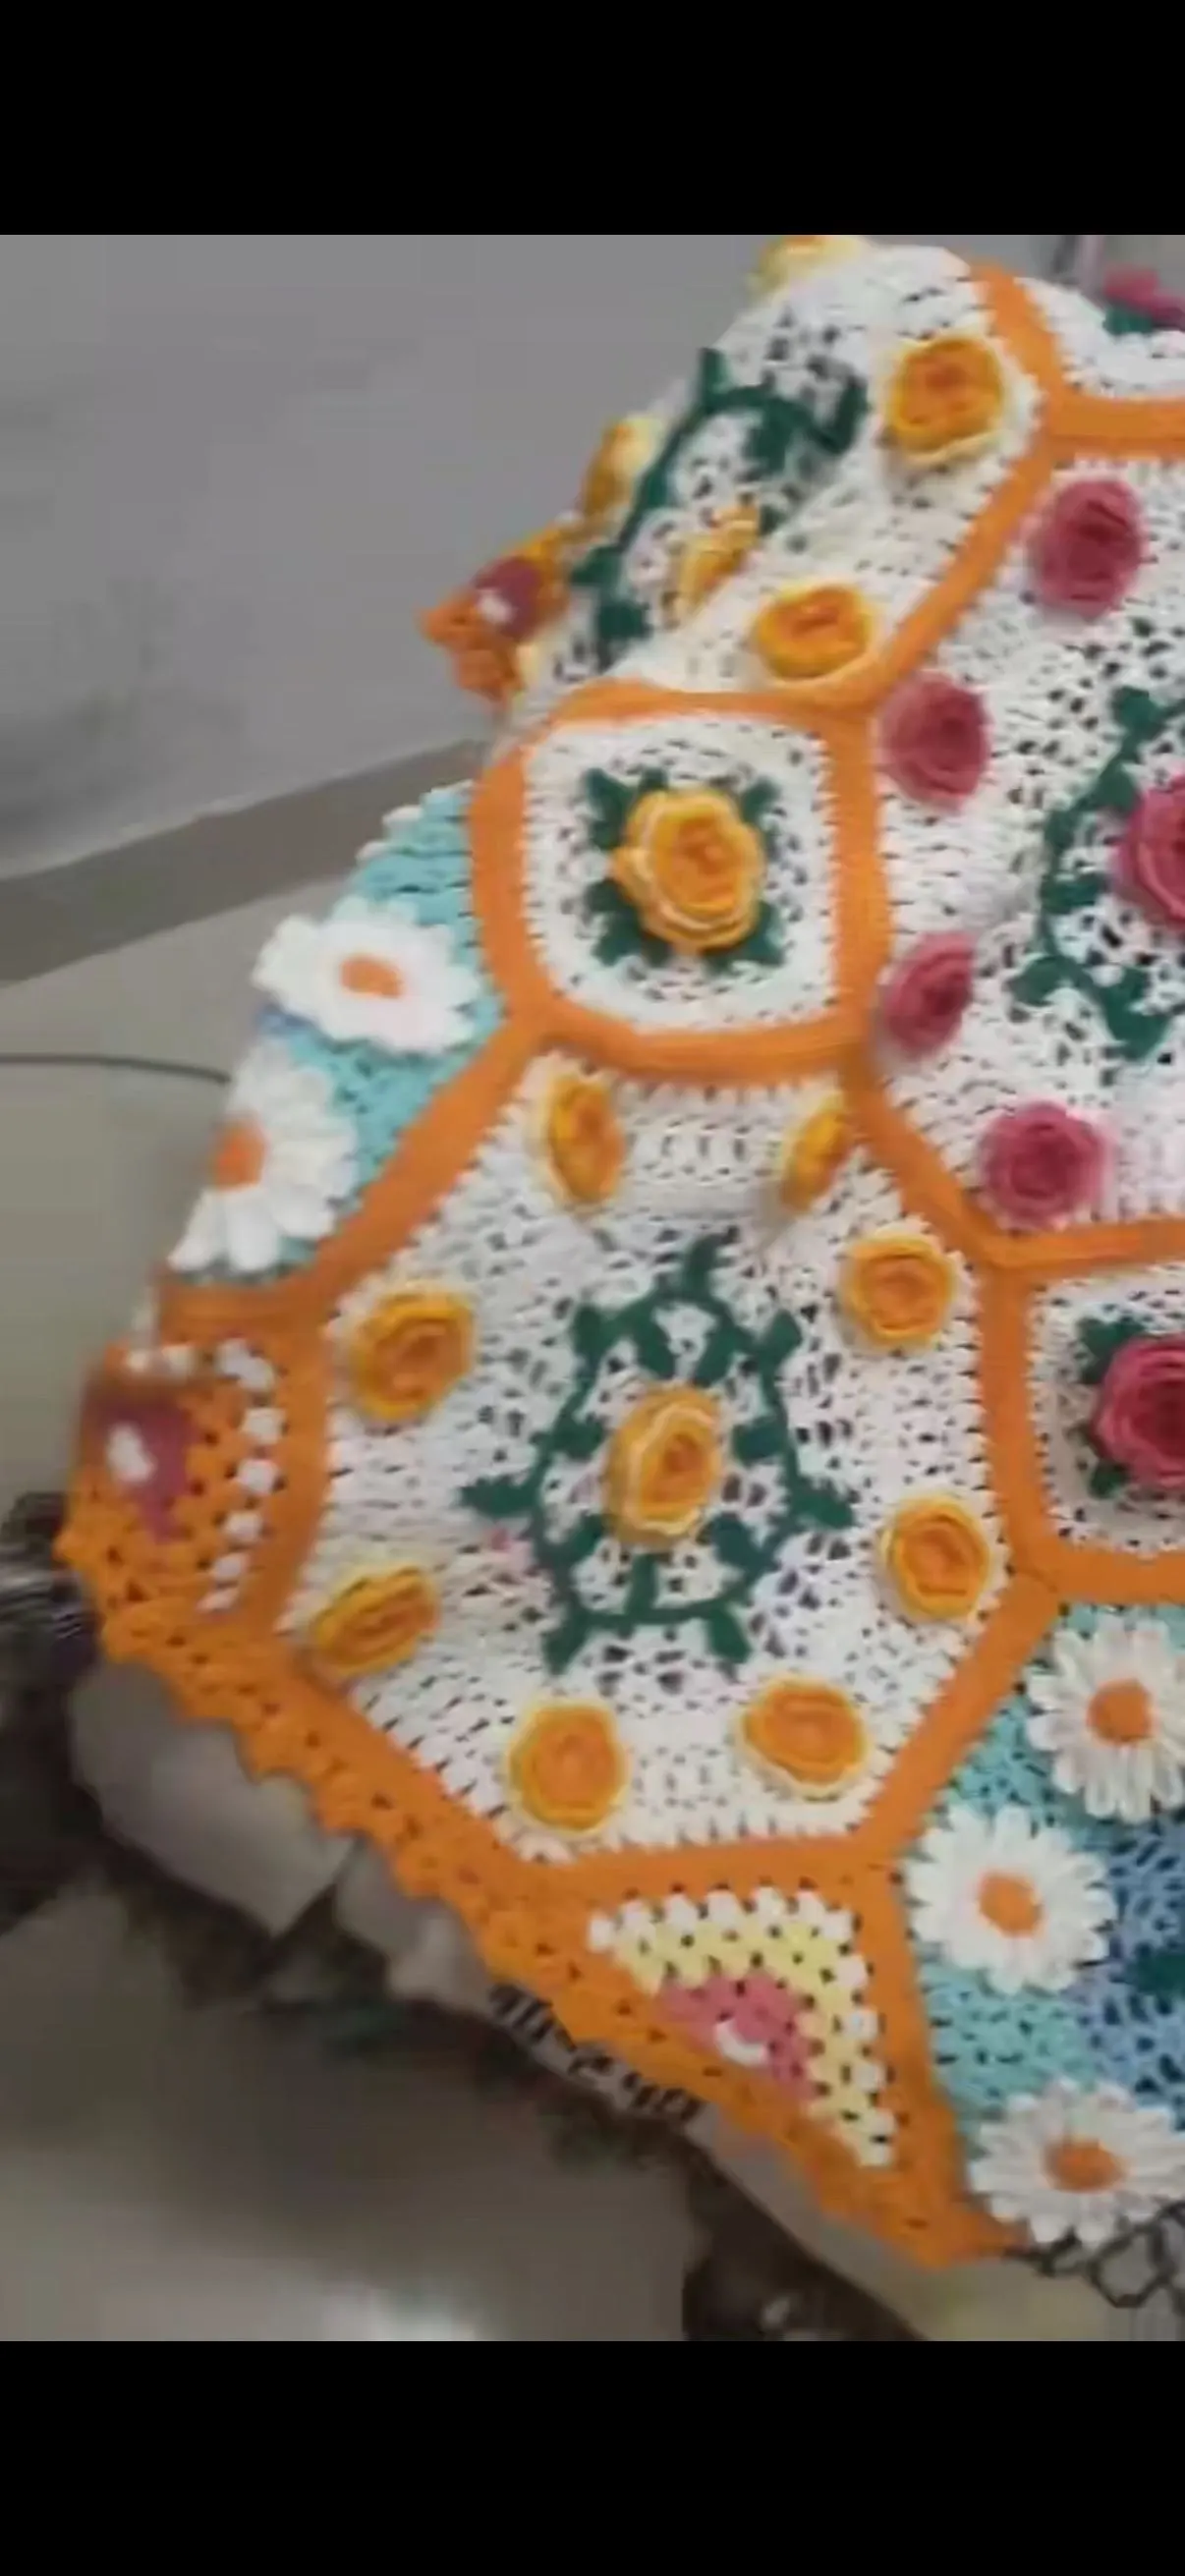
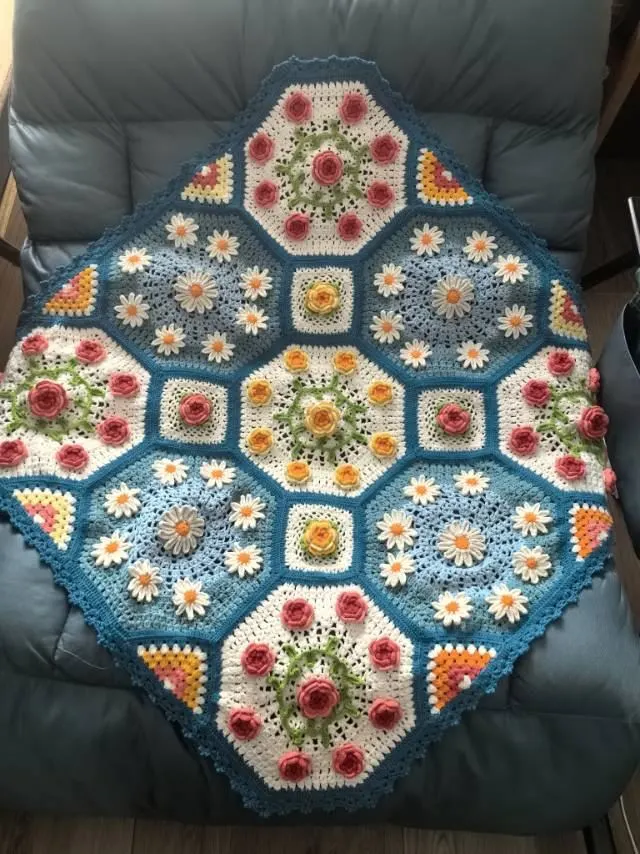
Flourishing Flowers Blanket
Project preview
See the finished project
Pattern format
Instructions
Watch and follow
Video tutorial
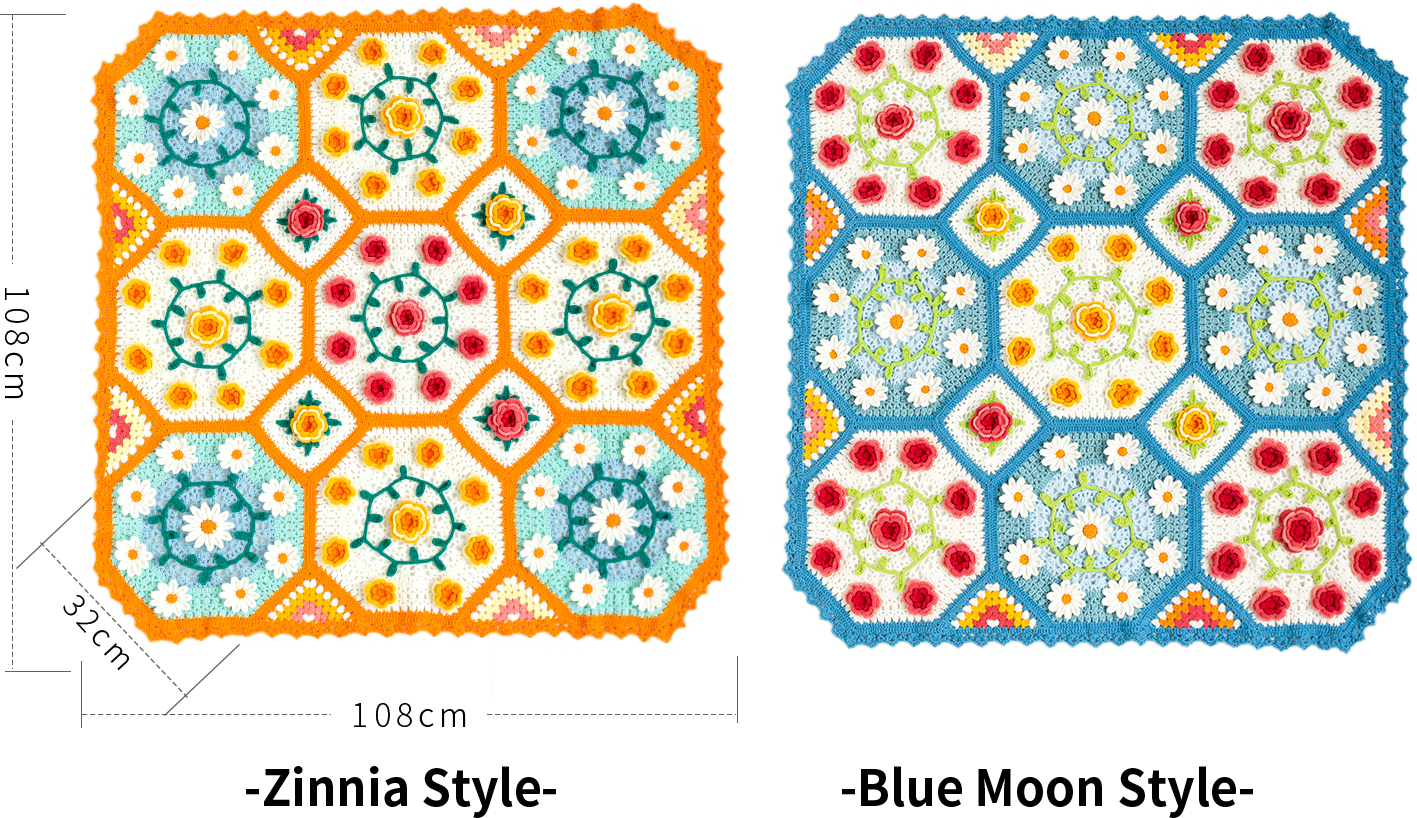
The handcrafted measurements may have an error of 1 to 2 cm.
Due to variations in individual tension, the size of the sample is for reference only.
Materials: 4-Ply Combed Cotton & Acrylic Fibre Hand Knitting Yarn
Tools:3.00 mm crochet hook
Chart Key









Note: 1. This pattern is making in Chinese crochet pattern terms, and the stitch name is written using American terminology. All measurements in charts are in cm.


Part 1 Motif 1 , Motif 2 A
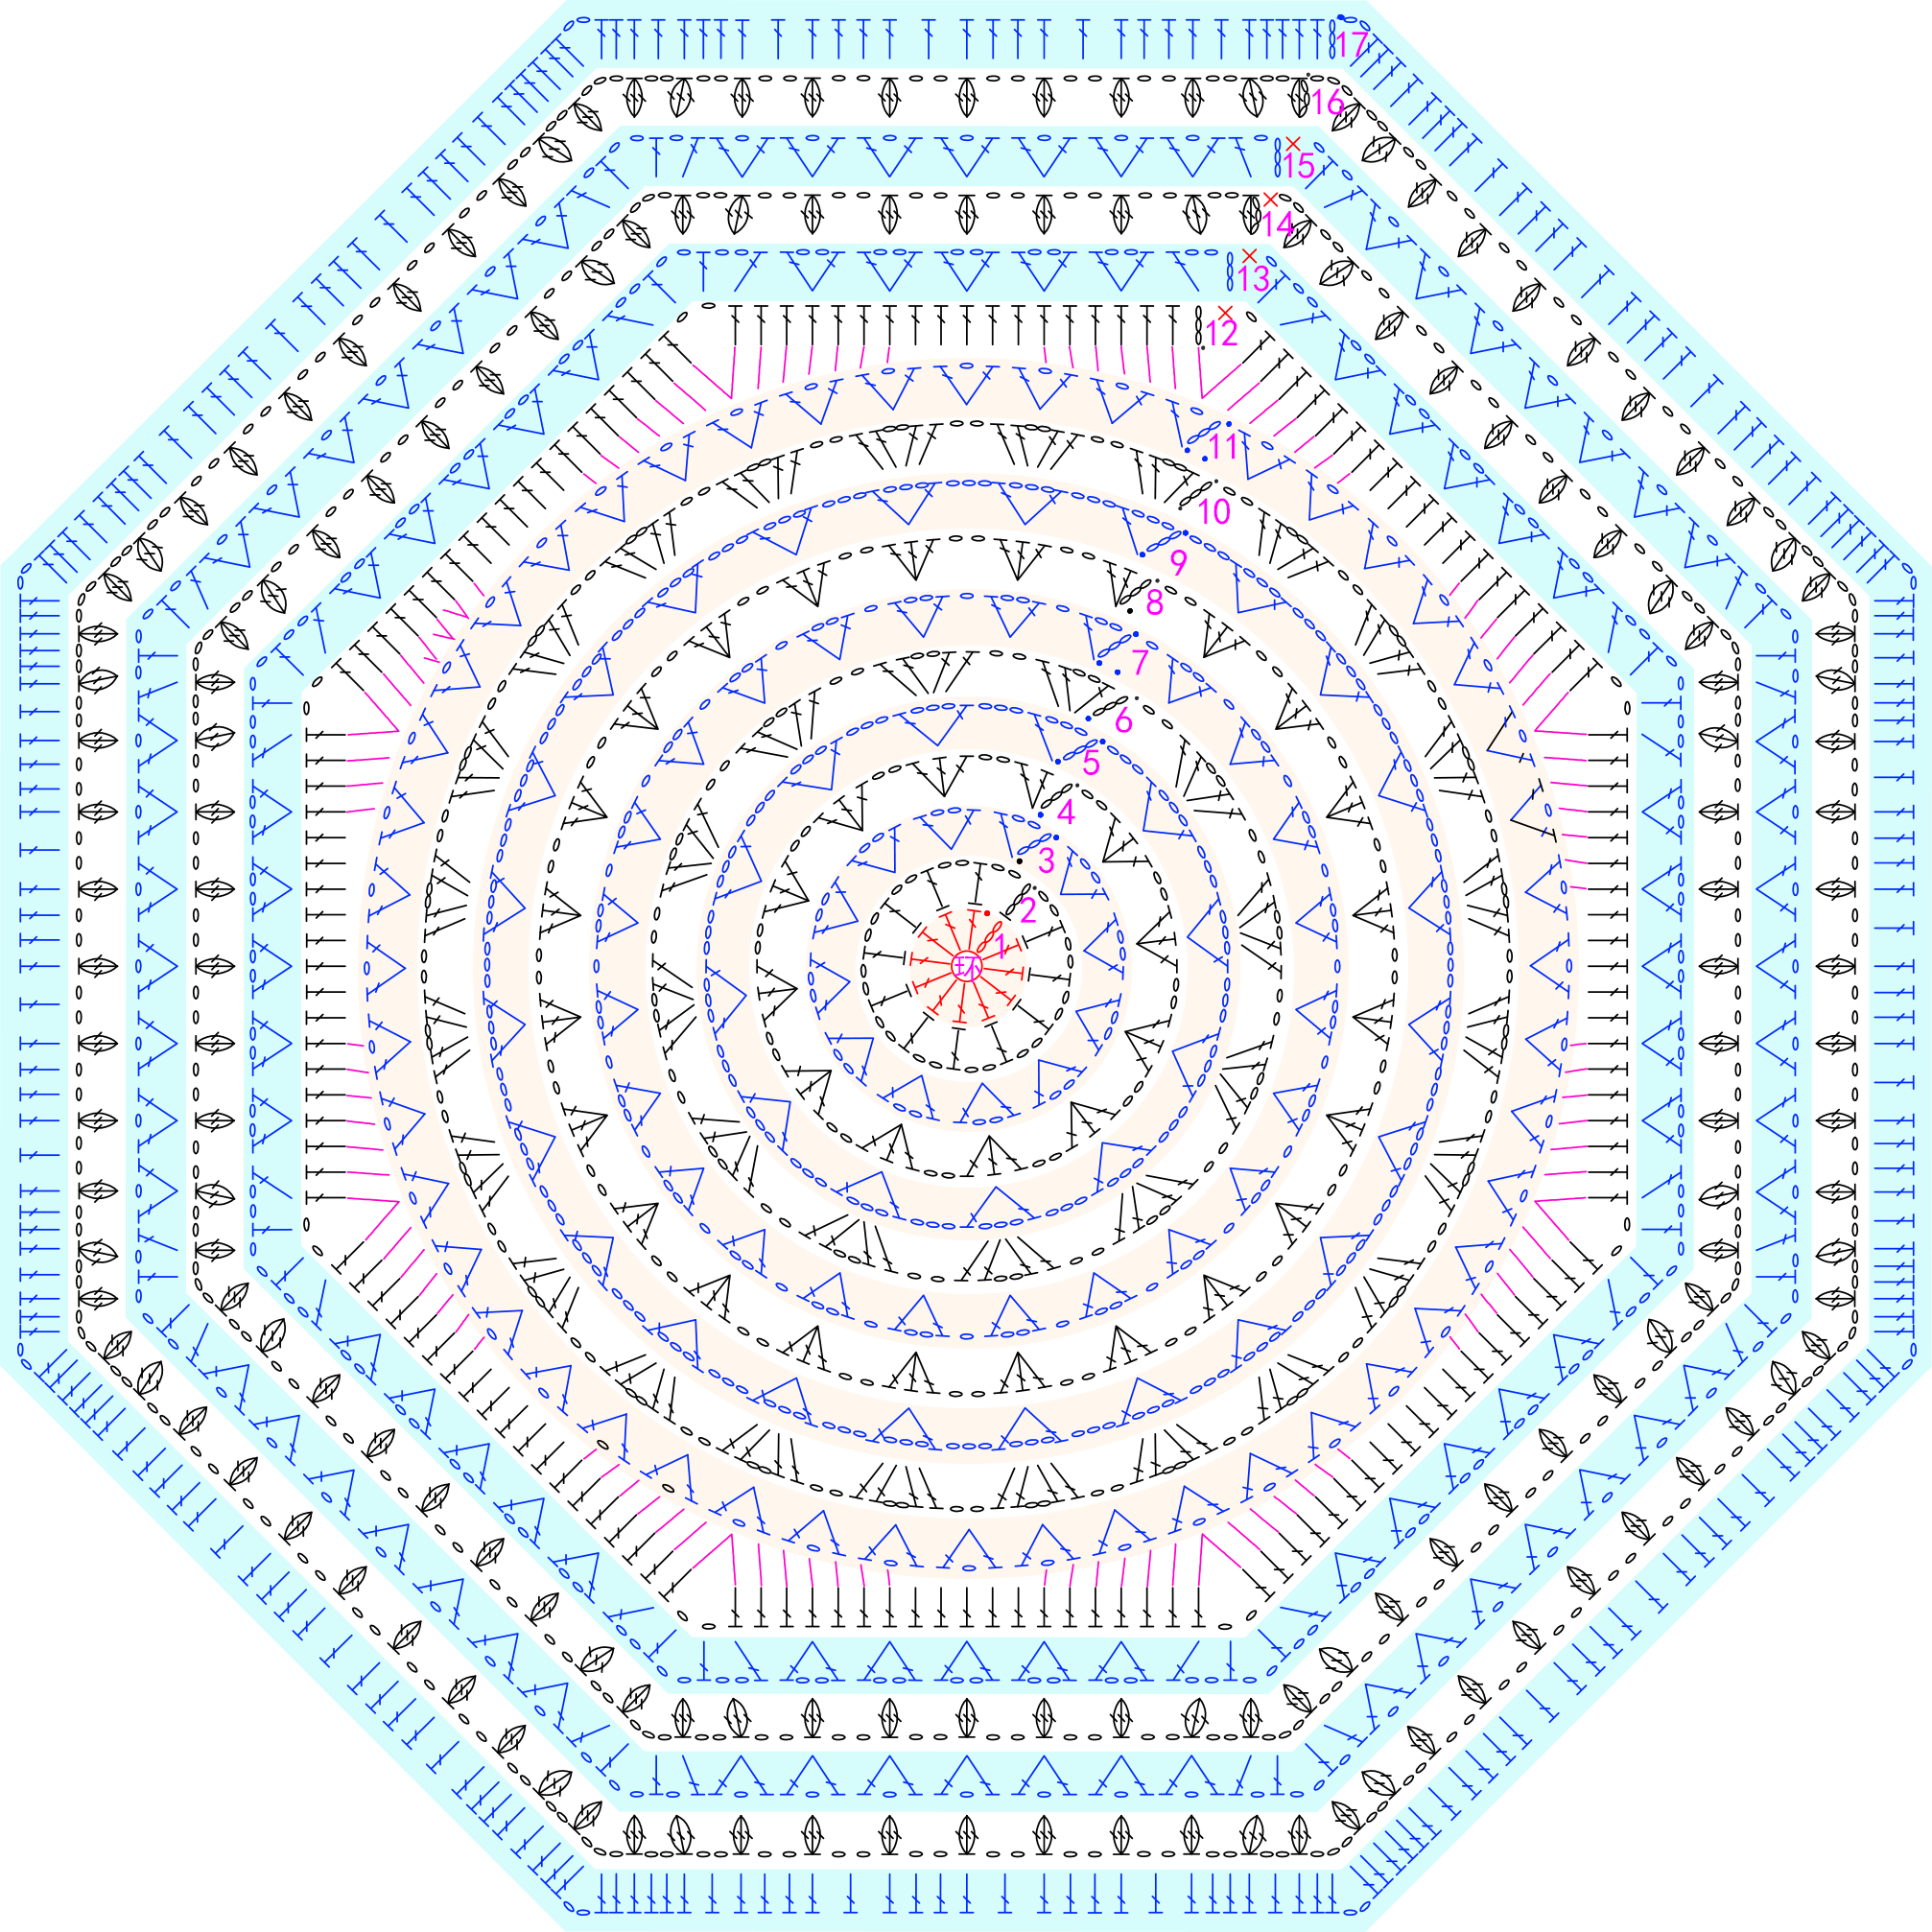
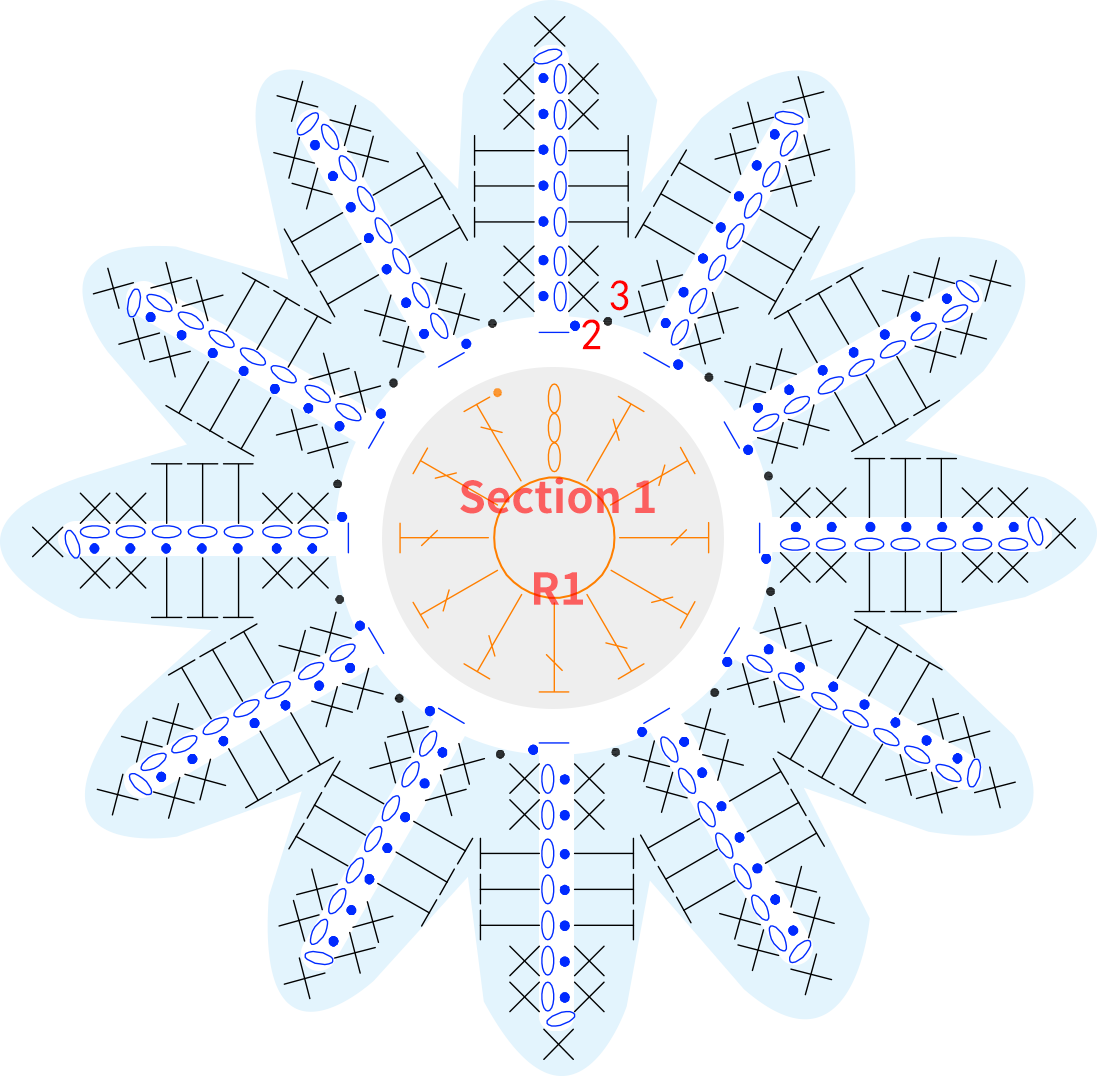
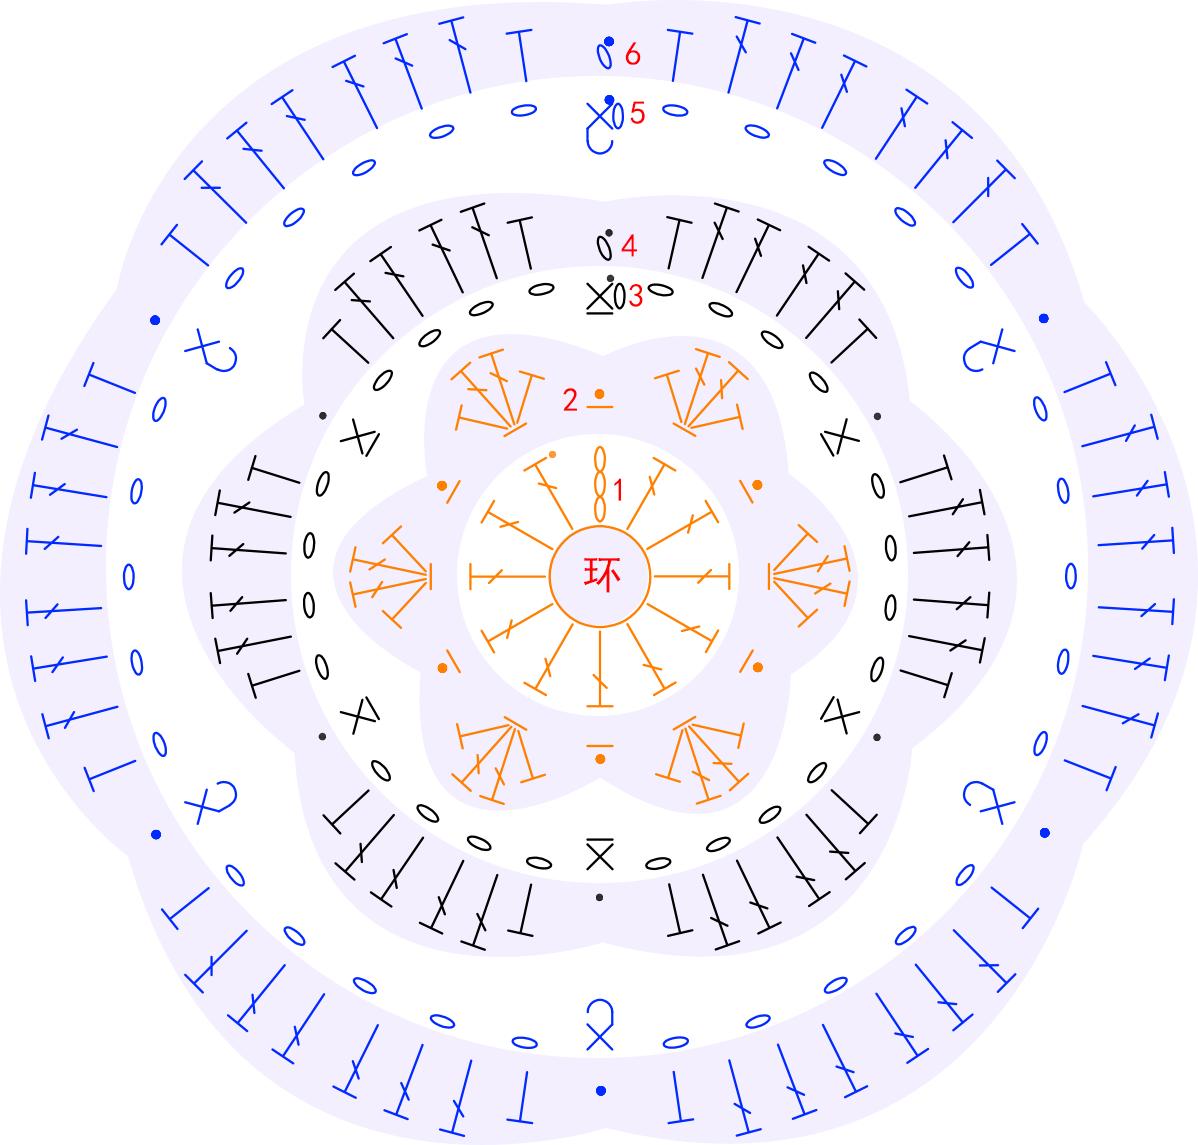
Both Motif 1 and Motif 2 are divided into two sections. The first section is the octagon swatch at the bottom, and the second section is the central flower. Crochet the first section first, then work the second section in its center.
Step 1 Section 1 of Motif 1 and Motif 2 A1 01' 45'' (Part1)
The section 1 of both motifs starts with a magic ring, and you crochet in rounds counterclockwise from the ring outward. You need to switch colors while crocheting. Pay attention that the first section of Motif 1 has one more color change than Motif 2 , and their color schemes are different. Please refer to each motif's color chart for details.
| Motif 1 Section 1 *4 | ||
| Rounds | Blue Moon Style | Zinnia Style |
| R1 | 30#Zinnia | 30#Zinnia |
| R2~R11 | 54#Baby Blue | 54#Baby Blue |
| R12~R16 | 17#Marine Blue | 05#Yucca |
| R17 | 42#Blue Moon | 30#Zinnia |
| Motif 2 Section 1 【Blue Moon Style】 | ||
| Rounds | Color 1 *4 | Color 2 *1 |
| R1 | 35#Tomato | 30#Zinnia |
| R2~R16 | 06#Bright White | 06#Bright White |
| R17 | 42#Blue Moon | 42#Blue Moon |
| Motif 2 Section 1 【Zinnia Style】 | ||
| Rounds | Color 1 *1 | Color 2 *4 |
| R1 | 35#Tomato | 30#Zinnia |
| R2~R16 | 06#Bright White | 06#Bright White |
| R17 | 30#Zinnia | 30#Zinnia |
Note:
① For the 2nd round, crochet through the back loop of the stitches from the 1st round;
② After completing the 7th round, measure the motif's size (diameter approximately 12.5cm). If it differs significantly from the sample, adjust your tension and re-crochet;
③ For Motif One, switch colors on the 12th round. After finishing the 11th round, break the yarn directly and join a new yarn at the corresponding position. Refer to the video tutorial for details.
Step 2 Section 2 of Motif 1 A2 53' 26'' (Part1)
The second part continues crocheting in rounds on the first round of the corresponding first part. After completion, leave a yarn tail of about 30 centimeters, and sew it together with the first part. Please refer to the video demonstration for details.
| Motif 1 Section 2 *4 | ||
| Rounds | Blue Moon Style | Zinnia Style |
| R2~R3 | 06#Bright White | 06#Bright White |
Note: The first round of the second section is the same as the first round of the first section. The second section starts crocheting the second round directly on the front loop of the first round of the first section.
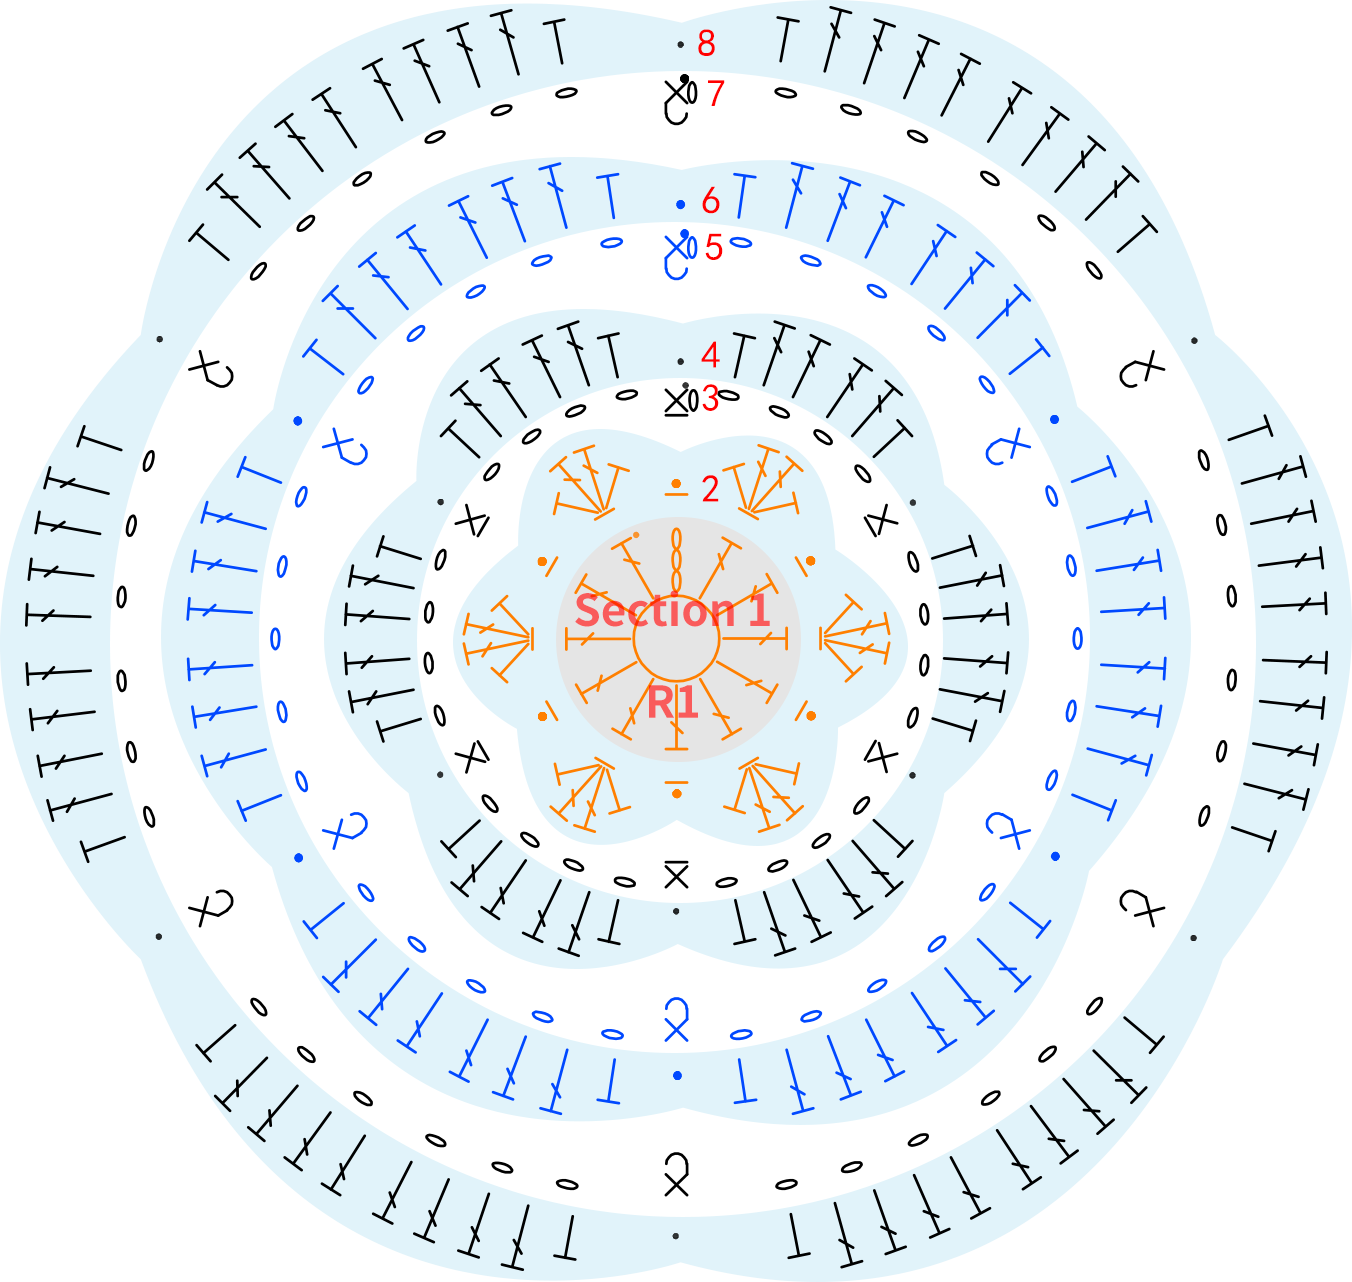
Step 3 Section 2 of Motif 2 A3 68' 24'' (Part1)
The second section of Motif Two has 2 color schemes. Both are crocheted counterclockwise outward from the first round of the corresponding first section. You need to switch colors while crocheting. Please refer to the video demonstration for details.
| Motif 2 Section 2 【Blue Moon Style】 | ||
| Rounds | Color 1 *4 | Color 2 *1 |
| R2 | 35#Tomato | 30#Zinnia |
| R3~R4 | 50#Deep Sea Coral | 60#Lemon Chrome |
| R5~R6 | 12#Shell Pink | 16#Lemonade |
| R7~R8 | 50#Deep Sea Coral | 60#Lemon Chrome |
| Motif 2 Section 2 【Zinnia Style】 | ||
| Rounds | Color 1 *1 | Color 2 *4 |
| R2 | 35#Tomato | 30#Zinnia |
| R3~R4 | 50#Deep Sea Coral | 60#Lemon Chrome |
| R5~R6 | 12#Shell Pink | 16#Lemonade |
| R7~R8 | 50#Deep Sea Coral | 60#Lemon Chrome |
Note: The first round of the second part is the same as the first round of the first part. Directly pick up and crochet in the front loops of the first round of the first part, which is in the same color as the second round of the second part. For the third round, pick up and crochet in the back loops of the first round.
Part 2 Motif 3 A
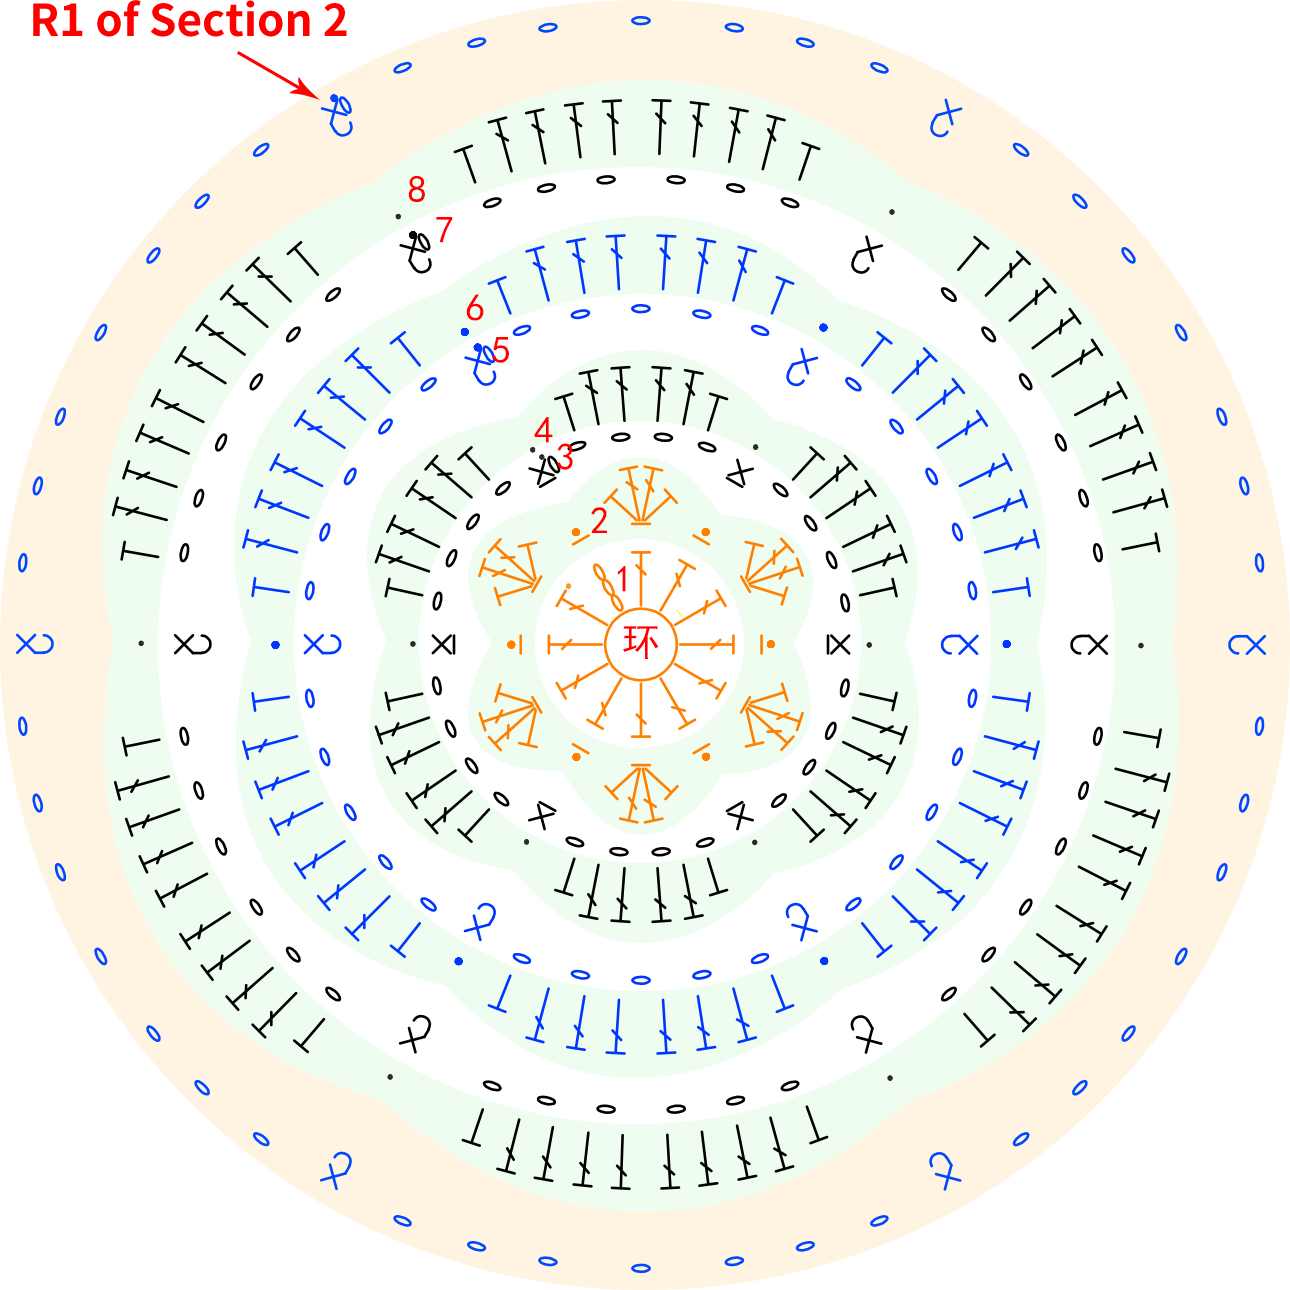
Motif 3 has two color schemes, and is also divided into the section 1 and the section 2 .
Step 1 Section 1 00' 44'' (Part2)
The flower crochet technique in the first section is identical to the flowers in the first section of Motif Two. Please refer to the video tutorial for details.
Note: The 2nd round picks the front half of the 1st round, and the 3rd round picks the back half of the 1st round.
| Motif 3 Section 1 【Zinnia Style&Blue Moon Style】 | ||
| Rounds | Color 1 *2 | Color 2 *2 |
| R1 | 35#Tomato | 30#Zinnia |
| R2 | 35#Tomato | 30#Zinnia |
| R3~R4 | 50#Deep Sea Coral | 60#Lemon Chrome |
| R5~R6 | 12#Shell Pink | 16#Lemonade |
| R7~R8 | 50#Deep Sea Coral | 60#Lemon Chrome |
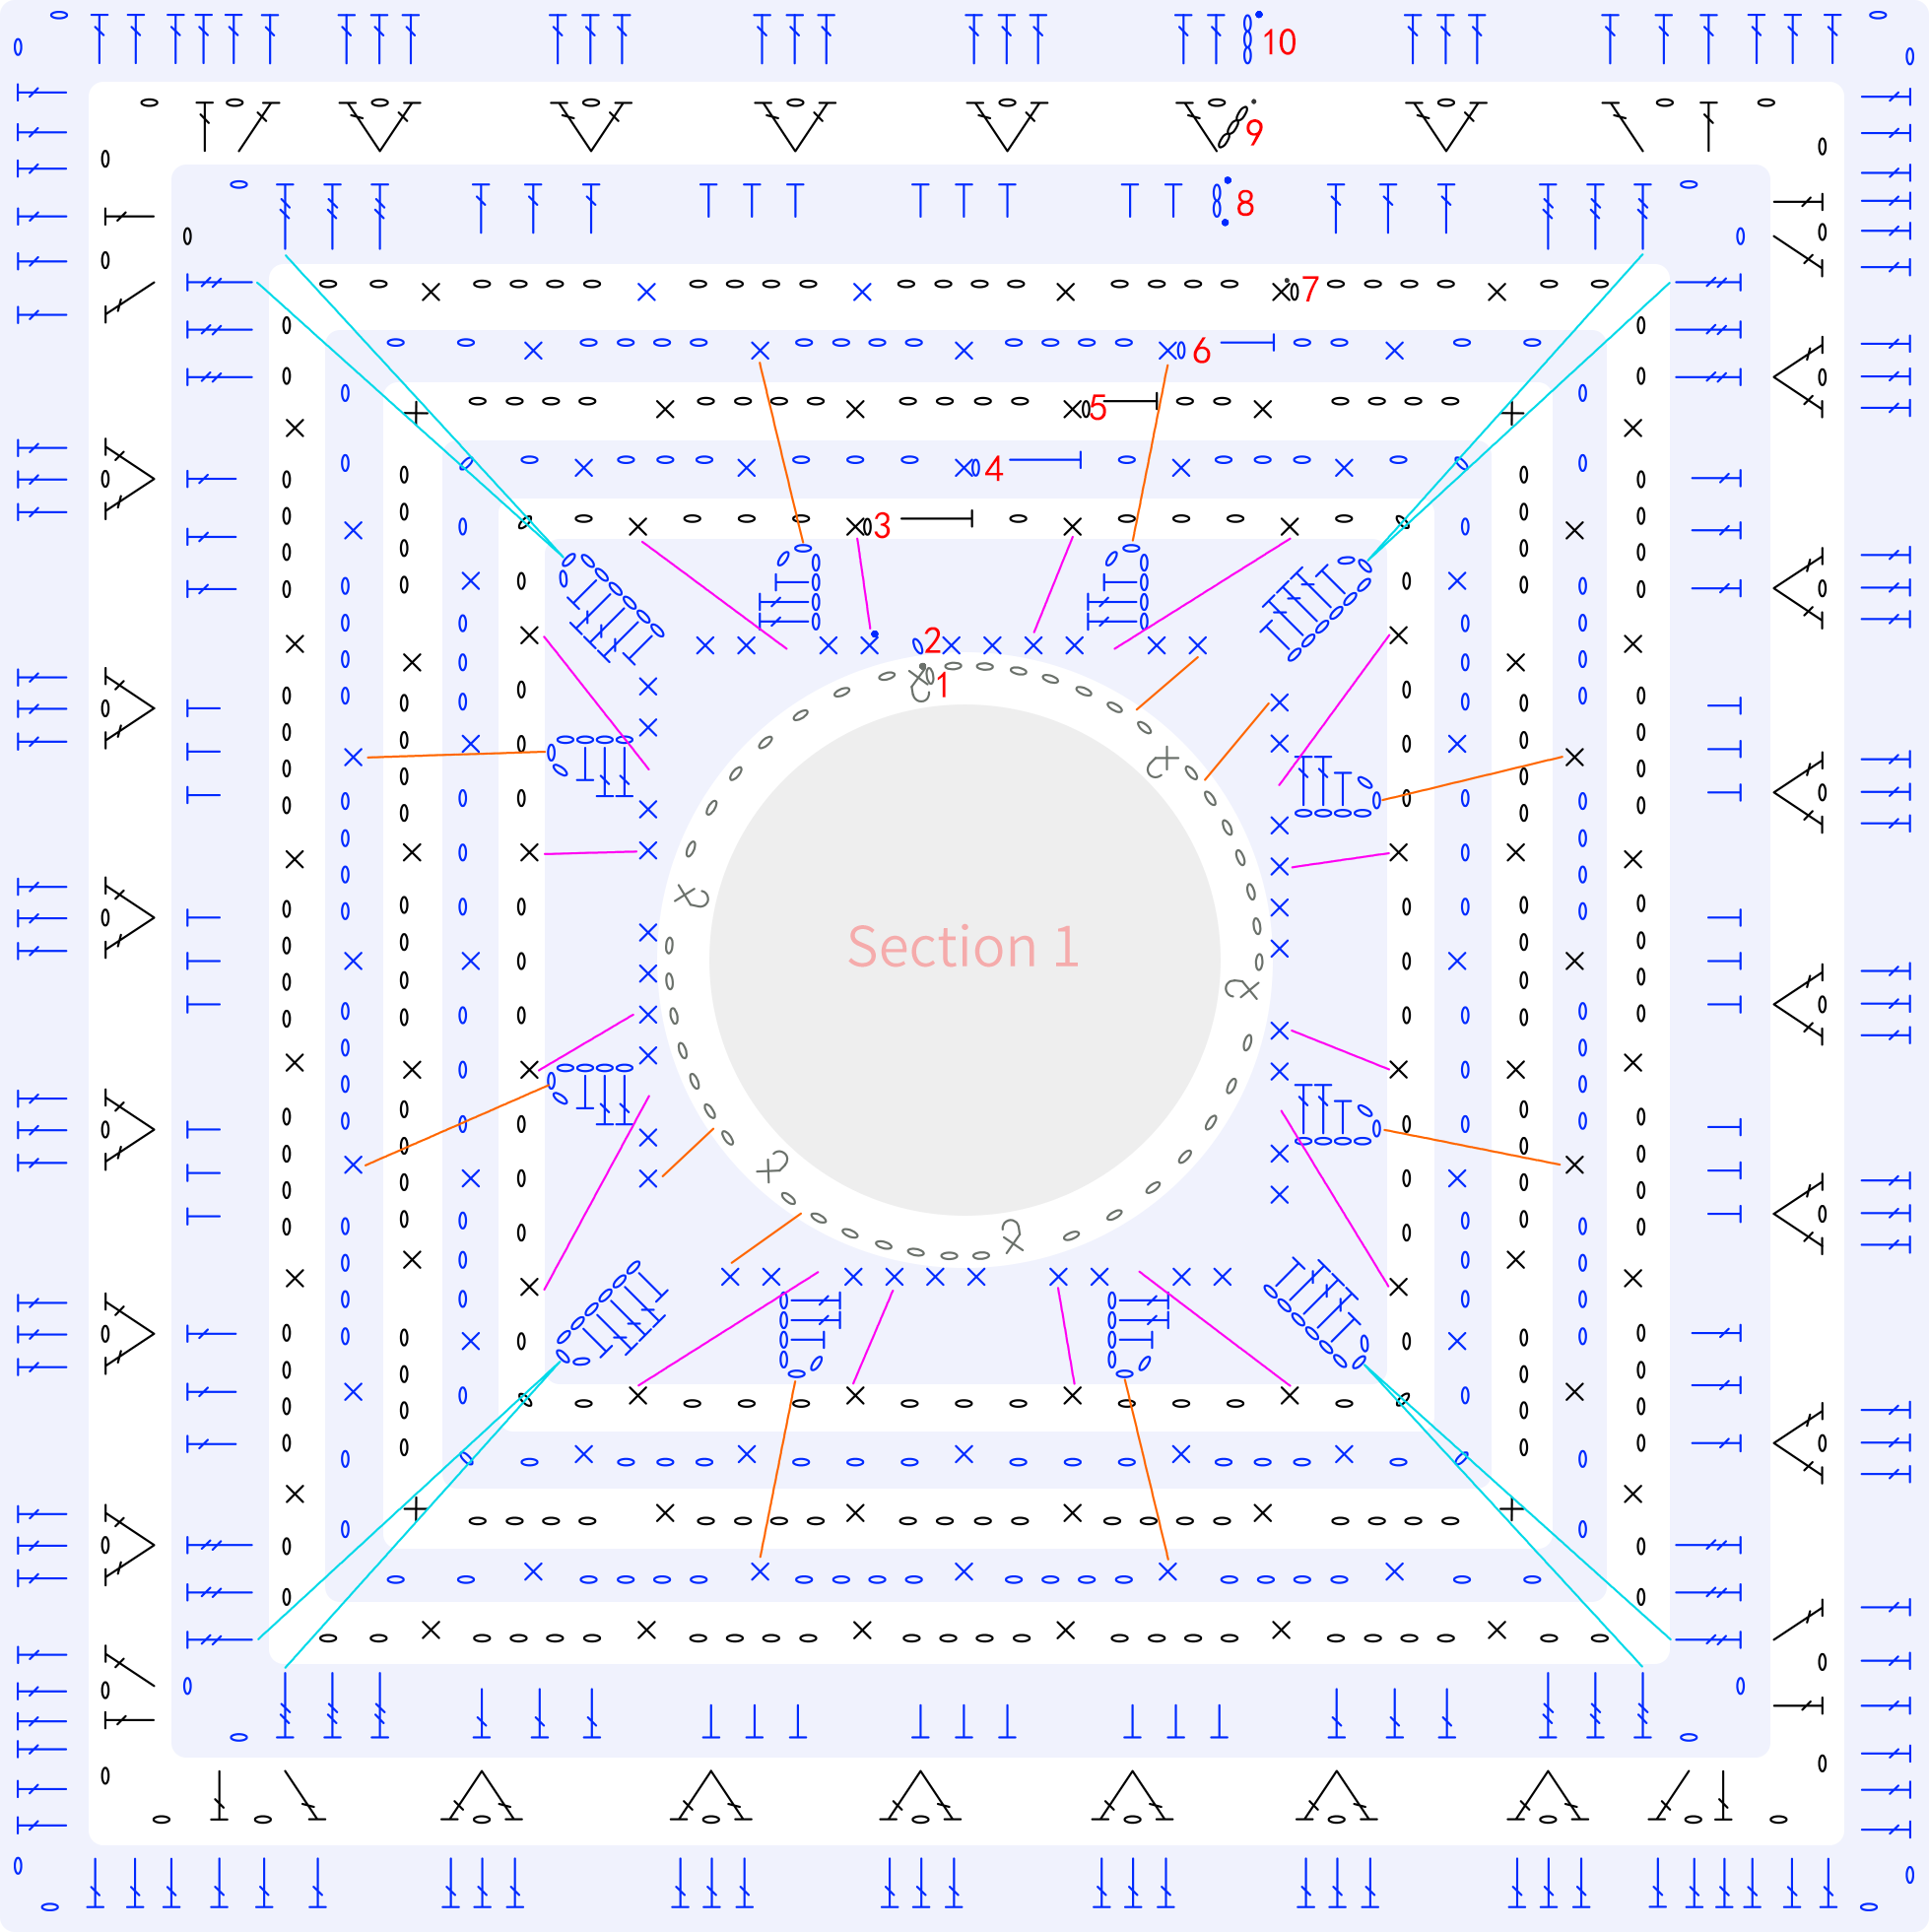
Step 2 Section 2 of Motif 3 A4 02' 02'' (Part2)
After completing the first part, continue to crochet in rounds outward for the second part. Please refer to the video demonstration for details.
| Motif 3 Section 2 | ||
| Rounds | Blue Moon Style | Zinnia Style |
| R1~R2 | 48#Lime Green | 22#Viridis |
| R3~R9 | 06#Bright White | 06#Bright White |
| R10 | 42#Blue Moon | 30#Zinnia |
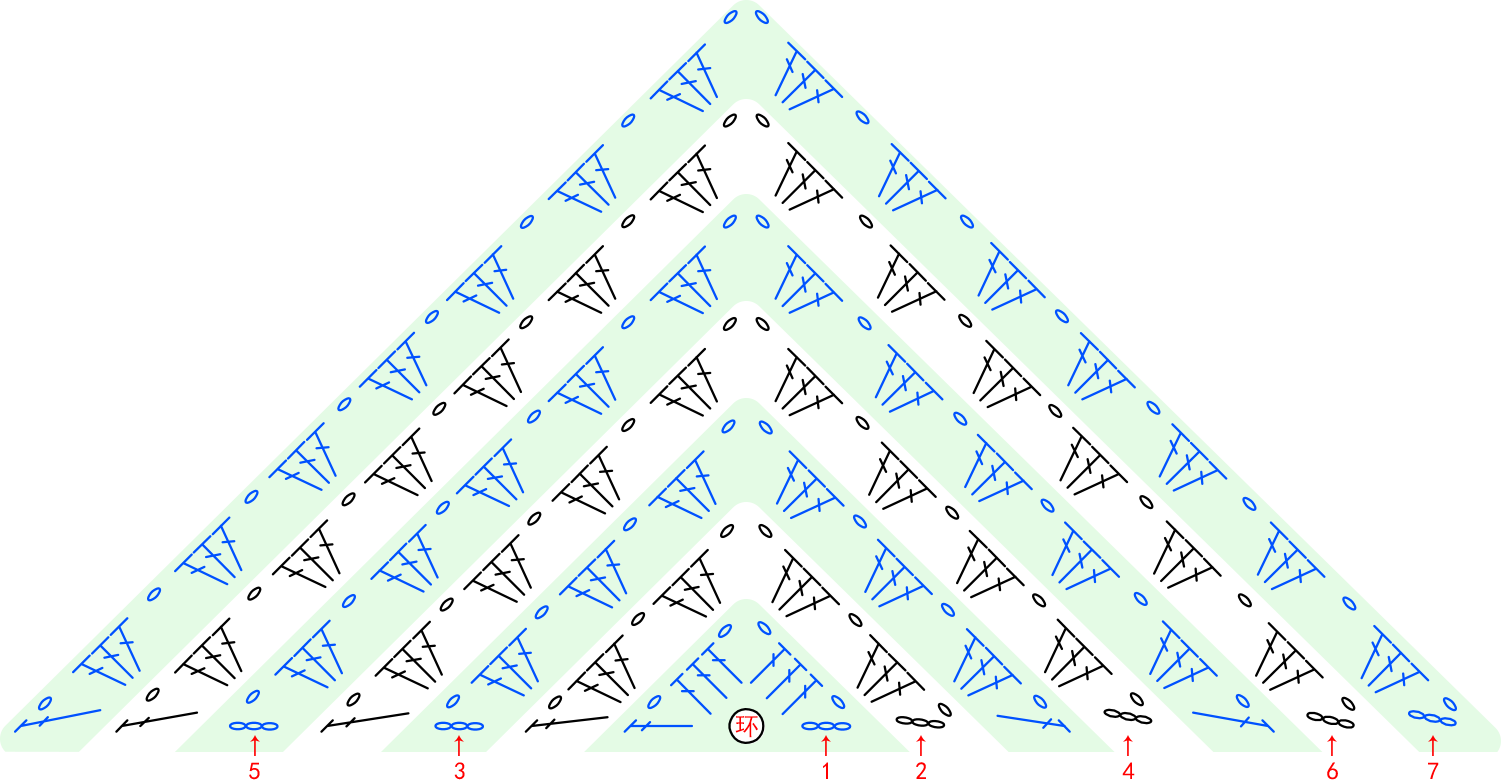
Part 3 Motif 4 x 8 A5 38' 15'' (Part2)
Motif 4 starts with a magic ring and is crocheted back and forth from the center outward. You will need to switch colors while crocheting. Please refer to the video demonstration for specifics.
| Motif 4 | ||
| Rows | Blue Moon Style | Zinnia Style |
| H1 | 06#Bright White | |
| H2~H3 | 【12#Shell Pink、50#Deep Sea Coral】Randomly | |
| H4~H5 | 【30#Zinnia、16#Lemonade、60#Lemon Chrome】Randomly | |
| H6 | 06#Bright White | |
| H7 | 42#Blue Moon | 30#Zinnia |
Part 4 Joining A6 47' 49'' (Part2)
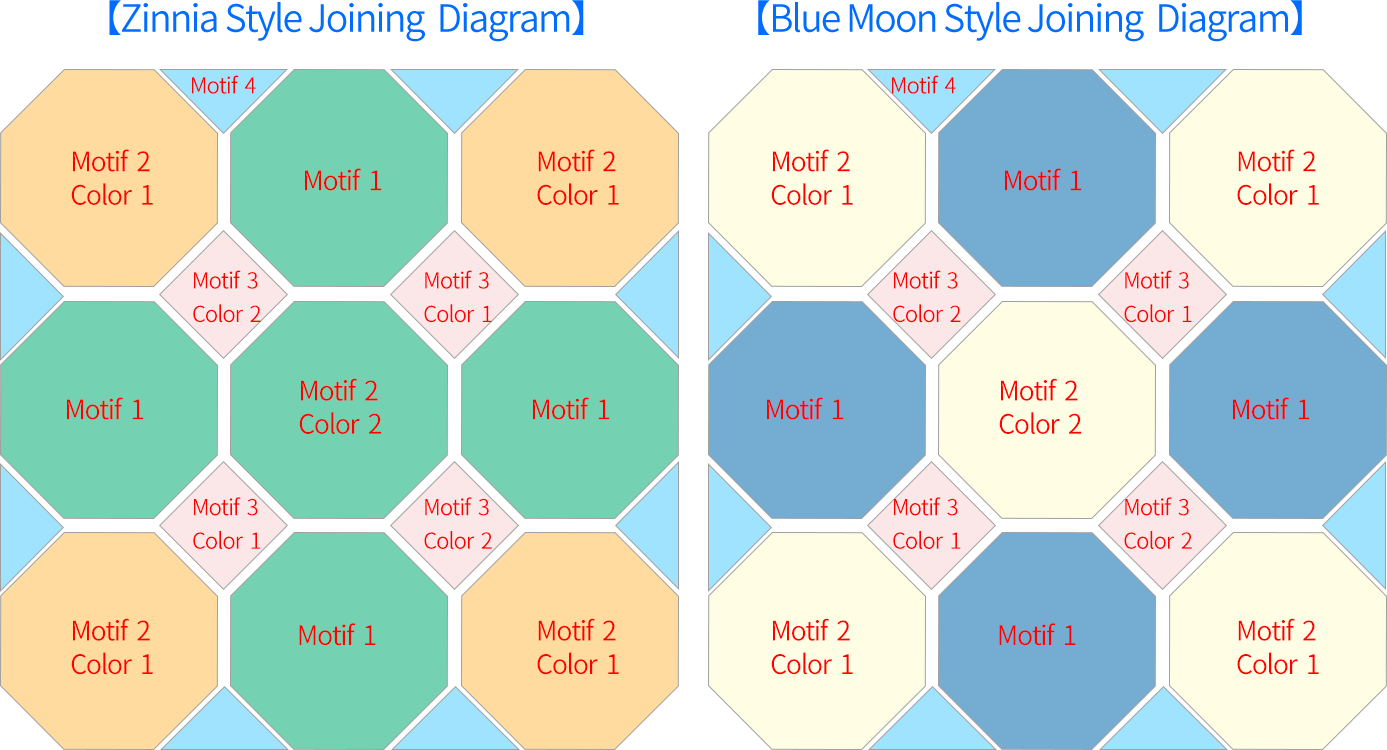
After completing all the motifs, you can refer to the finished product or the joining dragram to position the four types of pieces correctly. Pay attention that the positions of motif 1 and motif 2 are different for the two kinds of blankets. As for the specific placement of the octagon motifs, you can also determine it according to your own preference. Use the whip stitch method for sewing together. You can start sewing from the central motif or one of the edge motifs. For more details, please refer to the video demonstration.
| Joining | Blue Moon Style | Zinnia Style |
| 42#Blue Moon | 30#Zinnia |
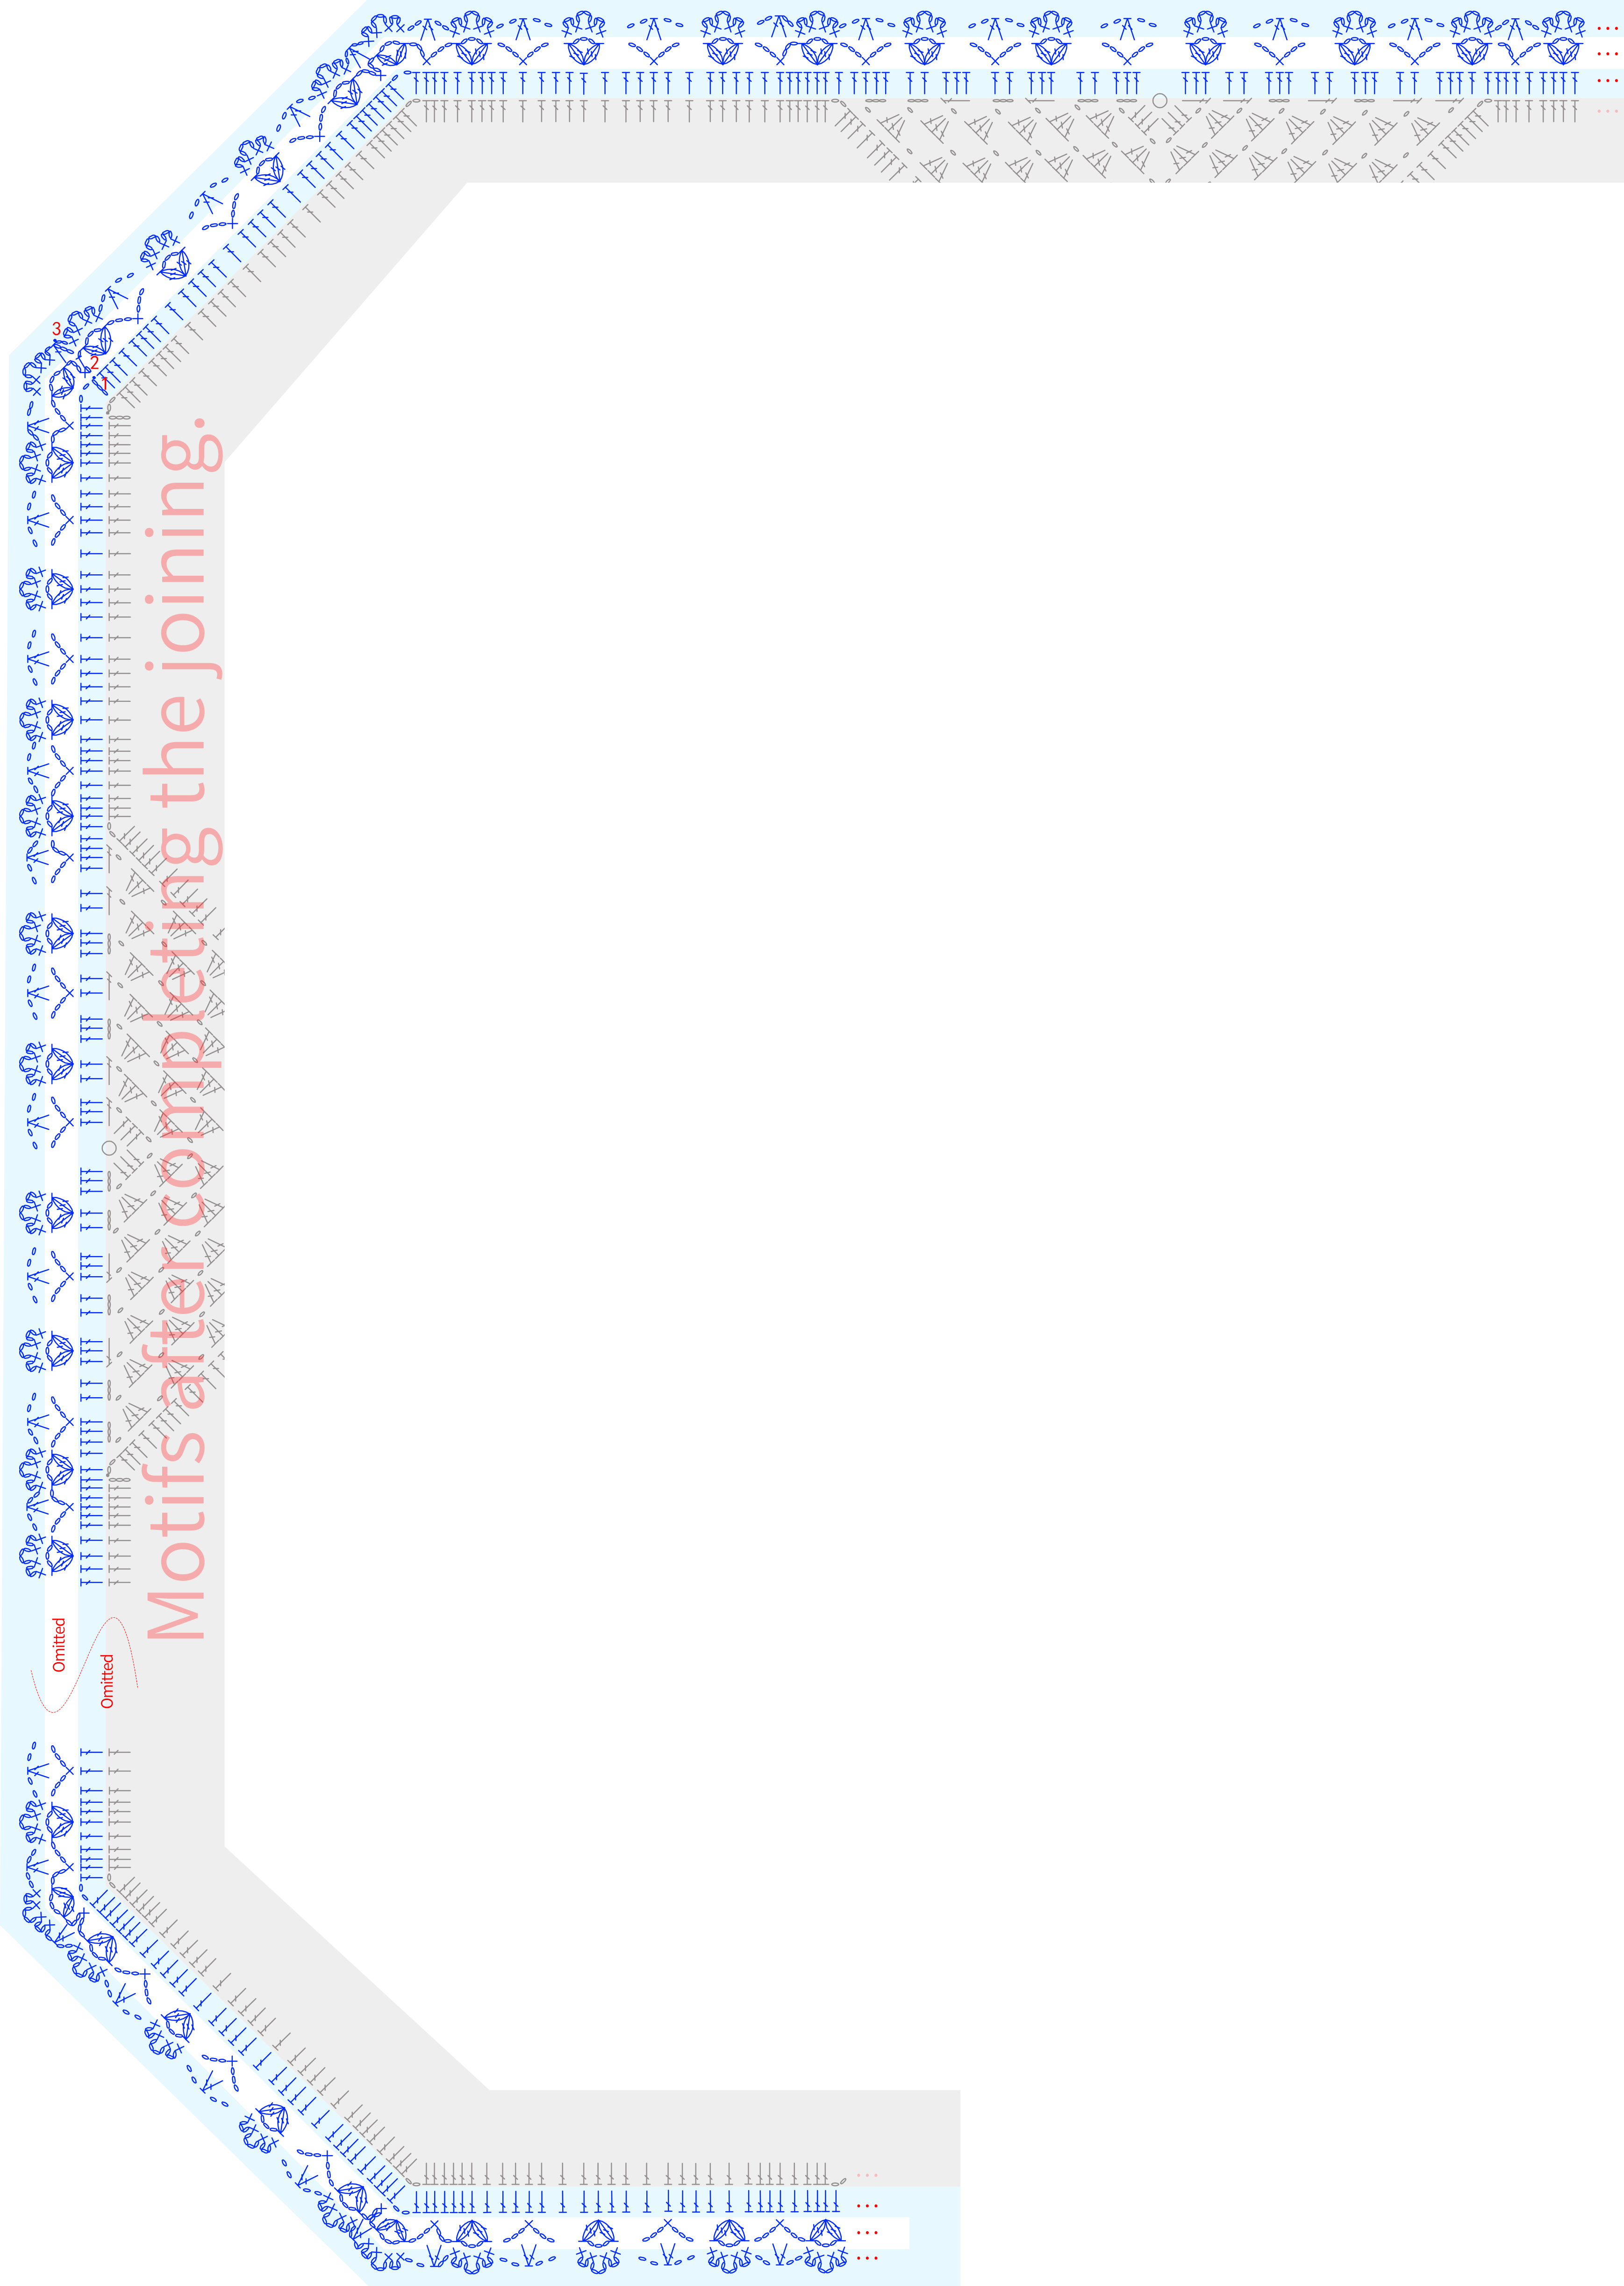
Part 5 Edging A7 61' 40'' (Part2)
The edging is crocheted around the completed motif in rounds. Please refer to the video demonstration for specifics.
| Edging | Blue Moon Style | Zinnia Style |
| 42#Blue Moon | 30#Zinnia |
Part 6 Decoration B
There are mainly 3 types of decorations: leaf ring, flower one, and flower two. Crochet the corresponding amount and color schemes for each decoration separately, then sew them onto the corresponding positions.
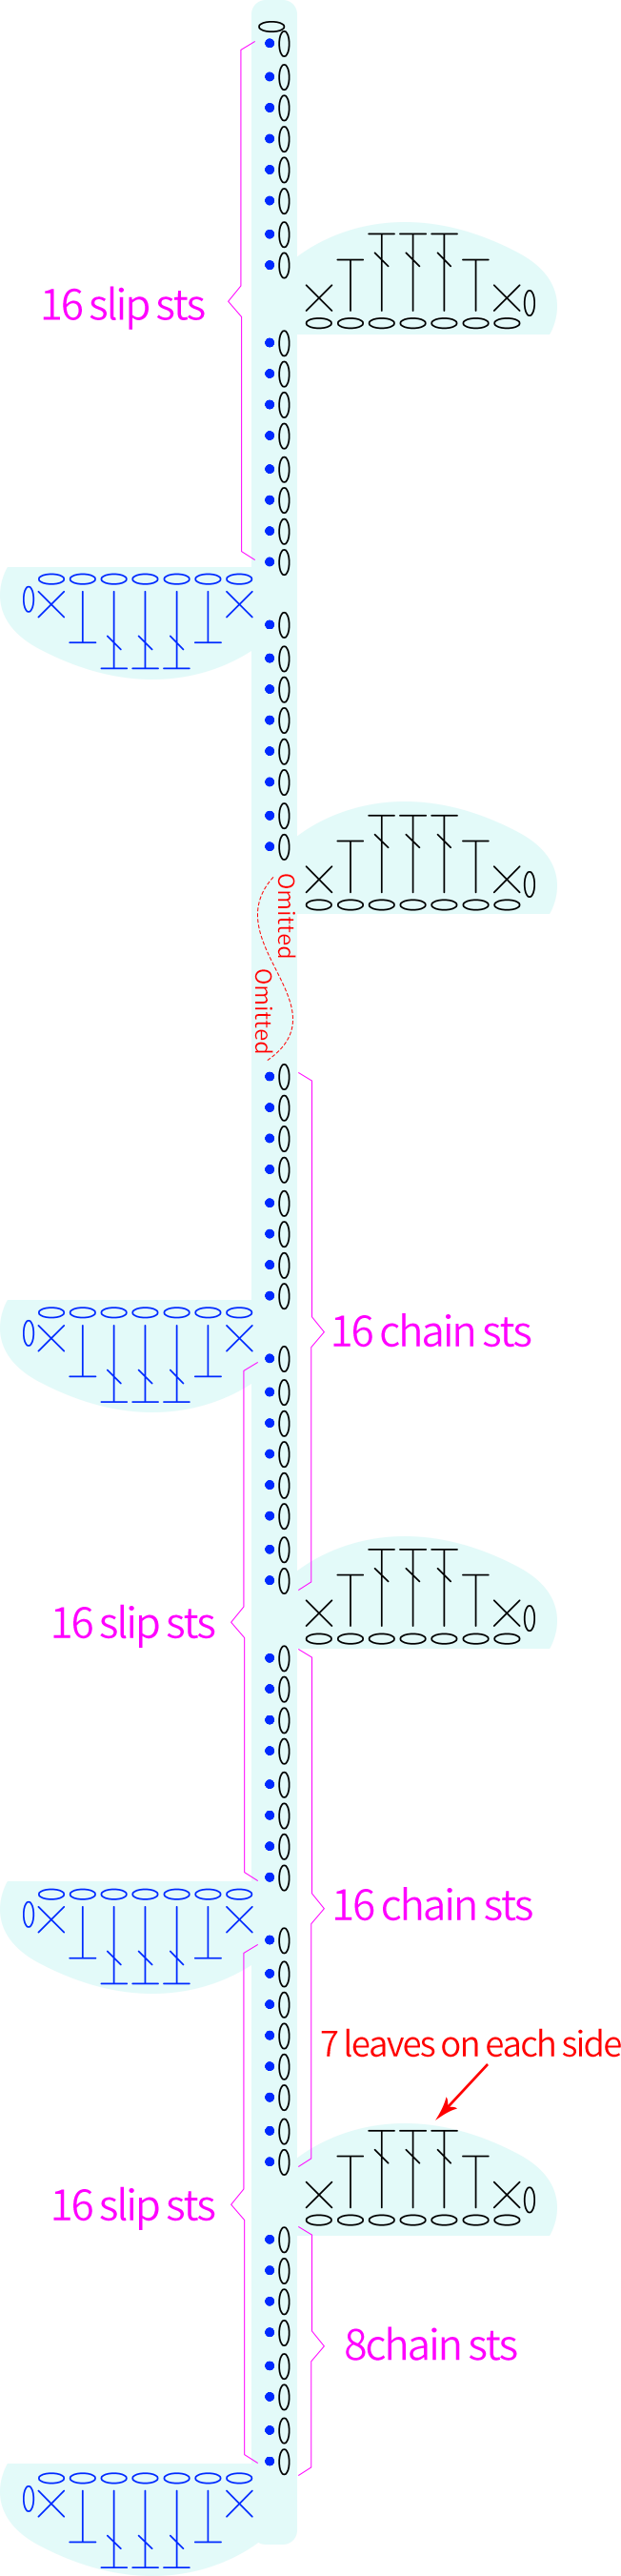
Step 1 Leaf Circle B1 82' 51'' (Part2)
The leaf circle is crocheted back and forth, and finally, leave a tail to sew it into a circle, then secure it at the corresponding position on the octagon piece. Please refer to the video demonstration for details.
| Leaf Circle | Blue Moon Style | Zinnia Style |
| 48#Lime Green | 22#Viridis |
Step 2 Flower 1 B2 96' 31'' (Part2)
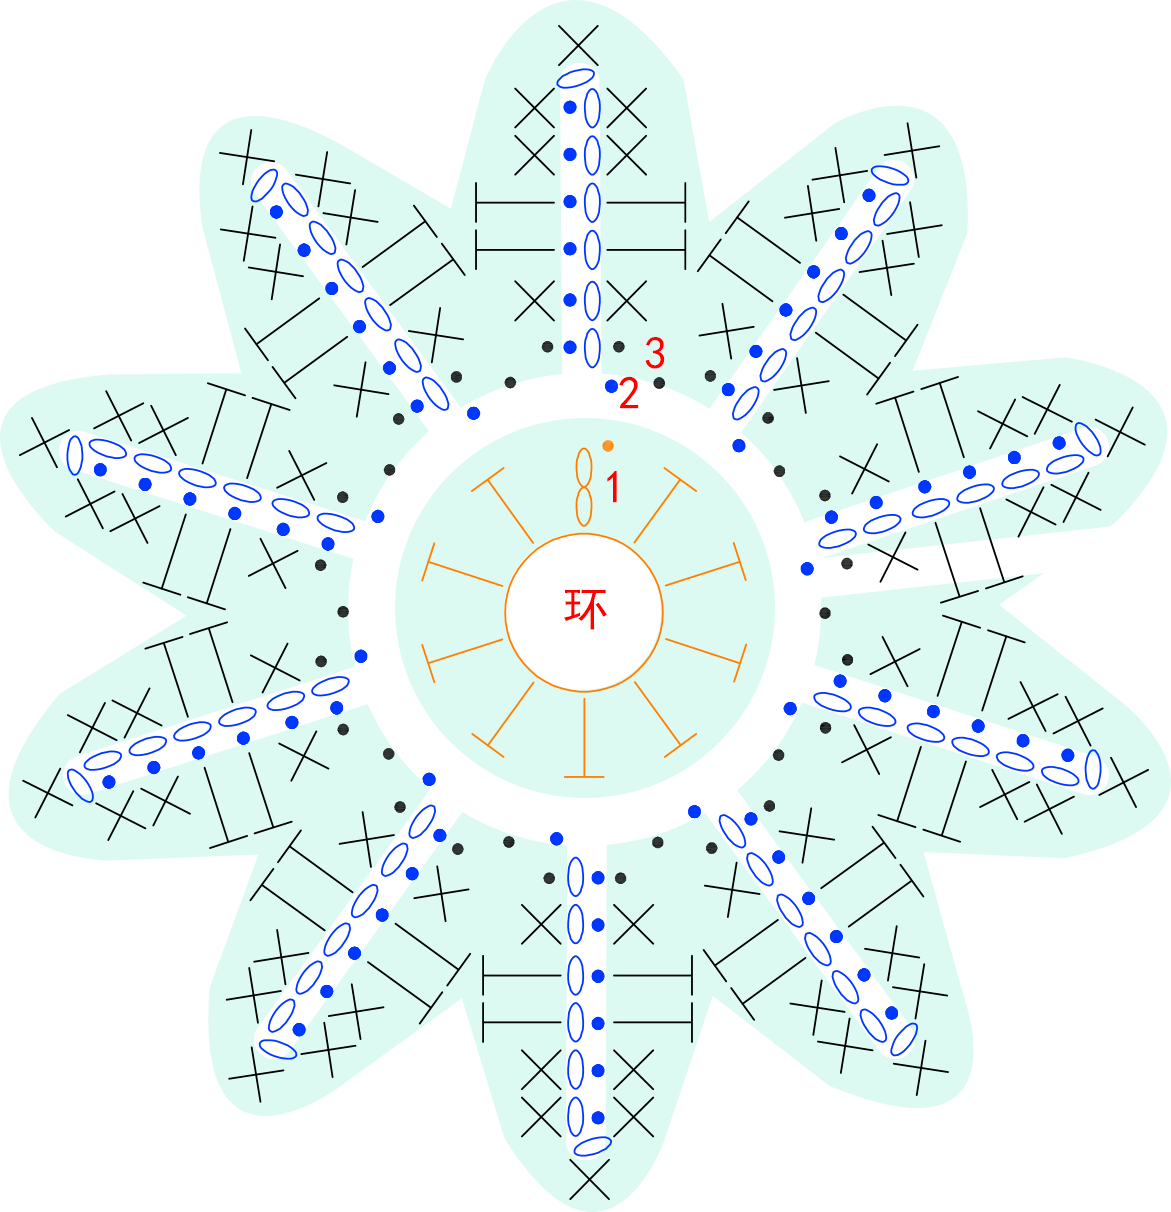
The crochet method for Flower 1 is similar to the central flower of Motif 1. It also starts with a magic ring and is crocheted in rounds counterclockwise. At the end, leave a yarn tail of approximately 30 centimeters, then sew it onto the eight corners of Motif 1. Each motif should be paired with eight flowers. For more details, please refer to the video demonstration.
| Flower 1 *32 | ||
| Rounds | Blue Moon Style | Zinnia Style |
| R1 | 30#Zinnia | 30#Zinnia |
| R2~R3 | 06#Bright White | 06#Bright White |
Step 3 Flower 2 B3 104' 12'' (Part2)
Flower 2 has 2 contrasting colors, and the crochet method and color scheme for the first 6 rounds of the central flower in motif 2 are the same. Pay attention to leave approximately 20 centimeters of yarn tail for sewing. For specifics, please refer to the video demonstration.
| Flower 2 【Blue Moon Style】 | ||
| Rounds | Color 1 *32 | Color 2 *8 |
| R1 | 35#Tomato | 30#Zinnia |
| R2 | 35#Tomato | 30#Zinnia |
| R3~R4 | 50#Deep Sea Coral | 60#Lemon Chrome |
| R5~R6 | 12#Shell Pink | 16#Lemonade |
| Flower 2 【Zinnia Style】 | ||
| Rounds | Color 1 *8 | Color 2 *32 |
| R1 | 35#Tomato | 30#Zinnia |
| R2 | 35#Tomato | 30#Zinnia |
| R3~R4 | 50#Deep Sea Coral | 60#Lemon Chrome |
| R5~R6 | 12#Shell Pink | 16#Lemonade |
Made by the community