Clothes
Fresh Summer
Project preview
See the finished project
Pattern format
Instructions


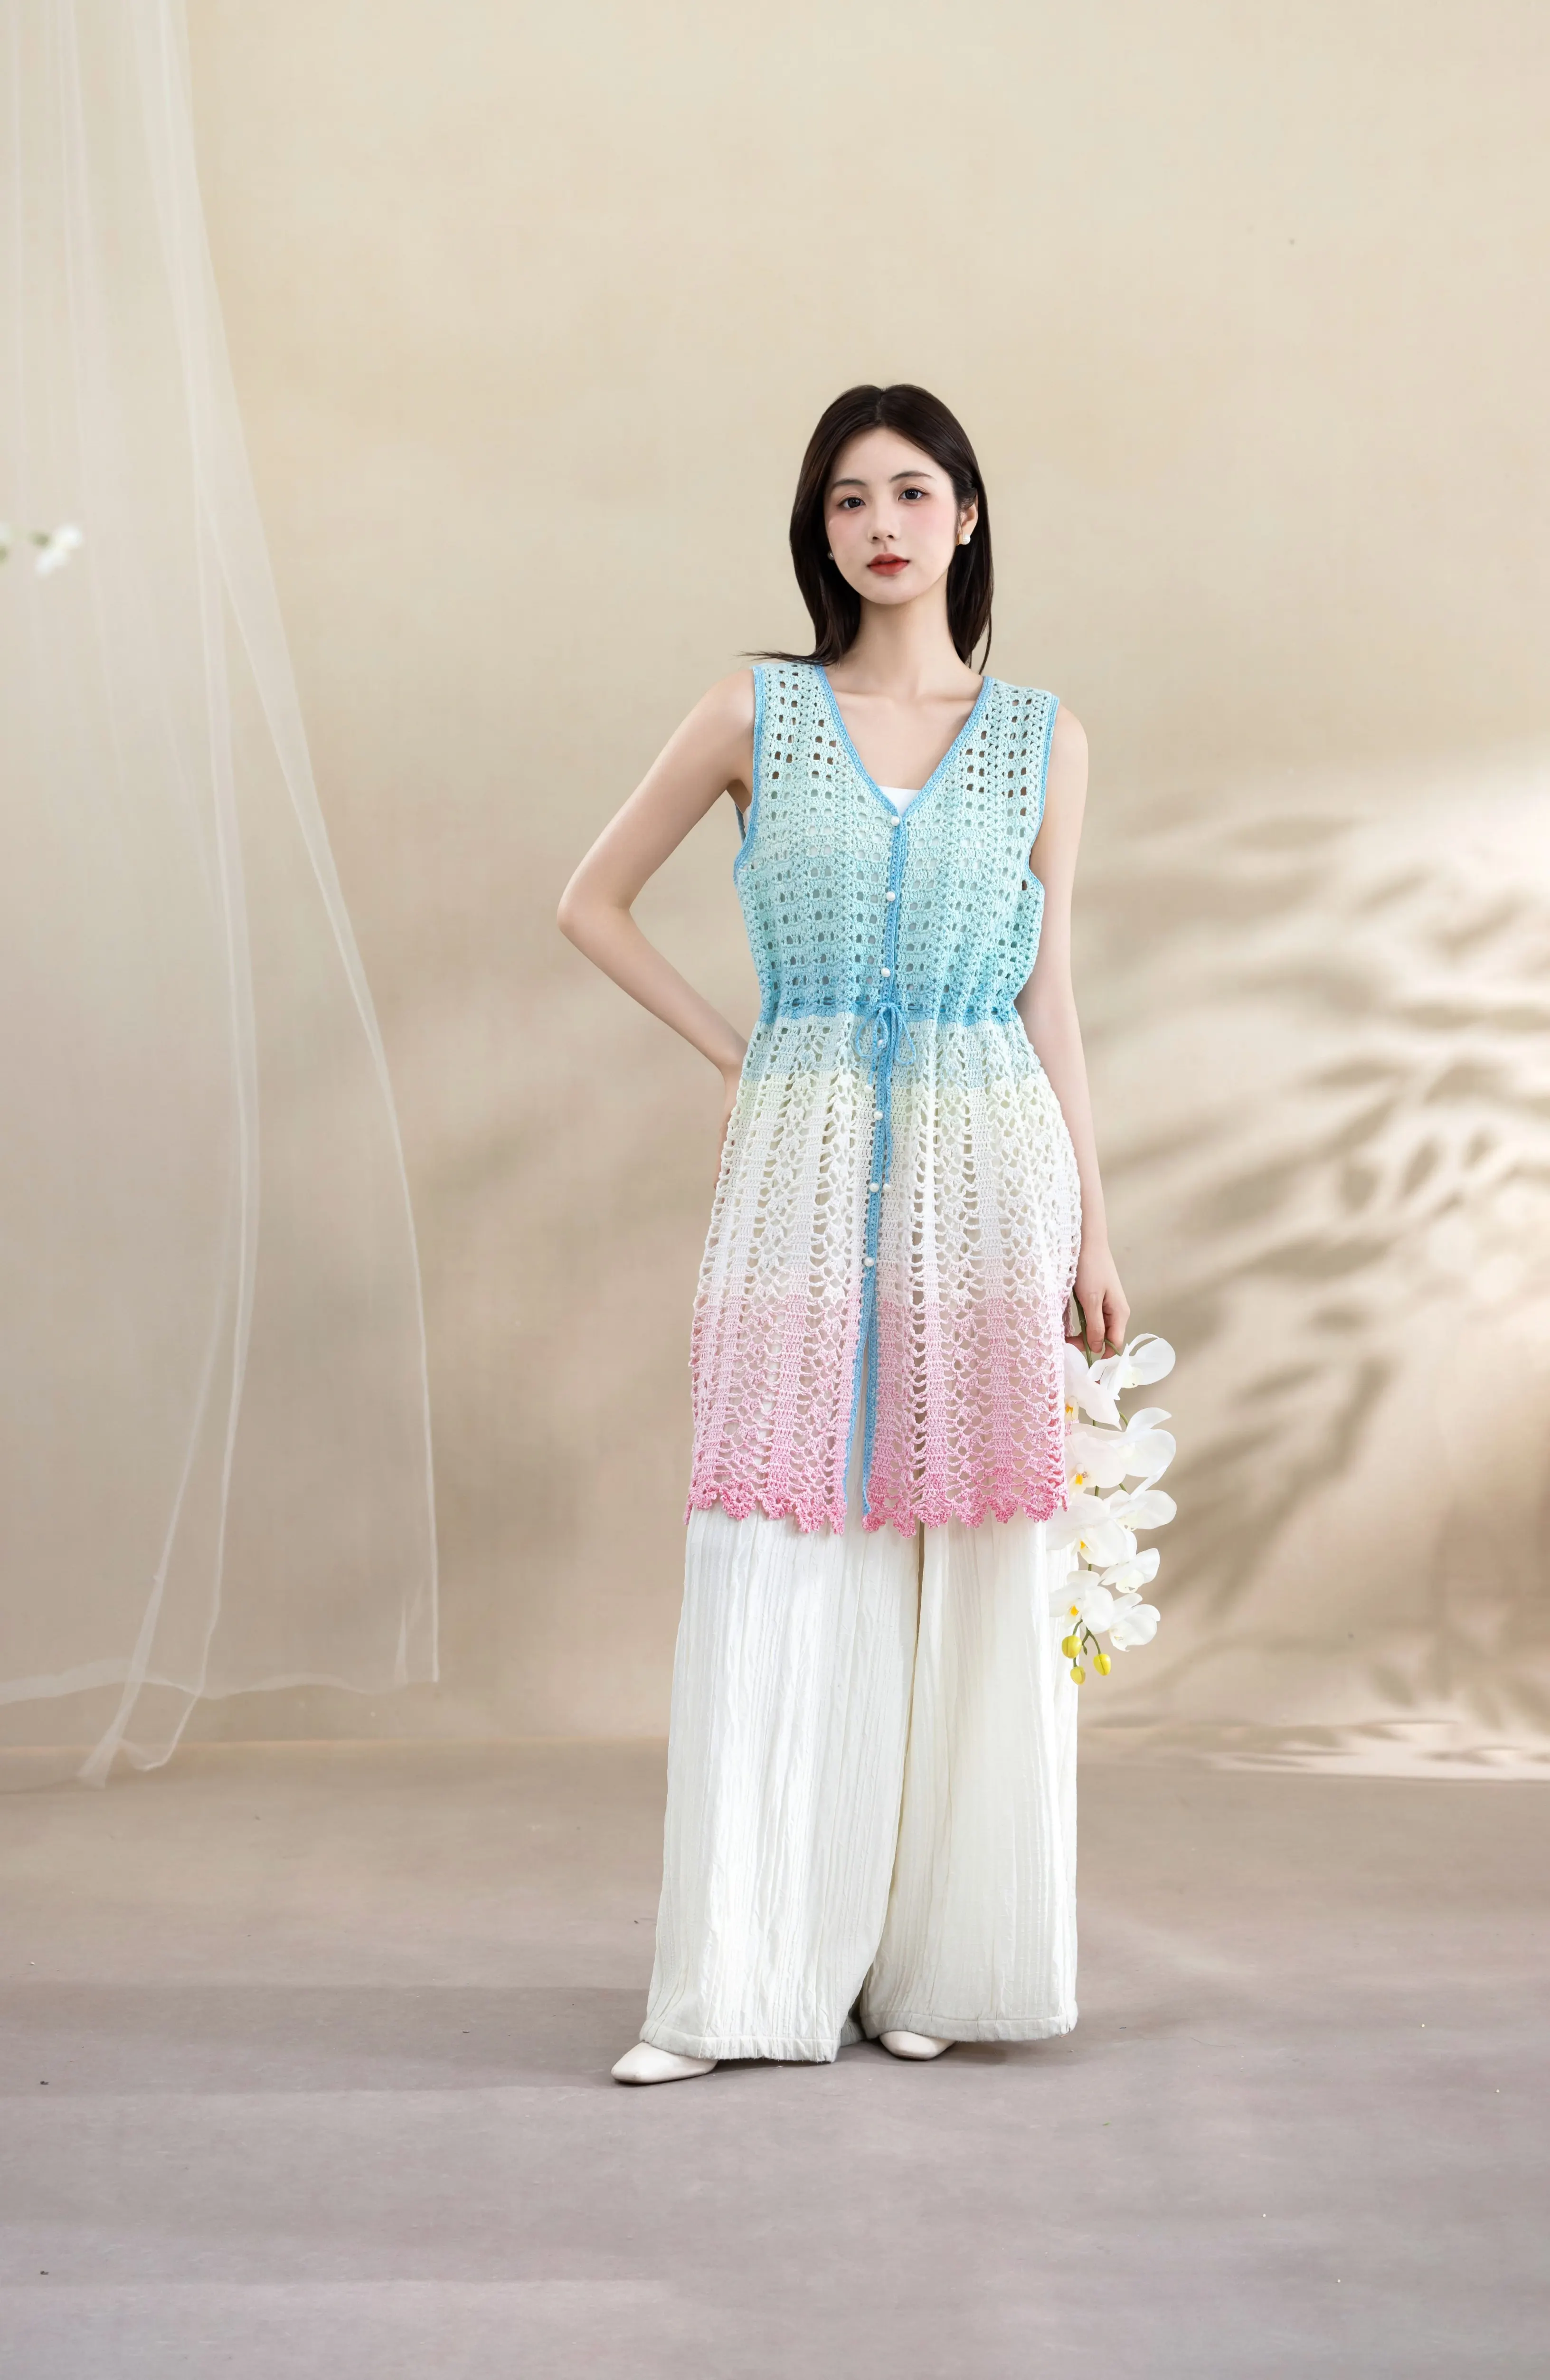
This sweater consists of the main body, sleeves, front band, cuffs, and ties. The main body includes the back piece, left front piece, and right front piece. First, complete the main body, then crochet the sleeves. After that, pick up and knit for the front band and sleeves, crochet the patterns for the front band and cuffs, and finally finish crocheting the ties.
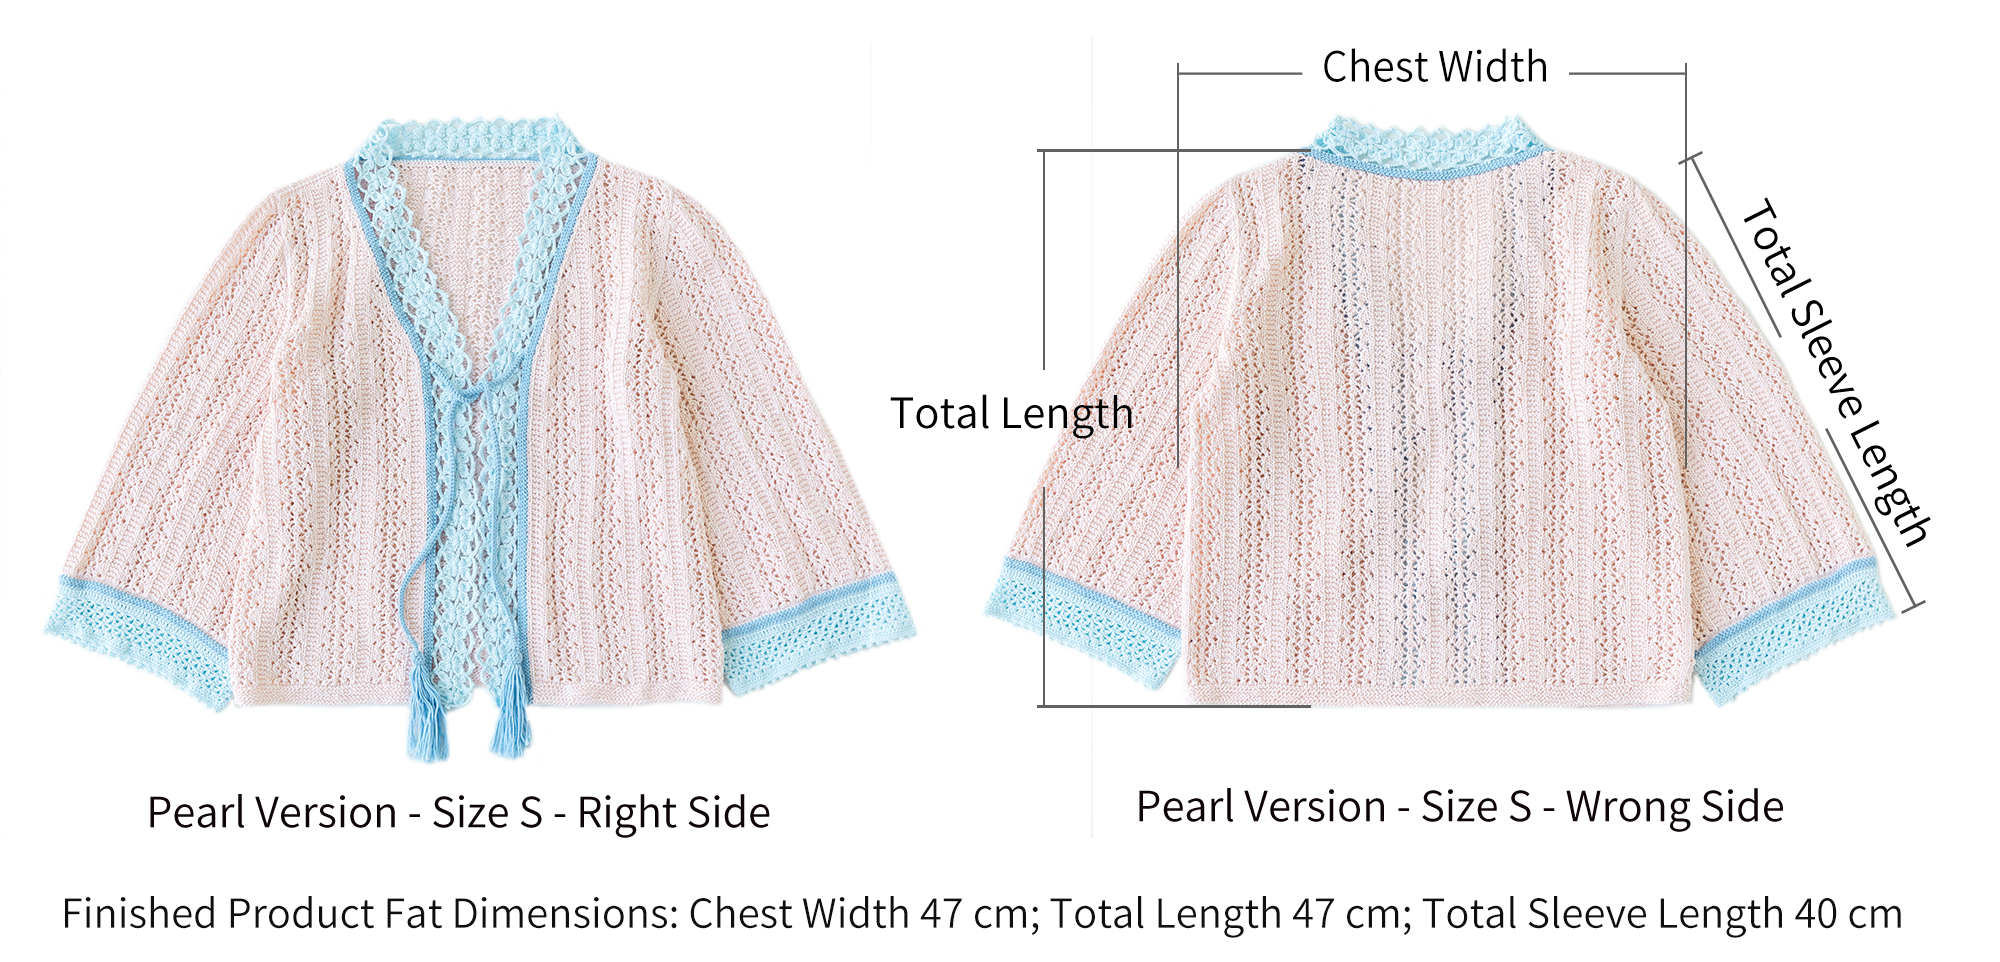
| Part | White Version | Pearl Version |
| Main Body | Combed 3# Lace - 01#Brilliant White | Combed 3# Lace - 05#Pearl |
| Gem Twist - 01#Small Silver Snail | Gem Twist - 08#Bronze | |
| Sleeves | Combed 3# Lace - 01#Brilliant White | Combed 3# Lace - 05#Pearl |
| Gem Twist - 01#Small Silver Snail | Gem Twist - 08#Bronze | |
| Pick Up the Edge of the Front Band | Combed 3# Lace - 27#Lime Green | Combed 3# Lace - 15#Sky Blue |
| Front Band Crochet | Combed 5# Lace - 11# Lime Cream | Combed 5# Lace - 09#Bleached Aqua |
| Pick Up the Edges for the Cuffs | Combed 3# Lace - 27#Lime Green | Combed 3# Lace - 15#Sky Blue |
| Cuffs Crochet | Combed 5# Lace - 11# Lime Cream | Combed 5# Lace - 09#Bleached Aqua |
| Sewing Together | Combed 3# Lace - 01#Brilliant White | Combed 3# Lace - 05#Pearl |
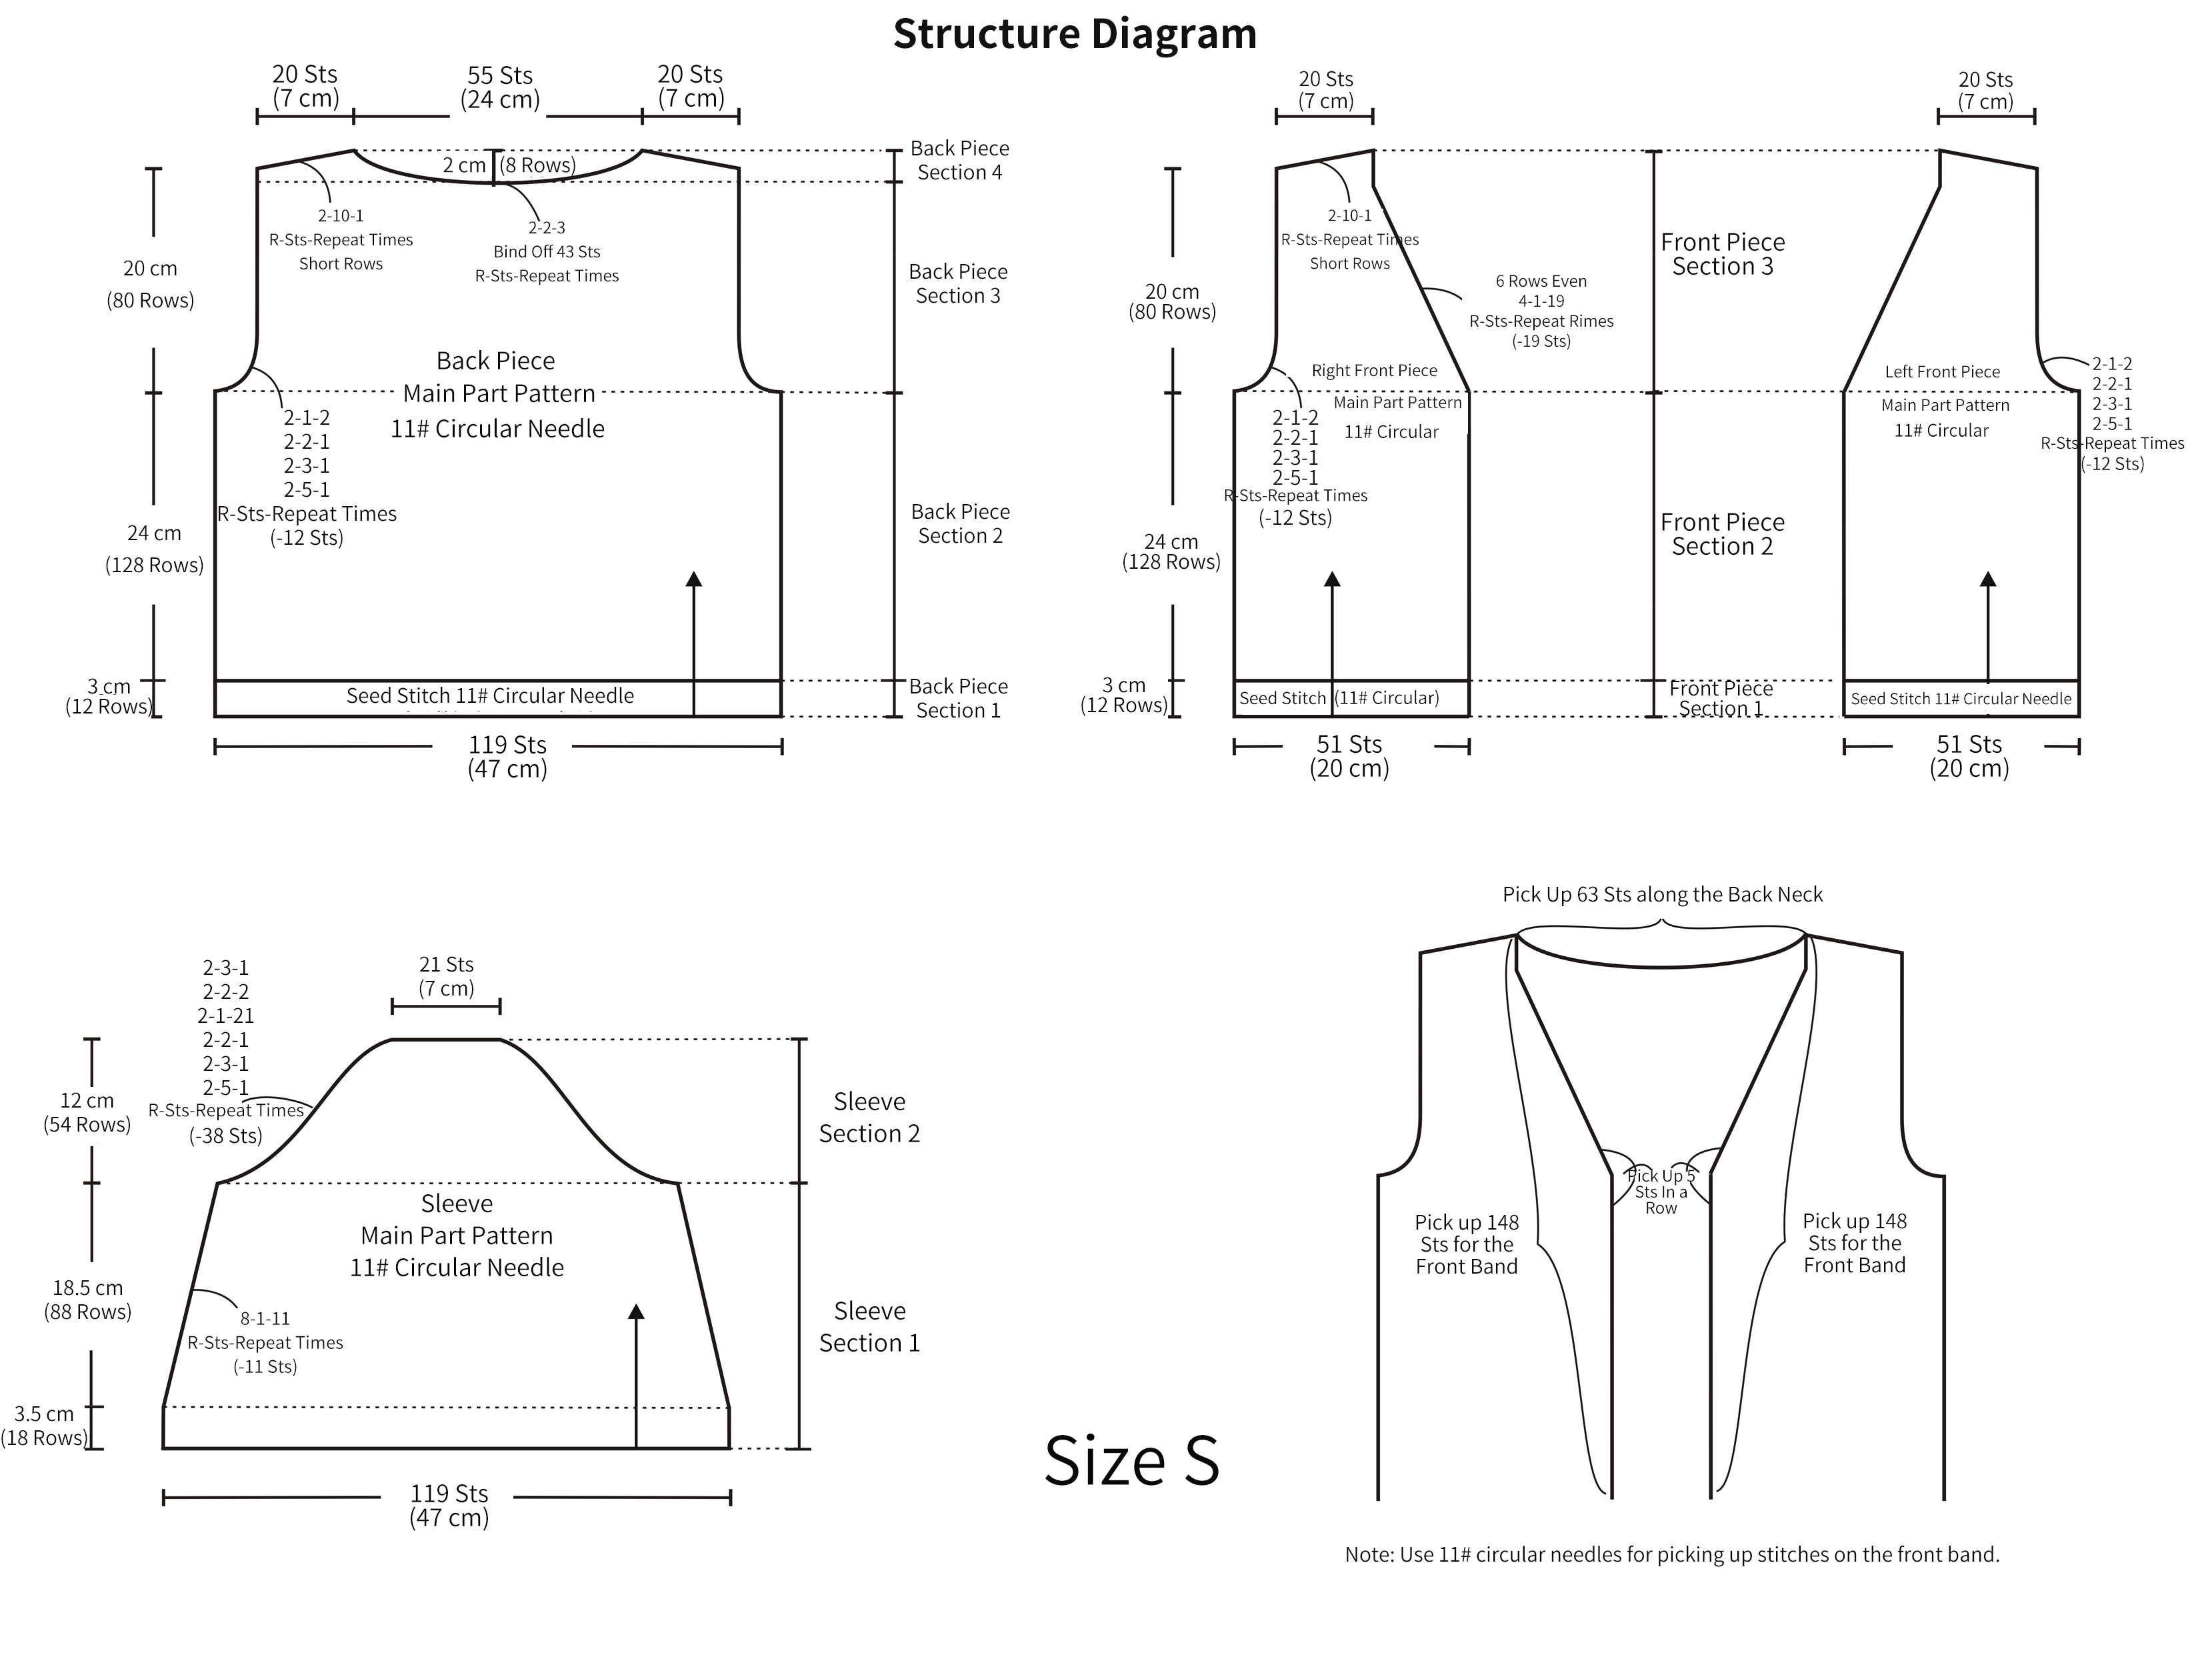
Note:
1. The pattern chart shows the texture of the right side of the fabric. When working on the wrong side, work the opposite stitches.
2. The row numbers in Section 1 are for reference only. Work until you reach the corresponding length roughly, making sure that the last row is worked on the wrong side.
3. The left and right sides in the chart refer to the actual left and right when worn.
Due to variations in individual tension, the size of the sample is for reference only.
Materials: Combed 3# Lace / Combed 5# Lace / Gem Twist
Notion: 11# - 3.00mm circular needle / 1.75mm Crochet Hook

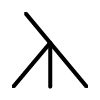
Chart Key







Chart Key







Note:
1. This pattern is making in Chinese crochet pattern terms, and the stitch name is written using American terminology. All measurements in charts are in cm.
2. The chart represent the right side of fabric, so check the key to see how to work a certain symbol on the right side and on the wrong side.
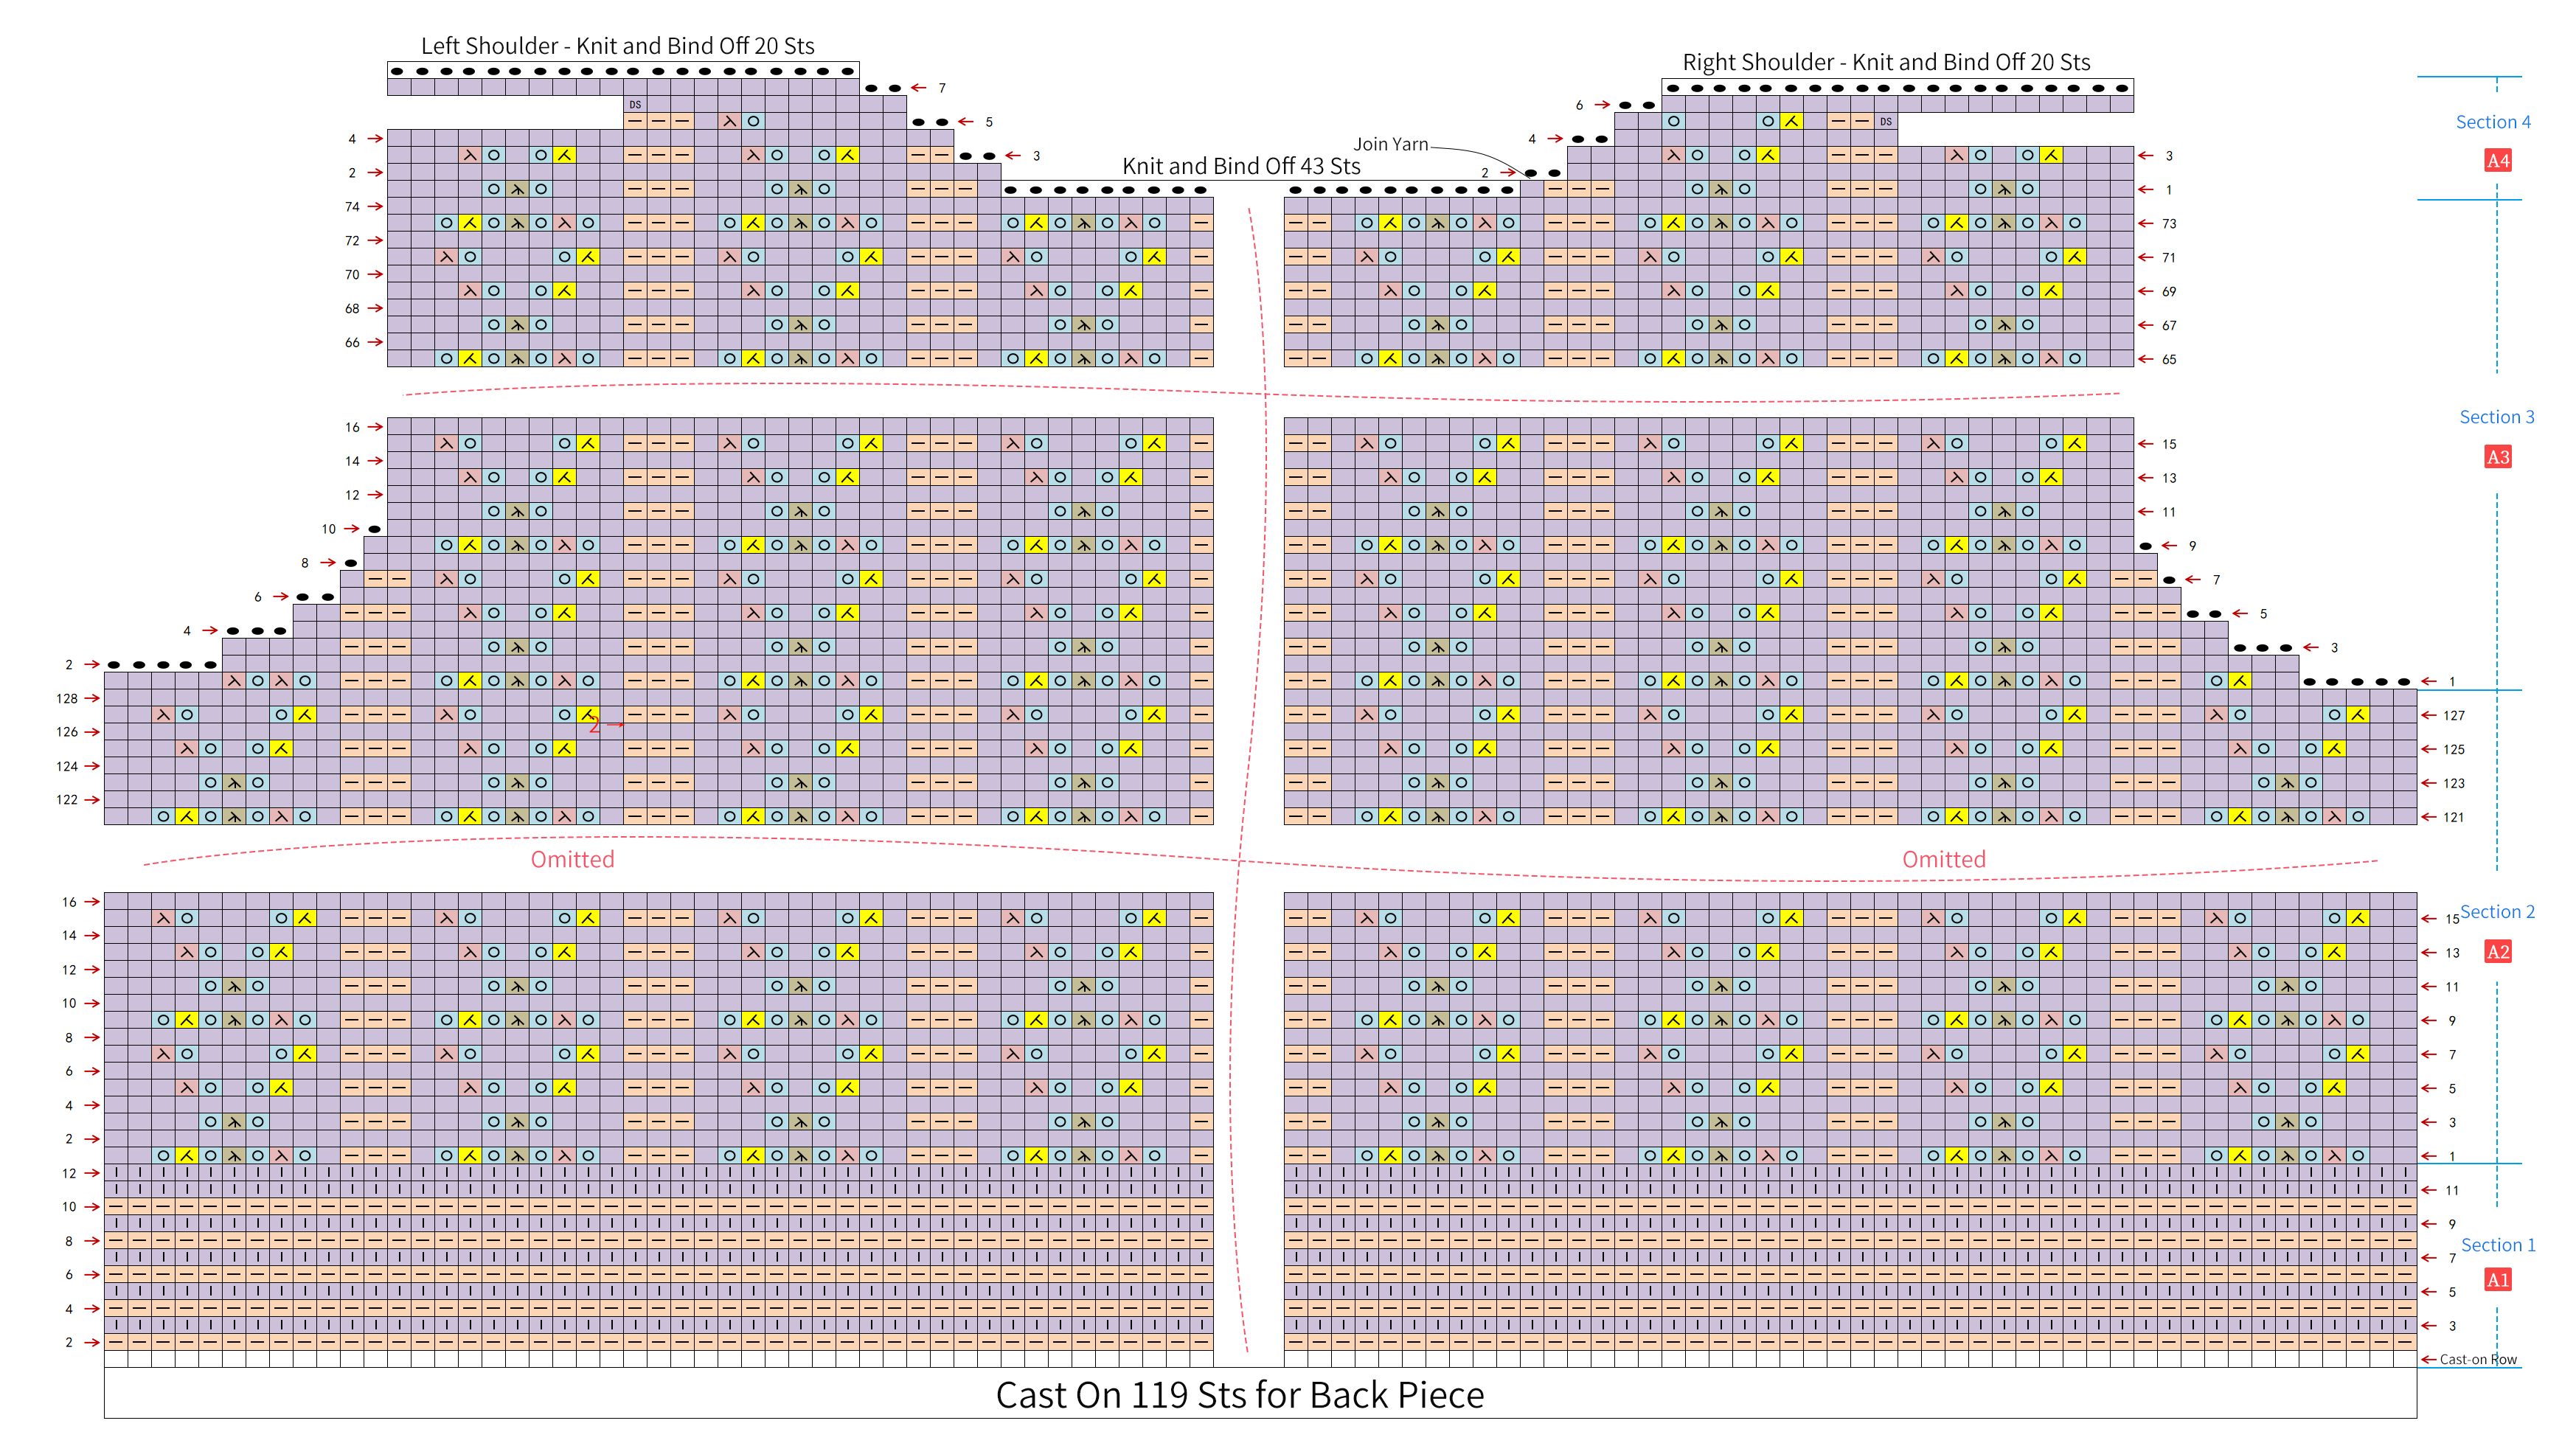
Part 1 Back PieceA 01' 43'' (Part 1)
The back piece is divided into four sections and knit from the bottom upwards. Section 1 knits the bottom edge, Section 2 knits the main pattern, Section 3 binds off stitches underarm and continues with the pattern, Section 4 divides into left and right shoulder-parts. Knit the left shoulder-part first, then the right one. For the casting on method, pattern knitting, underarm binding off, and shoulder short rows, please refer to the video demonstration.
Part 2 Right Front PieceB 35' 49'' (Part 1)
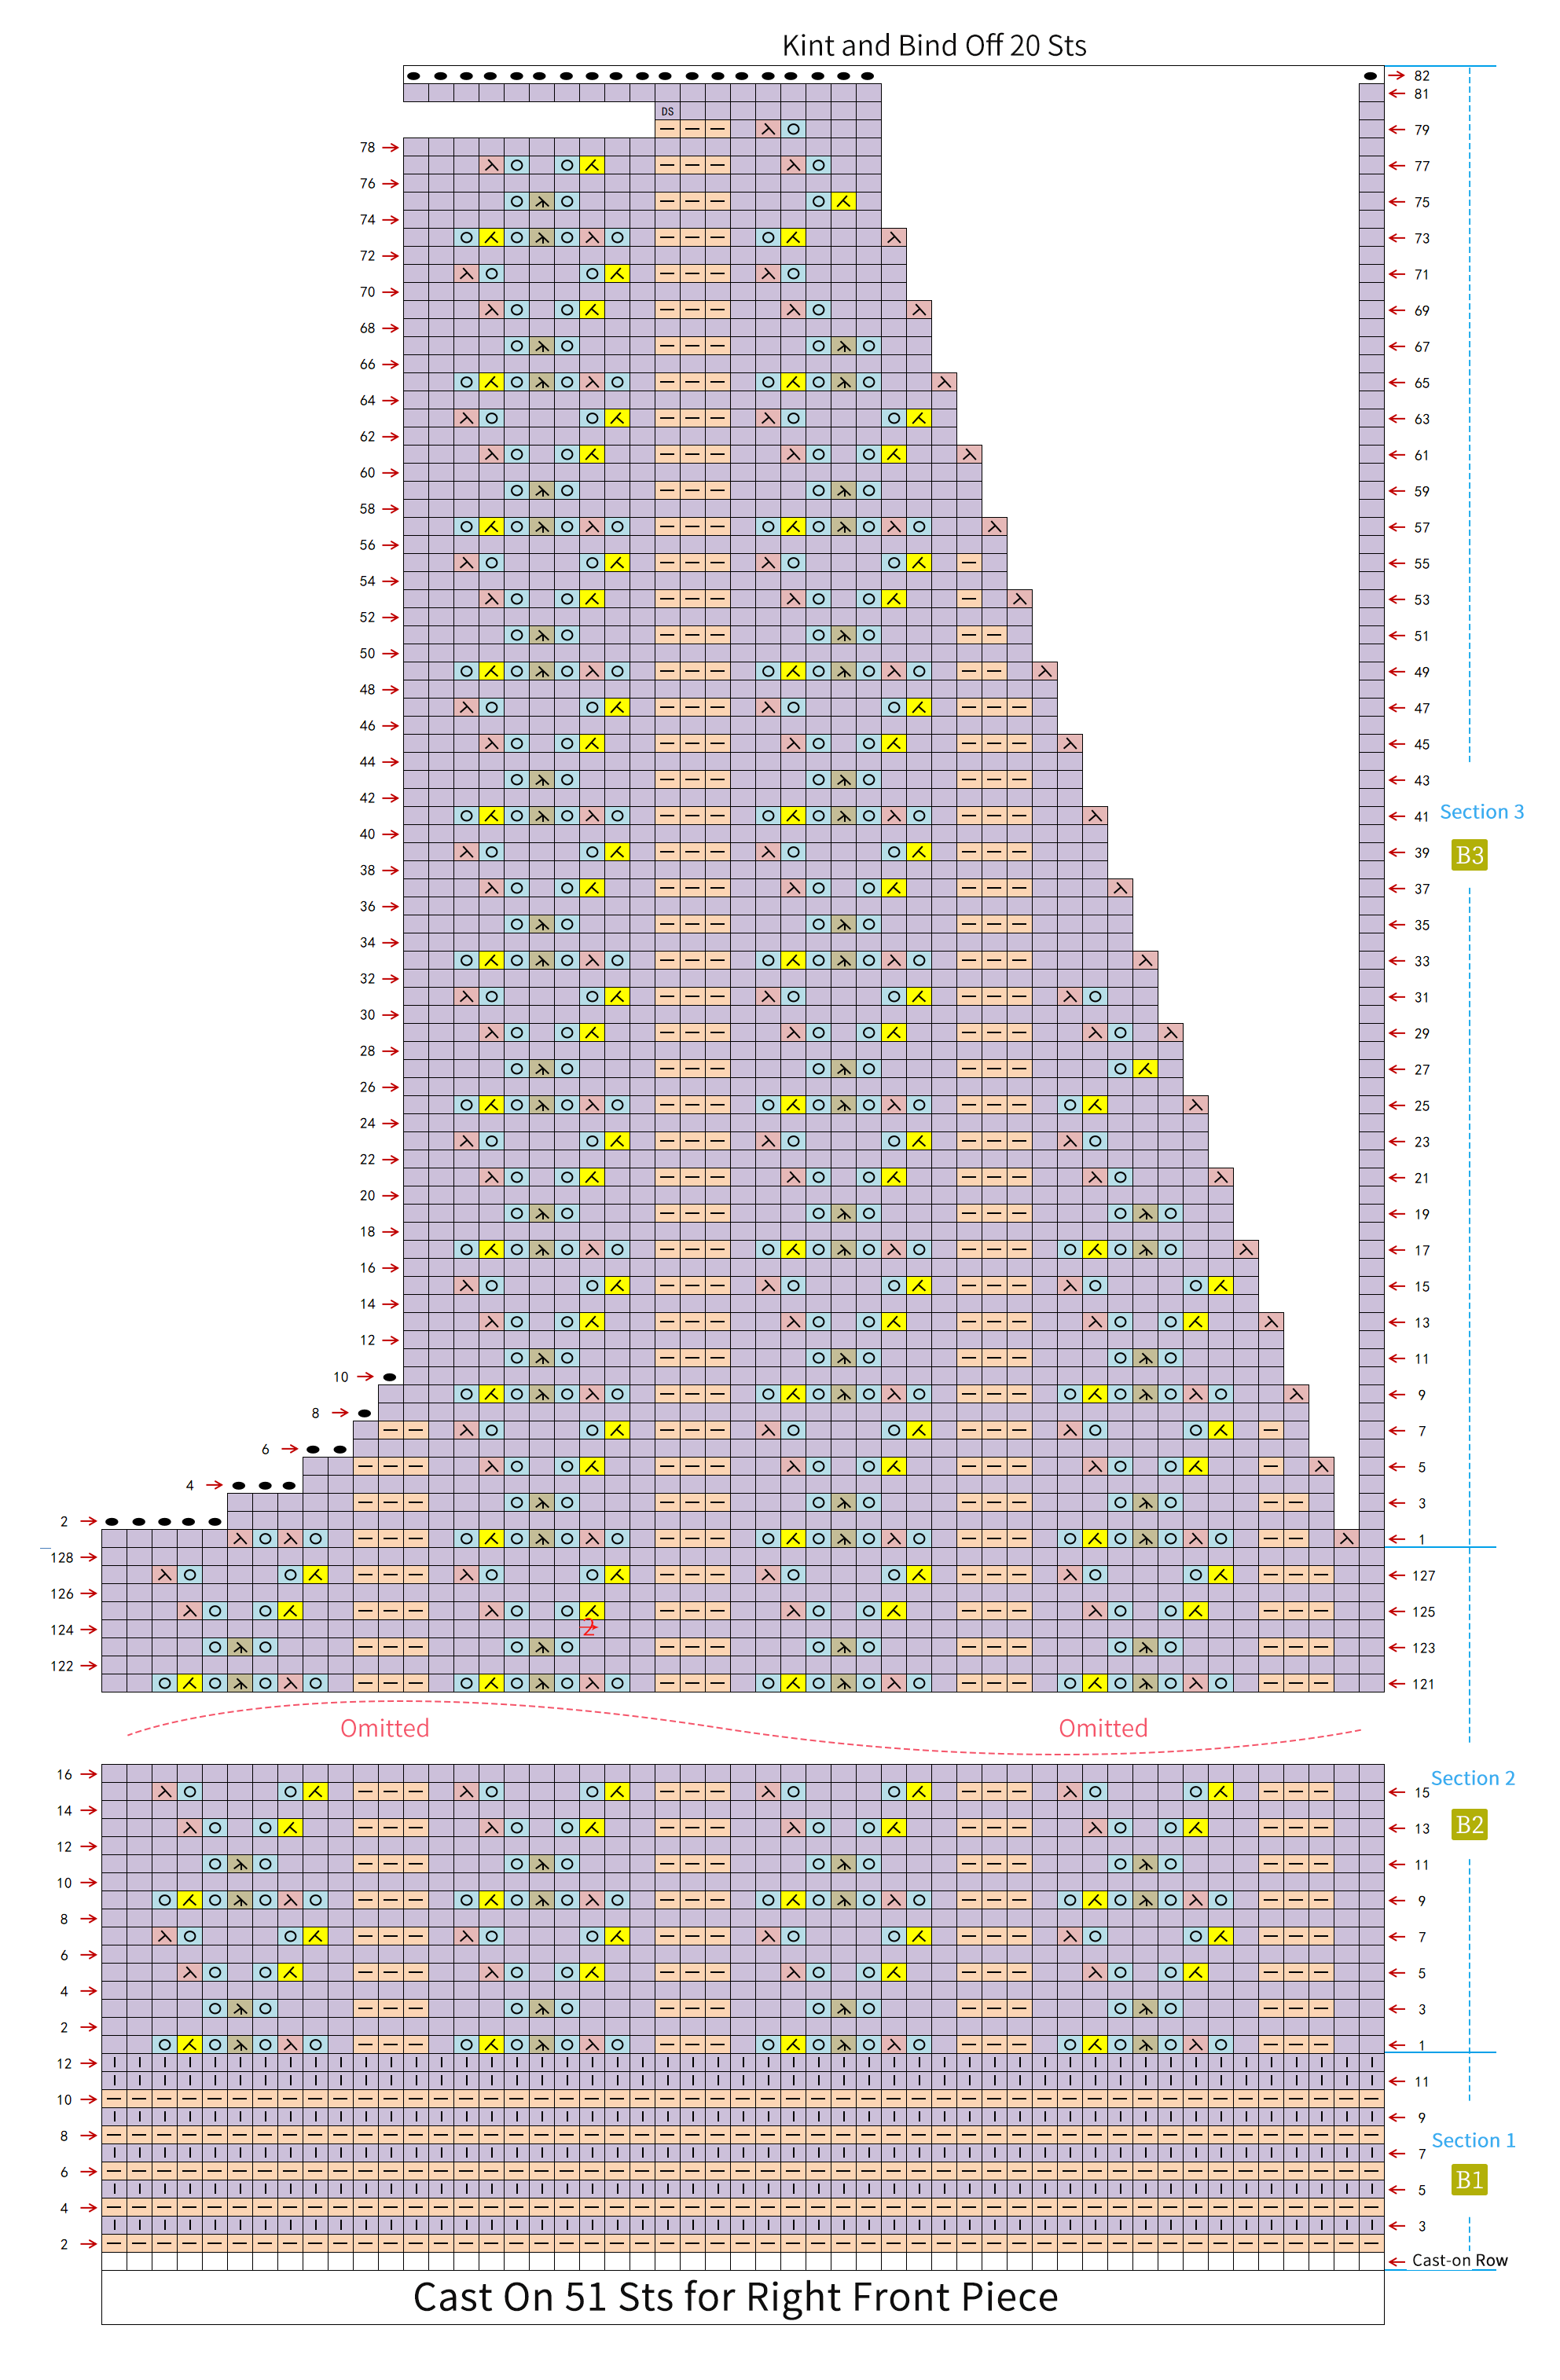
The right front piece is divided into three sections and knit from the bottom upwards. Section 1 knits the bottom edge, Section 2 knits the main pattern, and Section 3 knits the front band and underarm while binding off, then continues with the pattern. Please refer to the chart for details.
Part 3 Left Front PieceB 36' 33'' (Part 1)
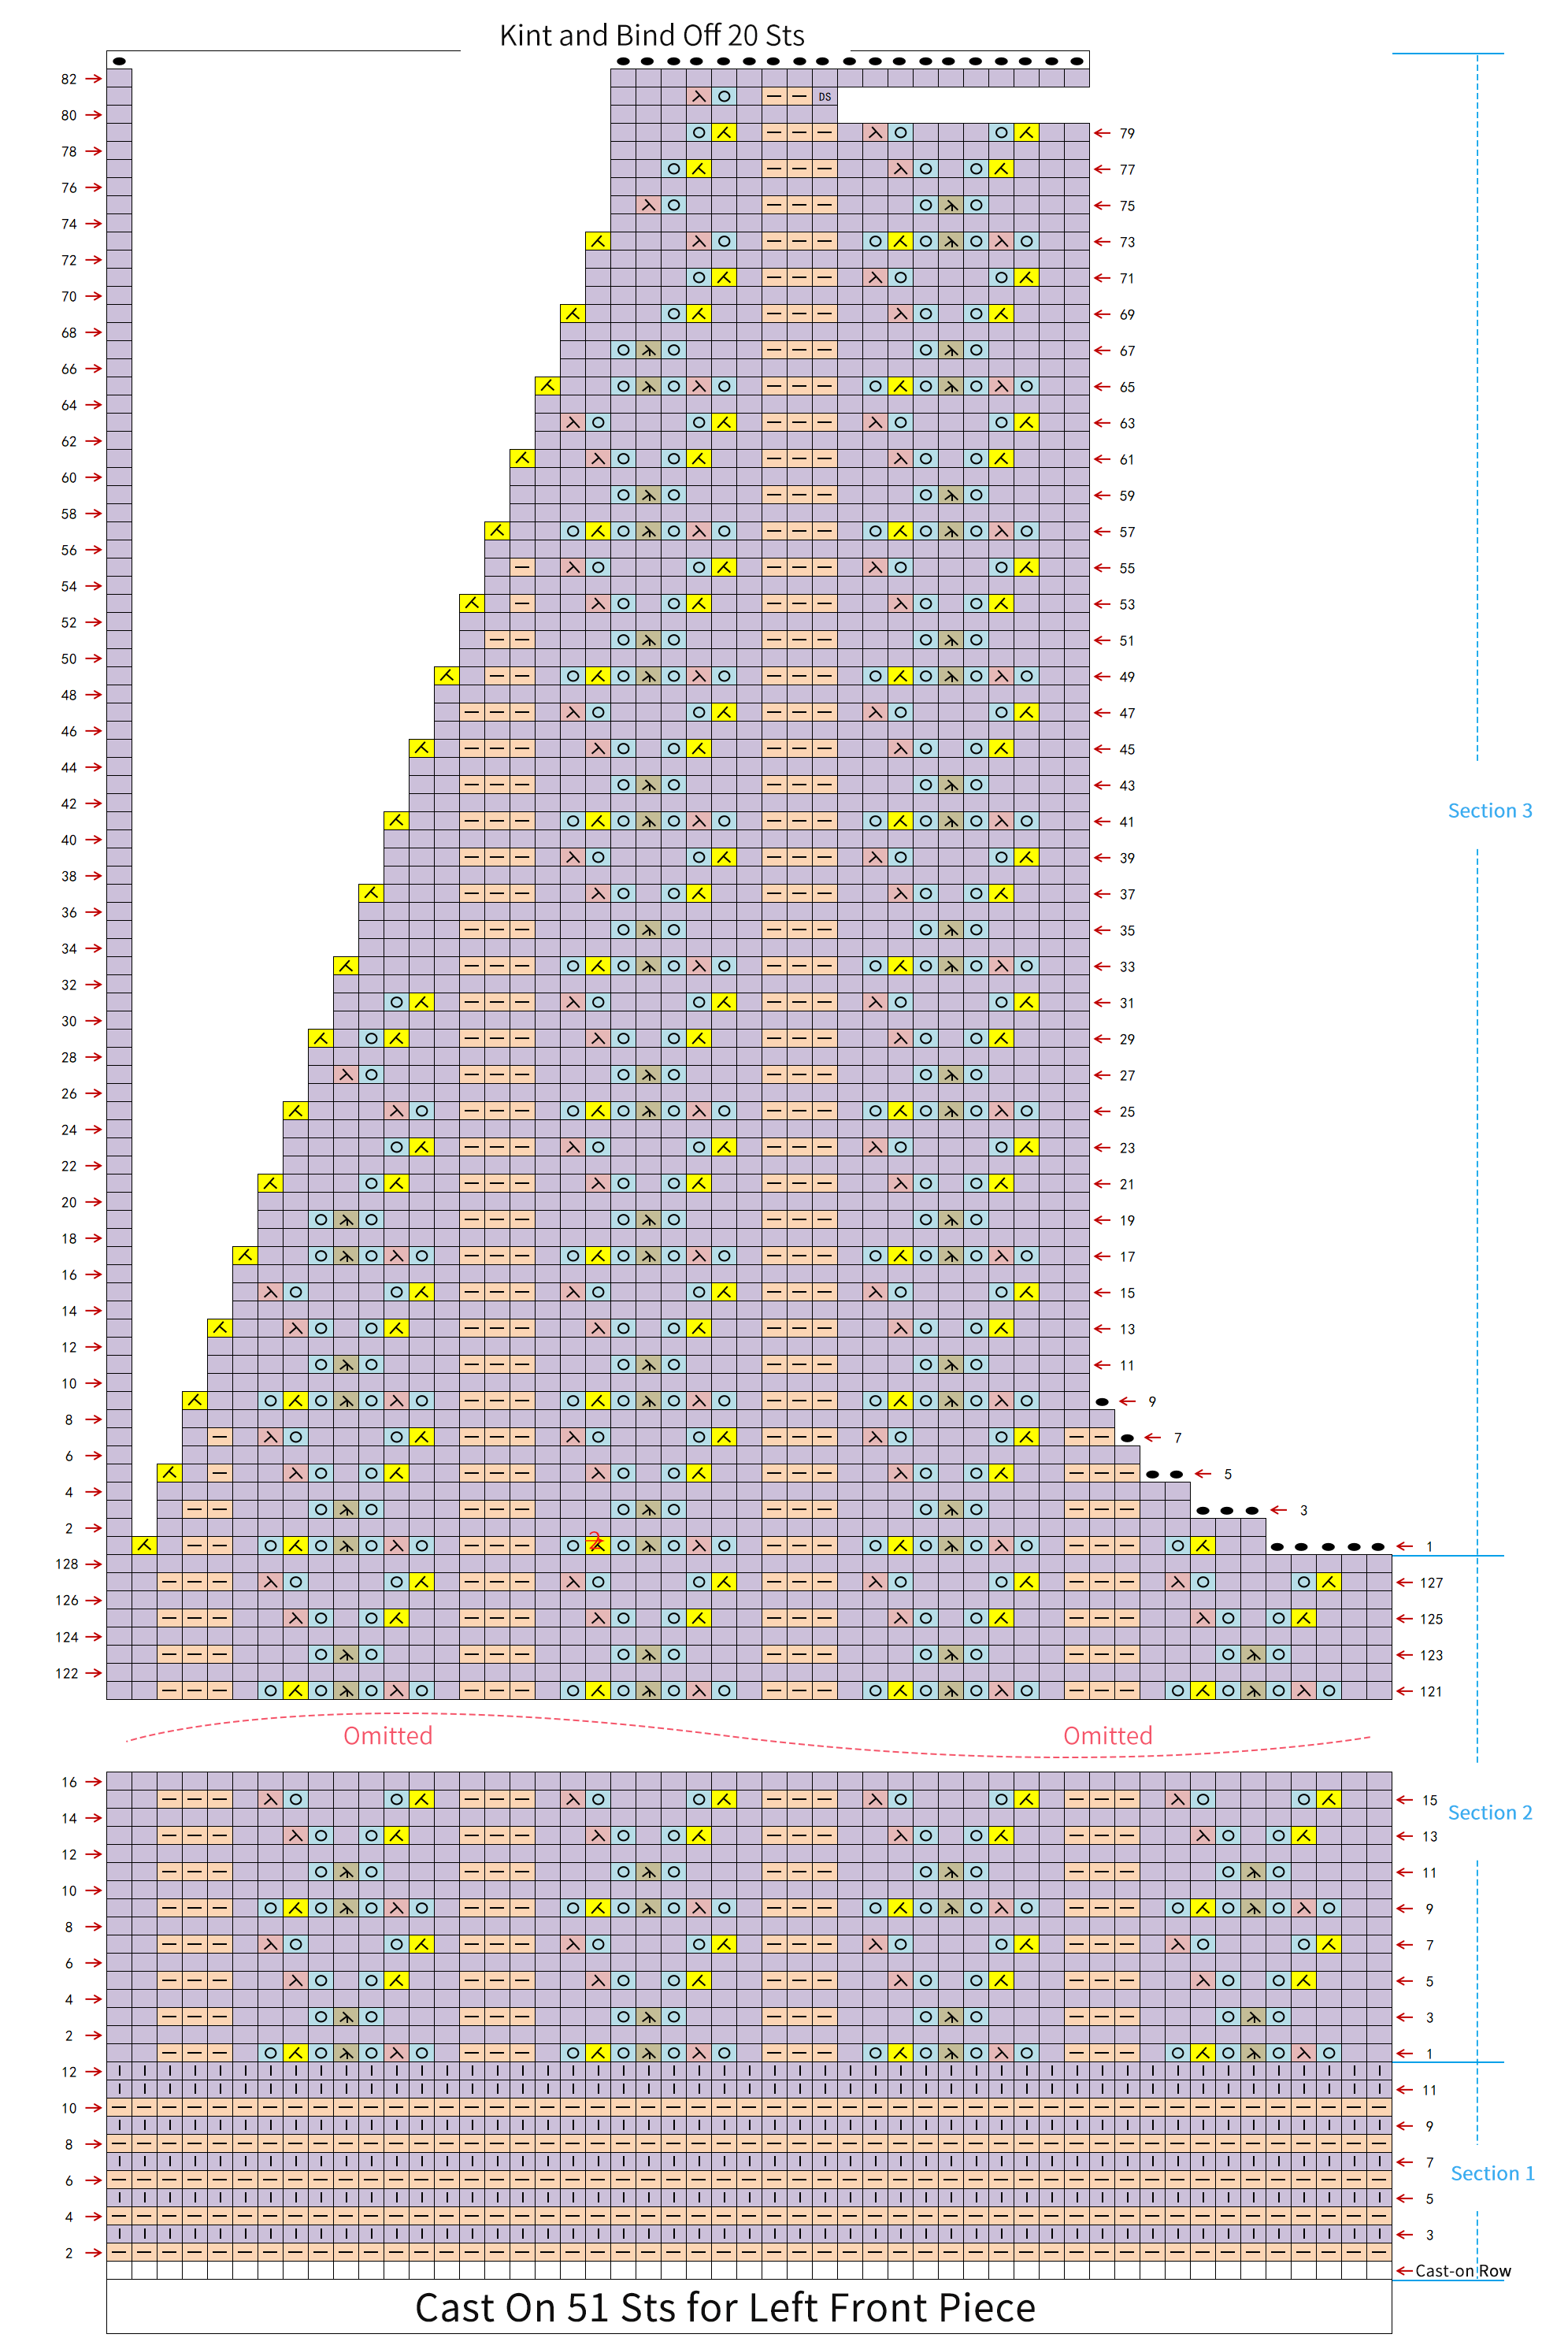
Divide and crochet in the same way as the right front piece.
Part 4 SleevesC 36' 55'' (Part 1)
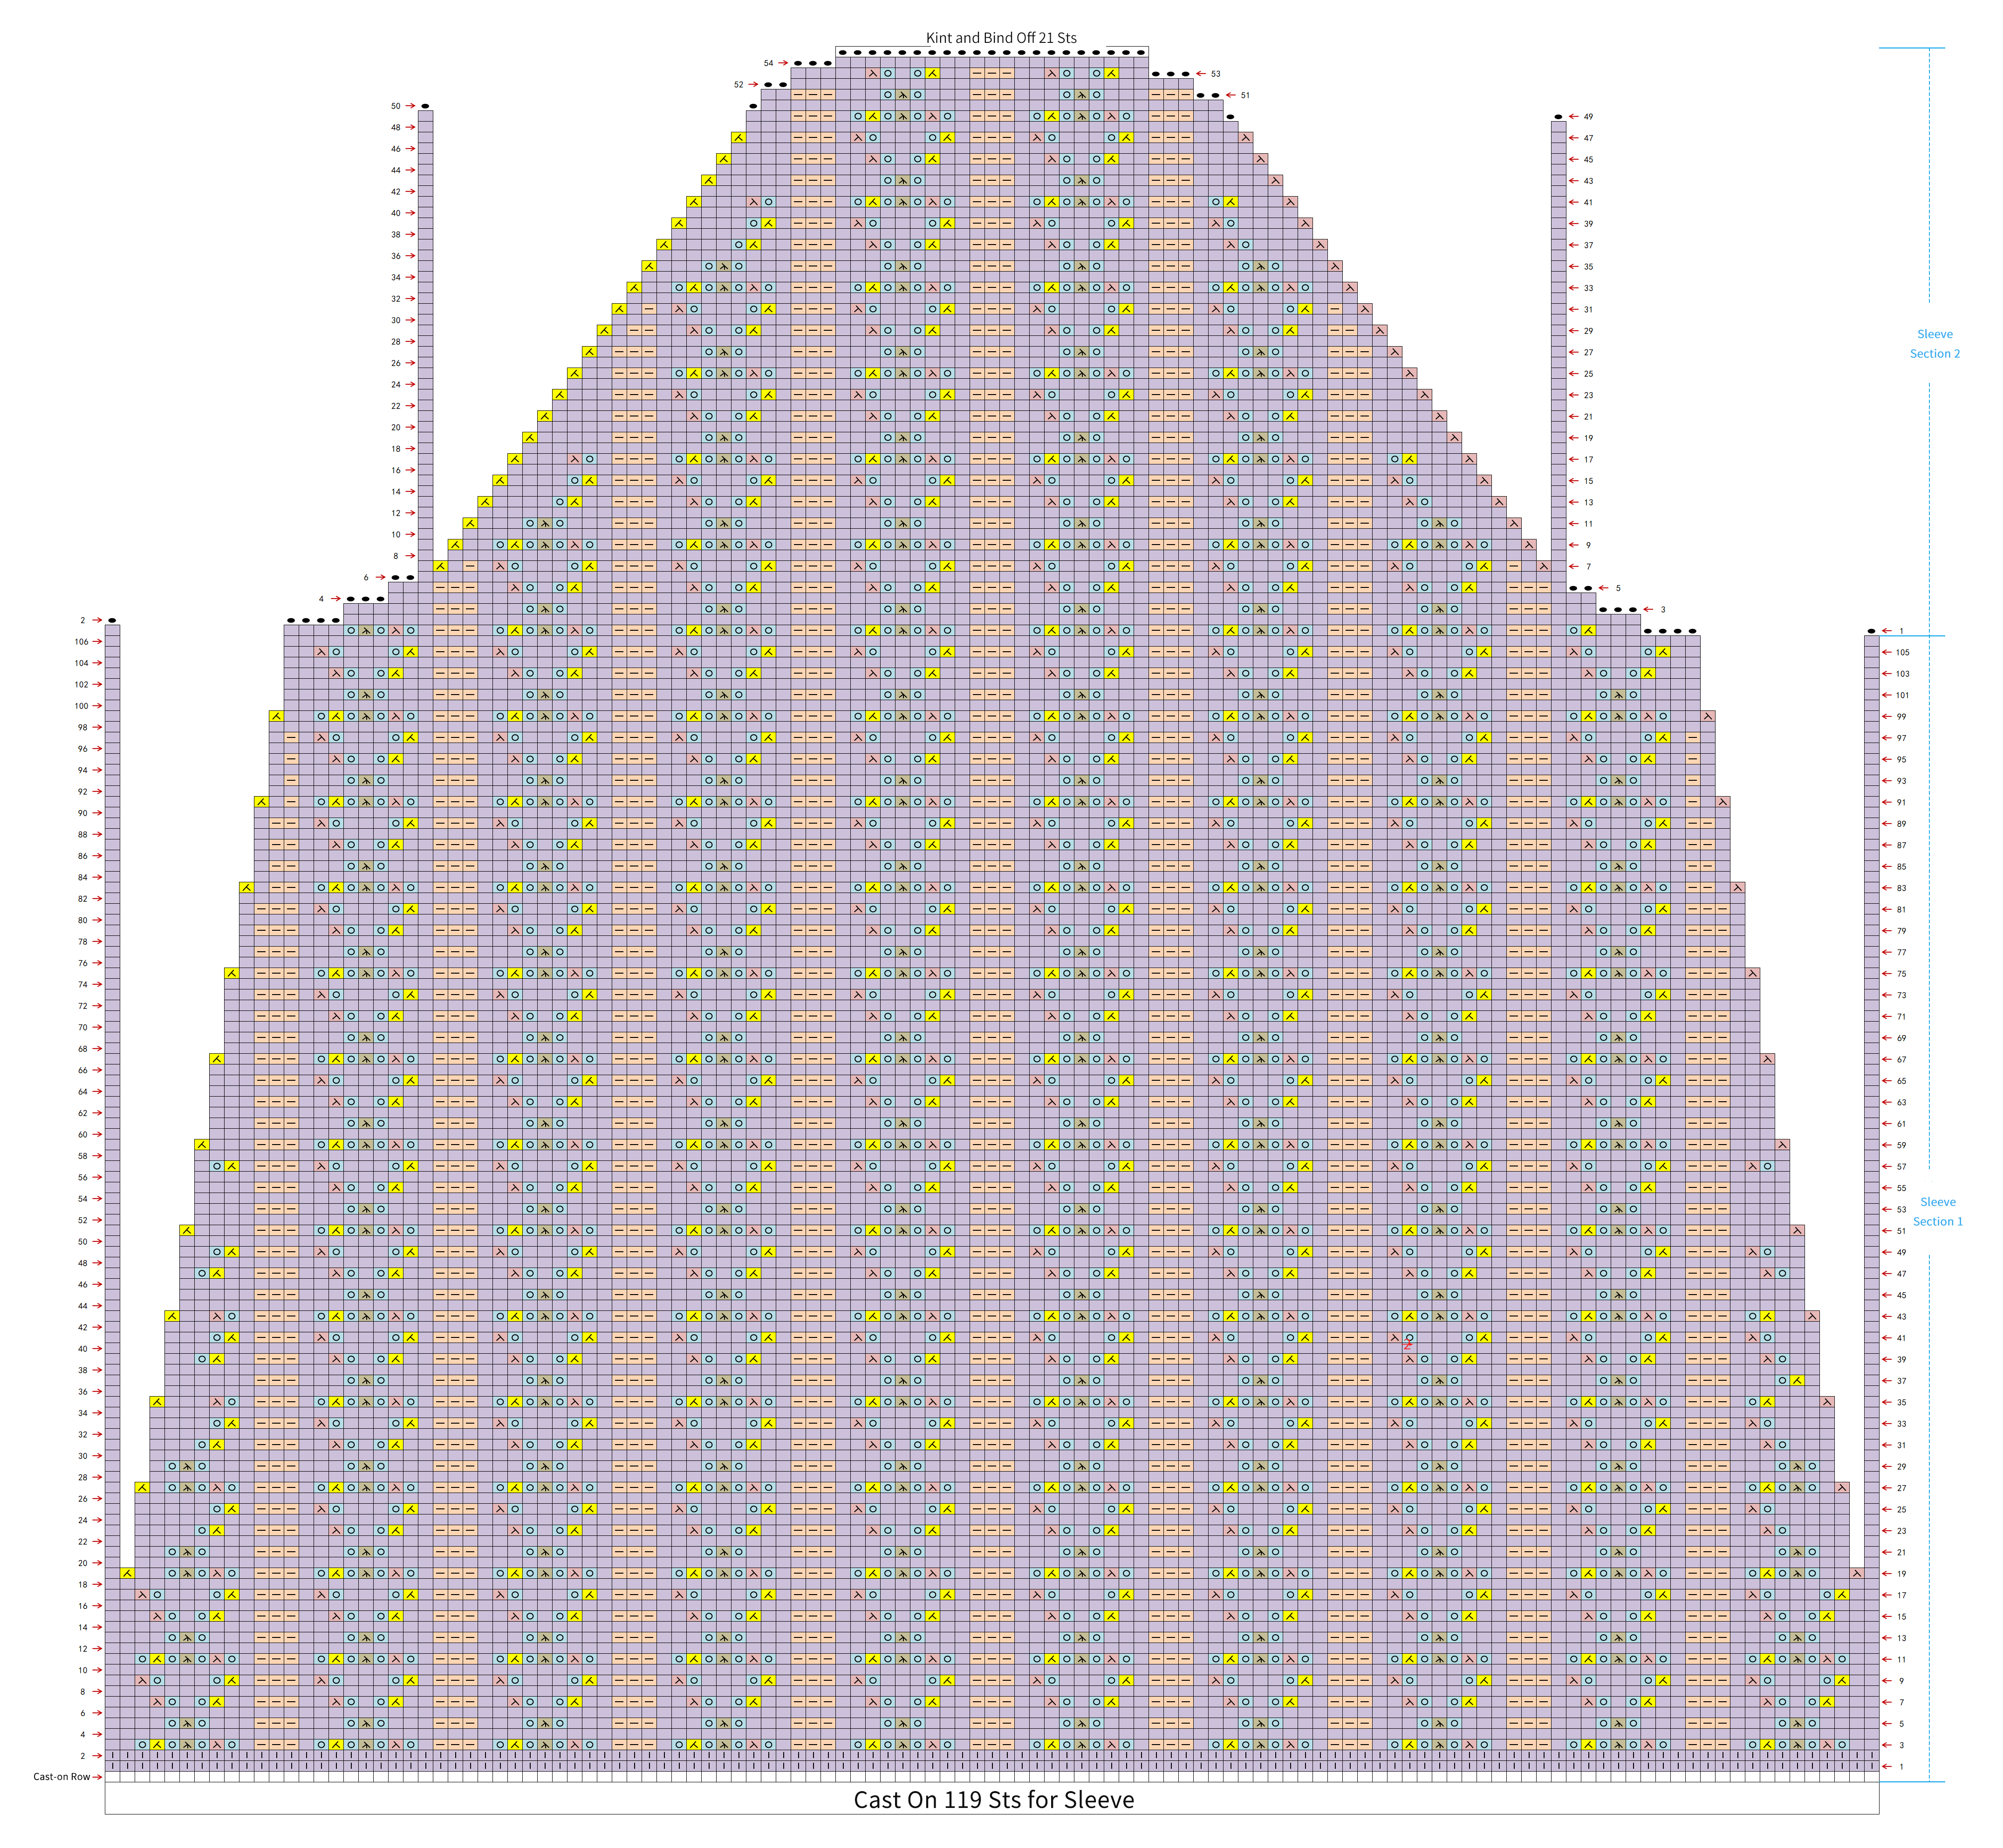
The sleeve is divided into two sections. In Section 1, crochet the main pattern and bind off. In Section 2, bind off underarm and proceed with the sleeve cap crocheting. For the methods of casting on and binding off the sleeve, please refer to the video demonstration. For the method of binding off the sleeve cap, please refer to the video demonstration.
Part 5 Sewing TogetherD 46' 23'' (Part 1)
The shoulders, body, sleeve pieces, sleeves and body need to be sewn together separately. Please refer to the video demonstration for details.
Part 6 Front BandE 00' 09'' (Part 2)
Pick up stitches on the front band from the right side. After completing the pick-up on the right side, work knit stitches on the wrong side. For the specific method of picking up stitches on the front band, please refer to the video demonstration.

Part 7 Front Band CrochetF 06' 33'' (Part 2)
For the crochet method of the front band pattern, please refer to the video demonstration.
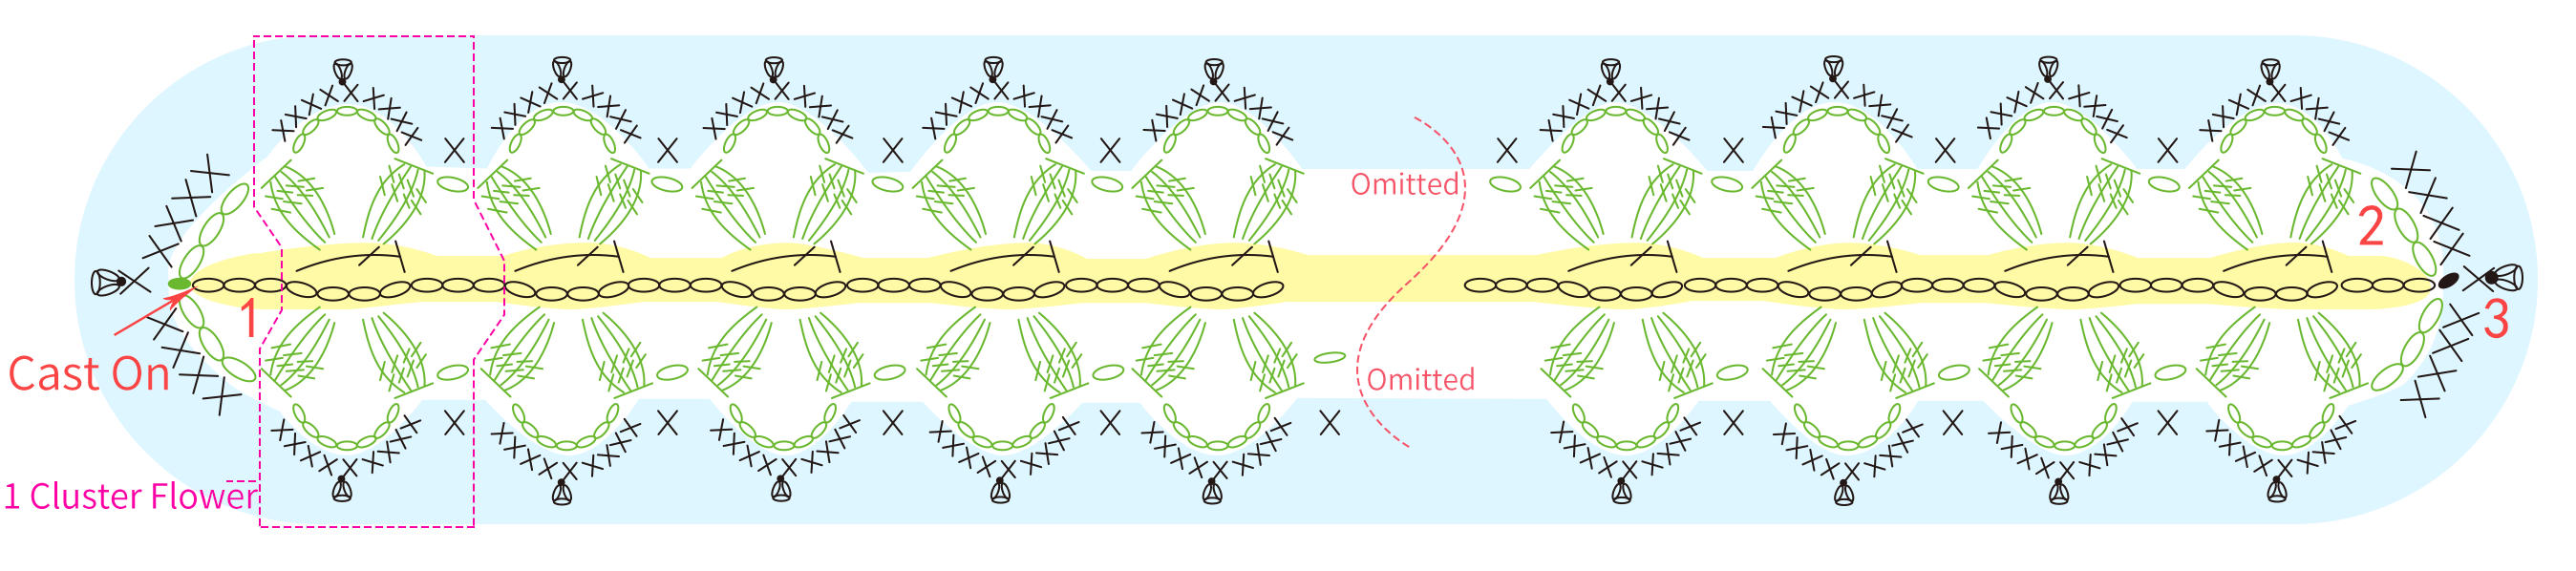
Note: The exact number of motif clusters on the front band should be adjusted according to the stitch count of the front band. Usually, 6 stitches correspond to 1 cluster. For example, size S has 60 clusters (for reference only, please refer to the actual situation). At the first stitch where binding off starts on the front band, you can appropriately reduce it to 5 stitches for 1 cluster.
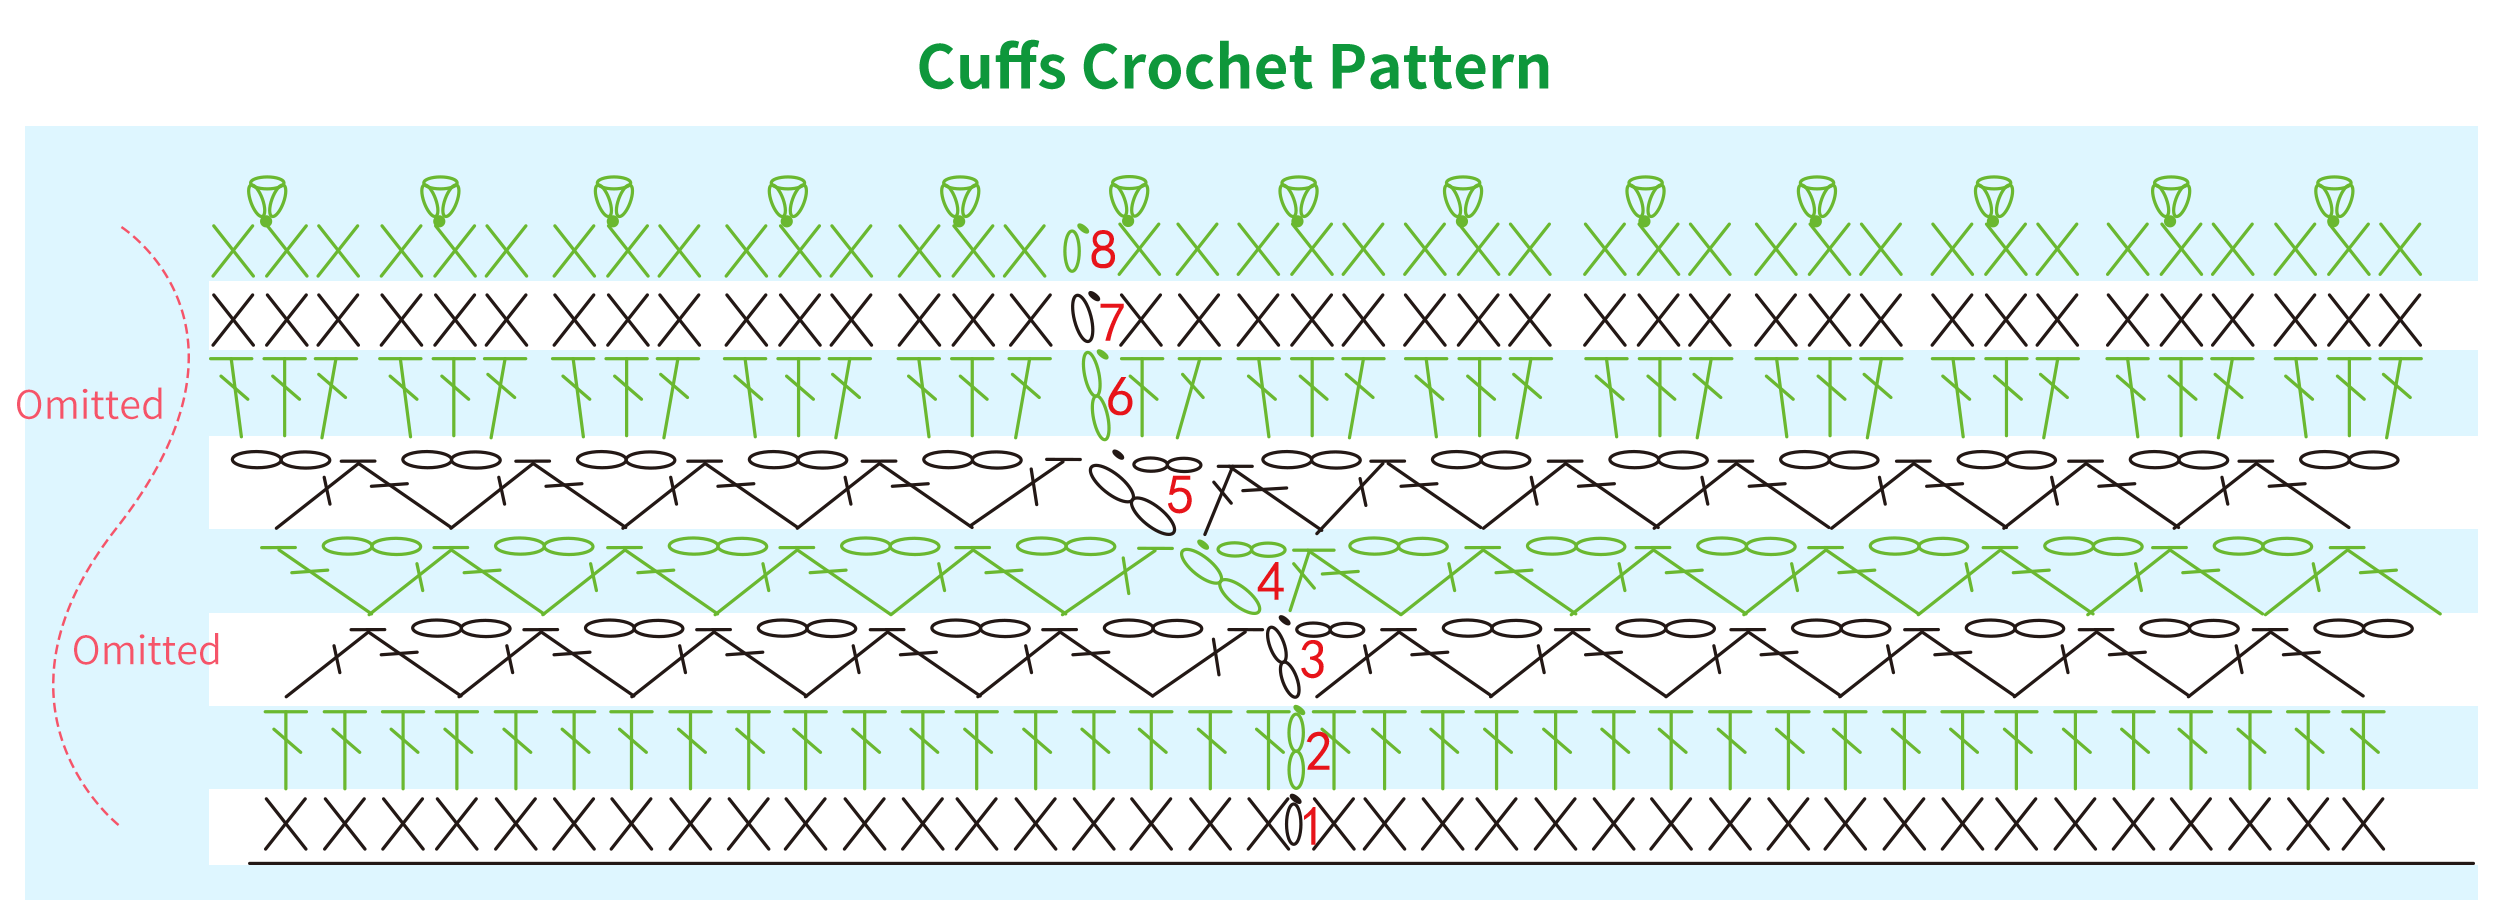
Part 8 Crocheting the Edging and Cuff Patterns for the SleevesG 26' 49'' (Part 2)
The edging technique for the sleeves is identical to the one used for the front band. For the method of crocheting the cuff pattern, please refer to the video tutorial.

Part 9 TiesH 46' 35'' (Part 2)
For the ties knitting method, please refer to the video tutorial.
Note: The reference length is 31cm, but you can also determine the knitting length according to your own preference.