
Clothes
Jade Night Cardigan
Project preview
See the finished project
Pattern format
Instructions
Watch and follow
Video tutorial
| Style | Yarn | Color |
|---|---|---|
| Leather Brow | Morandi 4# |  08#Linen x 2 08#Linen x 2 24#Leather Brown x 10 24#Leather Brown x 10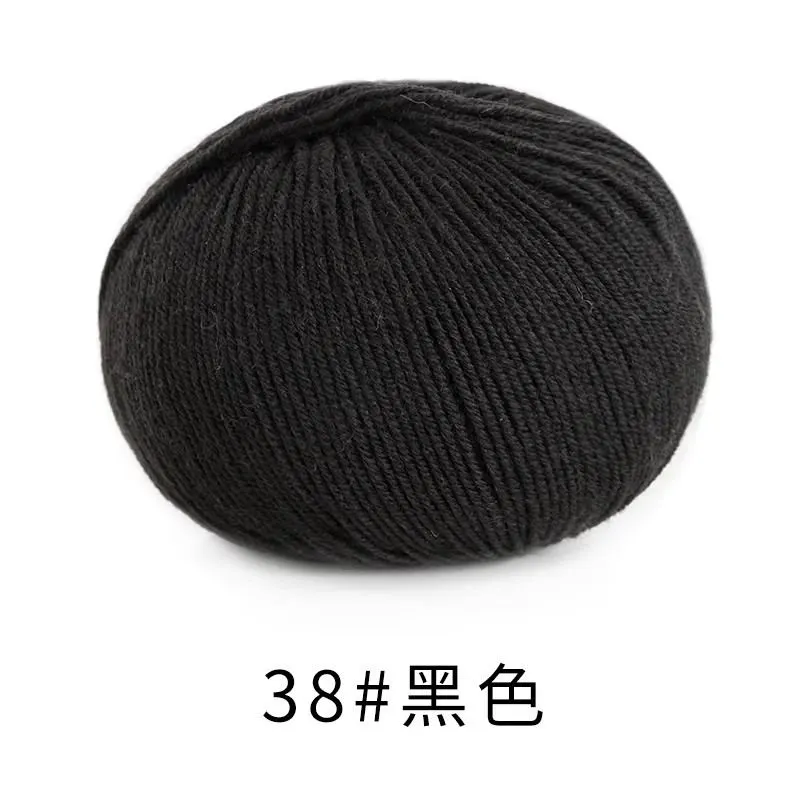 38#Black x 2 38#Black x 2 |
| Whisper White | Morandi 4# |  01#Whisper White x 10 01#Whisper White x 10 11#Lavender Mist x 2 11#Lavender Mist x 2 44#Glacier Gray x 2 44#Glacier Gray x 2 |
| Avocado Green | Morandi 4# | 01#Whisper White x 2 17#Avocado Green x 1038#Black x 2 17#Avocado Green x 1038#Black x 2 |
| Praline | Morandi 4# |  04#Praline x 10 04#Praline x 10 18#Red Ochre x 2 18#Red Ochre x 2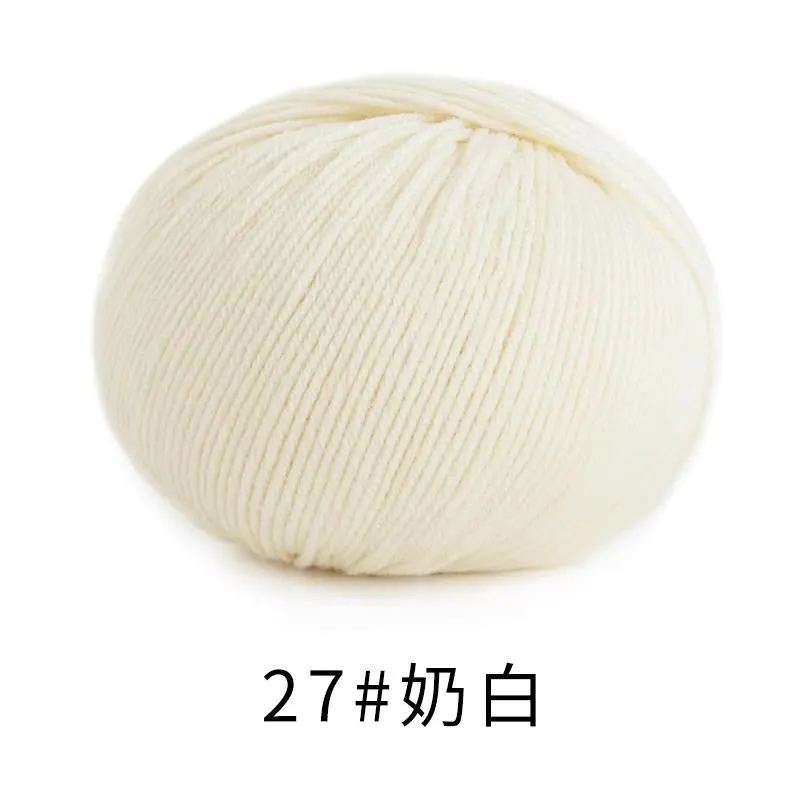 27#Antique White x 2 27#Antique White x 2 |
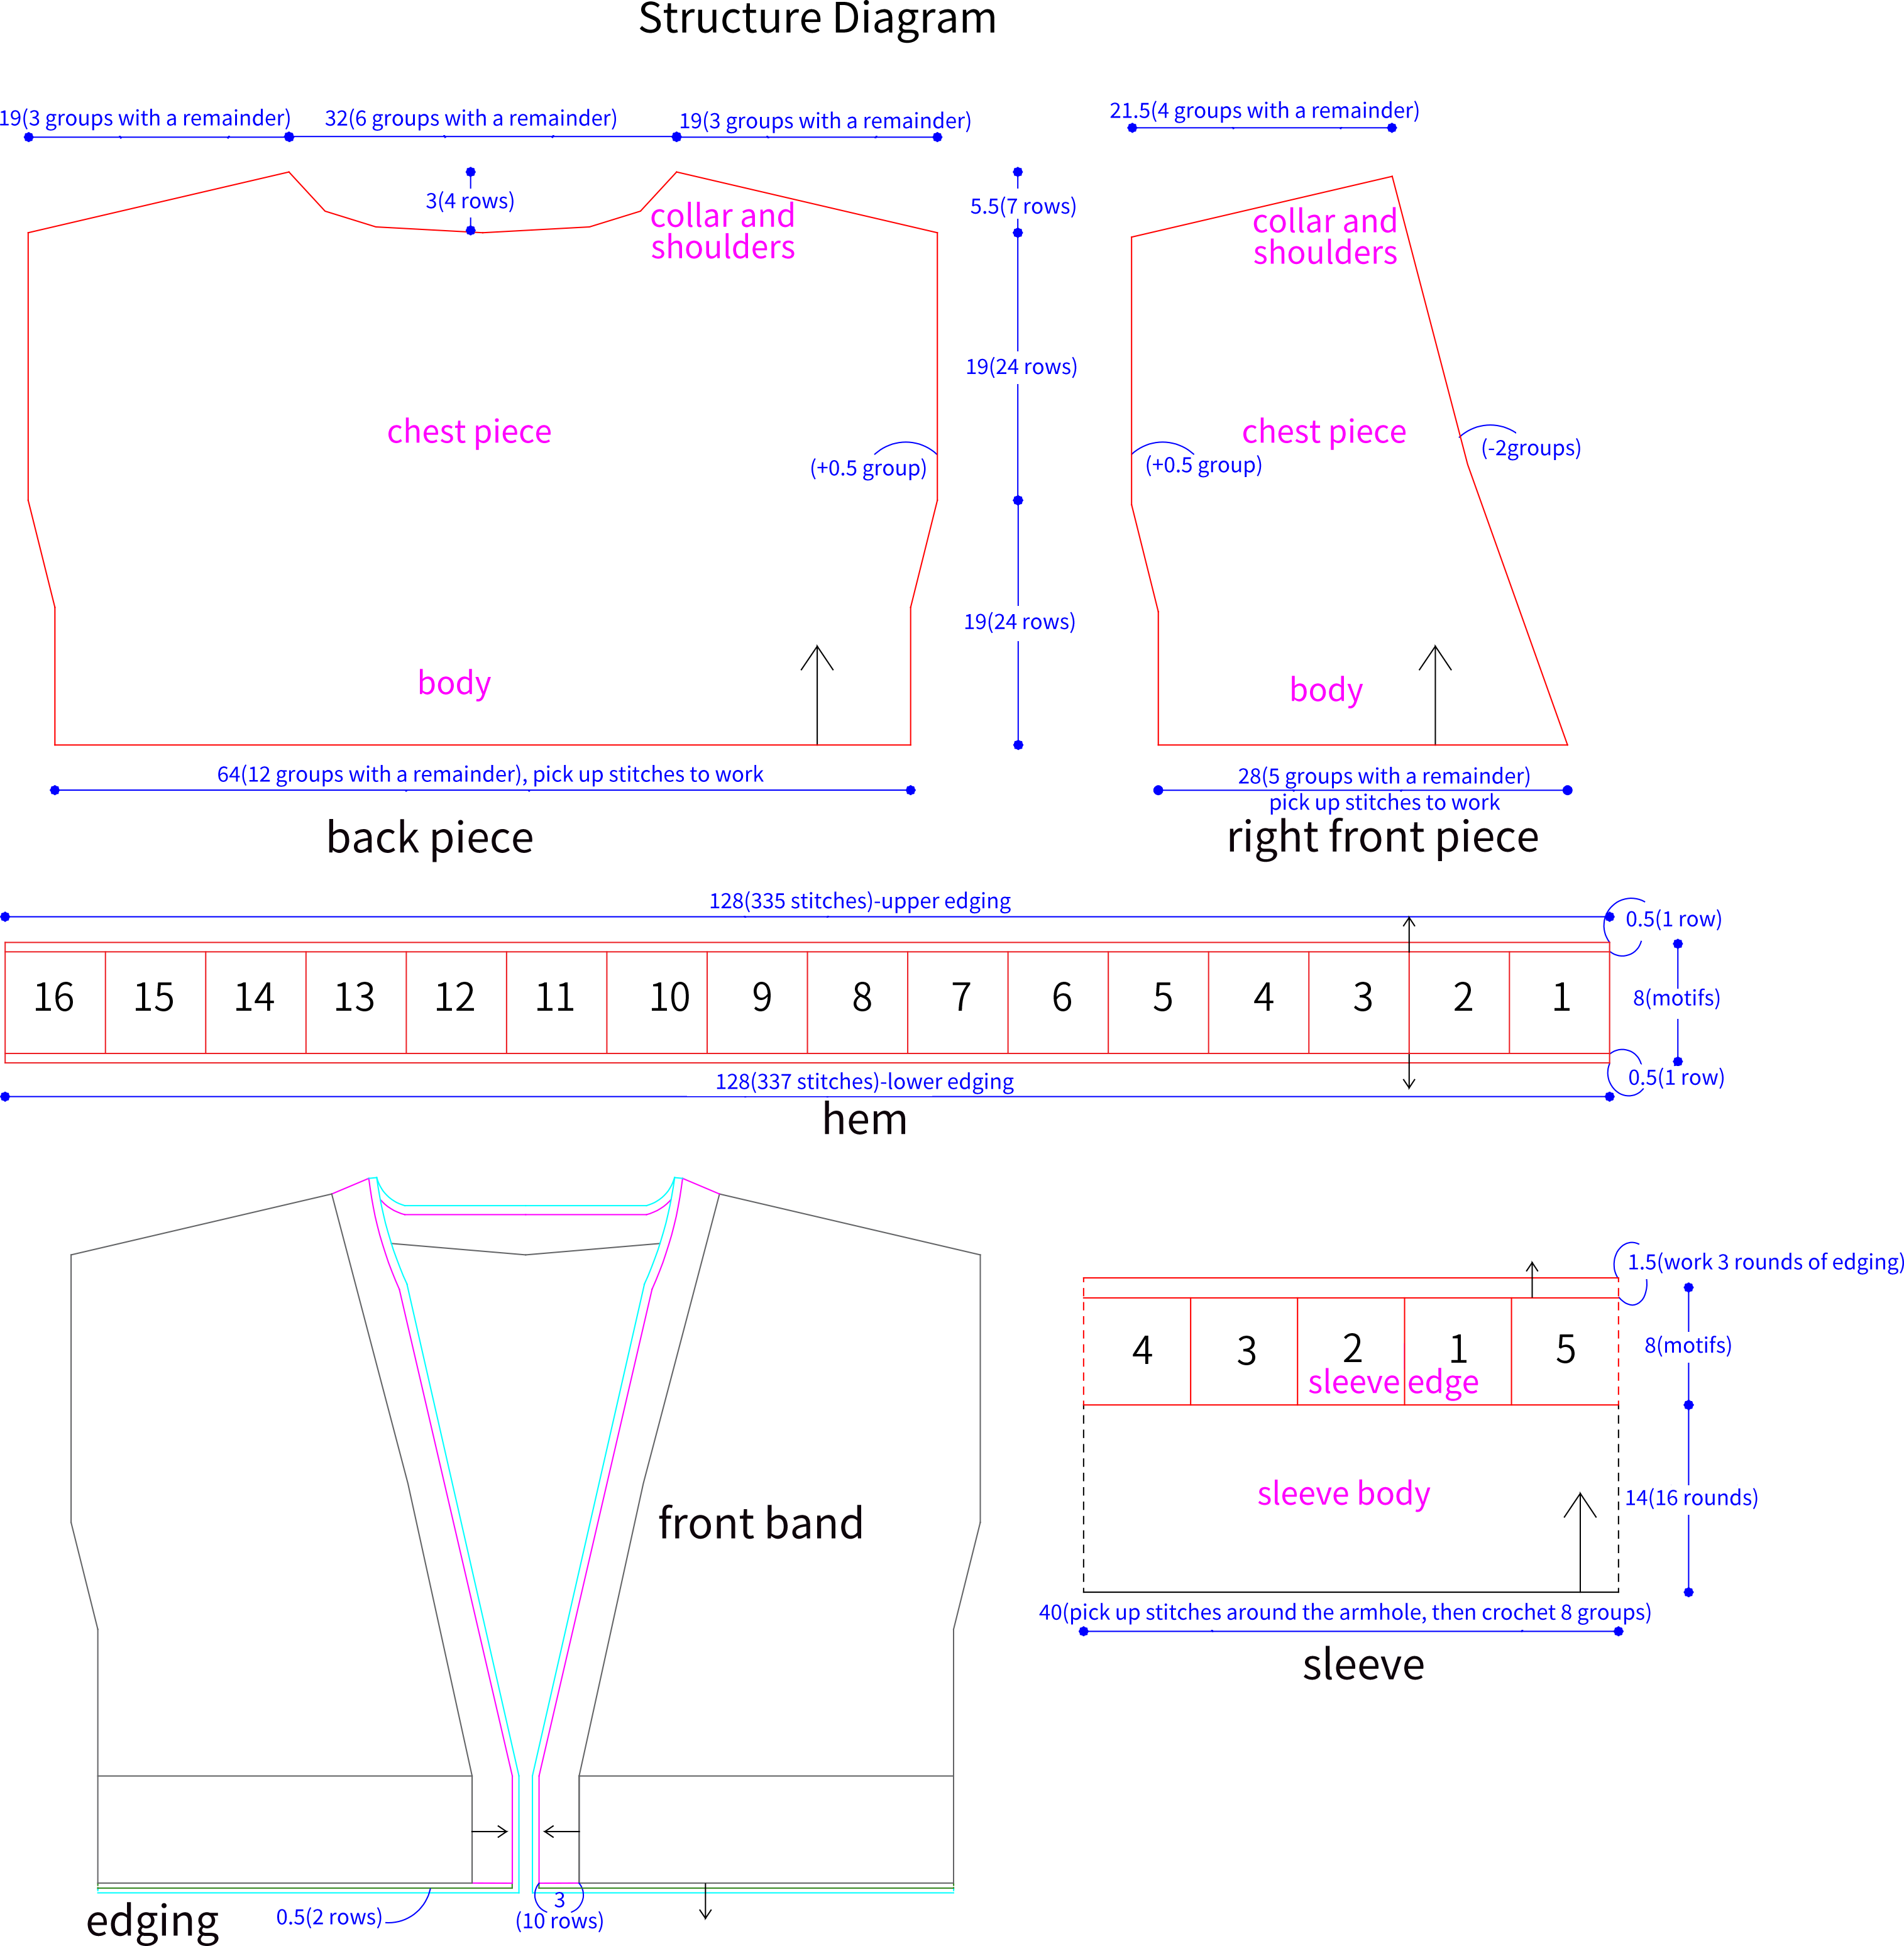
This cardigan consists of the following parts: hem, left front piece, right front piece, back piece, sleeves, front band, edging, and Chinese knot button.
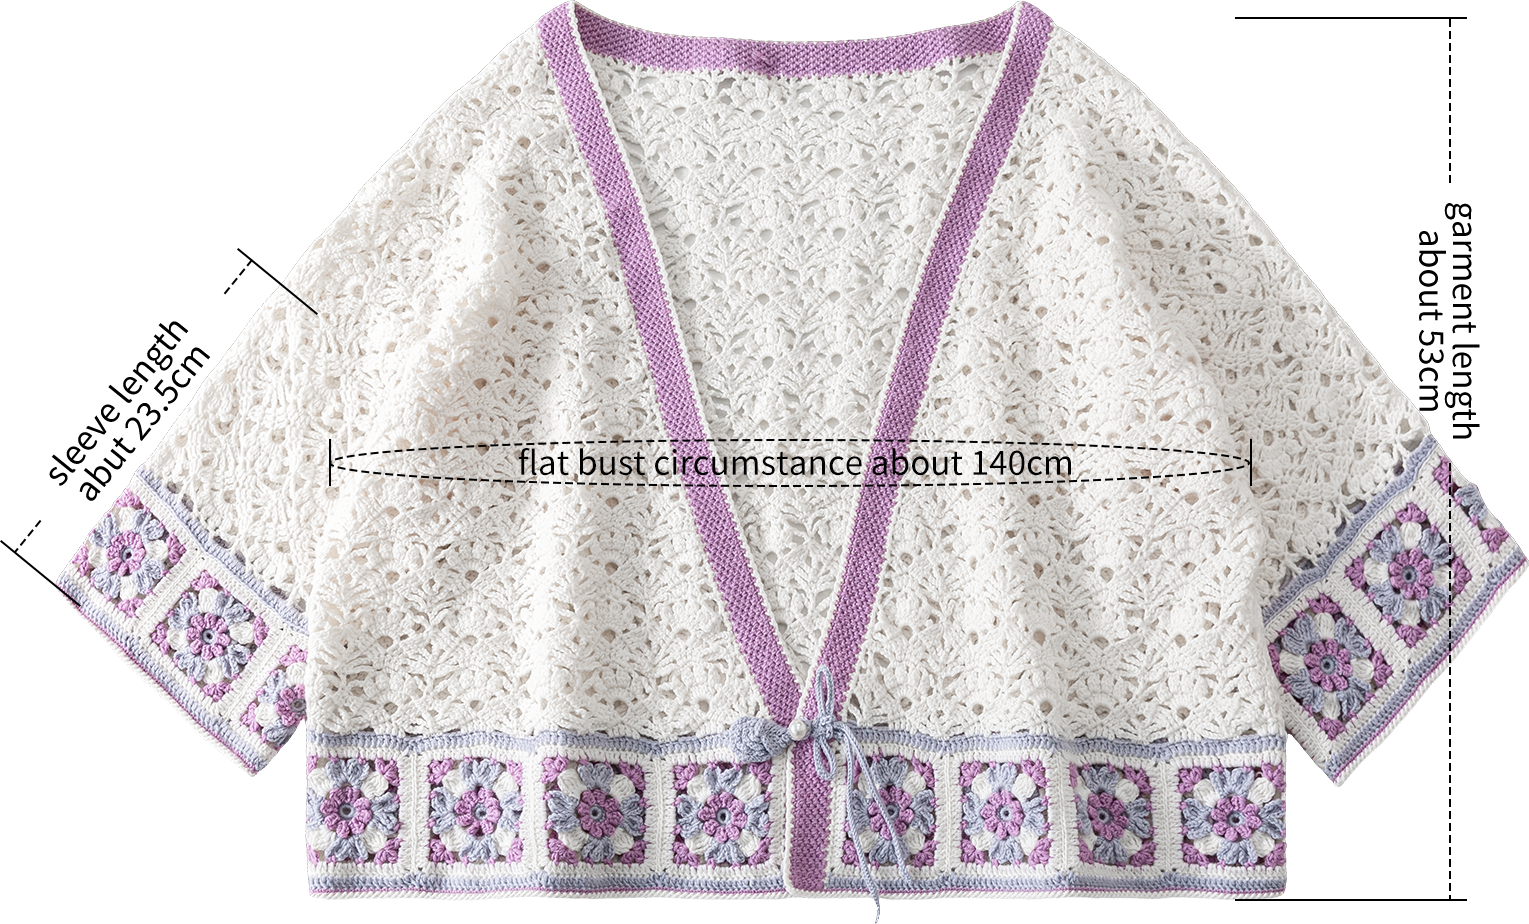
Due to variations in individual tension, the size of the sample is for reference only.
Materials: Morandi 4#
Crochet Hook: 3.00 mm Crochet Hook
Note:
1. Identify the left and right of the fabric pieces based on the actual left and right when worn.
2. The yarn used for this product is relatively special and not easy to undo. It’s recommended that before crocheting, you use scrap yarn from home to practice the crochet method by following the video. Once you're proficient, then proceed with the corresponding y arn for formal crocheting.
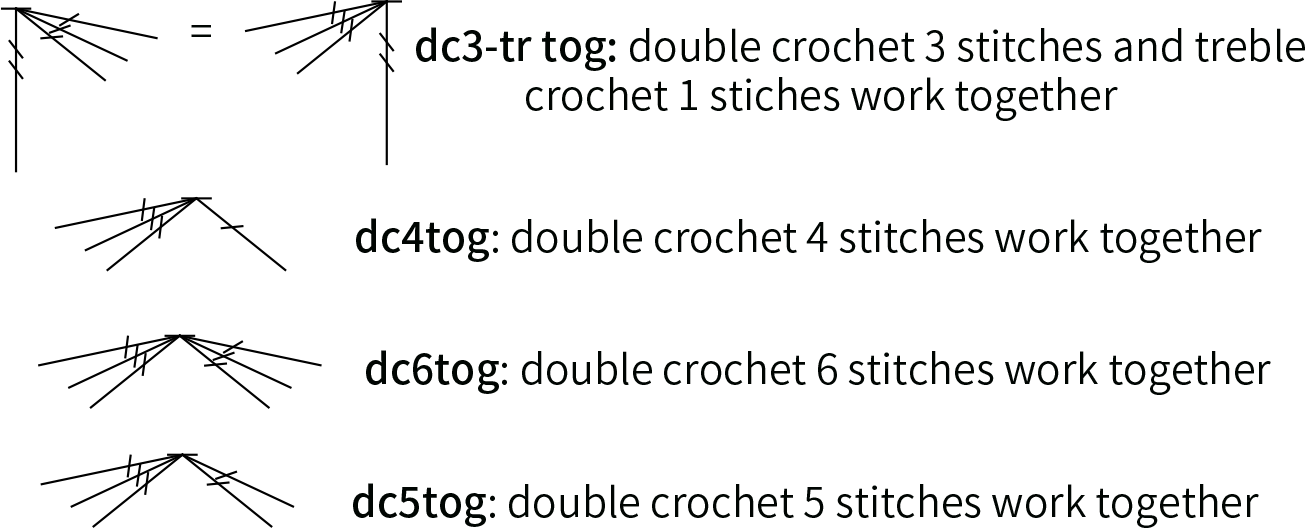
3. This pattern is making in Chinese crochet pattern terms, and the stitch name is written using American terminology. All measurements in charts are in cm.

Chart Key

















| Part | Leather Brown Style | Whisper White Style | Avocado Green Style | Praline Style | ||
| Hem | Motif | Round 1-3 | 08#Linen | 44#Glacier gray | 01#Whisper White | 27#Antique White |
| Round 4 | 38#Black | 11#Lavender Mist | 38#Black | 18#Red Ochre | ||
| Round 5 | 24#Leather Brown | 01#Whisper White | 17#Avocado Green | 04#Praline | ||
| Round 6 | 38#Black | 11#Lavender Mist | 38#Black | 18#Red Ochre | ||
| Round 7 | 24#Leather Brown | 01#Whisper White | 17#Avocado Green | 04#Praline | ||
| Joining | 24#Leather Brown | 01#Whisper White | 17#Avocado Green | 04#Praline | ||
| Edging | 08#Linen | 44#Glacier gray | 01#Whisper White | 27#Antique White | ||
| Left and Right Pieces, Back Piece and Joining | 24#Leather Brown | 01#Whisper White | 17#Avocado Green | 04#Praline | ||
| Sleeves | Sleeve Body | Round 1-15 | 24#Leather Brown | 01#Whisper White | 17#Avocado Green | 04#Praline |
| Round 16 | 08#Linen | 44#Glacier gray | 01#Whisper White | 27#Antique White | ||
| Sleeve Edge | Motif | same as the motifs on the hem | ||||
| Round 1 | 08#Linen | 44#Glacier gray | 01#Whisper White | 27#Antique White | ||
| Round 2 | 38#Black | 11#Lavender Mist | 38#Black | 18#Red Ochre | ||
| Round 3 | 24#Leather Brown | 01#Whisper White | 17#Avocado Green | 04#Praline | ||
| Front Band | Row 1 | 24#Leather Brown | 01#Whisper White | 17#Avocado Green | 04#Praline | |
| Row 2-10 | 38#Black | 11#Lavender Mist | 38#Black | 18#Red Ochre | ||
| Edging | Row 1 | 38#Black | 11#Lavender Mist | 38#Black | 18#Red Ochre | |
| Round 2 | 24#Leather Brown | 01#Whisper White | 17#Avocado Green | 04#Praline | ||
| Chinese Knot Button | 08#Linen | 44#Glacier gray | 01#Whisper White | 27#Antique White | ||
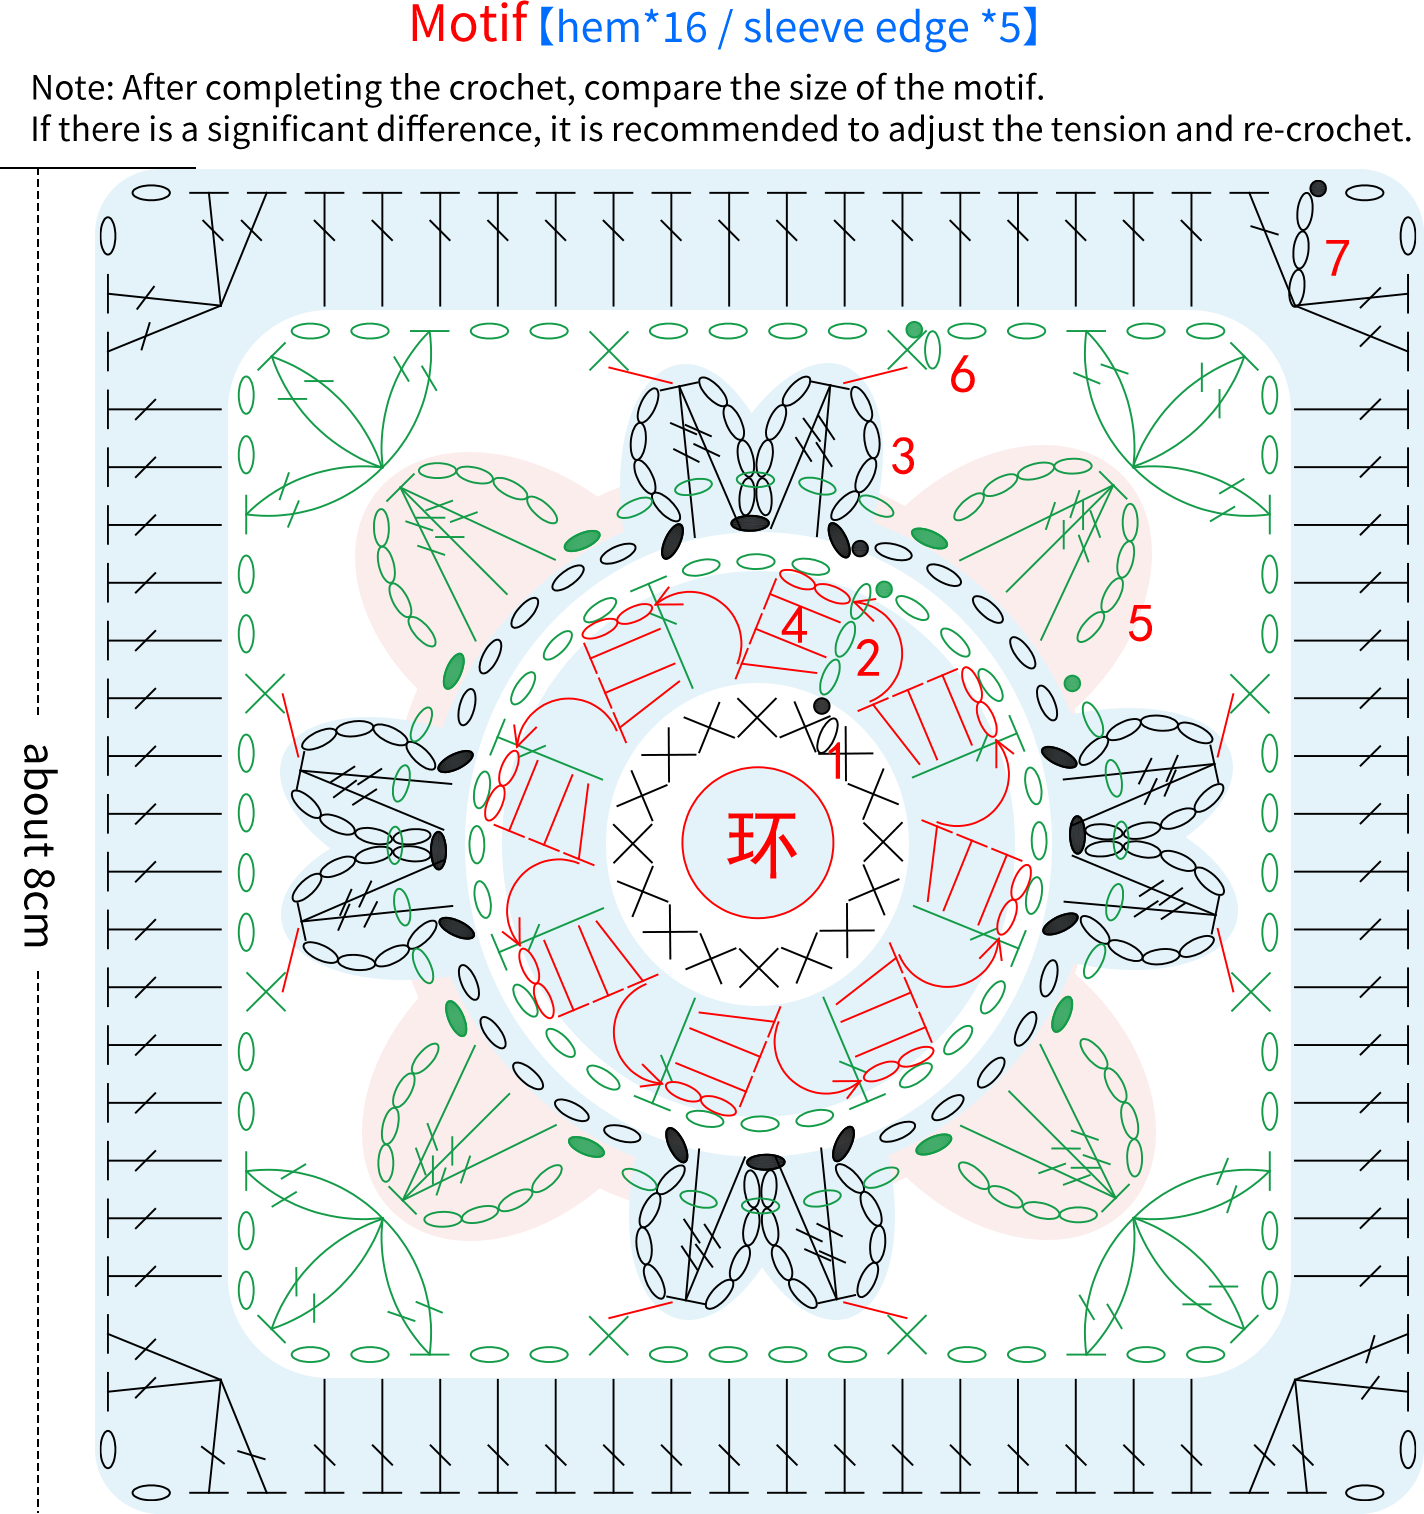
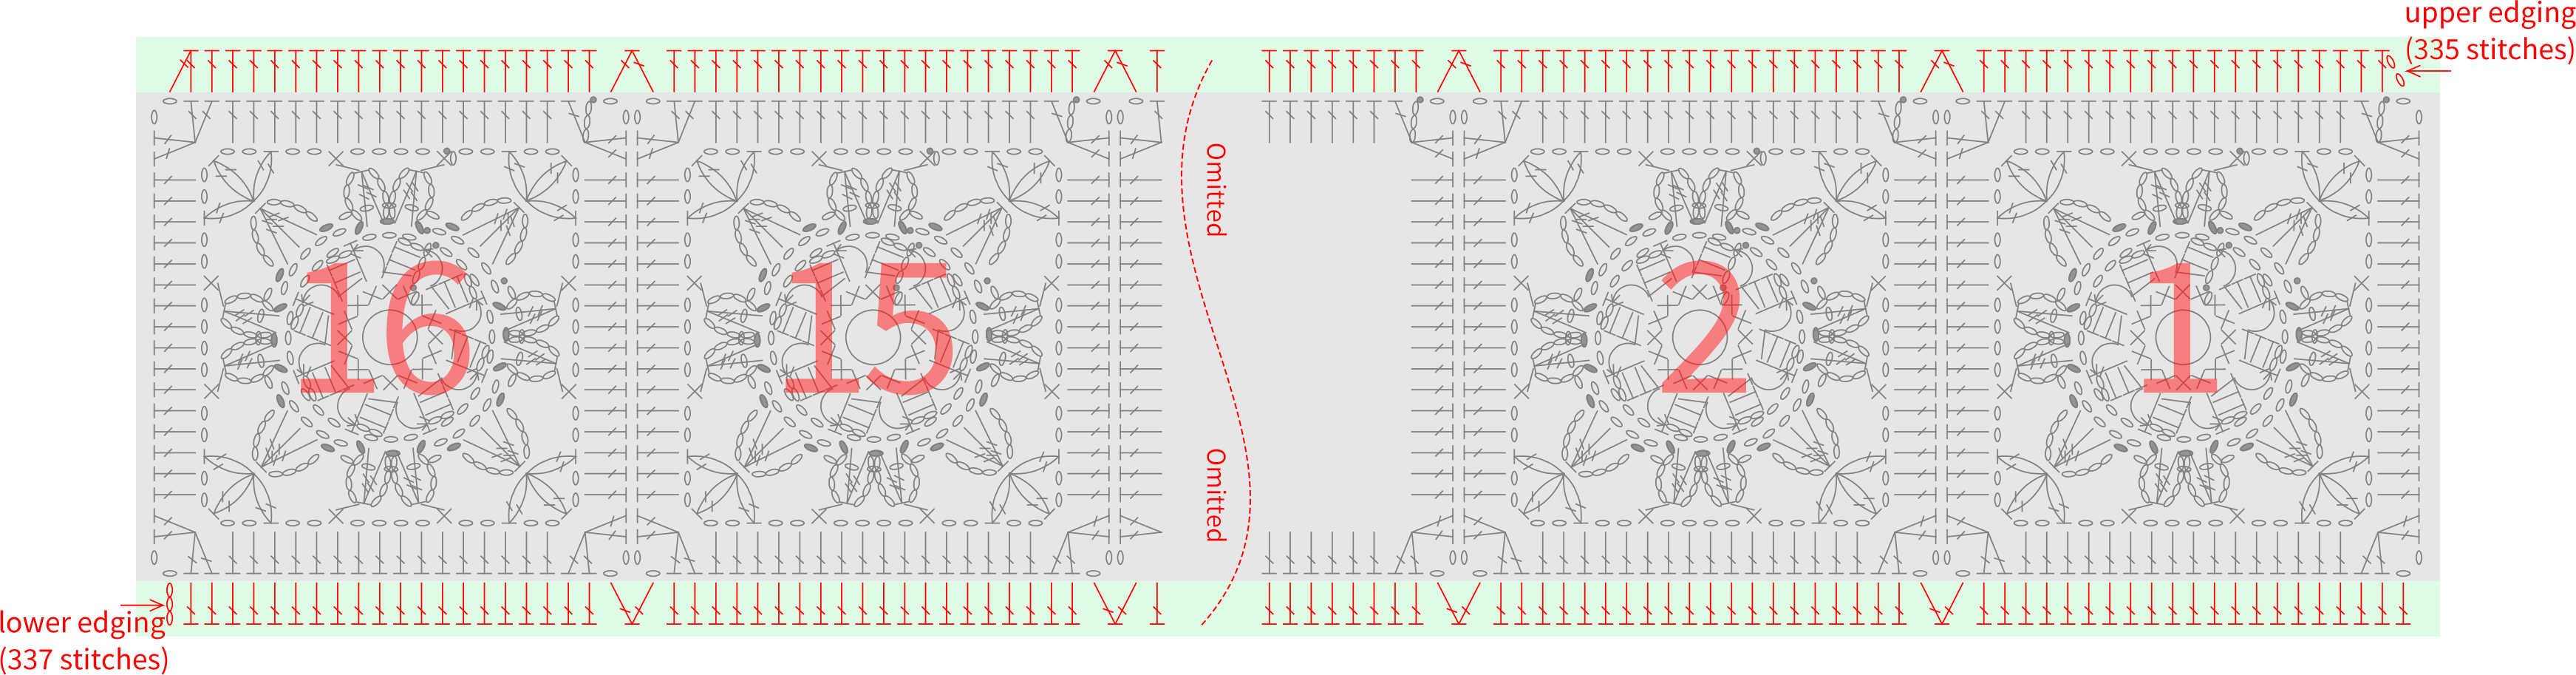
Part 1 Hem A 01' 20'' (Part1)
Divide into motifs and edging. First, crochet the corresponding number of motifs, then connect the motifs together, and finally crochet the edging along the connected motifs. Refer to the video demonstration for specifics.
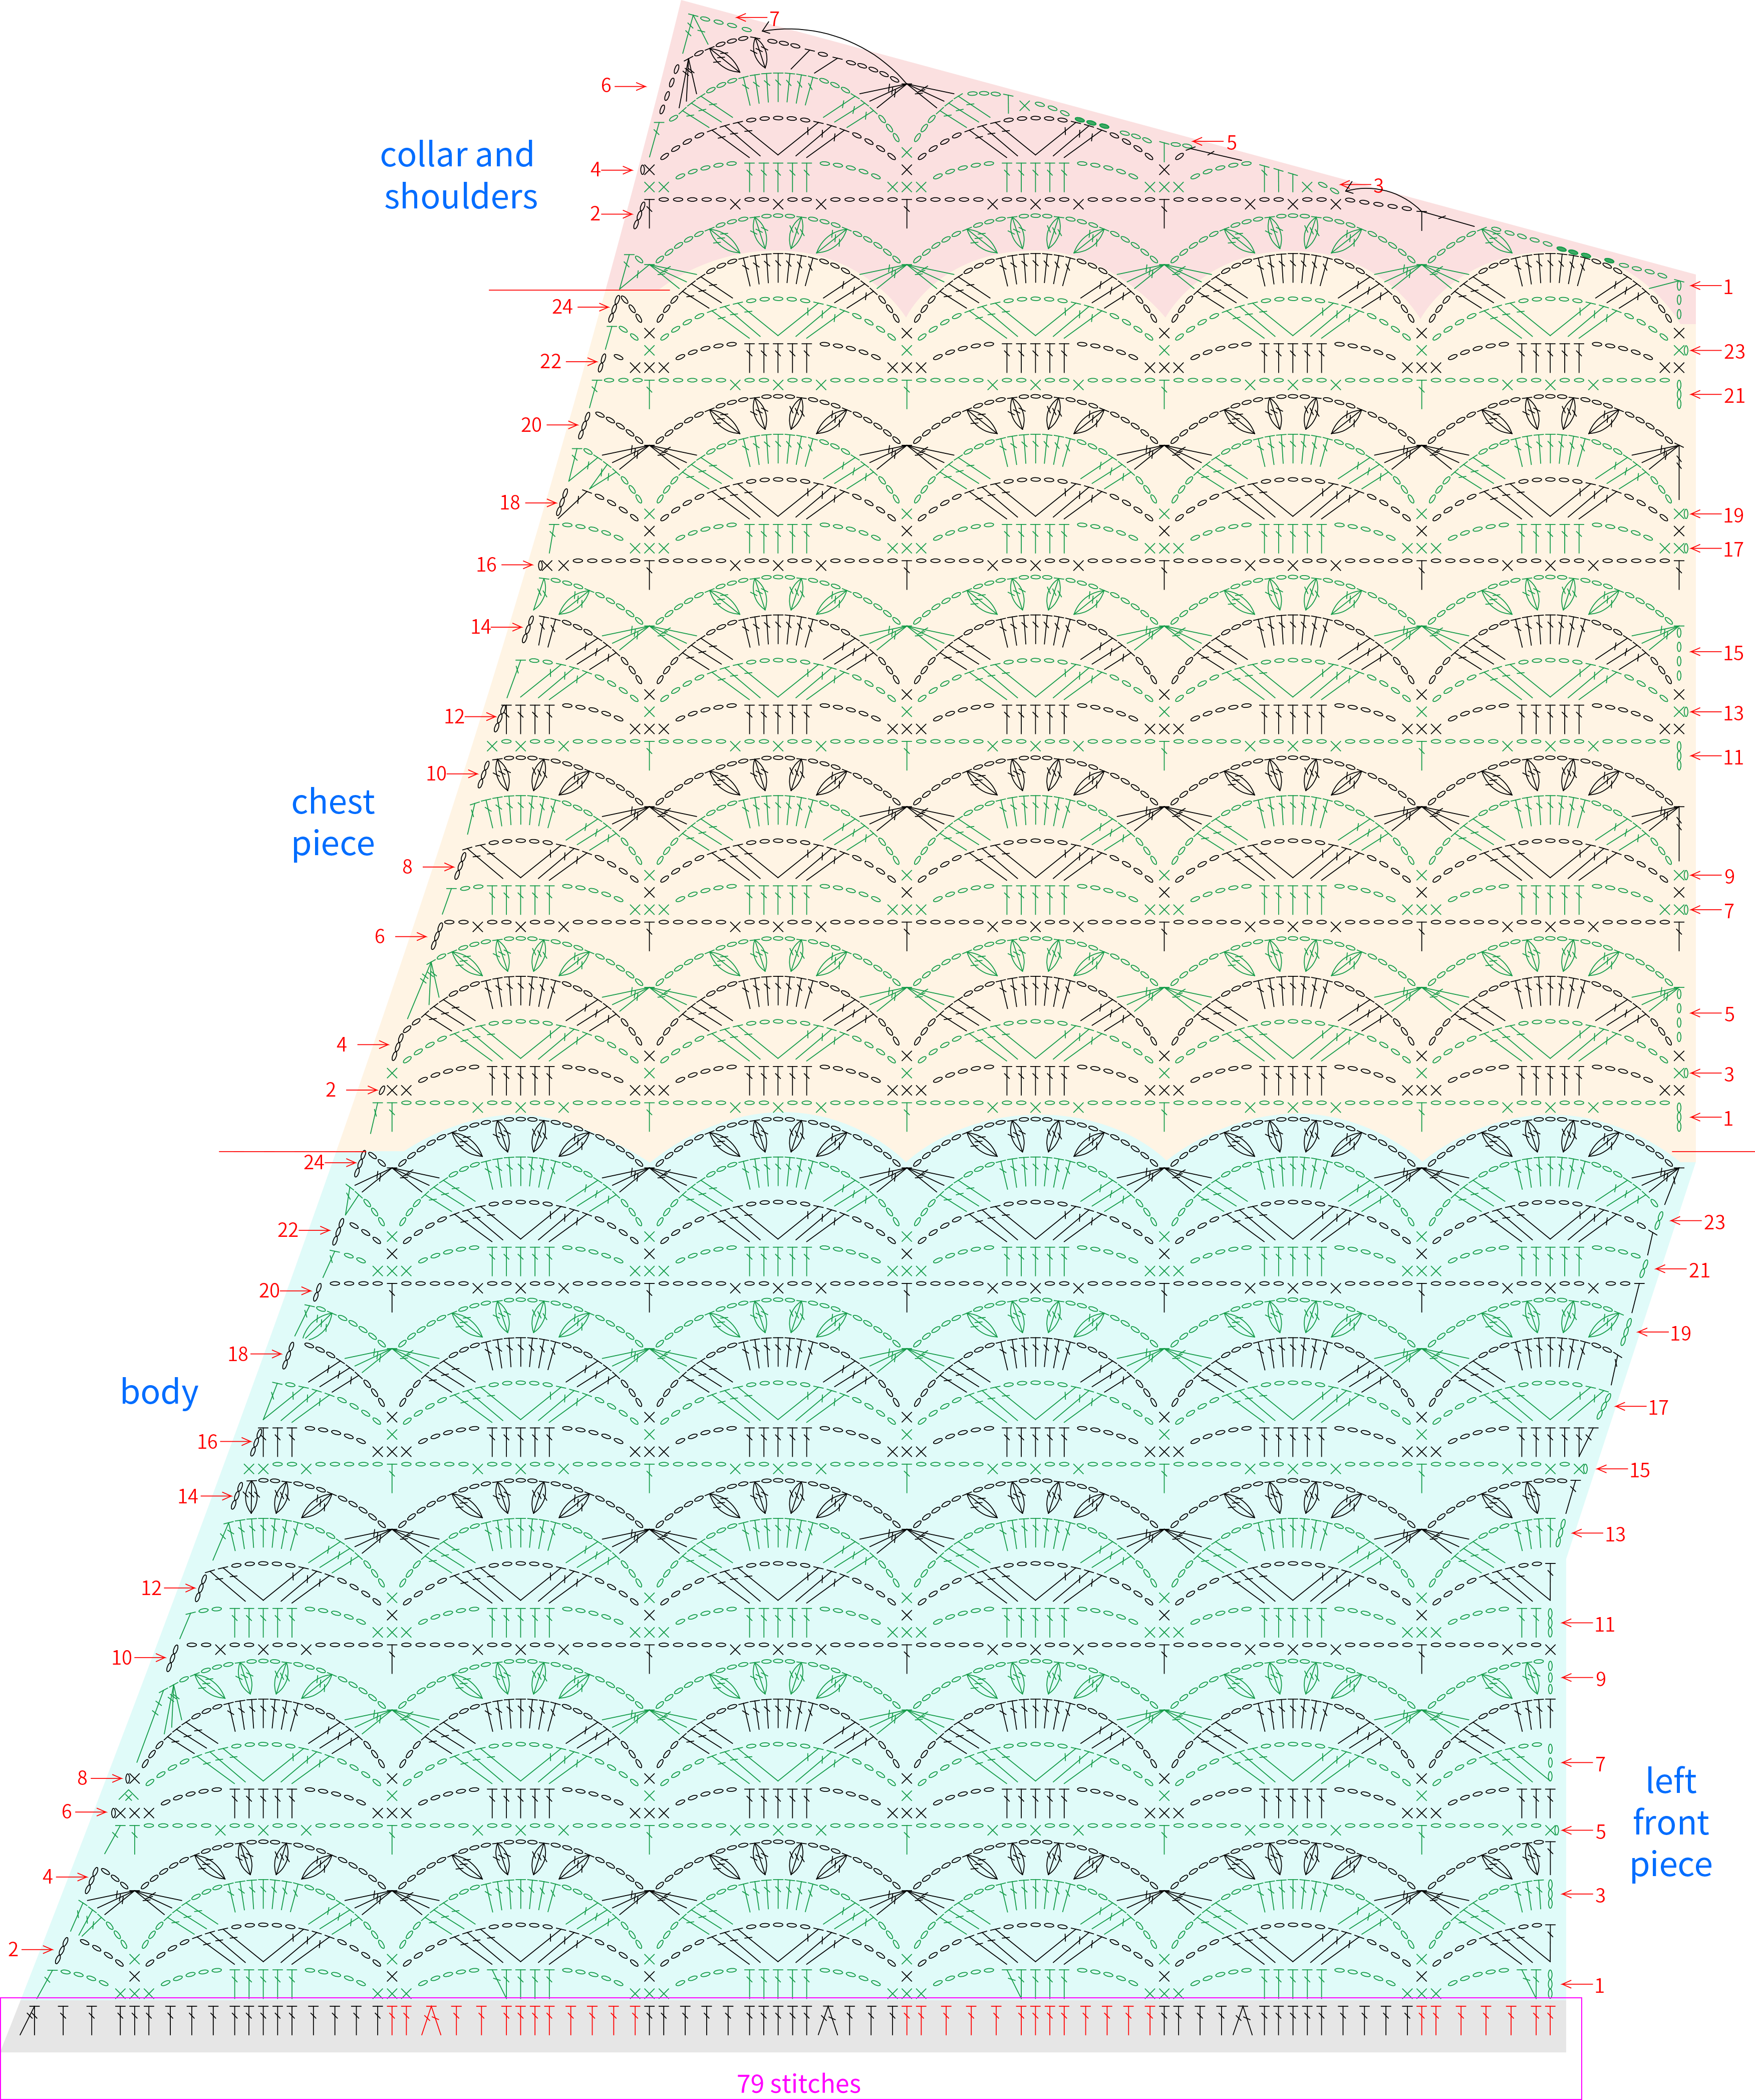
Part 2 Left and Right Front Pieces B 45' 37'' (Part1)
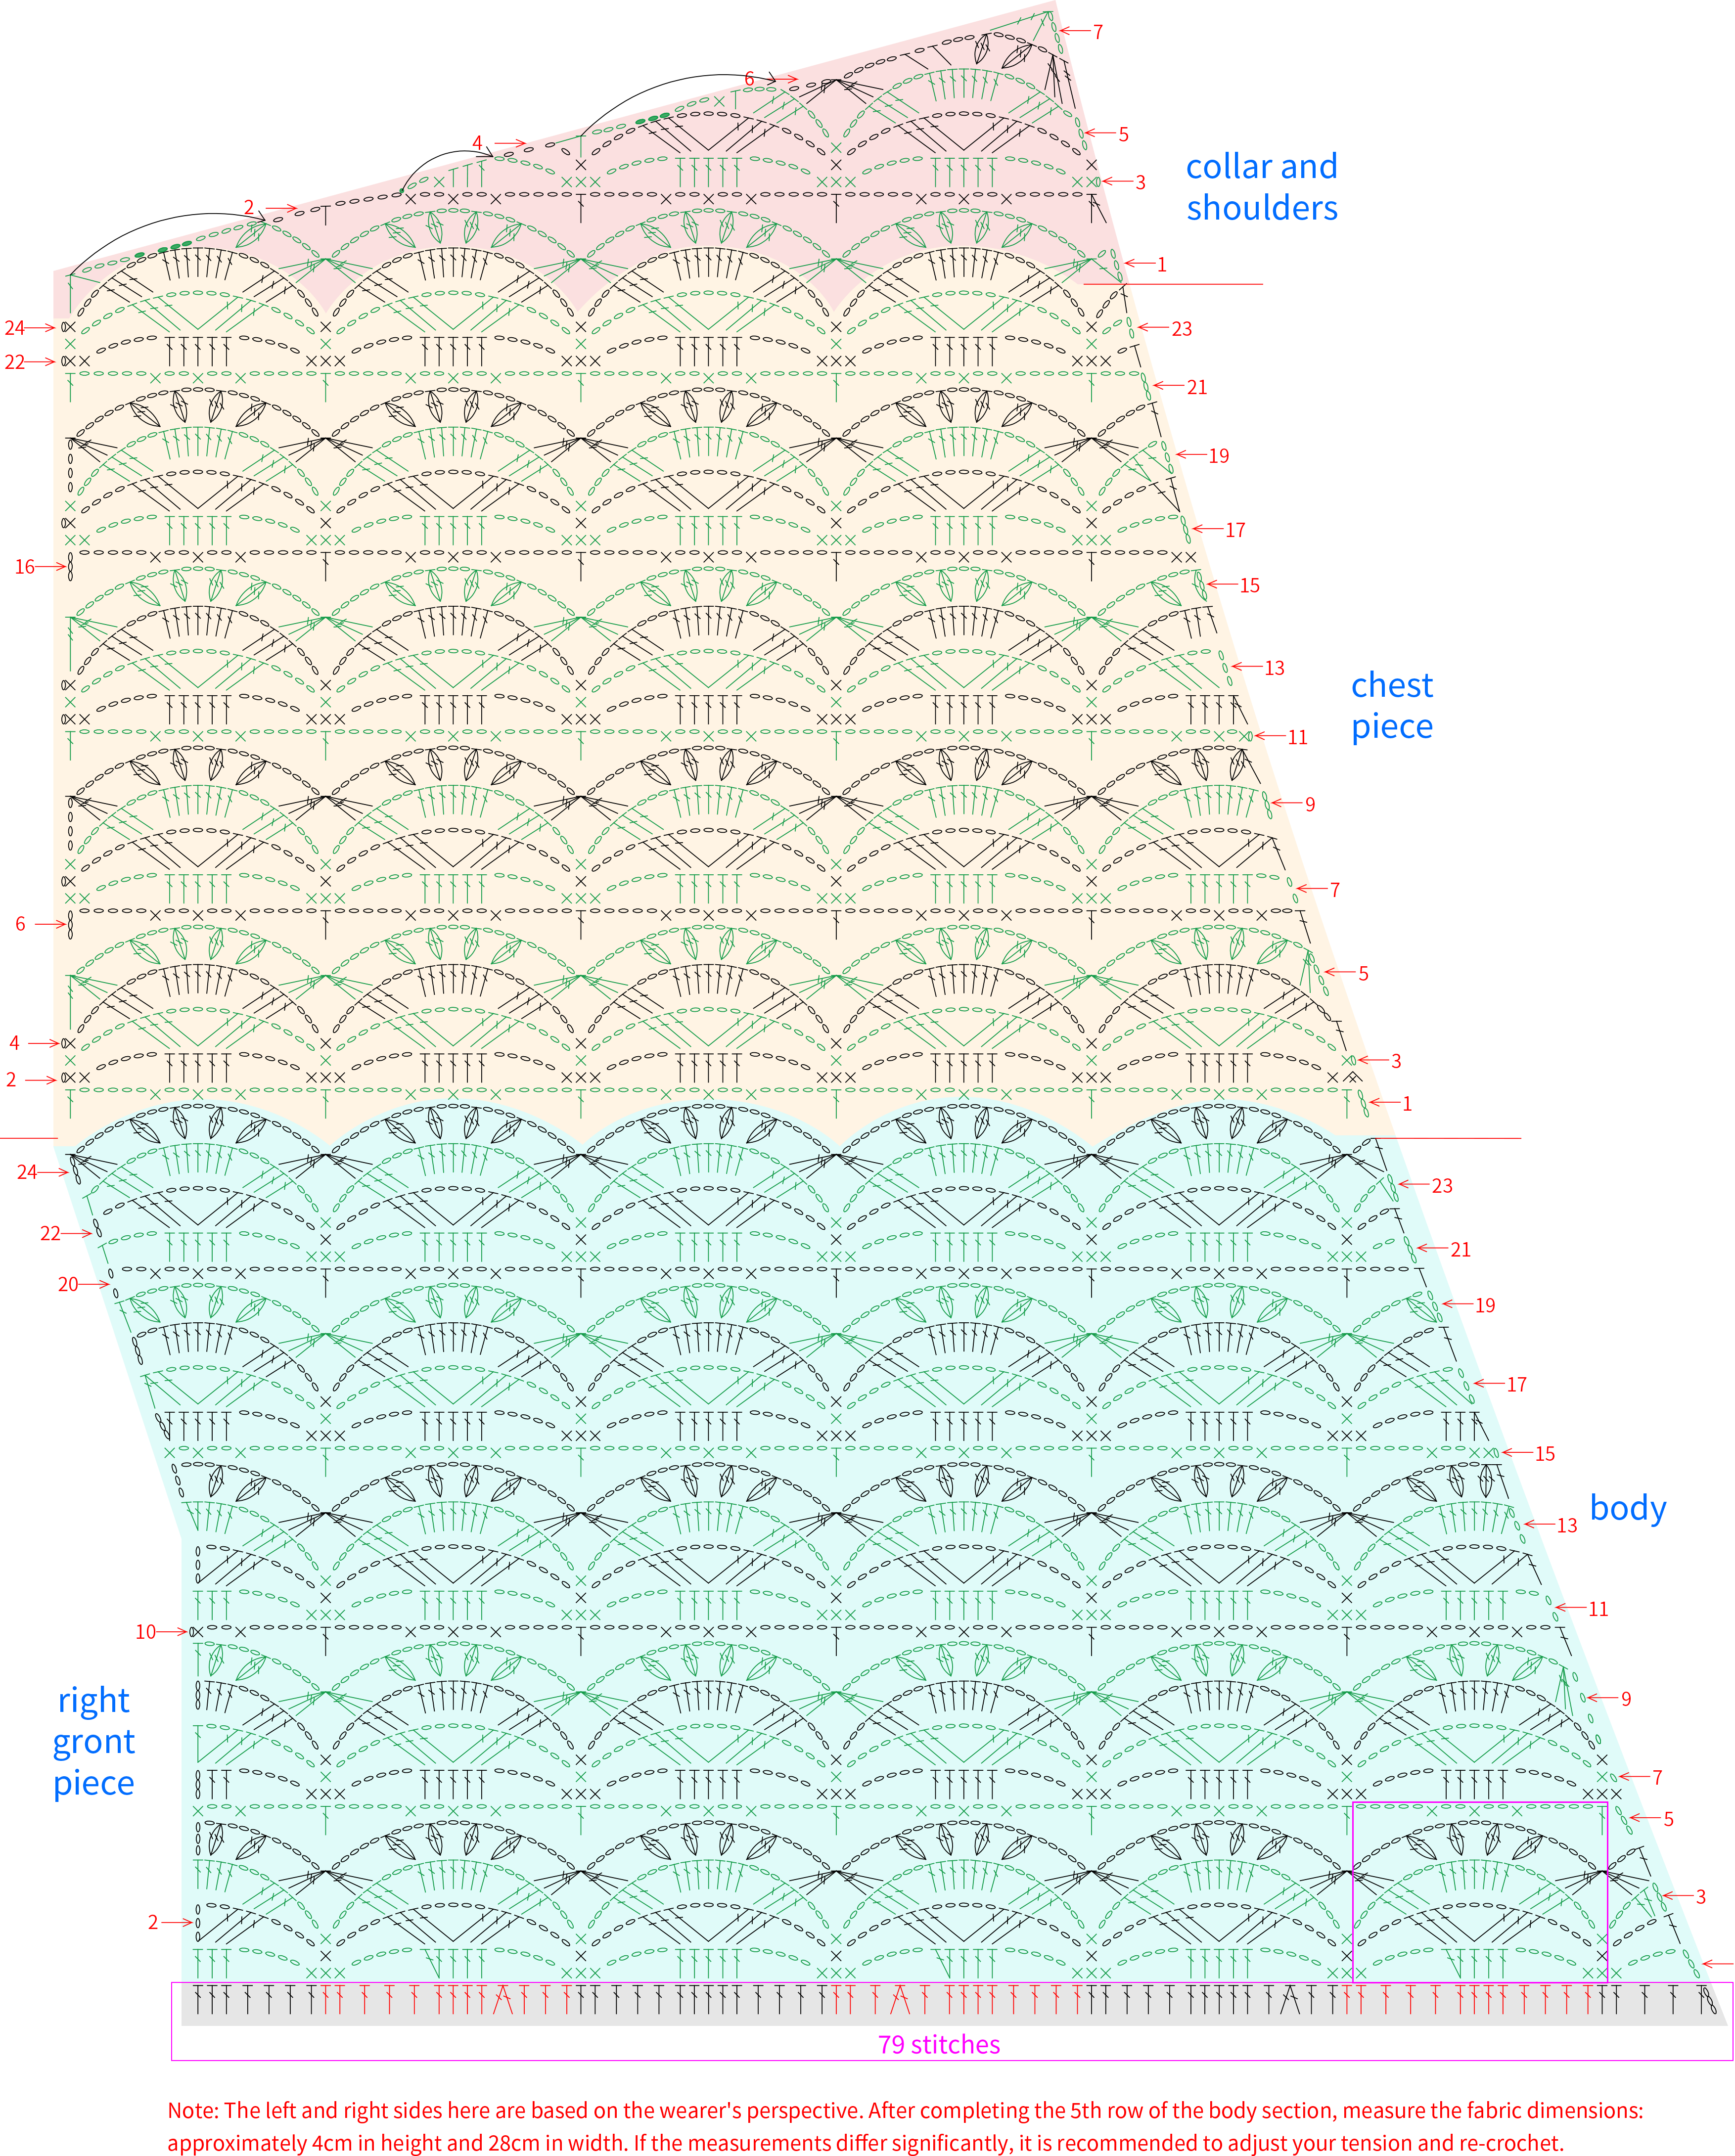
Along the corresponding position of the upper edging, work back and forth. Start with the right front piece, dividing it into three parts: body, chest piece, and collar and shoulders. Please refer to the video demonstration for details.
Right Front Piece
Left Front Piece
Part 3 Back Piece C 00' 08'' (Part2)
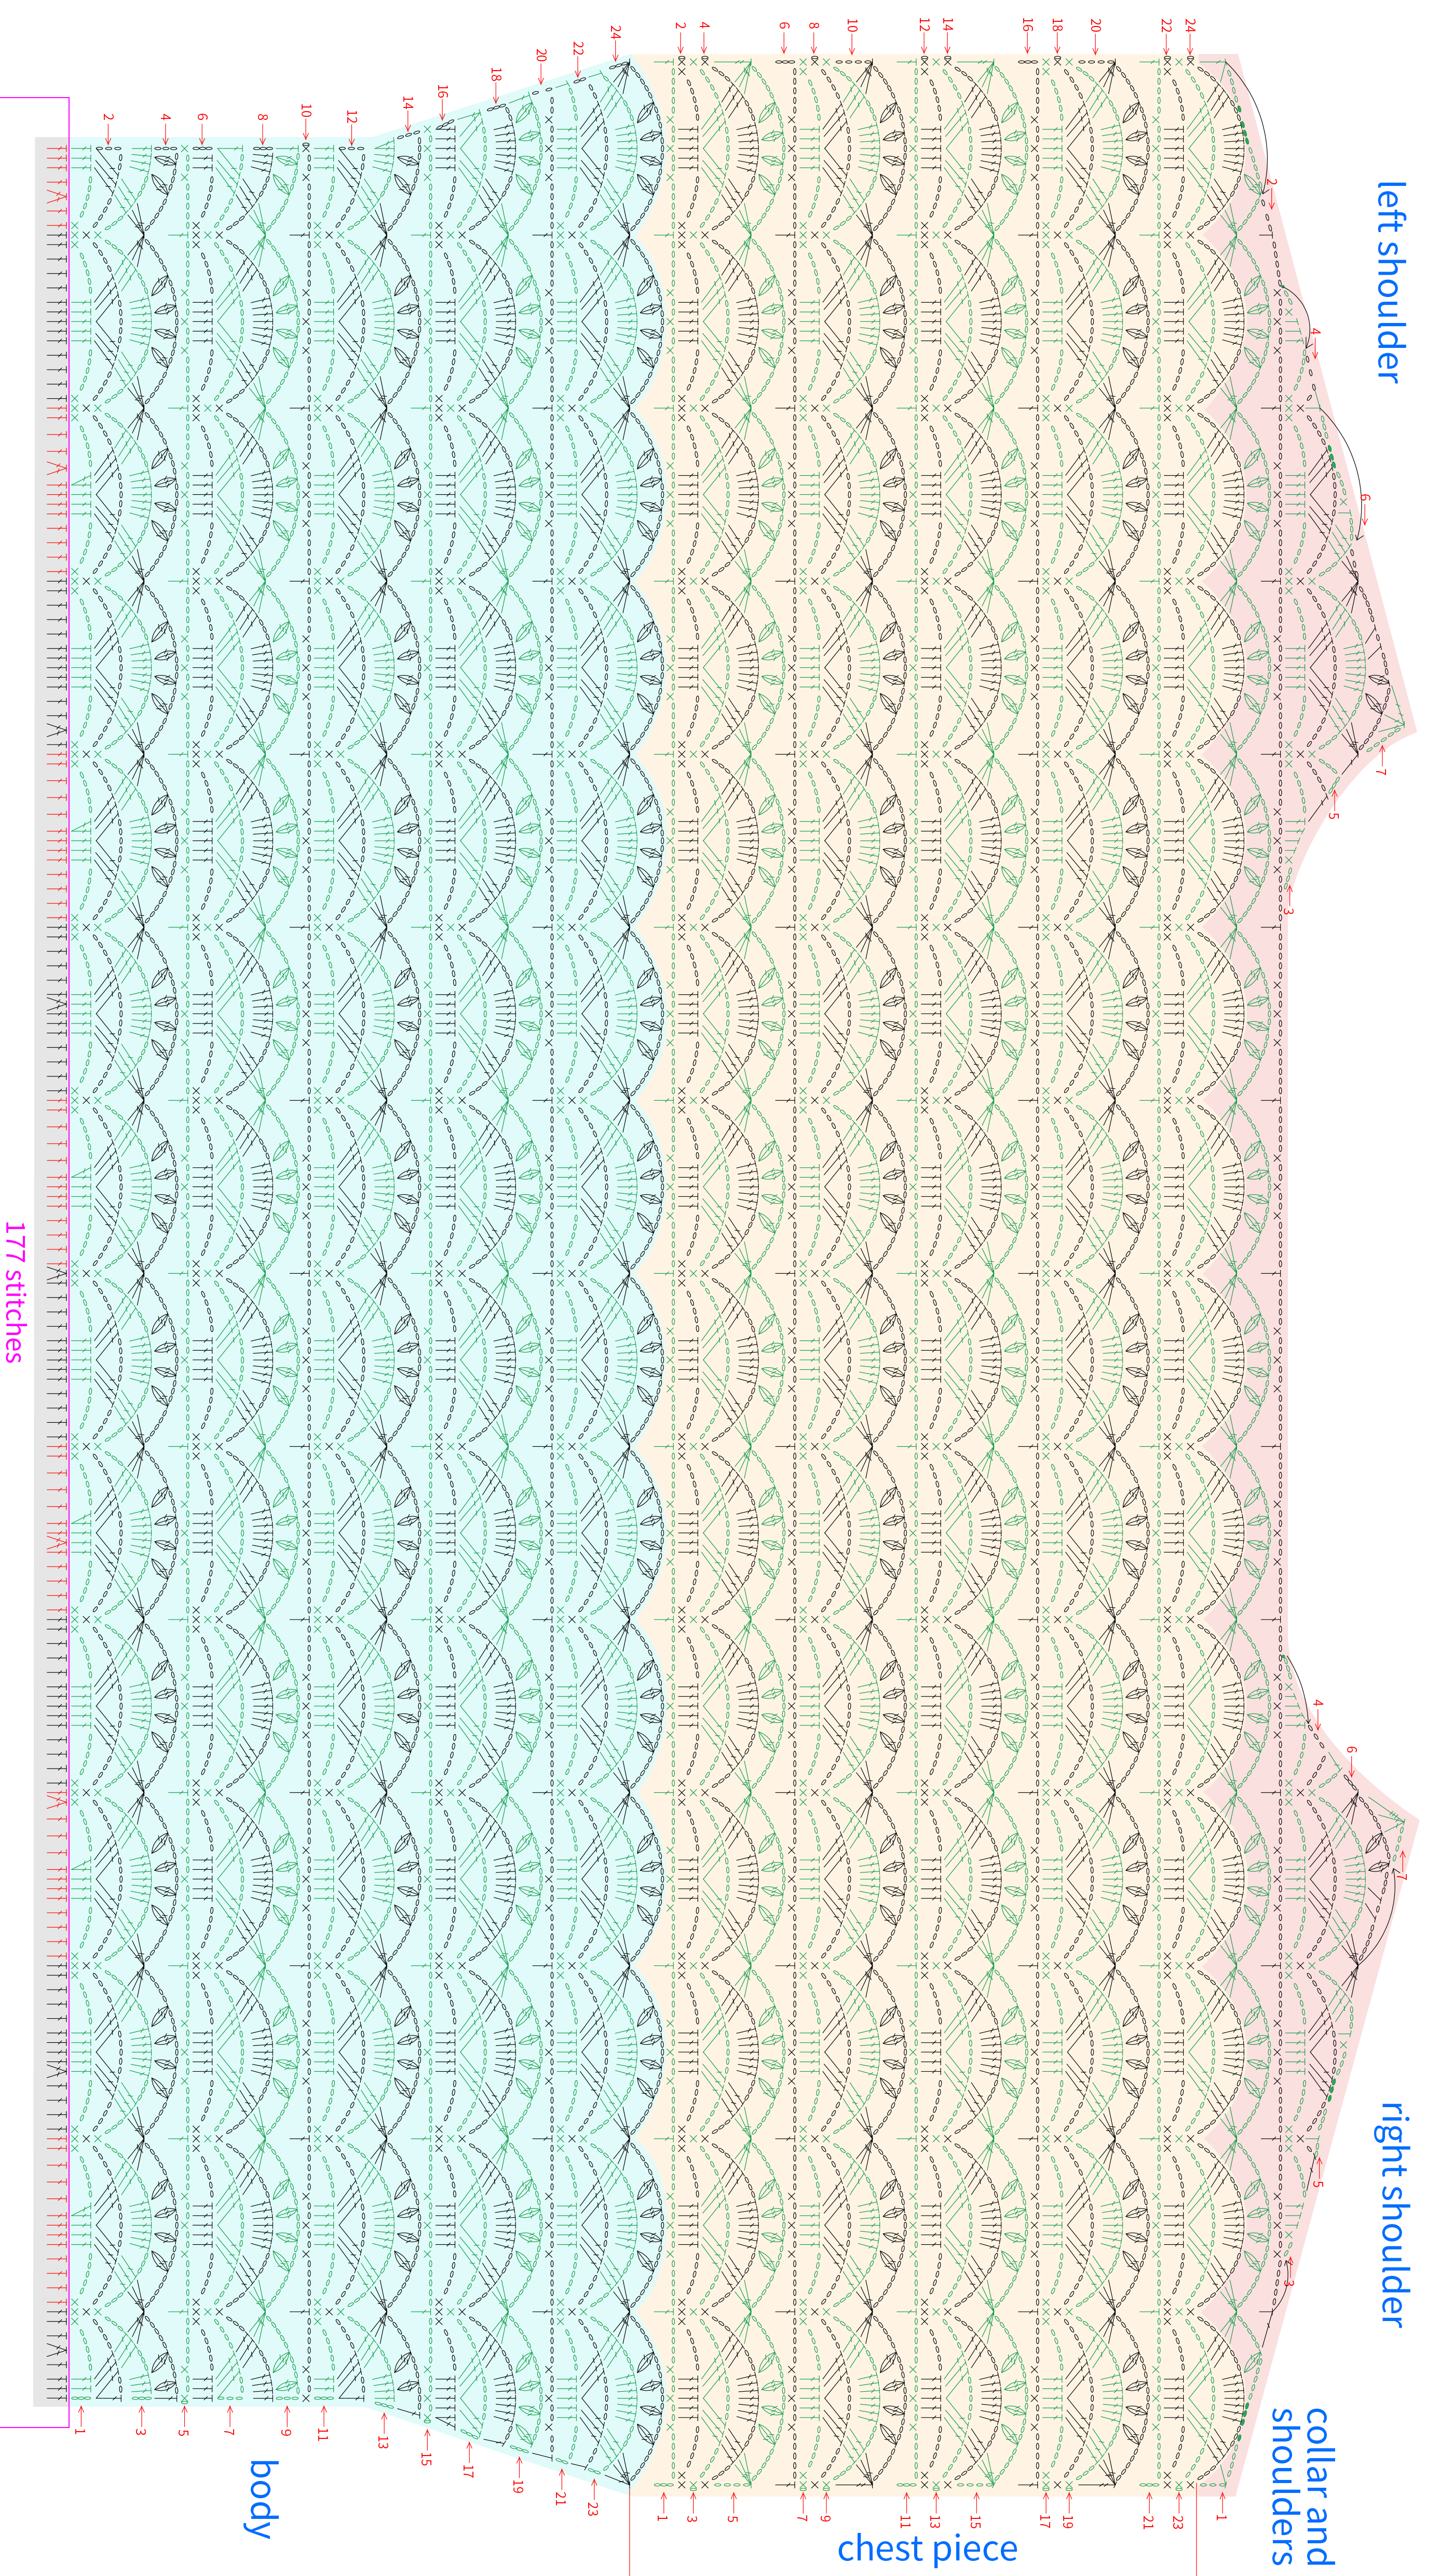
Divide into body, chest piece, and collar and shoulders, and work back and forth along the hem. For more details, please refer to the video demonstration.
Note: After completing the 5th row of the body, measure the fabric dimension: height is about 4 cm, width is about 62 cm. If the dimensions differ significantly, it's recommended to adjust the tension of your hands and re-crochet.
Back Piece
Part 4 Joining the Front and Back Pieces D 07' 18'' (Part2)
For the joining of the collar and shoulders, and body, use single crochets for joining. Place 2 chains between each single crochet, and the number of chains can be adjusted according to actual conditions. When joining, keep the fabric piece looking neat and flat. For specifics, please refer to the video demonstration.

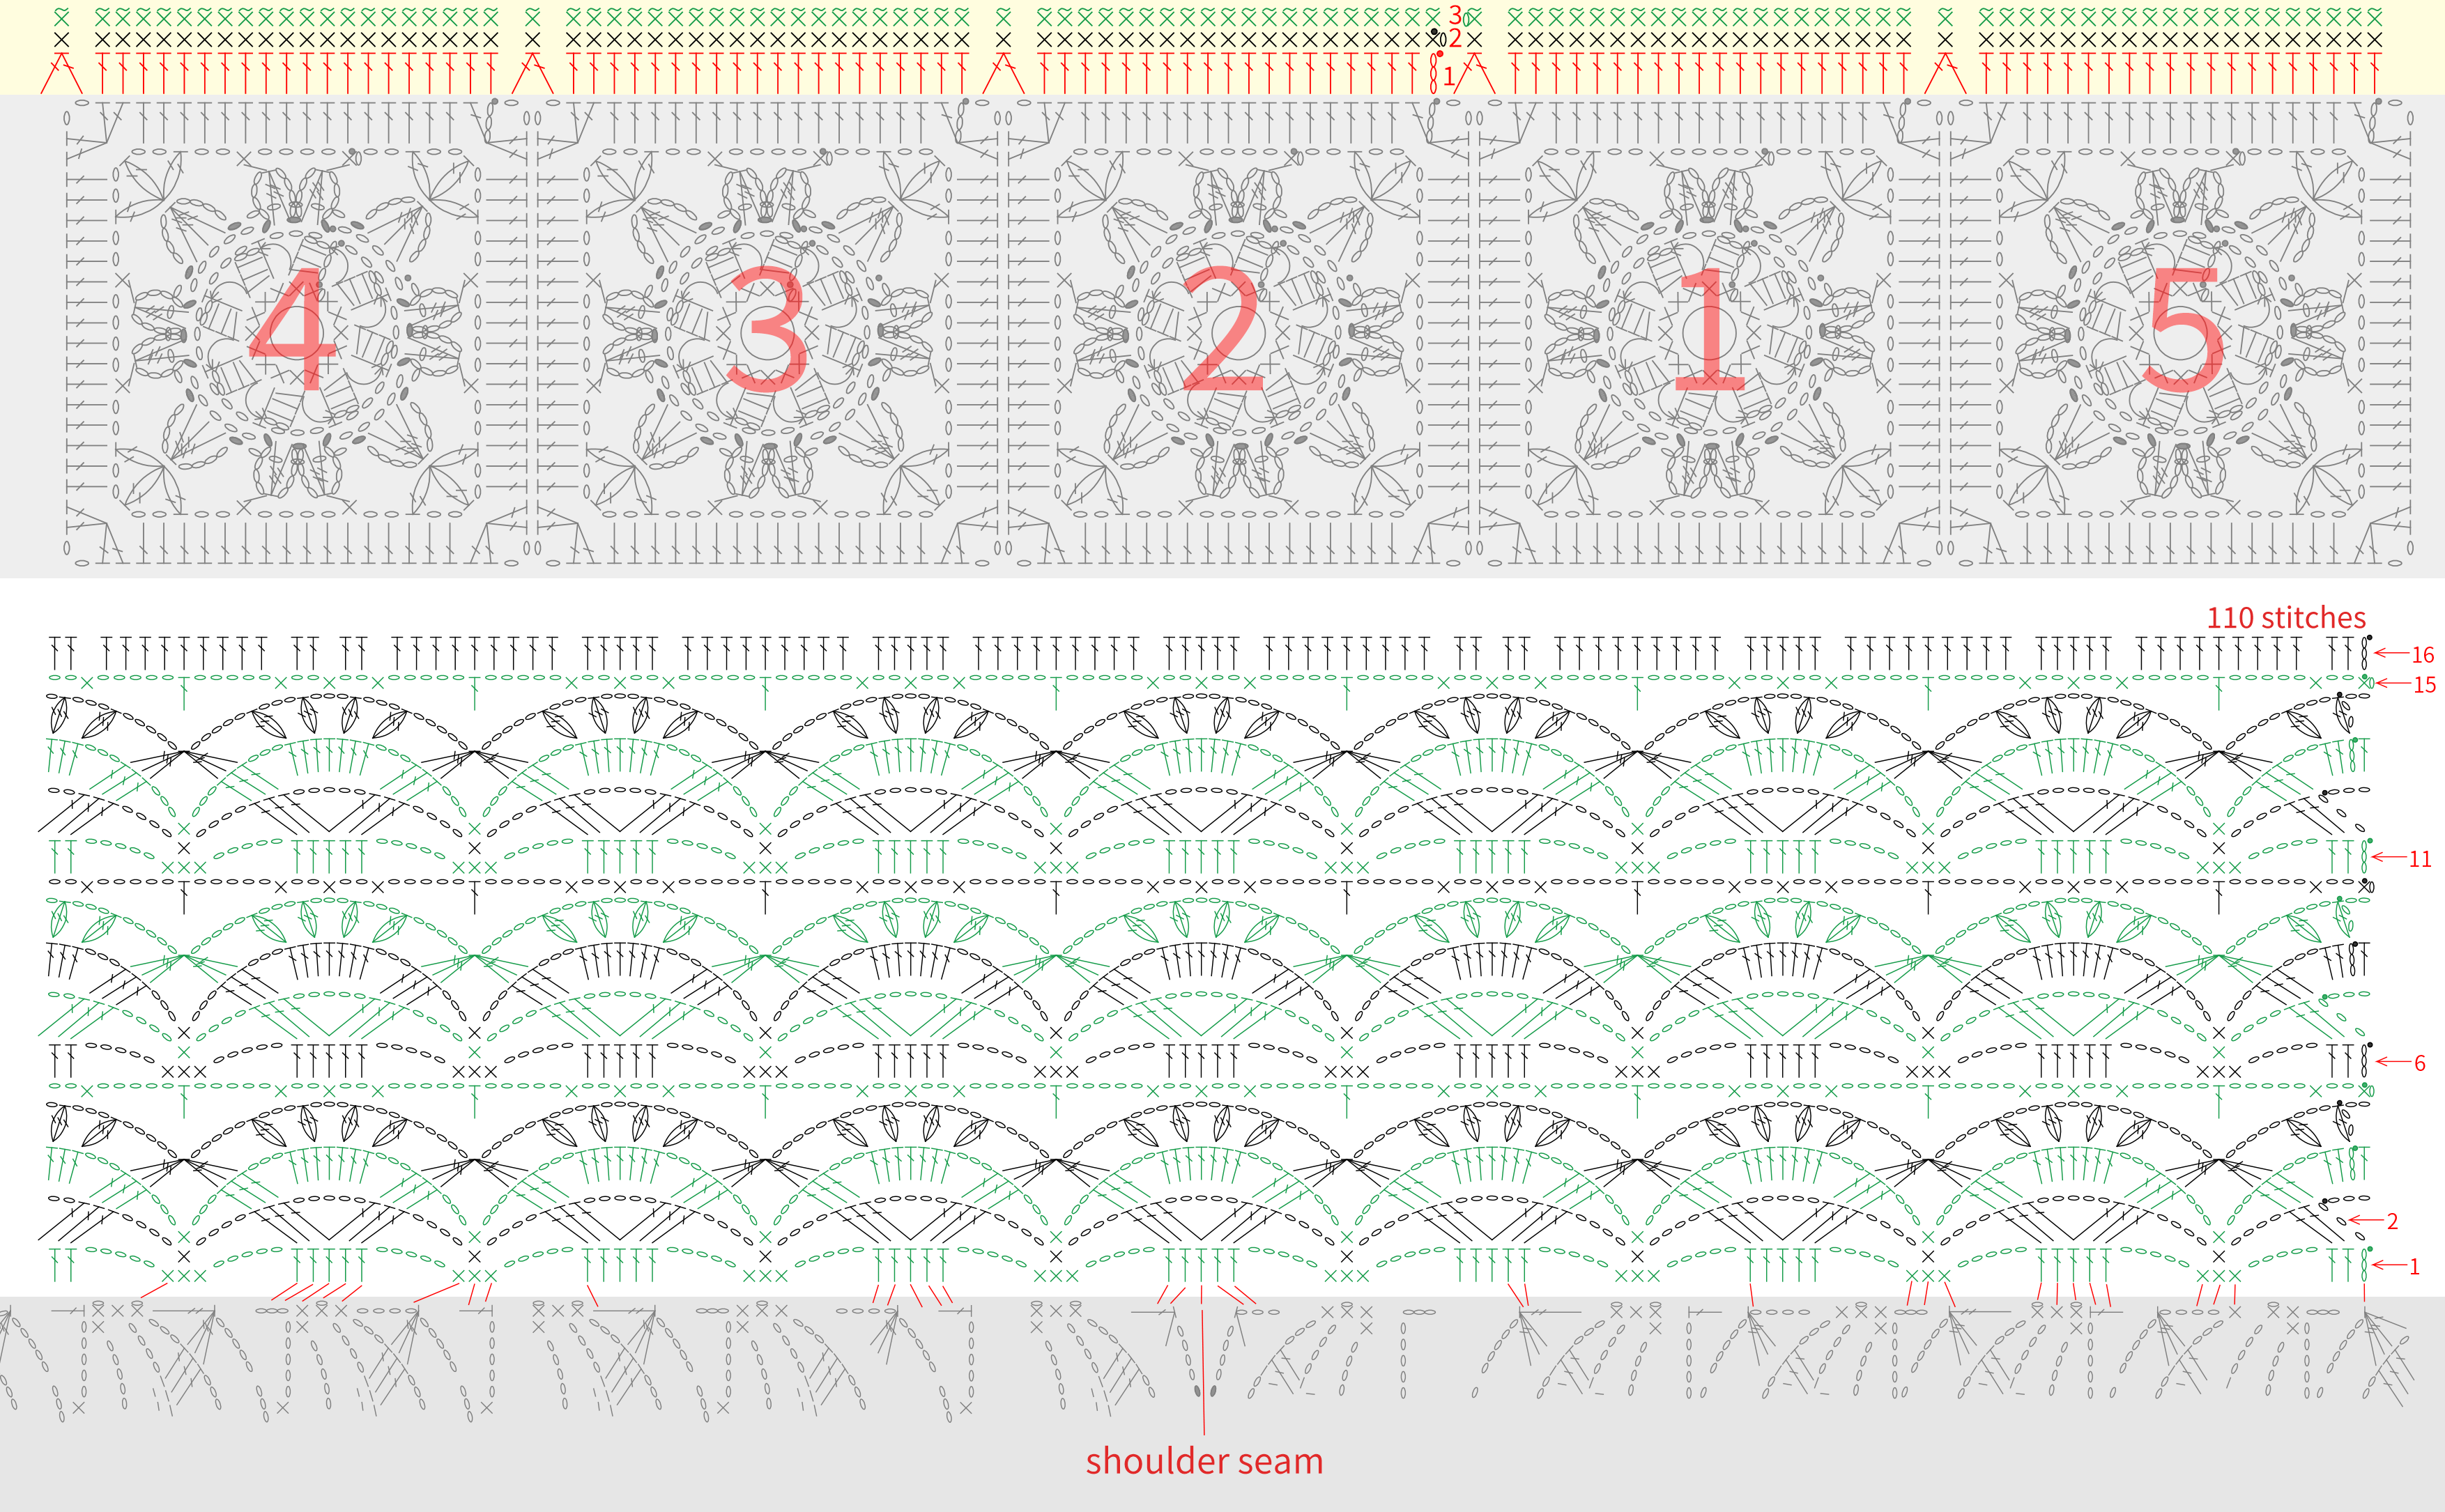
Part 5 Sleeves E 14' 22'' (Part2)
The crocheting method for both sleeves is identical, divided into the sleeve body and the sleeve edge. Work around the armhole counterclockwise. For specifics, please refer to the video demonstration.
Part 6 Front Band F& Edging G 24' 14'' (Part2)
The front band runs along the left and right front pieces, back piece, neckline, and hem , worked back and forth. The edging then follows the yarn from the front band, crocheting around the hem in one round. Please refer to the video demonstration for details.
Note: The number of single crochets and the insertion position on both the left and right front pieces in the first row of the front band can be adjusted according to the actual situation, as long as the fabric piece is flat and beautiful.
Part 7 Chinese Knot Buttons H 36' 48'' (Part2)
It is composed of one Pipa button and one swastika knot. Crochet first, then make it. After completion, install it in the front band. For specific instructions, please refer to the video demonstration.
Note:
1. Pipa button: Use the double chain rope method to crochet a rope with a length of about 60cm. The length can be adjusted according to the actual situation. After crocheting, leave a long yarn tail and fix the Pipa button at an appropriate position on the right front piece.
2. Swastika knot: Use the double chain rope method to crochet a rope with a length of about 60cm. After crocheting, leave a yarn tail, thread it through a pearl button, then weave in the ends, and make the swastika knot. Finally, take a piece of same color yarn about 30cm long, and fix it at the symmetrical position on the left front piece.
Made by the community





