
Clothes
Jane Eyre
Project preview
See the finished project
Pattern format
Instructions
Watch and follow
Video tutorial
| Style | Yarn | Color |
|---|---|---|
| Jane Eyre Lace Cardigan-Bleached Sand Version | Fancy Dyed Lace |  204#Garden Oasis 204#Garden Oasis |
| Combed 5# Lace |  02# Bleached Sand 02# Bleached Sand | |
| Jane Eyre Lace Cardigan- Bleached Aqua Version | Fancy Dyed Lace | 204#Garden Oasis |
| Combed 5# Lace |  09#Bleached Aqua 09#Bleached Aqua |
Due to variations in individual tension, the size of the sample is for reference only.
Dimension:Chest width 39 cm , Length 45 cm, Collar 14 cm.
Materials: Combed 5# Lace & Fancy Dyed Lace
Crochet Hook: 1.75 mm Crochet Hook

Chart Key










Note:
This pattern is making in Chinese crochet pattern terms, and the stitch name is written using American terminology. All measurements in charts are in cm.
Part 1 The Main Part
The main part includes the front body, back body, collar, and pearl buttons.
Step 1 The Front Piece 01' 36''
and The Back Piece 28' 13''
The front and back pieces are each composed of the body panel and two shoulder-parts. The stitch patterns for the front and back body panels are identical; they only differ in the number of rows crocheted. We will start from foundation chain, then work back and forth along the starting chain to complete the body panel. After that, decrease stitches separately to crochet the two shoulder-parts. Please refer to the video demonstration for more details.
Note: 1. After completing the body piece, you can check the required length and crochet a few more pattern repeats if needed based on the actual situation;
2. After completing the left and right shoulder-parts of the front piece, leave a 25 cm tail for each part separately.
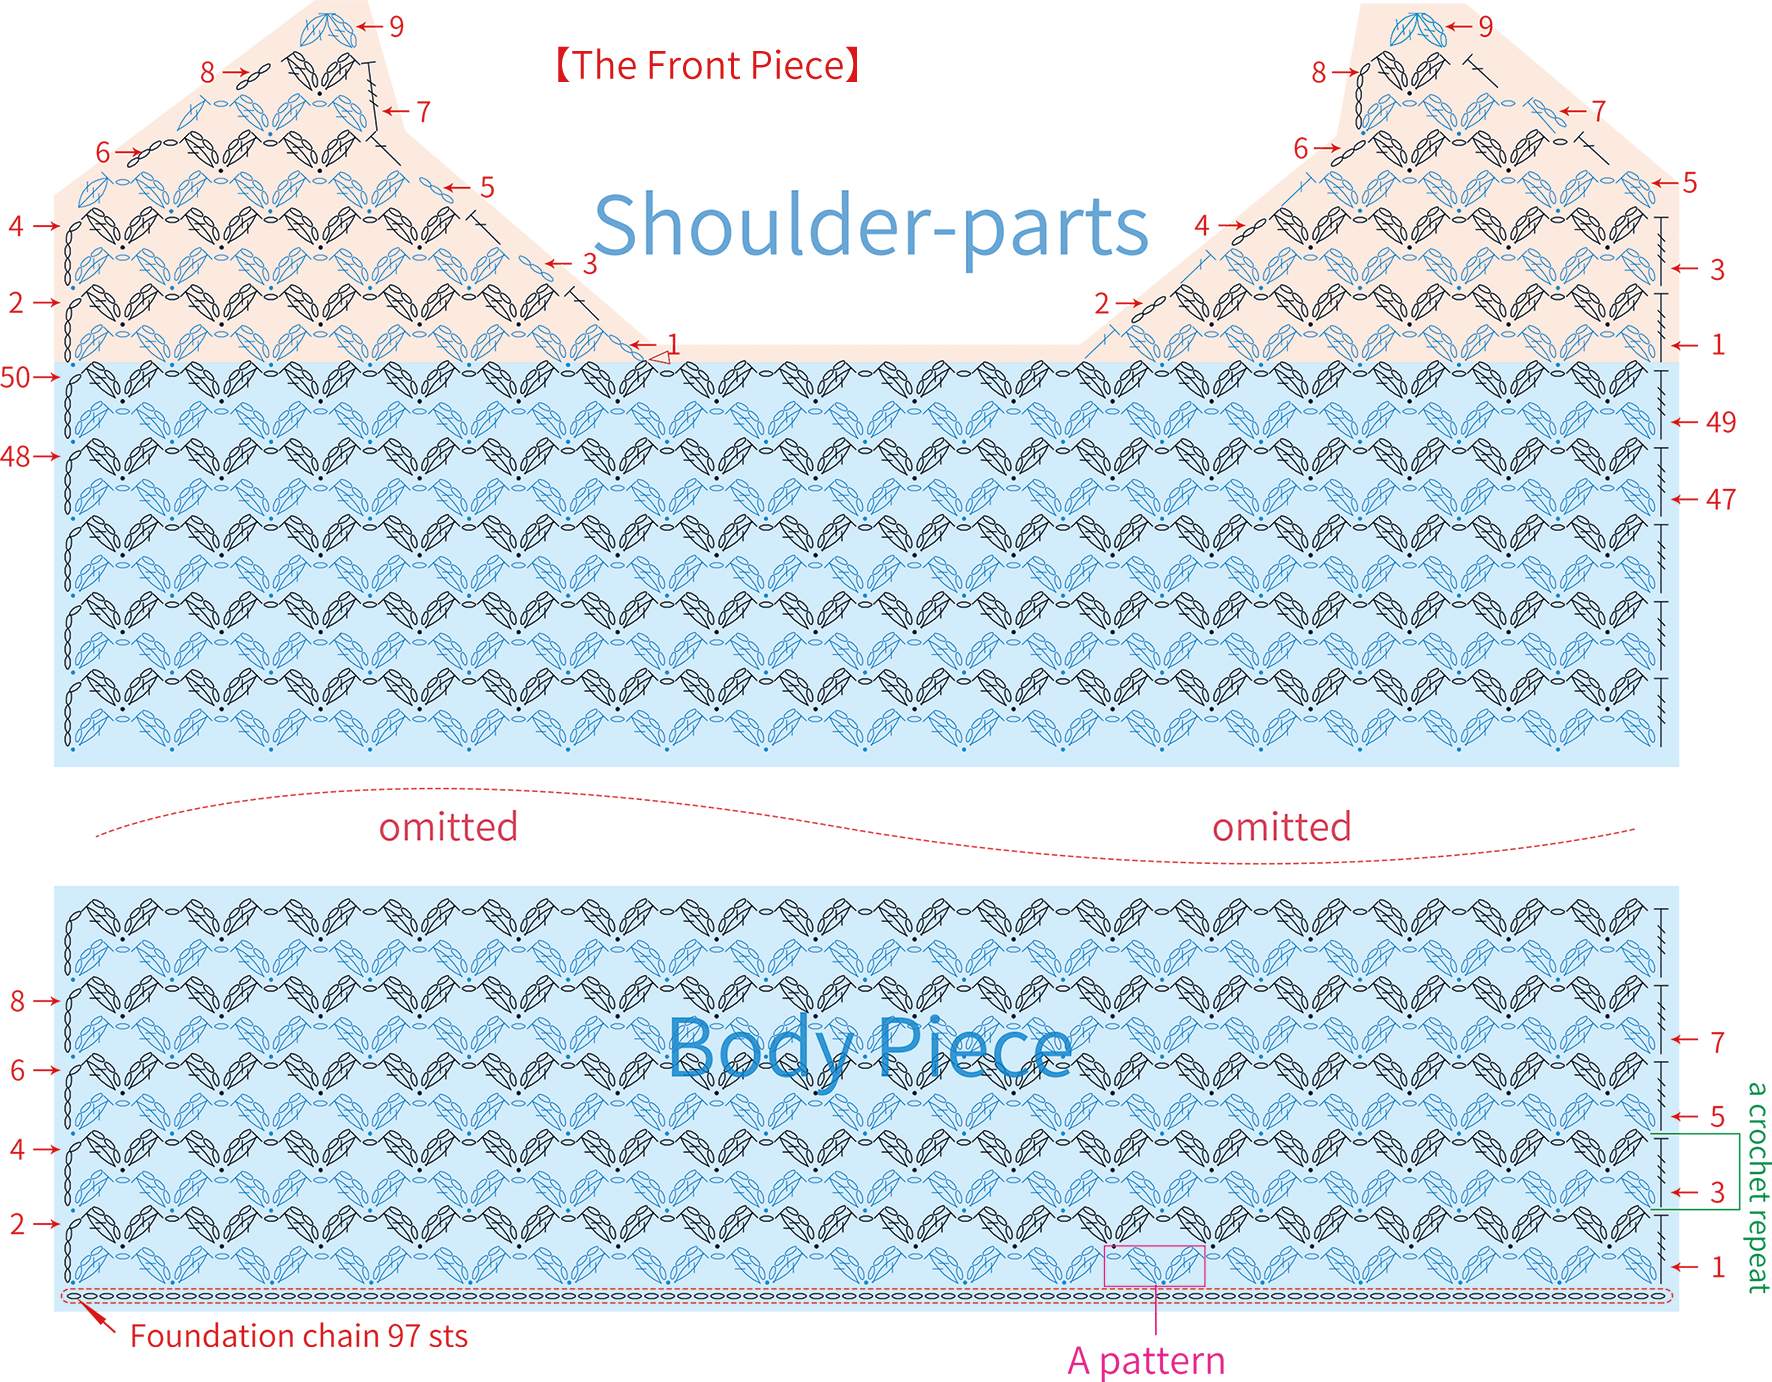
Note: The crocheting method for the back piece is identical to the front piece, but with fewer rows. If there are additional pattern repeats added to the front piece, the same number of repeats should also be added to the back piece. After completing the shoulder-parts on both sides, fasten off normally.
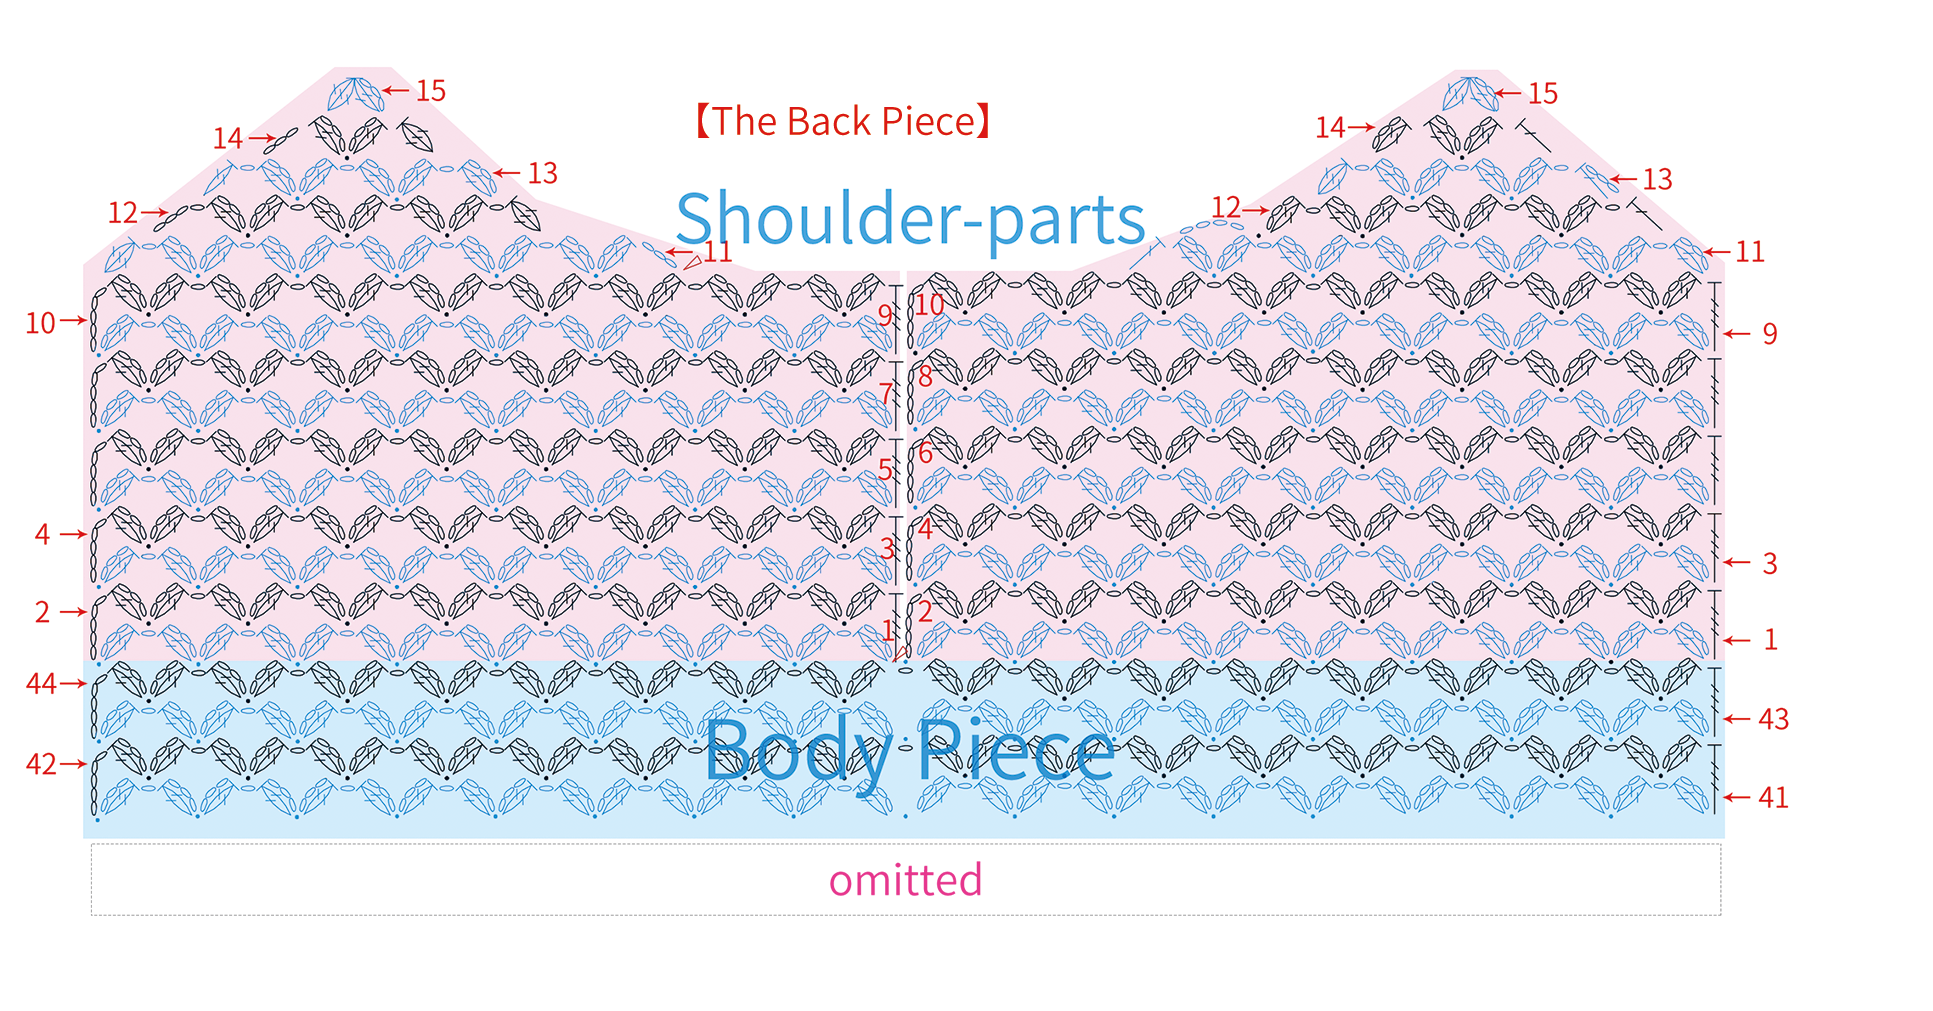
Step 2 Joining together, Collar 29' 24''
After completing the crocheting of the front and back pieces, use the reserved yarn tails to connect the corresponding positions of the shoulder-parts of the front and back pieces. After that, pick up stitches around the neckline to crochet the collar. Finally, sew pearl buttons on the left side of the opening in the back piece collar. Please refer to the video demonstration for more details.

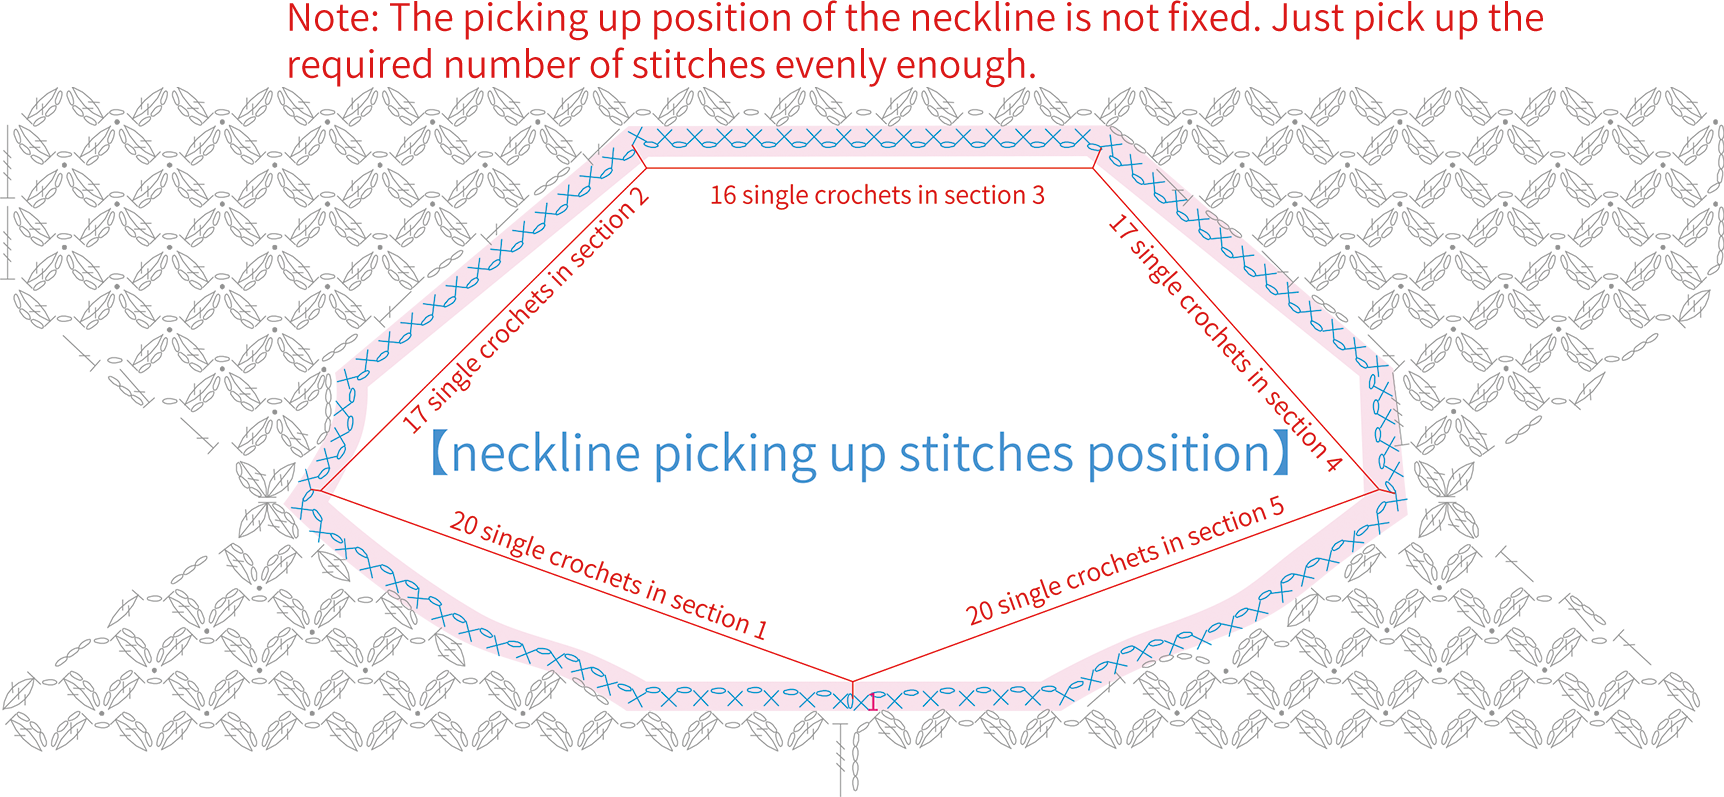

Part 2 Accessories
Accessories include lace trim, edging, and embellishments.
Step 1 Attach the lace trim and crochet the edging 41' 15''
First, attach lace trim separately to the cast-on positions of the front and back pieces. Then, attach lace trim separately to both sides of the body. Next, crochet the edging on the small holes on the other side of the lace trim. Finally, sew together and tidy up. Please refer to the video demonstration for more details.
Note: 1. Before attaching, the lace trim needs to be ironed flat;
2. The lace trim corresponding to the starting point should be about 8 centimeters longer than the width of the front and back pieces;
3. The lace trim on both sides of the body should be about 16 centimeters longer than the total length of the side seams of the front and back pieces.

Step 2 Straps 62' 29''
You need to crochet 4 straps in total, and attach them separately on both sides of the front and back body. Please refer to the video demonstration for more details.
Note: The strap installation positions are on both sides of the front and back garment bodies, about 23cm above the shoulders. They should be at the middle of the corresponding fan pattern, at the position of 3 chain stitches. Mindful that all straps should be installed at the same height and not staggered.

Step 3 Ribbon, Roses, and Leaves 65' 17''
Attach S-shaped bent ribbons to all the lace trims, and then embroider roses and leaves corresponding to the bent positions of the ribbons. Please refer to the video demonstration for more details.
Note: The roses are embroidered using variegated yarn. You can refer to the finished product or, according to your preference, cut the corresponding color sections of the variegated yarn for embroidering.
Step 4 Handling of inner layers 76' 05''
Cut the lace trim 2 centimeters longer than the circumference of the cuff. Attach the ribbon, roses, and leaves as demonstrated in the previous method, then sew it onto the cuff of the undergarment. Please refer to the video demonstration for more details.
Note: The starting position for sewing corresponds to the seam line under the sleeve.
Made by the community





