Bag
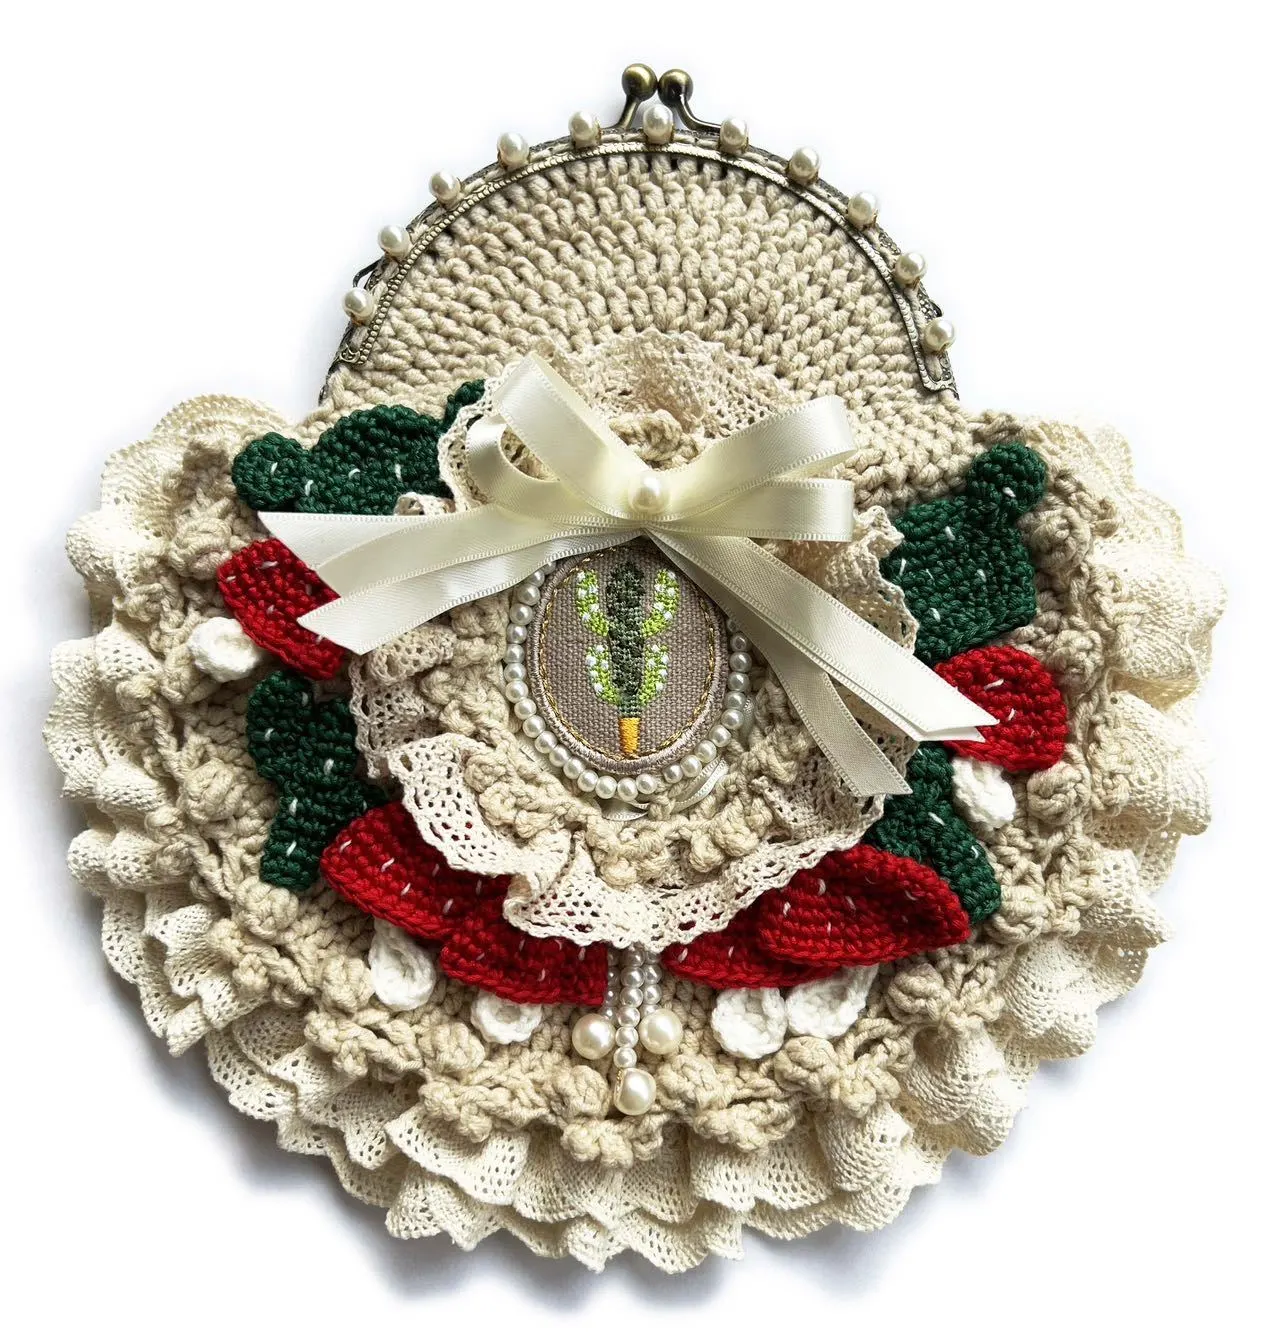
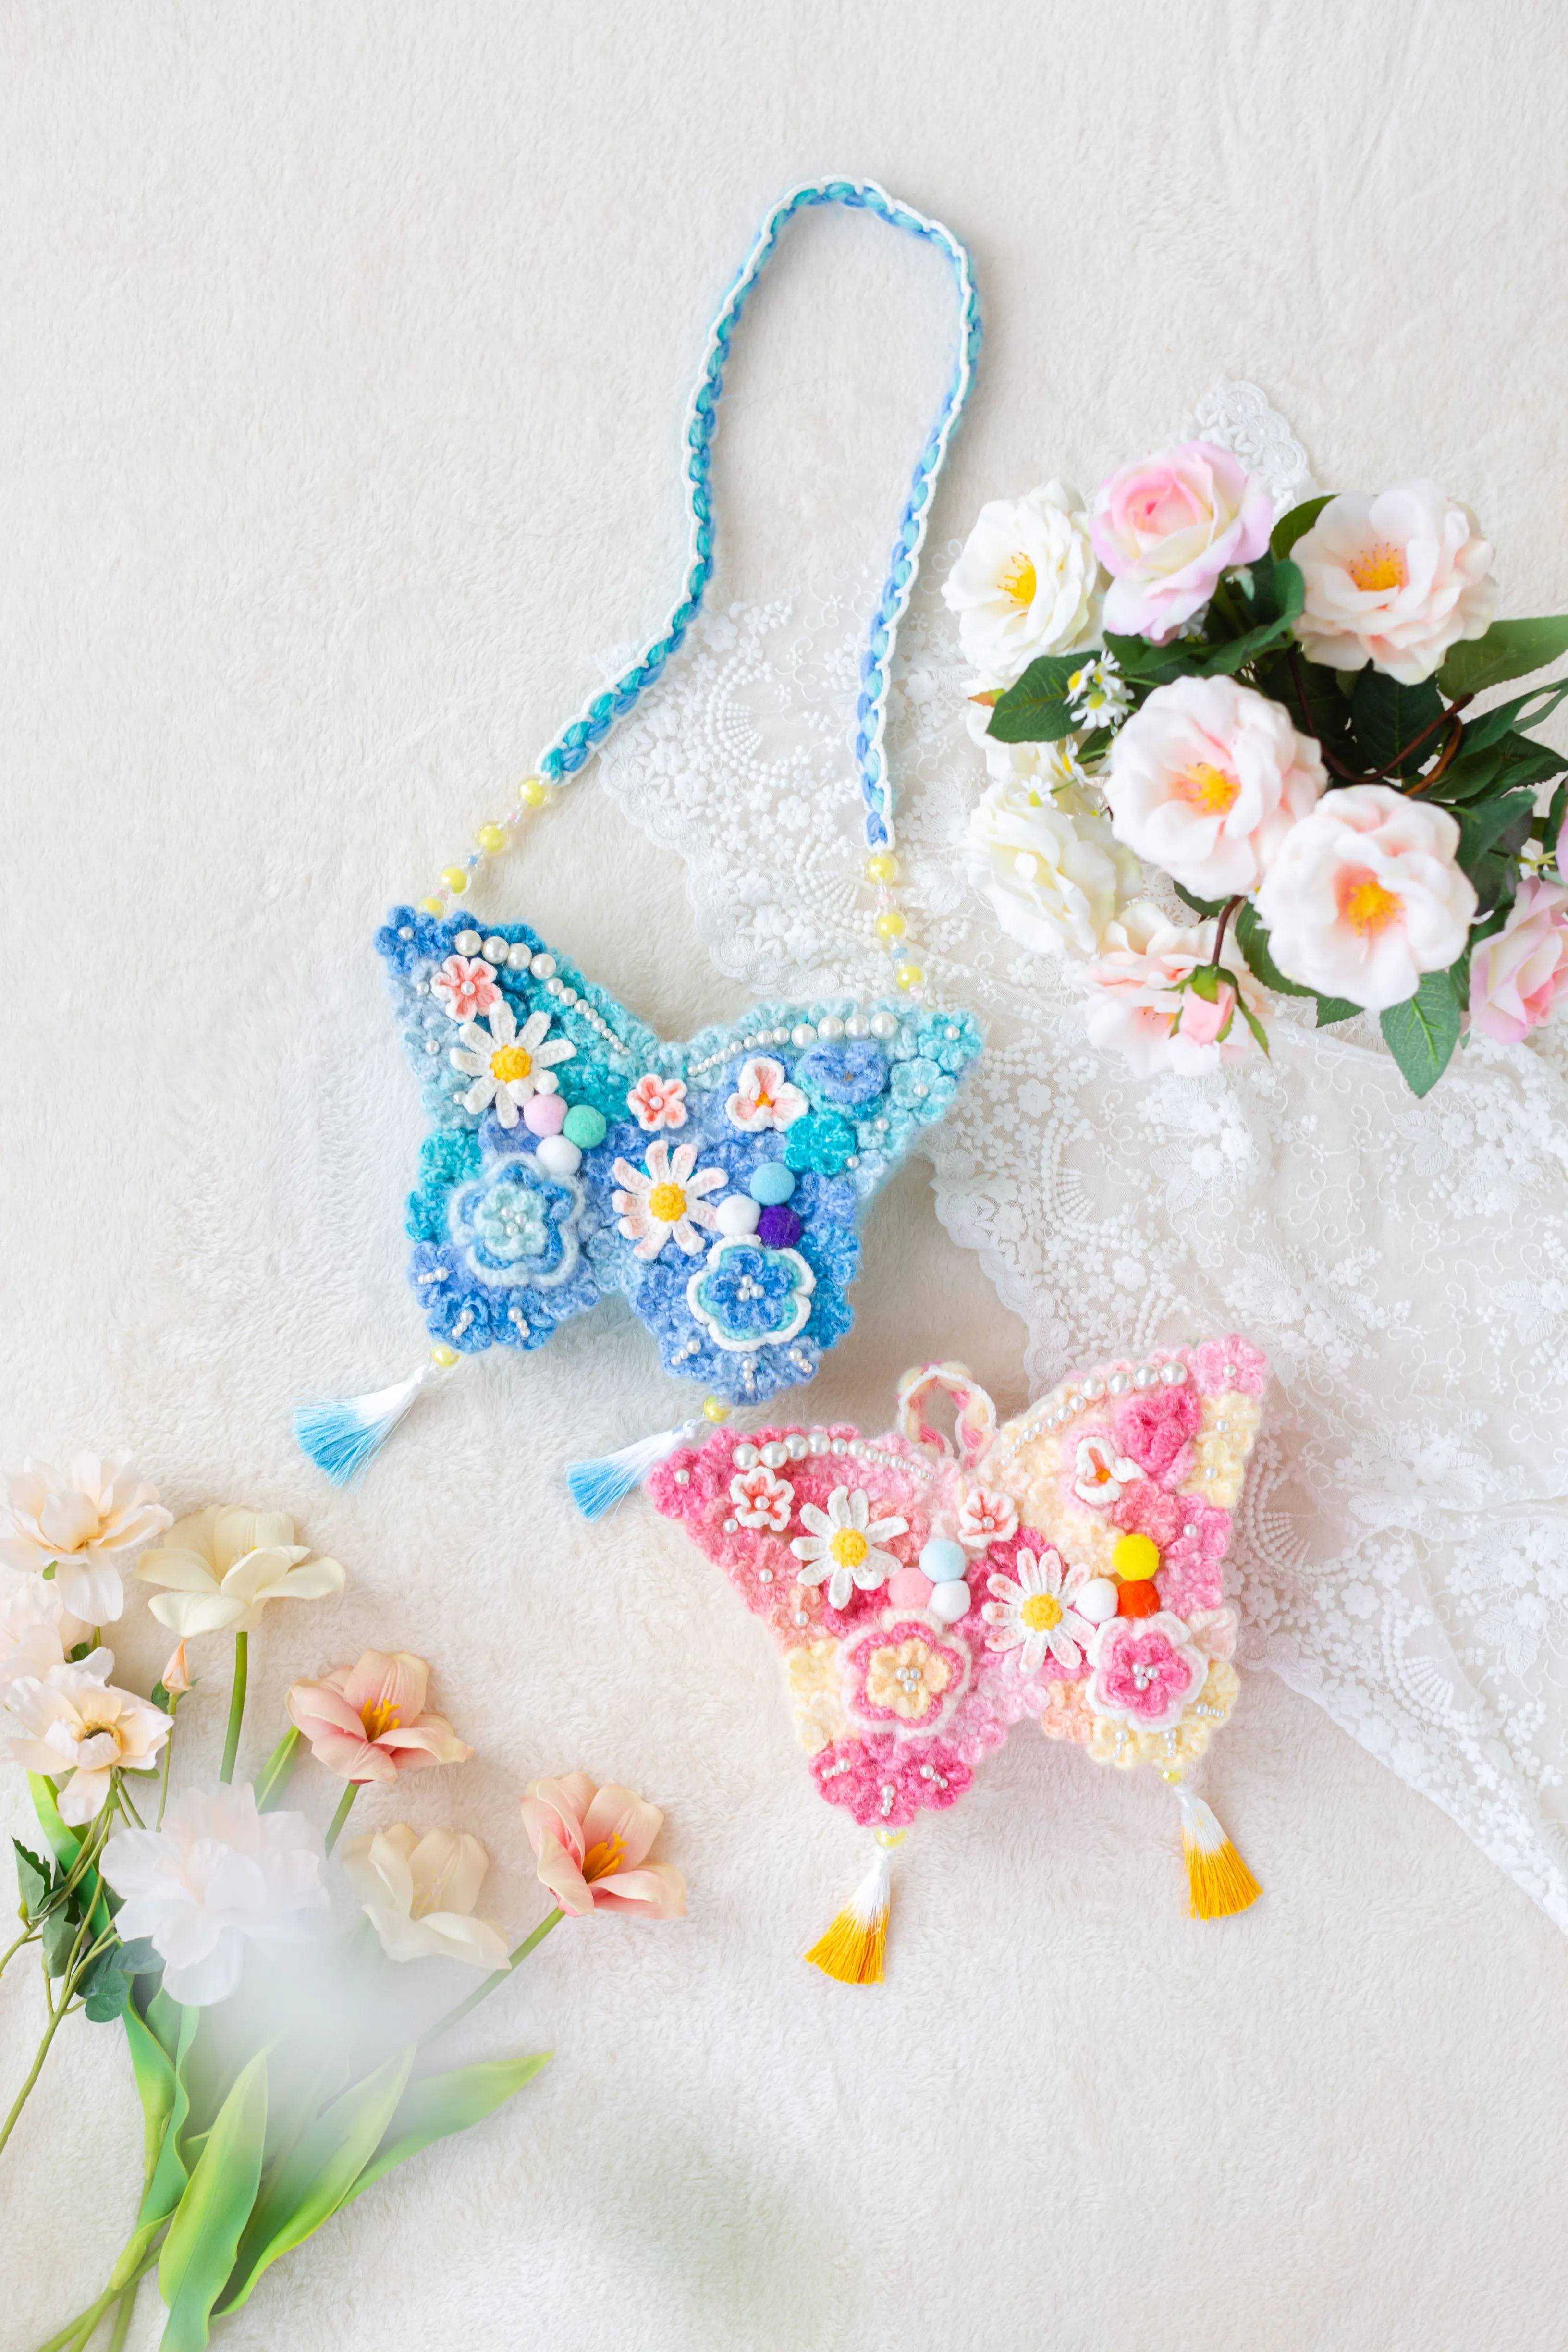
Muse Verdant Kisslock Bag
Project preview
See the finished project
Pattern format
Instructions
Watch and follow
Video tutorial
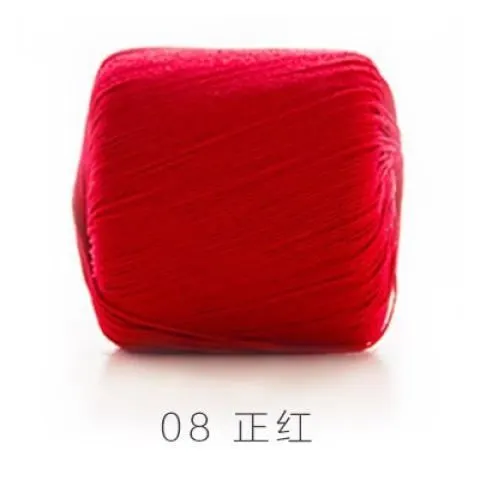

Due to variations in individual tension, the size of the sample is for reference only.
Materials: Susan`s Family 4-Ply Combed Cotton & Acrylic Fibre Hand Knitting Yarn ,Combed 3# Lace
Crochet Hook: 2.5mm Crochet Hook

Chart Key










Note: This pattern is making in Chinese crochet pattern terms, and the stitch name is written using American terminology. All measurements in charts are in cm.

Part 1 Main Part
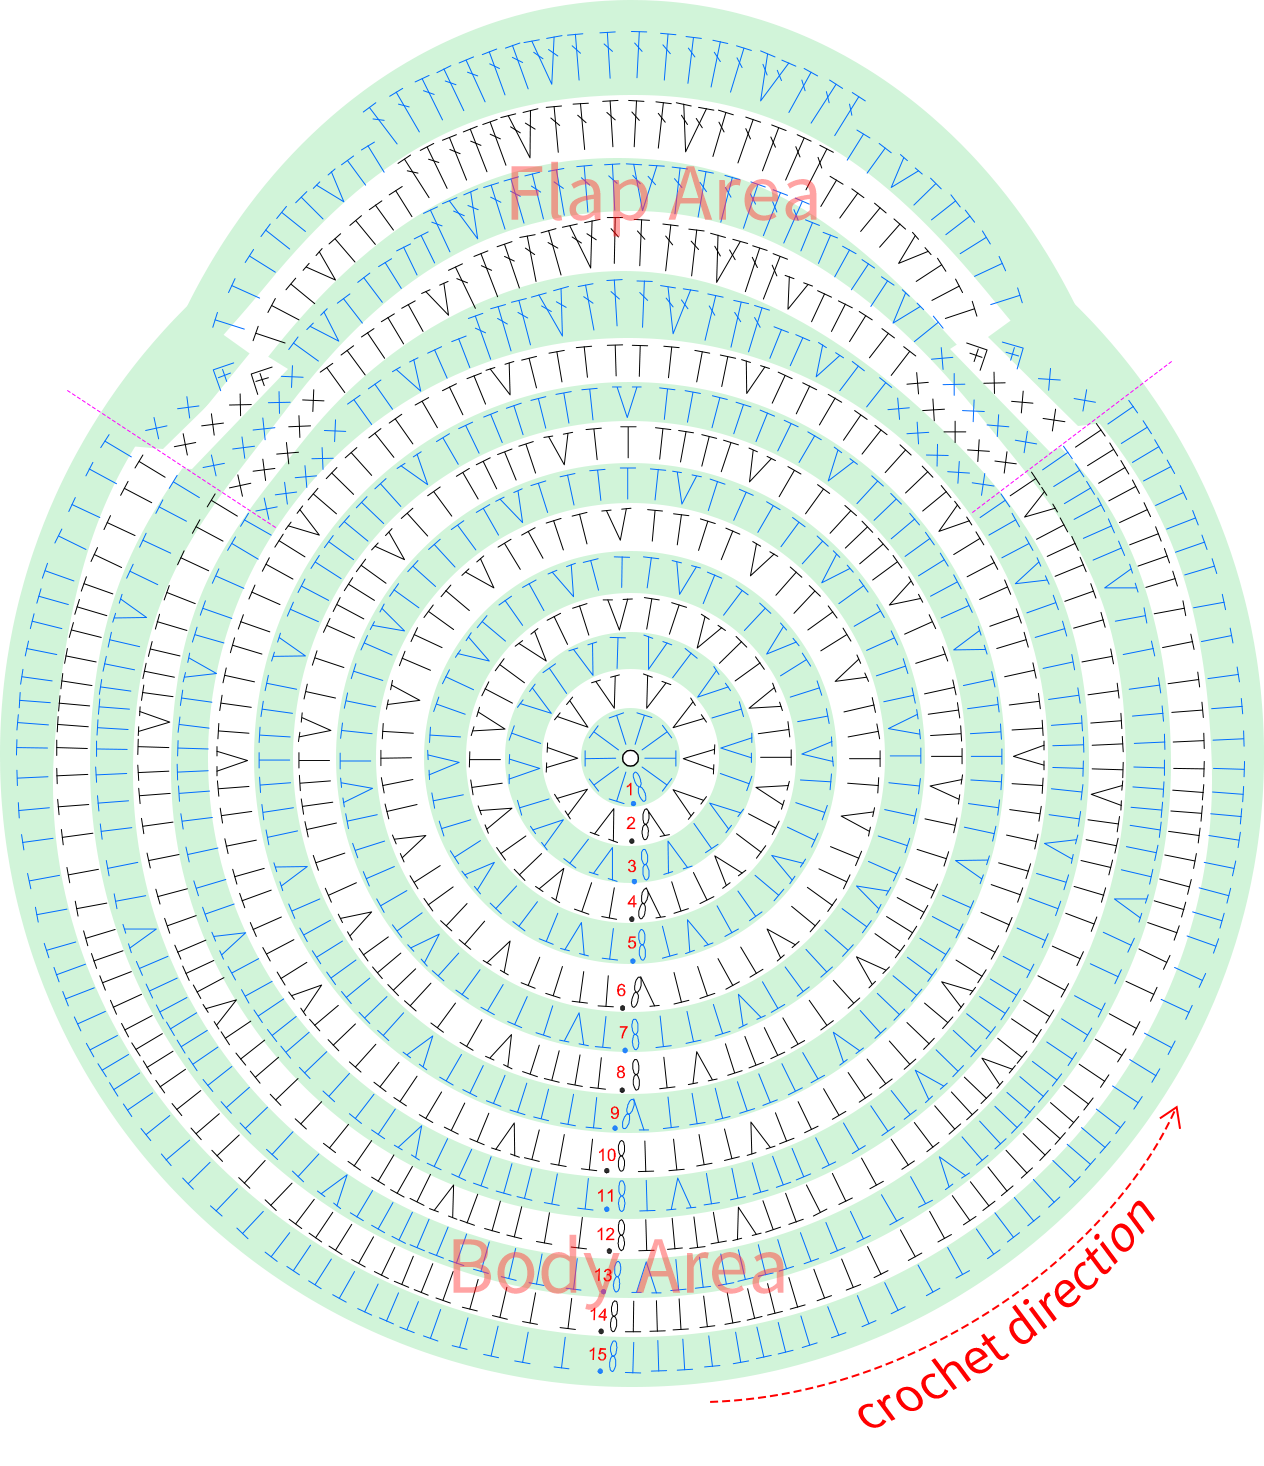
Step 1 Back Body 01' 16'' (Part 1)(4-Ply Combed Cotton & Acrylic Fibre Hand Knitting Yarn,53#Cloud Cream)
The back body is started with a magic ring, and crocheted outward in a circular pattern counterclockwise around the center. When crocheting the 11th round, divide the workpiece into the flap area and the body area. After completing the crocheting, fasten off normally.small motifs. Please refer to the video demonstration for more details.
| Part | Rounds | Total Stitches | Add Stitches | Stitch Instructions |
| Back Body | 1 | 10 | / | / |
| 2 | 20 | 10 | hdc2-in-1 | |
| 3 | 30 | 10 | add 1 st every 2 sts | |
| 4 | 40 | 10 | add 1 st every 3 sts | |
| 5 | 50 | 10 | add 1 st every 4 sts | |
| 6 | 60 | 10 | add 1 st every 5 sts | |
| 7 | 70 | 10 | add 1 st every 6 sts | |
| 8 | 80 | 10 | add 1 st every 7 sts | |
| 9 | 90 | 10 | add 1 st every 8 sts | |
| 10 | 100 | 10 | add 1 st every 9 sts | |
| 11-15 | For the body section from R11 to R13, increase approximately 7 sts evenly in each round (the chart is for reference only). For the bag opening section, refer to the diagram. | |||
Step 2 Front Body 29' 52'' (Part 1)(4-Ply Combed Cotton & Acrylic Fibre Hand Knitting Yarn,53#Cloud Cream)
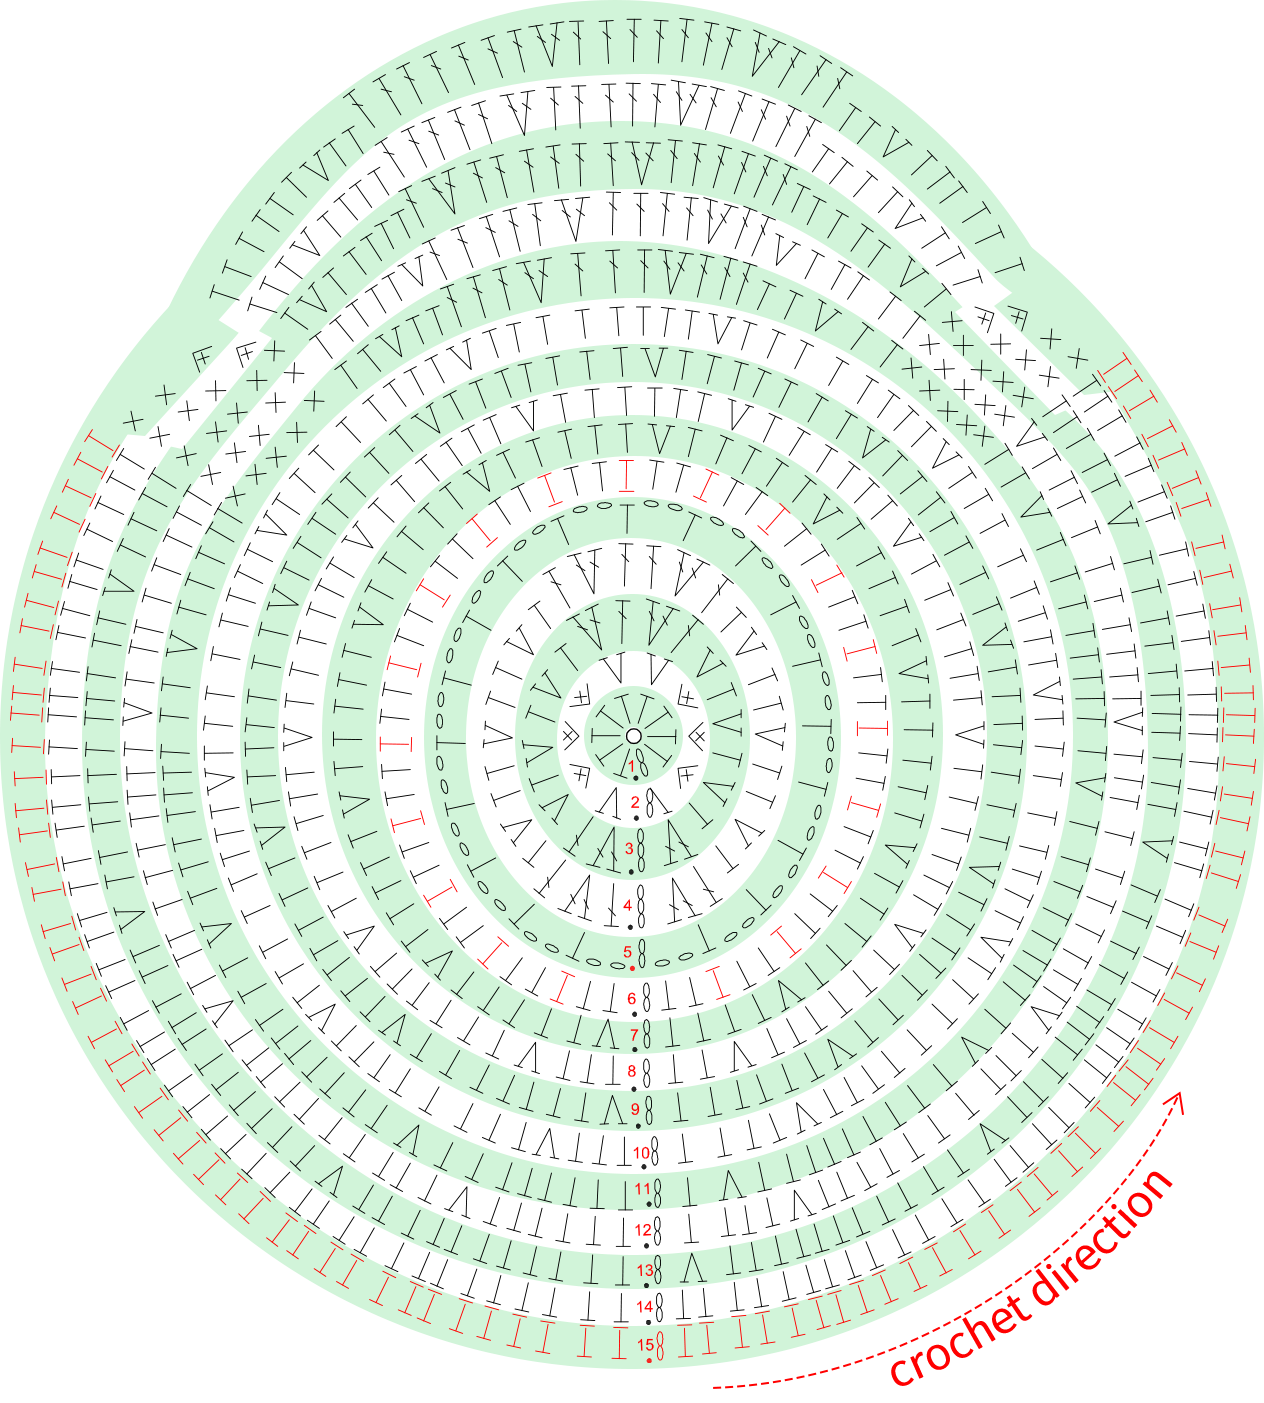
The front body is divided into the main part and the edging. The main part also uses the magic ring technique, working counterclockwise in a circular pattern from the center, similar in shape to the back body but with slight variations in the crochet methods for the center and edges. The edging is divided into the middle edging and the outer edging, worked separately by picking up stitches at the corresponding positions on the front body. Please refer to the video demonstration for more details.
Note: The horizontal line below the front body stitch pattern indicates working into the back loop only.
| Part | Rounds | Total Stitches | Add Stitches | Stitch Instructions |
| Front Body | 1 | 10 | / | / |
| 2 | 20 | 10 | hdc2-in-1 | |
| 3 | 30 | 10 | add 1 st every 2 sts | |
| 4 | 40 | 10 | add 1 st every 3 sts | |
| 5-6 | Refer to the diagram | |||
| 7 | 70 | 10 | add 1 st every 6 sts | |
| 8 | 80 | 10 | add 1 st every 7 sts | |
| 9 | 90 | 10 | add 1 st every 8 sts | |
| 10 | 100 | 10 | add 1 st every 9 sts | |
| 11-15 | For the body section from R11 to R13, increase approximately 7 sts evenly in each round (the chart is for reference only). For the bag opening section, refer to the diagram. | |||
Middle Edging 42' 39'' (Part 1)
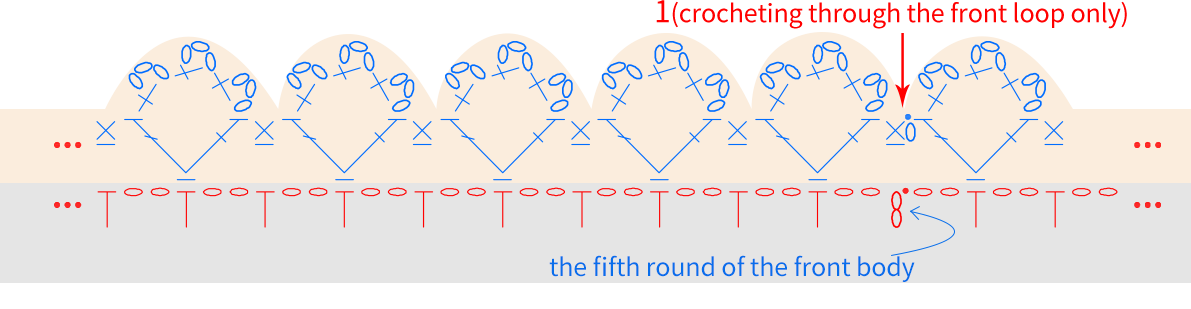
Outer Edging 49' 54'' (Part 1)

Part 2 Accessories
The accessories include lace trim, ribbon, pearl chains, fabric patches, cacti, mushrooms, metal frames, and straps.
Step 1 Front Body Lace Trim, Ribbon, Pearl Chain, and Fabric Patches. 00' 30'' (Part 2)
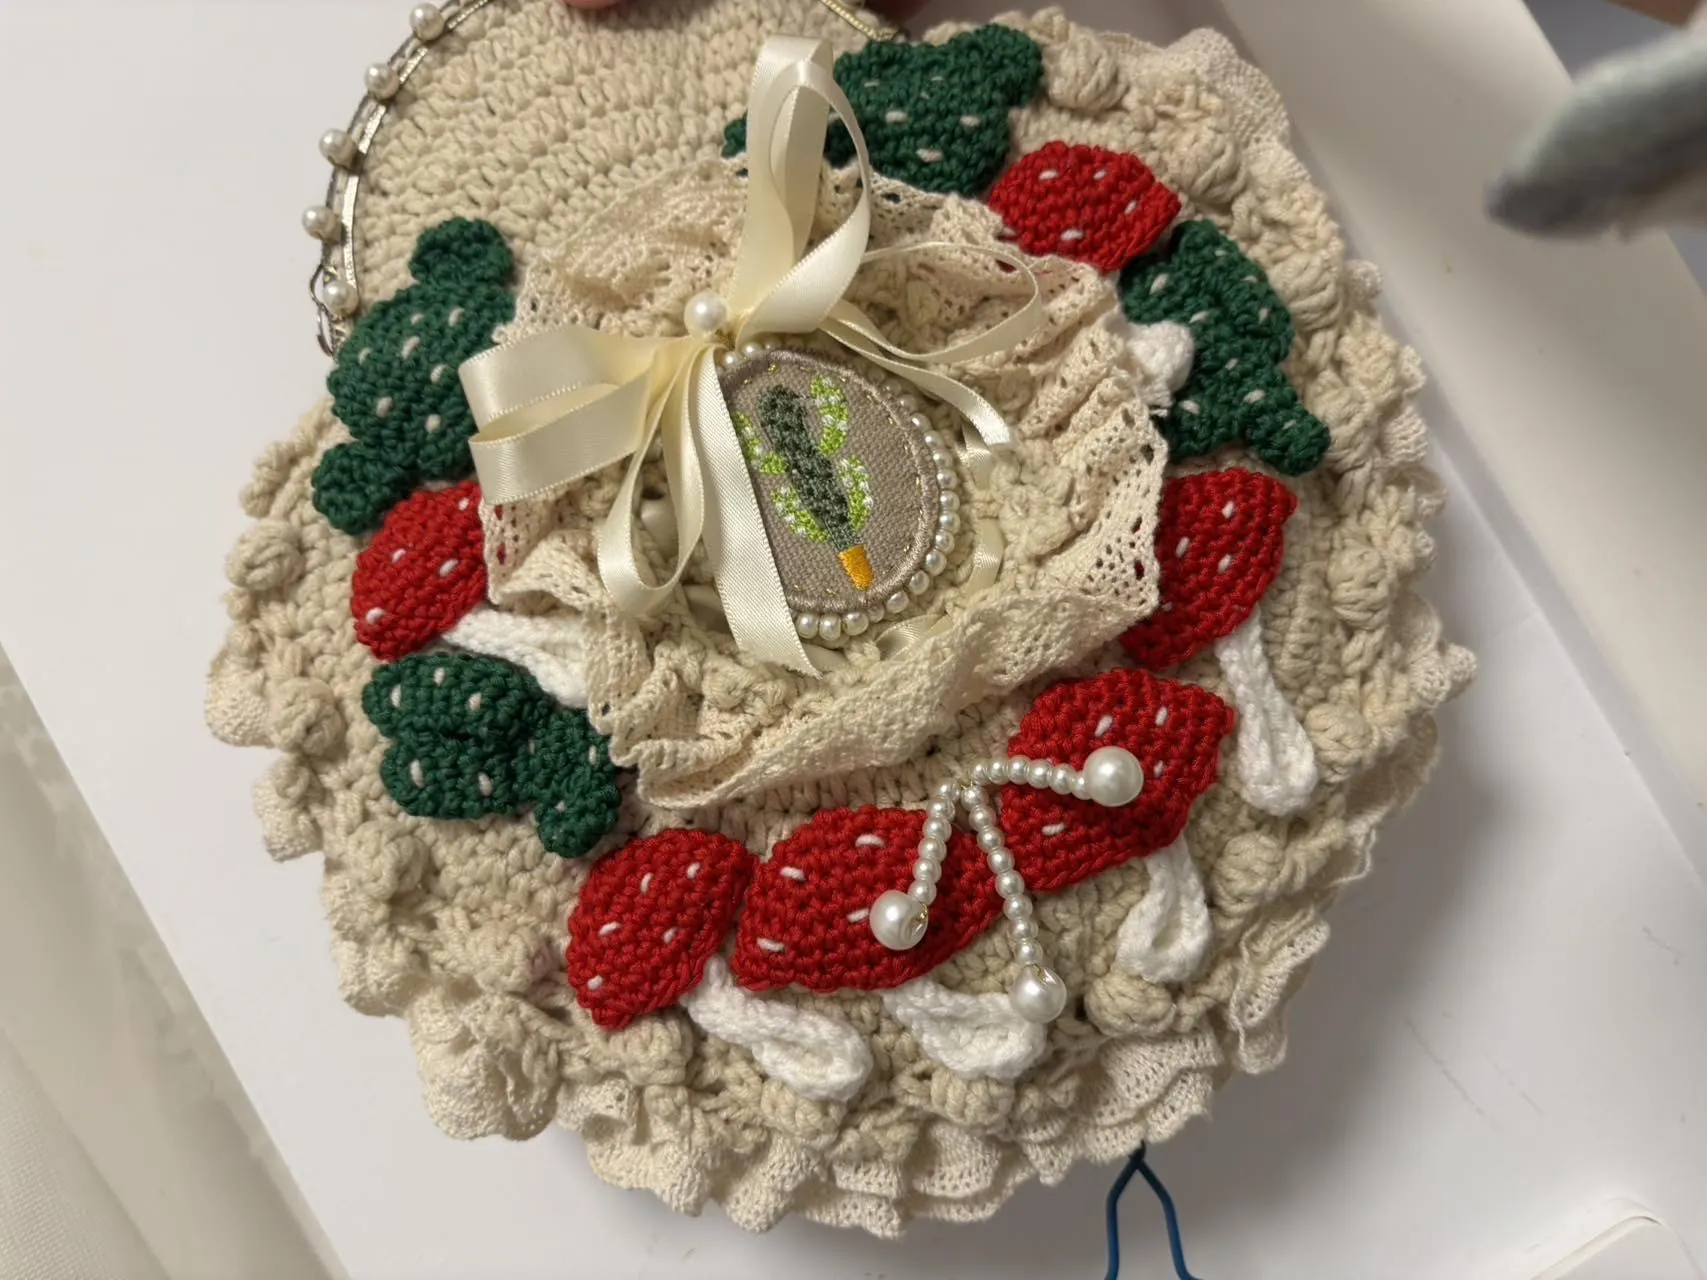
According to the video demonstration, sew a white lace trim (50cm, 53#Cloud Cream) below the crocheted border in the middle, then attach a ribbon (1m) and a pearl chain (gold thread), followed by sewing on the fabric patch (with gold thread), making sure the pattern on the patch corresponds to the bag's opening area. Finally, sew pearls (39 pearls with gold thread) around the edges of the patch. Please refer to the video demonstration for more details.
Step 2 Sew together the front and back bodys, attach the magnetic snap and strap. 27' 56'' (Part 2)(4-Ply Combed Cotton & Acrylic Fibre Hand Knitting Yarn, 53#Cloud Cream)
Sew together the front and back pieces of the bag body using a whip stitch. Add a wide lace trim (70cm) while sewing. Then use a backstitch to sew on the magnetic snap at the bag opening. Finally, attach large pearls (gold thread, 11 pieces) onto the magnetic snap. Please refer to the video demonstration for more details.
Step 3 Cactus 54' 43'' (Part 2)(Combed 3# Lace, 19#Verdant Green)
There are two different types of cacti, designated as type 1 and type 2. Both consist of one main stem and auxiliary stems. Each stem starts with a magic ring and is crocheted in rounds counterclockwise. After completing the crocheting, leave a 20cm yarn tail for sewing together to shape the cactus. Please refer to the video demonstration for more details.
ABBREVIATIONS
Xsingle crochet
V = sc2-in-12 single crochets into the same stitch
A = sc2togsingle crochet 2 stitches together
| Cactus 1 × 2 | |||
| Main Stem×1 | Rounds | Stitch Instructions | Total Stitches |
| Cast On | adjustable loop | ||
| R1 | 6X | 6 | |
| R2 | 6V | 12 | |
| R3 | (X,V)×6 | 18 | |
| R4 | 18X | 18 | |
| R5 | (5X,V)×3 | 21 | |
| R6-R8 | 21X | 21 | |
| R9 | (X,A)×7 | 14 | |
| R10 | 14X | 14 | |
| Auxiliary Stem×2 | Cast On | adjustable loop | |
| R1 | 6X | 6 | |
| R2 | (V,X)×3 | 9 | |
| R3 | 9X | 9 | |
| R4 | (A,X)×3 | 6 | |
Note: For every round, you need to crochet beginning chain and slip stitch.
| Cactus 2 × 2 | |||
| Main Stem×1 | Rounds | Stitch Instructions | Total Stitches |
| Cast On | adjustable loop | ||
| R1-R12 | 6X | 6 | |
| Auxiliary Stem1×1 | Cast On | adjustable loop | |
| R1-R7 | 6X | 6 | |
| Auxiliary Stem2×1 | Cast On | adjustable loop | |
| R1-R3 | 6X | 6 | |
Step 4 Mushroom 67' 54'' (Part 2)
There are two different mushrooms, designated as type 1 and type 2, each consisting of a mushroom cap and a mushroom stem. The mushroom cap starts with a magic ring, while the mushroom stem begins with a chain cast on. Both parts are then crocheted in rounds counter-clockwise. After crocheting is finished, they are sewn together with the cactus onto the corresponding position of the front body. Please refer to the video demonstration for more details.
Note: For every round, you need to crochet beginning chain and slip stitch.
| Mushroom 1 ×4 | ||||
| Mushroom Cap | Rounds | Stitch Instructions | Total Stitches | Color |
| Cast On | adjustable loop | Combed 3# Lace 08#High Risk Red |
||
| R1 | 5X | 5 | ||
| R2 | 5V | 10 | ||
| R3 | (X,V)×5 | 15 | ||
| R4 | (2X,V)×5 | 20 | ||
| R5-R7 | 20X | 20 | ||
| Mushroom 2 ×2 | ||||
| Mushroom Cap | Rounds | Stitch Instructions | Total Stitches | Color |
| Cast On | adjustable loop | Combed 3# Lace 08#High Risk Red |
||
| R1 | 5X | 5 | ||
| R2 | 5V | 10 | ||
| R3 | (X,V)×5 | 15 | ||
| R4 | (2X,V)×5 | 20 | ||
| R5 | (3X,V)×5 | 25 | ||
| R6-R8 | 25X | 25 | ||
Mushroom Stem 69' 04'' (Part 2)(4-Ply Combed Cotton & Acrylic Fibre Hand Knitting Yarn, 06#Bright White)
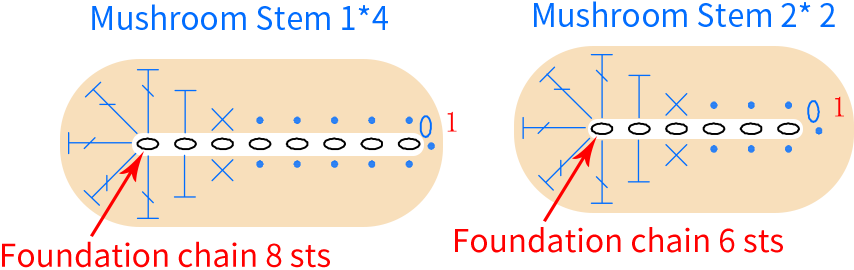
Note: After crocheting the mushroom stem, leave a 30cm yarn tail for sewing.
Step 5 Strap 80' 39'' (Part 2)
Attach the steel wire circle to the small hole above the snap closure, then fasten the strap. Please refer to the video demonstration for more details.
Made by the community