
Clothes
Nomadic Patchwork Coat
Project preview
See the finished project
Pattern format
Instructions
Watch and follow
Video tutorial
| Style | Yarn | Color |
|---|---|---|
| Oatmeal Version | Alpaca | 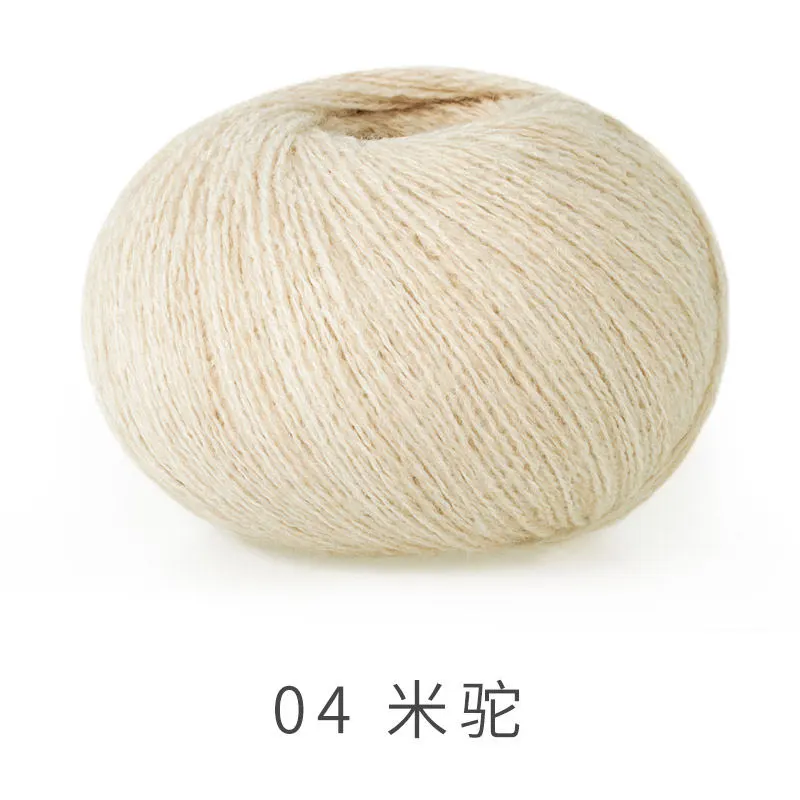 04#Sandshell x 6 04#Sandshell x 6 15#Samoan Sun x 1 15#Samoan Sun x 1 30#Black x 2 30#Black x 2 |
| Sequin Mahai |  08#Clearly Aqua x 1 08#Clearly Aqua x 1 | |
| Lamb Wool |  42#Antique white x 8 42#Antique white x 8 | |
| Monet Impression |  22#Pinetree Moon x 2 22#Pinetree Moon x 2 | |
| Sheep Curly |  09#Spruce Yellow x 1 09#Spruce Yellow x 1 | |
| Spruce Yellow Version | Alpaca | 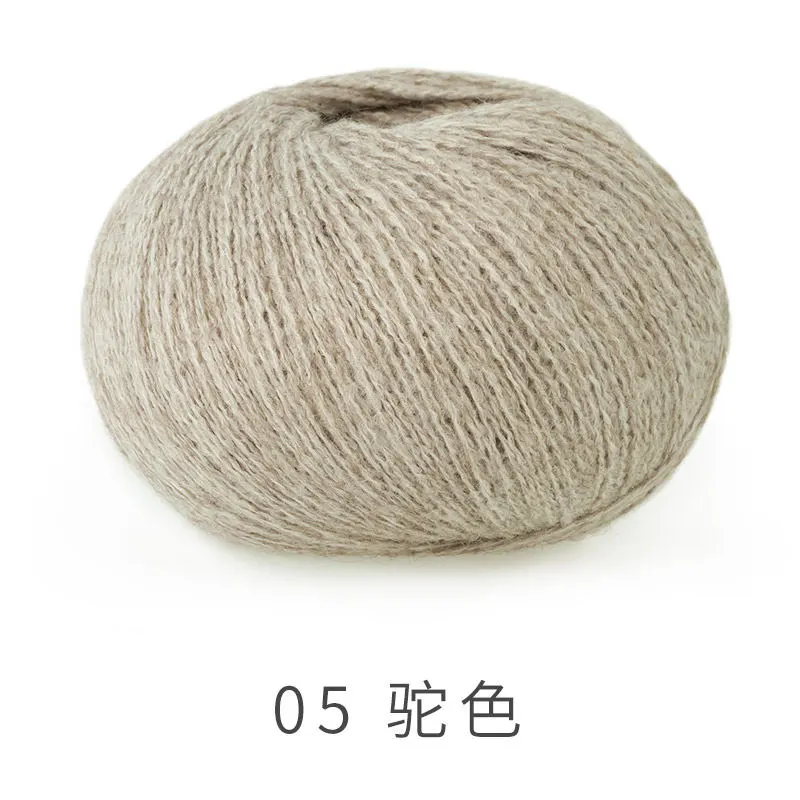 05#Simply Taupe x 1 05#Simply Taupe x 1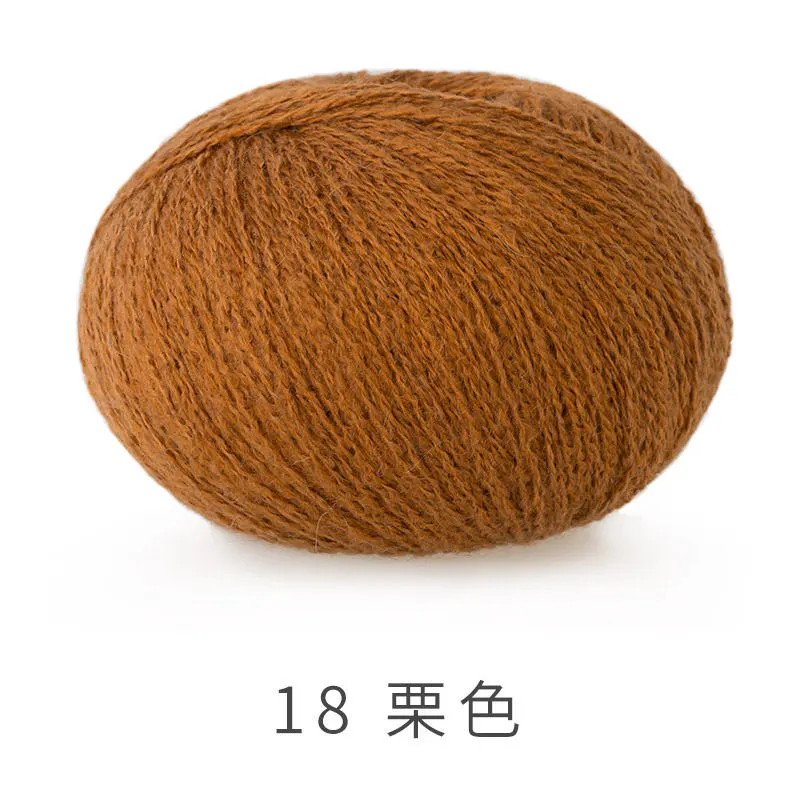 18#Glazed Ginger x 6 18#Glazed Ginger x 6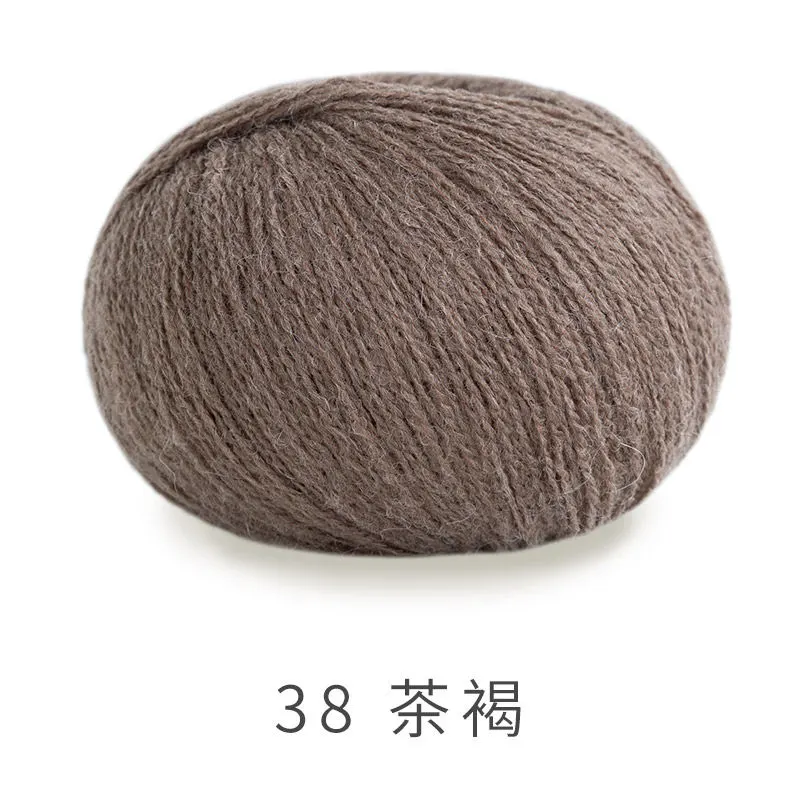 38#Warm Taupe x 2 38#Warm Taupe x 2 |
| Sequin Mahai |  10#Khaki x 1 10#Khaki x 1 | |
| Lamb Wool |  40#Bombay Brown x 8 40#Bombay Brown x 8 | |
| Monet Impression |  12#Dawn x 2 12#Dawn x 2 | |
| Sheep Curly |  07#Peach Fuzz x 1 07#Peach Fuzz x 1 |
Oatmeal Version
42#Antique white x 809#Spruce Yellow x 1Spruce Yellow Version
40#Bombay Brown x 807#Peach Fuzz x 1This garment is divided into the back body, front bodies (left and right), hems, front bands, cuffs, horn buttons, and sleeves. After completing the garment, there will be remaining yarn to crochet a matching bag.
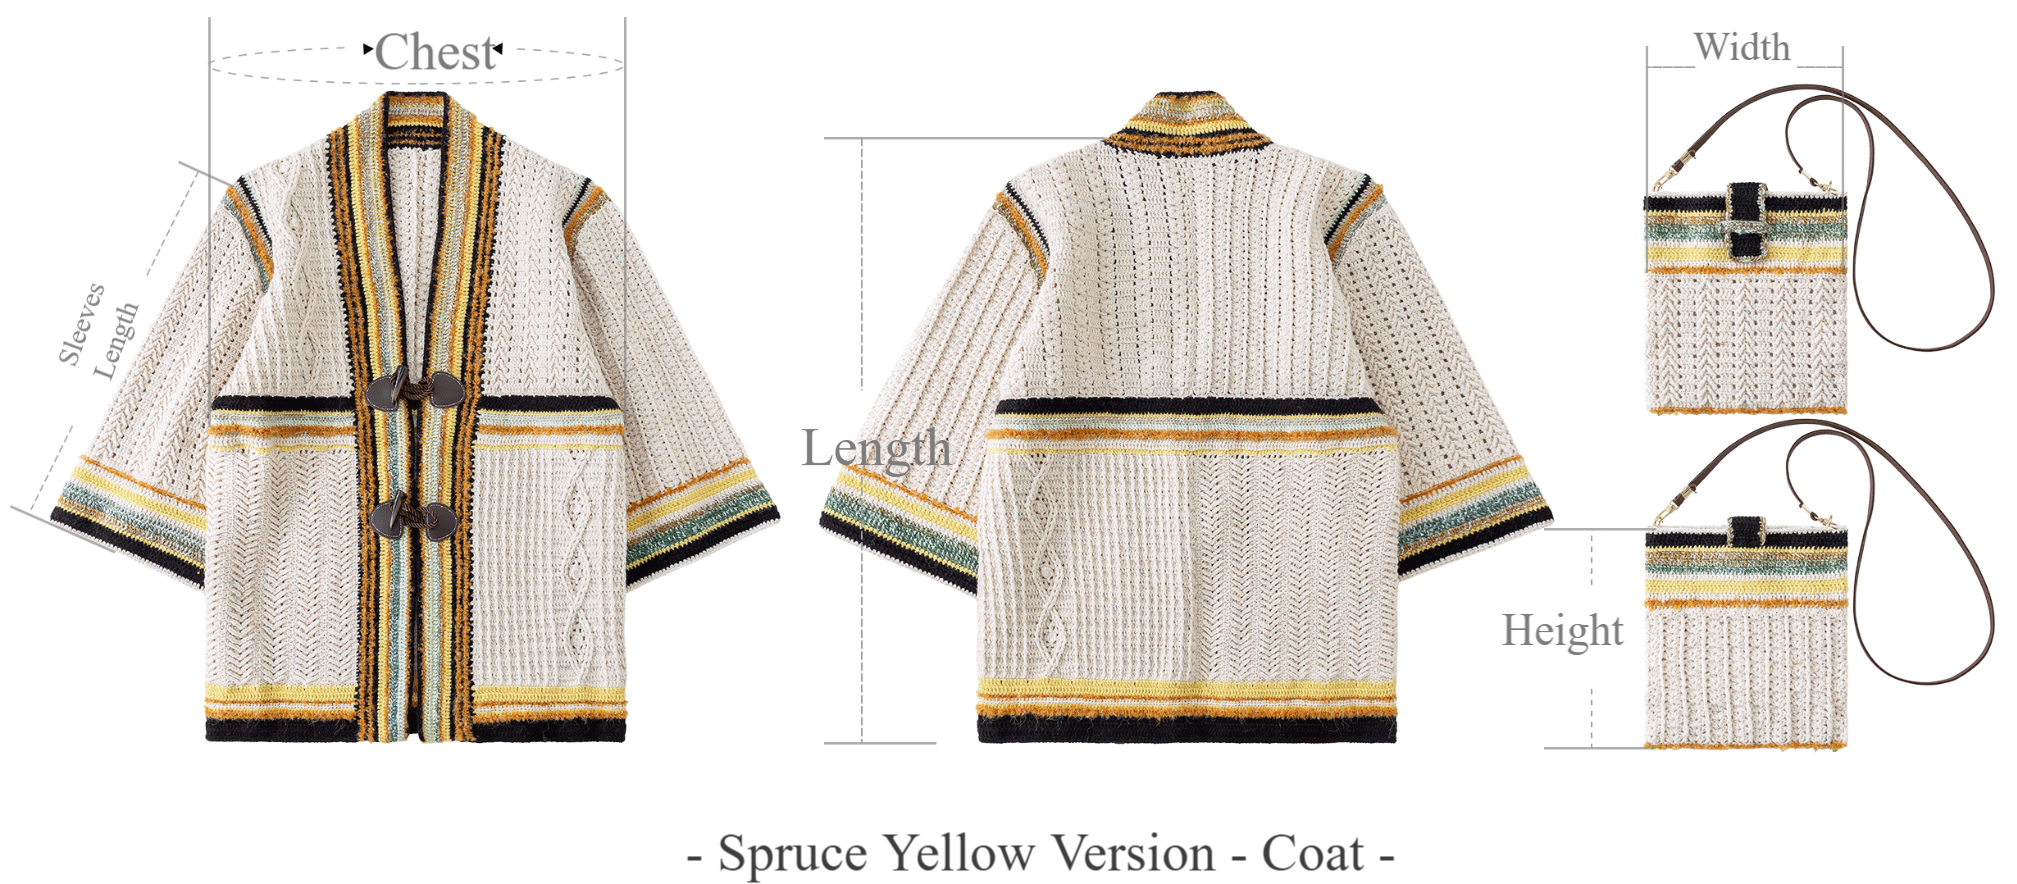
| Coat | ||
| Chest | Length | Sleeves Length |
| 116 cm | 75.5 cm | 47 cm |
| Bag | |
| Width | Height |
| 22 cm | 25 cm |
Note: Hand-measured, with a possible error of 1-2 cm. Due to differences in individual tension, the sample size is for reference only.
Materials : Lamb Wool , Alpaca , Sequin Mohair , Monet Impression , Sheep Curly . Tools : 3.00 mm crochet hook

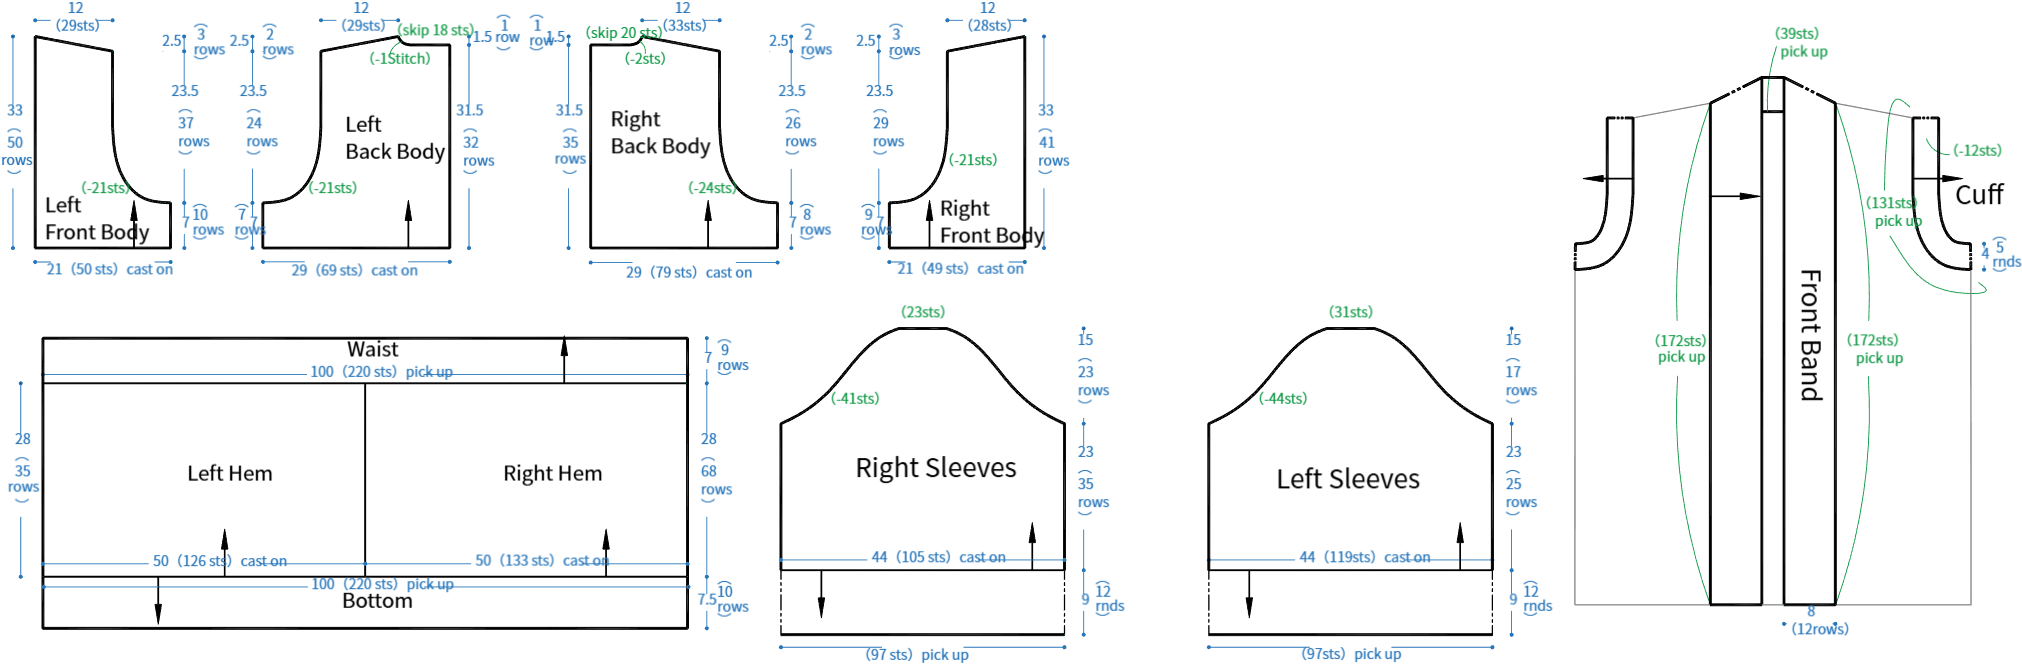
schematic diagram
gauge swatch
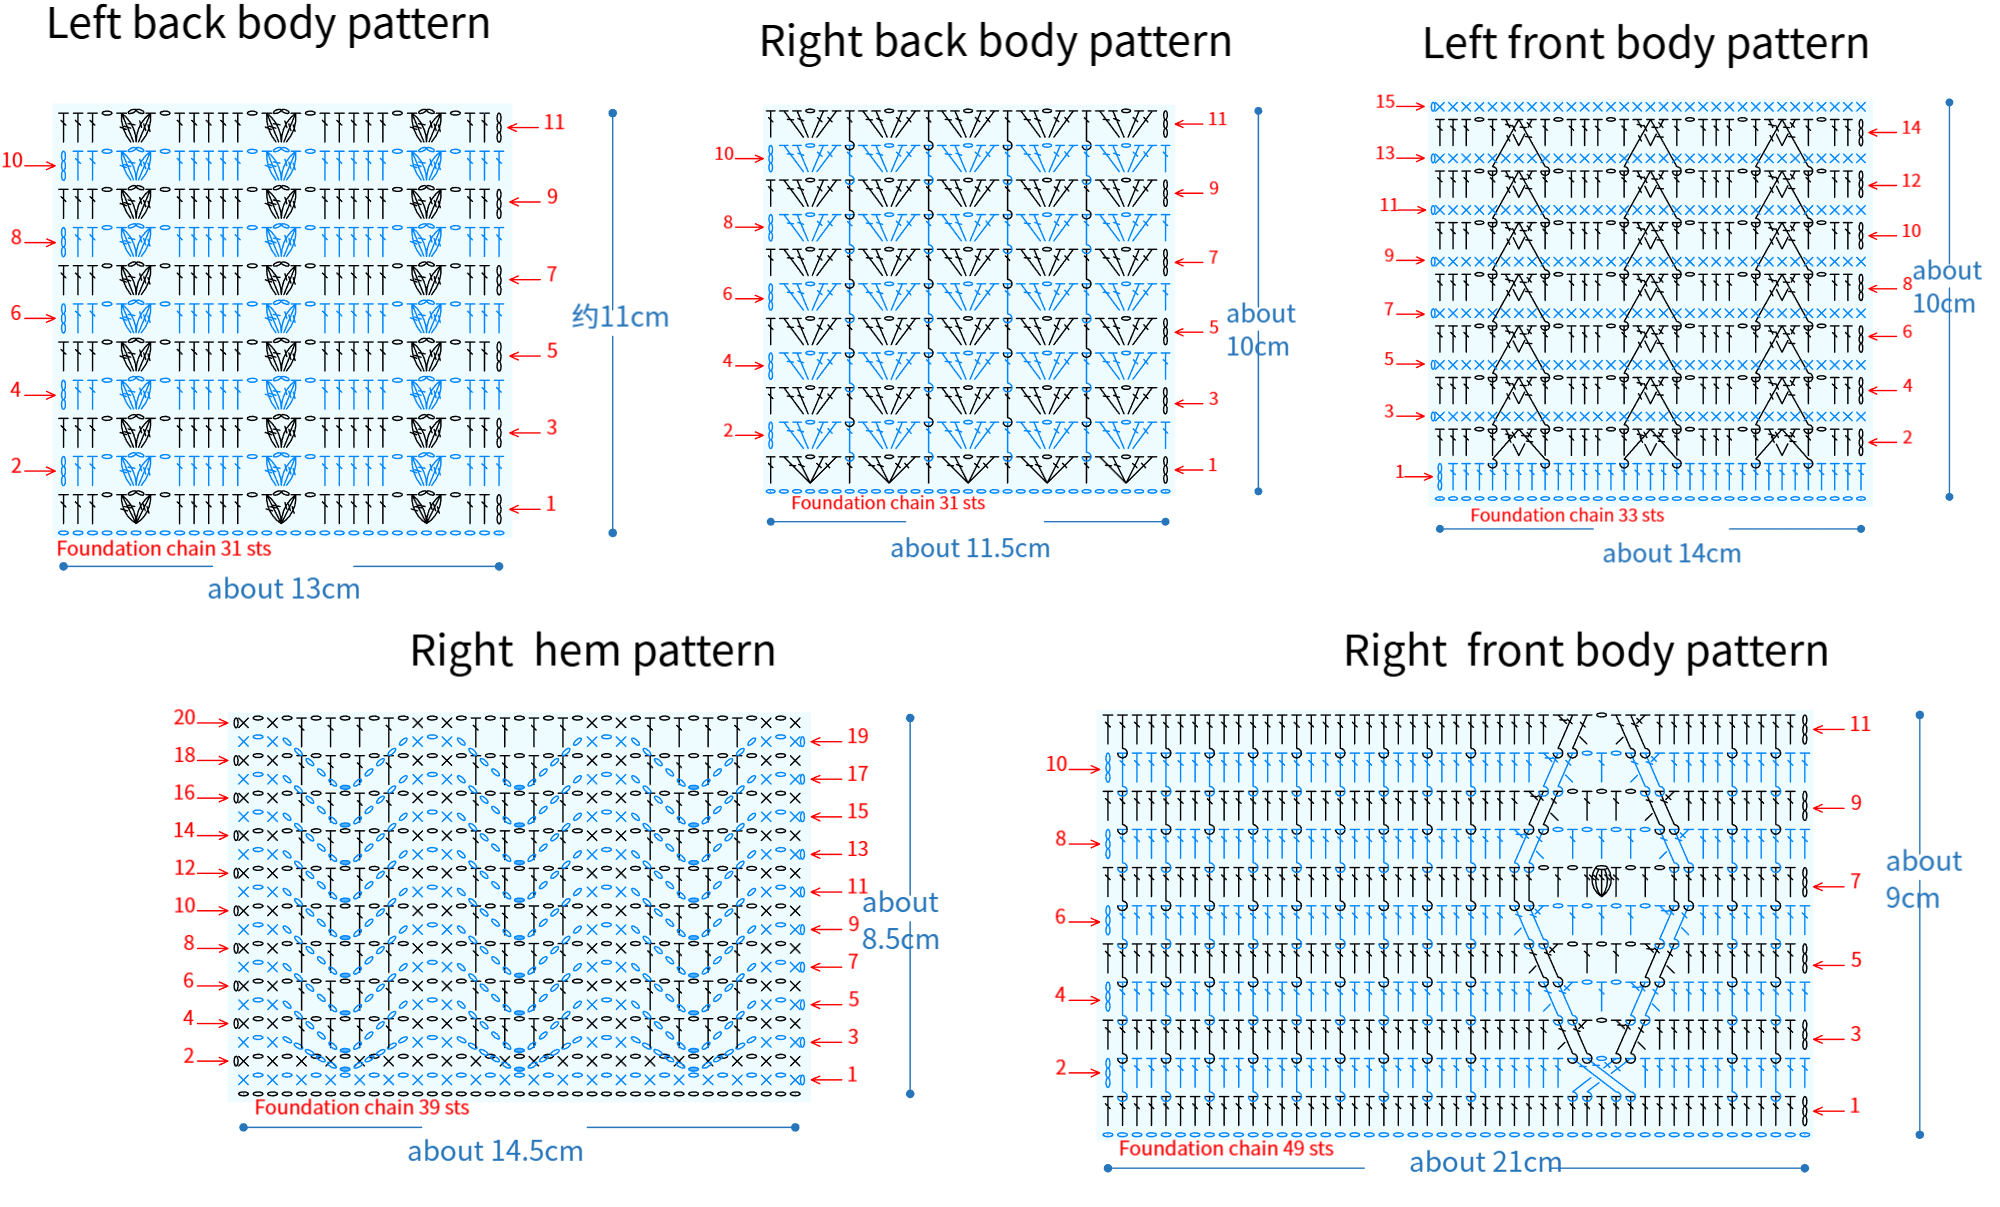
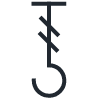
Chart Key







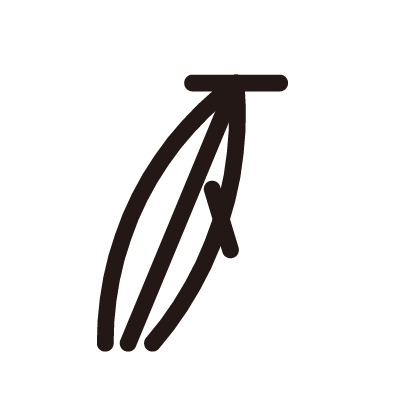
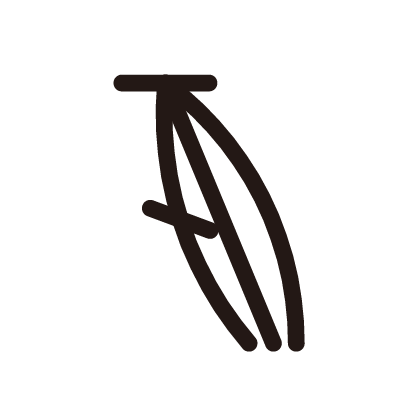
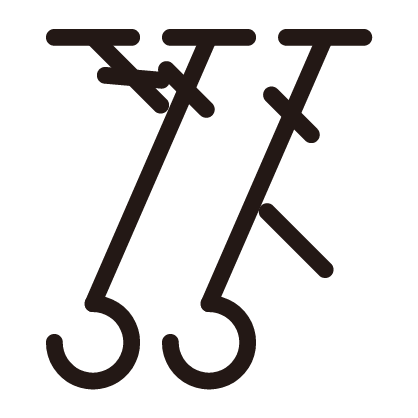
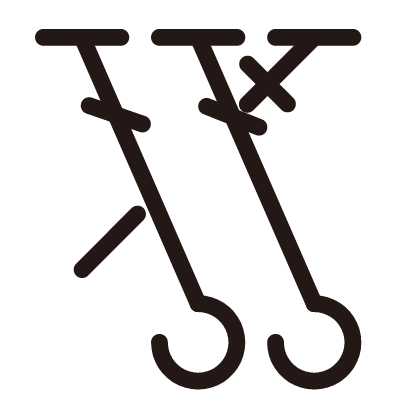






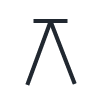

Note:
1. This pattern is making in Chinese crochet pattern terms, and the stitch name is written using American terminology. All measurements in charts are in cm.

| Part | Oatmeal Version | Spruce Yellow Version | ||
| front body, back body and seaming | Lamb Wool 42#Antique white 1 strand+Alpaca 04#Sandshell 1 strand | Lamb Wool 40#Bombay Brown 1 strand+Alpaca 18#Glazed Ginger 1 strand | ||
| Hem | bottom hems and joining | Lamb Wool 42#Antique white 1 strand+Alpaca 04#Sandshell 1 strand | Lamb Wool 40#Bombay Brown 1 strand+Alpaca 18#Glazed Ginger 1 strand | |
| Bottom | R 1 - 2 | Alpaca 15#Samoan Sun 2 strands | Alpaca 05#Simply Taupe 2 strands | |
| R 3 | Sheep Curly 09#Spruce Yellow 1 strand | Sheep Curly 07#Peach Fuzz 1 strand | ||
| R 4 | Lamb Wool 42#Antique white 1 strand+Alpaca 04#Sandshell 1 strand | Lamb Wool 40#Bombay Brown 1 strand+Alpaca 18#Glazed Ginger 1 strand | ||
| R 5 | Alpaca 15#Samoan Sun 2 strands | Alpaca 05#Simply Taupe 2 strands | ||
| R 6 | Sheep Curly 09#Spruce Yellow 1 strand | Sheep Curly 07#Peach Fuzz 1 strand | ||
| R 7 - 10 | Alpaca 30#Black 2 strands | Alpaca 38#Warm Taupe 2 strands | ||
| Waist | R 1 | Alpaca 15#Samoan Sun 2 strands | Alpaca 05#Simply Taupe 2 strands | |
| R 2 | Lamb Wool 42#Antique white 1 strand+Alpaca 04#Sandshell 1 strand | Lamb Wool 40#Bombay Brown 1 strand+Alpaca 18#Glazed Ginger 1 strand | ||
| R 3 | Monet Impression 22#Pinetree Moon 1 strand+Sequin Mohair 08#Clearly Aqua 1 strand | Monet Impression 12#Dawn 1 strand+Sequin Mohair 10#Khaki 1 strand | ||
| R 4 | Sheep Curly 09#Spruce Yellow 1 strand | Sheep Curly 07#Peach Fuzz 1 strand | ||
| R 5 - 6 | Monet Impression 22#Pinetree Moon 1 strand+Sequin Mohair 08#Clearly Aqua 1 strand | Monet Impression 12#Dawn 1 strand+Sequin Mohair 10#Khaki 1 strand | ||
| R 7 | Alpaca 15#Samoan Sun 2 strands | Alpaca 05#Simply Taupe 2 strands | ||
| R 8 - 9 | Alpaca 30#Black 2 strands | Alpaca 38#Warm Taupe 2 strands | ||
| sew to front and back bodies | Lamb Wool 42#Antique white 1 strand+Alpaca 04#Sandshell 1 strand | Lamb Wool 40#Bombay Brown 1 strand+Alpaca 18#Glazed Ginger 1 strand | ||
| front body | R 1 | Alpaca 30#Black 2 strands | Alpaca 38#Warm Taupe 2 strands | |
| R 2 | Sheep Curly 09#Spruce Yellow 1 strand | Sheep Curly 07#Peach Fuzz 1 strand | ||
| R 3 | Alpaca 30#Black 2 strands | Alpaca 38#Warm Taupe 2 strands | ||
| R 4 | Sheep Curly 09#Spruce Yellow 1 strand | Sheep Curly 07#Peach Fuzz 1 strand | ||
| R 5 | Alpaca 30#Black 2 strands | Alpaca 38#Warm Taupe 2 strands | ||
| R 6 | Alpaca 15#Samoan Sun 2 strands | Alpaca 05#Simply Taupe 2 strands | ||
| R 7 | Sheep Curly 09#Spruce Yellow 1 strand | Sheep Curly 07#Peach Fuzz 1 strand | ||
| R 8 - 10 | Monet Impression 22#Pinetree Moon 1 strand+Sequin Mohair 08#Clearly Aqua 1 strand | Monet Impression 12#Dawn 1 strand+Sequin Mohair 10#Khaki 1 strand | ||
| R 11 | Sheep Curly 09#Spruce Yellow 1 strand | Sheep Curly 07#Peach Fuzz 1 strand | ||
| R 12 | Alpaca 30#Black 2 strands | Alpaca 38#Warm Taupe 2 strands | ||
| Cuff | R 1 | Monet Impression 22#Pinetree Moon 1 strand+Sequin Mohair 08#Clearly Aqua 1 strand | Monet Impression 12#Dawn 1 strand+Sequin Mohair 10#Khaki 1 strand | |
| R 2 | Alpaca 30#Black 2 strands | Alpaca 38#Warm Taupe 2 strands | ||
| R 3 | Monet Impression 22#Pinetree Moon 1 strand+Sequin Mohair 08#Clearly Aqua 1 strand | Monet Impression 12#Dawn 1 strand+Sequin Mohair 10#Khaki 1 strand | ||
| R 4 | Sheep Curly 09#Spruce Yellow 1 strand | Sheep Curly 07#Peach Fuzz 1 strand | ||
| R 5 | Monet Impression 22#Pinetree Moon 1 strand+Sequin Mohair 08#Clearly Aqua 1 strand | Monet Impression 12#Dawn 1 strand+Sequin Mohair 10#Khaki 1 strand | ||
| horn button fixed | sew with 2 strands of yarn | |||
| Coat Sleeves | Oatmeal Version | Spruce Yellow Version | |
| Sleeves Body 、Cap and Joining Together | Lamb Wool 42#Antique white 1 strand+Alpaca 04#Sandshell 1 strand | Lamb Wool 40#Bombay Brown 1 strand+Alpaca 18#Glazed Ginger 1 strand | |
| Cuff | R 1 | Sheep Curly 09#Spruce Yellow 1 strand | Sheep Curly 07#Peach Fuzz 1 strand |
| R 2 | Lamb Wool 42#Antique white 1 strand+Alpaca 04#Sandshell 1 strand | Lamb Wool 40#Bombay Brown 1 strand+Alpaca 18#Glazed Ginger 1 strand | |
| R 3 - 4 | Alpaca 15#Samoan Sun 2 strands | Alpaca 05#Simply Taupe 2 strands | |
| R 5 | Lamb Wool 42#Antique white 1 strand+Alpaca 04#Sandshell 1 strand | Lamb Wool 40#Bombay Brown 1 strand+Alpaca 18#Glazed Ginger 1 strand | |
| R 6 - 8 | Monet Impression 22#Pinetree Moon 1 strand+Sequin Mohair 08#Clearly Aqua 1 strand | Monet Impression 12#Dawn 1 strand+Sequin Mohair 10#Khaki 1 strand | |
| R 9 | Alpaca 15#Samoan Sun 2 strands | Alpaca 05#Simply Taupe 2 strands | |
| R 10 - 11 | Alpaca 30#Black 2 strands | Alpaca 38#Warm Taupe 2 strands | |
| R 12 | Lamb Wool 42#Antique white 1 strand+Alpaca 04#Sandshell 1 strand | Lamb Wool 40#Bombay Brown 1 strand+Alpaca 18#Glazed Ginger 1 strand | |
| Bag | Oatmeal Version | Spruce Yellow Version | |
| Body Piece and Seaming | Lamb Wool 42#Antique white 1 strand+Alpaca 04#Sandshell 1 strand | Lamb Wool 40#Bombay Brown 1 strand+Alpaca 18#Glazed Ginger 1 strand | |
| Bottom and Seaming | Sheep Curly 09#Spruce Yellow 1 strand | Sheep Curly 07#Peach Fuzz 1 strand | |
| Edging | R 1 | Sheep Curly 09#Spruce Yellow 1 strand | Sheep Curly 07#Peach Fuzz 1 strand |
| R 2 | Lamb Wool 42#Antique white 1 strand+Alpaca 04#Sandshell 1 strand | Lamb Wool 40#Bombay Brown 1 strand+Alpaca 18#Glazed Ginger 1 strand | |
| R 3 - 4 | Alpaca 15#Samoan Sun 2 strands | Alpaca 05#Simply Taupe 2 strands | |
| R 5 | Lamb Wool 42#Antique white 1 strand+Alpaca 04#Sandshell 1 strand | Lamb Wool 40#Bombay Brown 1 strand+Alpaca 18#Glazed Ginger 1 strand | |
| R 6 - 8 | Monet Impression 22#Pinetree Moon 1 strand+Sequin Mohair 08#Clearly Aqua 1 strand | Monet Impression 12#Dawn 1 strand+Sequin Mohair 10#Khaki 1 strand | |
| R 9 | Alpaca 15#Samoan Sun 2 strands | Alpaca 05#Simply Taupe 2 strands | |
| R 10 - 11 | Alpaca 30#Black 2 strands | Alpaca 38#Warm Taupe 2 strands | |
| R 12 | Lamb Wool 42#Antique white 1 strand+Alpaca 04#Sandshell 1 strand | Lamb Wool 40#Bombay Brown 1 strand+Alpaca 18#Glazed Ginger 1 strand | |
| Buttonhole Band 1 | Monet Impression 22#Pinetree Moon 1 strand+Sequin Mohair 08#Clearly Aqua 1 strand | Monet Impression 12#Dawn 1 strand+Sequin Mohair 10#Khaki 1 strand | |
| Button Band Front Body 2 | Main Part | Alpaca 30#Black 2 strands | Alpaca 38#Warm Taupe 2 strands |
| Edging | Monet Impression 22#Pinetree Moon 1 strand+Sequin Mohair 08#Clearly Aqua 1 strand | Monet Impression 12#Dawn 1 strand+Sequin Mohair 10#Khaki 1 strand | |
| D-ring seam | Lamb Wool 42#Antique white 1 strand+Alpaca 04#Sandshell 1 strand | Lamb Wool 40#Bombay Brown 1 strand+Alpaca 18#Glazed Ginger 1 strand | |
PART 1 Back Body A 01' 53'' (Part 1)
The back body is divided into left and right back sections, both worked in rows with a chain cast on. Decrease stitches at the left underarm and back neck. Once complete, sew the two back sections together. Please refer to the video demonstration for more details.
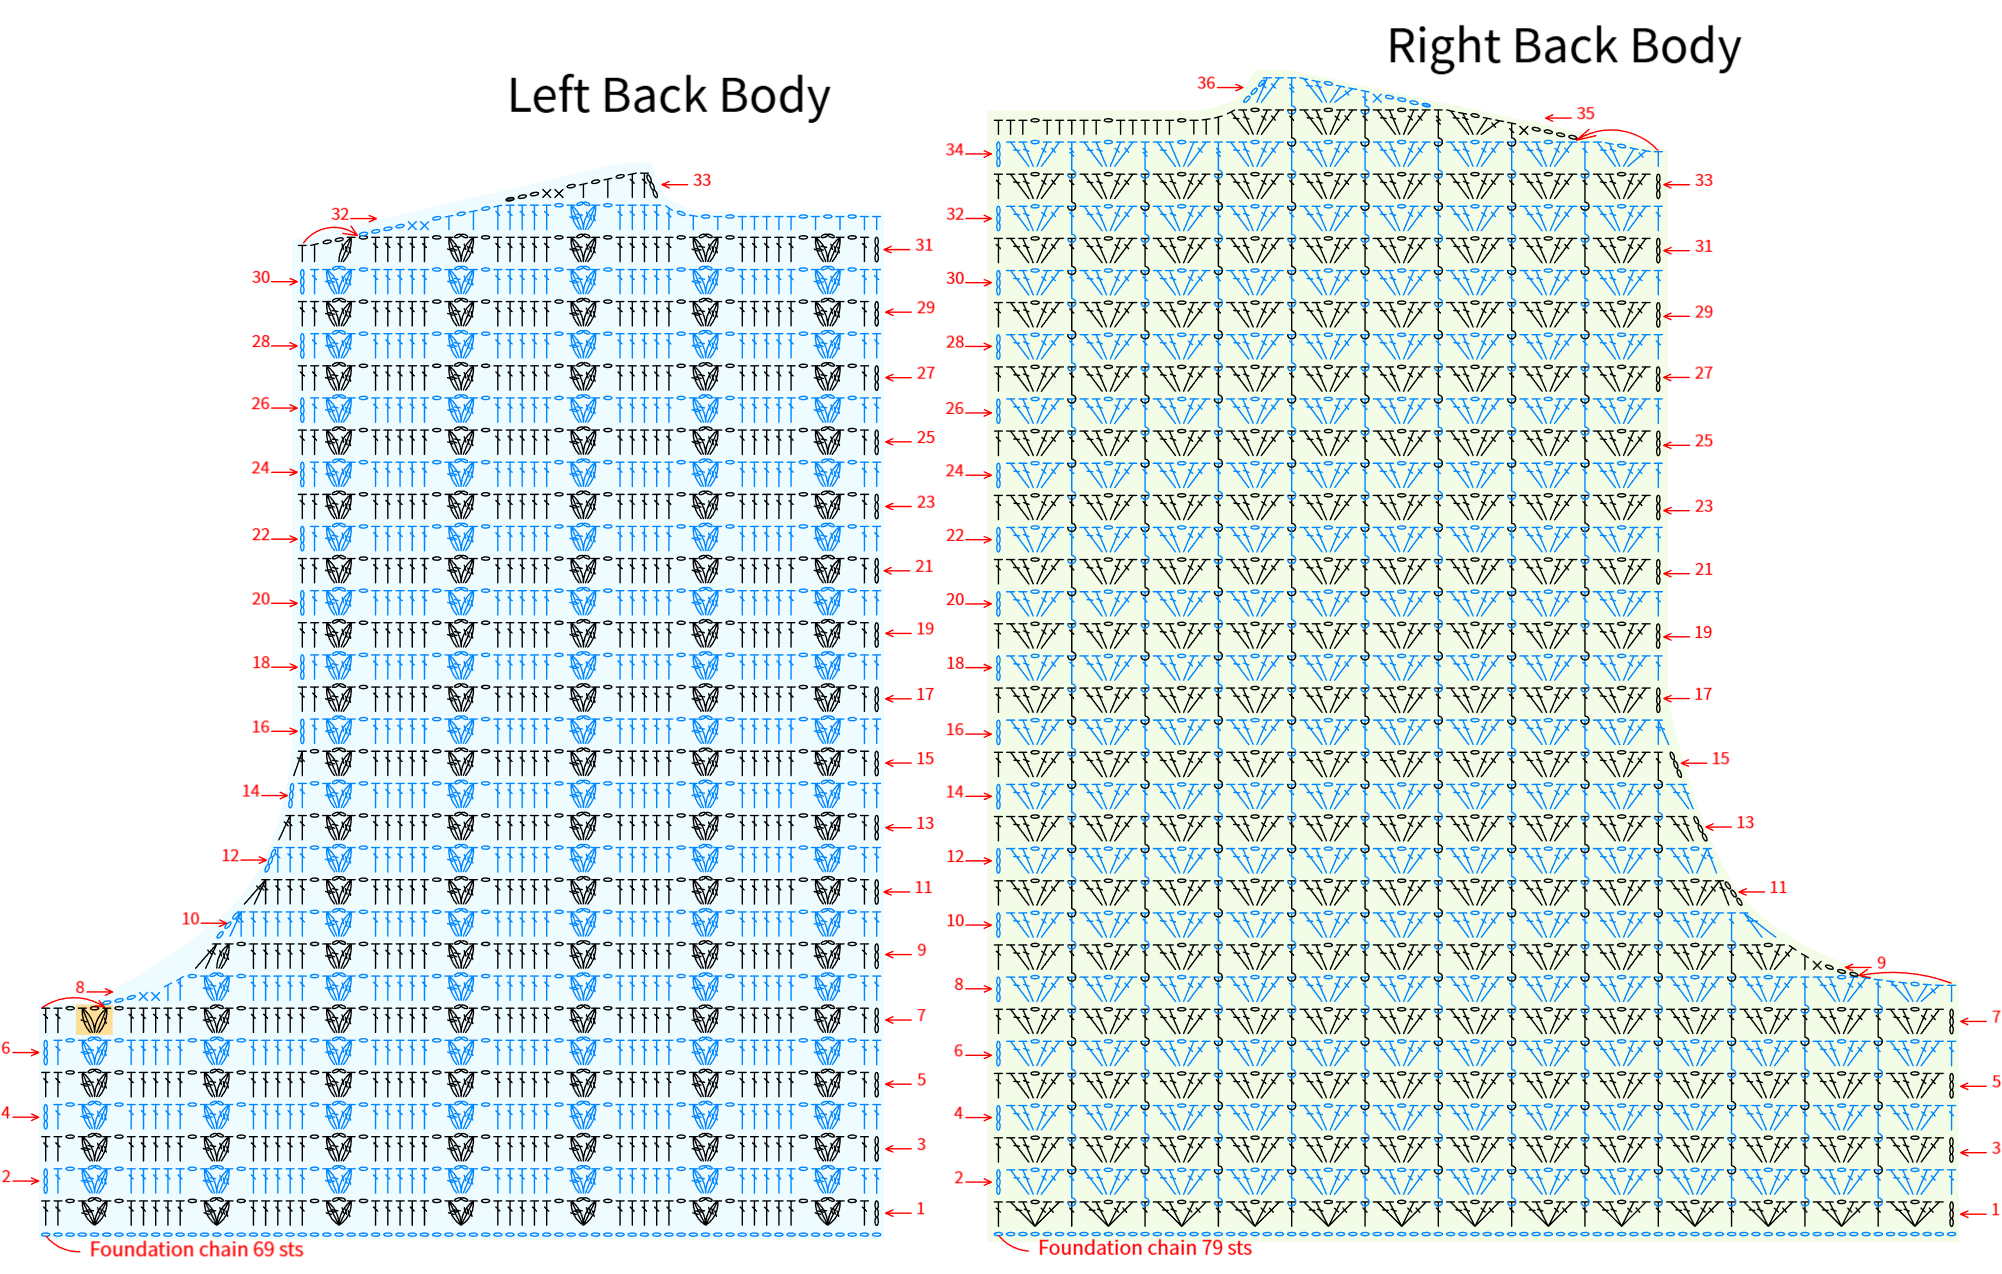
Note: 1. The left and right here refer to the left and right when the garment is worn.
2. After completing row 4 of the left back piece, the width should be approximately 29 cm and the height about 4 cm. If there's a significant difference, adjust your tension and re-crochet to avoid affecting the final size. Keep your tension consistent for subsequent rows.
3. Since the chart shows the texture of the right side of the fabric, when the slip stitch symbol appears on the wrong side, work the opposite stitch as shown in the chart.
4. When crocheting the right back piece, compare it with the left back piece to ensure the measurements match.
5. For the final assembly of the back piece, work single crochet through both corresponding edge loops on the wrong side, with 3 chain stitches between each join.
PART 2 Left and Right Front Bodies B 46' 07'' (Part 1)
Both front bodies are worked with foundation chain, crocheting in rows, and decreasing at the underarm. Once complete, they are joined to the back body at the shoulders and under the underarm. Please refer to the video demonstration for more details.
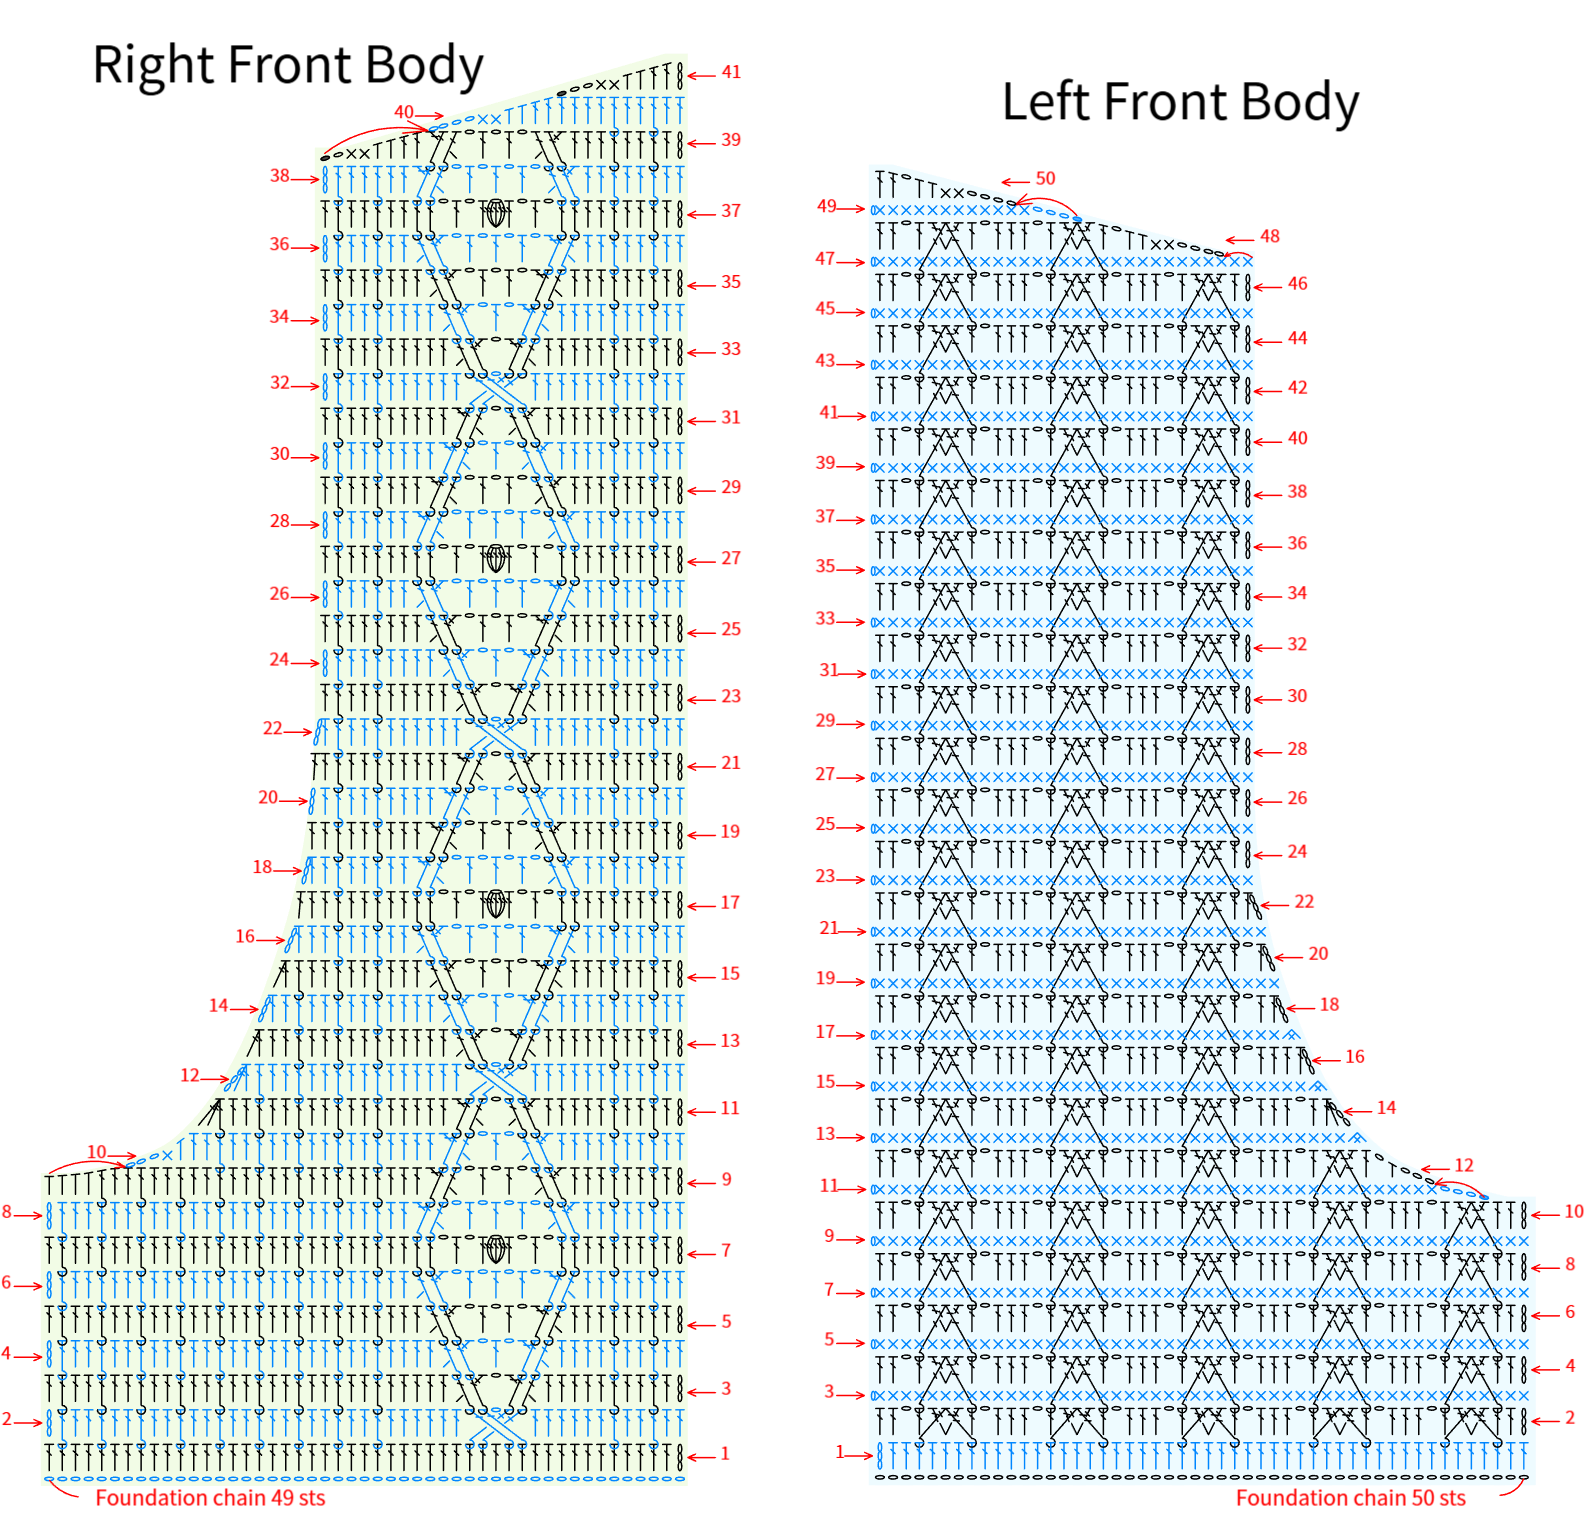
Note: After completing row 5 of the left front body, the width should be about 21 cm and the height about 4 cm. Later, you can compare it with the back body to ensure the height matches. When crocheting the right front body, also check against the left front body to keep the dimensions consistent.
PART 3 Hem C 00' 08'' (Part 2)
The hem is divided into the left hem, right hem, bottom , and waist. First, crochet the left and right hems separately, then join them together in the middle. Next, work back and forth on the cast-on edge and last row of the joined hem to crochet the bottom edge and waist. Once the waist is complete, attach it to the cast-on edges of the front and back bodies. Please refer to the video demonstration for more details.
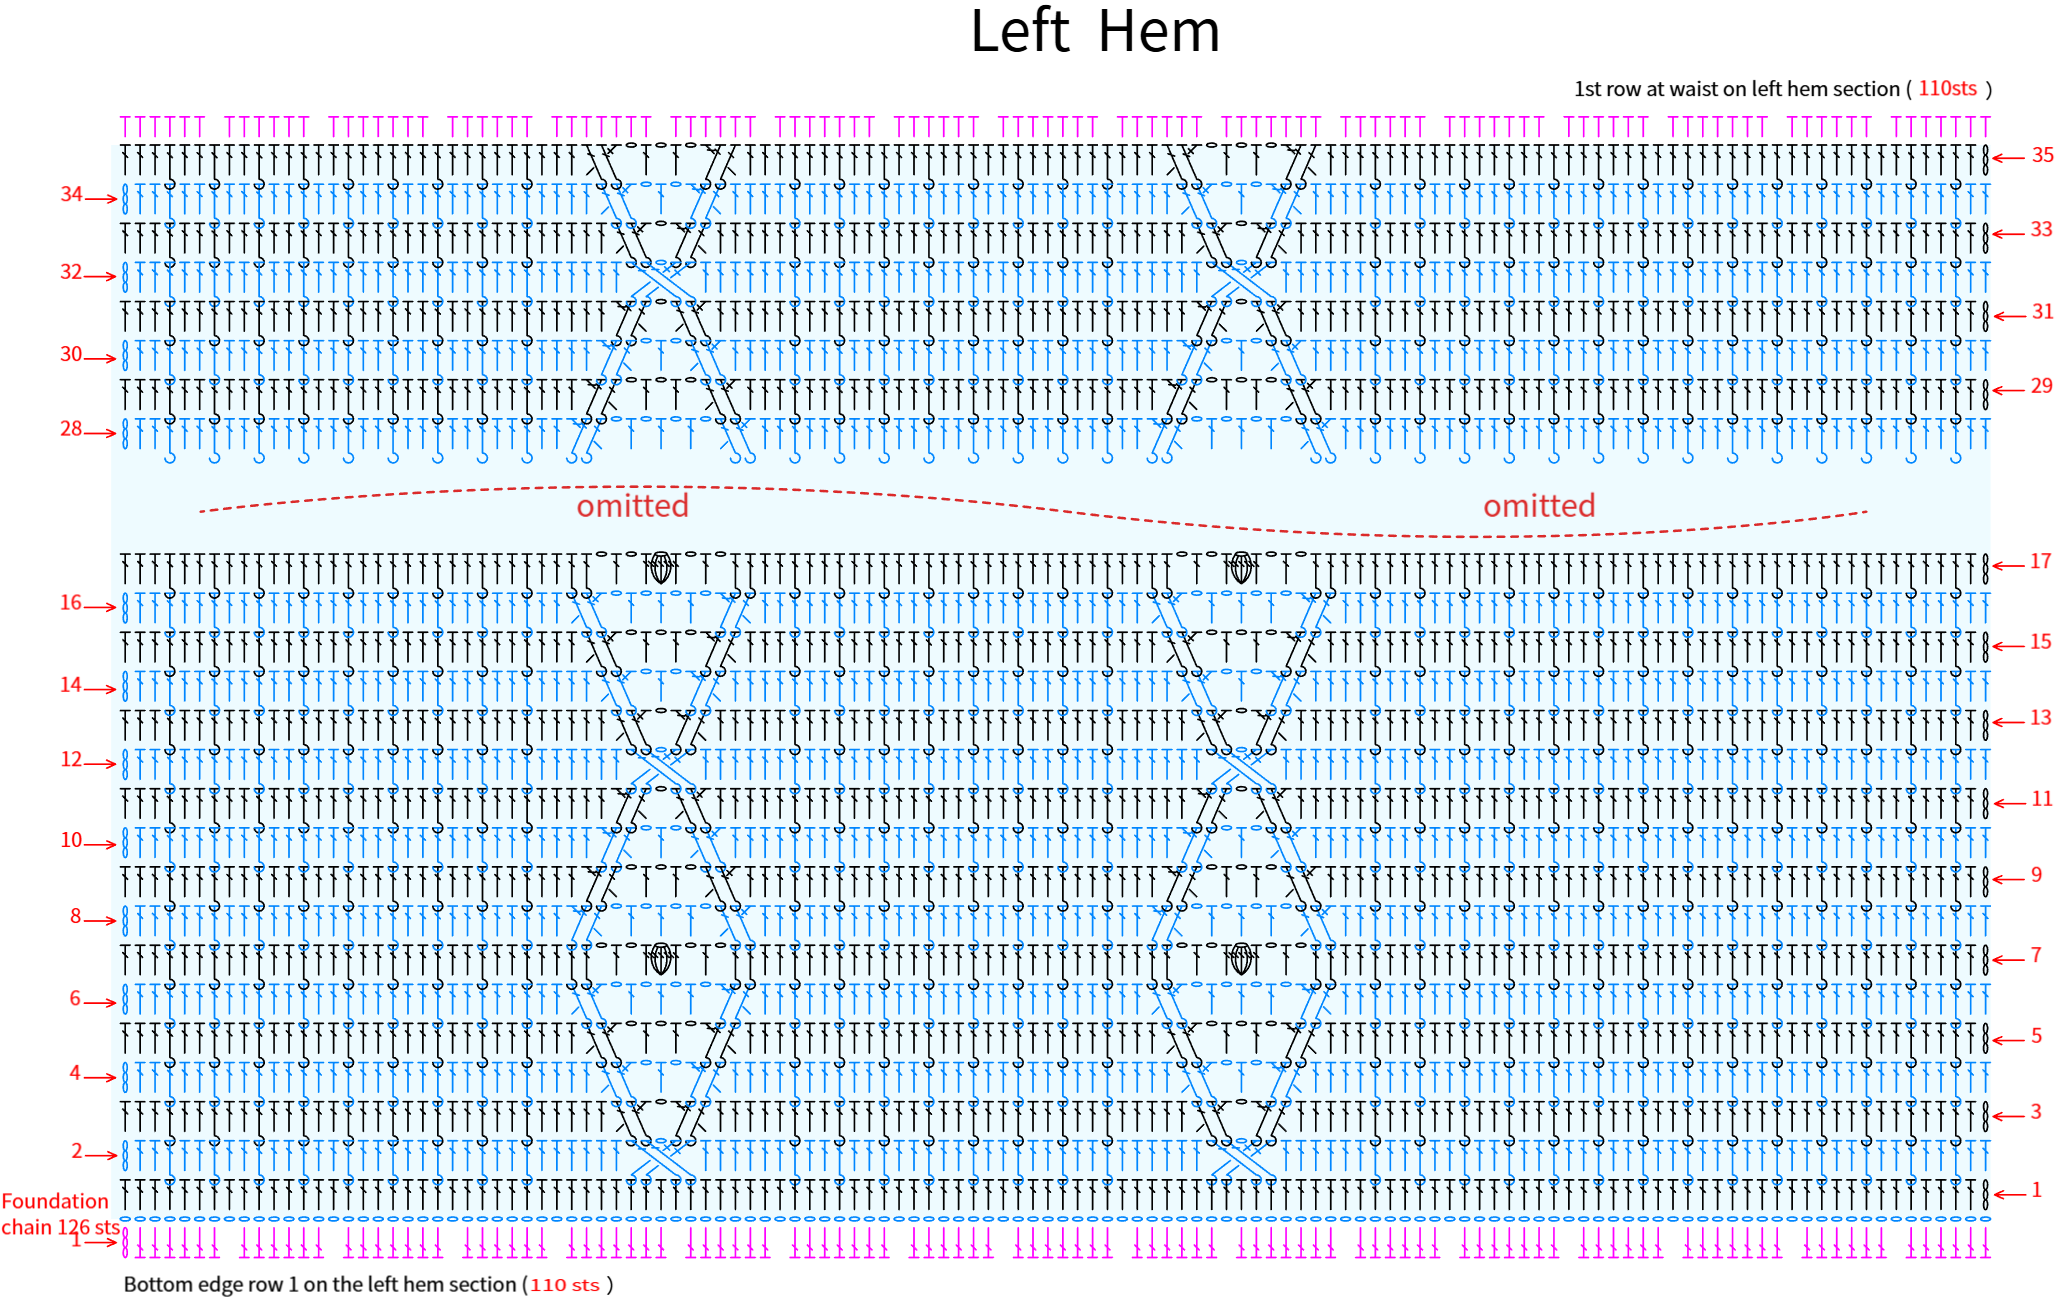
Note: After completing row 4 of the left hem, the height should be about 3.5 cm, and the width should match the corresponding front and back body on one side. Final height should refer to the structure diagram.
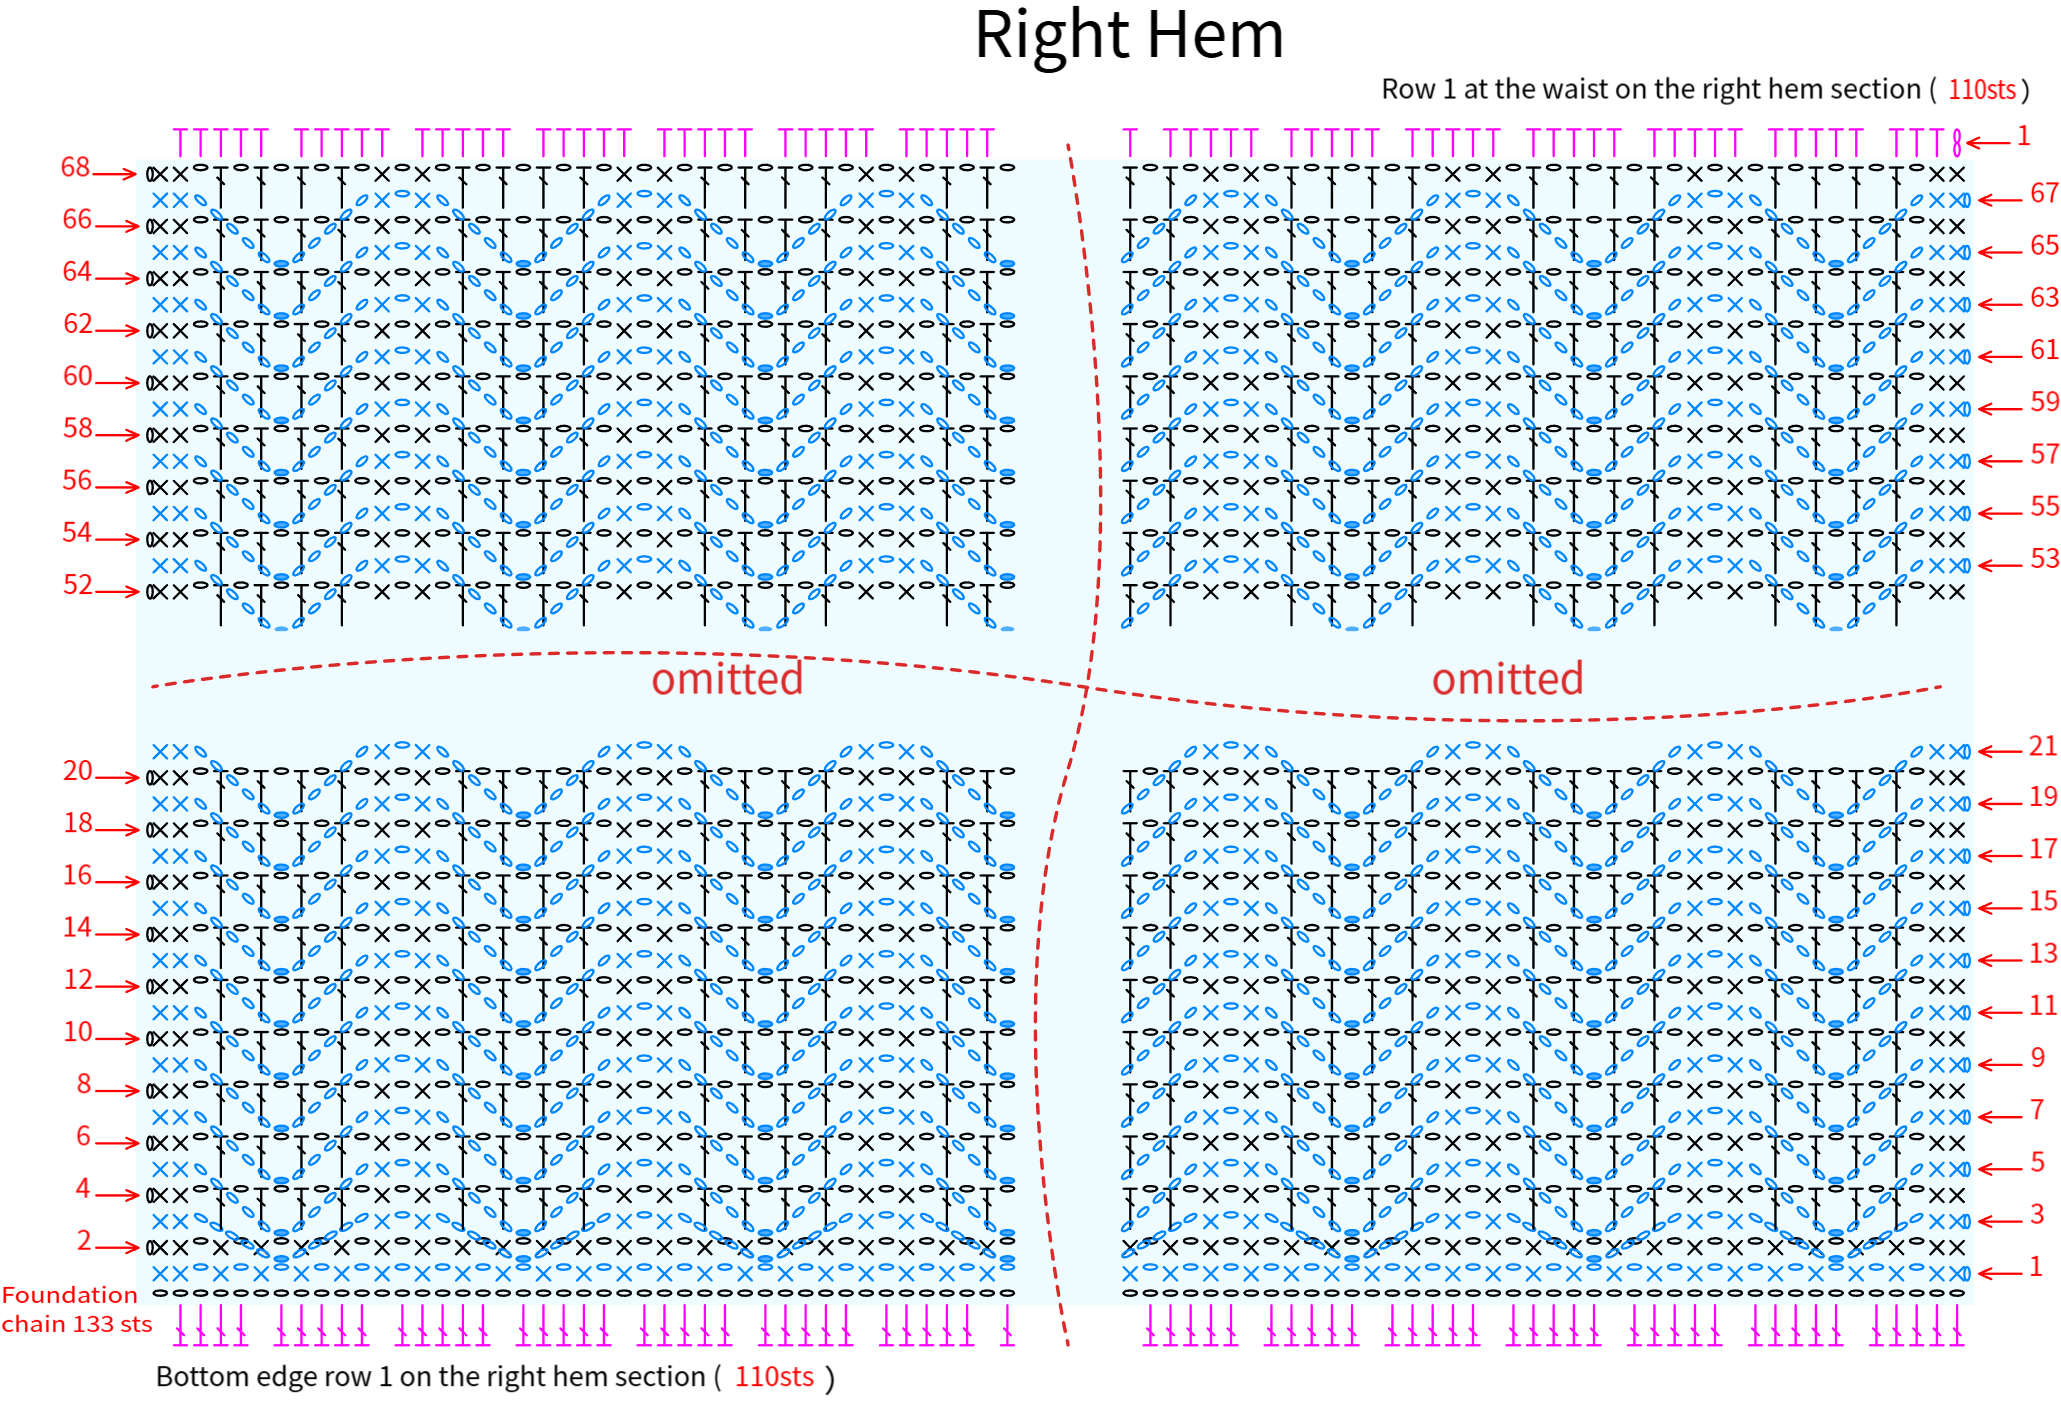
Note: After completing row 8 of the right hem, the height should be about 3.5 cm. Compare with the hem as you crochet to keep the size consistent.
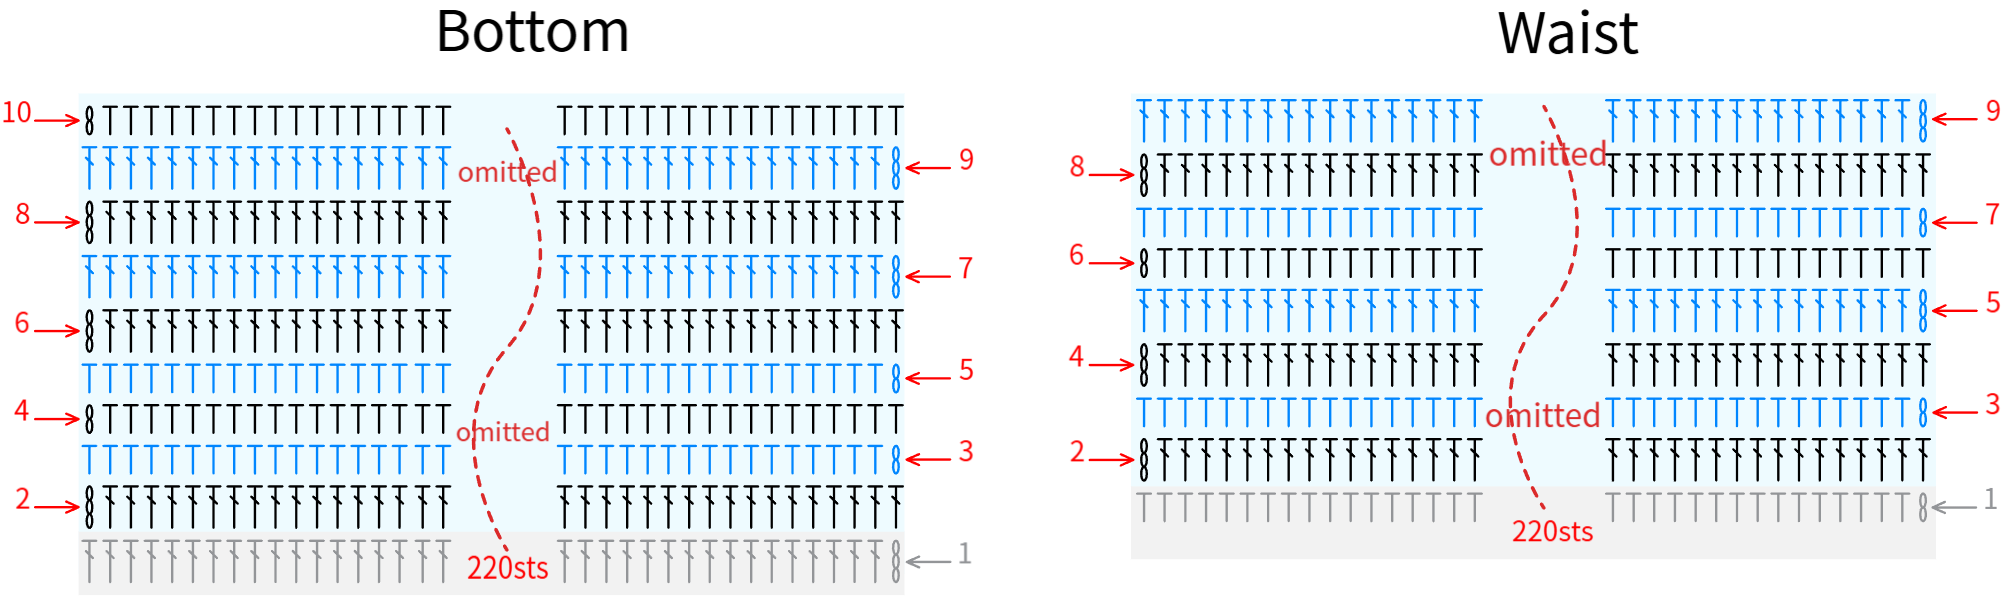
Note: When crocheting the first row of the bottom edge and waist, you can refer to the chart for stitch placement or adjust it as needed, just make sure the fabric lies flat and has consistent width after finishing. For self-striping yarn, simply choose color sections according to your preference.
PART 4 Front Band D 28' 53'' (Part 2)
The front band is crocheted back and forth along the edges of the front body, back body, and hem, with color changes required during the process. Please refer to the video demonstration for more details.
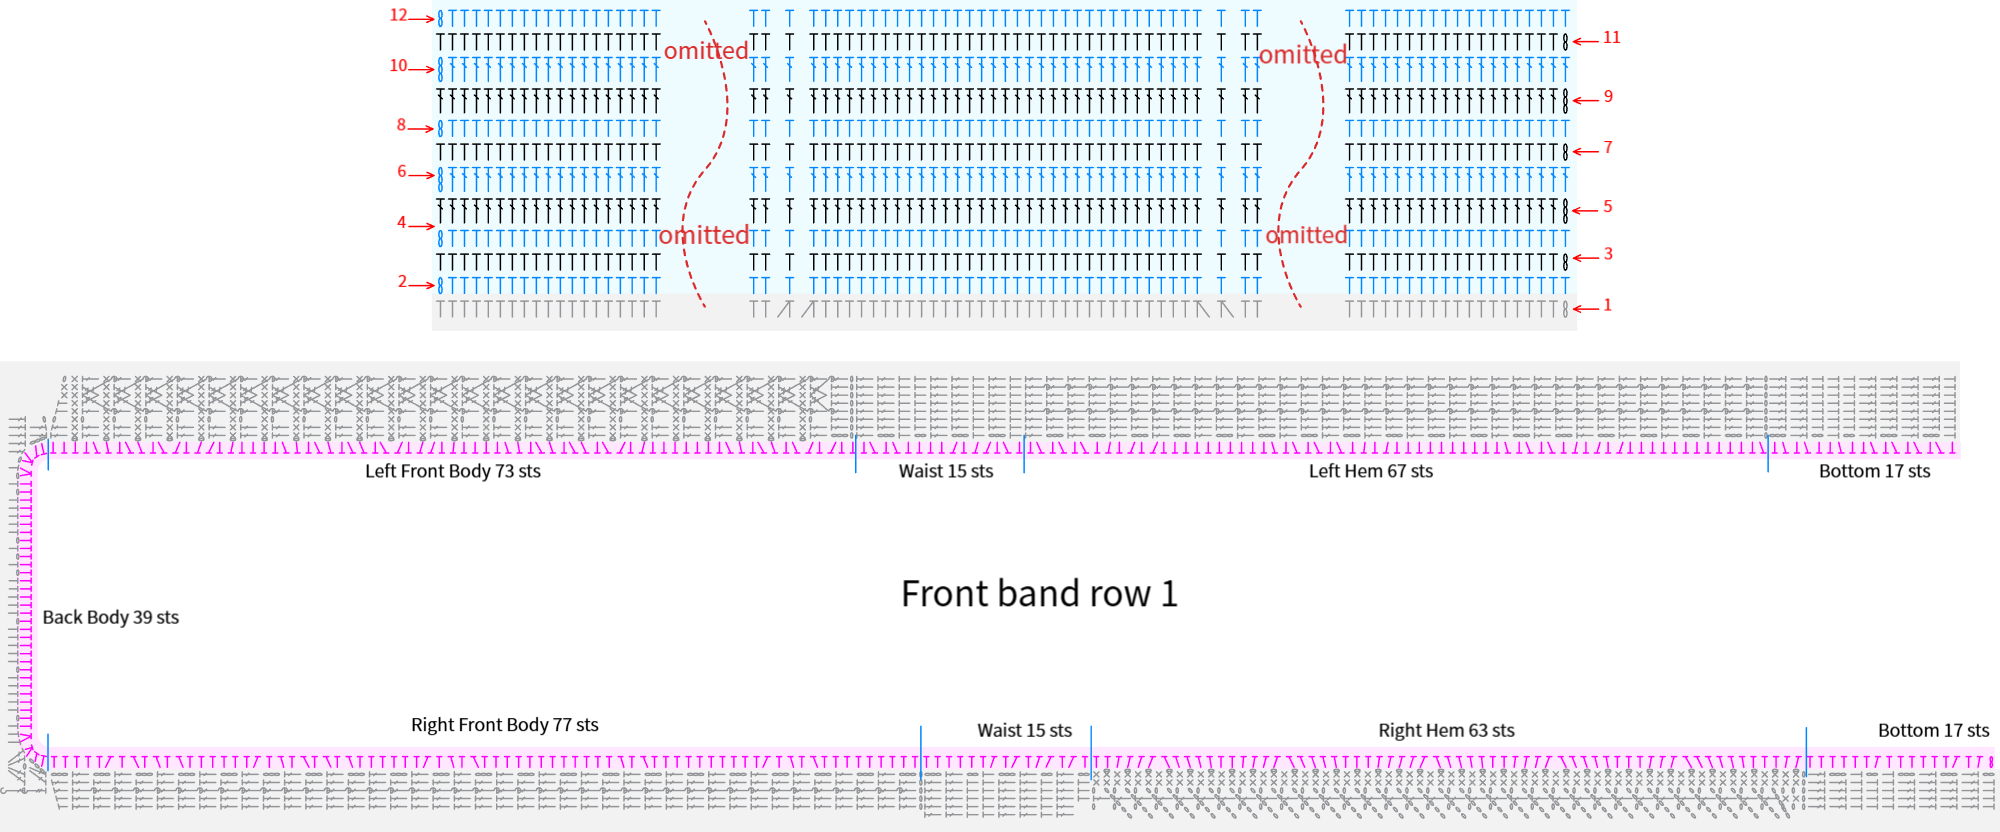
Note: When crocheting the first row, you can refer to the diagram for stitch placement or adjust it yourself, just make sure the fabric looks neat and even after you're done.
PART 5 Cuffs E 36' 12'' (Part 2)
The cuffs are crocheted in rounds counterclockwise at the armhole positions formed by the front and back bodies, with color changes required during the process. Please refer to the video demonstration for more details.
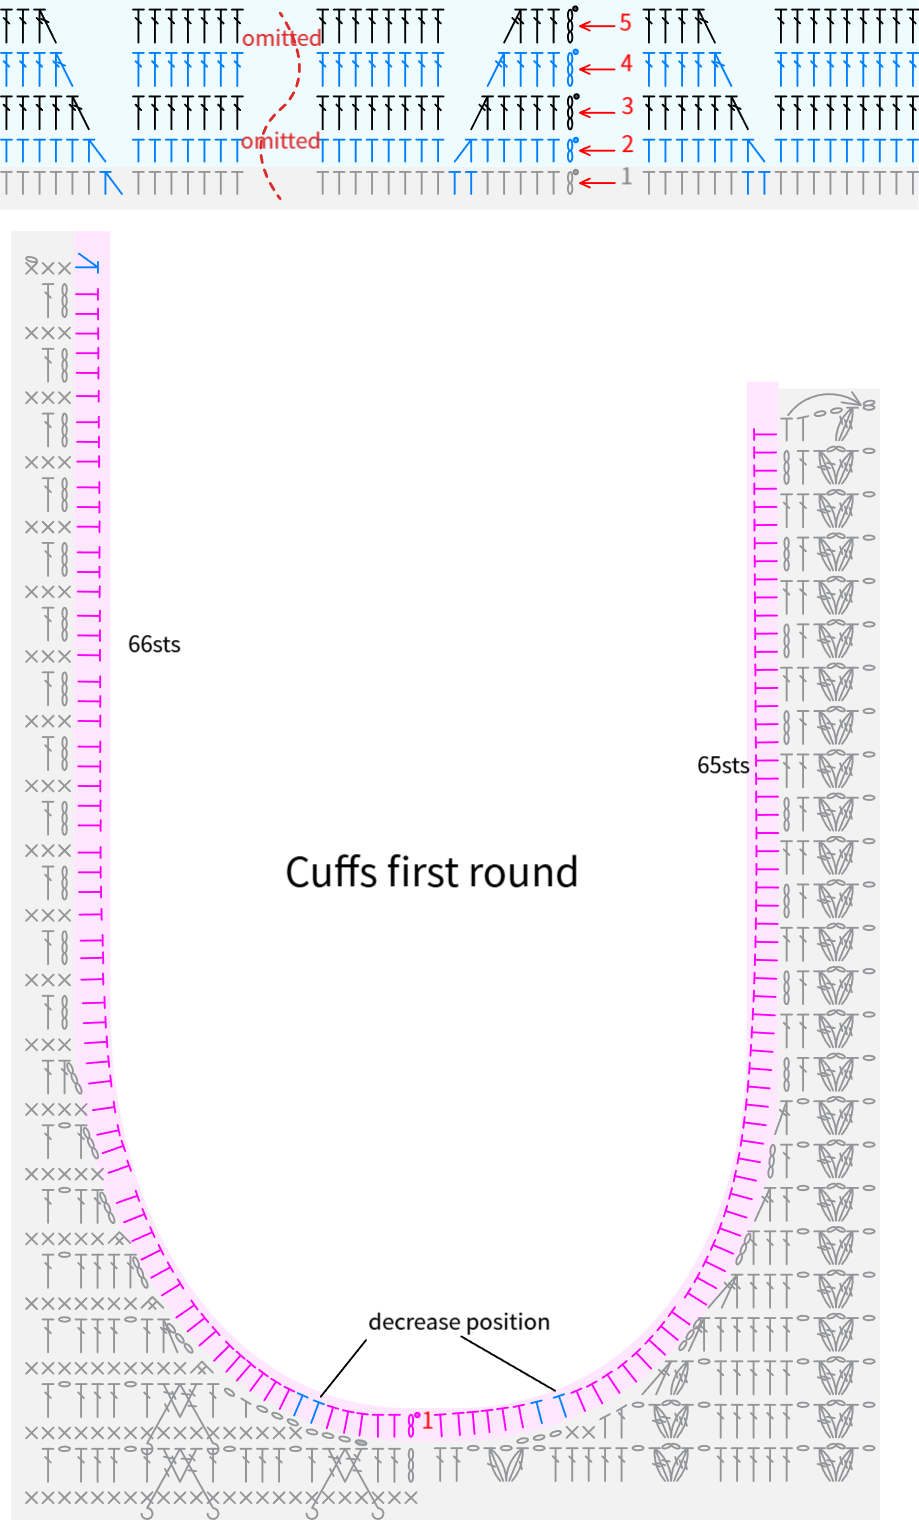
Note: The diagram shows the left cuff as an example. For the right cuff, work in the same way. You can adjust the starting stitch position for Row 1 as needed, just make sure the stitch count matches the diagram.
PART 6 Horn Buttons F 43' 03'' (Part 2)
Finally, secure 2 pairs of horn buttons on the front band. You can adjust the exact positions as needed. Please refer to the video demonstration for more details.
PART 7 Sleeves G 47' 29'' (Part 2)
The sleeves are divided into left and right sleeves, with each sleeve consisting of the sleeve body, sleeve cap, seam, and cuff. Start by crocheting the sleeve body and sleeve cap, then seam the side of the sleeve body on the wrong side and attach the sleeve cap to the corresponding armhole. Finally, crochet the cuff in rounds on the right side. Please refer to the video demonstration for more details.
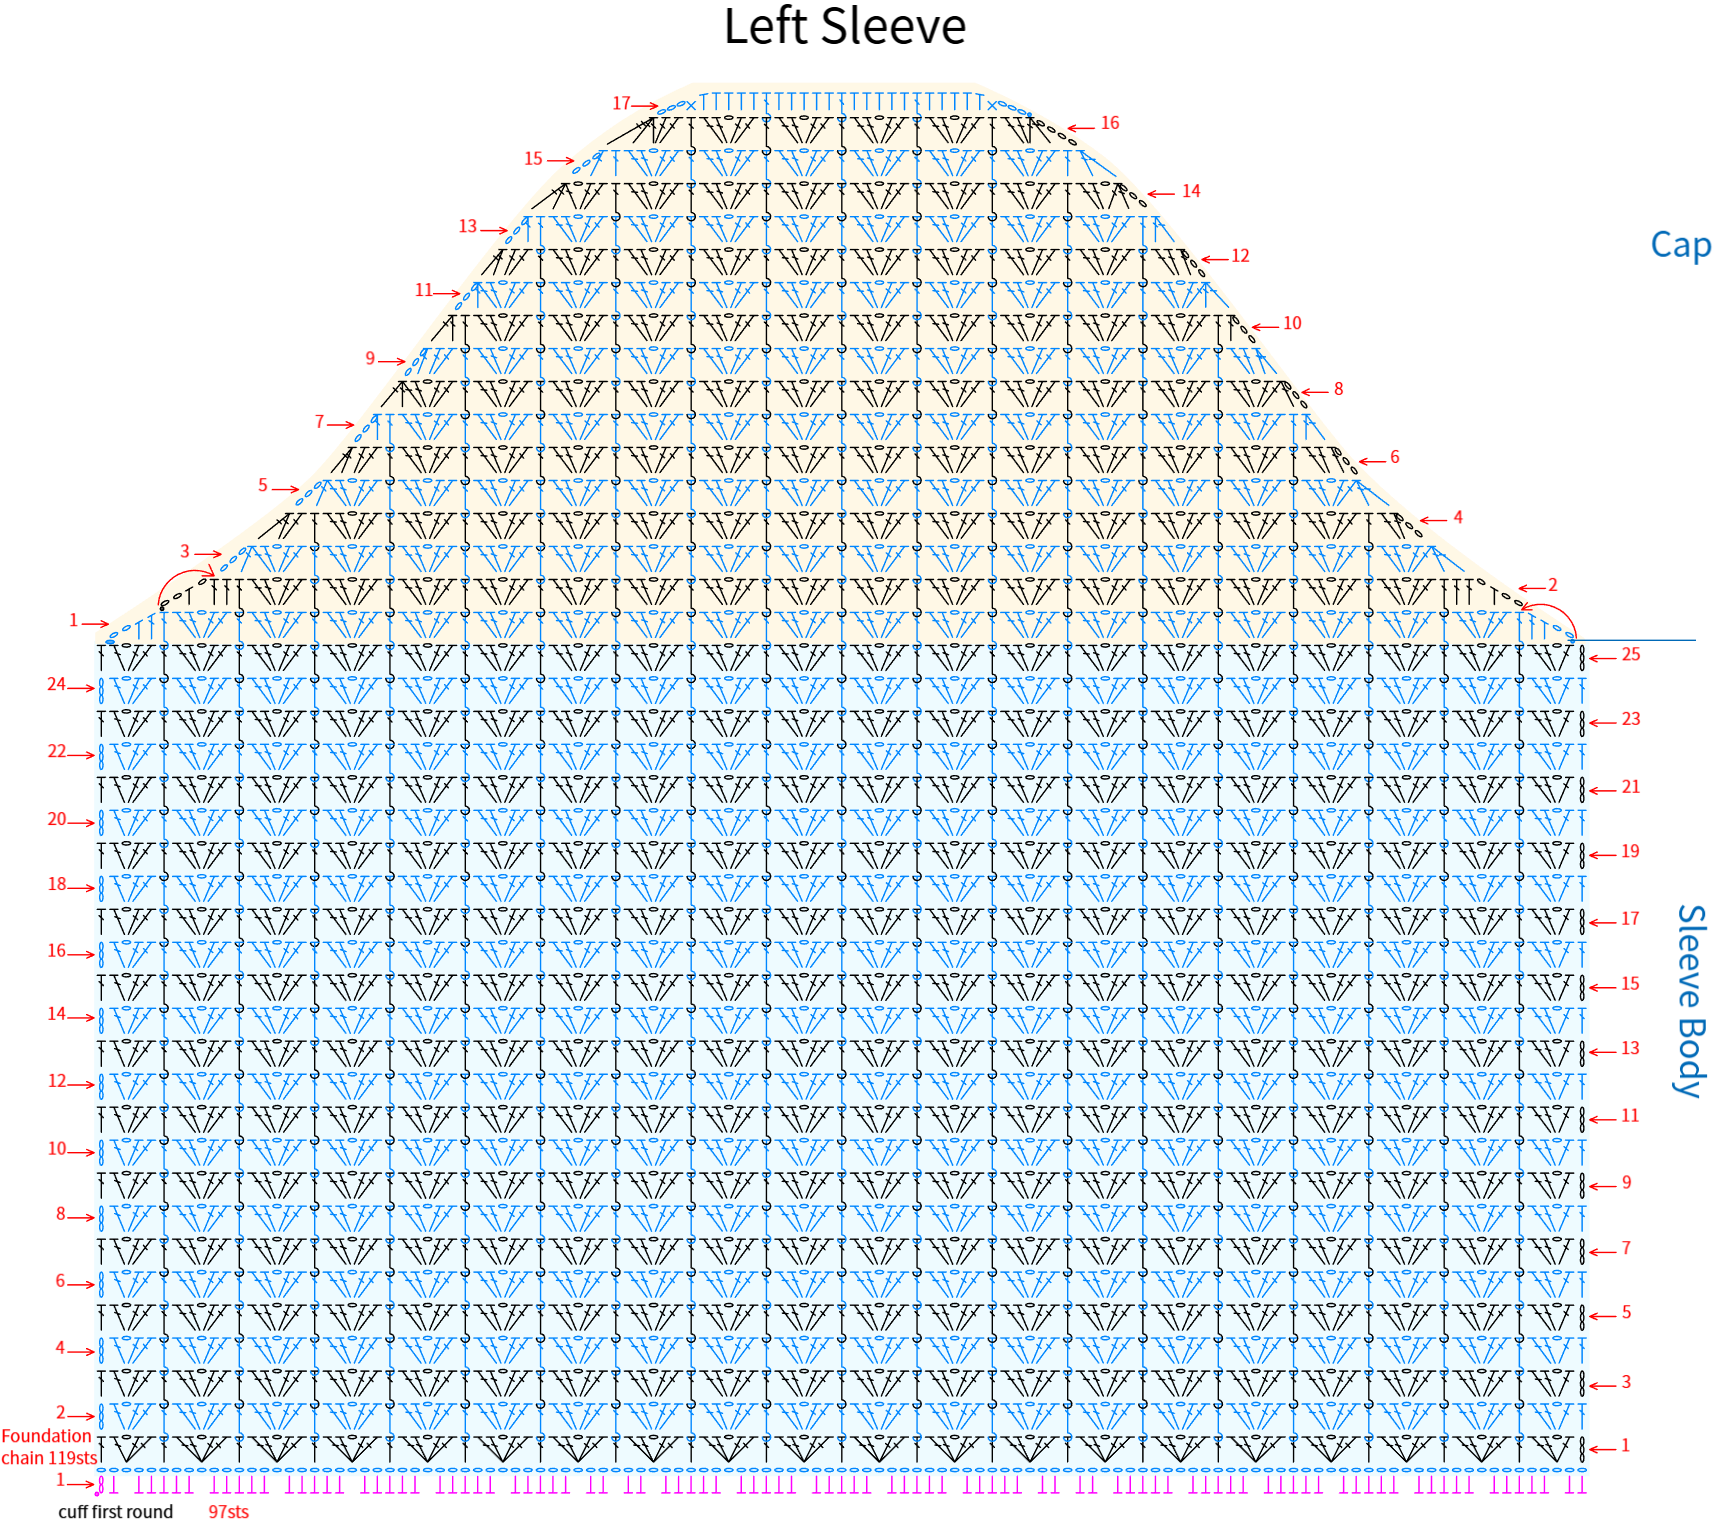
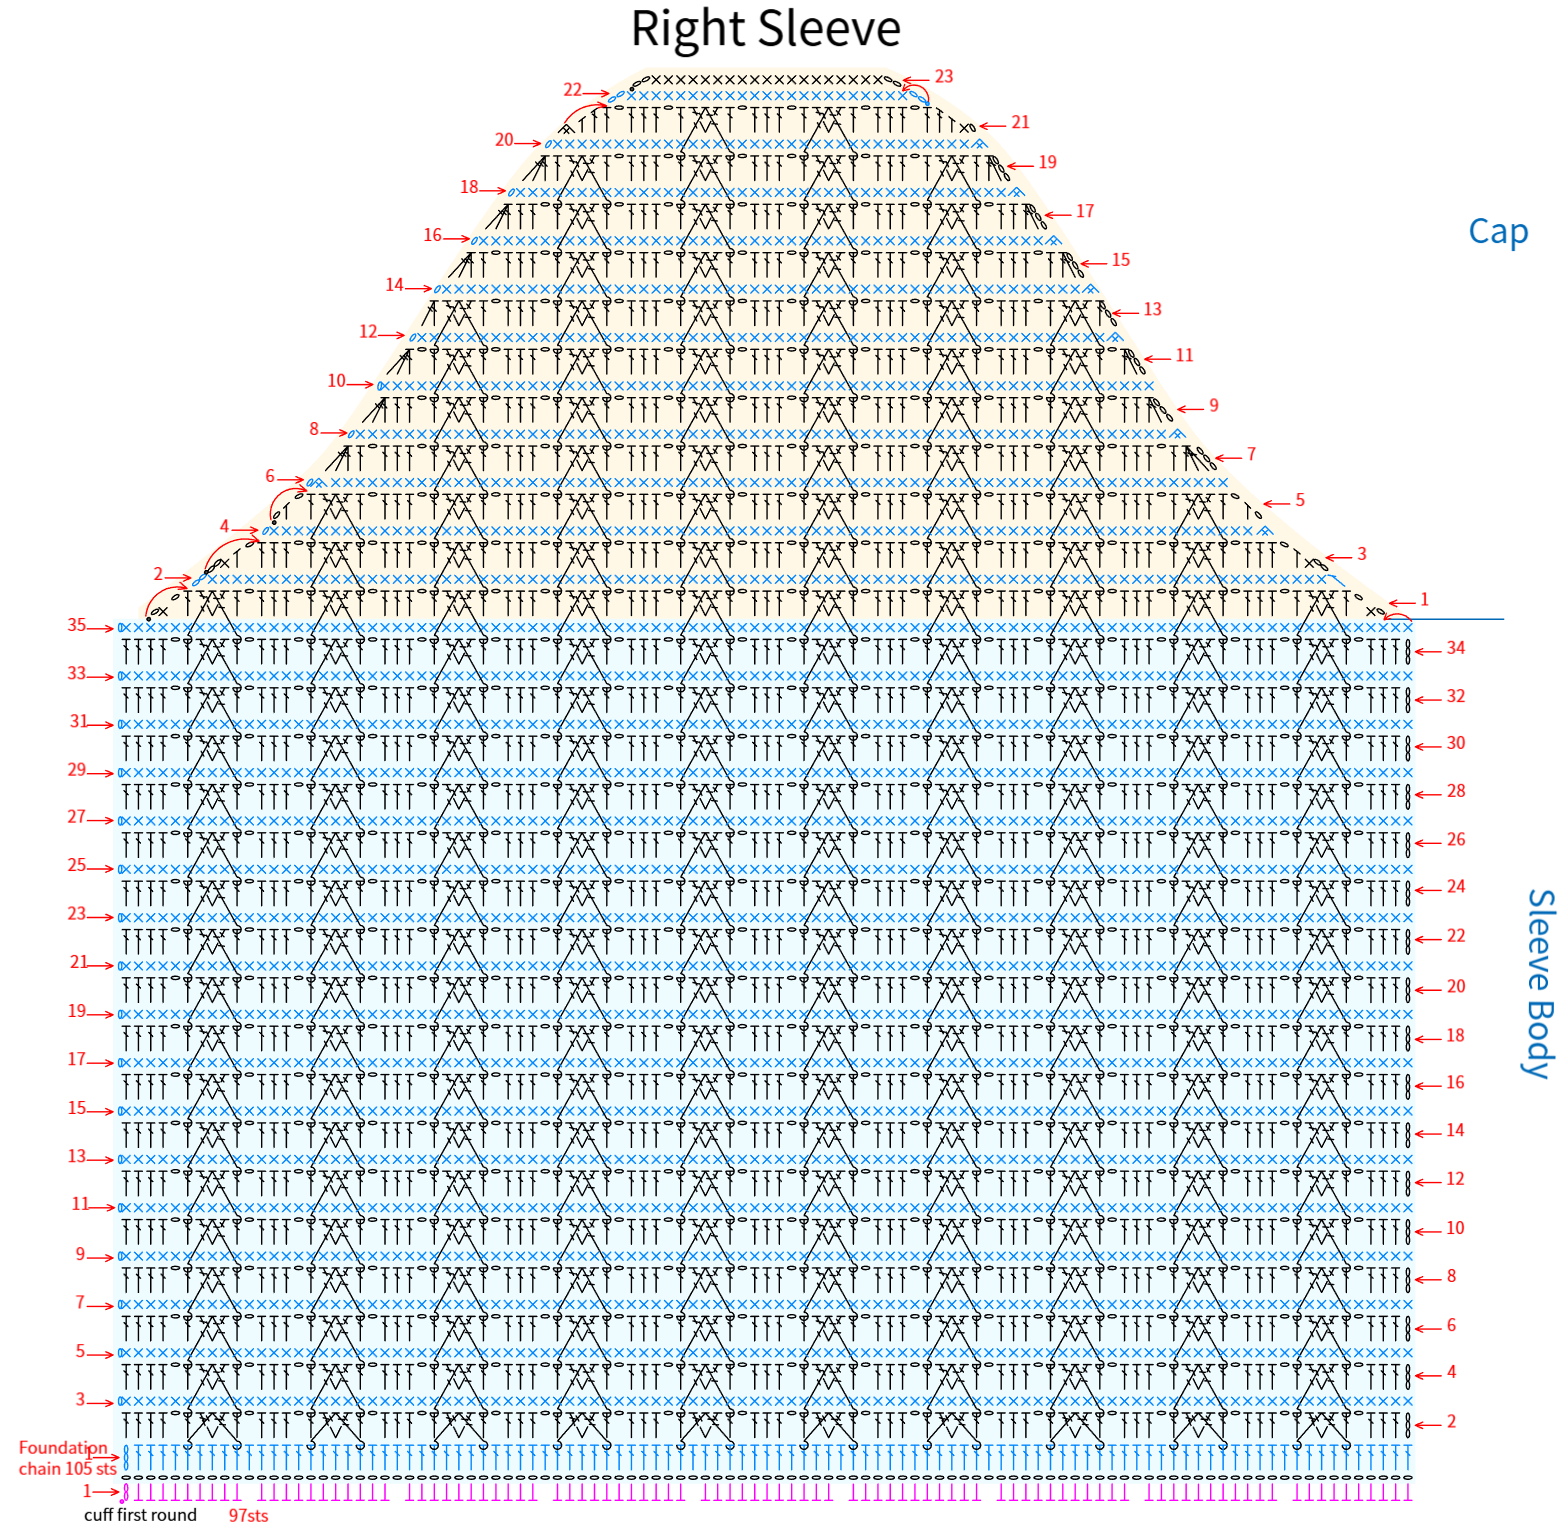
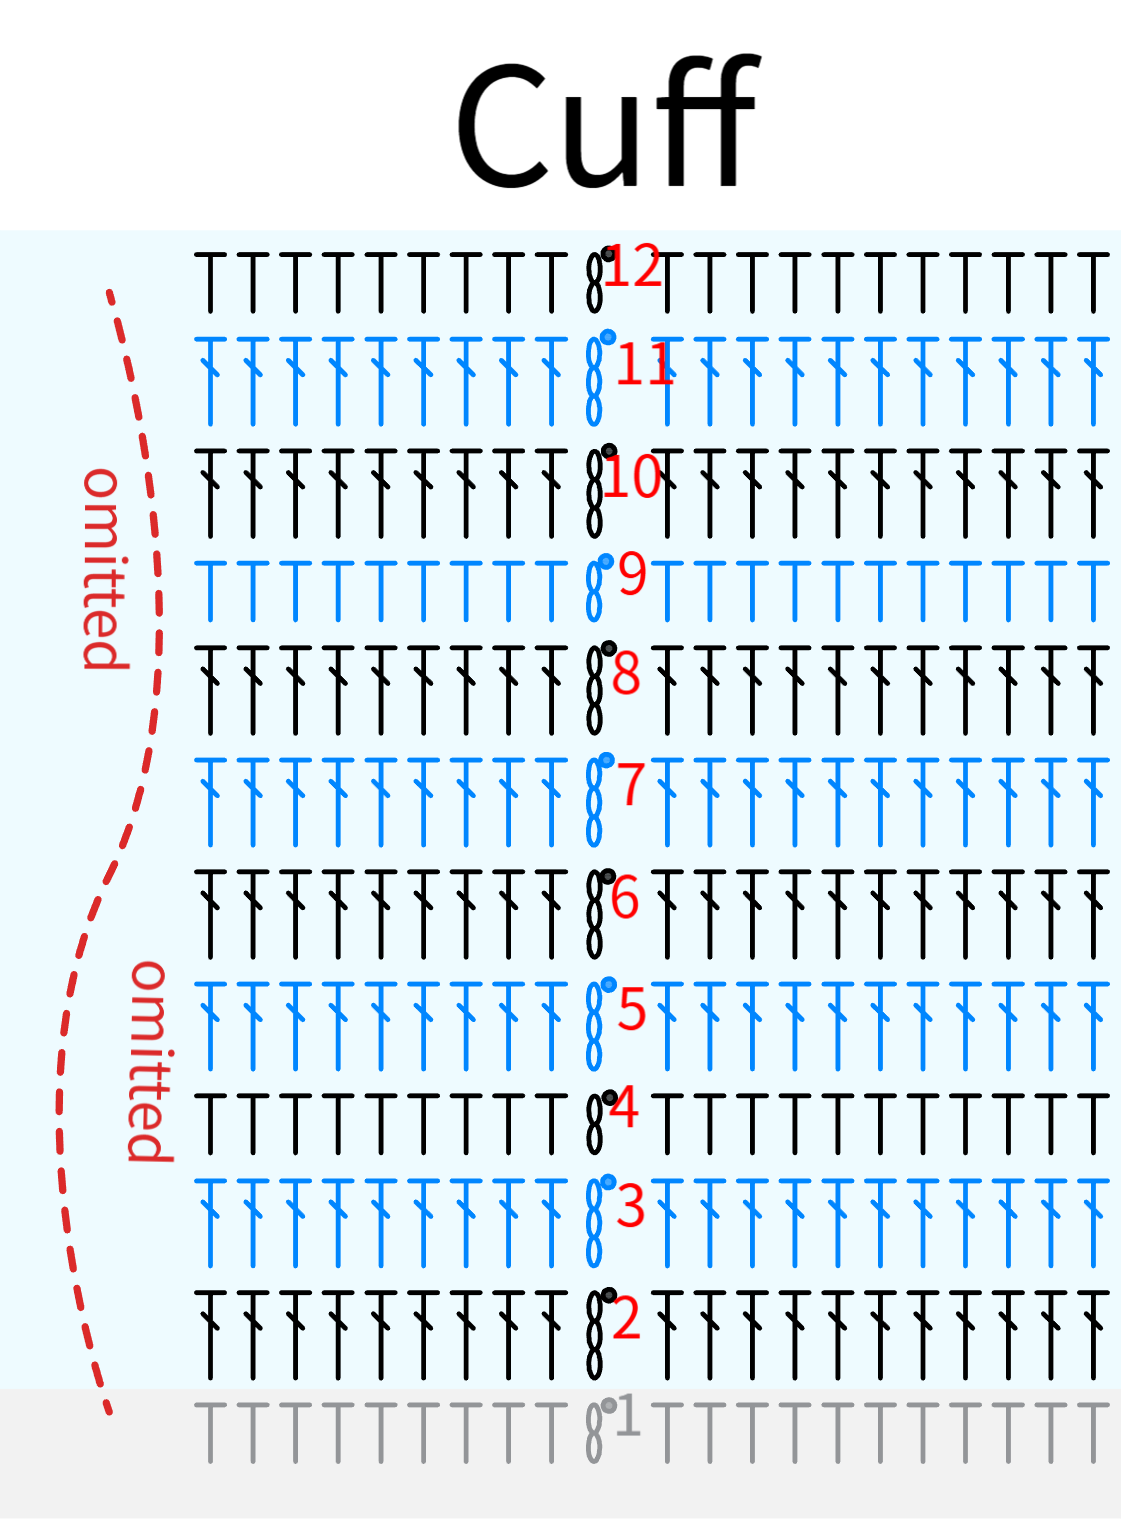
Note: For the first round of the Cuff, refer to the sleeve chart.
PART 8 Bag H
The bag is divided into the body, bottom, edging, and accessories.
STEP 1 Body 51' 39'' (Part 2)
The bag body is divided into three parts: bag body piece 1, bag body piece 2, and the joining section. Both bag body pieces are crocheted in rows using chain cast on, and then joined together on the wrong side after completion. Please refer to the video demonstration for more details.
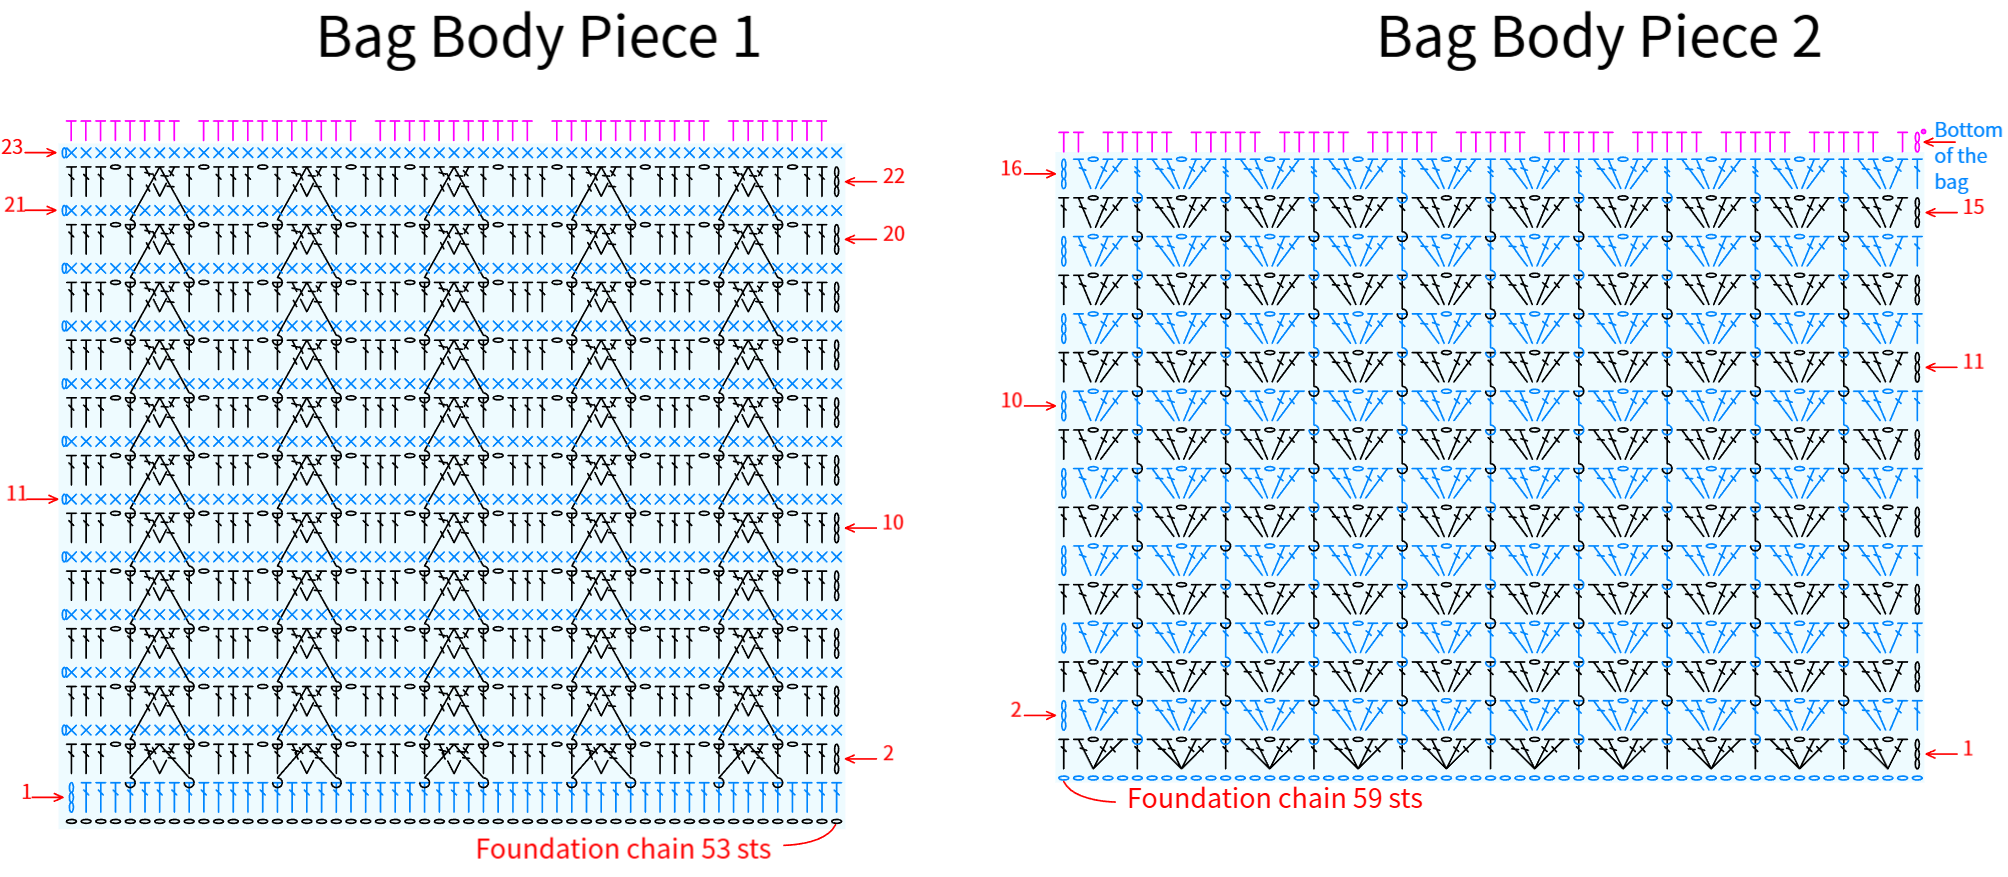
Note: When crocheting the bag body, keep the dimensions consistent. The finished piece uses the last row as the bottom of the bag, and you can choose the orientation based on your preference.
STEP 2 Bottom and Border 52' 46'' (Part 2)
First, crochet the bag bottom in rounds along the last row of the bag body piece, then sew it together with a mattress stitch. Once completed, crochet the bag border in rounds along the cast-on edge of the bag body piece. Please refer to the video demonstration for more details.
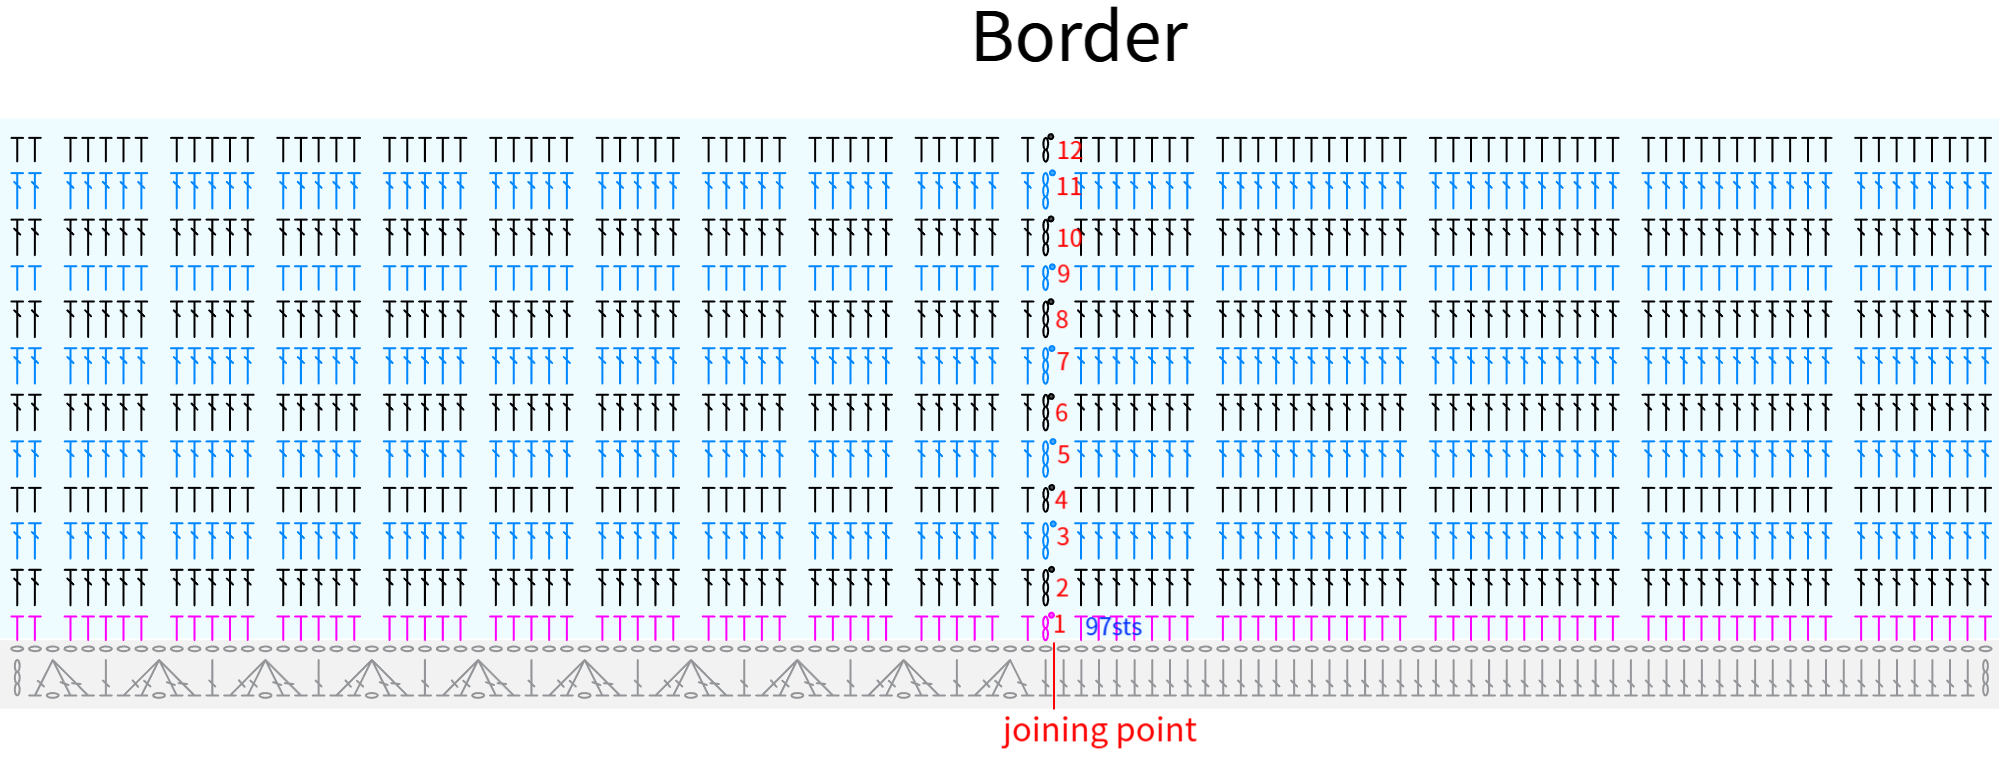
Note: Refer to the bag body chart for the bottom chart. Leave about 70 cm of yarn tail at the end and sew the flattened fabric with a whipstitch.
STEP 3 Accessories 55' 13'' (Part 2)
The accessory includes the clasp piece, D-ring, and strap. The clasp piece is divided into clasp piece 1, clasp piece 2, and sewing these 3 parts. Clasp piece 2 consists of the main body and edging. Once the clasp piece is completed, sew it onto the appropriate position of the bag edge. Finally, attach the D-rings and strap to both ends of the bag edge.Please refer to the video demonstration for more details.
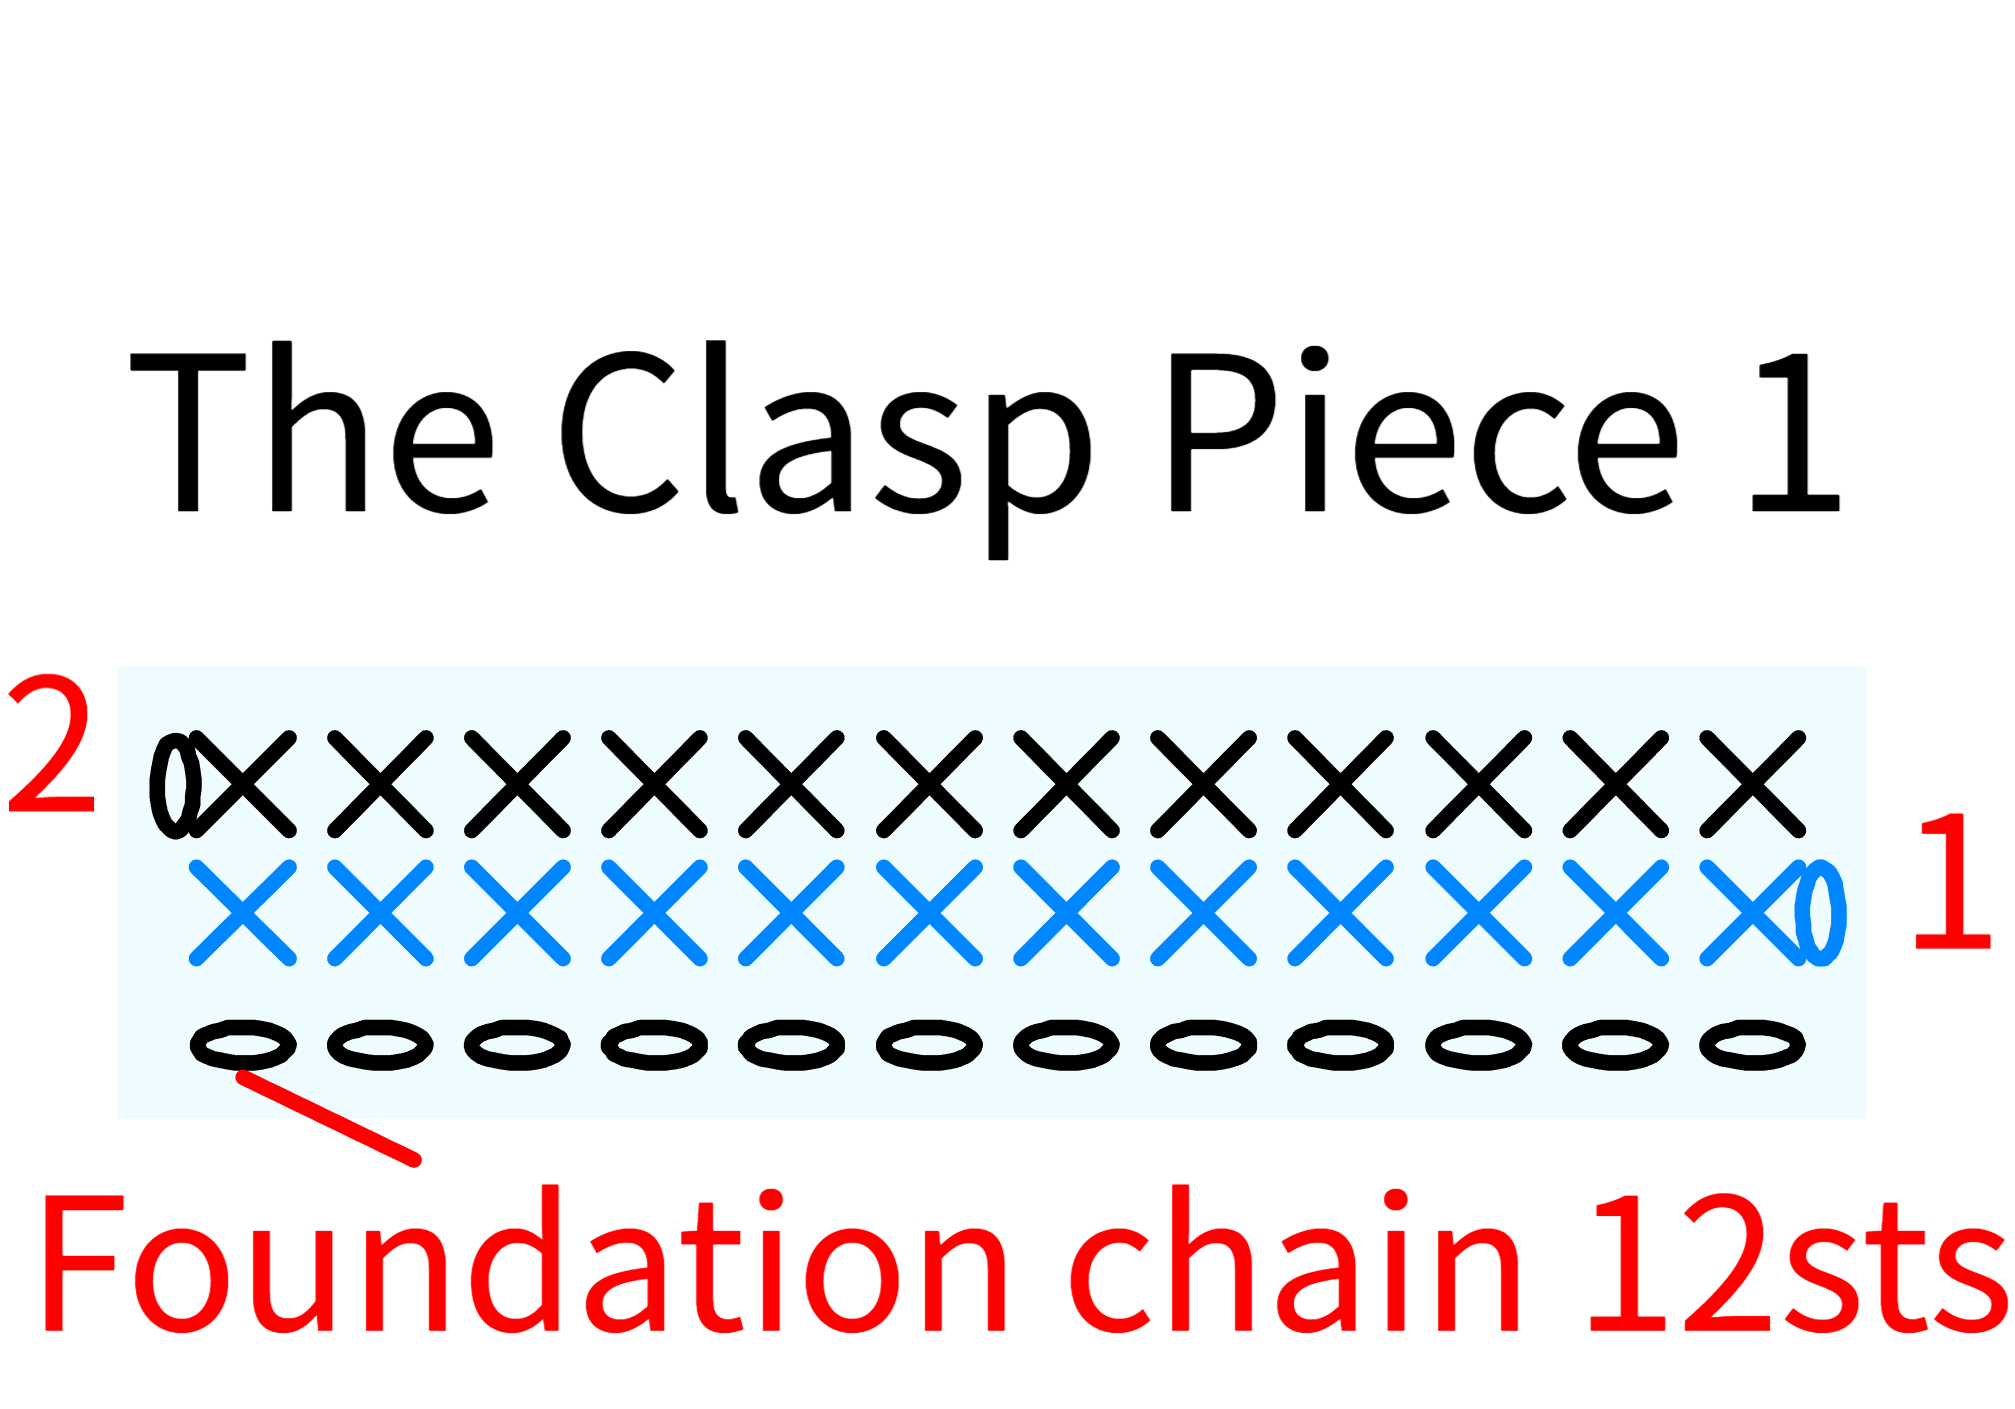
Note: Leave a 20 cm yarn tail at the end for sewing.
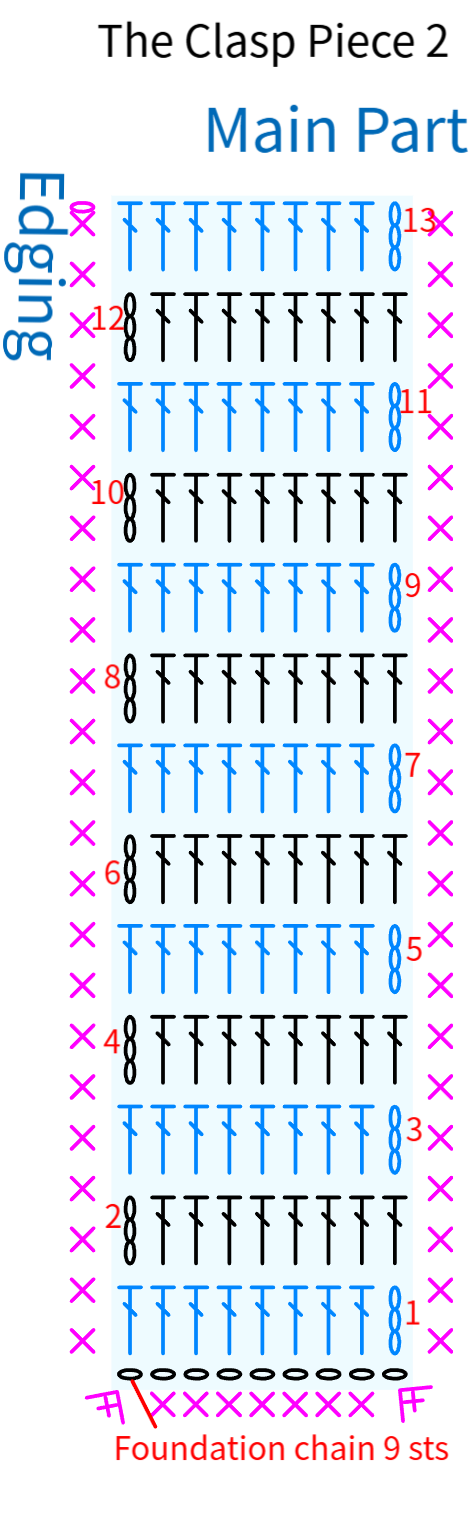
Note: Leave a 30 cm yarn tail at the end of the main piece for sewing. You can adjust the stitch count on the edging sides as long as the fabric looks smooth and neat.
Made by the community




