Clothes
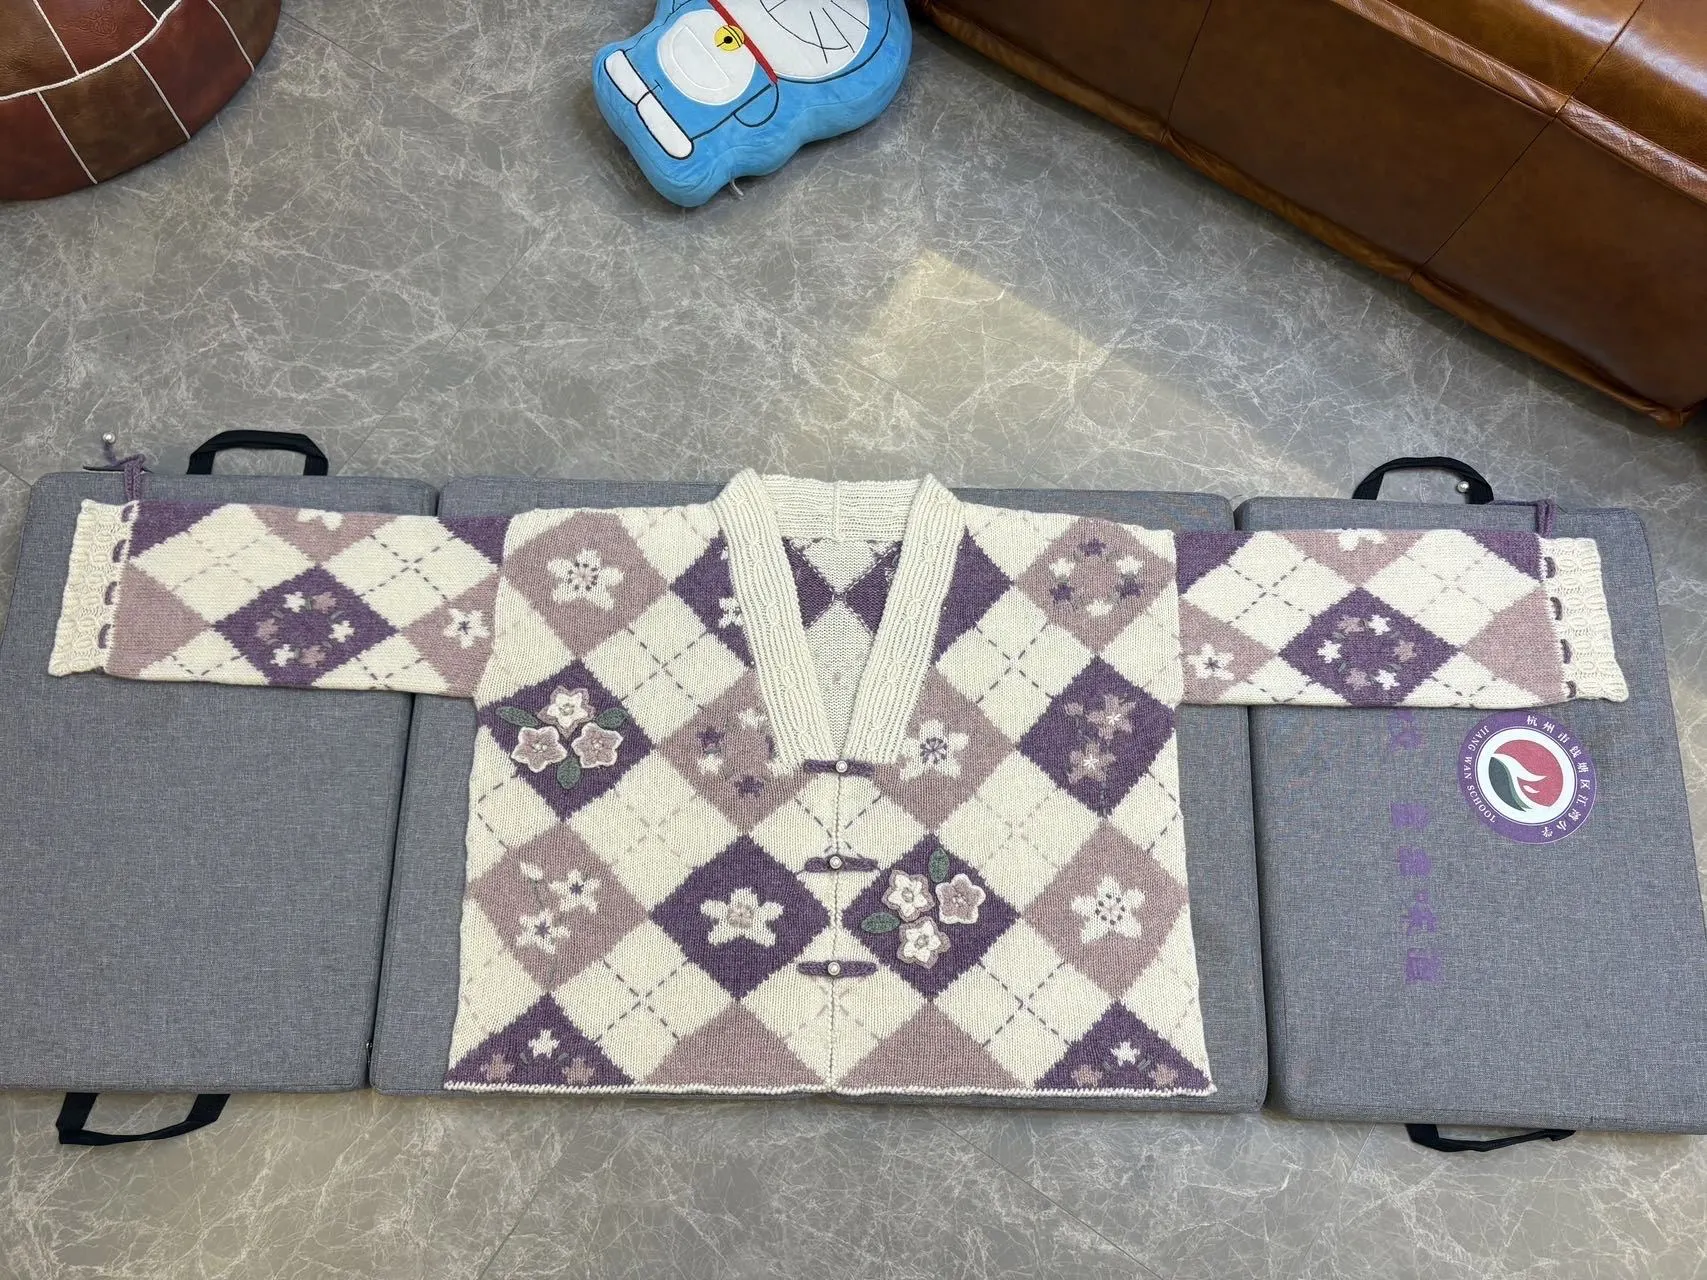
Peach Blossom Shuitian Cardigan
Project preview
See the finished project
Pattern format
Instructions
Watch and follow
Video tutorial
This cardigan consists of the back piece, front piece, edging, sleeves, and decorations. Start by knitting the back piece and front piece, then connect them together at the corresponding positions and work the edging. Next, work the sleeves, and finally add the decorations.
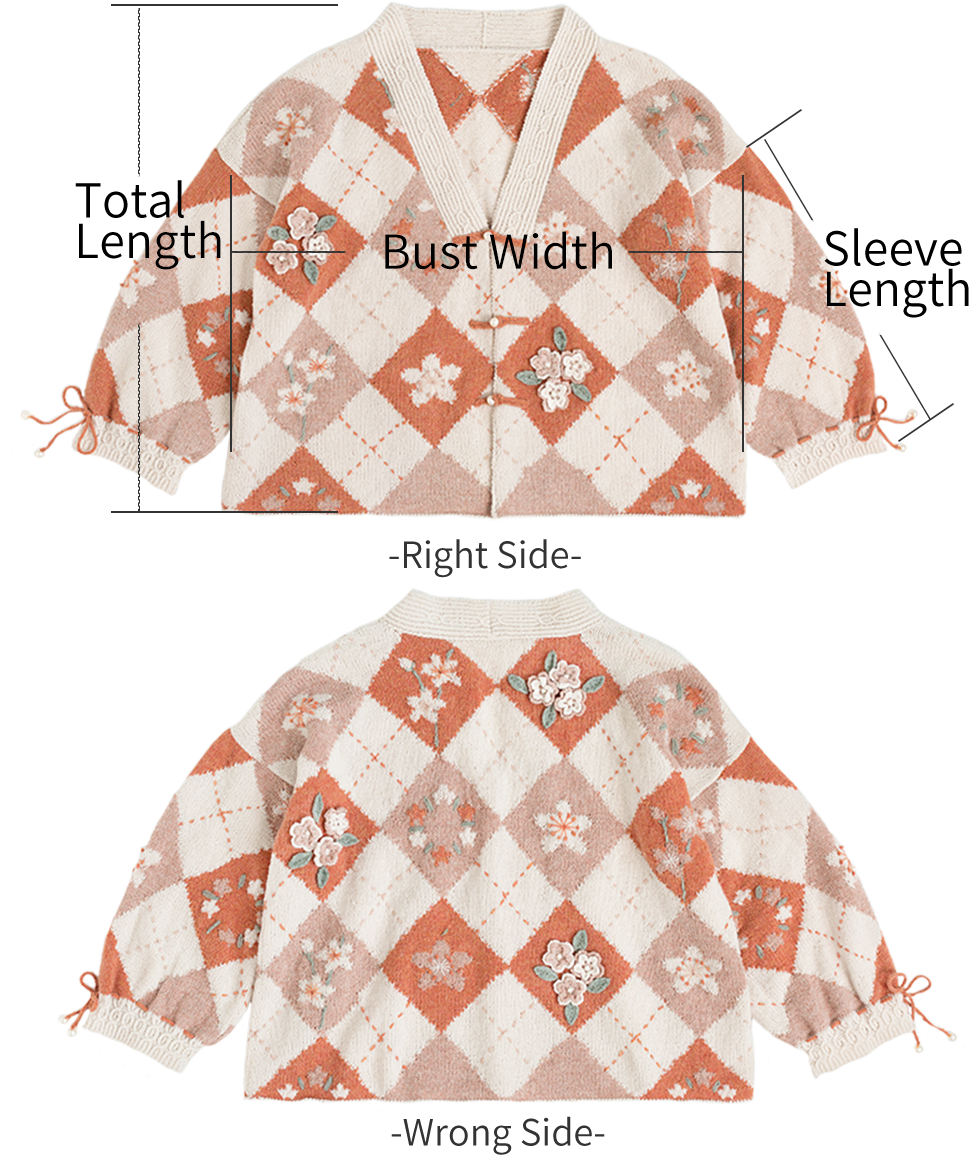
The handcrafted measurements may have an error of 1 to 2 cm. Due to variations in individual tension, the size of the sample is for reference only.
Materials: Susan's Family Two strands of Lamb Wool held together
(When sewing with the Lamb Wool, don't pull too hard to avoid breaking the yarn tail.)
Needles: 3.75 mm circular needle
Hooks: 2.0 mm , 3.00 mm crochet hook



Chart Key




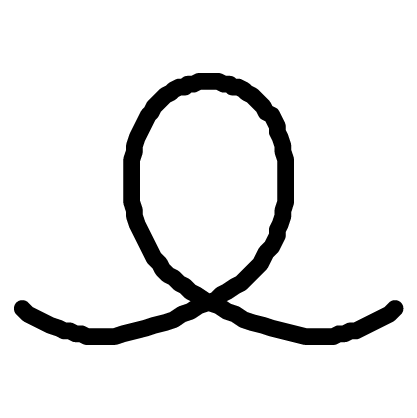

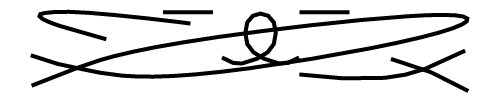


Chart Key






Note:
1,This pattern is making in Chinese crochet pattern terms, and the stitch name is written using American terminology. All measurements in charts are in cm.
2,The chart represent the right side of fabric, so check the key to see how to work a certain symbol on the right side and on the wrong side.


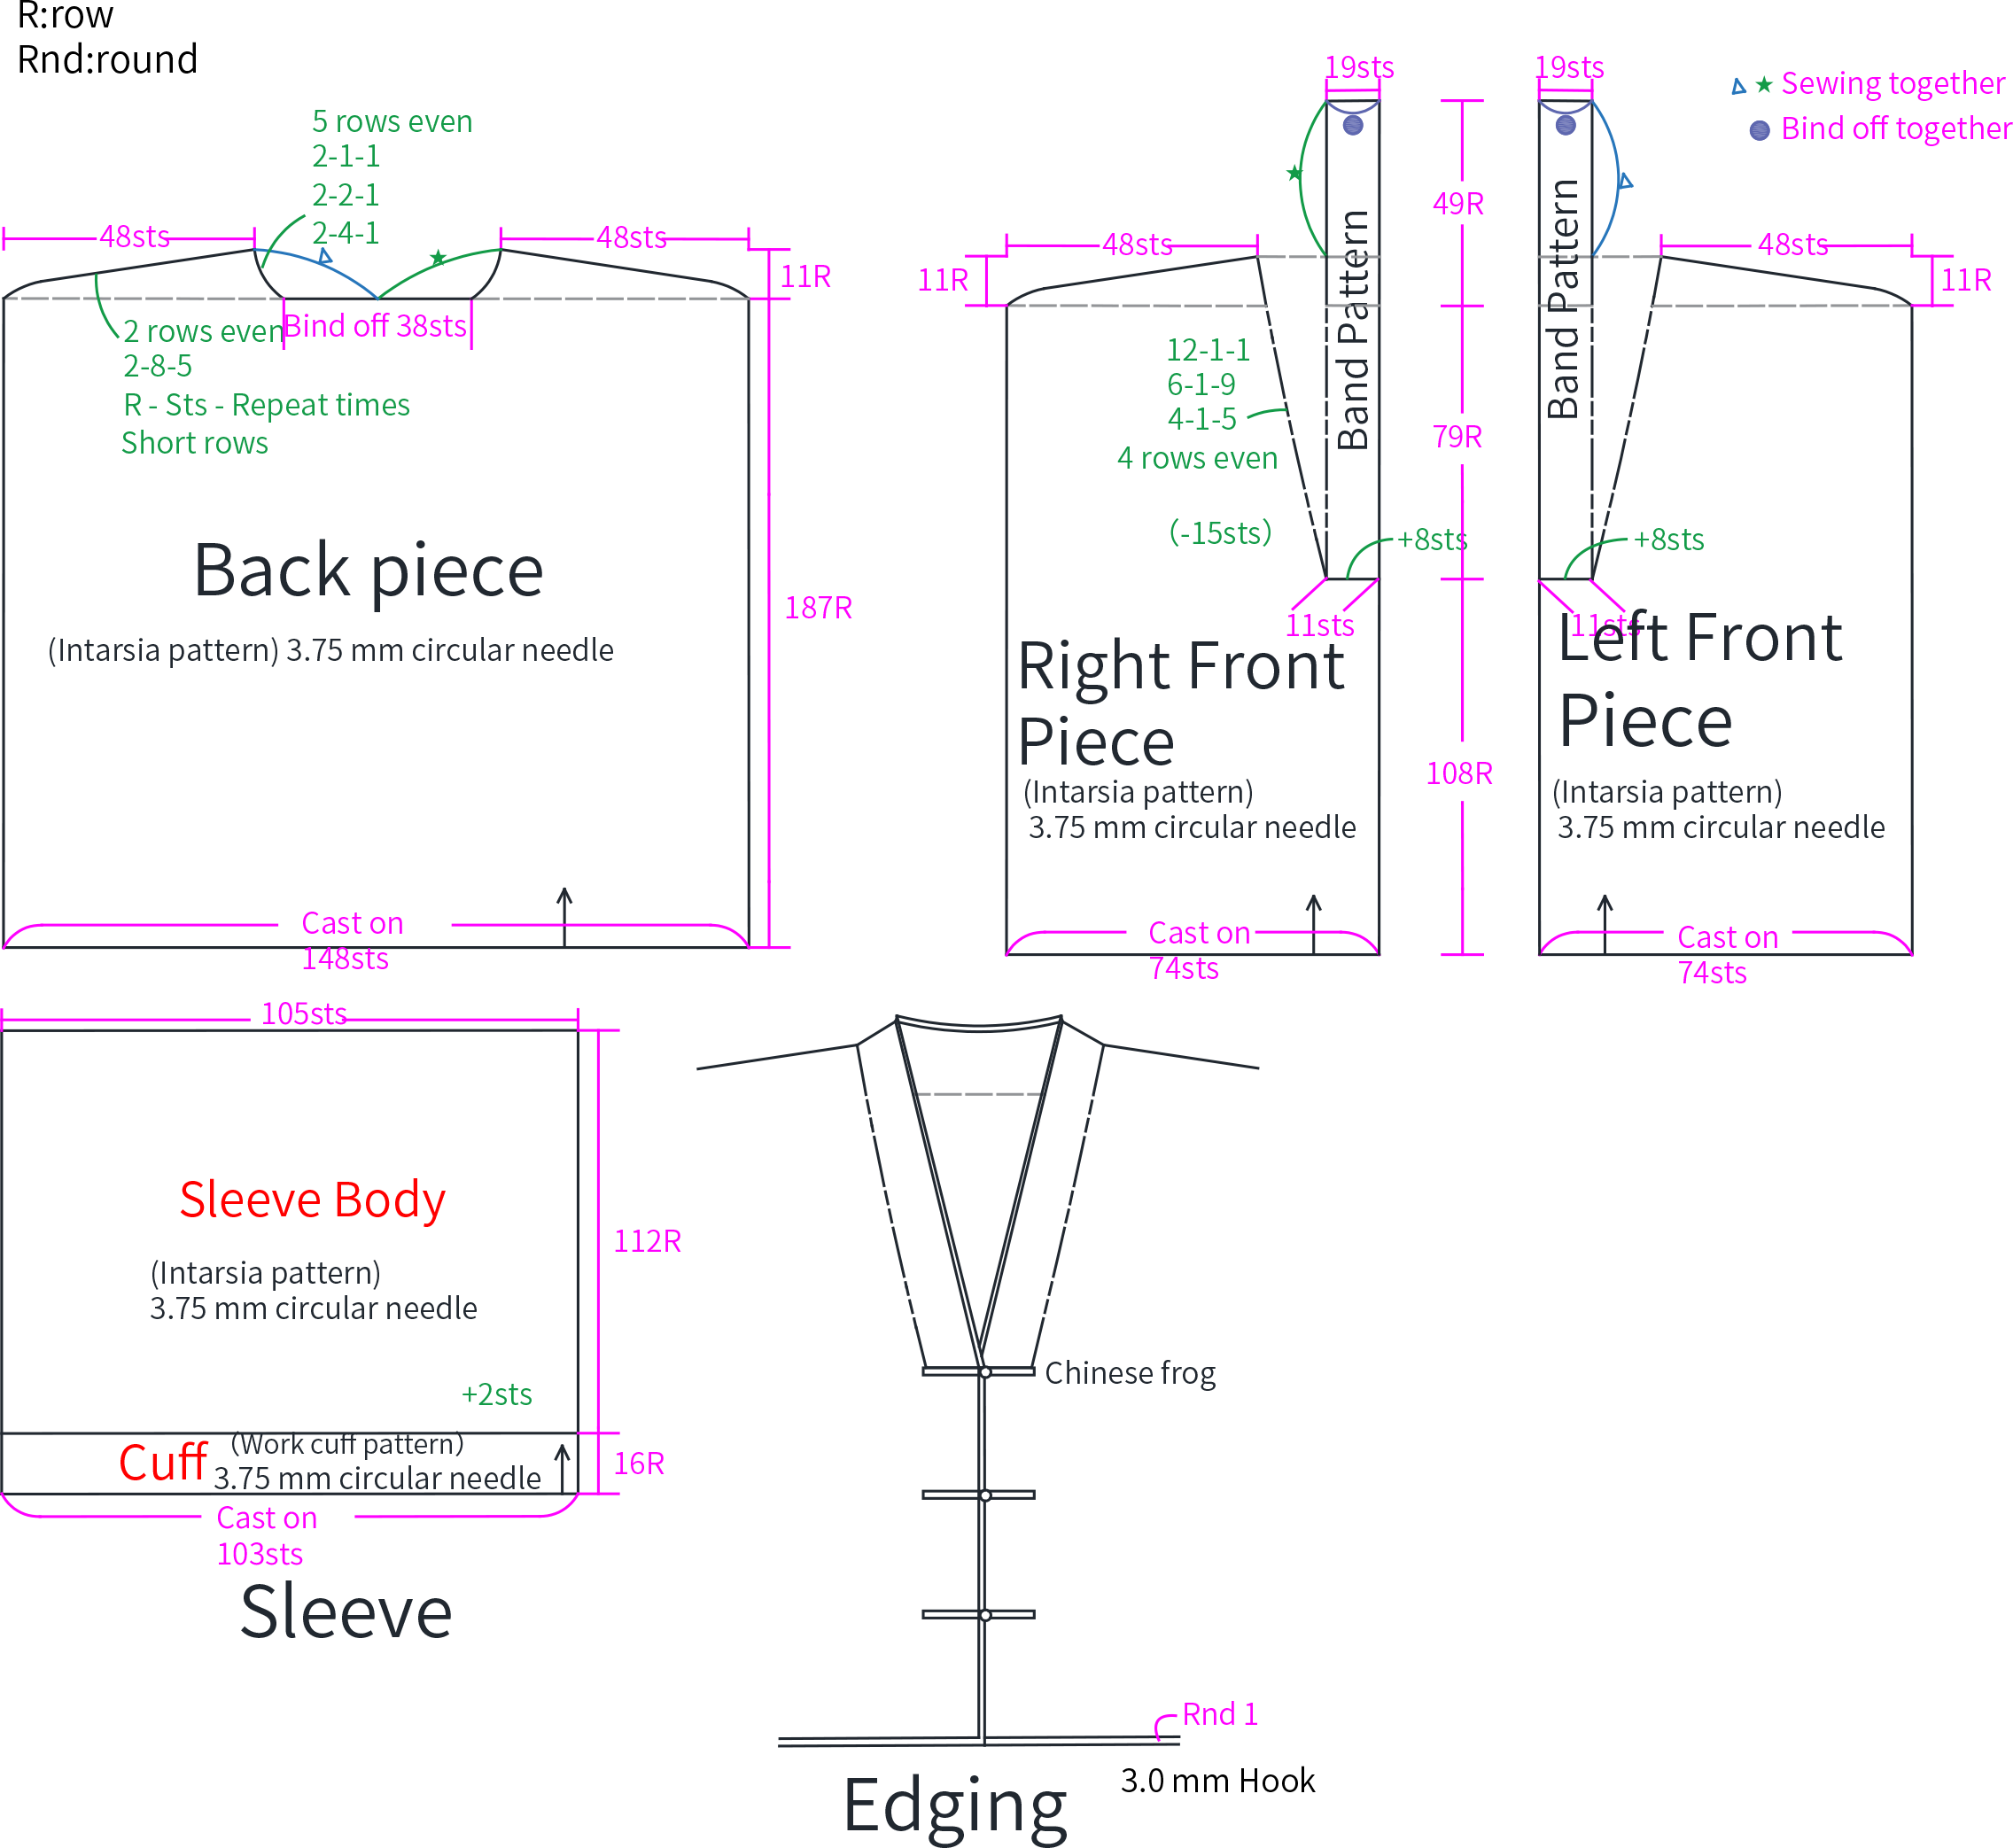
Part 1 Back Piece (3.75 mm circular needle)A 01' 00'' (Part 1)
The back piece is divided into two sections: the body and the shoulder-parts, and it's worked upwards from the bottom. The body section features an intarsia pattern, while the shoulder-parts are divided into left and right sections with stitches bind off in the middle. First, work the left shoulder-part, then join yarn to work the right shoulder-part symmetrically. Please refer to the video demonstration for specifics.
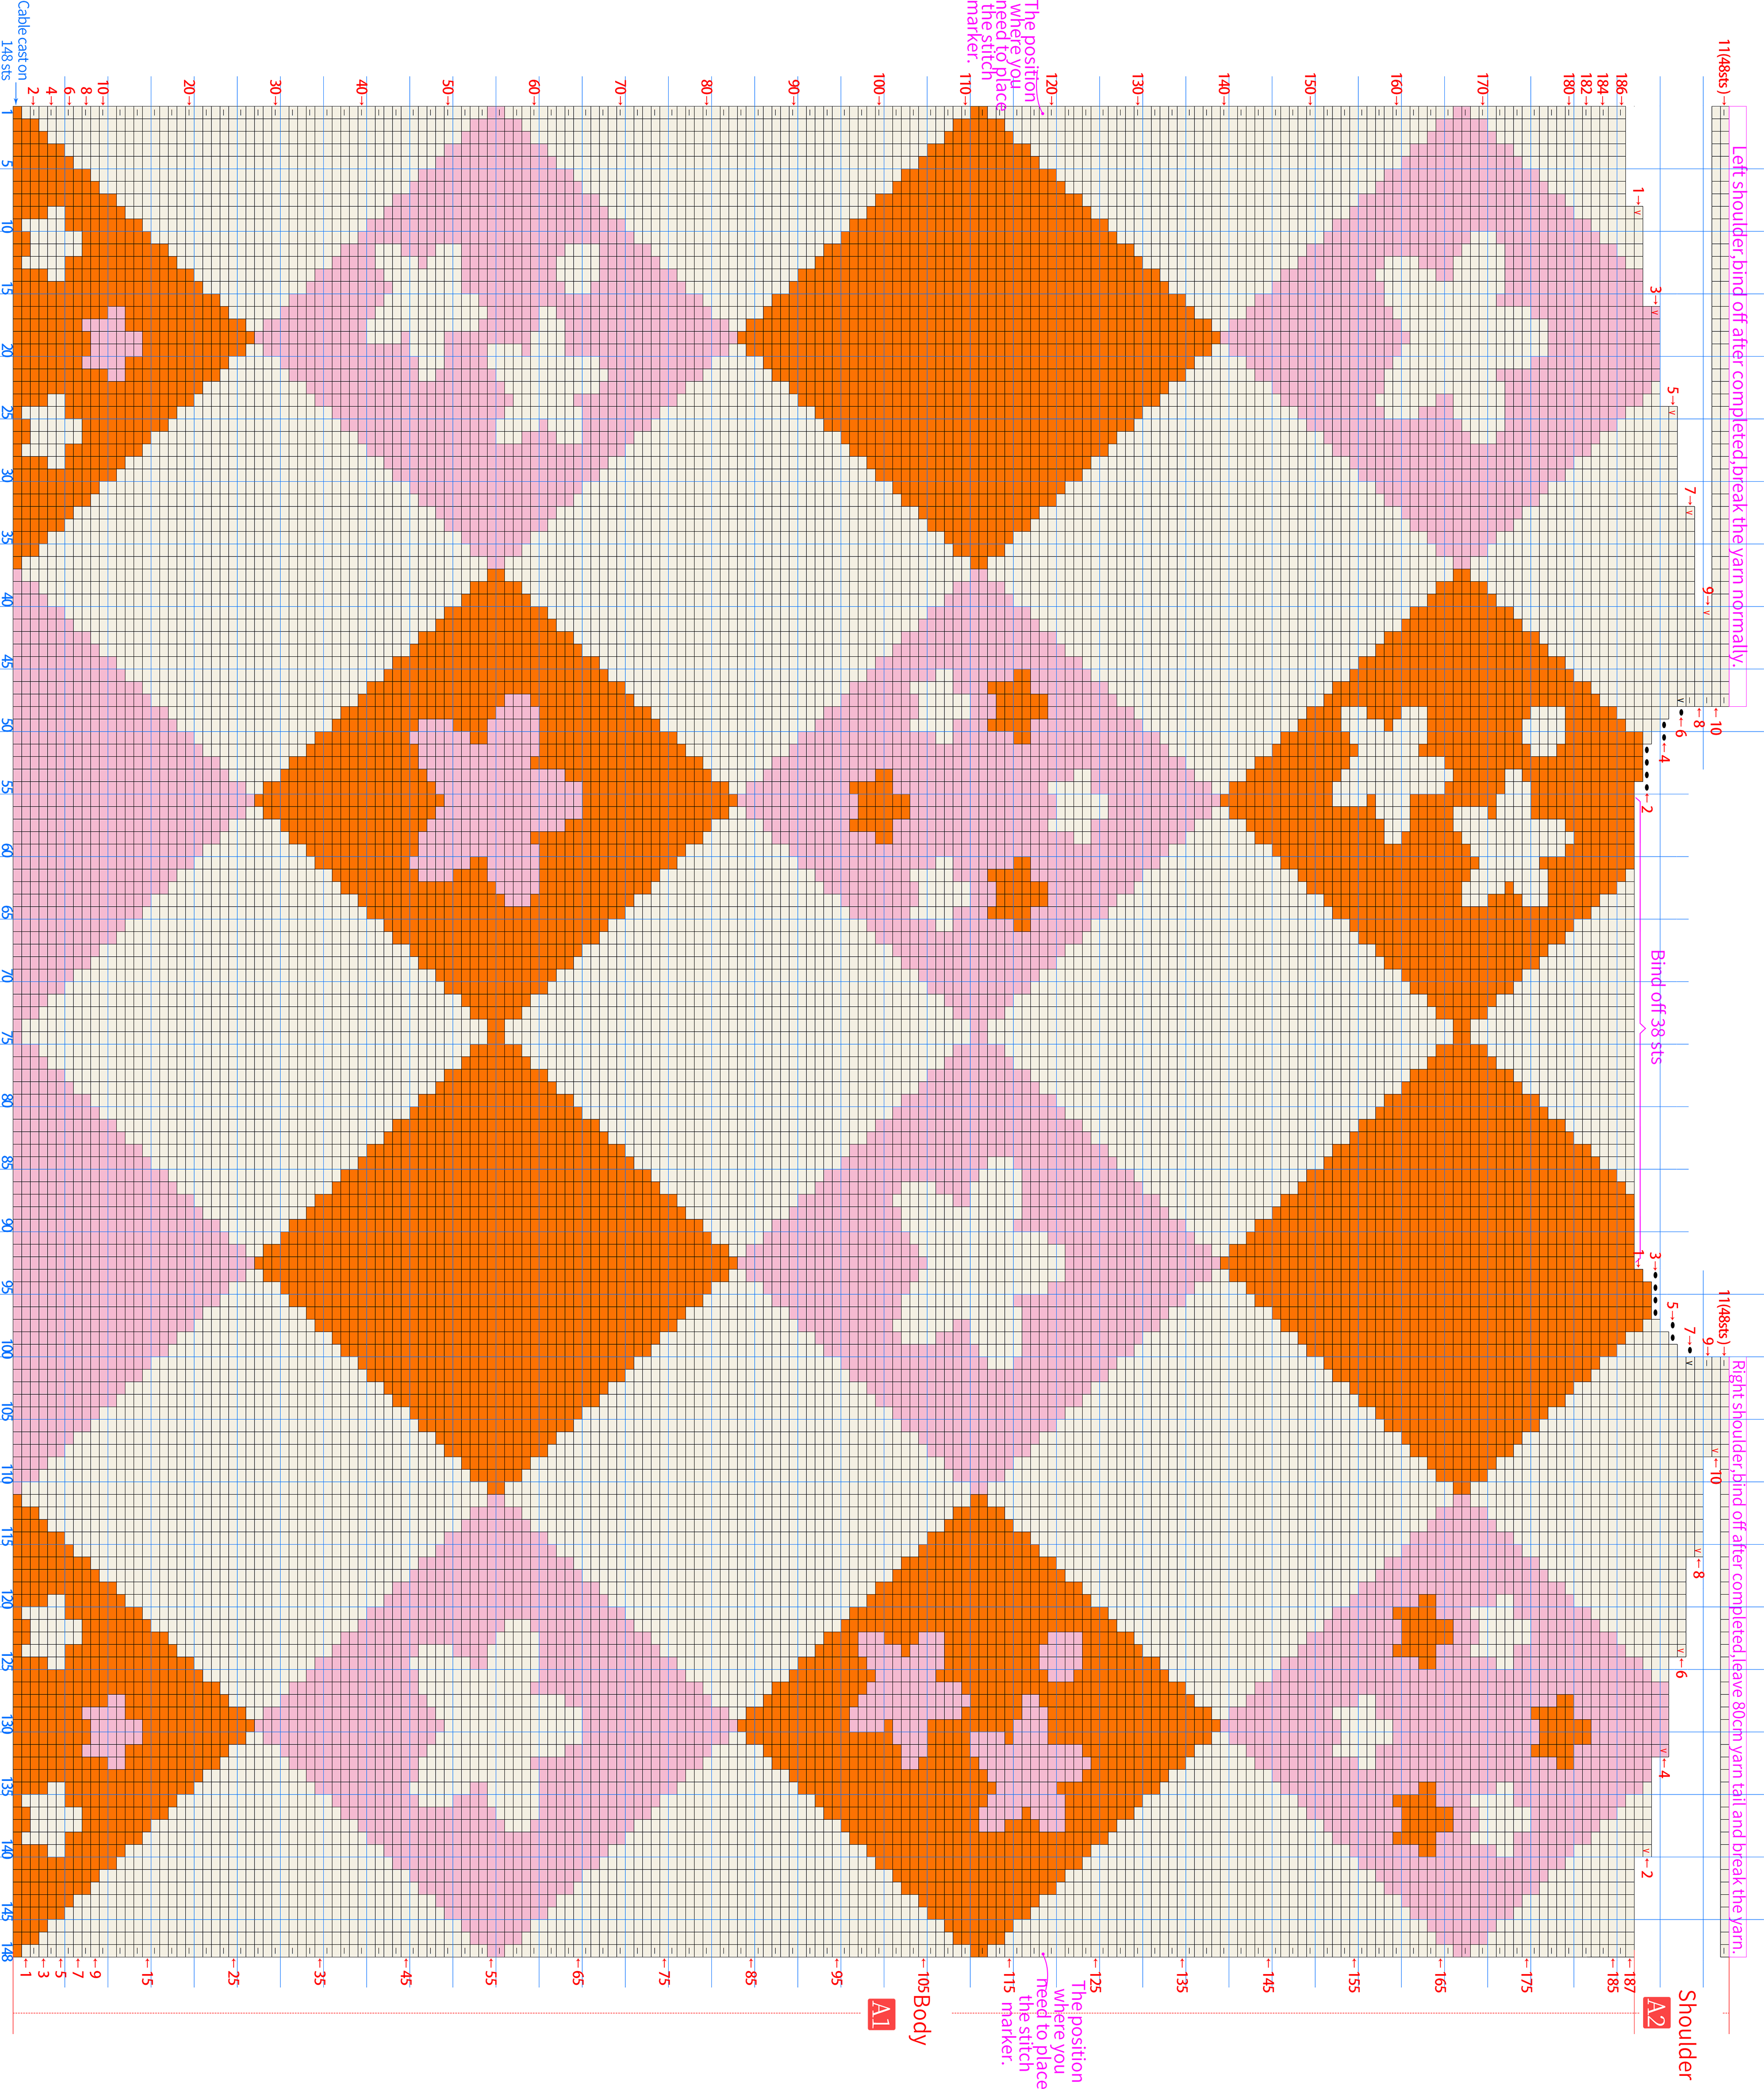
Note:
1. The fabric piece is worked back and forth in rows. The chart shows the effect on the right side, so you need check the key to see how to work a certain symbol on the wrong side.
2. During the crocheting process, pay attention to marking the sewing positions.
3. Differentiate the left and right pieces based on which side will be worn.
Part 2 Front Piece(3.75 mm circular needle)(Seaming using three strands of color 1 held together)B 67' 55'' (Part 1)
The front piece is divided into the left front and the right front. Both are divided into three sections: Section 1, Section 2, and the shoulder-parts. At the corresponding position of the shoulder-parts, join with the back piece, then continue to work back and forth for the front band. After completing it, holding stitches and sew together the corresponding positions on the sides. The left and right fronts are worked symmetrically and connected to the back piece. Finally, join the left and right front bands and sew them to the corresponding position of the neck opening on the back piece. Please refer to the video demonstration for details.
Step 1 Left Front PieceB1
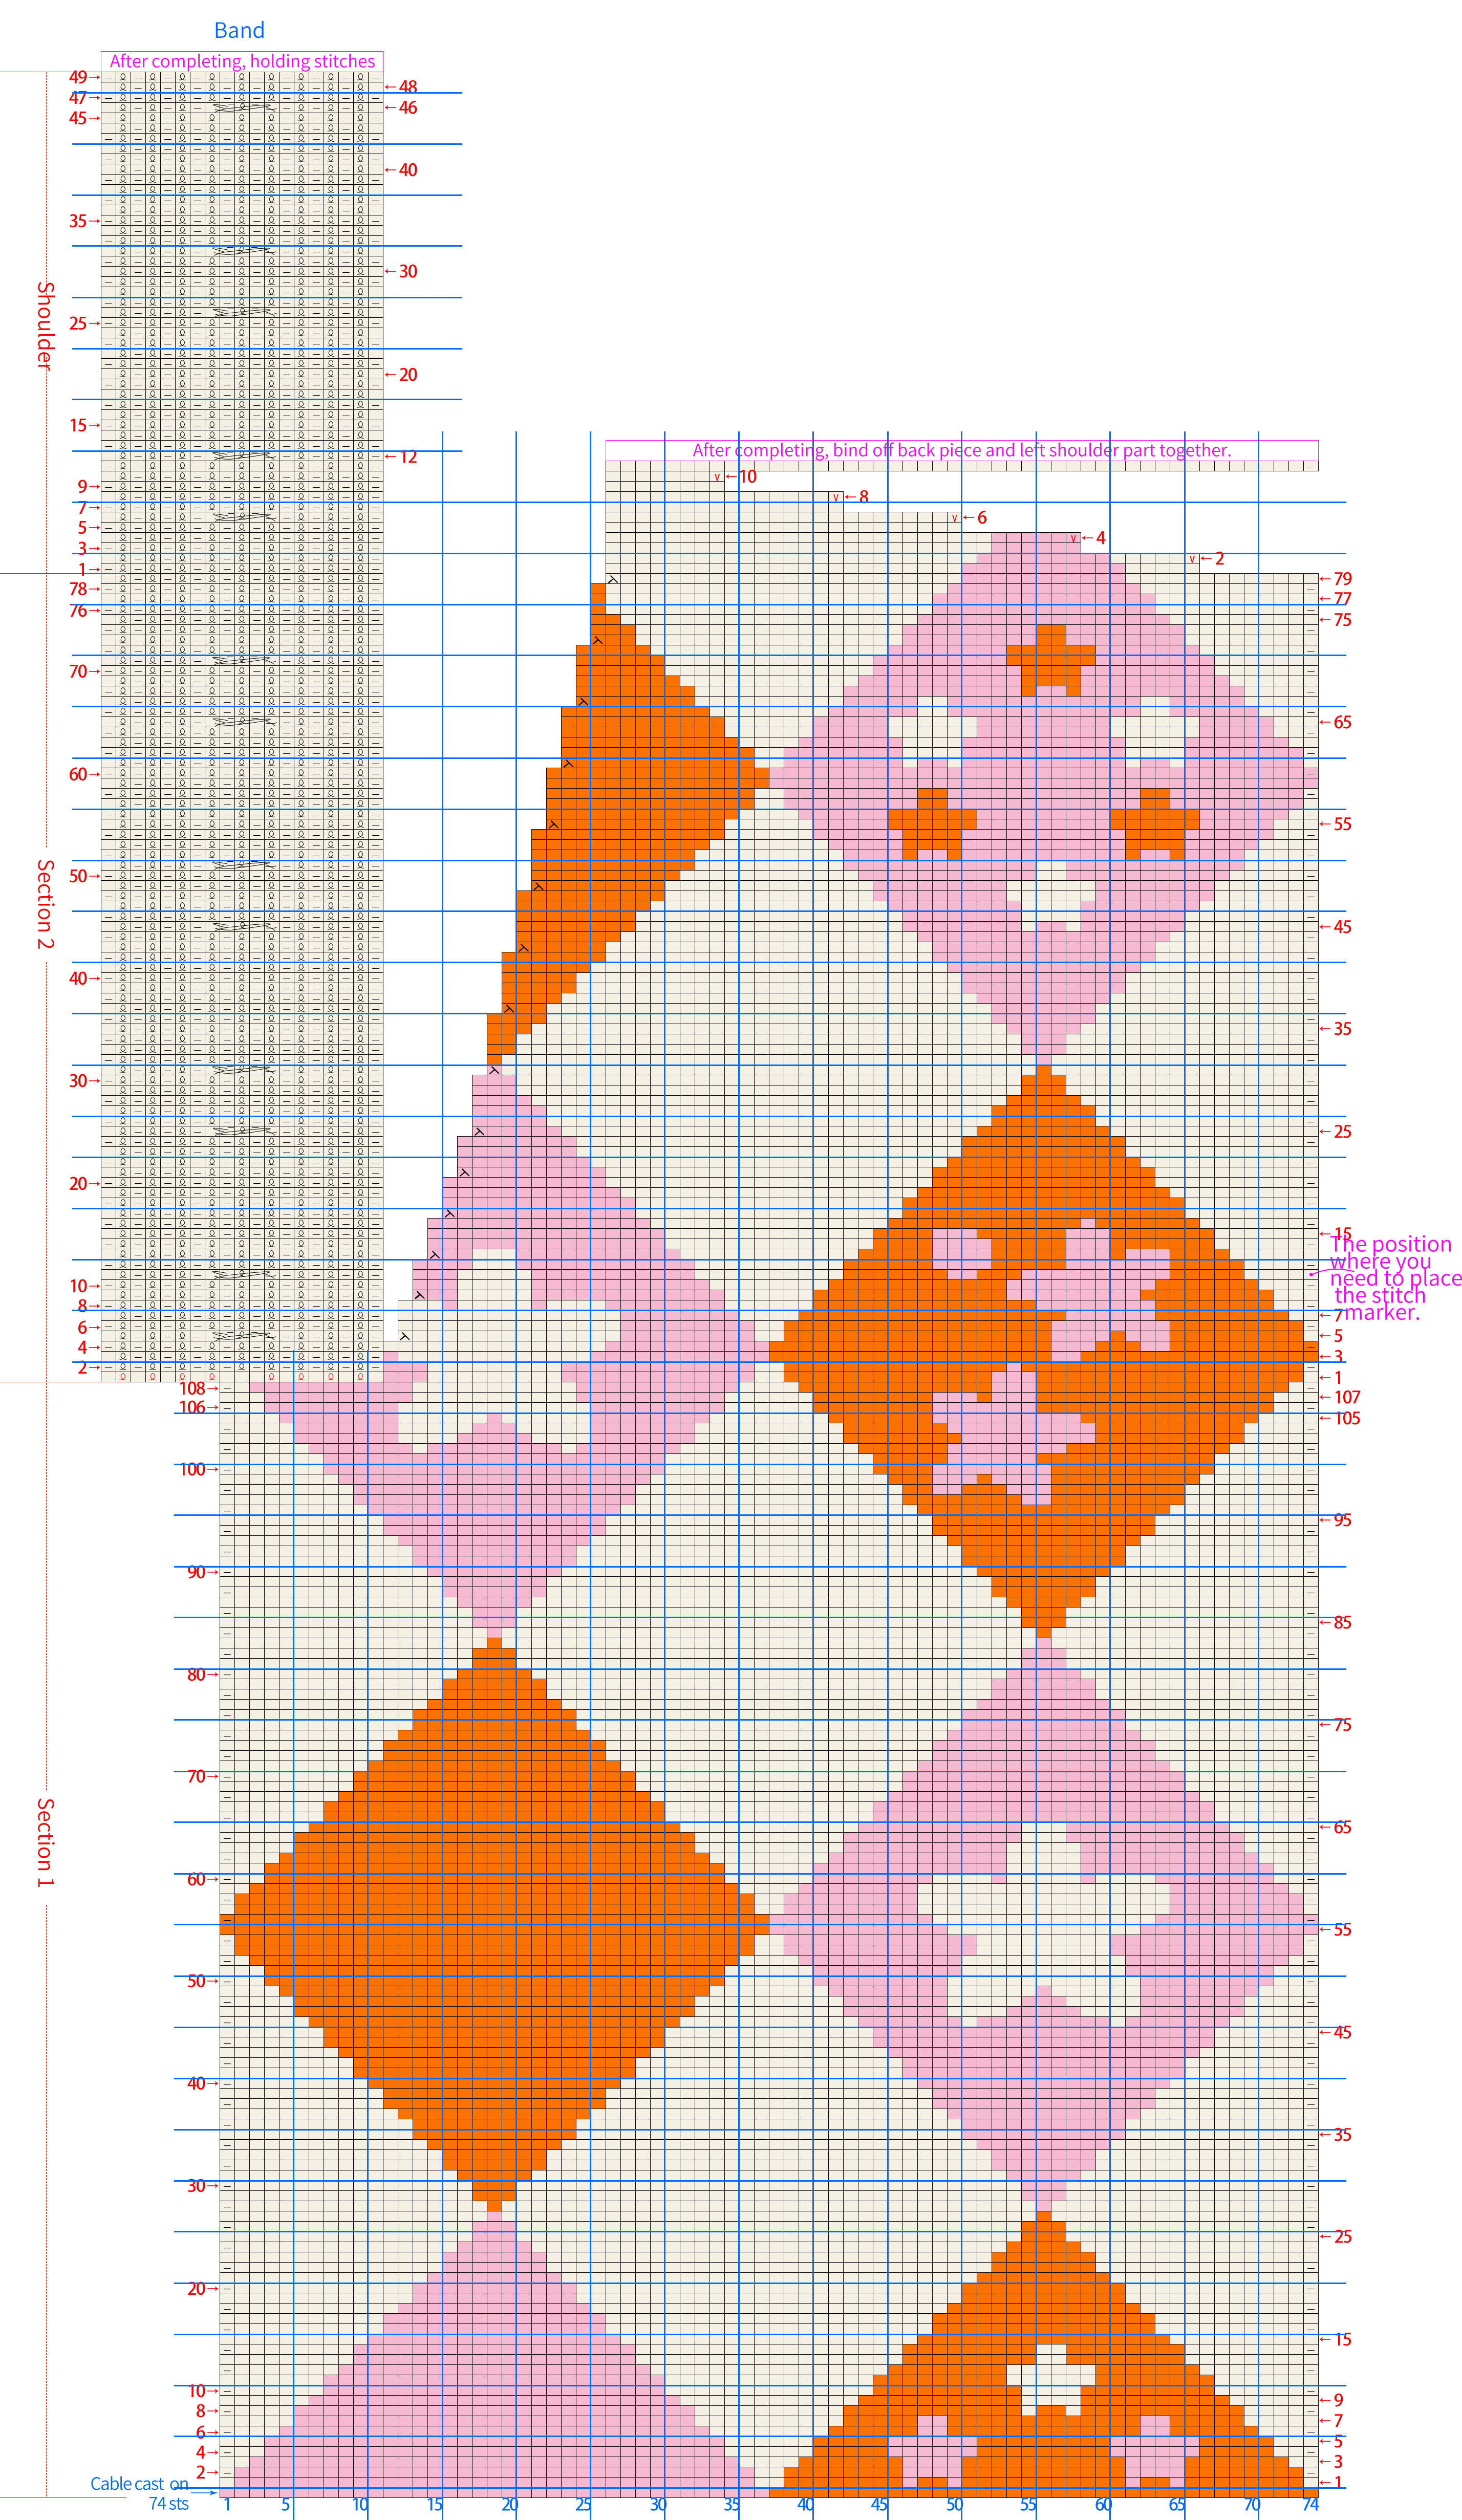
Note:
1. During the process, pay attention to marking the sewing positions.
2. After connecting the shoulder-parts of the front and back pieces, continue to work the corresponding rows for the button bands. You can also knit while comparing the length of the button bands to the neck opening of the back piece, until the length of the button bands at the top of the shoulders matches half the length of the neck opening of the back piece.
Step 2 Right Front PieceB2
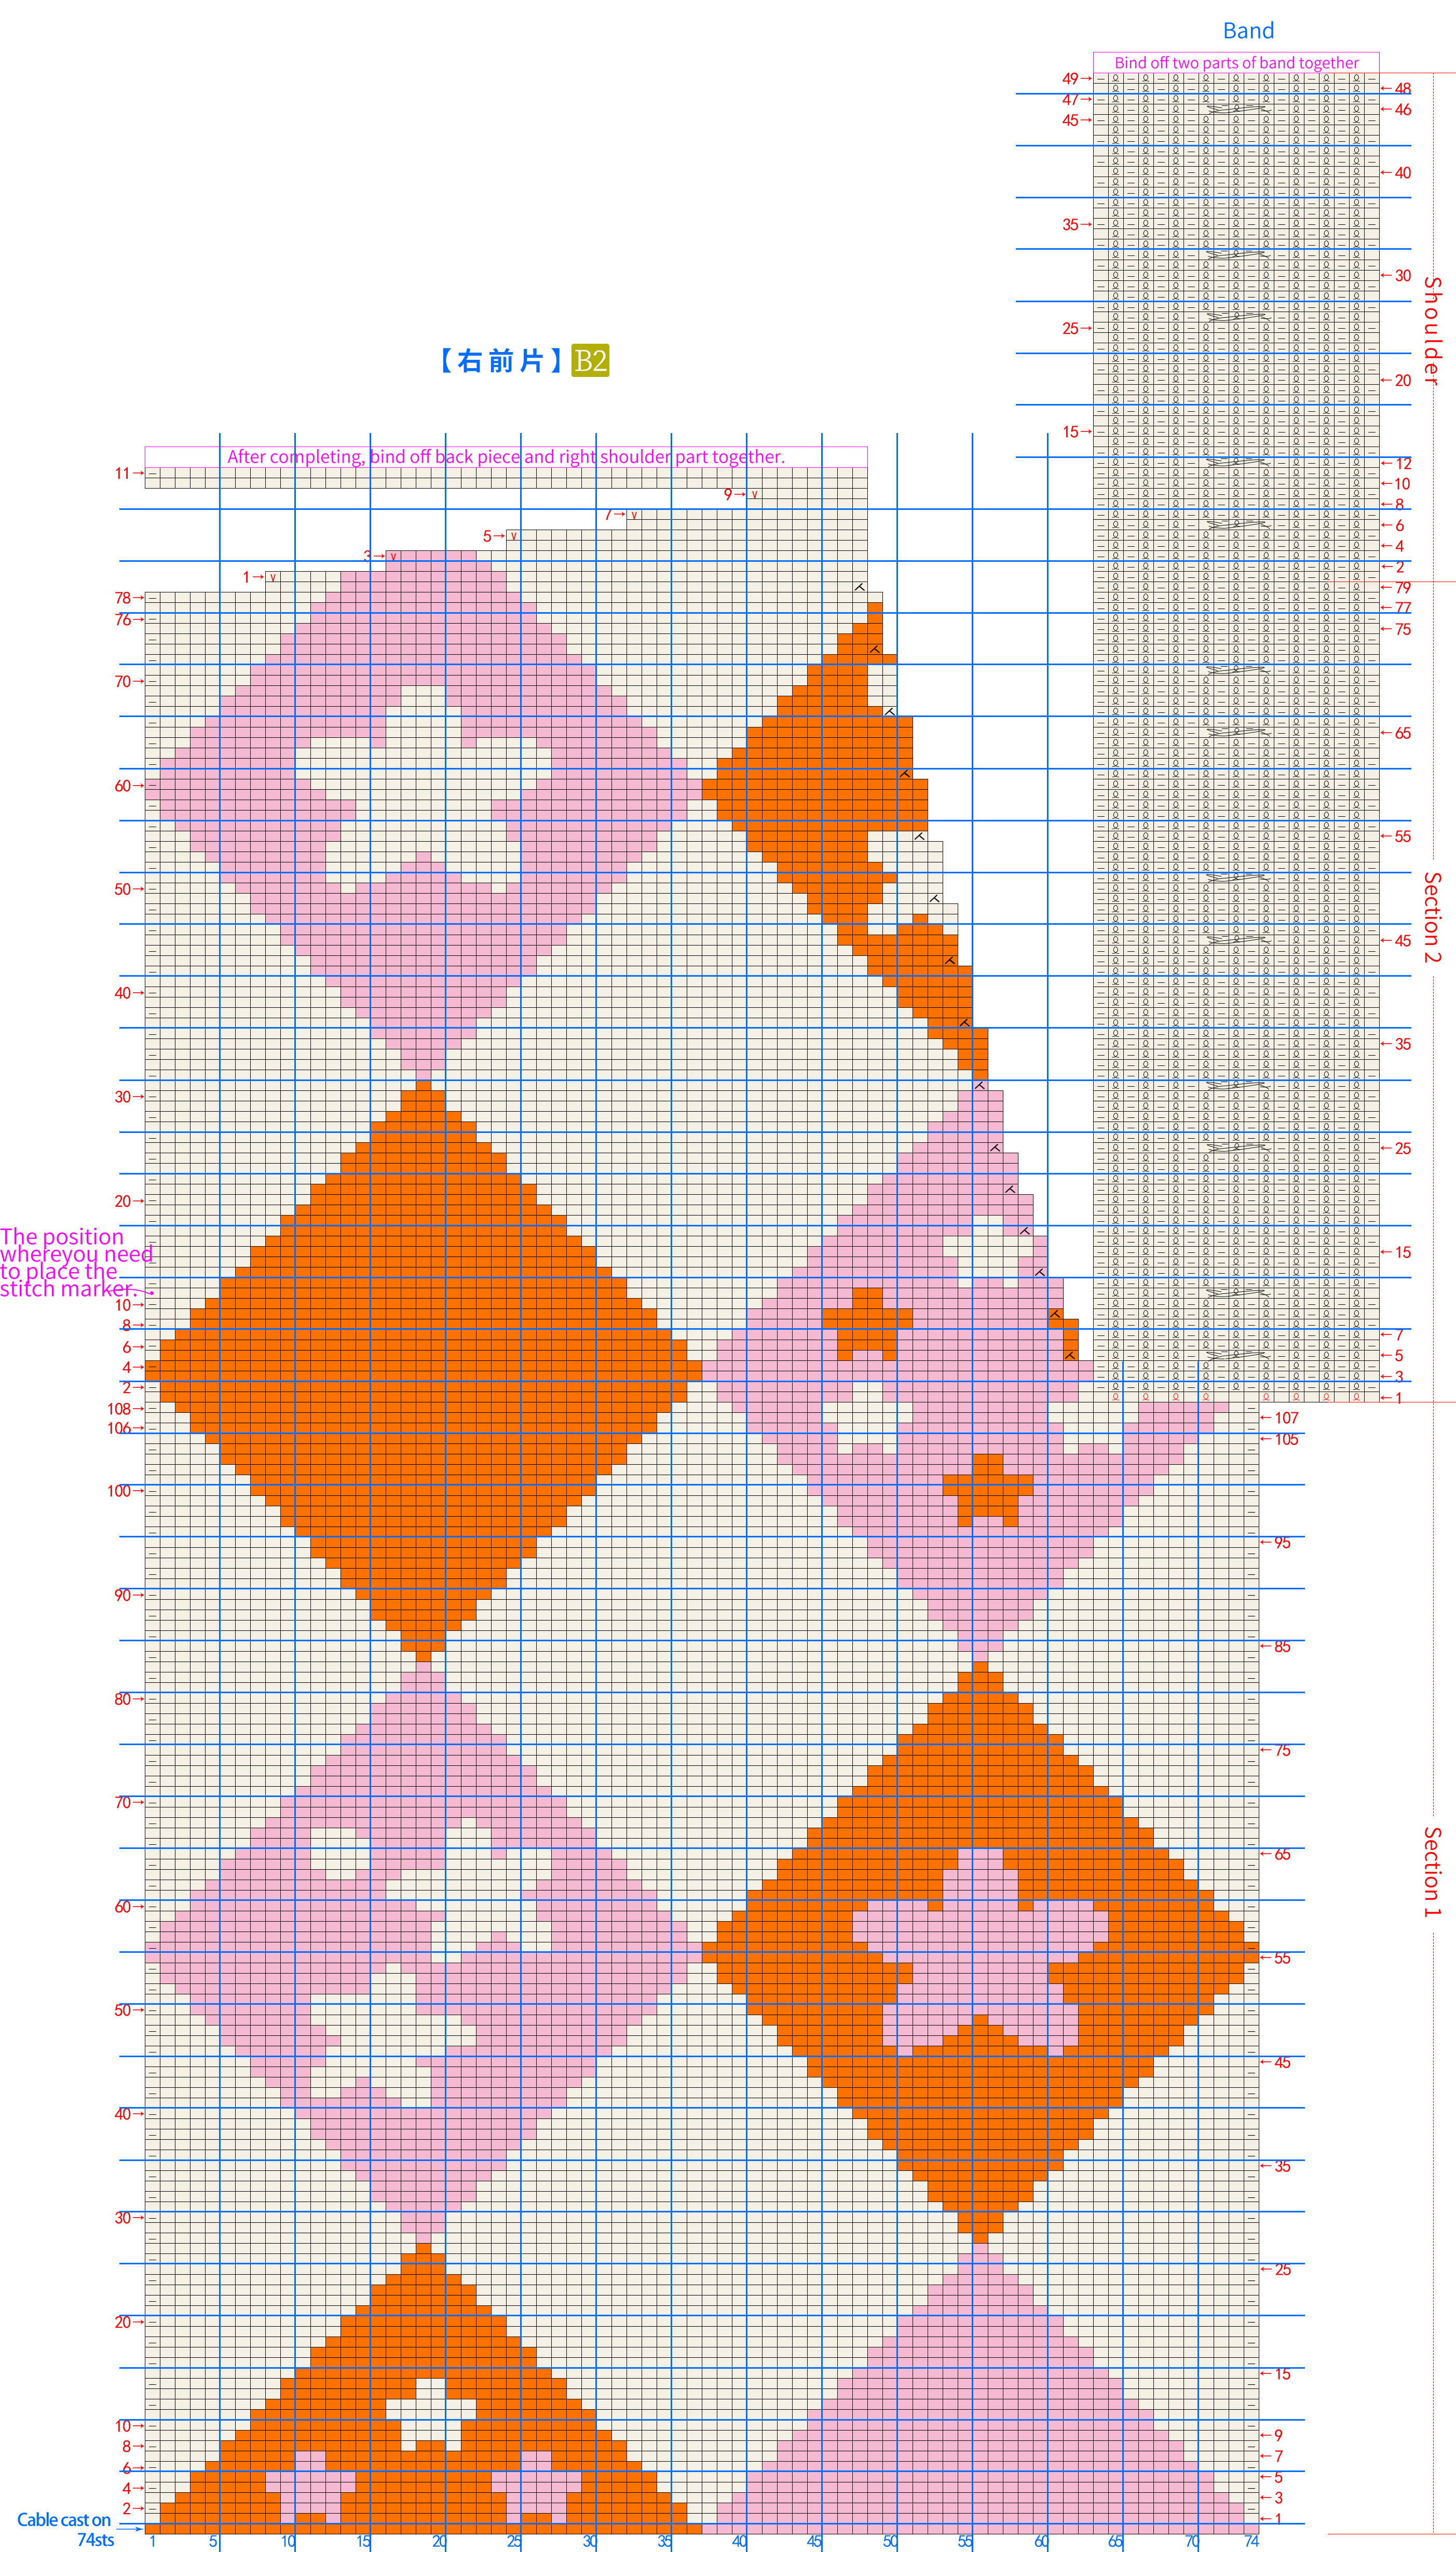
Part 3 Edging(3.0 mm hook)(two strands of color 1 held together)C 00' 12'' (Part 2)
Start from the connection point of the front and back pieces, and crochet in rounds along the bottom edge, side edges, and front band edges. Please refer to the video demonstration for specifics.
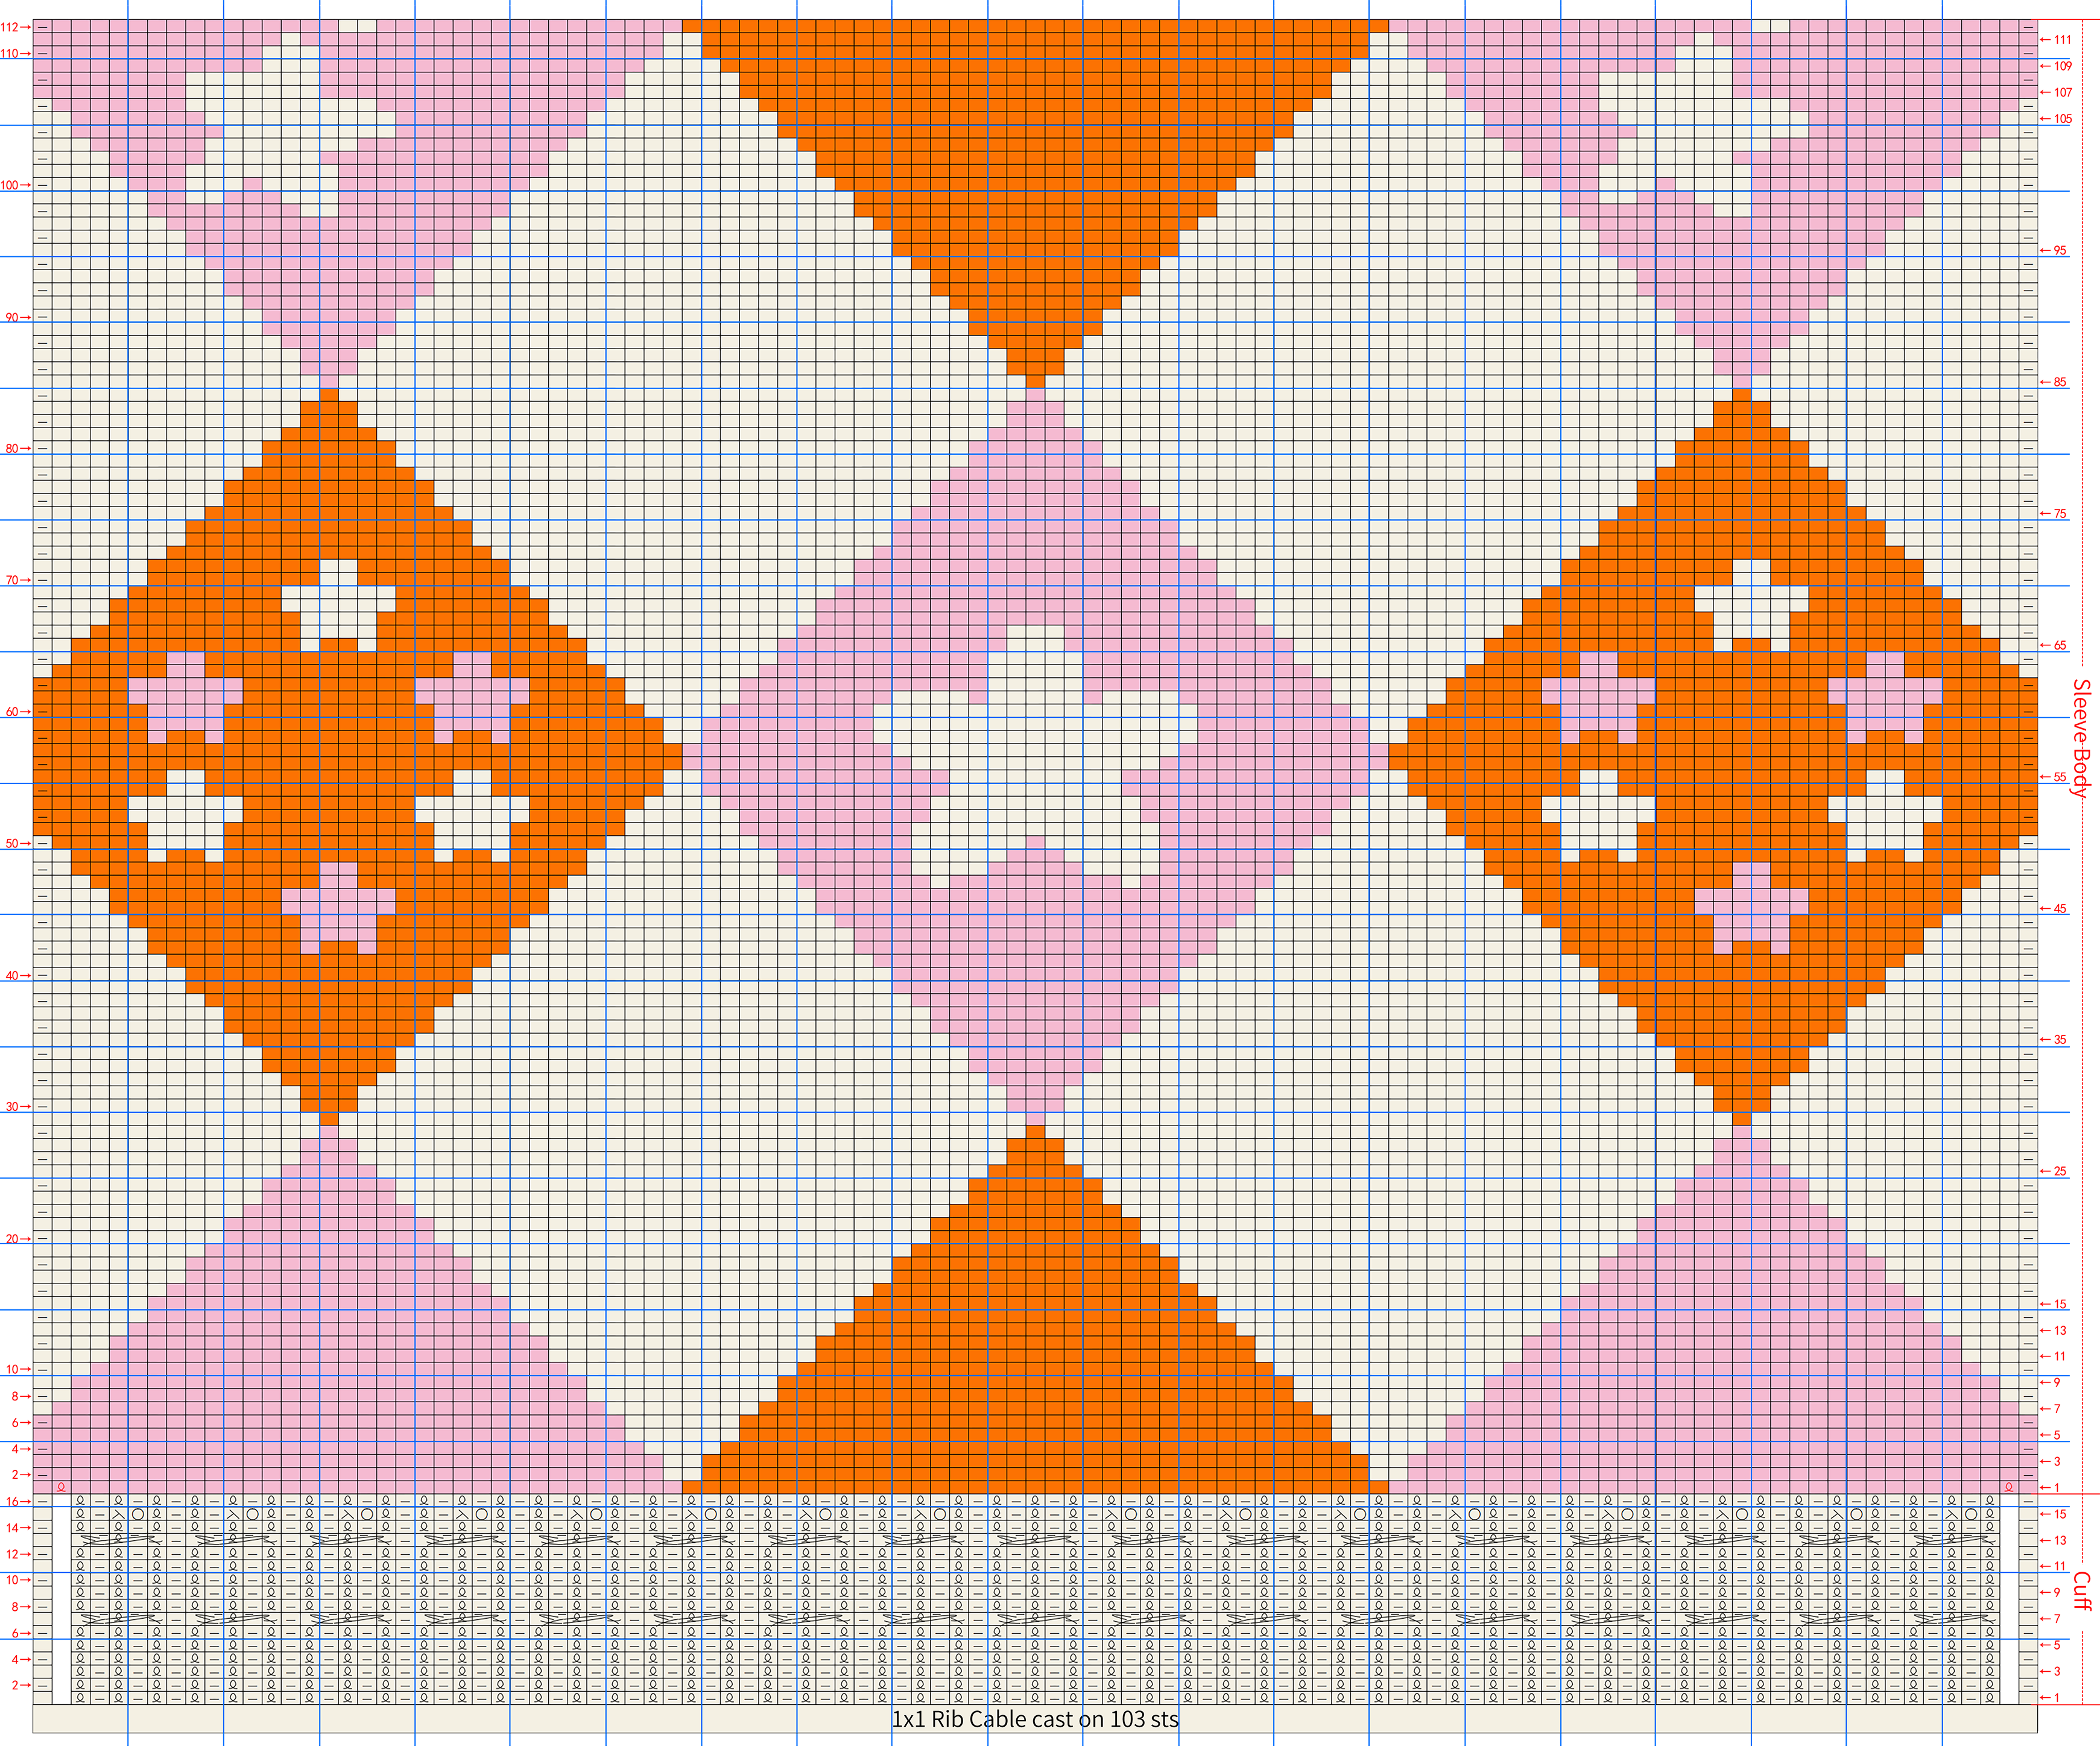
Part 4 Sleeves(3.75 mm circular needle)D 05' 31'' (Part 2)
The two sleeves are worked in the same way, divided into two parts: the cuff and the sleeve body. The cuff is worked back and forth in the corresponding pattern; the sleeve body is worked with intarsia patterns. After completing both parts, sew them together and connect them to the front and back pieces. Please refer to the video demonstration for details.
Part 5 DecorationsE 16' 47'' (Part 2)
The decorations include flowers and leaves, embroidery, ties, and buttons. The flowers and leaves are crocheted based on the chart and sewn onto the corresponding positions. Then, add embroidery to the corresponding intarsia pattern areas. Next, crochet the ties and attach them to the corresponding positions on the cuffs. Finally, make and attach the chinese frog, sewing on pearl buttons. Please refer to the video demonstration for specifics.
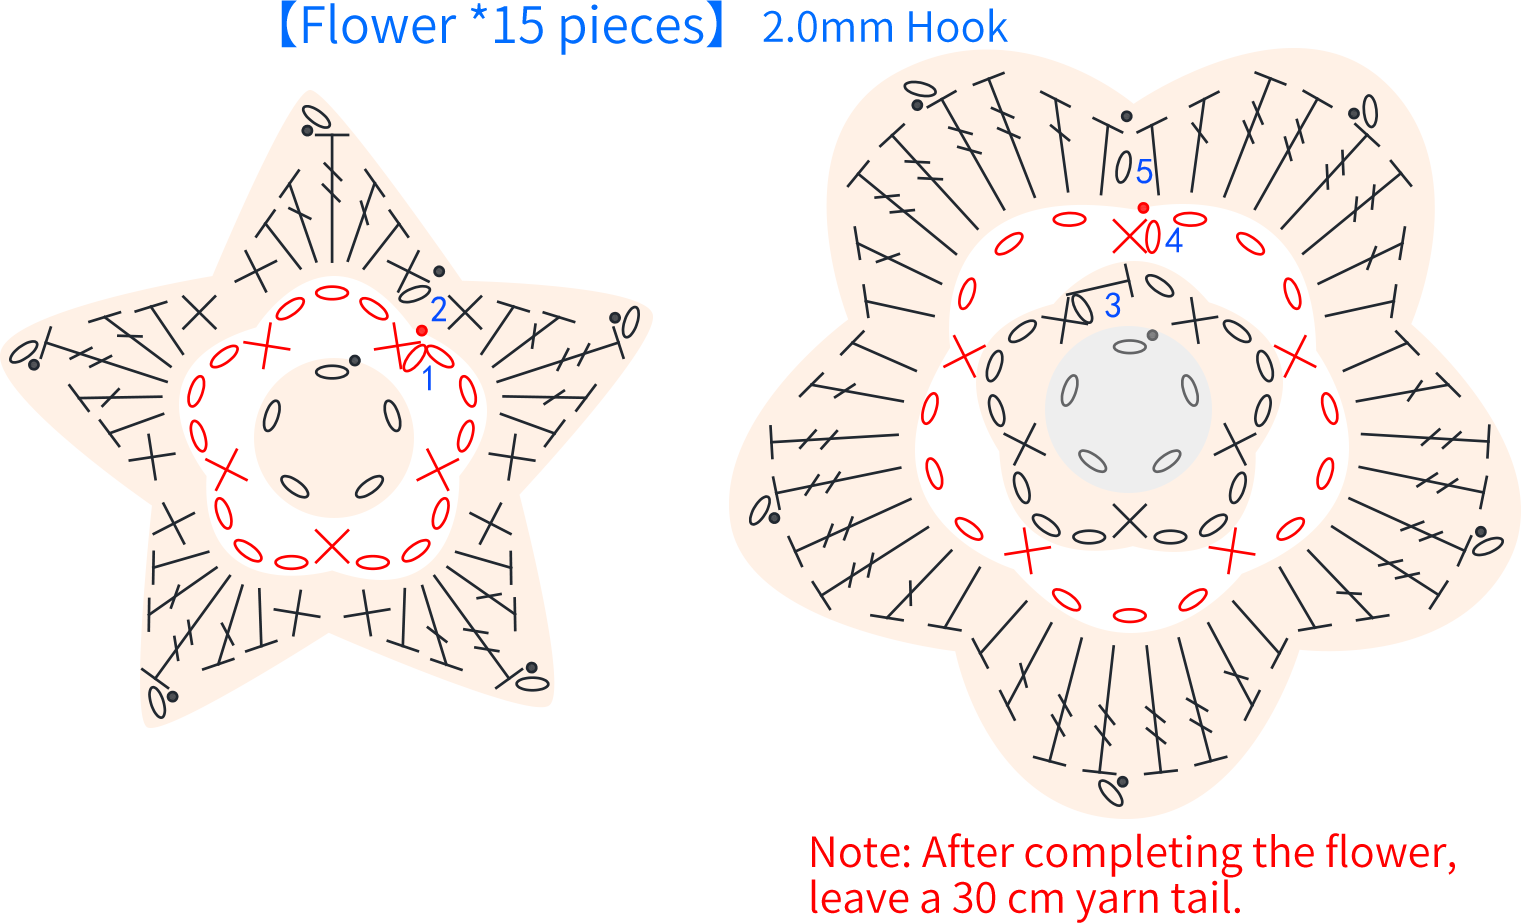
Flower color scheme:
Randomly choose color 1 or color 3, using one yarn to crochet. The beginning chain and round 2 should have a different color scheme from rounds 3 to 5. Sew a pearl to the center of the flower using sewing thread and a gold needle.
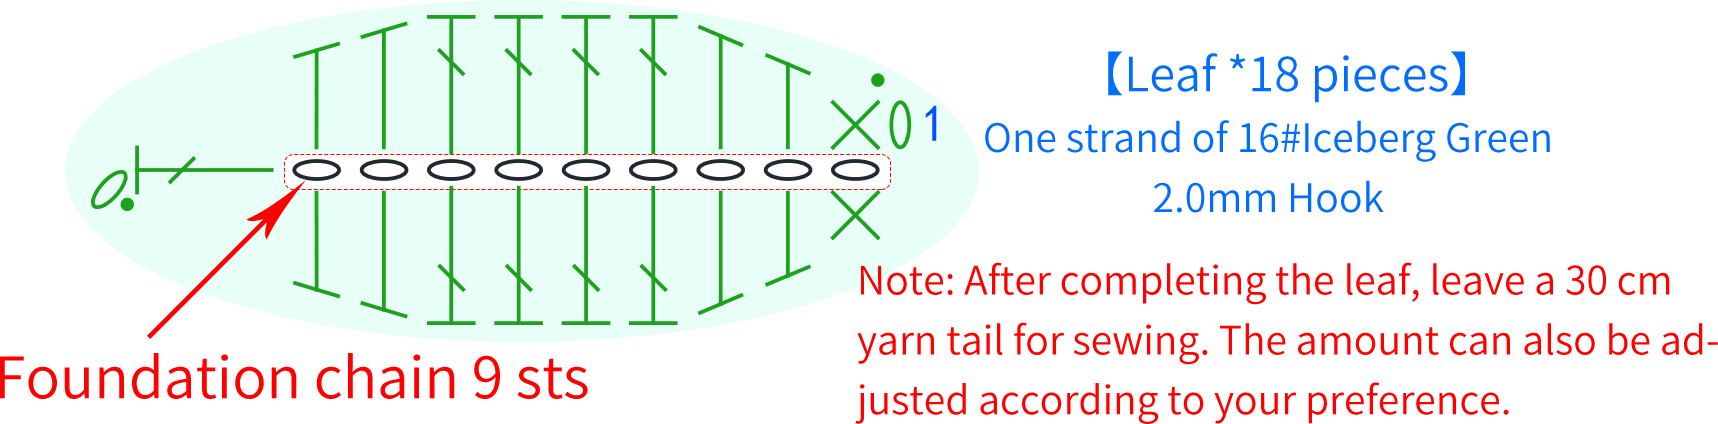
Embroidery Color Scheme:
1. Stripes: Randomly use color 2 and color 3, combining two strands for embroidery. The color scheme of the stripes should be different between adjacent diamonds.
2. Branches and Sepals: Use two strands of 16# Green Cloud color for embroidery.
3. Flower Center: Randomly use color 1, color 2, or color 3, with one strand for embroidery. The color should be different from the flowers at the embroidery position.
4. Stamen Knots: Randomly use color 2 or color 3, with one strand for embroidery.
5. Leaves: Use two strands of 16# Green Cloud color for embroidery.
6. Tie: Use two strands of color 2 for crocheting, with a length of 70 cm, leaving about 10 cm of yarn tails at both ends. (3.0 mm crochet hook)
7. Chinese Frog: Use two strands of color 2 for crocheting, with a length of 8 cm, leaving about 20 cm of yarn tails at both ends. (3.0 mm crochet hook)
Made by the community