Home / Blanket
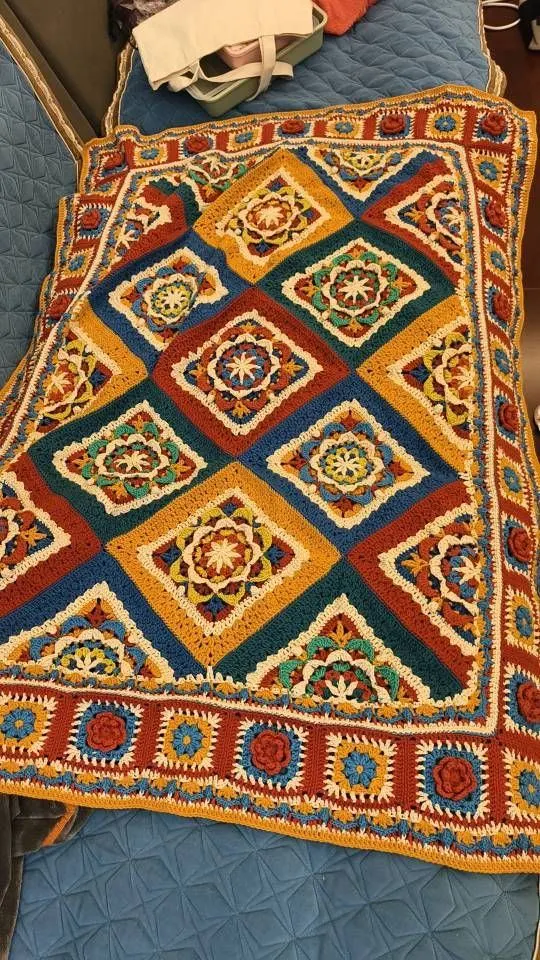
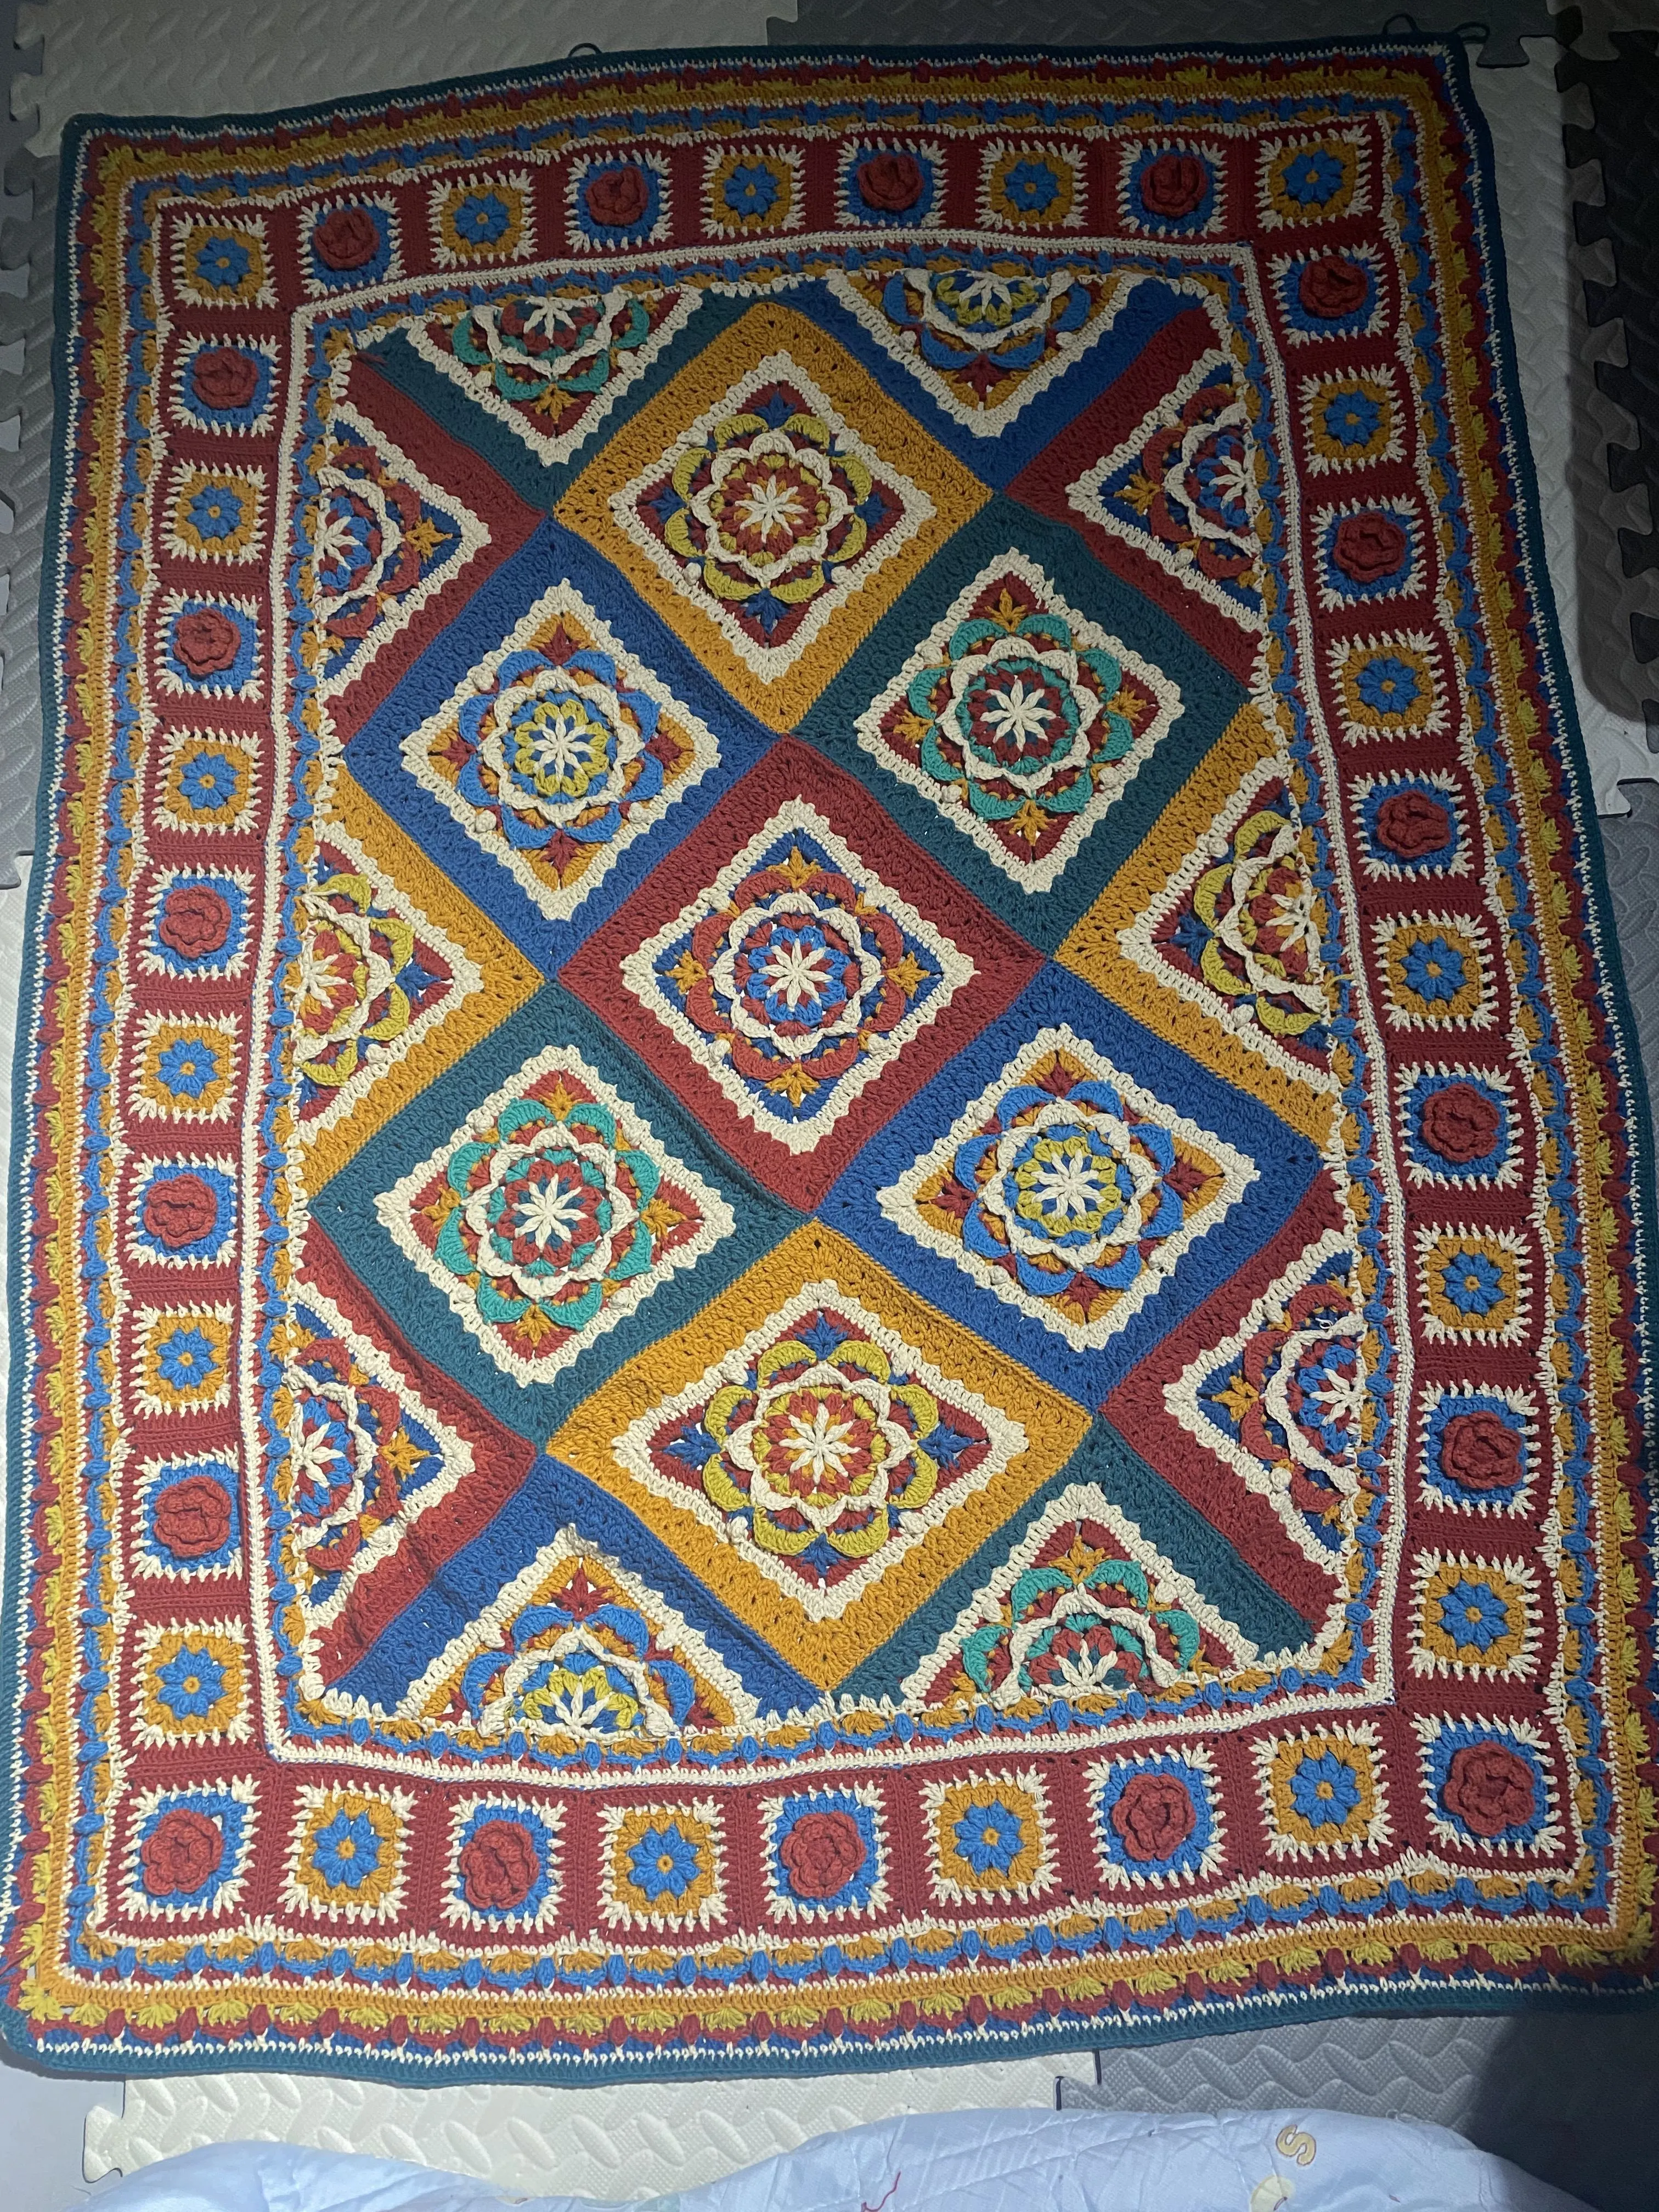
Persian Flower Blanket
Project preview
See the finished project
Pattern format
Instructions
Watch and follow
Video tutorial
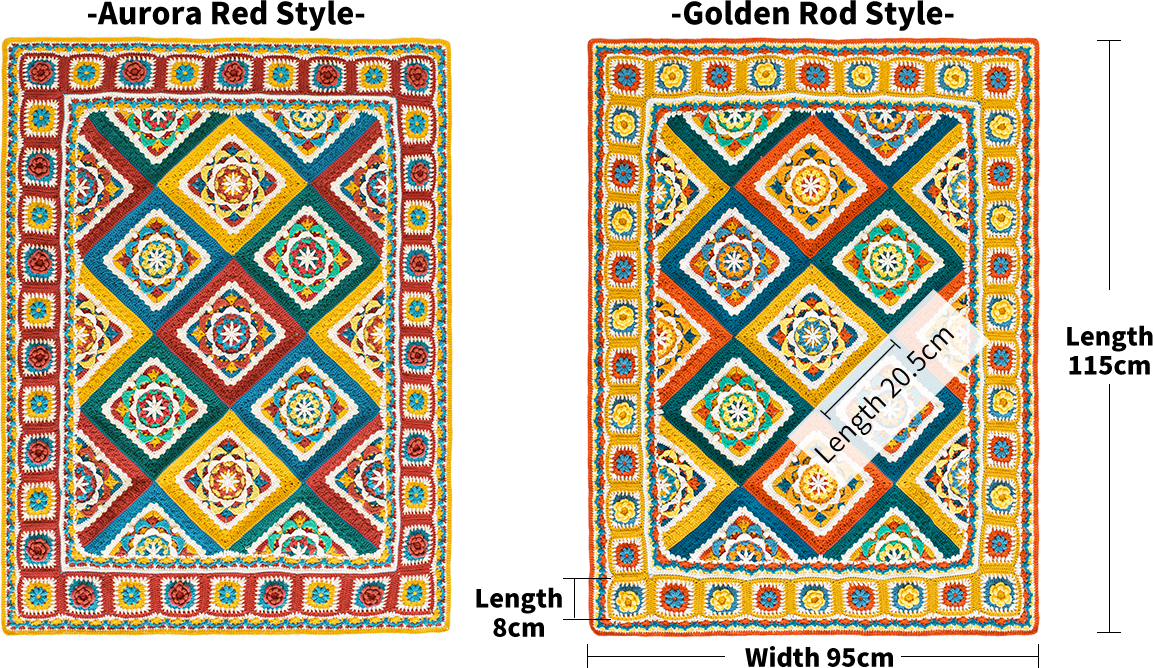
Due to variations in individual tension, the size of the sample is for reference only.
Materials: 4-Ply Combed Cotton & Acrylic Fibre Hand Knitting Yarn
Crochet Hook: 3.0mm Crochet Hook

Chart Key
















Note: This pattern is making in Chinese crochet pattern terms, and the stitch name is written using American terminology. All measurements in charts are in cm.

Part 1 Square MotifA
There are two types of flower patterns, referred to as motif 1 and motif 2 separately.
Step 1 Motif oneA1 01' 20'' (Part 1)
Work with a magic ring, crocheting outwards in rounds counterclockwise. The first two rounds are circular, and then it becomes square. While crocheting, you need to change colors.Please refer to the video demonstration for more details.
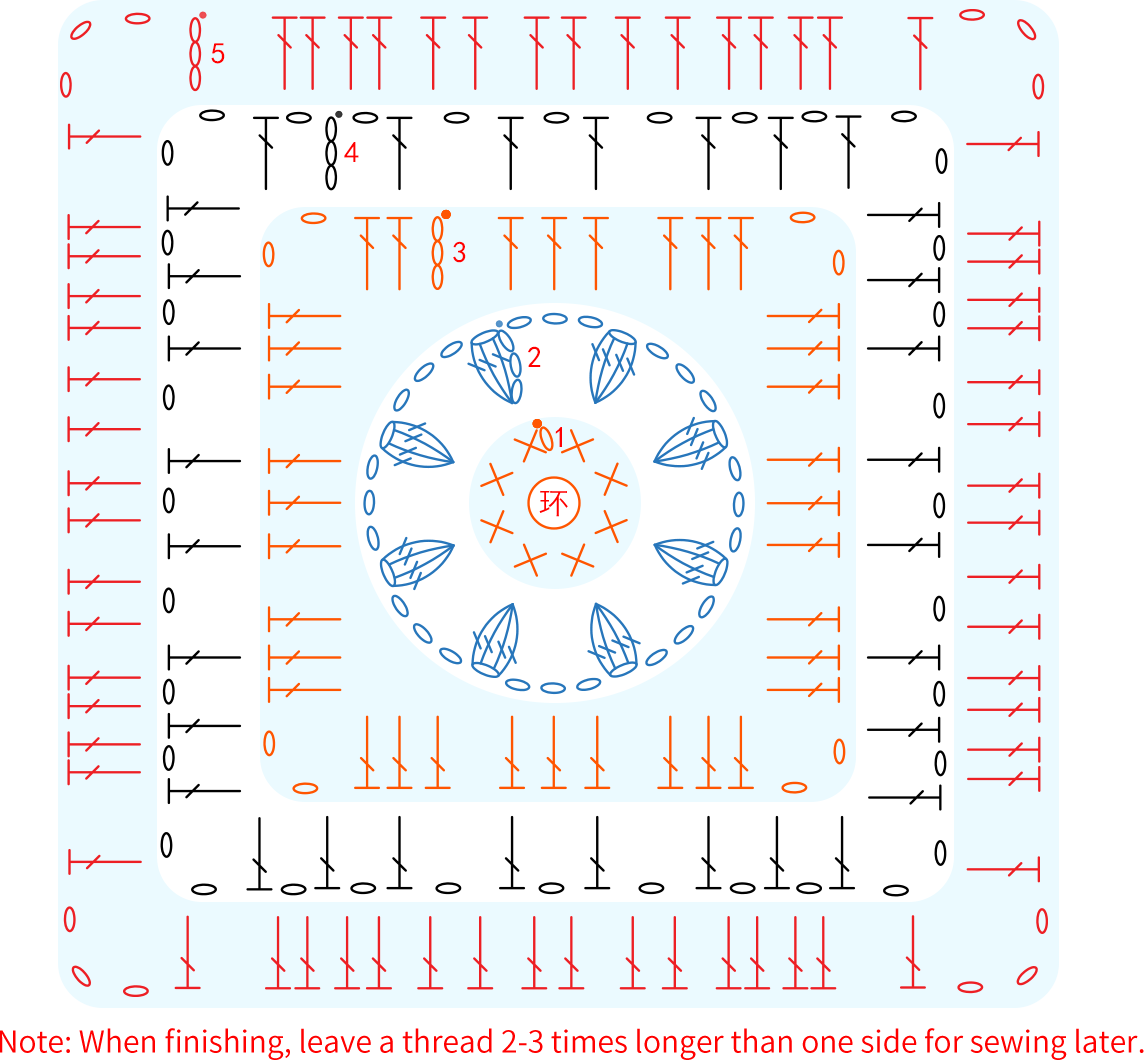
| Motif 1×19 | ||
| Row | Aurora Red Style | Golden Rod Style |
| R1 | 40#Golden Rod | 45#Orangeade |
| R2 | 42#Blue Moon | 42#Blue Moon |
| R3 | 40#Golden Rod | 45#Orangeade |
| R4 | 53#Cloud Cream | 19#Whisper White |
| R5 | 29#Aurora Red | 40#Golden Rod |
Step 2 Motif 2A2 27' 22'' (Part 1)
Work the same as Motif 1 square section, starting with a double magic ring and crocheting counterclockwise in rounds. The last few rounds of the square part are identical to the square part of Motif 1. Please refer to the video demonstration for more details.
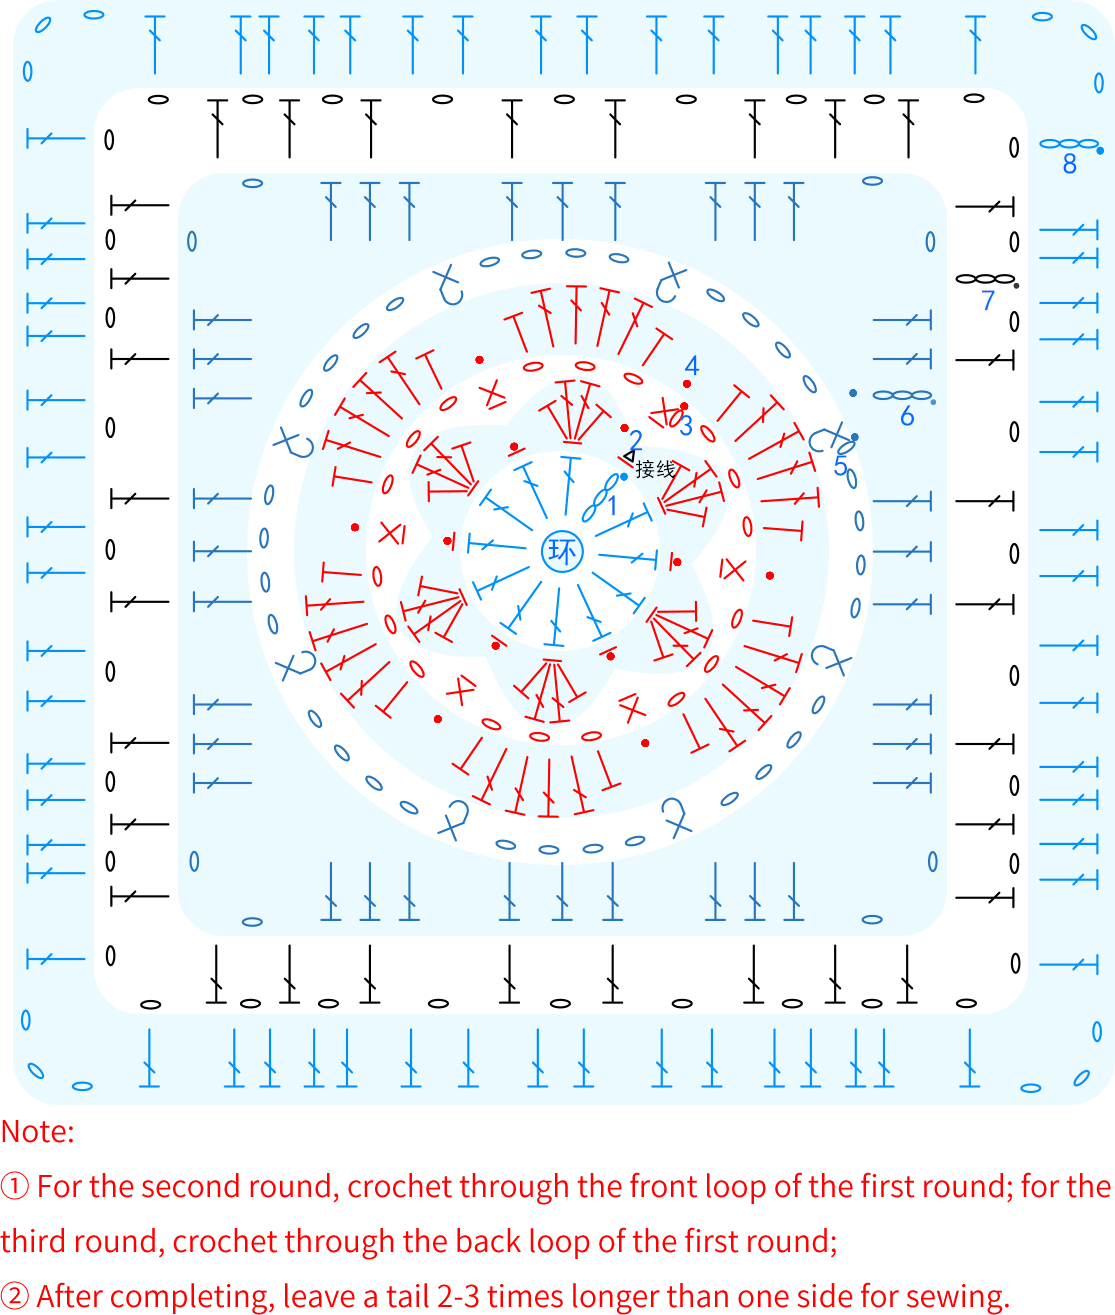
| Motif 2×19 | ||
| Row | Aurora Red Style | Golden Rod Style |
| R1 | 29#Aurora Red | 40#Golden Rod |
| R2-1 | 24#Red Clay | 09#Aspen Gold |
| R5-6 | 42#Blue Moon | 42#Blue Moon |
| R7 | 53#Cloud Cream | 19#Whisper White |
| R8 | 29#Aurora Red | 40#Golden Rod |
Part 2 Diamond MotifB 45' 32'' (Part 1)
Both use a magic ring to start and crochet in rounds. Color changes are needed while crocheting. Please refer to the video demonstration for more details.
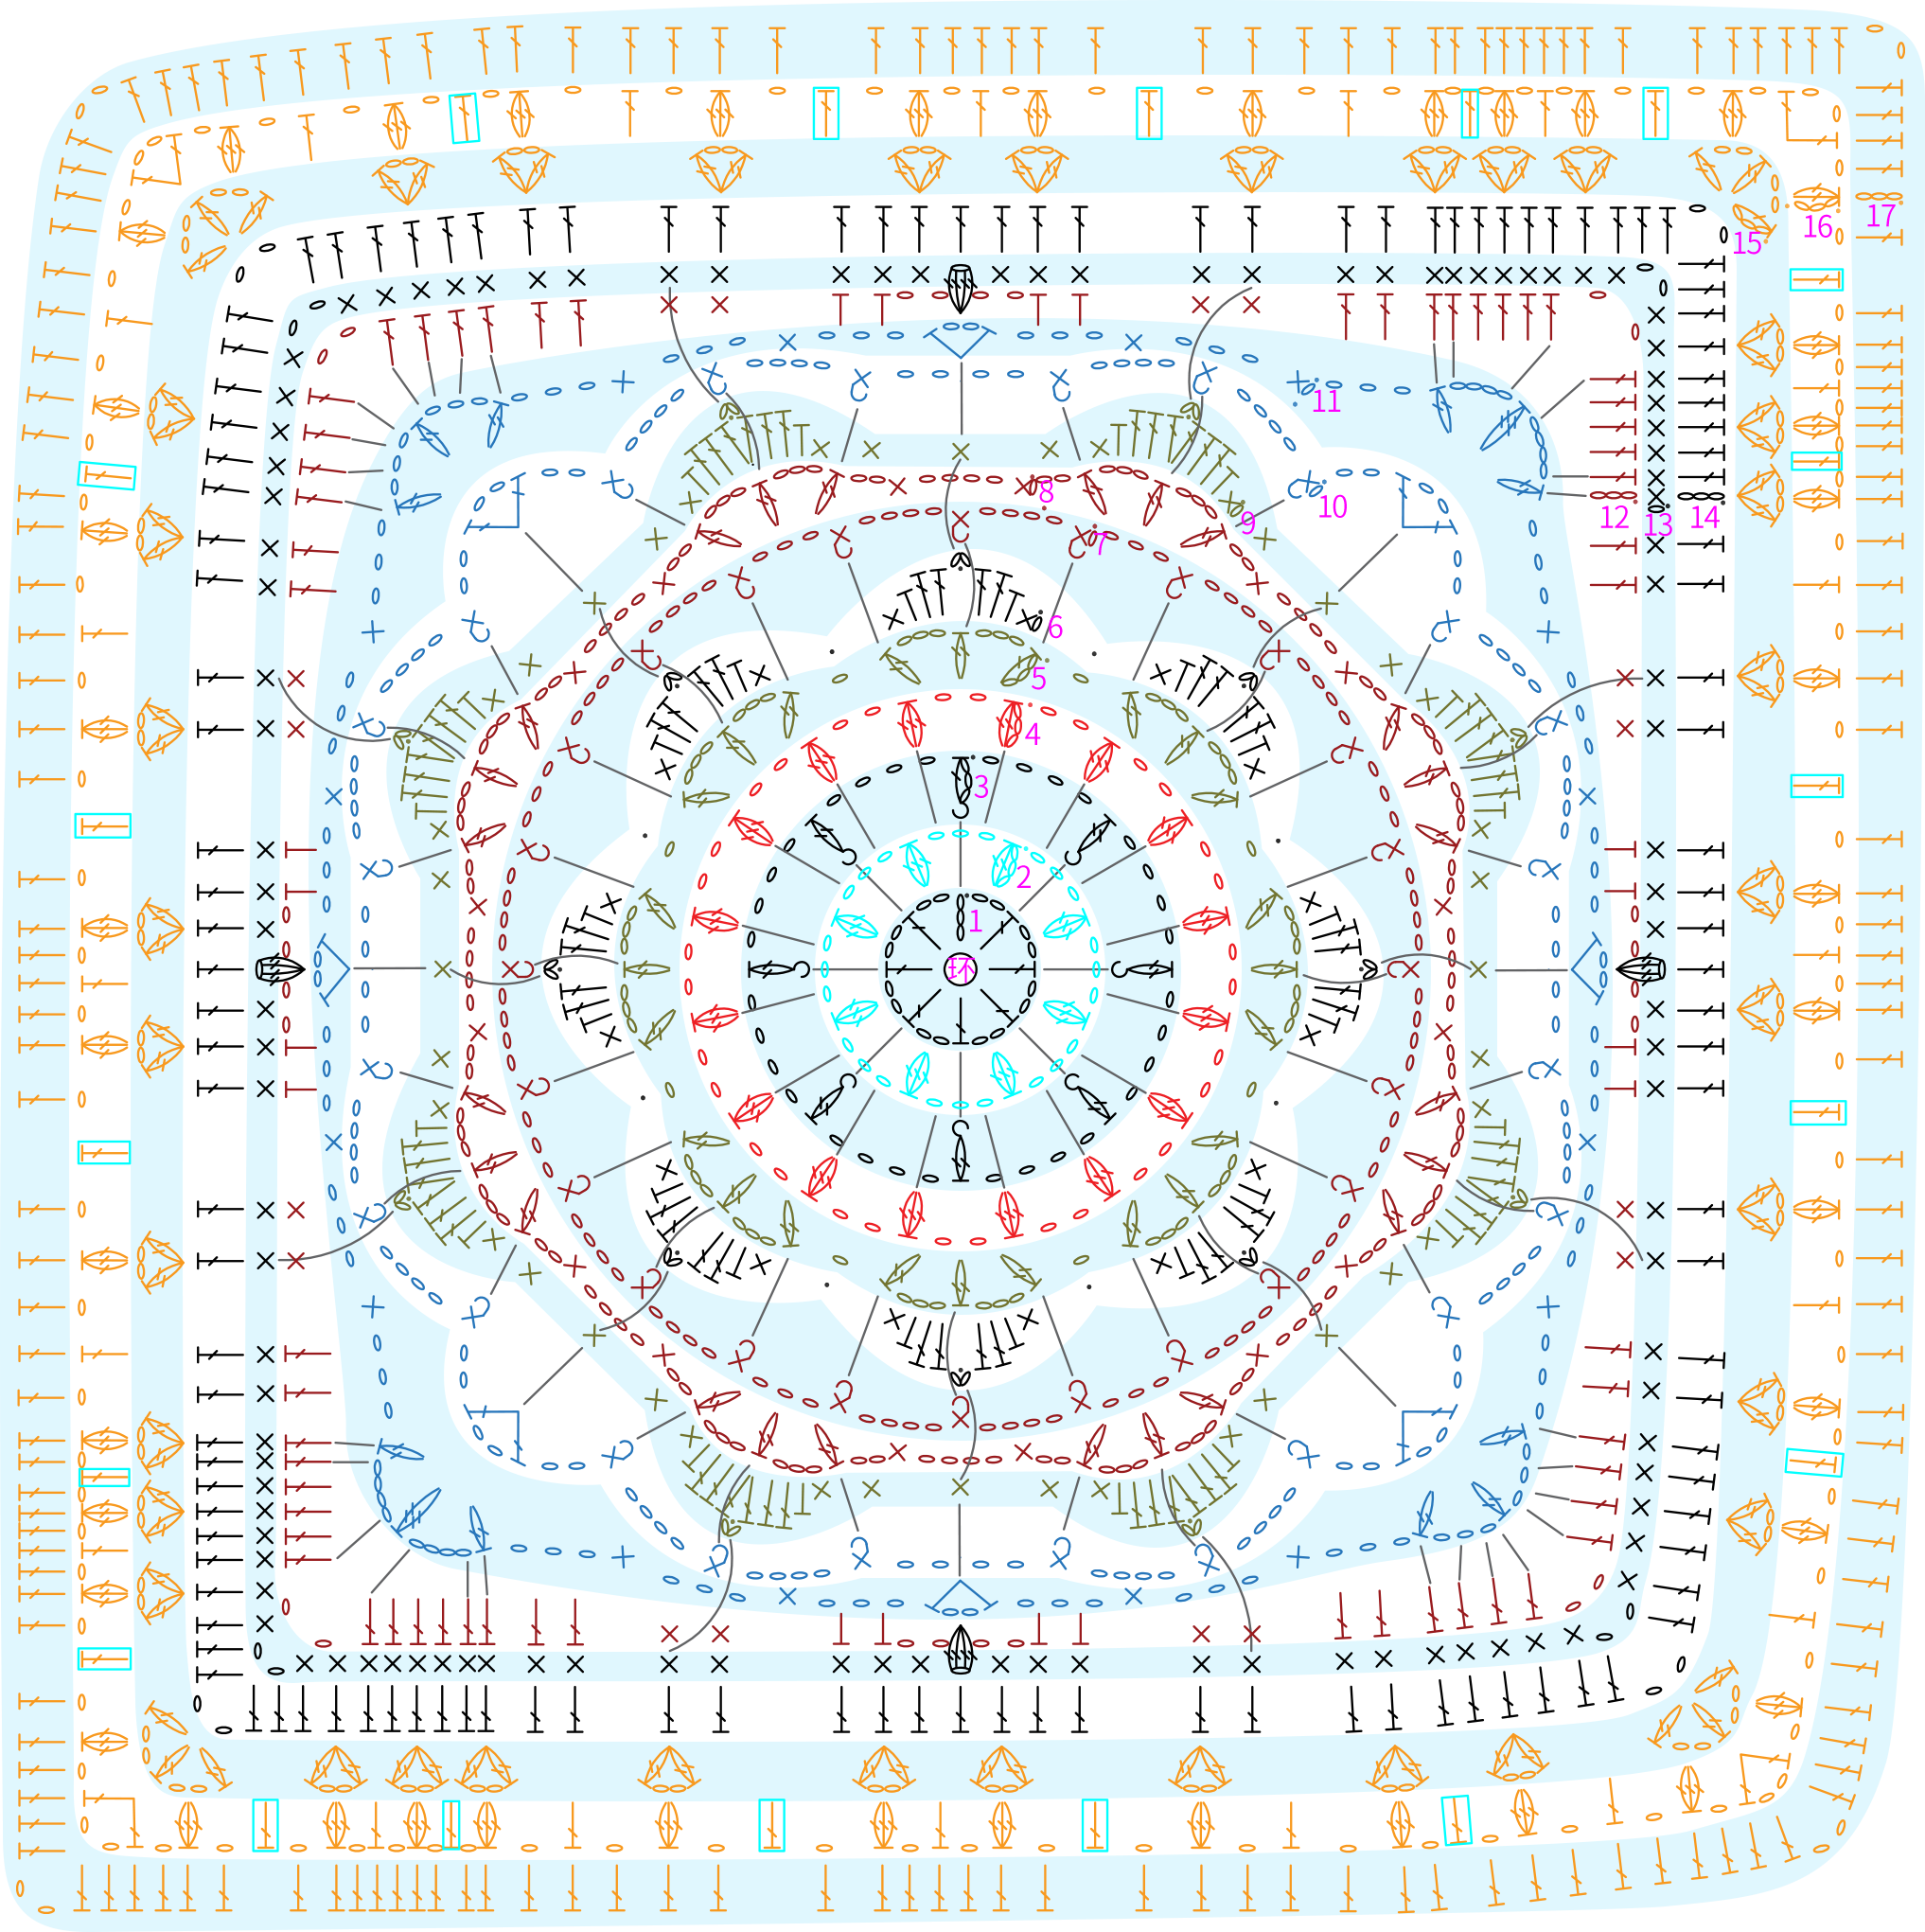
| Diamond Motif【 Aurora Red Style】 | ||||
| Row | Color 1×2 | Color 2×2 | Color 3×2 | Color 4×1 |
| R1 | 53#Cloud Cream | 53#Cloud Cream | 53#Cloud Cream | 53#Cloud Cream |
| R2 | 46#Lyons Blue | 33#Teal Green | 40#Golden Rod | 29#Aurora Red |
| R3 | 53#Cloud Cream | 53#Cloud Cream | 53#Cloud Cream | 53#Cloud Cream |
| R4 | 01#Bamboo Yellow | 24#Red Clay | 24#Red Clay | 42#Blue Moon |
| R5 | 42#Blue Moon | 59#Spectra Green | 01#Bamboo Yellow | 24#Red Clay |
| R6 | 53#Cloud Cream | 53#Cloud Cream | 53#Cloud Cream | 53#Cloud Cream |
| R7-8 | 40#Golden Rod | 29#Aurora Red | 29#Aurora Red | 46#Lyons Blue |
| R9 | 42#Blue Moon | 59#Spectra Green | 01#Bamboo Yellow | 24#Red Clay |
| R10-11 | 29#Aurora Red | 40#Golden Rod | 46#Lyons Blue | 40#Golden Rod |
| R12 | 40#Golden Rod | 29#Aurora Red | 29#Aurora Red | 46#Lyons Blue |
| R13-14 | 53#Cloud Cream | 53#Cloud Cream | 53#Cloud Cream | 53#Cloud Cream |
| R15-17 | 46#Lyons Blue | 33#Teal Green | 40#Golden Rod | 29#Aurora Red |
| Diamond Motif 【 Golden Rod Style】 | ||||
| Row | Color 1×2 | Color 2×2 | Color 3×2 | Color 4×1 |
| R1 | 19#Whisper White | 19#Whisper White | 19#Whisper White | 19#Whisper White |
| R2 | 46#Lyons Blue | 33#Teal Green | 45#Orangeade | 40#Golden Rod |
| R3 | 19#Whisper White | 19#Whisper White | 19#Whisper White | 19#Whisper White |
| R4 | 30#Zinnia | 09#Aspen Gold | 09#Aspen Gold | 42#Blue Moon |
| R5 | 42#Blue Moon | 59#Spectra Green | 30#Zinnia | 09#Aspen Gold |
| R6 | 19#Whisper White | 19#Whisper White | 19#Whisper White | 19#Whisper White |
| R7-8 | 45#Orangeade | 40#Golden Rod | 40#Golden Rod | 46#Lyons Blue |
| R9 | 42#Blue Moon | 59#Spectra Green | 30#Zinnia | 09#Aspen Gold |
| R10-11 | 40#Golden Rod | 45#Orangeade | 46#Lyons Blue | 45#Orangeade |
| R12 | 45#Orangeade | 40#Golden Rod | 40#Golden Rod | 46#Lyons Blue |
| R13-14 | 19#Whisper White | 19#Whisper White | 19#Whisper White | 19#Whisper White |
| R15-17 | 46#Lyons Blue | 33#Teal Green | 45#Orangeade | 40#Golden Rod |
Part 3 Triangle MotifC 13' 26'' (Part 2)
Work with a magic ring, crocheting in rows, each row as established for the diamond motif, but here only half the area of the diamond motif is crocheted. Please refer to the video demonstration for more details.
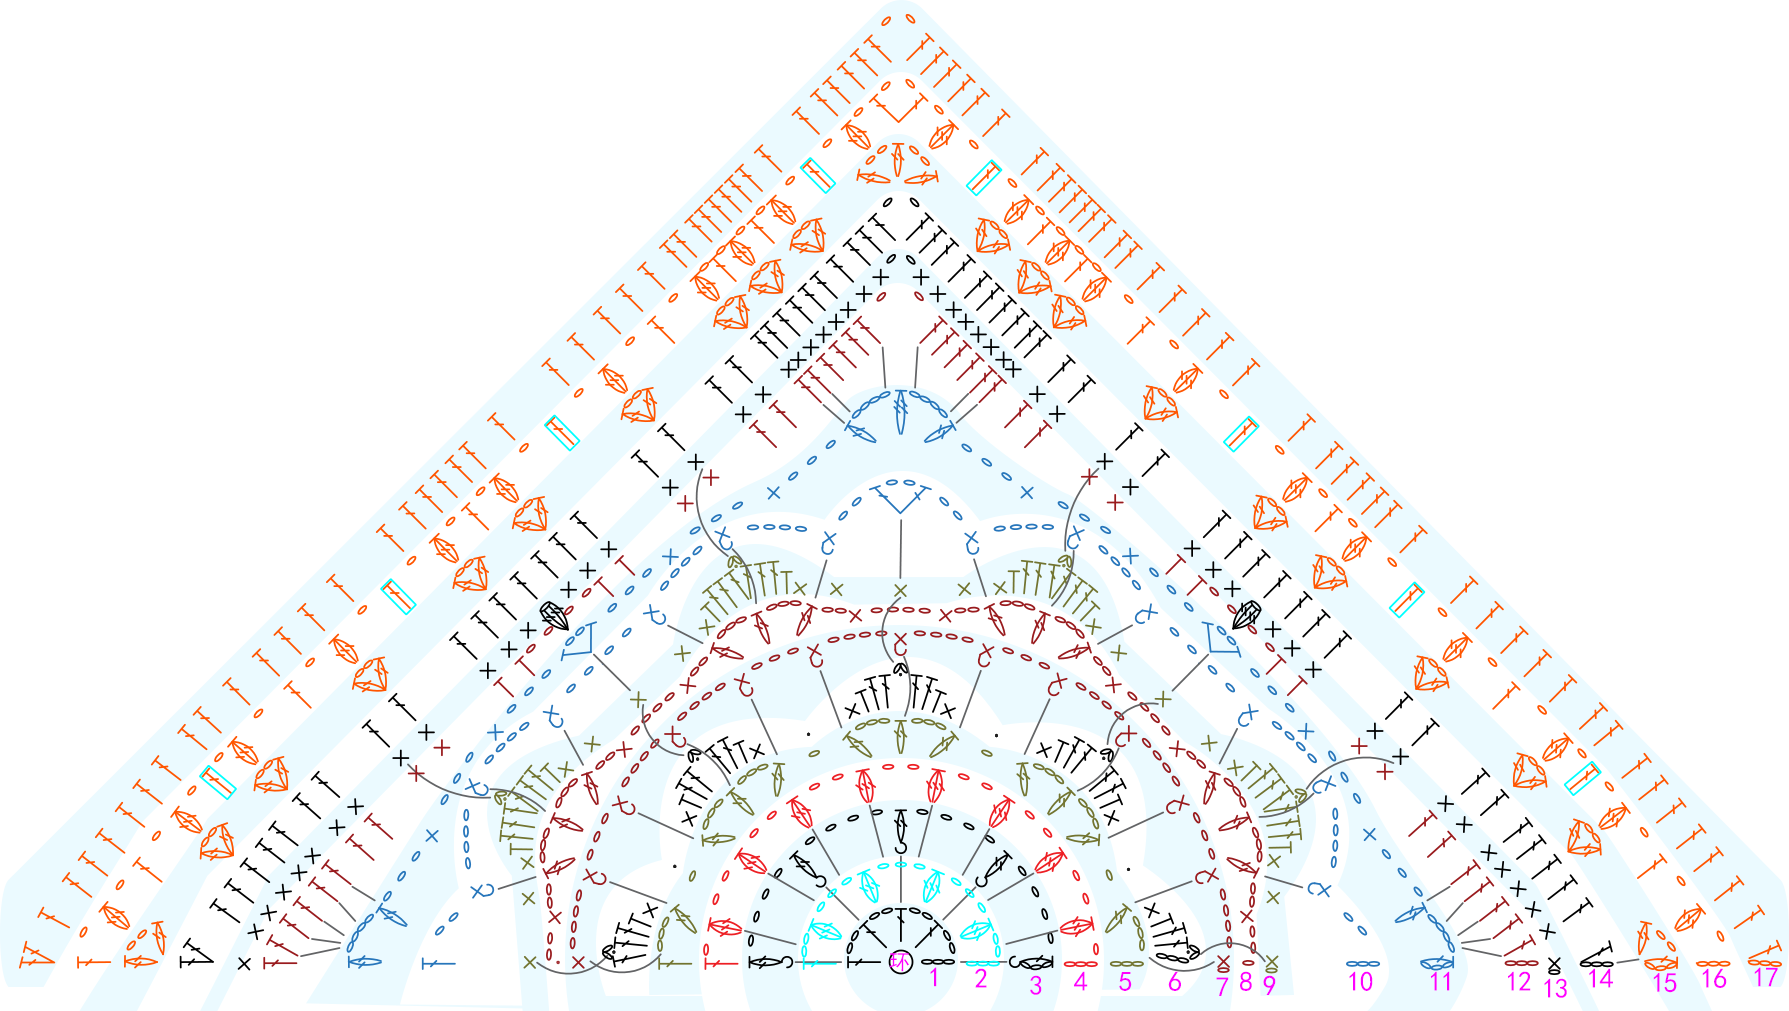
| Triangular motif【Aurora Red Style】 | ||||
| Row | Color 1×2 | Color 2×2 | Color 3×2 | Color 4×4 |
| R1 | 53#Cloud Cream | 53#Cloud Cream | 53#Cloud Cream | 53#Cloud Cream |
| R2 | 46#Lyons Blue | 33#Teal Green | 40#Golden Rod | 29#Aurora Red |
| R3 | 53#Cloud Cream | 53#Cloud Cream | 53#Cloud Cream | 53#Cloud Cream |
| R4 | 01#Bamboo Yellow | 24#Red Clay | 24#Red Clay | 42#Blue Moon |
| R5 | 42#Blue Moon | 59#Spectra Green | 01#Bamboo Yellow | 24#Red Clay |
| R6 | 53#Cloud Cream | 53#Cloud Cream | 53#Cloud Cream | 53#Cloud Cream |
| R7-8 | 40#Golden Rod | 29#Aurora Red | 29#Aurora Red | 46#Lyons Blue |
| R9 | 42#Blue Moon | 59#Spectra Green | 01#Bamboo Yellow | 24#Red Clay |
| R10-11 | 29#Aurora Red | 40#Golden Rod | 46#Lyons Blue | 40#Golden Rod |
| R12 | 40#Golden Rod | 29#Aurora Red | 29#Aurora Red | 46#Lyons Blue |
| R13-14 | 53#Cloud Cream | 53#Cloud Cream | 53#Cloud Cream | 53#Cloud Cream |
| R15-17 | 46#Lyons Blue | 33#Teal Green | 40#Golden Rod | 29#Aurora Red |
| Triangle Motif【Golden Rod Style】 | ||||
| Row | Color 1×2 | Color 2×2 | Color 3×2 | Color 4×4 |
| R1 | 19#Whisper White | 19#Whisper White | 19#Whisper White | 19#Whisper White |
| R2 | 46#Lyons Blue | 33#Teal Green | 45#Orangeade | 40#Golden Rod |
| R3 | 19#Whisper White | 19#Whisper White | 19#Whisper White | 19#Whisper White |
| R4 | 30#Zinnia | 09#Aspen Gold | 09#Aspen Gold | 42#Blue Moon |
| R5 | 42#Blue Moon | 59#Spectra Green | 30#Zinnia | 09#Aspen Gold |
| R6 | 19#Whisper White | 19#Whisper White | 19#Whisper White | 19#Whisper White |
| R7-8 | 45#Orangeade | 40#Golden Rod | 40#Golden Rod | 46#Lyons Blue |
| R9 | 42#Blue Moon | 59#Spectra Green | 30#Zinnia | 09#Aspen Gold |
| R10-11 | 40#Golden Rod | 45#Orangeade | 46#Lyons Blue | 45#Orangeade |
| R12 | 45#Orangeade | 40#Golden Rod | 40#Golden Rod | 46#Lyons Blue |
| R13-14 | 19#Whisper White | 19#Whisper White | 19#Whisper White | 19#Whisper White |
| R15-17 | 46#Lyons Blue | 33#Teal Green | 45#Orangeade | 40#Golden Rod |
PartD 38' 53'' (Part 2)
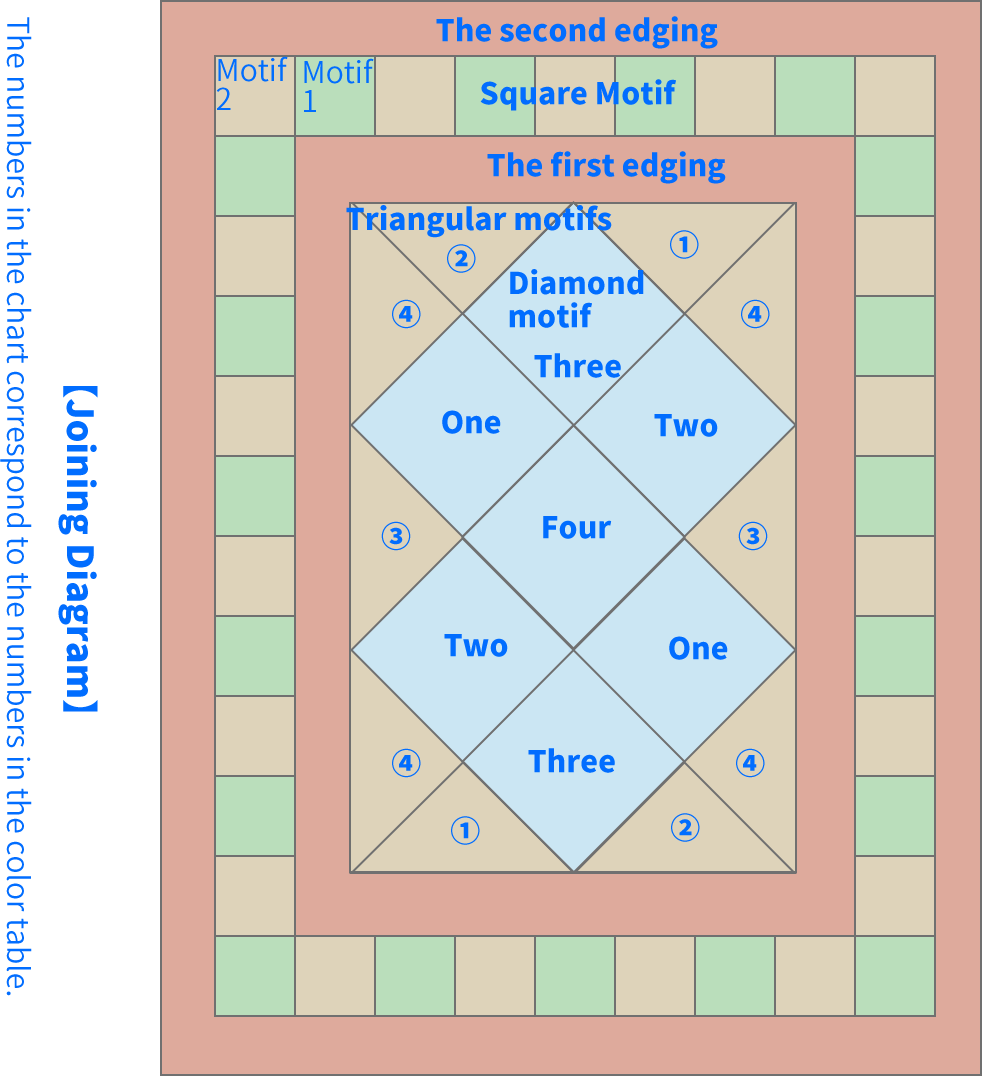
First, refer to the finished product or layout diagram to position the two types of motifs correctly. You can start with any motif (connection yarn:46#Lyons Blue). Begin by sewing together the surrounding motifs, or you can sew freely while making sure to keep the placement unchanged. Please refer to the video demonstration for more details.
Part 5 The First edgingE 48' 45'' (Part 2)
Crochet around the edges of the connected triangle motifs and diamond motifs in rounds. While crocheting, you still need to change colors. Please refer to the video demonstration for more details.
| The first edging | Aurora Red Style | Golden Rod Style |
| R1 | 53#Cloud Cream | 19#Whisper White |
| R2 | 40#Golden Rod | 45#Orangeade |
| R3 | 42#Blue Moon | 42#Blue Moon |
| R4 | 24#Red Clay | 09#Aspen Gold |
| R5-6 | 53#Cloud Cream | 19#Whisper White |
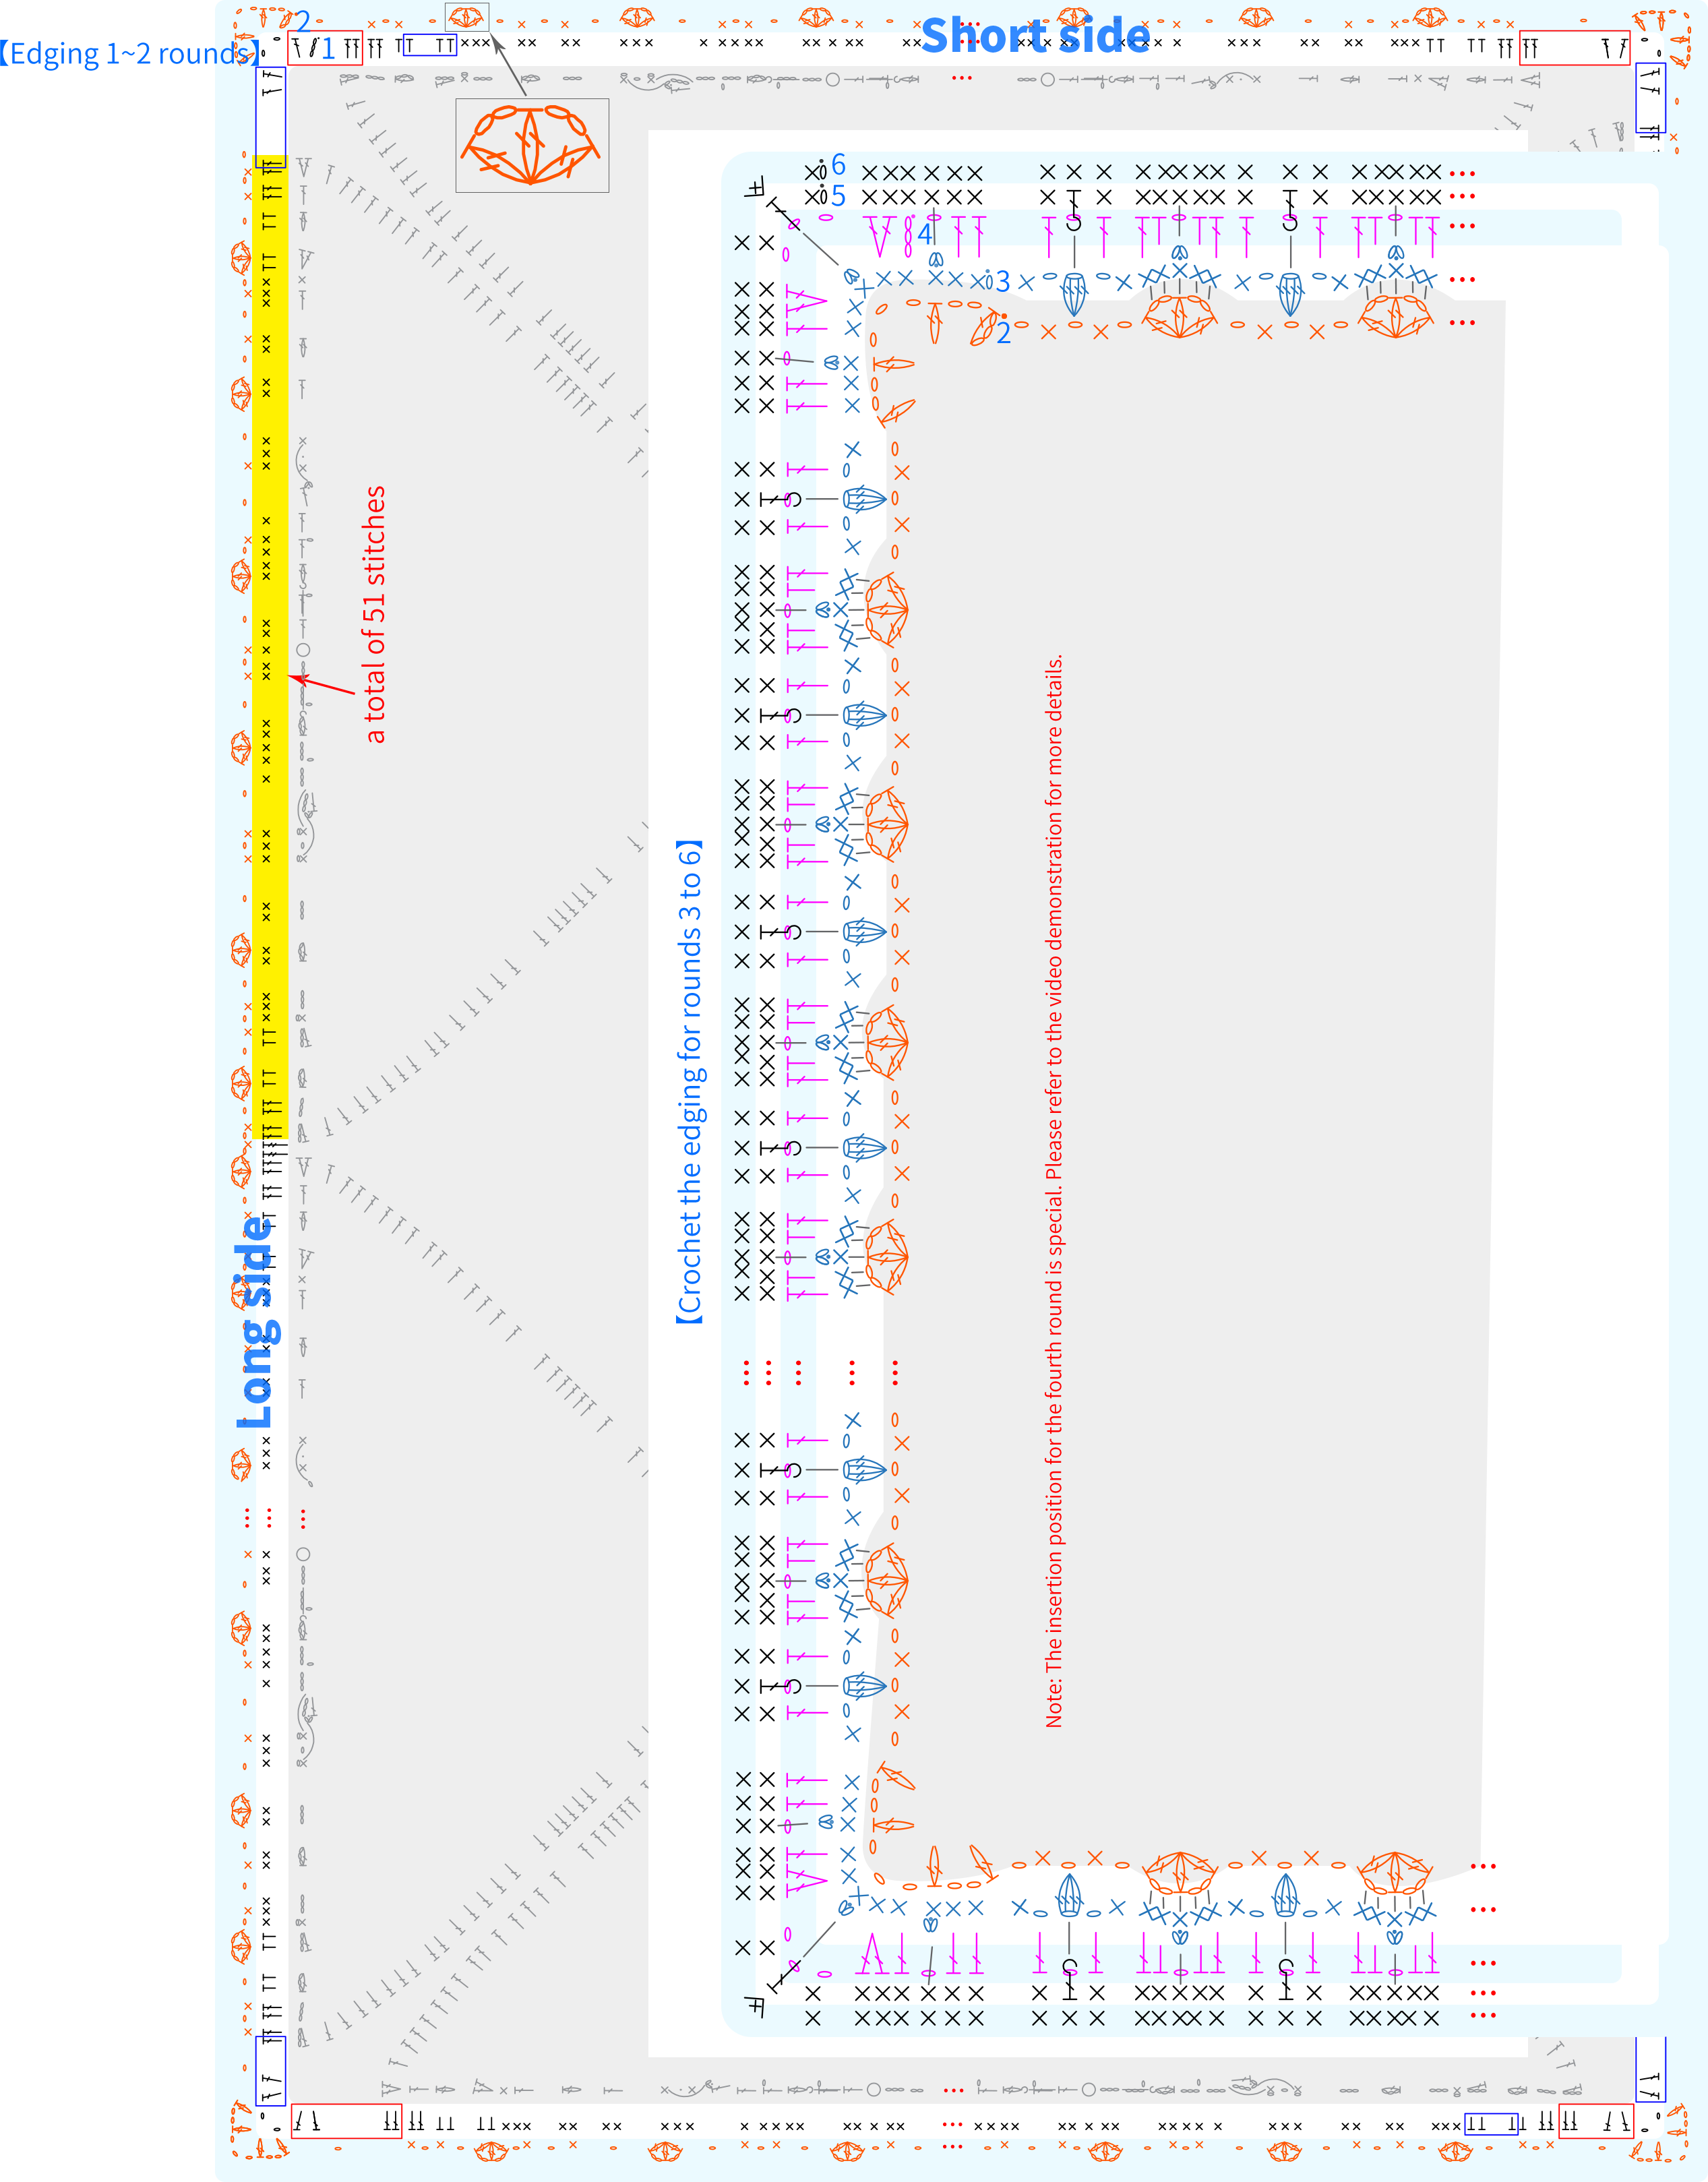
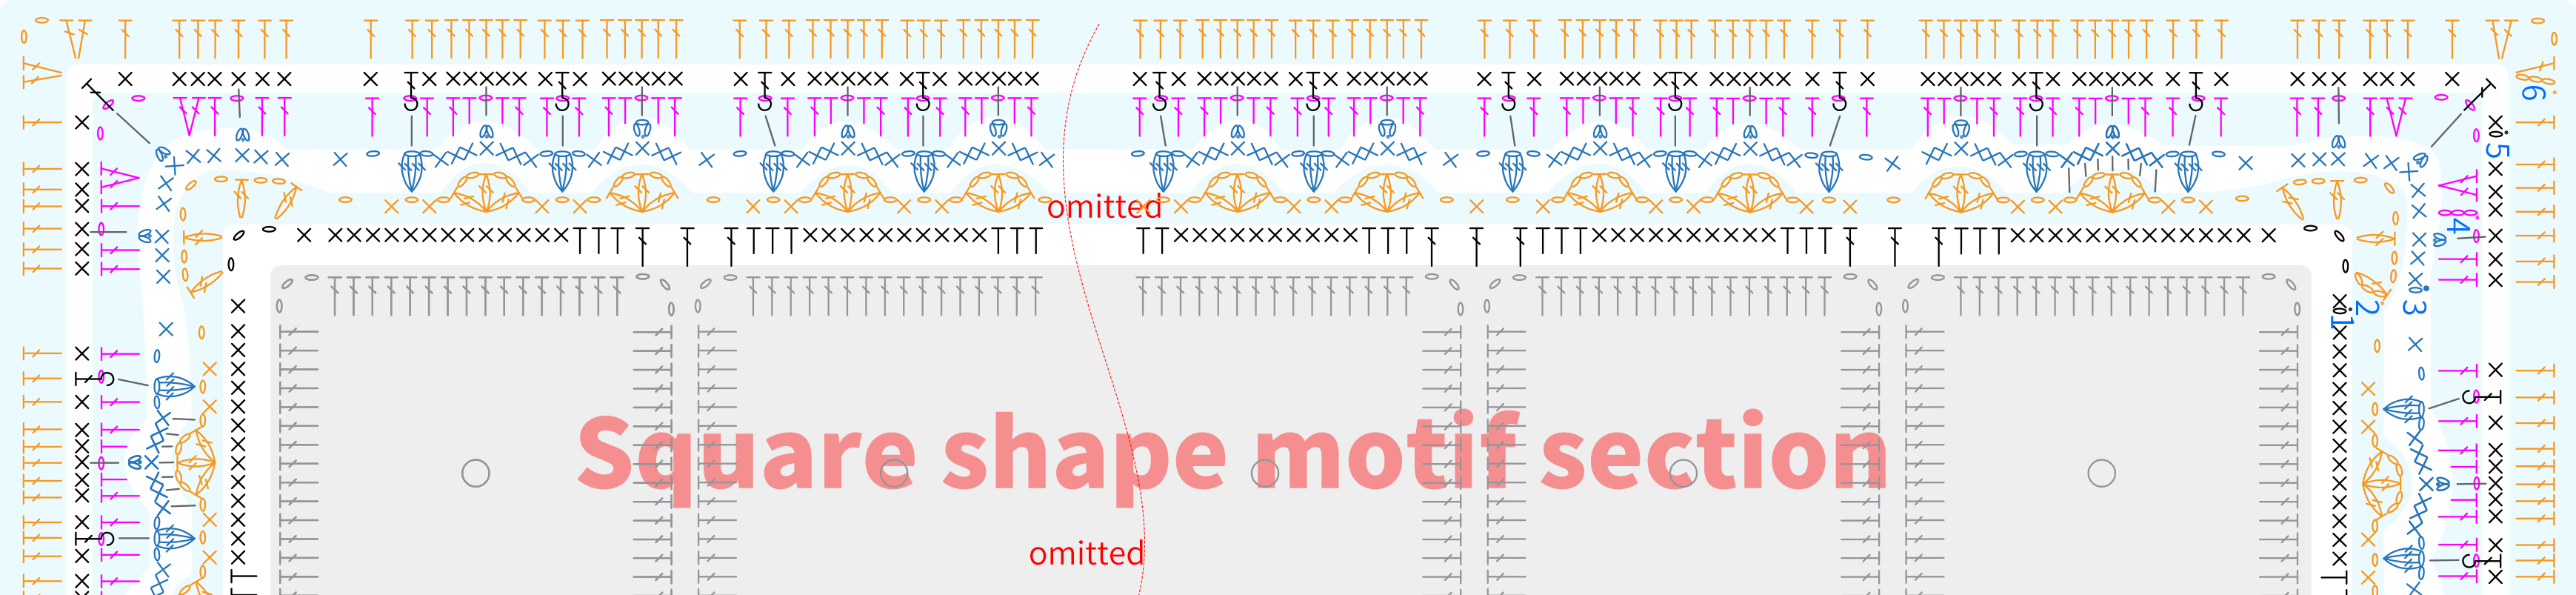
Part 6 Sewing Together the Square Motifs and the Second Edging Rounds 90' 43'' (Part 2)
First, join the motifs together, and then connect them to the already crocheted section (42#Blue Moon). Finally, crochet the edging along the edge for the second time. Please refer to the video demonstration for more details. F Please refer to the video demonstration for more details. G The second edging round
| The second edging | Aurora Red Style | Golden Rod Style |
| R1 | 53#Cloud Cream | 19#Whisper White |
| R2 | 40#Golden Rod | 45#Orangeade |
| R3 | 42#Blue Moon | 42#Blue Moon |
| R4 | 24#Red Clay | 09#Aspen Gold |
| R5 | 53#Cloud Cream | 19#Whisper White |
| R6 | 40#Golden Rod | 45#Orangeade |
Made by the community