Home / Blanket
Picture Dream
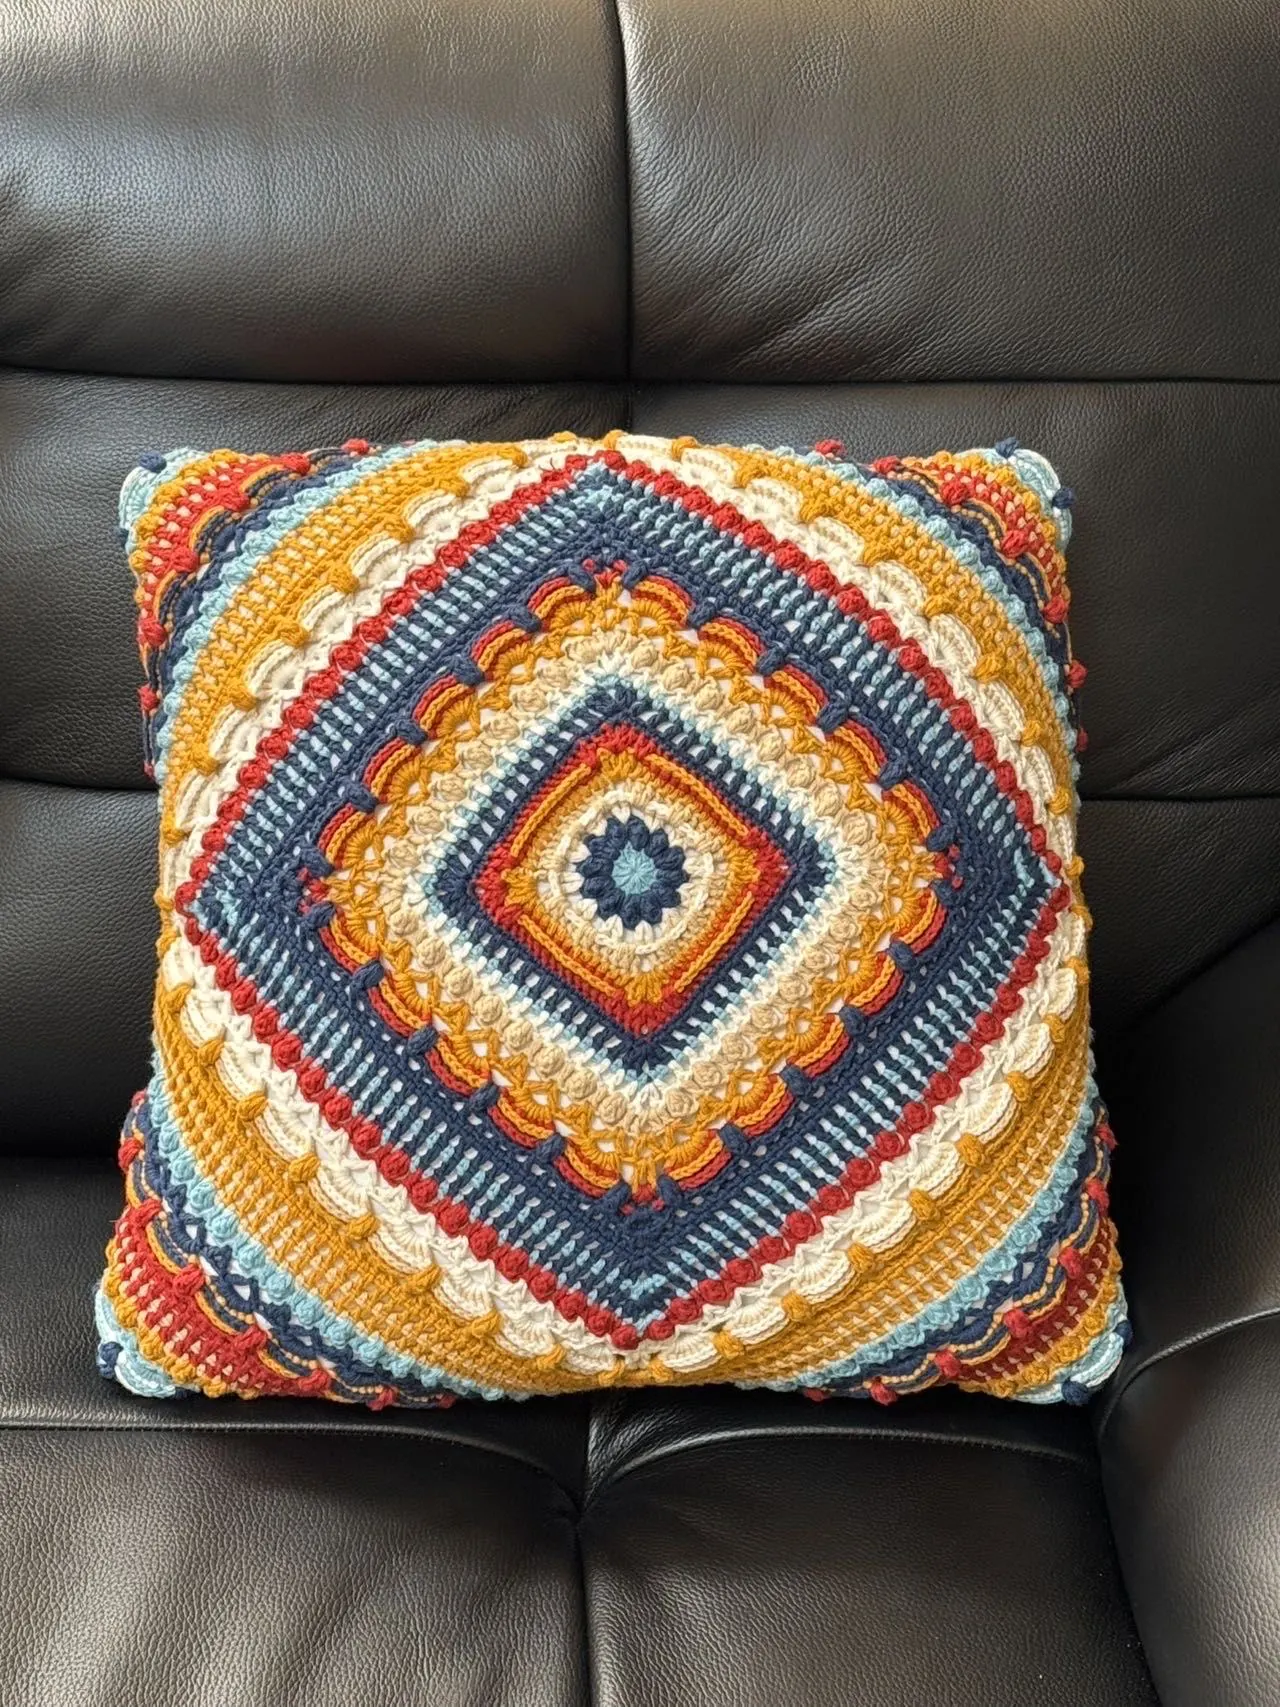
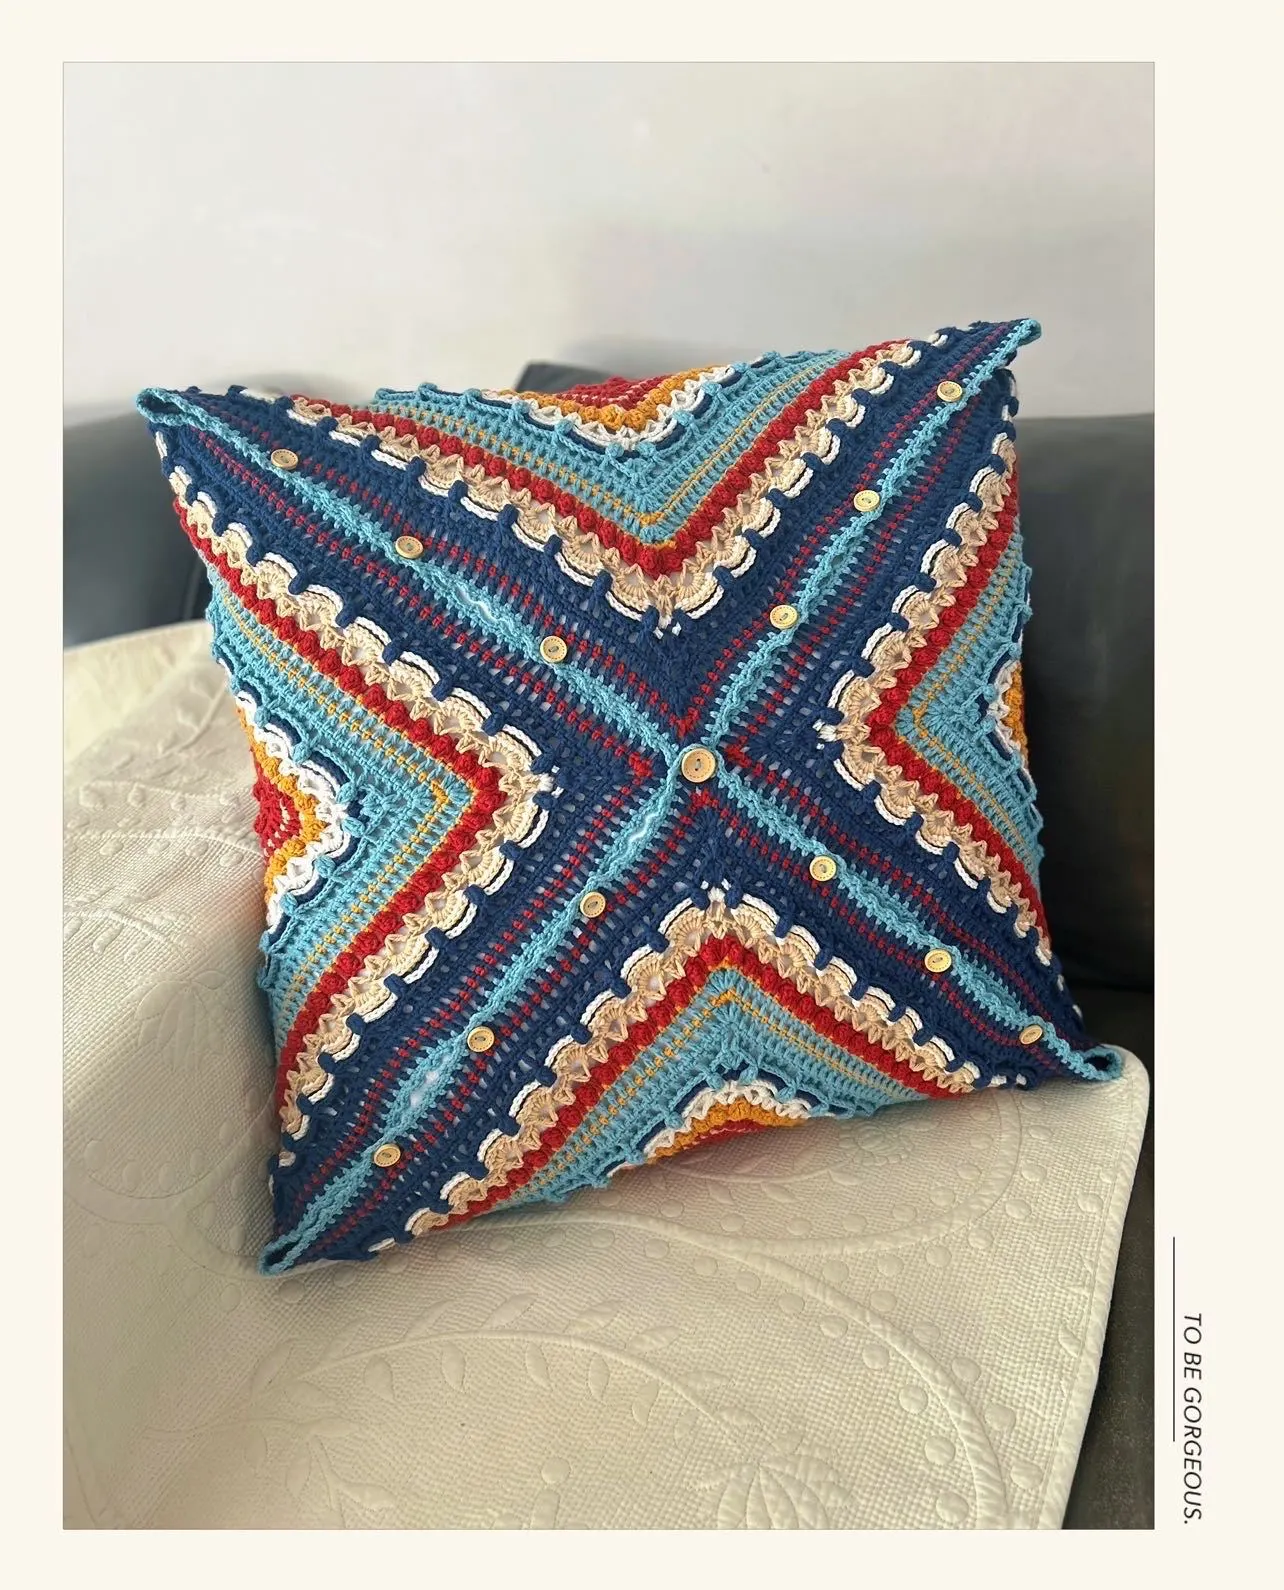
Project preview
See the finished project
Pattern format
Instructions
Due to variations in individual tension, the size of the sample is for reference only.
Materials: 4-Ply Combed Cotton & Acrylic Fibre Hand Knitting Yarn
Crochet Hook: 7# or 3.0mm Crochet Hook

Chart Key






Note: This pattern is making in Chinese crochet pattern terms, and the stitch name is written using American terminology. All measurements in charts are in cm.
Part 1 Blanket
The blanket is divided from the center outward into three sections: Section 1, Section 2, and Section 3, which are crocheted in sequence.
Step 1 Section 1 01' 24''
Section 1 begins with a magic ring and is crocheted counterclockwise from the center outward. Starting from the fourth round, each round has corresponding 4 sides and 4 corners (2 chain stitches), alternating crocheting between sides and corners. Please refer to the video demonstration for specifics.
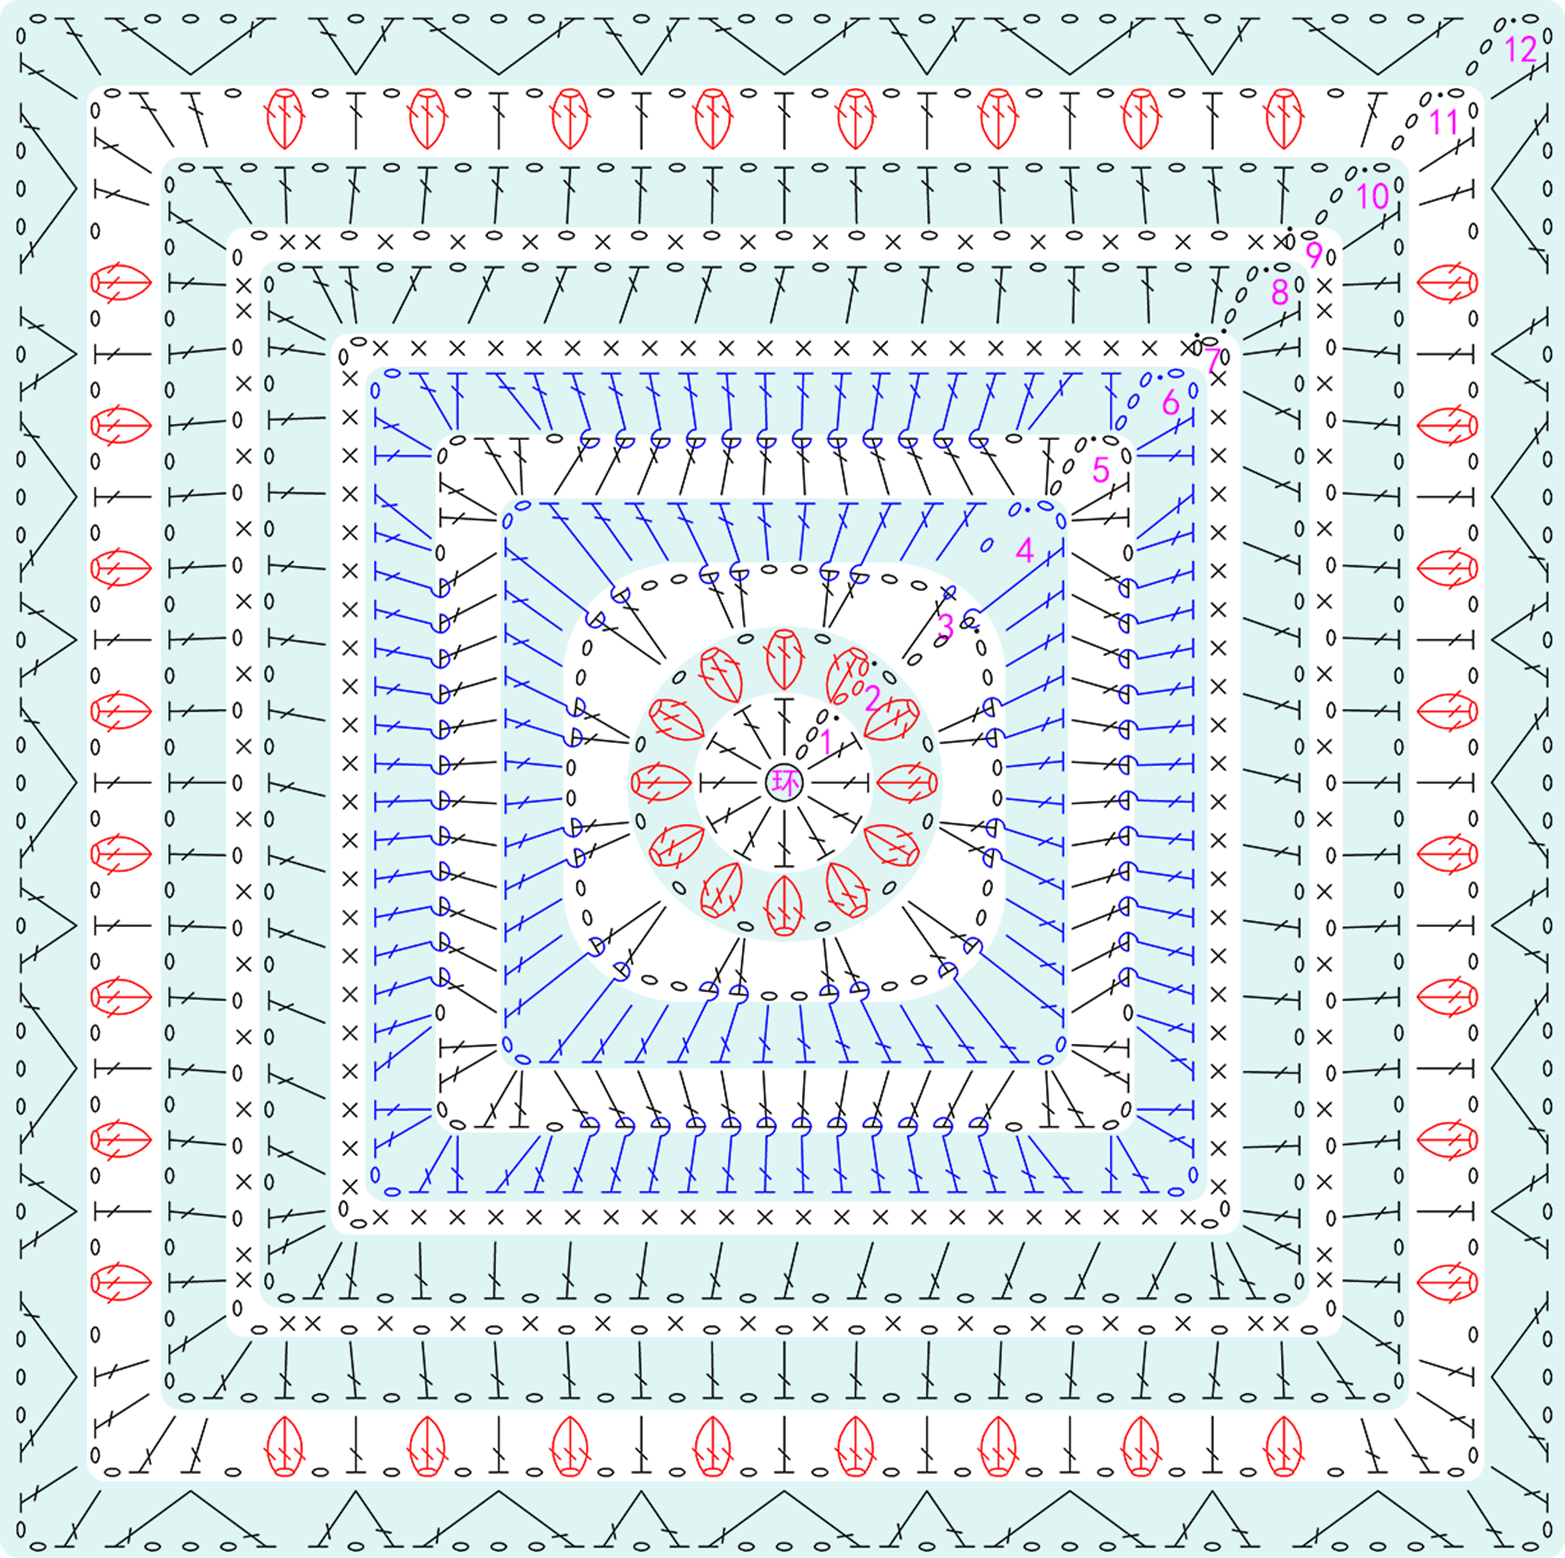
| Section 1 | Round | Blue Ashes Style | Tomato Style |
| Rnd 1 | 17# Marine Blue | 03# Peach Fuzz | |
| Rnd 2 | 44# Blue Ashes | 35# Tomato | |
| Rnd 3 | 19# Whisper White | 06# Bright White | |
| Rnd 4 | 18# New Wheat | 25# Fair Green | |
| Rnd 5 | 40# Golden Rod | 33# Teal Green | |
| Rnd 6 | 29# Aurora Red | 56# Golden Yellow | |
| Rnd 7 | 44# Blue Ashes | 35# Tomato | |
| Rnd 8 | |||
| Rnd 9 | 17# Marine Blue | 03# Peach Fuzz | |
| Rnd 10 | 19# Whisper White | 06# Bright White | |
| Rnd 11 | 18# New Wheat | 25# Fair Green | |
| Rnd 12 | 40# Golden Rod | 33# Teal Green |
Note:
1.For the next round with a color change, break the yarn at the end of the current round and join the new yarn to start crocheting the next round. For the next round without a color change, do not break the yarn at the end of the current round. At the beginning of the next round, make one slip stitch in the corresponding position for a smooth transition;
2. After completing the last round of Section 1, do not break the yarn.
3.When crocheting, the fabric may become uneven. You can stretch it gently with your hands while working to keep it mostly flat.
Step 2 Section 2 67' 44''
Section 2 is worked immediately following the last round of Section 1; Please refer to the video demonstration for more details.
| Section 2 | The first complete sequence | Round | Blue Ashes Style | Tomato Style |
| Rnd 1 | 40# Golden Rod | 33# Teal Green | ||
| Rnd 2 | 29# Aurora Red | 56# Golden Yellow | ||
| Rnd 3 | 44# Blue Ashes | 35# Tomato | ||
| Rnd 4 | ||||
| Rnd 5 | ||||
| Rnd 6 | ||||
| Rnd 7 | 17# Marine Blue | 03# Peach Fuzz | ||
| Rnd 8 | 44# Blue Ashes | 35# Tomato | ||
| Rnd 9 | 17# Marine Blue | 03# Peach Fuzz | ||
| Rnd 10 | 29# Aurora Red | 56# Golden Yellow | ||
| Rnd 11 | 19# Whisper White | 06# Bright White | ||
| The second complete sequence | Rnd 1 | |||
| Rnd 2 | 18# New Wheat | 25# Fair Green | ||
| Rnd 3 | 40# Golden Rod | 33# Teal Green | ||
| Rnd 4 | ||||
| Rnd 5 | ||||
| Rnd 6 | ||||
| Rnd 7 | 18# New Wheat | 25# Fair Green | ||
| Rnd 8 | 40# Golden Rod | 33# Teal Green | ||
| Rnd 9 | 18# New Wheat | 25# Fair Green | ||
| Rnd 10 | 17# Marine Blue | 03# Peach Fuzz | ||
| Rnd 11 | 44# Blue Ashes | 35# Tomato | ||
| The third complete sequence | Rnd 1 | |||
| Rnd 2 | 40# Golden Rod | 33# Teal Green | ||
| Rnd 3 | 29# Aurora Red | 56# Golden Yellow | ||
| Rnd 4 | ||||
| Rnd 5 | ||||
| Rnd 6 | ||||
| Rnd 7 | 18# New Wheat | 25# Fair Green | ||
| Rnd 8 | 29# Aurora Red | 56# Golden Yellow | ||
| Rnd 9 | 18# New Wheat | 25# Fair Green | ||
| Rnd 10 | 40# Golden Rod | 33# Teal Green | ||
| Rnd 11 | 17# Marine Blue | 03# Peach Fuzz |
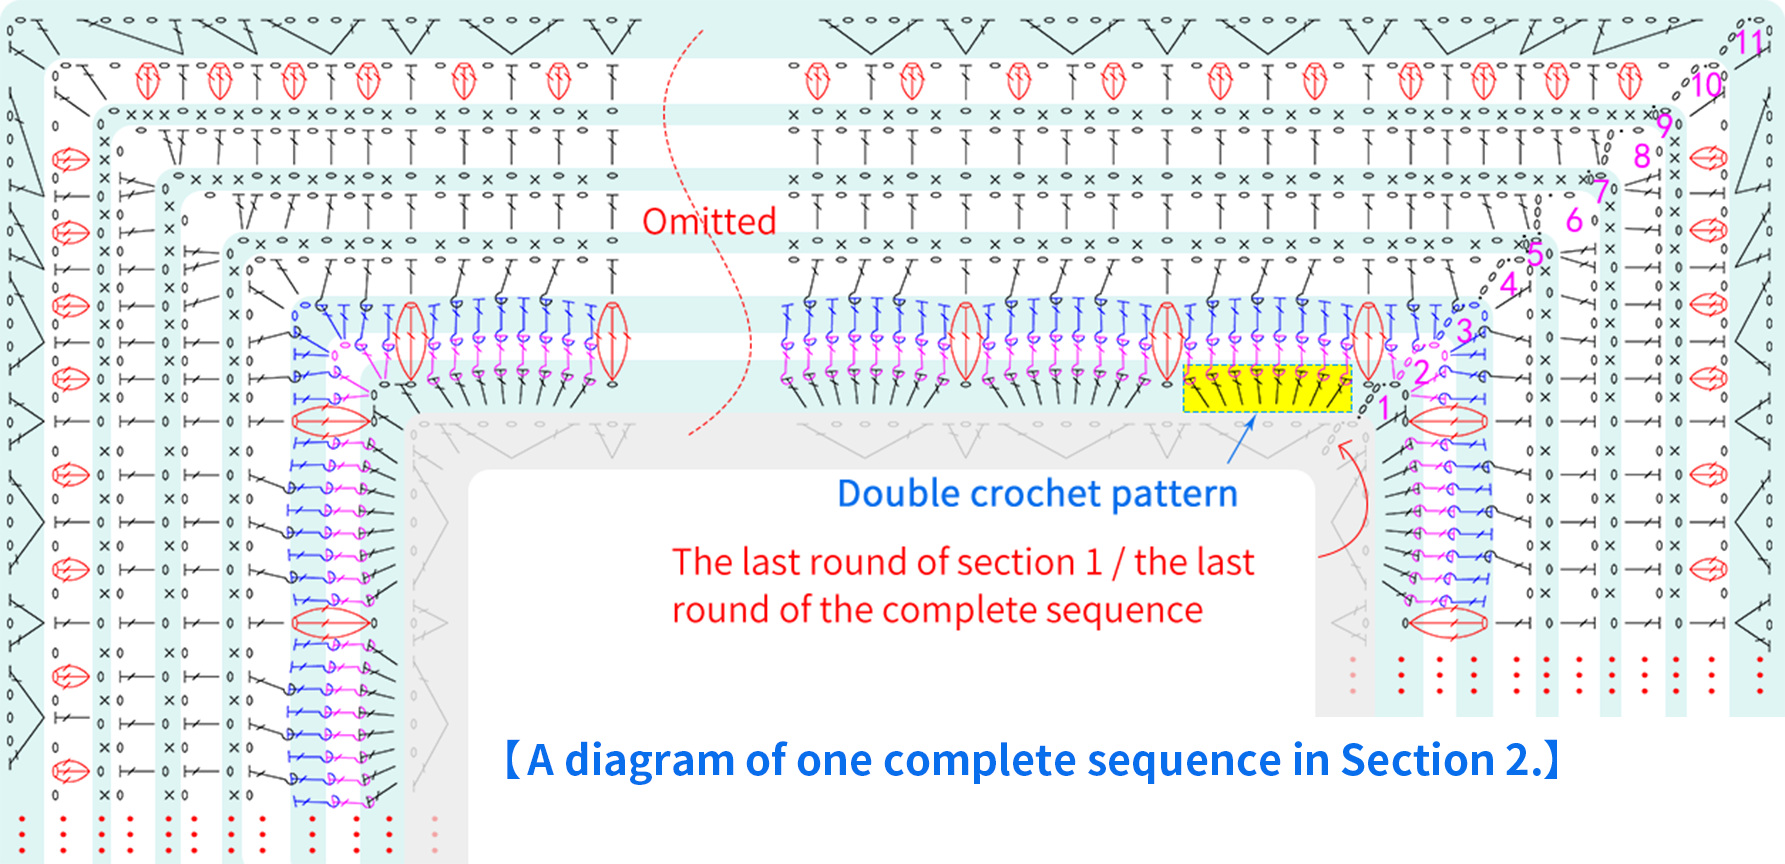
Note:
1.For convenience in demonstration, the chart omits repeated sections. In Section 2, every round still alternates between the sides and corners (2 chain stitches), with each having 4 parts;
2.Rounds 1-11 of Section 2 form one complete sequence, and Section 2 consists of 3 full sequences in total.
3.In the first sequence, round 1 has 5 double crochet motifs; in the second sequence, round 1 has 9 double crochet motifs; in the third sequence,round 1 has 13 double crochet motifs.
4.After completing the last round of Section 2, do not break the yarn.
Step 3 Section 3 94' 56''
Section 3 is crocheted following the last round of Section 2. The first 9 rounds are similar to the first 9 rounds of the complete sequence in Section 2. Each round still corresponds to 4 sides and 4 corners. Please refer to the video demonstration for more details.
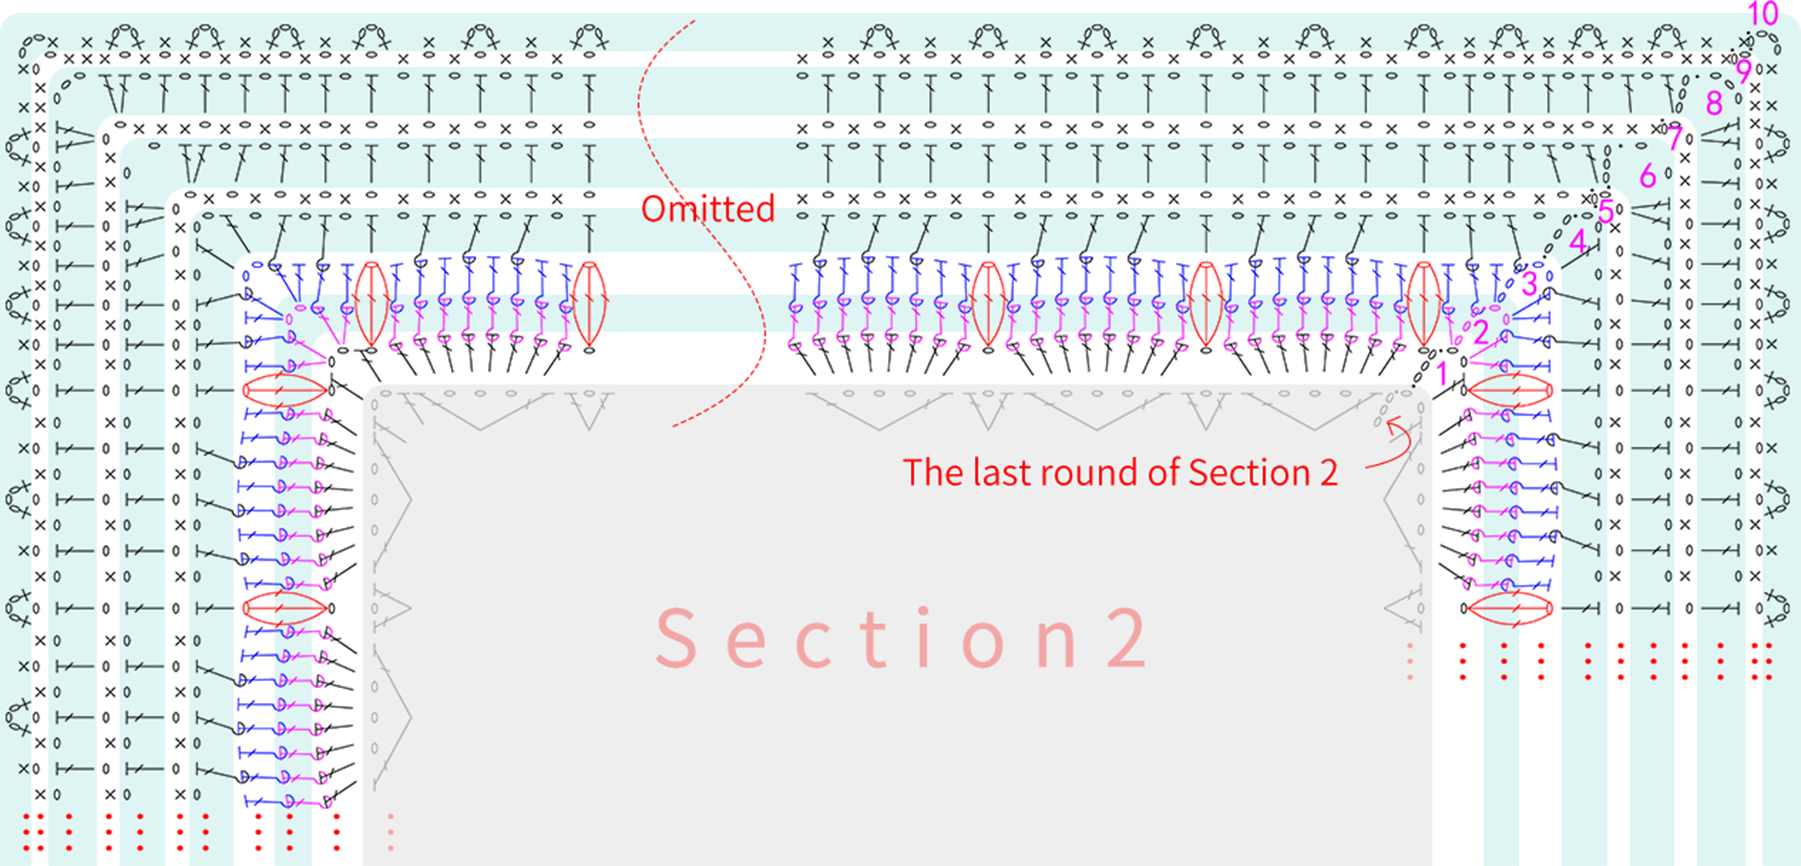
| Section 3 | Corresponds to the first 9 rounds of the sequence | Round | Blue Ashes Style | Tomato Style |
| Rnd 1 | 17# Marine Blue | 03# Peach Fuzz | ||
| Rnd 2 | 19# Whisper White | 06# Bright White | ||
| Rnd 3 | 44# Blue Ashes | 35# Tomato | ||
| Rnd 4 | ||||
| Rnd 5 | ||||
| Rnd 6 | ||||
| Rnd 7 | 17# Marine Blue | 03# Peach Fuzz | ||
| Rnd 8 | 44# Blue Ashes | 35# Tomato | ||
| Rnd 9 | 17# Marine Blue | 03# Peach Fuzz | ||
| / | Rnd 10 |
Note: For convenience in demonstration, the repeated sections have been omitted in the chart. The first 9 rounds of Section 3 correspond to the first 9 rounds of the pattern repeat in Section 2. The edges of Round 1 have 17 double crochet clusters. The corners of Round 8 and Round 10 consist of 3 chains, while the corners of the other rounds have 2 chains.
After completing the entire blanket, steam block it on the reverse side to lay flat.
Part 2 Button 100' 12''
【Yarn in use:Tomato Style 03# Peach Fuzz;Blue Ashes Style 17# Marine Blue】
Sew large buttons and small buttons on the second-to-last round on the right side of the blanket, please refer to the video demonstration for more details.
Part 3 The combination of blanket and pillow core
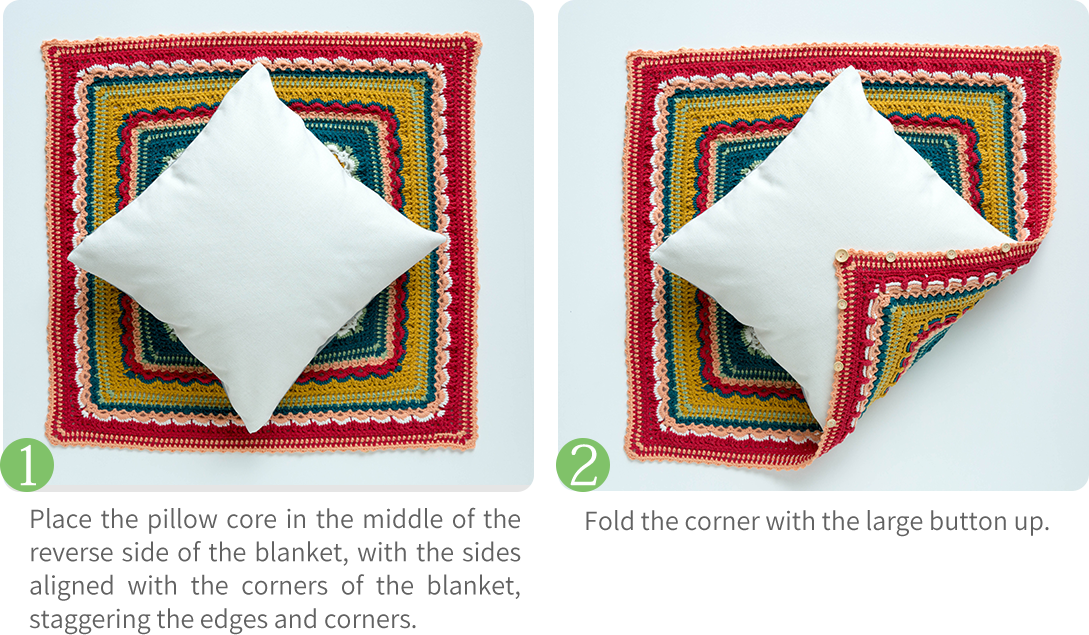
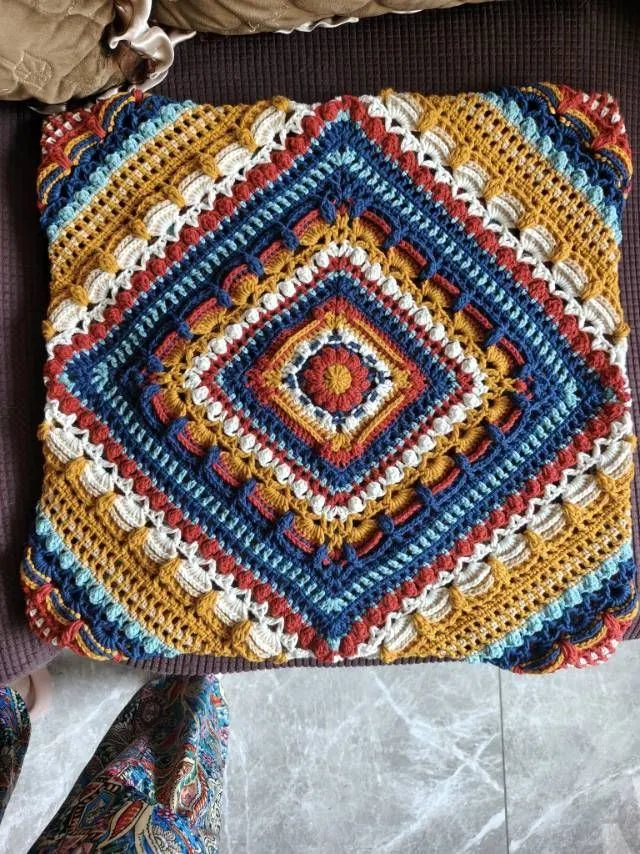
Made by the community