Clothes
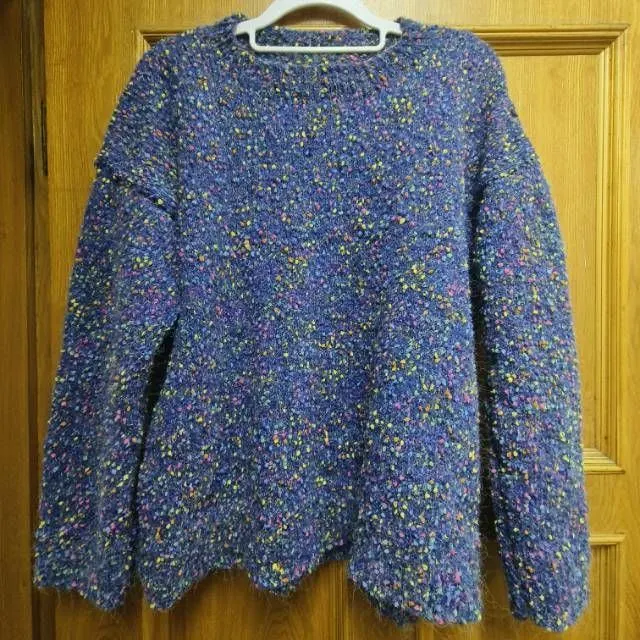
Point Pullover
Project preview
See the finished project
Pattern format
Instructions
Watch and follow
Video tutorial
This sweater comes in large and small sizes, and each size is further divided into long and short versions. The knitting method is almost identical, with only the stitch count and length varying. The sweater consists of front piece, back piece, sleeves, and collar. You'll make the front and back pieces as well as the sleeves separately, then sew them together, and finally knit the collar.
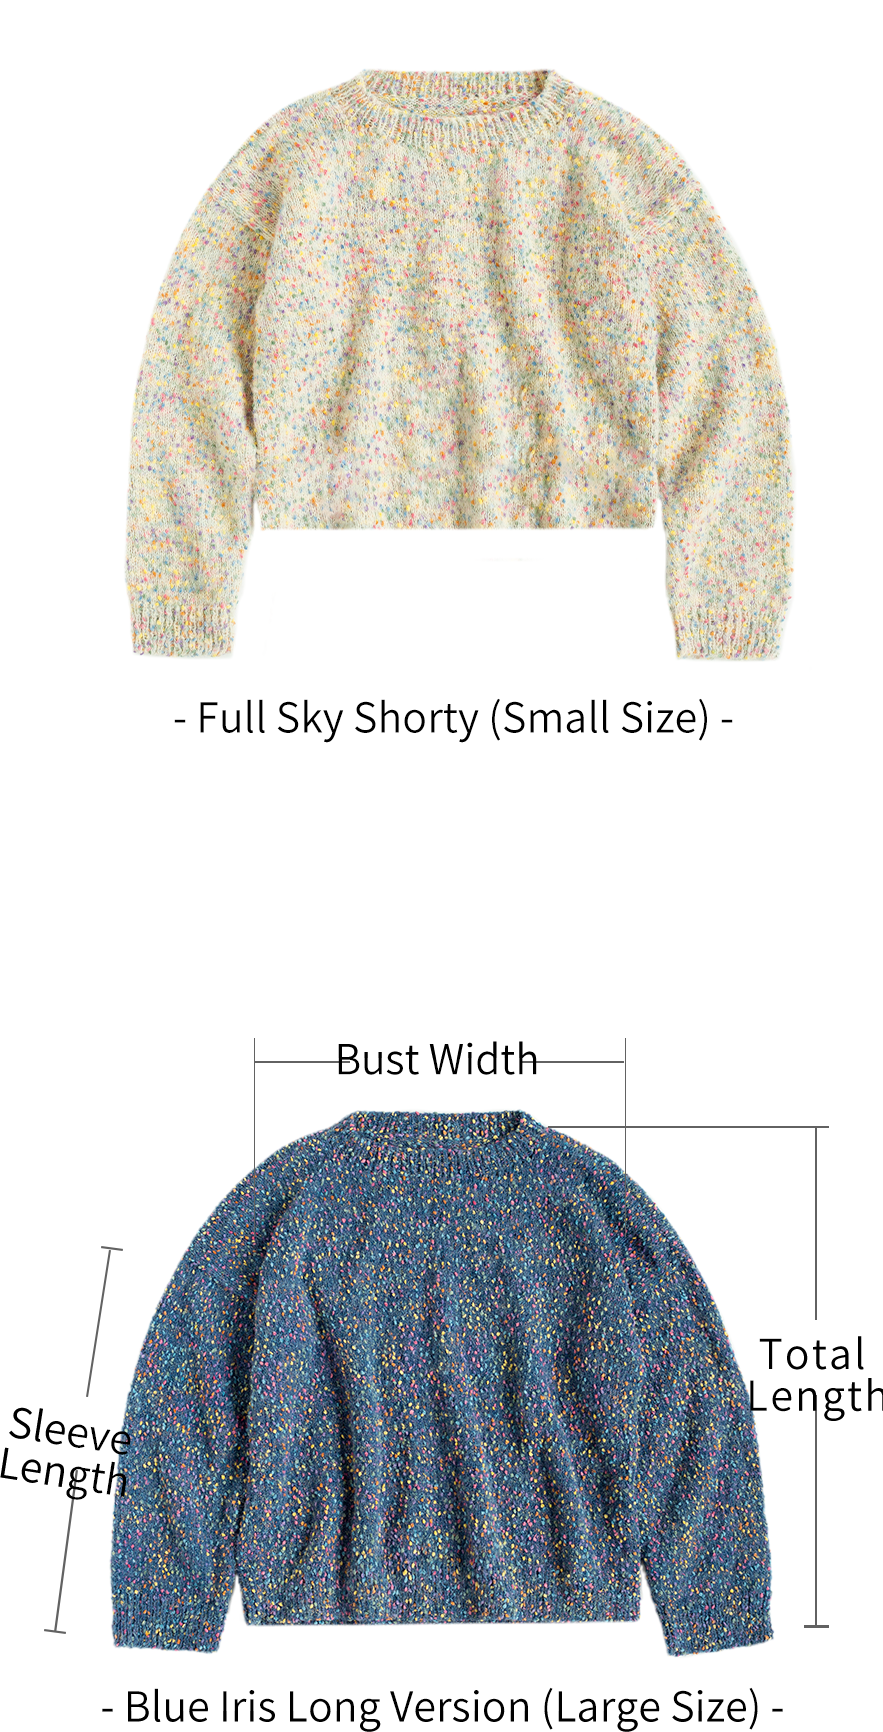
Due to variations in individual tension, the size of the sample is for reference only.
Materials: Susan's Family Pointillism Impression
Needles : 4.0 mm Circular Needle & 3.75 mm short straight needles
| Unit(cm) | Total Length (Excluding collar) |
Bust Width | Sleeve Length |
| Large Size Long Version | 60 | 63 | 45 |
| Large Size Short Version | 49 | 63 | 45 |
| Small Size Long Version | 60 | 53 | 49 |
| Small Size Short Version | 49 | 53 | 49 |

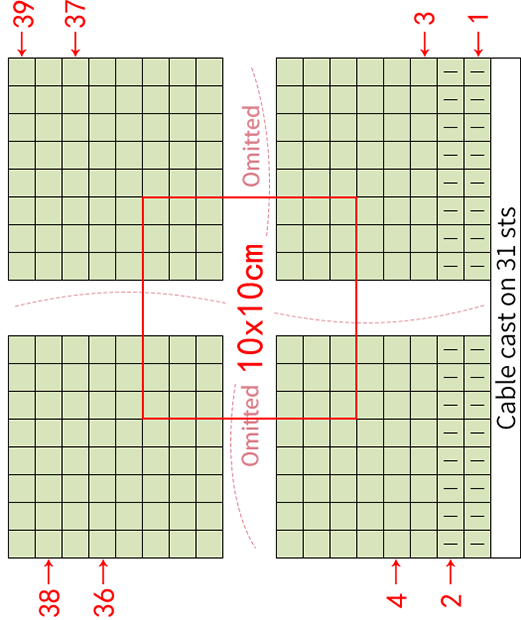
Chart Key


Note: 1. This pattern is making in Chinese crochet pattern terms, and the stitch name is written using American terminology. All measurements in charts are in cm.
2. The chart represent the right side of fabric, so check the key to see how to work a certain symbol on the right side and on the wrong side.
Part 1 The front and back pieces(3.75 mm short straight needles)A 01' 05''
First, make the front and back pieces. The method for both pieces is similar, each divided into three parts: the hem, body, and shoulder-parts. Start with the front piece, then after it's completed, knit the back piece and bind off, meanwhile, join the shoulder-parts correspondingly.
Step 1 HemA1 and BodyA2 01' 58''
The hem starts with the alternating cast on, and work in rows with 1 by 1 rib. The body is worked back and forth on the hem. Please refer to the video demonstration for specifics.
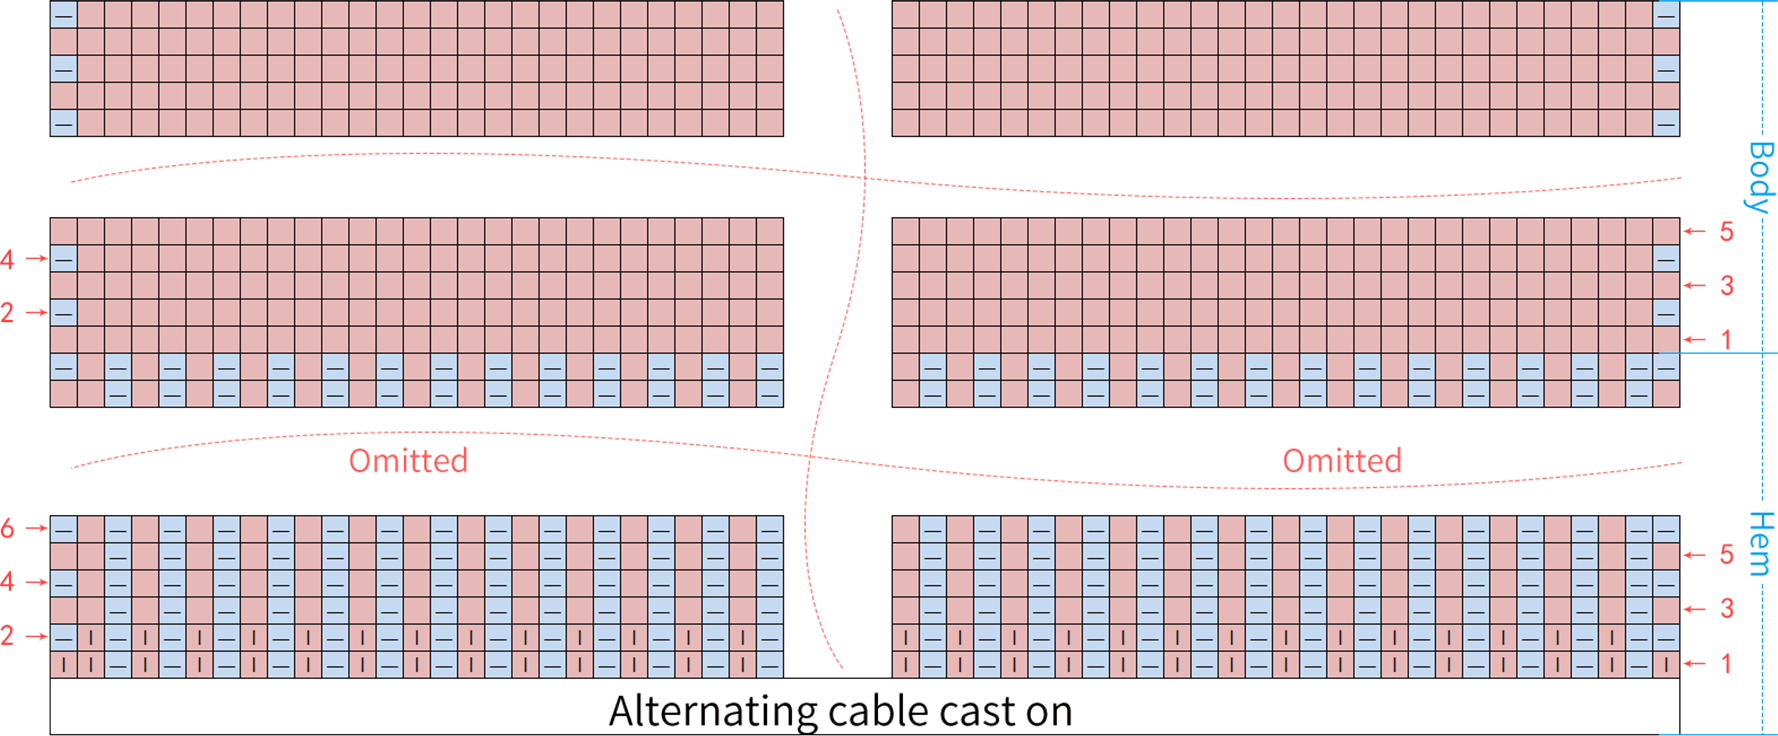
Note:
1. The first row is considered the right side of the piece, so when knitting the wrong side, check the key to see how to work a certain symbol on the wrong side
2. Pay attention that for convenience in sewing, the first and last stitch of each row should be knit stitches;
3. Due to individual differences in crochet tension, the row numbers for the hem and body section are for reference only. Refer to the chart and continue knitting until you reach the corresponding measurement, and always end with the wrong side.
| Size | Part | Cast on Sts for Hem | Row Number of Hem | Hem Length | Body Sts Number | Body Length | Row Number of Body |
| Large Size Long Version | Front Piece | 126 | 18 | 6 cm | 126 | 43 cm | 126 |
| Back Piece | 53 cm | 154 | |||||
| Large Size Short Version | Front Piece | 34 cm | 98 | ||||
| Back Piece | 43 cm | 126 | |||||
| Small Size Long Version | Front Piece | 106 | 16 | 5.5 cm | 106 | 43 cm | 126 |
| Back Piece | 53 cm | 154 | |||||
| Small Size Short Version | Front Piece | 34 cm | 98 | ||||
| Back Piece | 43 cm | 126 |
Step 2 Shoulder (4.00 mm circular needle) 19' 12''
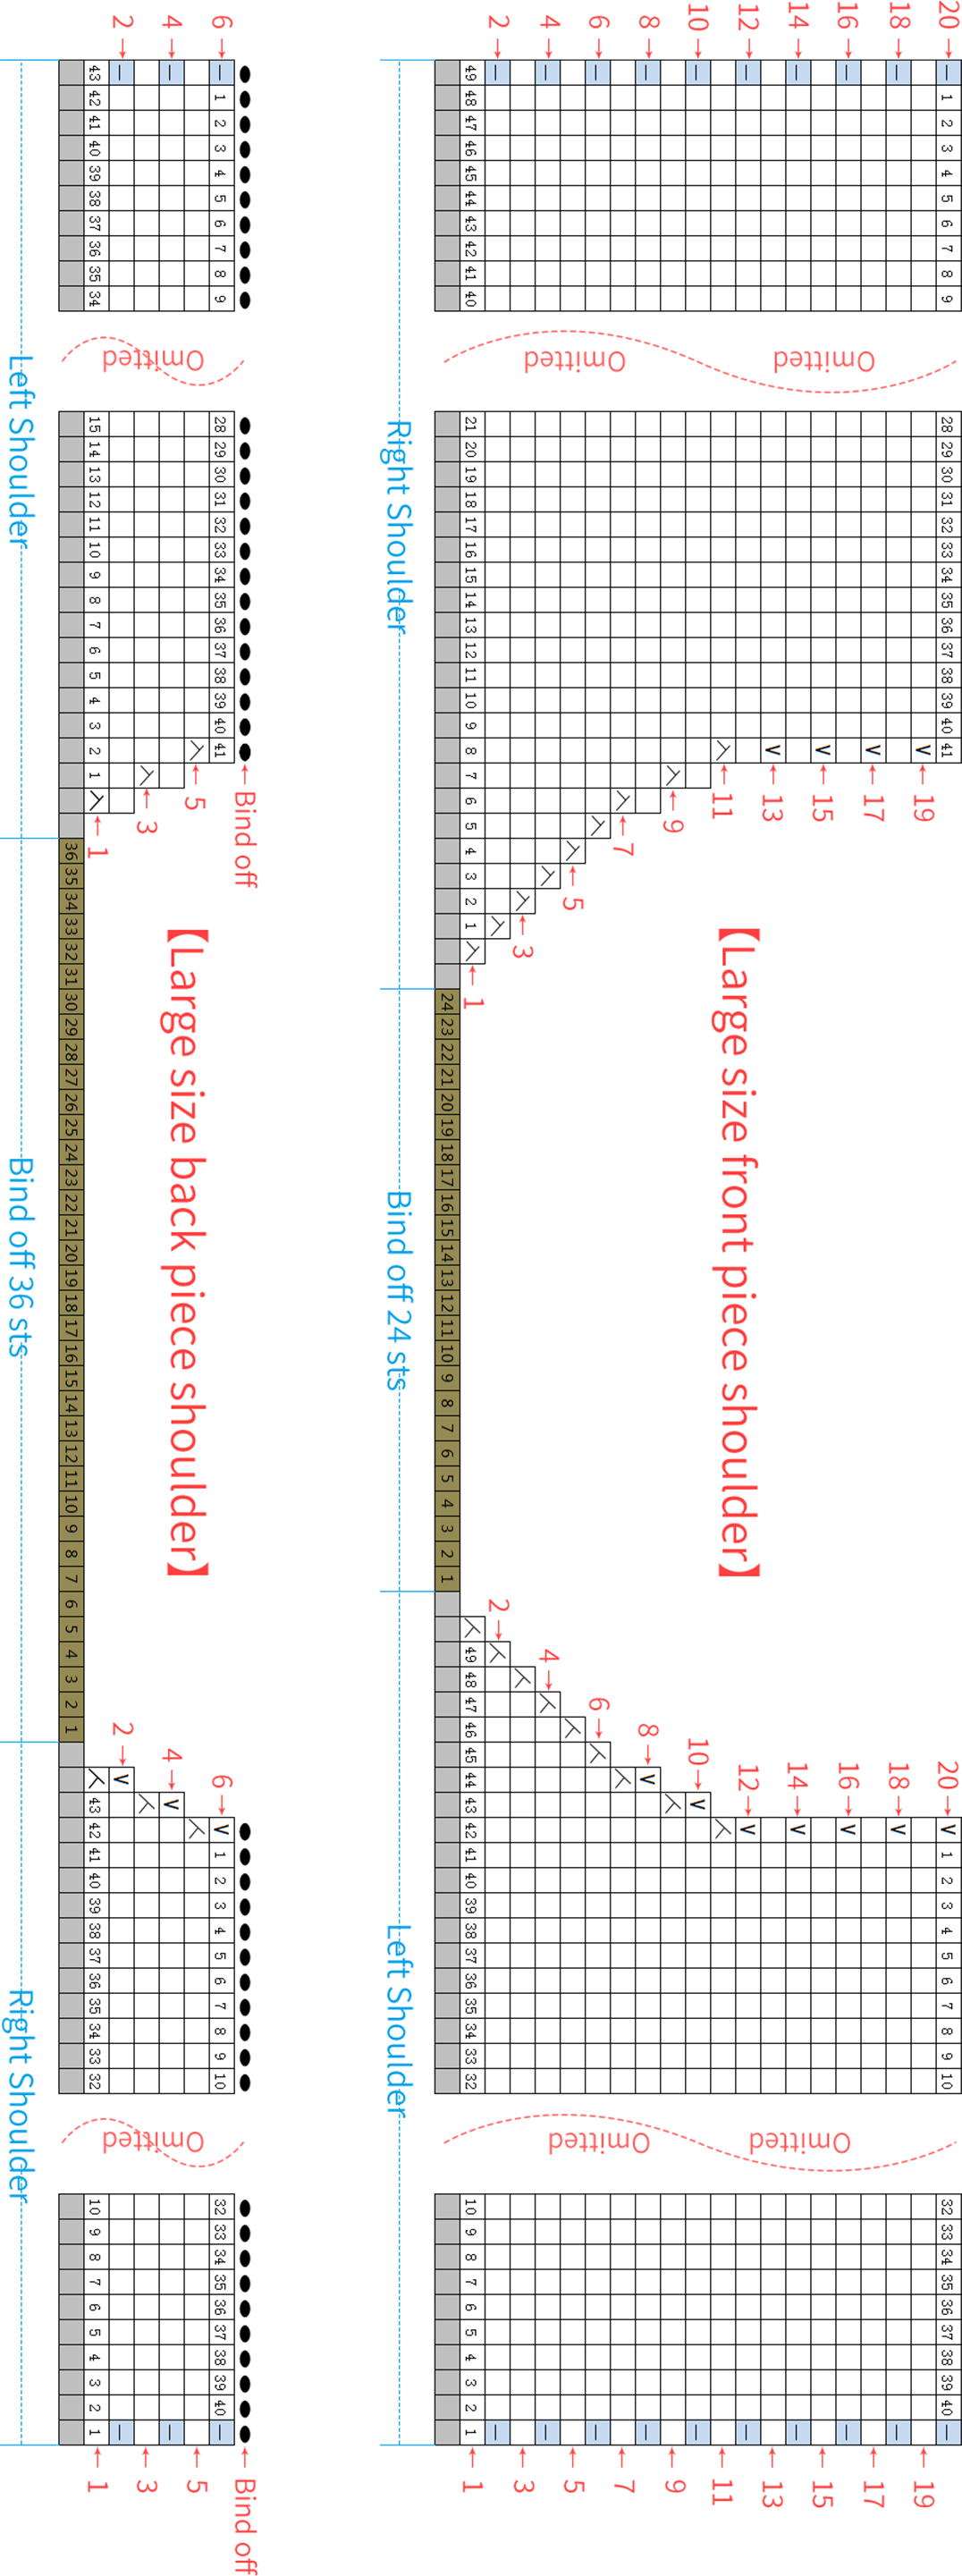
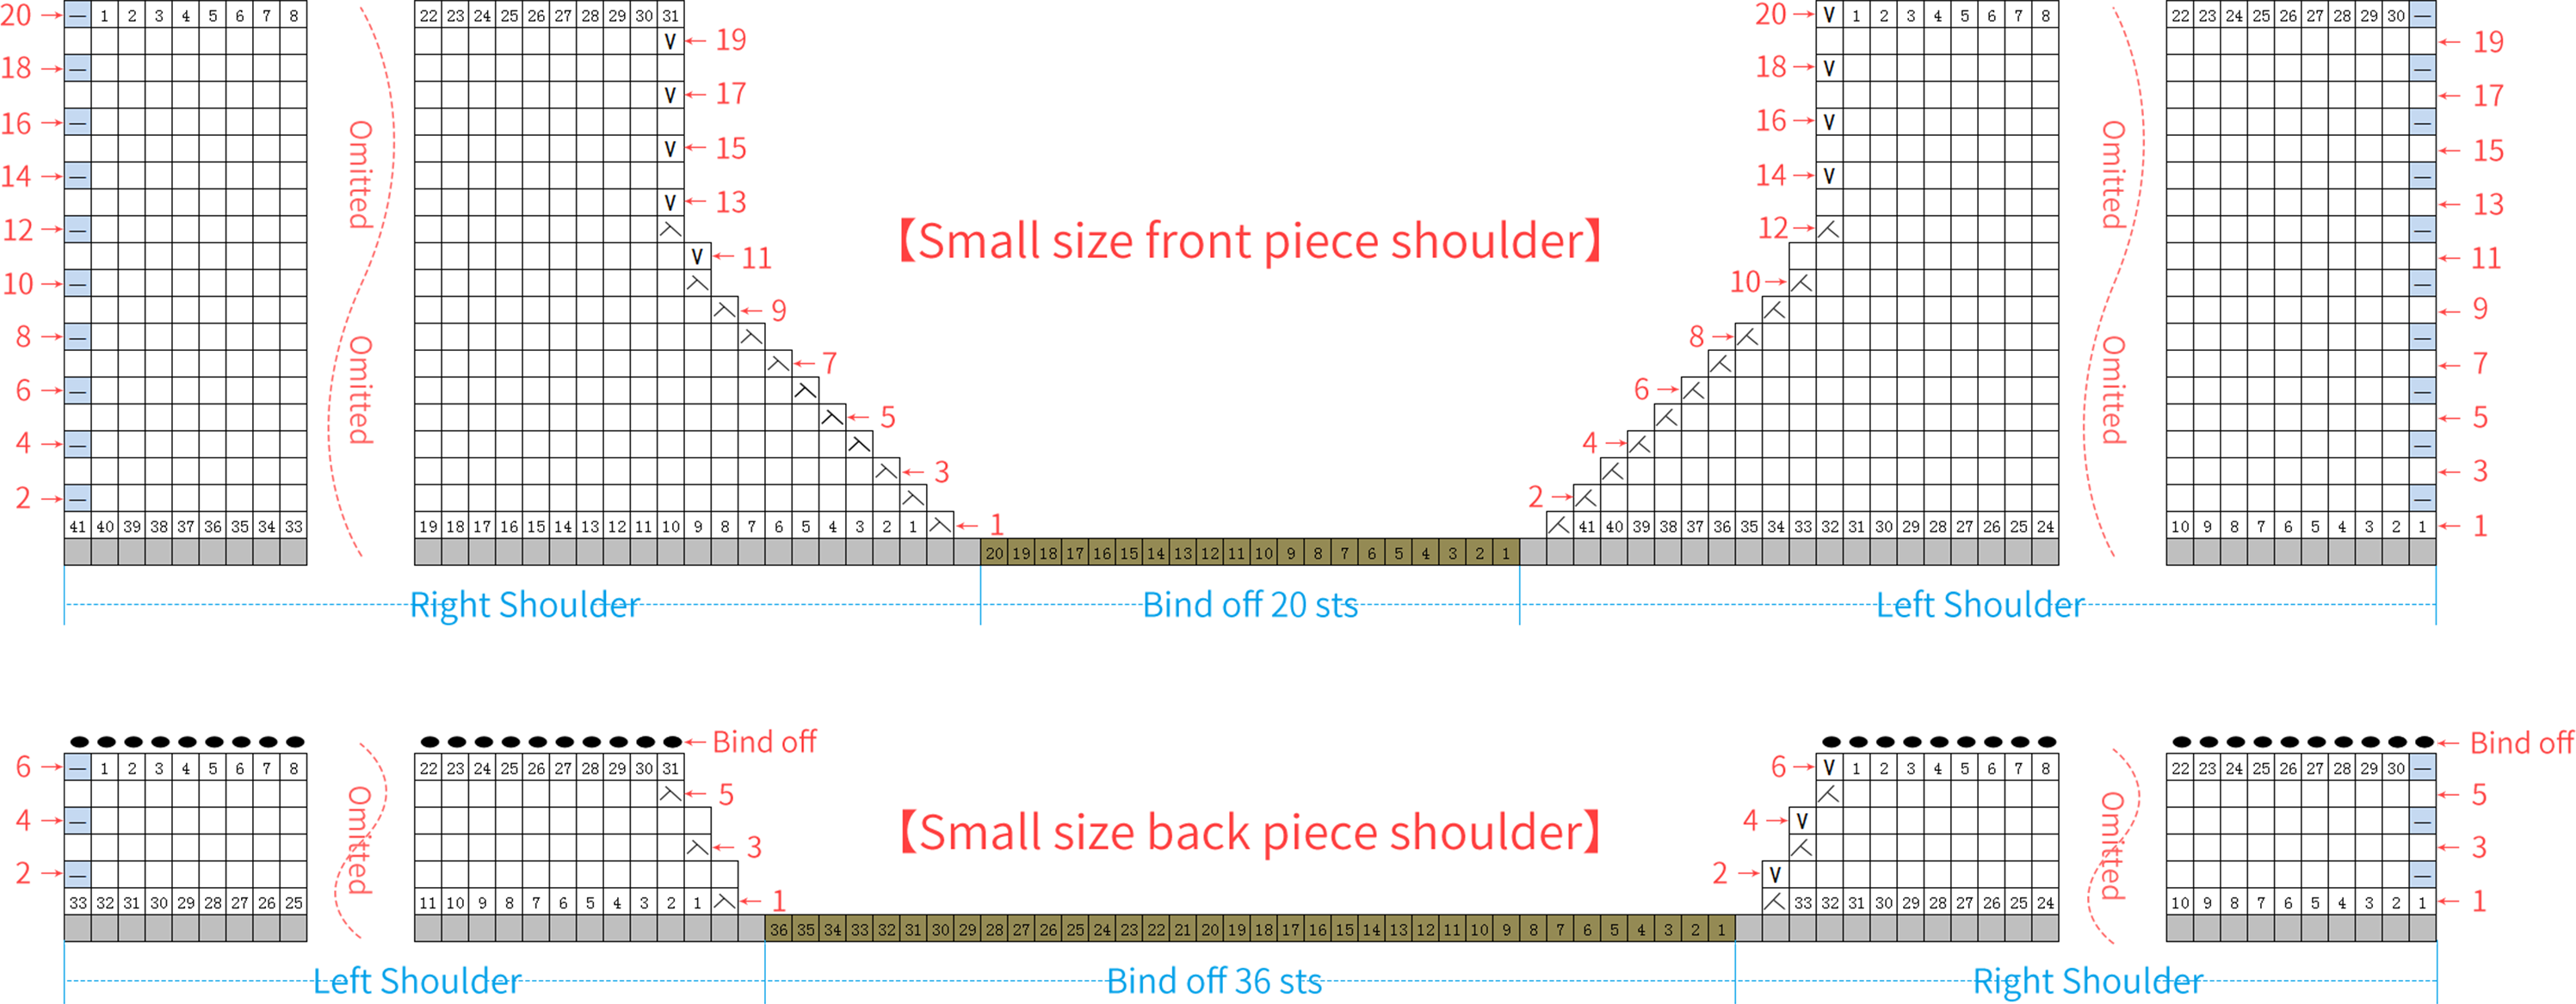
Continue working the front shoulderA3along the body part, starting with the left shoulder while holding stitches in the middle section. After completing the left shoulder, continue to work the right shoulder. For the back shoulder, start with the right shoulder first, holding stitches in the middle section. Once the right shoulder is done, join it with the corresponding right shoulder of the front piece A4. Then knit the left shoulder and join it with the corresponding front piece. Please refer to the video demonstration for specifics.
Note:
Part 2 Sleeves (4.00 mm circular needle) 44' 10''
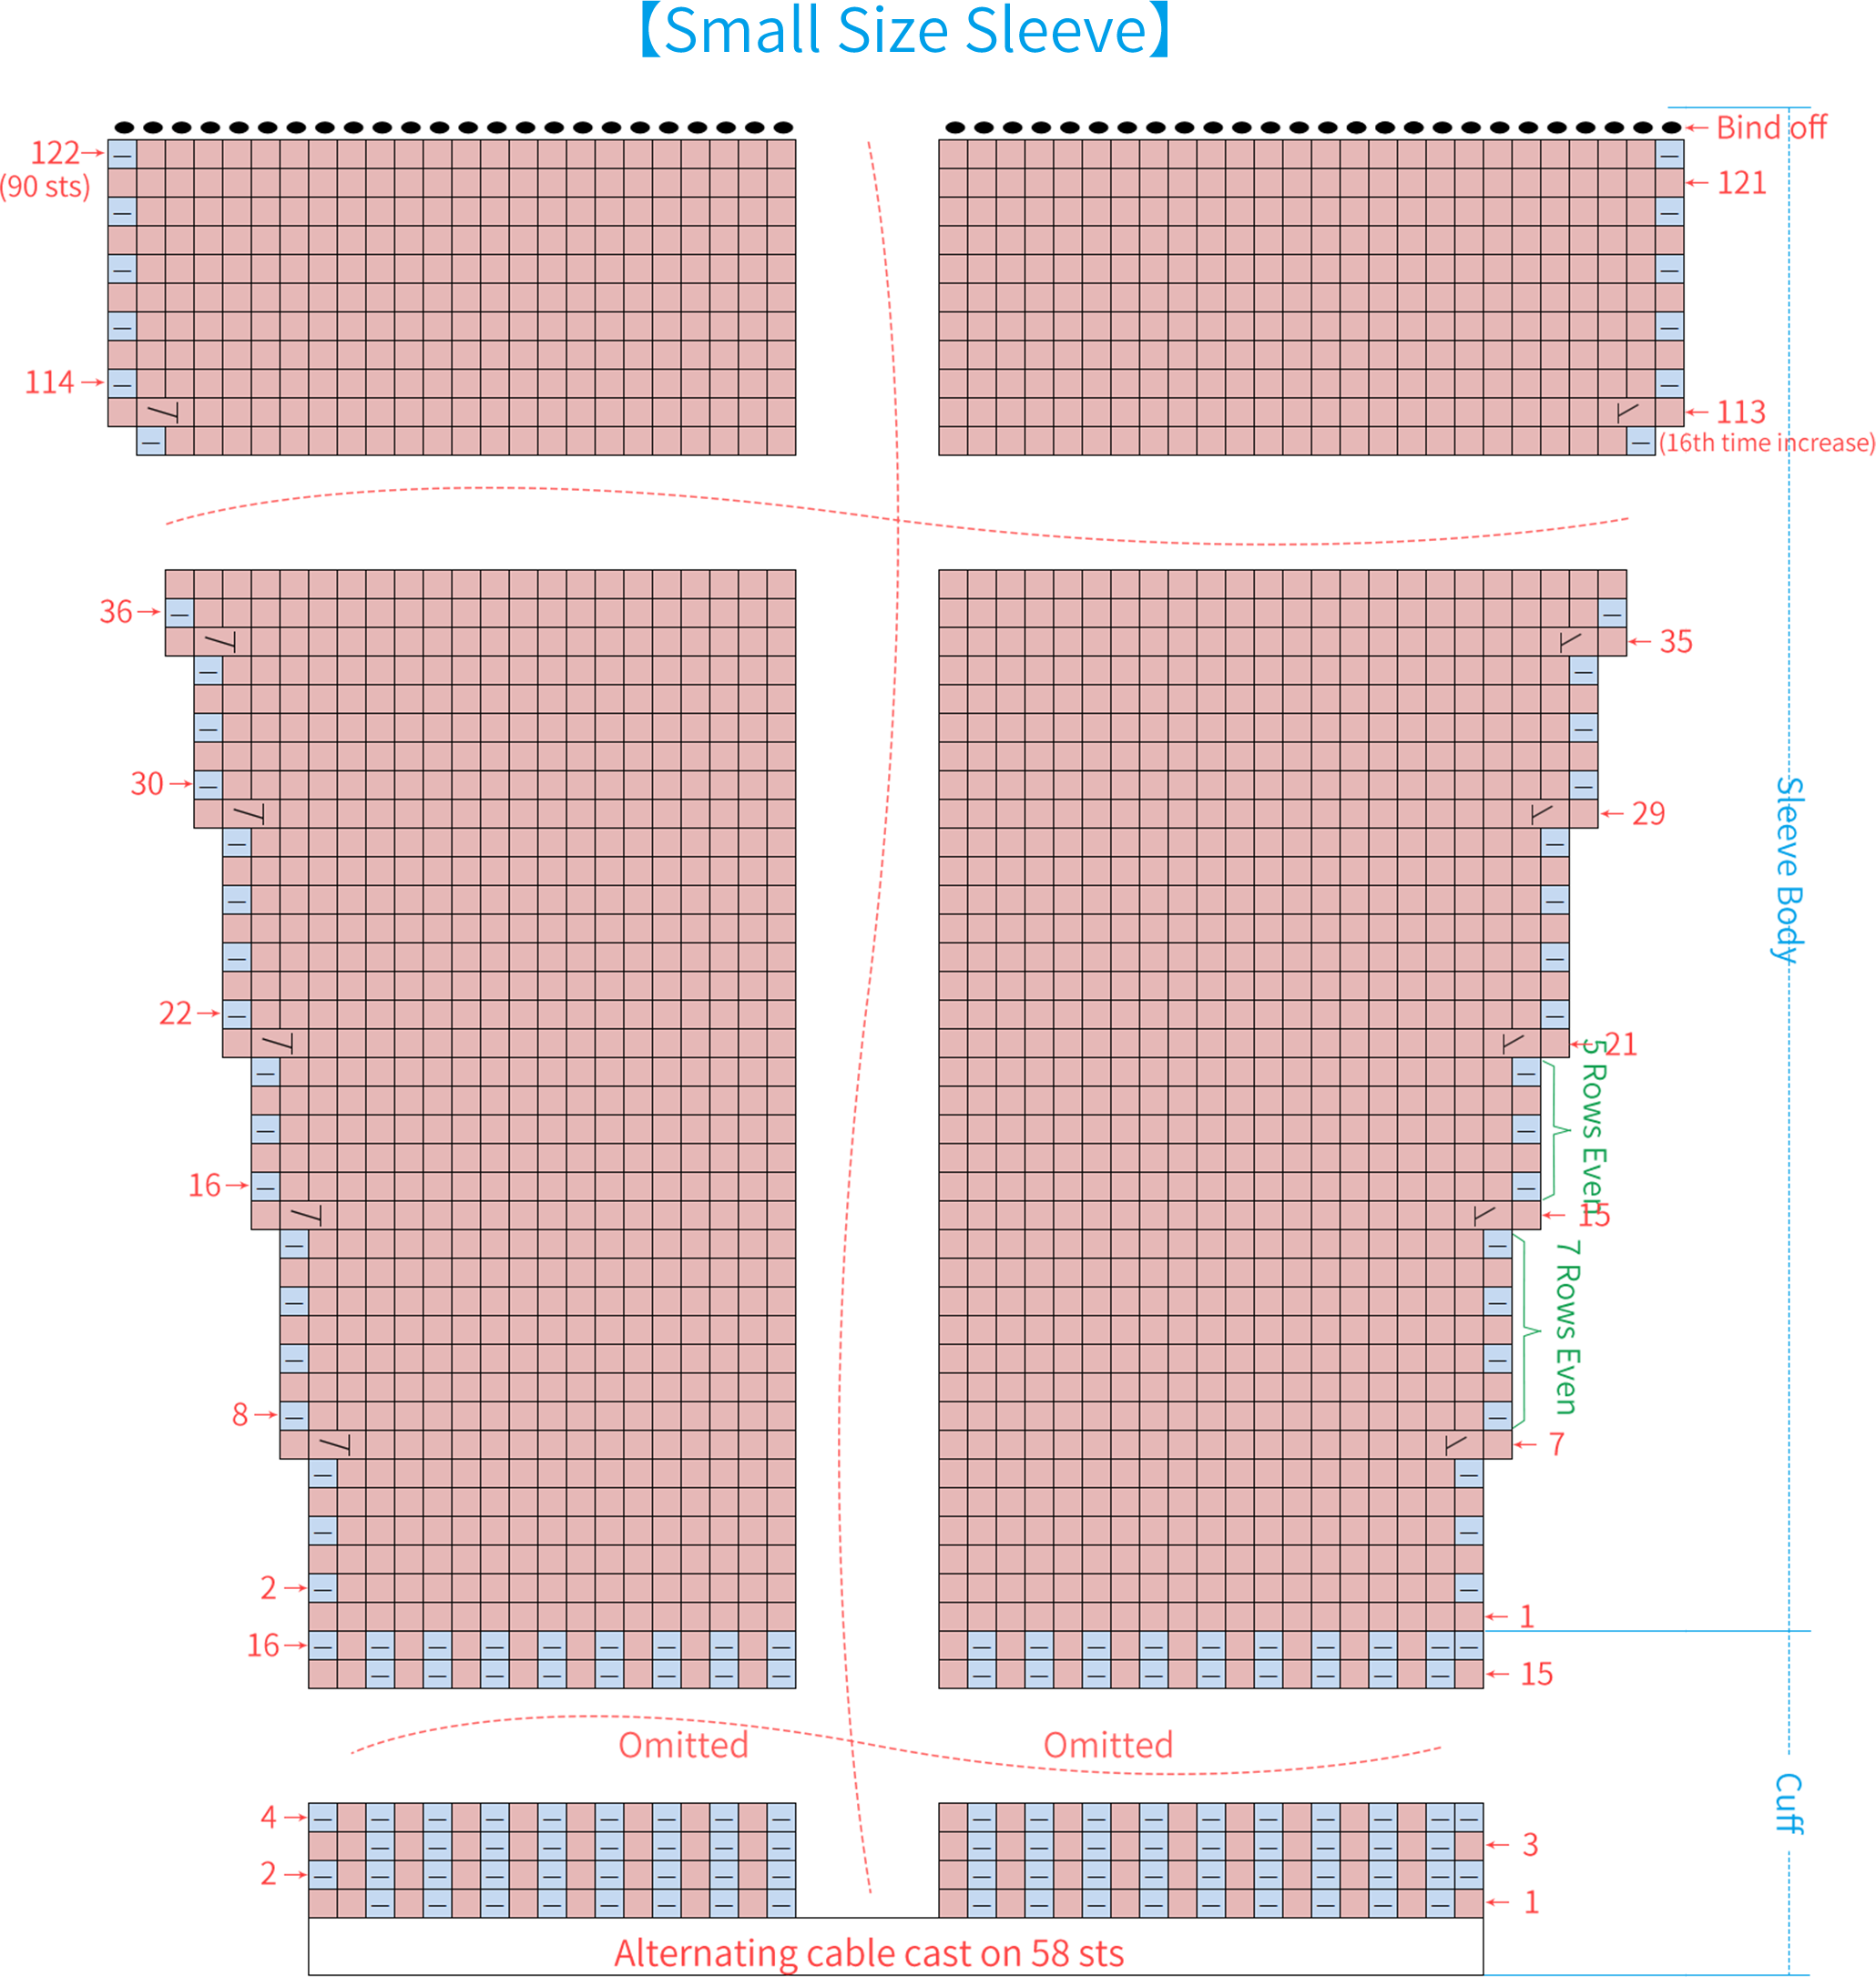
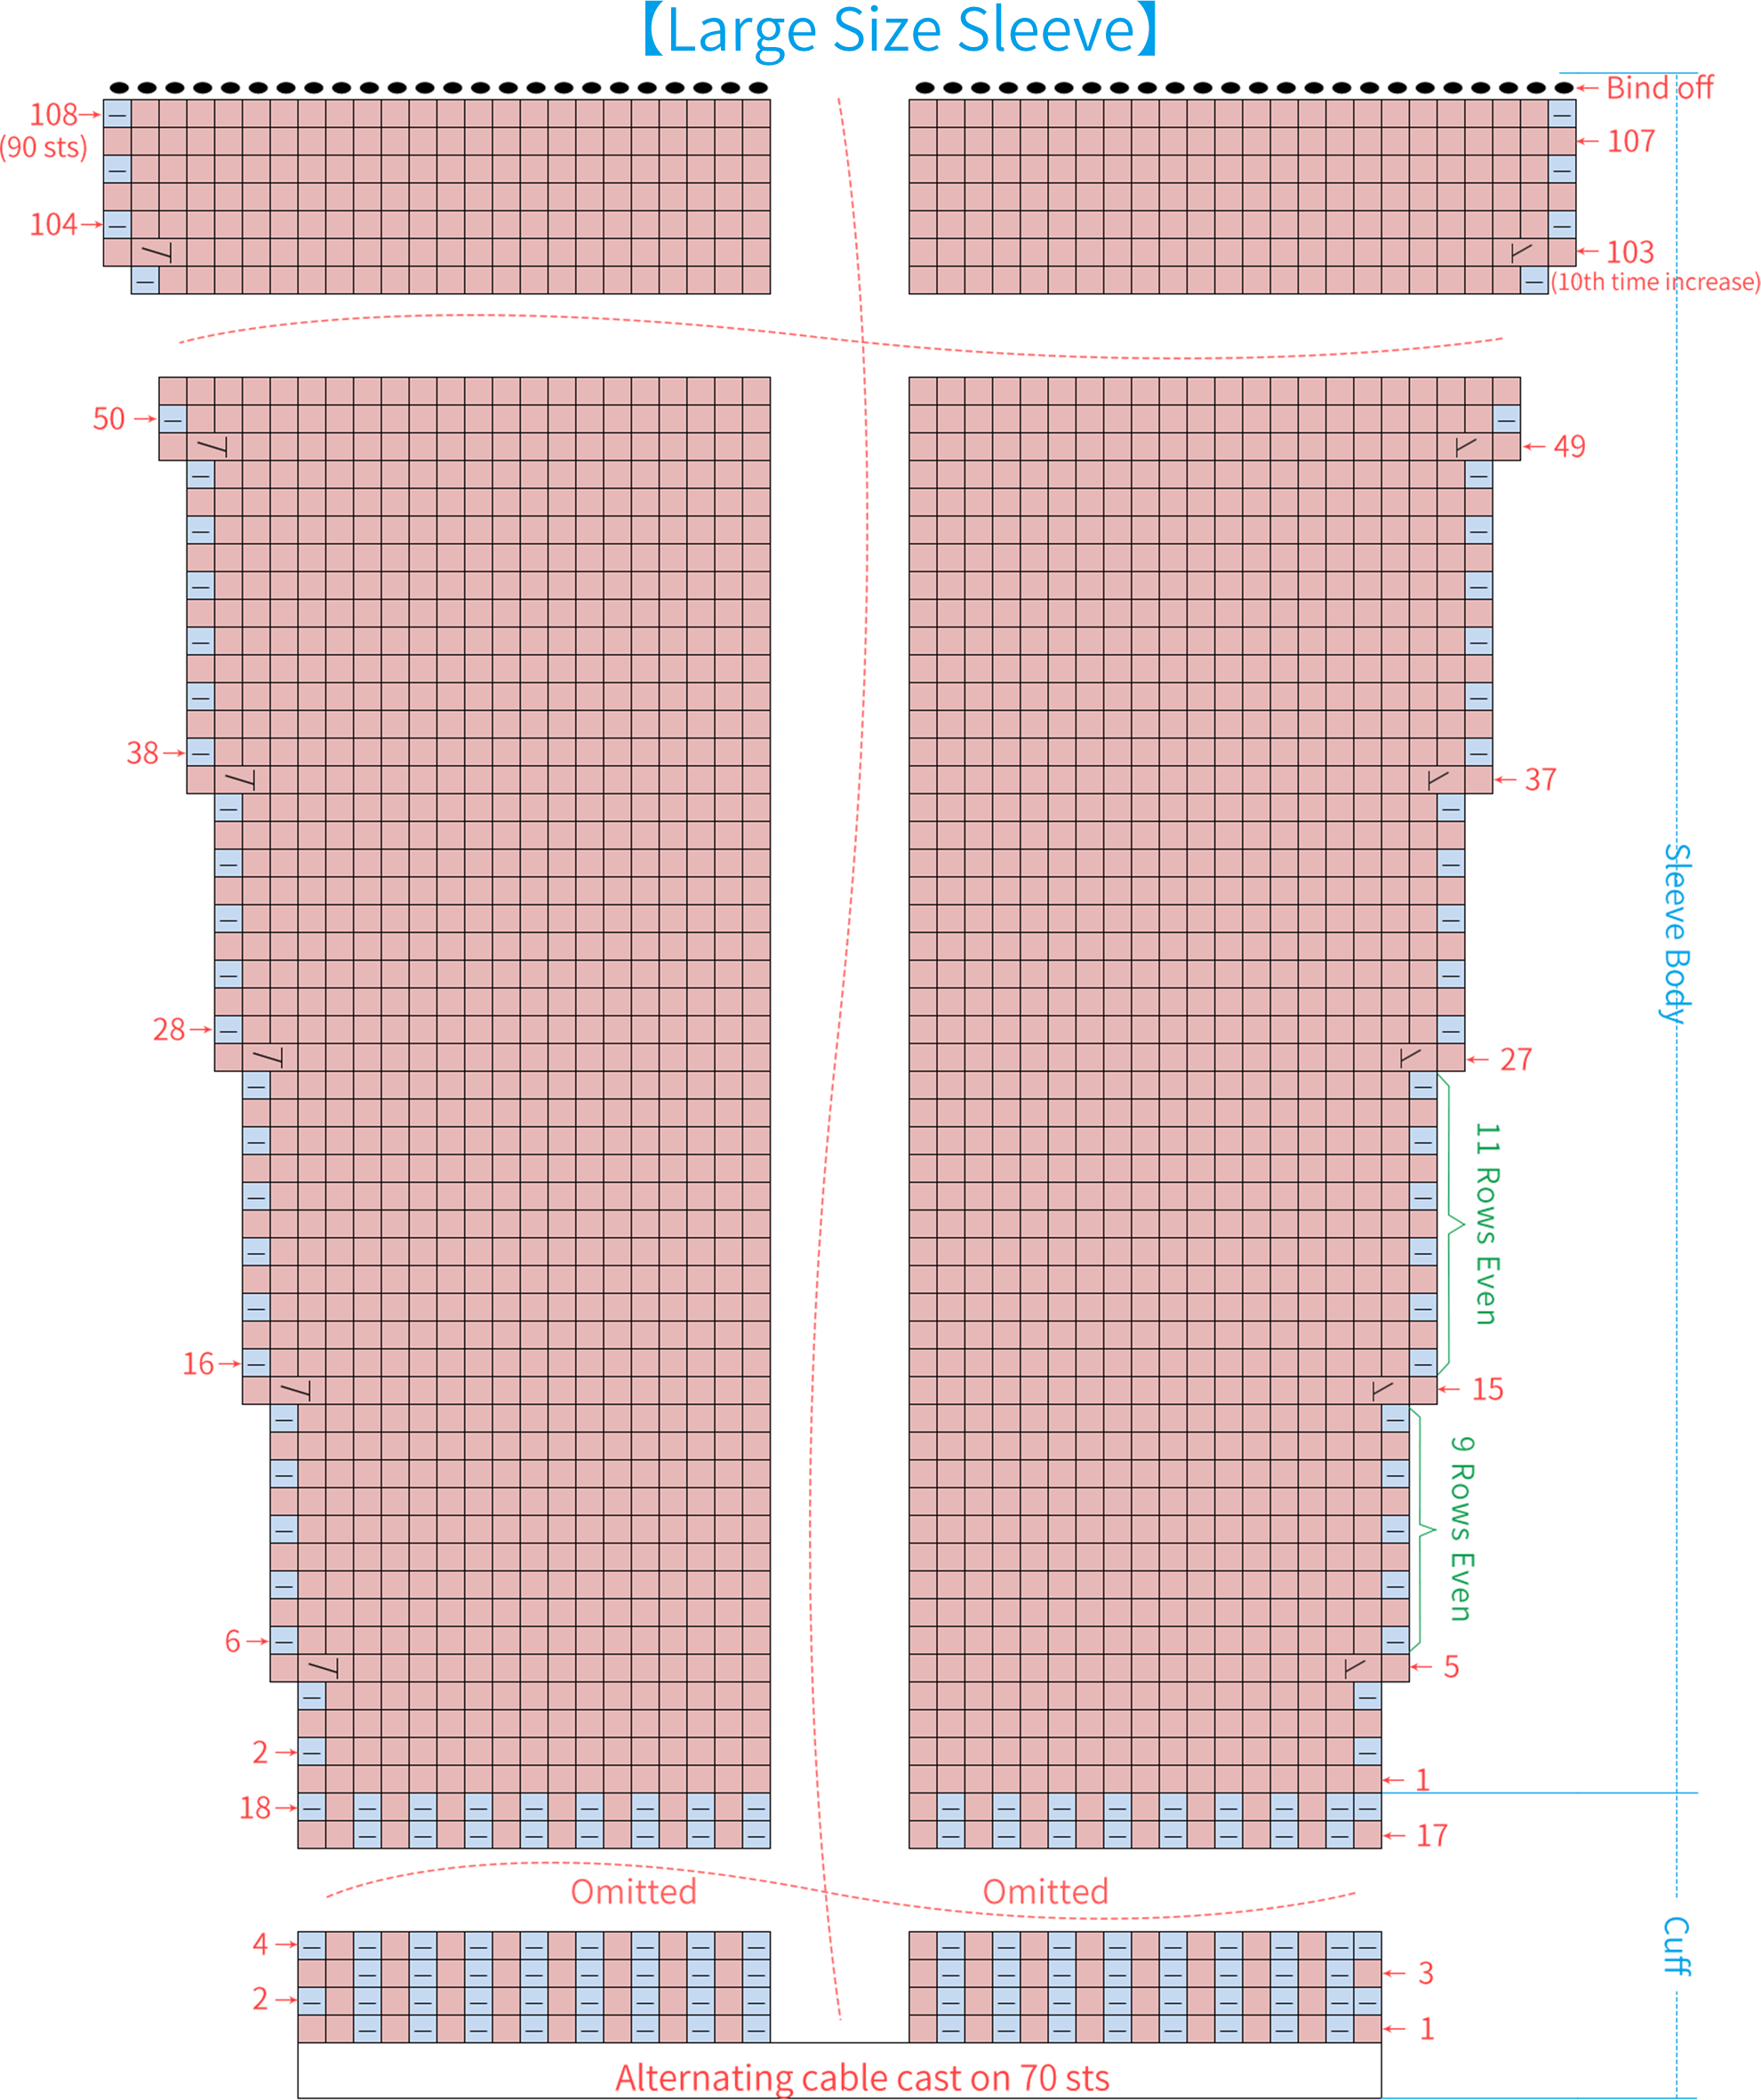
There are two sleeves, both worked in rows using the same method. They are divided into cuff A5 and sleeve body A6. After finishing the sleeves, sew the side seams together correspondingly. Please refer to the video demonstration for specifics.
| Sleeve | |||||
| Size | Cast on Sts for Cuff | Row Number for Cuff |
Cuff Length | Row Number for Sleeve Body |
Sleeve Body Length |
| Large Size | 70 | 18 | 6 cm | 108 | 39 cm |
| Small Size | 58 | 16 | 5.5 cm | 122 | 43.5 cm |
For the large size sleeve body increase pattern:
Except for the first 4 rows and last 5 rows, in the middle part, increase stitches once every 9 rows, then once every 11 rows, alternating according to this pattern. Each time, increase 1 stitch at both the beginning and ending, for a total of 10 increases.
For the small size sleeve body increase pattern:
Except for the first 6 rows and last 9 rows, in the middle part, increase stitches once every 7 rows, then once every 5 rows, alternating according to this pattern. Each time, increase 1 stitch at both the beginning and ending, for a total of 16 increases.
Part 3 Join pieces together 57' 12''
Sew the side seams of the front and back pieces together, and sew the sleeves at the same time. Please refer to the video demonstration for specifics.
Part 4 Collar (3.75 mm short straight needles)A8 64' 50''
The collar is worked in1 by 1 rib by picking up stitches around the neckline position, and finally finished with a ribbing bind off. Please refer to the video demonstration for specifics.
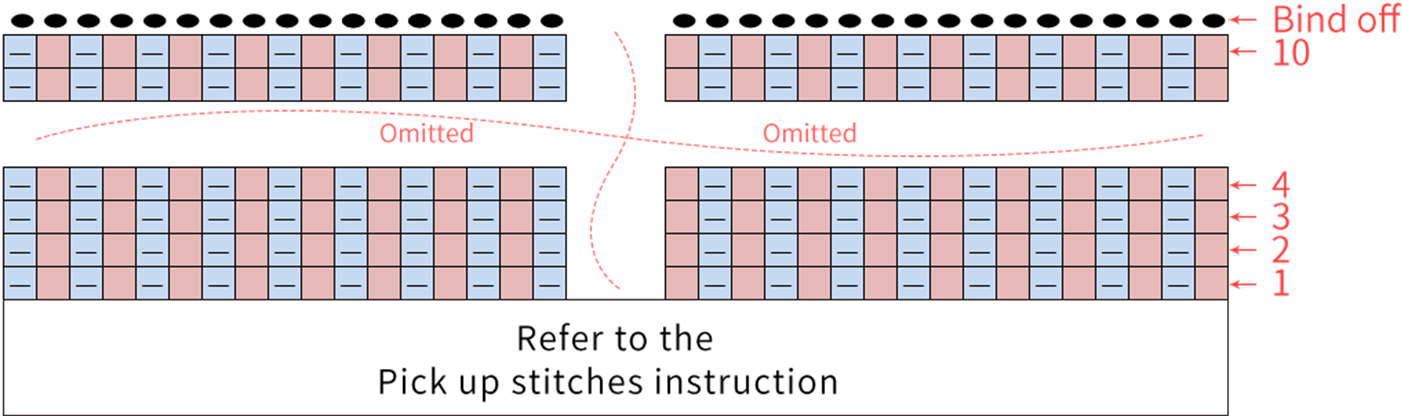
Pick up stitches instruction:
For the larger size, pick up stitches as follows: 36 held stitches from the back piece + 20 picked up stitches along the side + 24 held stitches from the front piece + 20 picked up stitches along the side (total 100 stitches).
For the smaller size, pick up stitches as follows: 36 held stitches from the back piece + 20 picked up stitches along the side + 20 held stitches from the front piece + 20 picked up stitches along the side (total 96 stitches).
Made by the community