Bag
Present Drawstring-Santa and Reindeer
Project preview
See the finished project
Pattern format
Instructions
Watch and follow
Video tutorial
The drawstring pouch consisted of the upper part and the lower part. Among these, the upper part mainly includes the head, the upper garment, the arms, the facial features and accessories. The lower part mainly includes the body and decorations. First, complete the upper and lower parts separately, then use a drawstring to connect them.
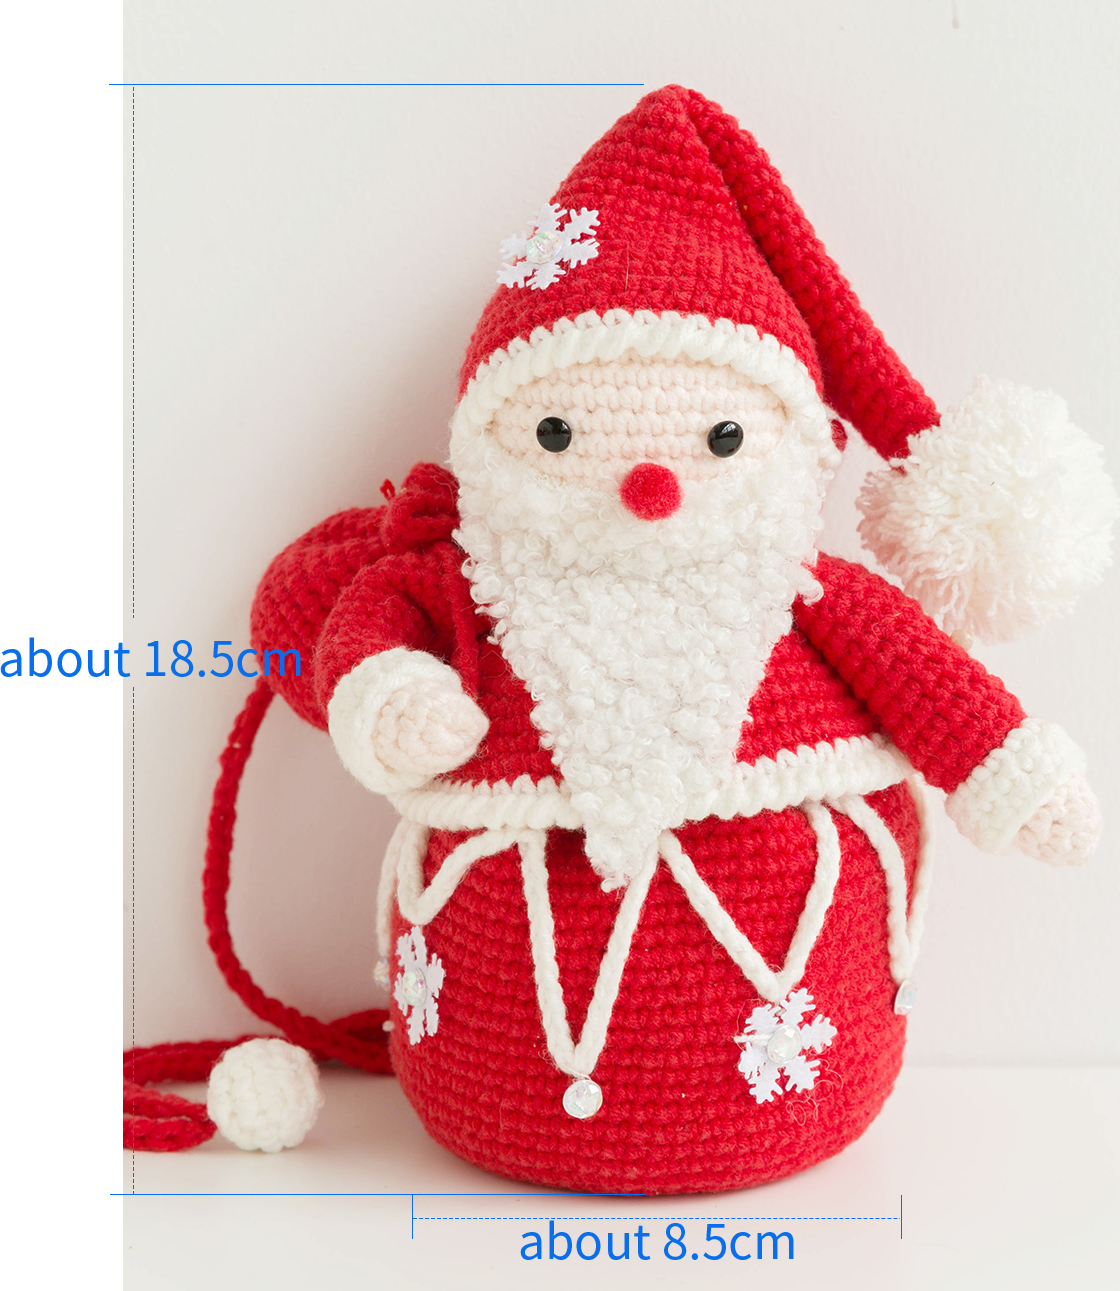
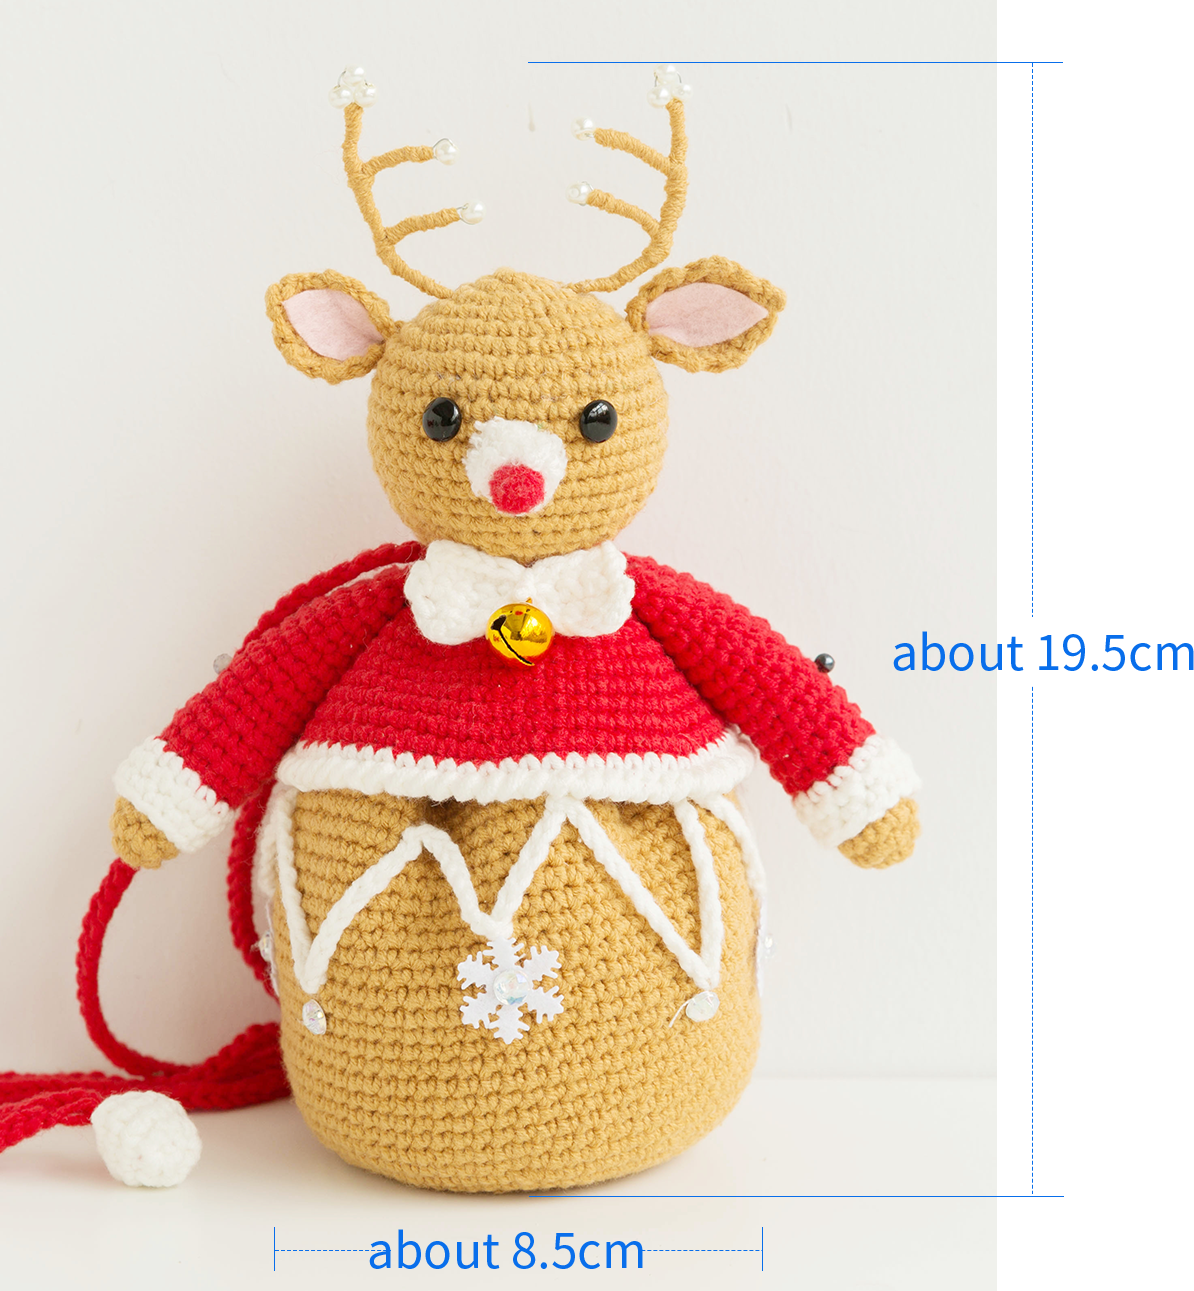
The handcrafted measurements may have an error of 1 to 2 cm. Due to variations in individual tension, the size of the sample is for reference only.
Material : 4-Ply Combed Cotton & Acrylic Fibre Hand Knitting Yarn
Hook : 2.00 mm crochet hook

ABBREVIATIONS
RRound
turnturn the piece
Dao2start in 2nd CH from the hook
MRadjustable magic ring
Kskip
Xsingle crochet
V = sc2-in-12 single crochets into the same stitch
CHchain
A = sc2togsingle crochet 2 stitches together
BLOback loop only
FLOfront loop only
A = sc2toginvisible single crochet 2 stitches together
HRow
Chart Key

Note:
1. This pattern is making in Chinese crochet pattern terms, and the stitch name is written using American terminology. All measurements in charts are in cm.
2. Working in joined round
When crocheting in rounds without further guidance, working in closed rounds, start each round with a set number of beginning chains and close with a slip stitch. The beginning chain preceding a single crochet and the slip stitch used for joining rounds are not included in the total stitches.
Upper part
Start by crocheting the head. Then, continue crocheting the upper garment from the head. After completing it, crochet the arms separately and sew them on. Finally, add the facial features and accessories.
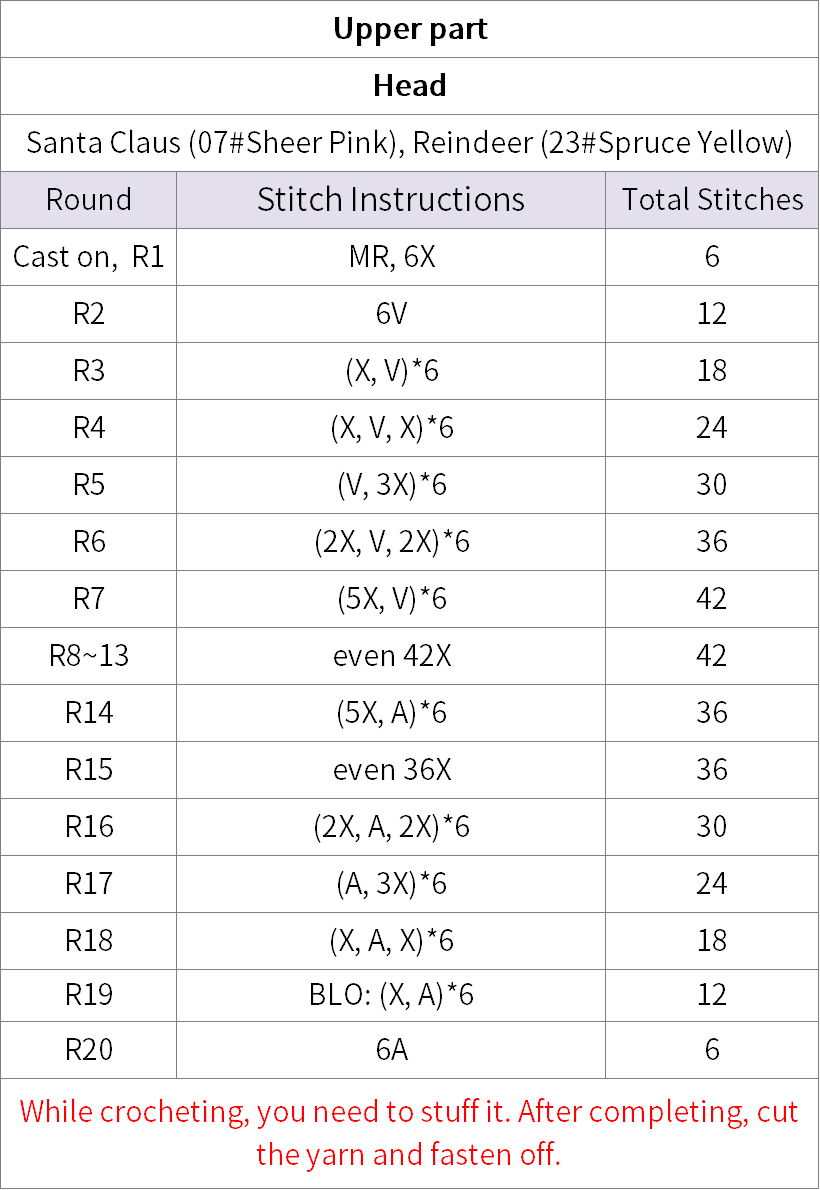
Part 1 Head 01' 44'' (Part 1)
Crochet in rounds using the magic ring method.Please refer to the video demonstration for more details.
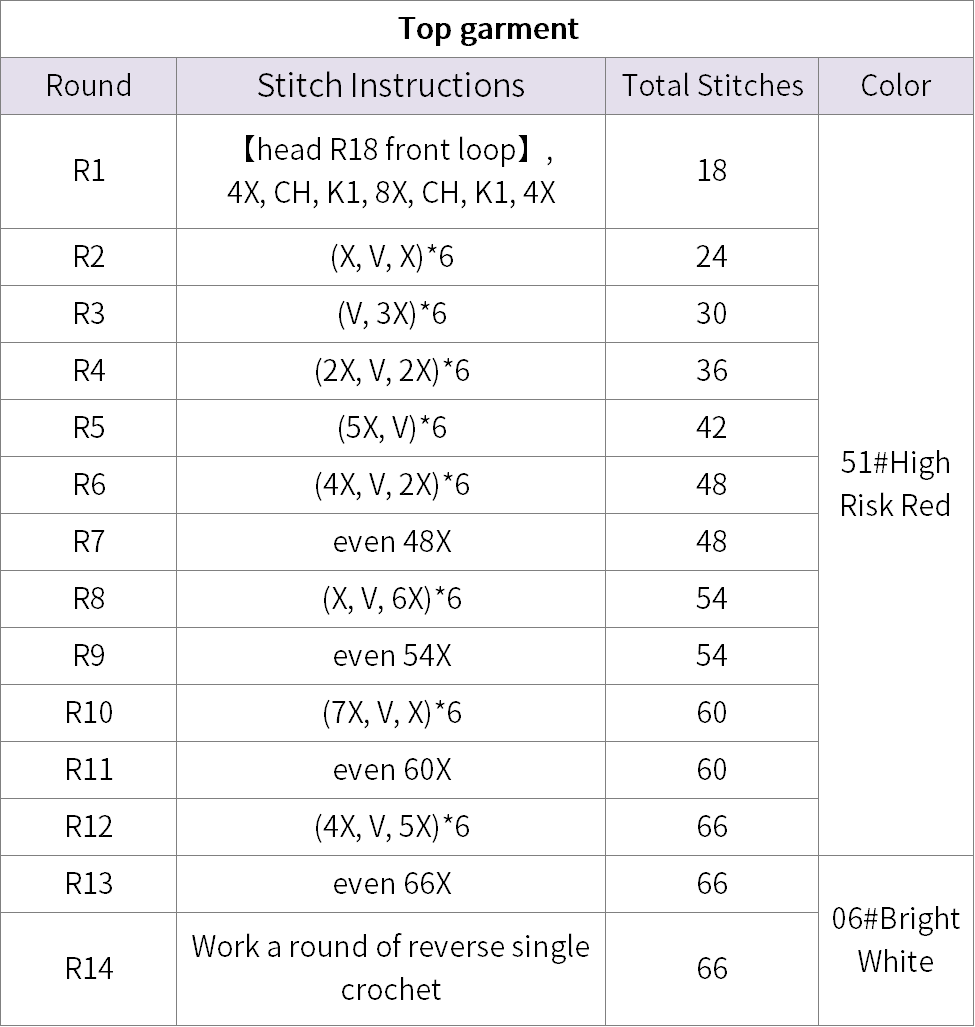
Part 2 Top garment 31' 08'' (Part 1)
Continuing from the corresponding position of the head, crochet in rounds for the top, then break the yarn and weave in the ends on the wrong side. Please refer to the video demonstration for specifics.
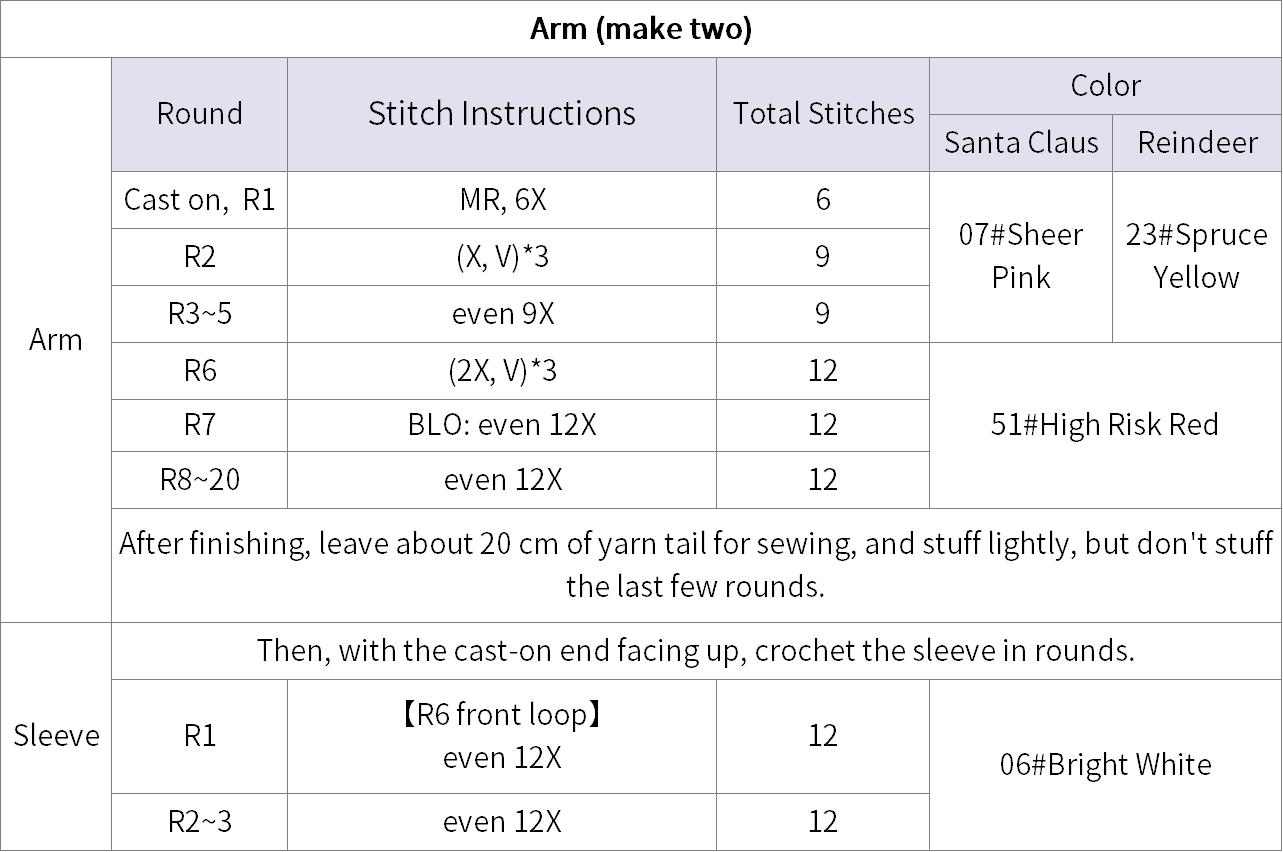
Part 3 Arms 42' 32'' (Part 1)
Both start by crocheting the arm, then crochet the sleeve, and finally sew them together. Please refer to the video demonstration for more details.
Part 4 Facial features
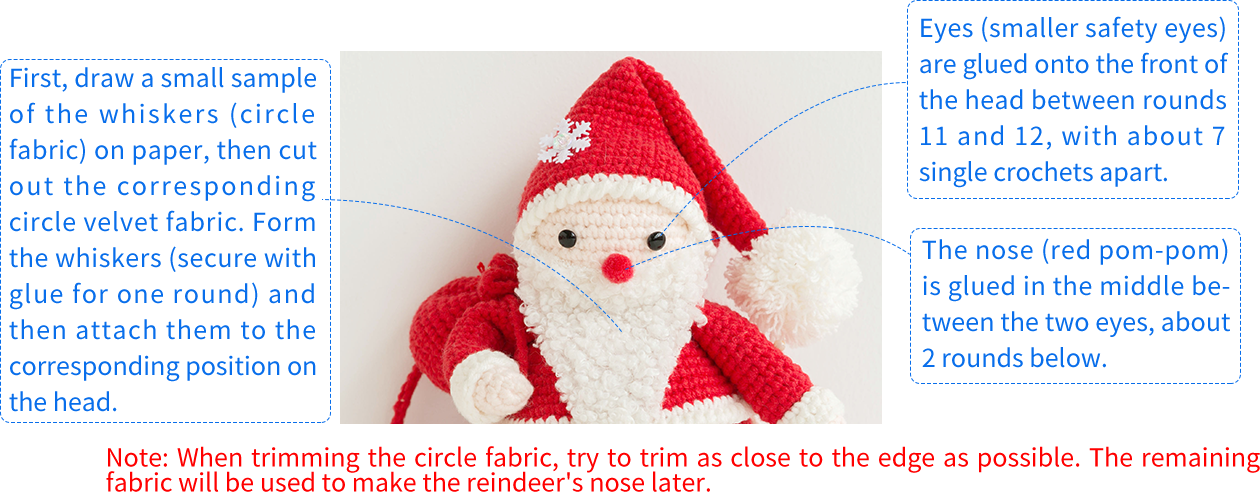
The two sets of facial features are different. Make them separately.
Step 1 Santa's facial features 49' 21'' (Part 1)
This includes the eyes, the nose, and the whiskers. Please refer to the video demonstration for more details.
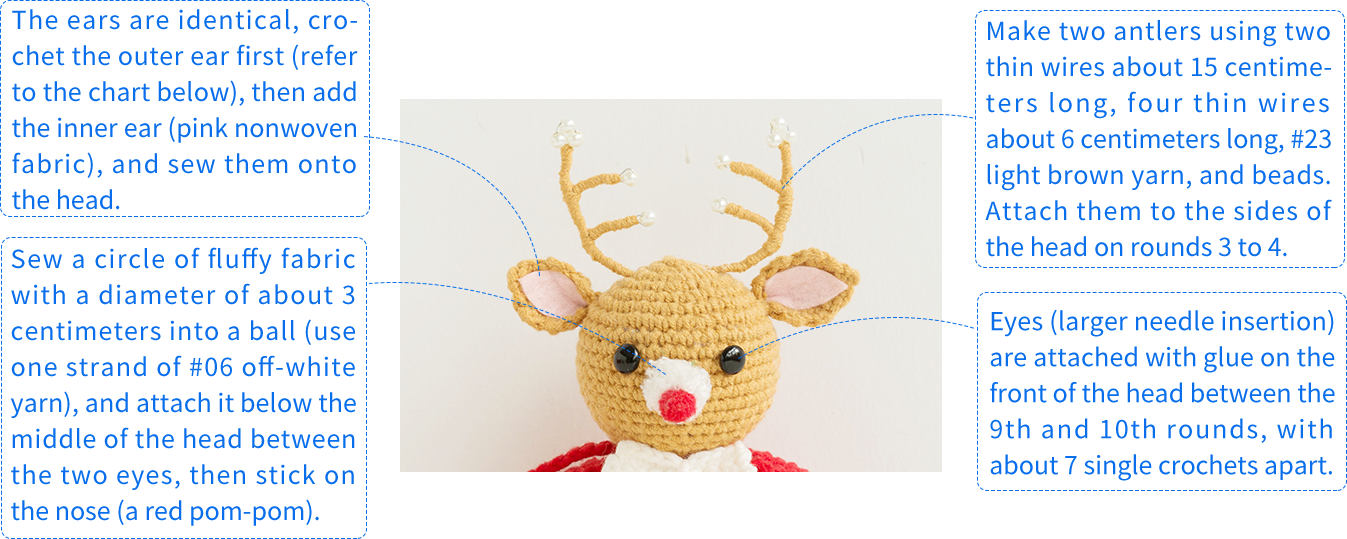
Step 2 Reindeer's facial features 55' 19'' (Part 1)
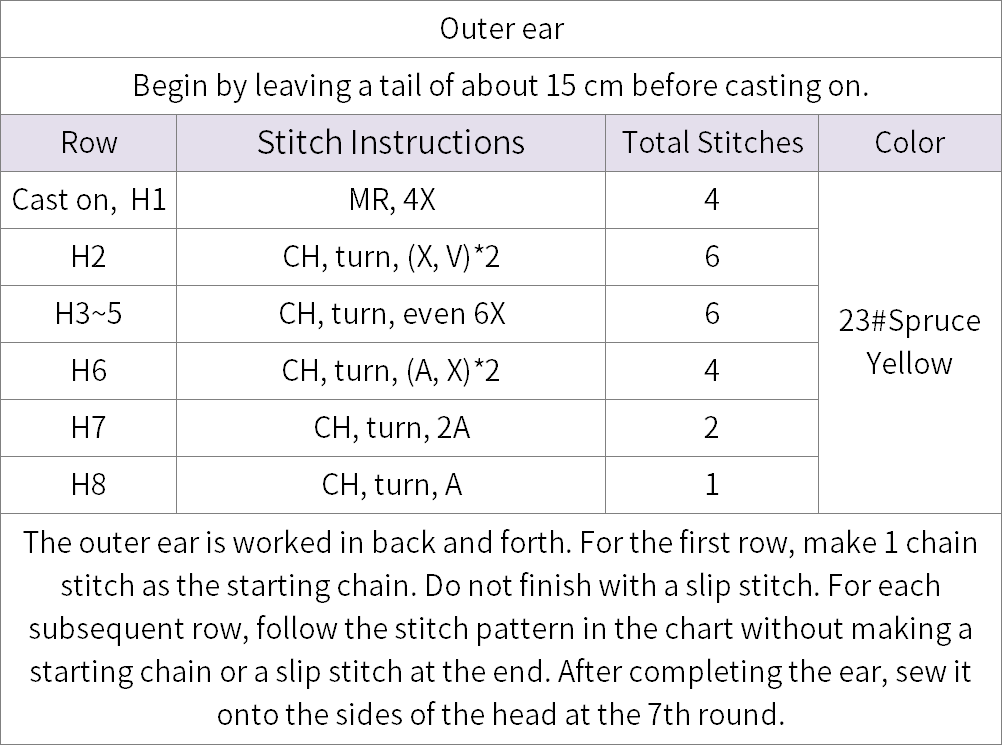
There are eyes, nose, ears and antlers. Please refer to the video demonstration for more details.
Part 5 Accessories
The two accessories are different, make them separately.
Step 1 Santa's accessories
The Santa's accessories include the making of a hat and a pocket.
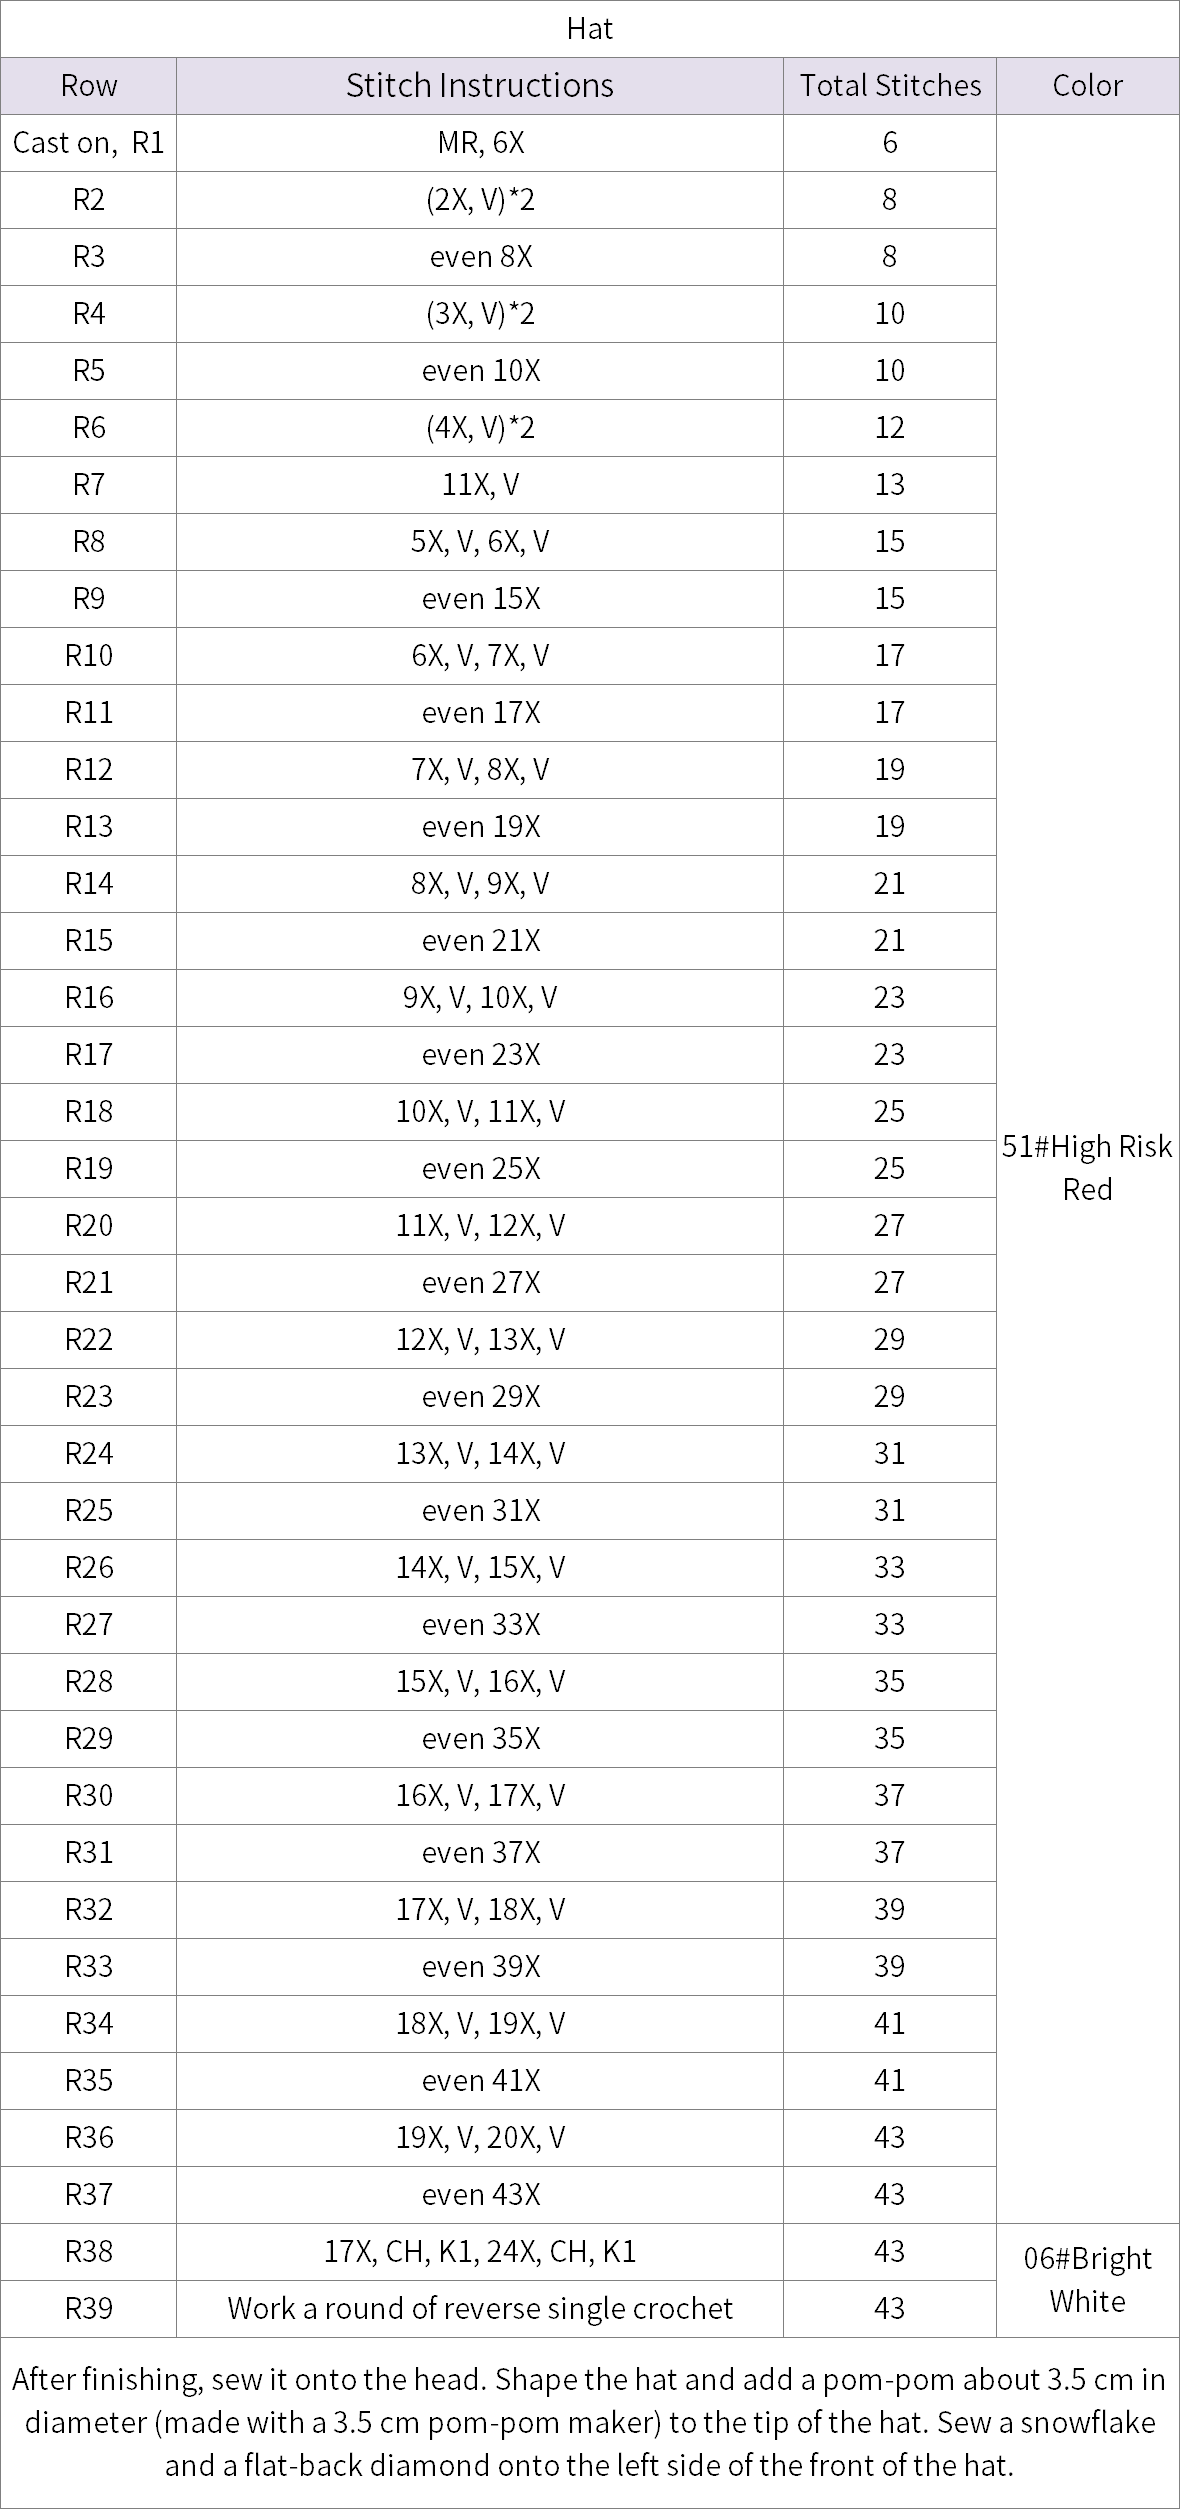
Hat 00' 12'' (Part 2)
Crochet the hat first. Sew it onto the head (06#Bright White) and shape it (51#High Risk Red). Add a pom-pom with a diameter of about 3.5 cm to the tip of the hat (for 06#Bright White, use a 3.5 cm pom-pom maker). Sew a snowflake and a flat-bottomed rhinestone on the left side of the front of the hat (take one strand from 06#Bright White).
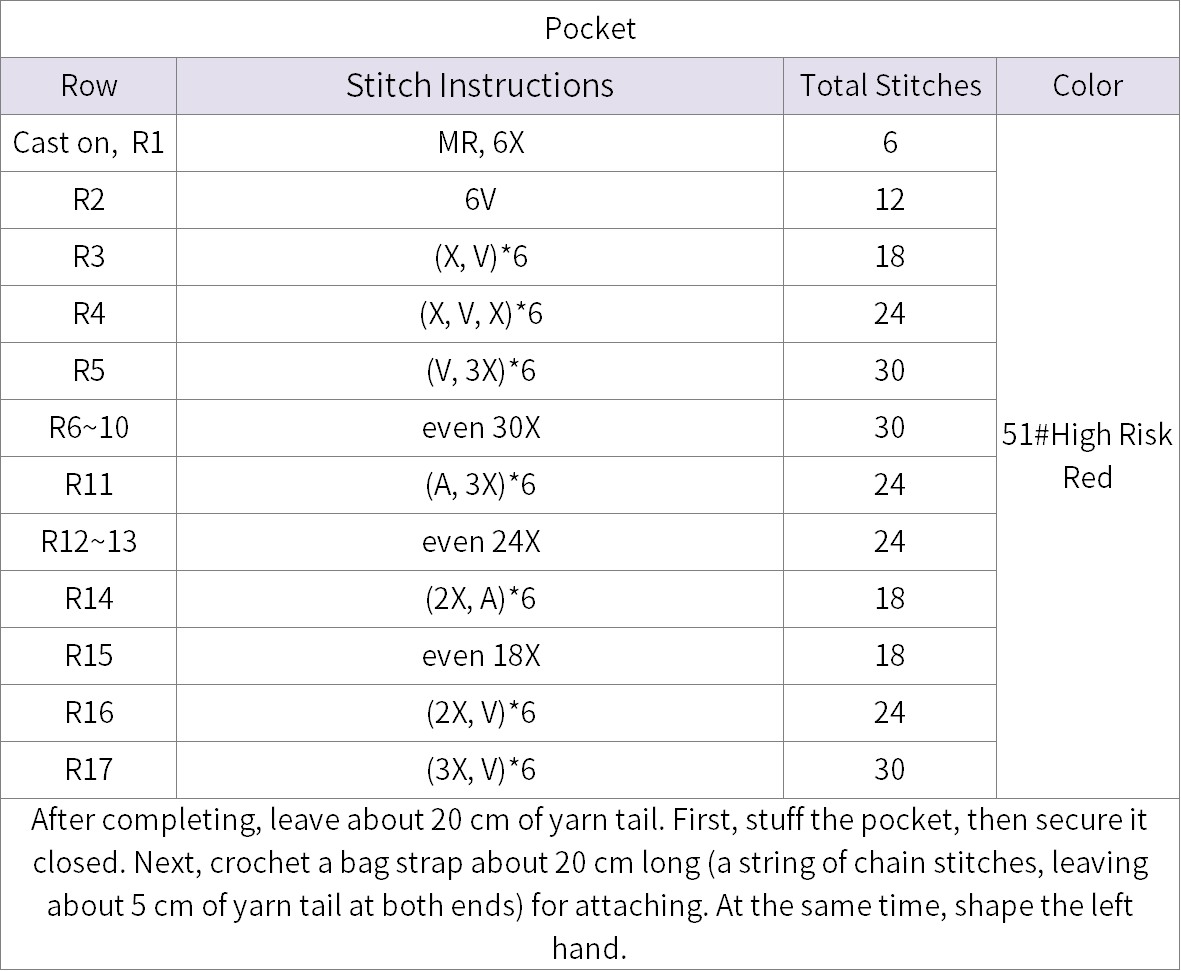
Pocket 09' 31'' (Part 2)
First crochet the pocket and the drawstring. Then attach them to the upper part. Please refer to the video demonstration for more details.
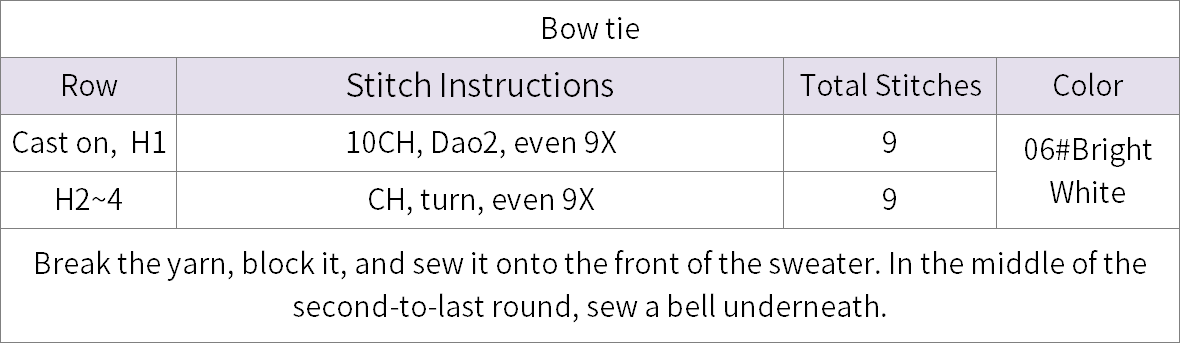
Step 2 Reindeer's accessories 16' 33'' (Part 2)
It’s the bow tie. Crochet and shape it. Sew it onto the top, then sew a bell underneath ( 06#Bright White). Please refer to the video demonstration for more details.
Lower part
The two versions differ only in the color of the body, the rest of the methods are the same. Both start by crocheting the body, and then add the decorations.
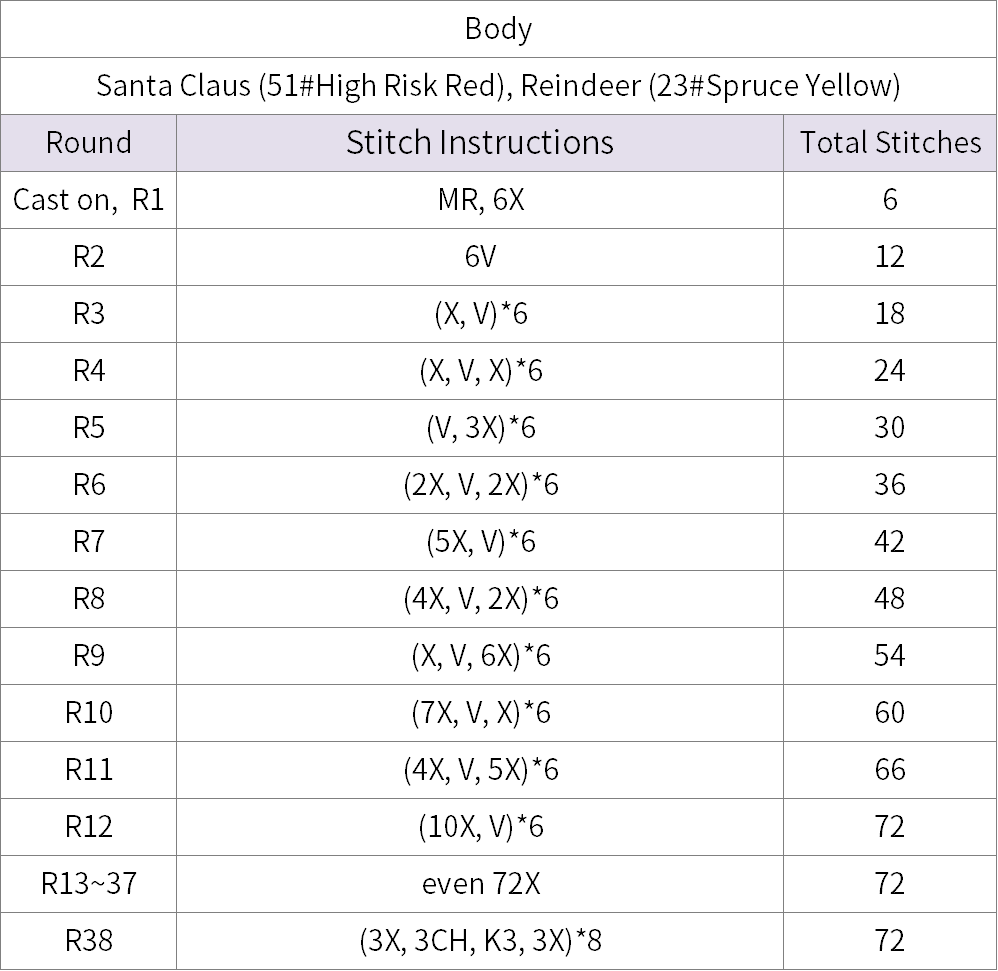
Part 1 Body 20' 29'' (Part 2)
The body starts with a magic ring. Refers to the chart for each round. Please refer to the video demonstration for more details.
Part 2 Decorations 20' 48'' (Part 2)
Make decorations on the body by crocheting chain stitches to form a decorative band (06#Bright White), then sew on snowflakes and flat-back rhinestones. Please refer to the video demonstration for specifics.
Join the upper and lower part 29' 52'' (Part 2)
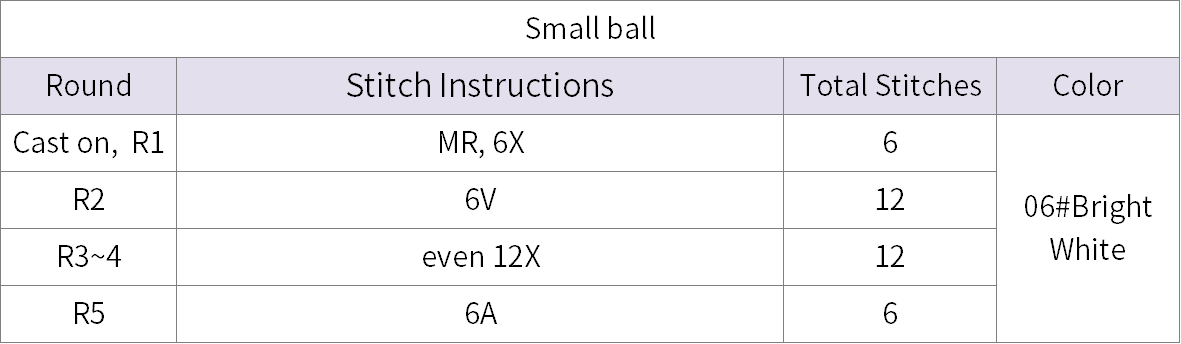
First, use the 51#High Risk Red yarn to crochet the drawstring. The finished drawstring should be about 110 cm long, but you can adjust the length as needed. Then, attach it to the top and bottom sections. Finally, crochet small balls at the tie-off points. Please refer to the video demonstration for more details.
Made by the community