Home / Blanket
Pupper Love Blanket
Project preview
See the finished project
Pattern format
Instructions
Watch and follow
Video tutorial
This blanket consists of the main part and some accessories. Start with the main part, then make and attach the accessories.
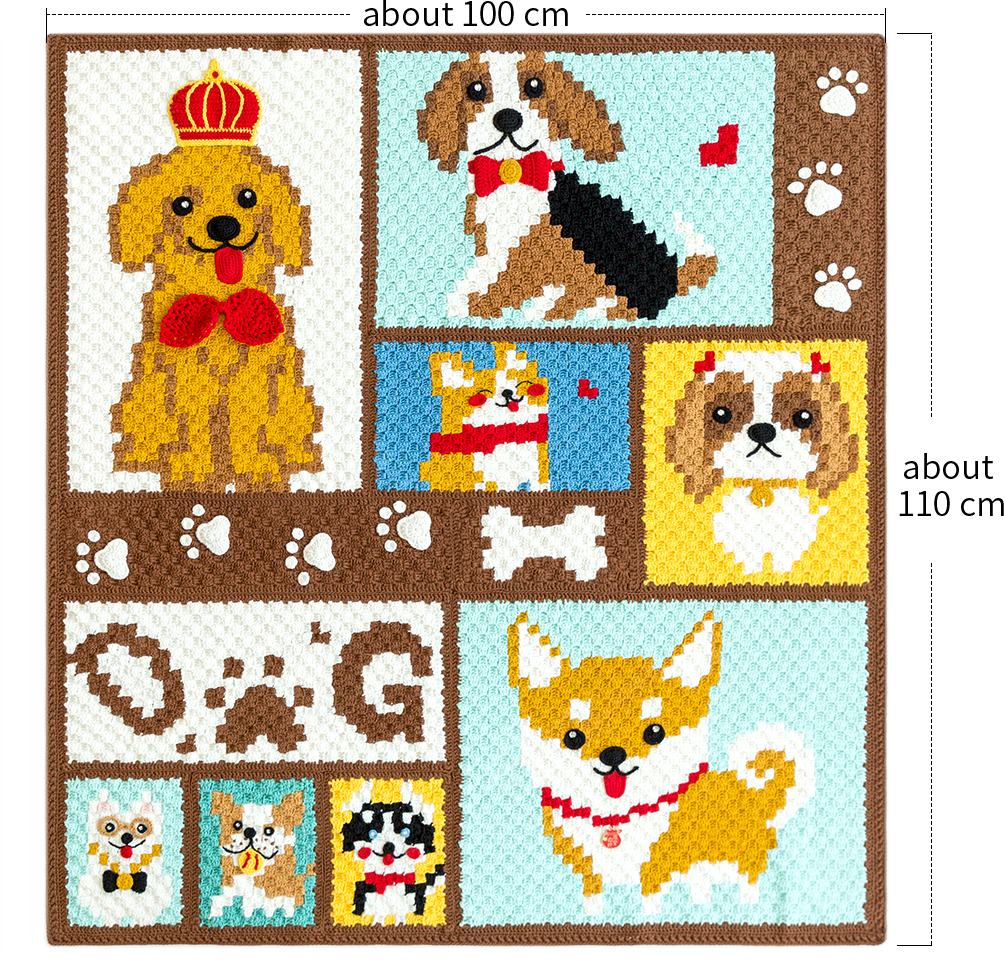
The handcrafted measurements may have an error of 1 to 2 cm. Due to variations in individual tension, the size of the sample is for reference only.
Materials: Susan's Family 4-Ply Combed Cotton & Acrylic Fibre Hand Knitting Yarn
Hook: 3.0 mm crochet hook

Note: This pattern is making in Chinese crochet pattern terms, and the stitch name is written using American terminology. All measurements in charts are in cm.
Chart Key













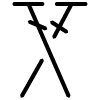

Part 1 Main part
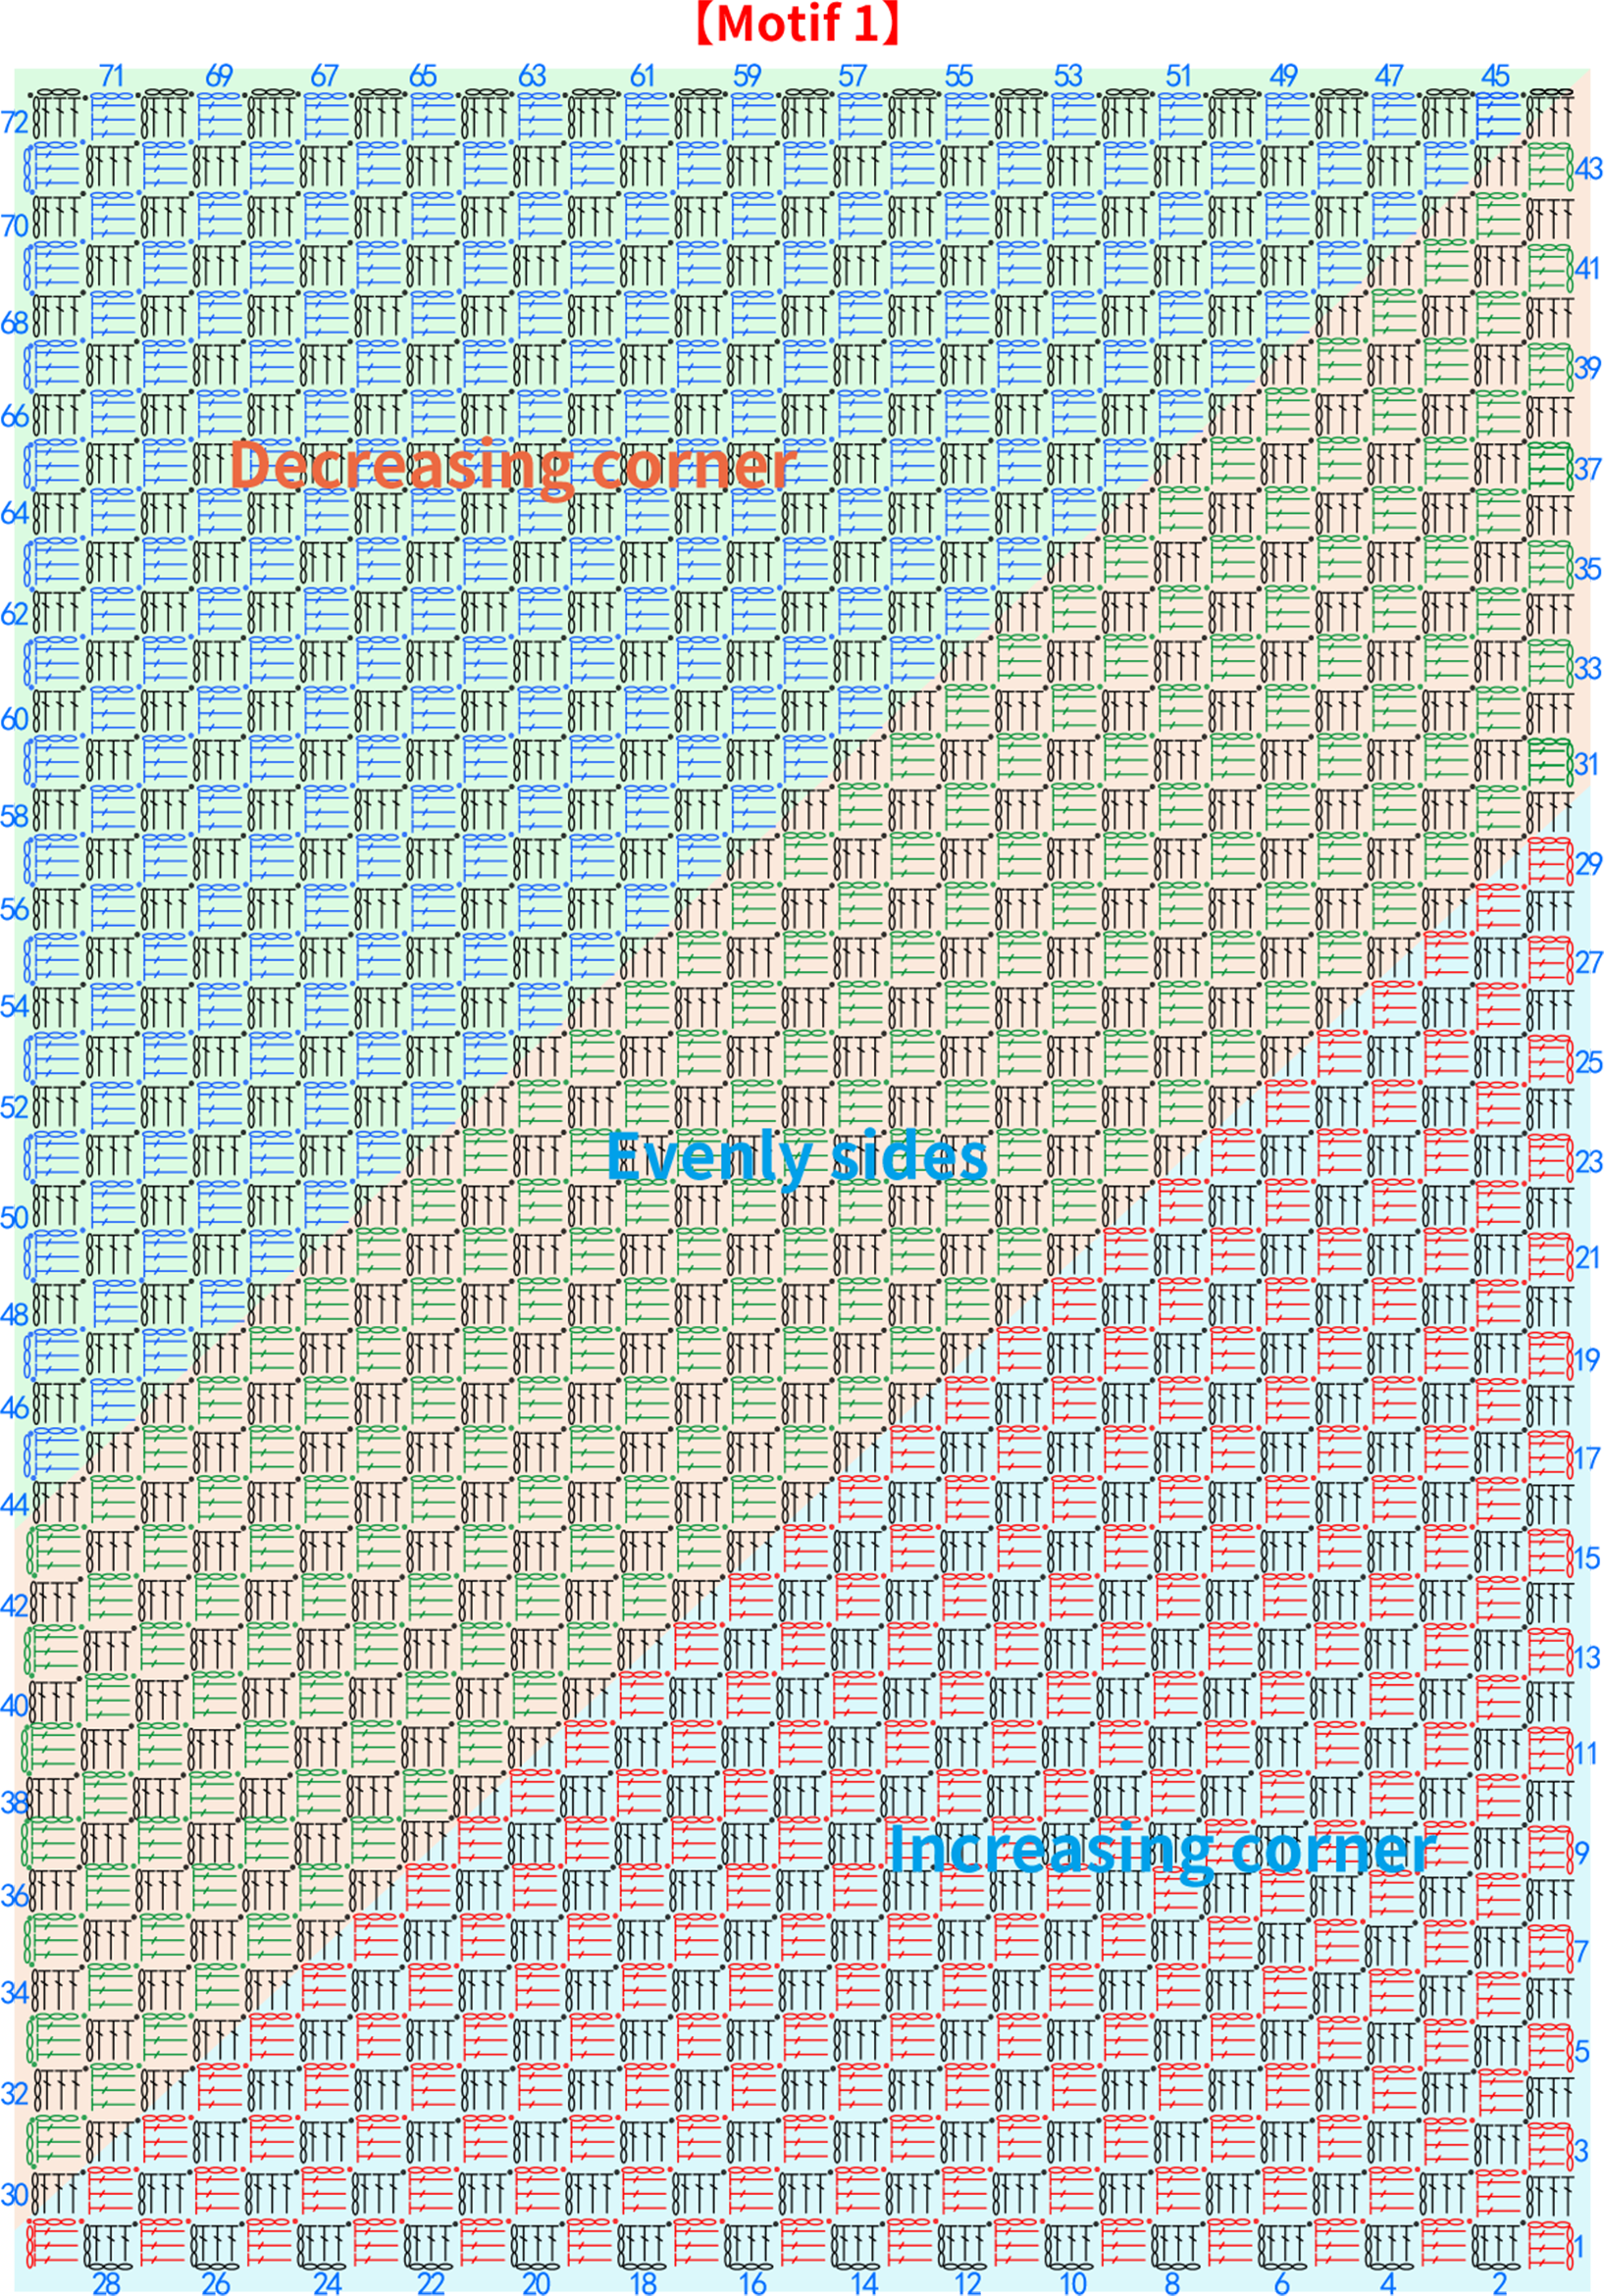
The main part includes several sizes of motifs. motif edging. motif sewing and blanket edging. First, create the motifs. After that, crochet the edging on each motif. Then, sew them together in the correct order. Lastly, crochet the edging along the border.
Step 1 MotifsA1 00' 52'' (Part 1)
There are two forms of motifs here: horizontal and vertical. The crochet method is the same for both, just the number of rows and the number of pattern repeats differ. Use the diagonal method and work back and forth. Divide it into increasing corner, evenly sides and decreasing corner. In the middle, continuously join new yarn and change colors to crochet the corresponding pattern. Refer to the video demonstration for specifics.
Note: The pattern chart demonstrates the horizontal and vertical forms of the fabric piece using Motif 1 and Motif 2 as examples.
Step 2 Motif edgingA2 45' 06'' (Part 1)
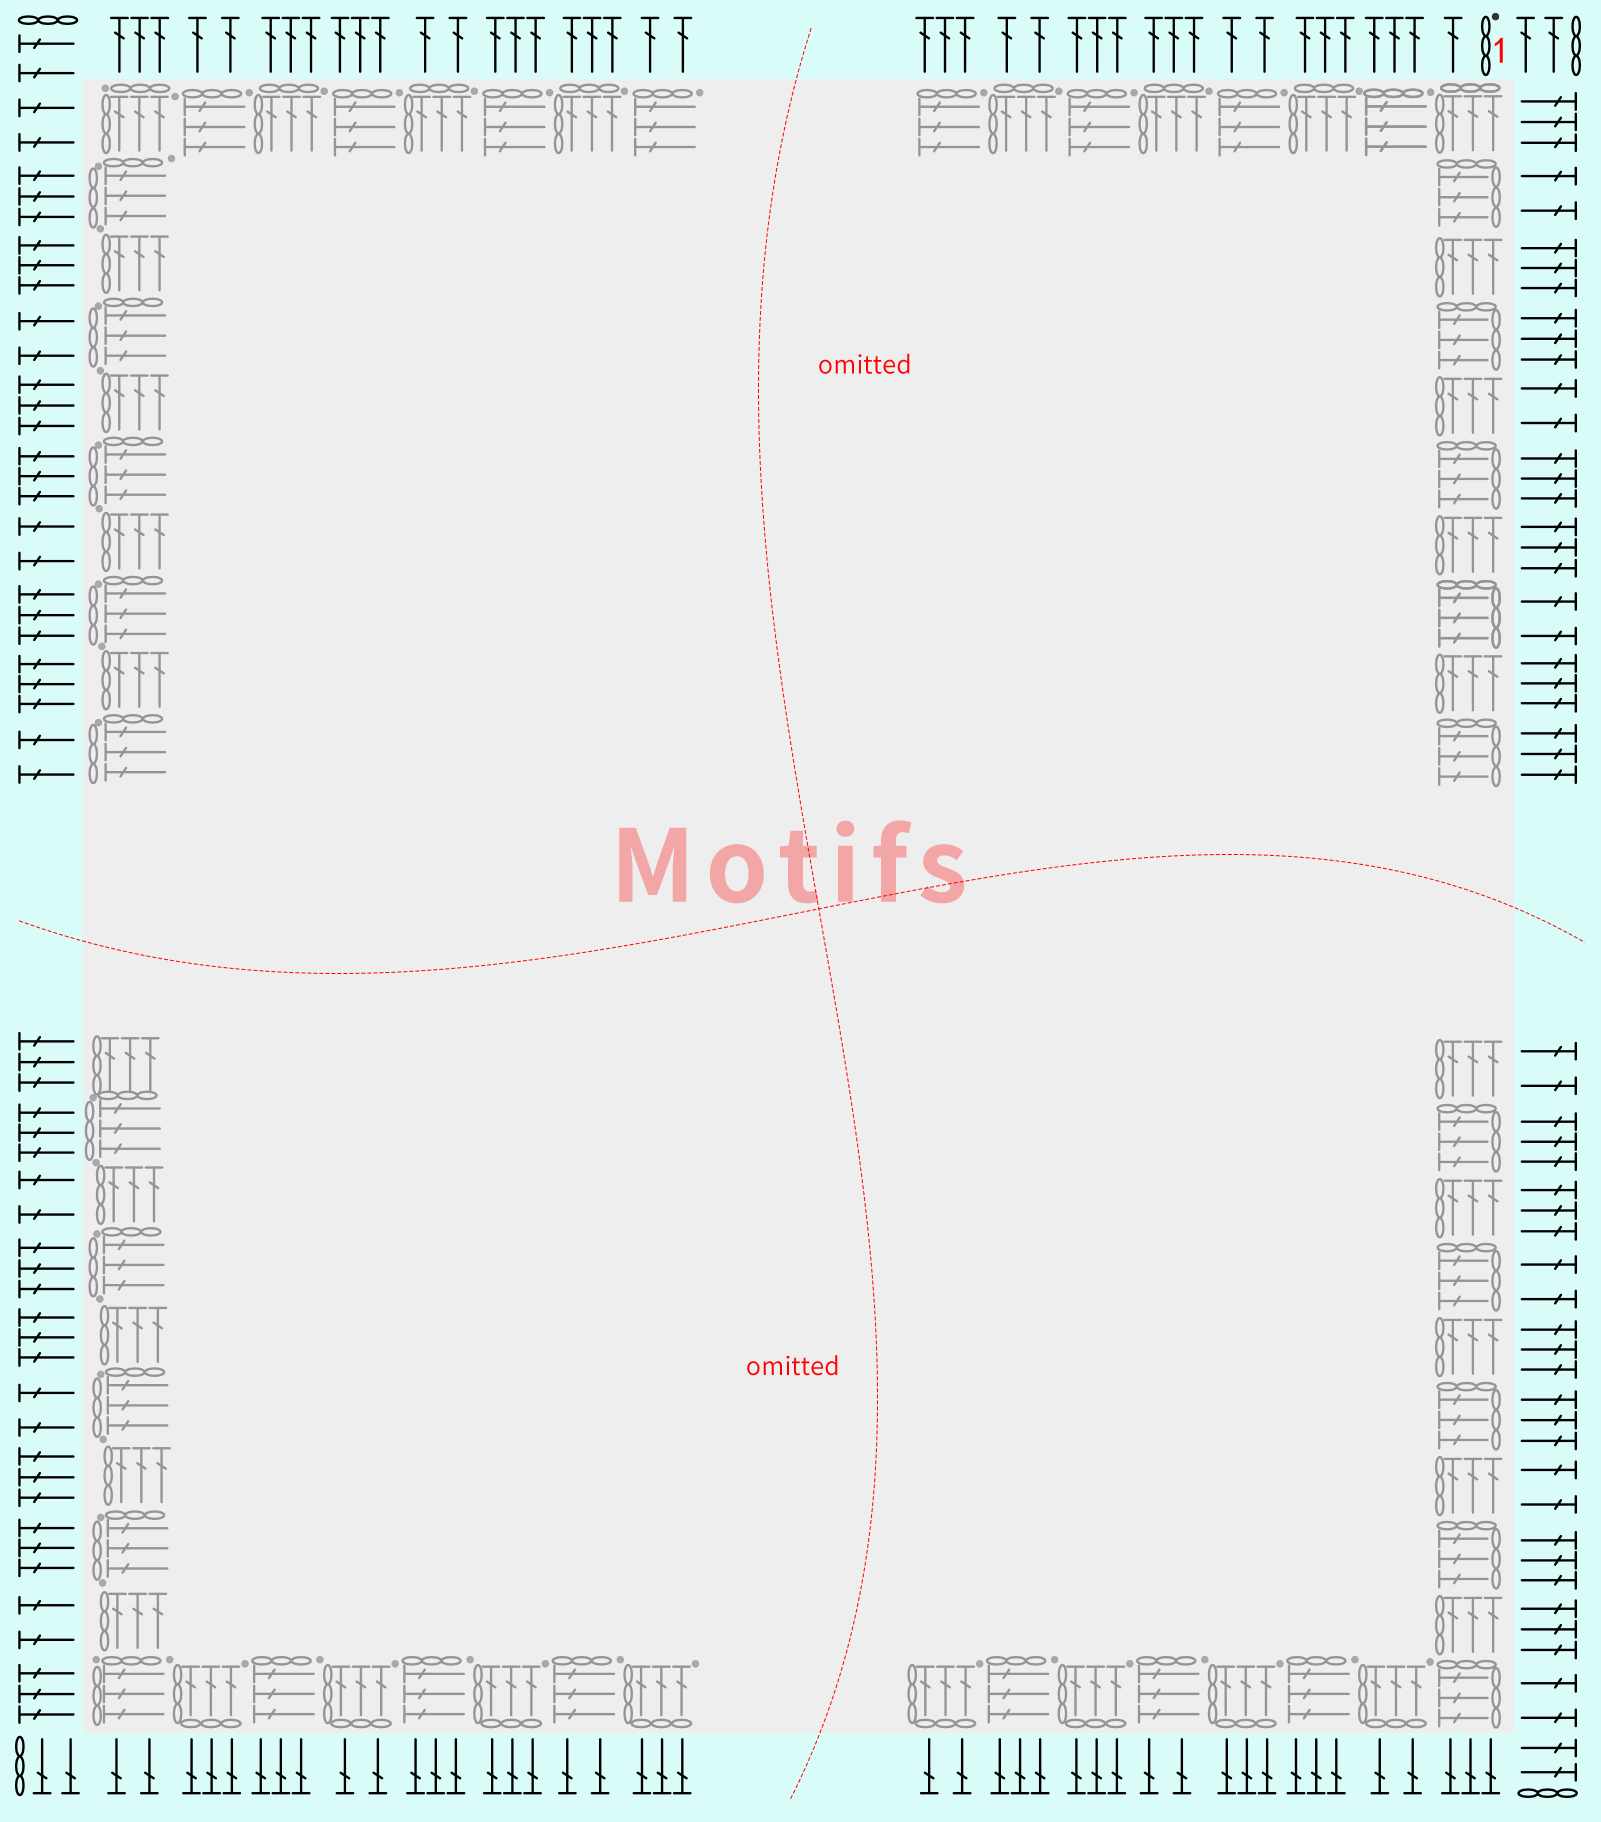
Whether it's a motif worked horizontally or vertically, with the same way work the edging around the motif in rounds. Refer to the pattern and video demonstration for details. (34#Toffee)
Step 3 Motif sewingA3 54' 51'' (Part 1)
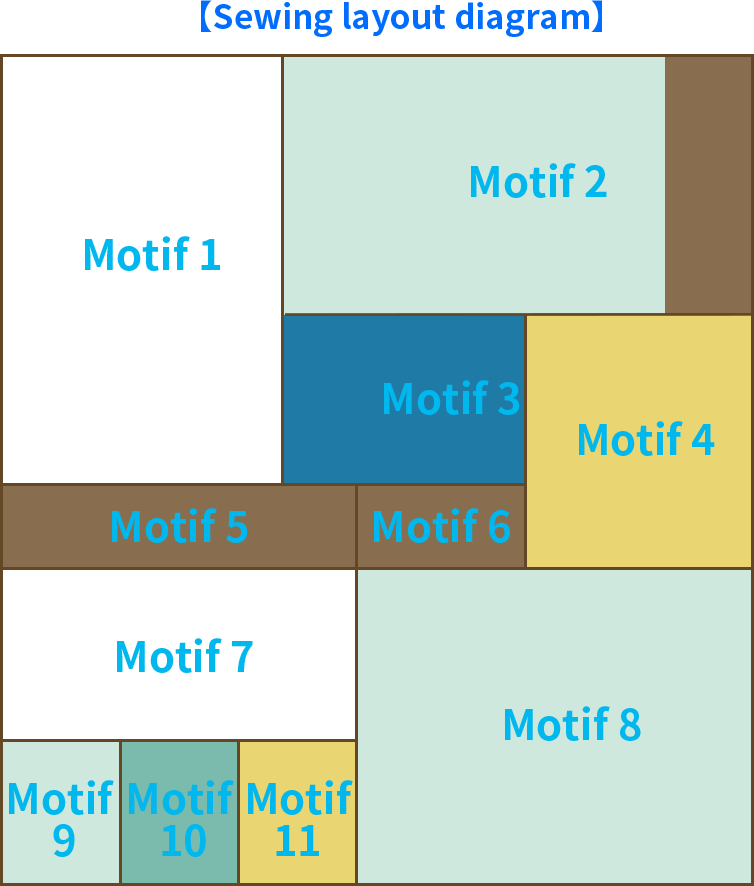
Since the sizes of the motifs vary, start by referring to the Sewing Layout Diagram and the finished product to arrange the motifs in order. Then sew them together from top to bottom. For specifics, please refer to the pattern chart and the video demonstration. (34#Toffee)
Step 4 Blanket edgingA4 75' 42'' (Part 1)
Completed the sewing, then work the edging for the blanket in rounds around the outer edge. Refer to the pattern and video demonstration for details. (34#Toffee)

Part 2 Accessories
The accessories for each motif need to be crocheted and attached, and the accessories for each motif are different. Start by completing the crochet accessories you need, then attach them and add the remaining accessories to the corresponding motifs. The crochet accessories consist of a crown, eyes, nose, tongue, blush, bow, paw prints, bow tie, and circular pieces, and they should be crocheted in order.
Step 1 CrownB1 94' 35'' (Part 1)
The crown consists of the main part, edging, tip, and decorations. Start by working the main part with a foundation chain, then work back and forth in rows while changing colors. After completing this, crochet the edging around the main part. Next, crochet the tip, and finally, make and attach the decorations. Refer to the pattern and video demonstration for specifics.
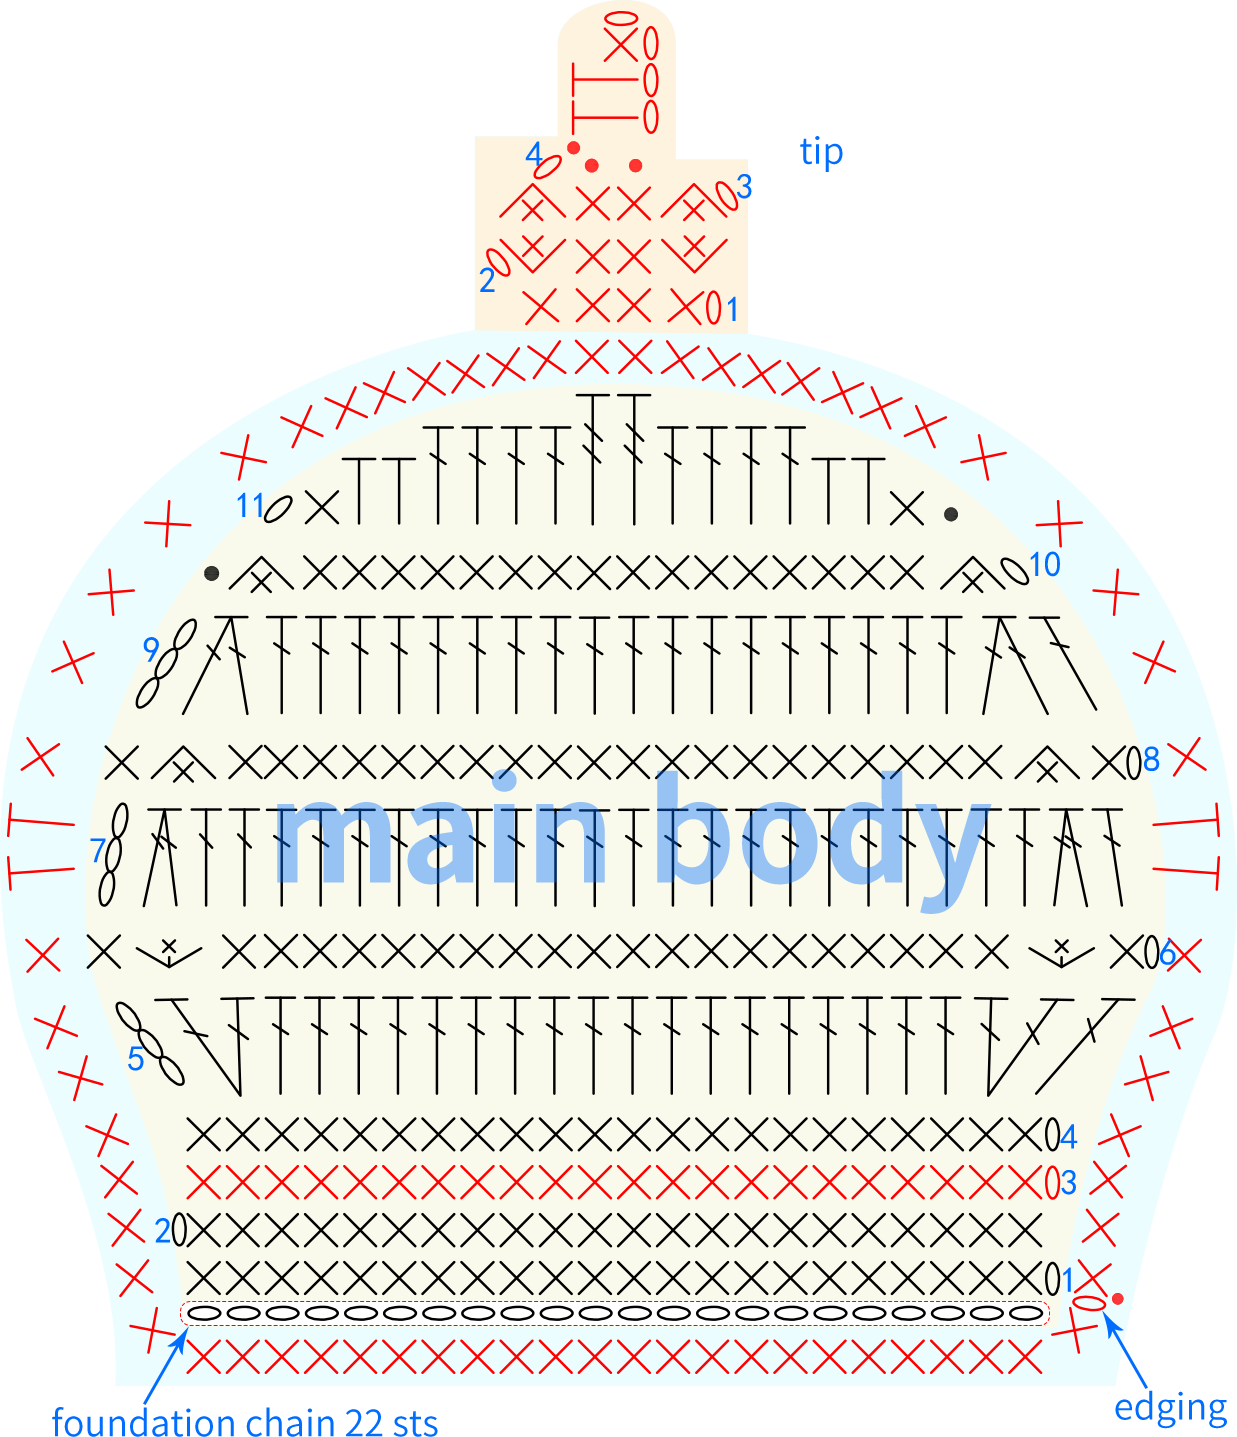
Note: For the main part of the crown, use yarn color 09#Aspen Gold for row 3, and use yarn color 51#High Risk Red for all other rows; use yarn color 09#Aspen Gold for crocheting the tip and edging.
Step 2 EyeB2, NoseB3, TongueB4 17' 17'' (Part 2)
The three positions are divided into large, medium, and small sizes. Crochet the eyes first, then attach acrylic rhinestones once it's completed. For the nose and tongue, crochet the corresponding pieces directly. Please refer to the video demonstration for specifics.
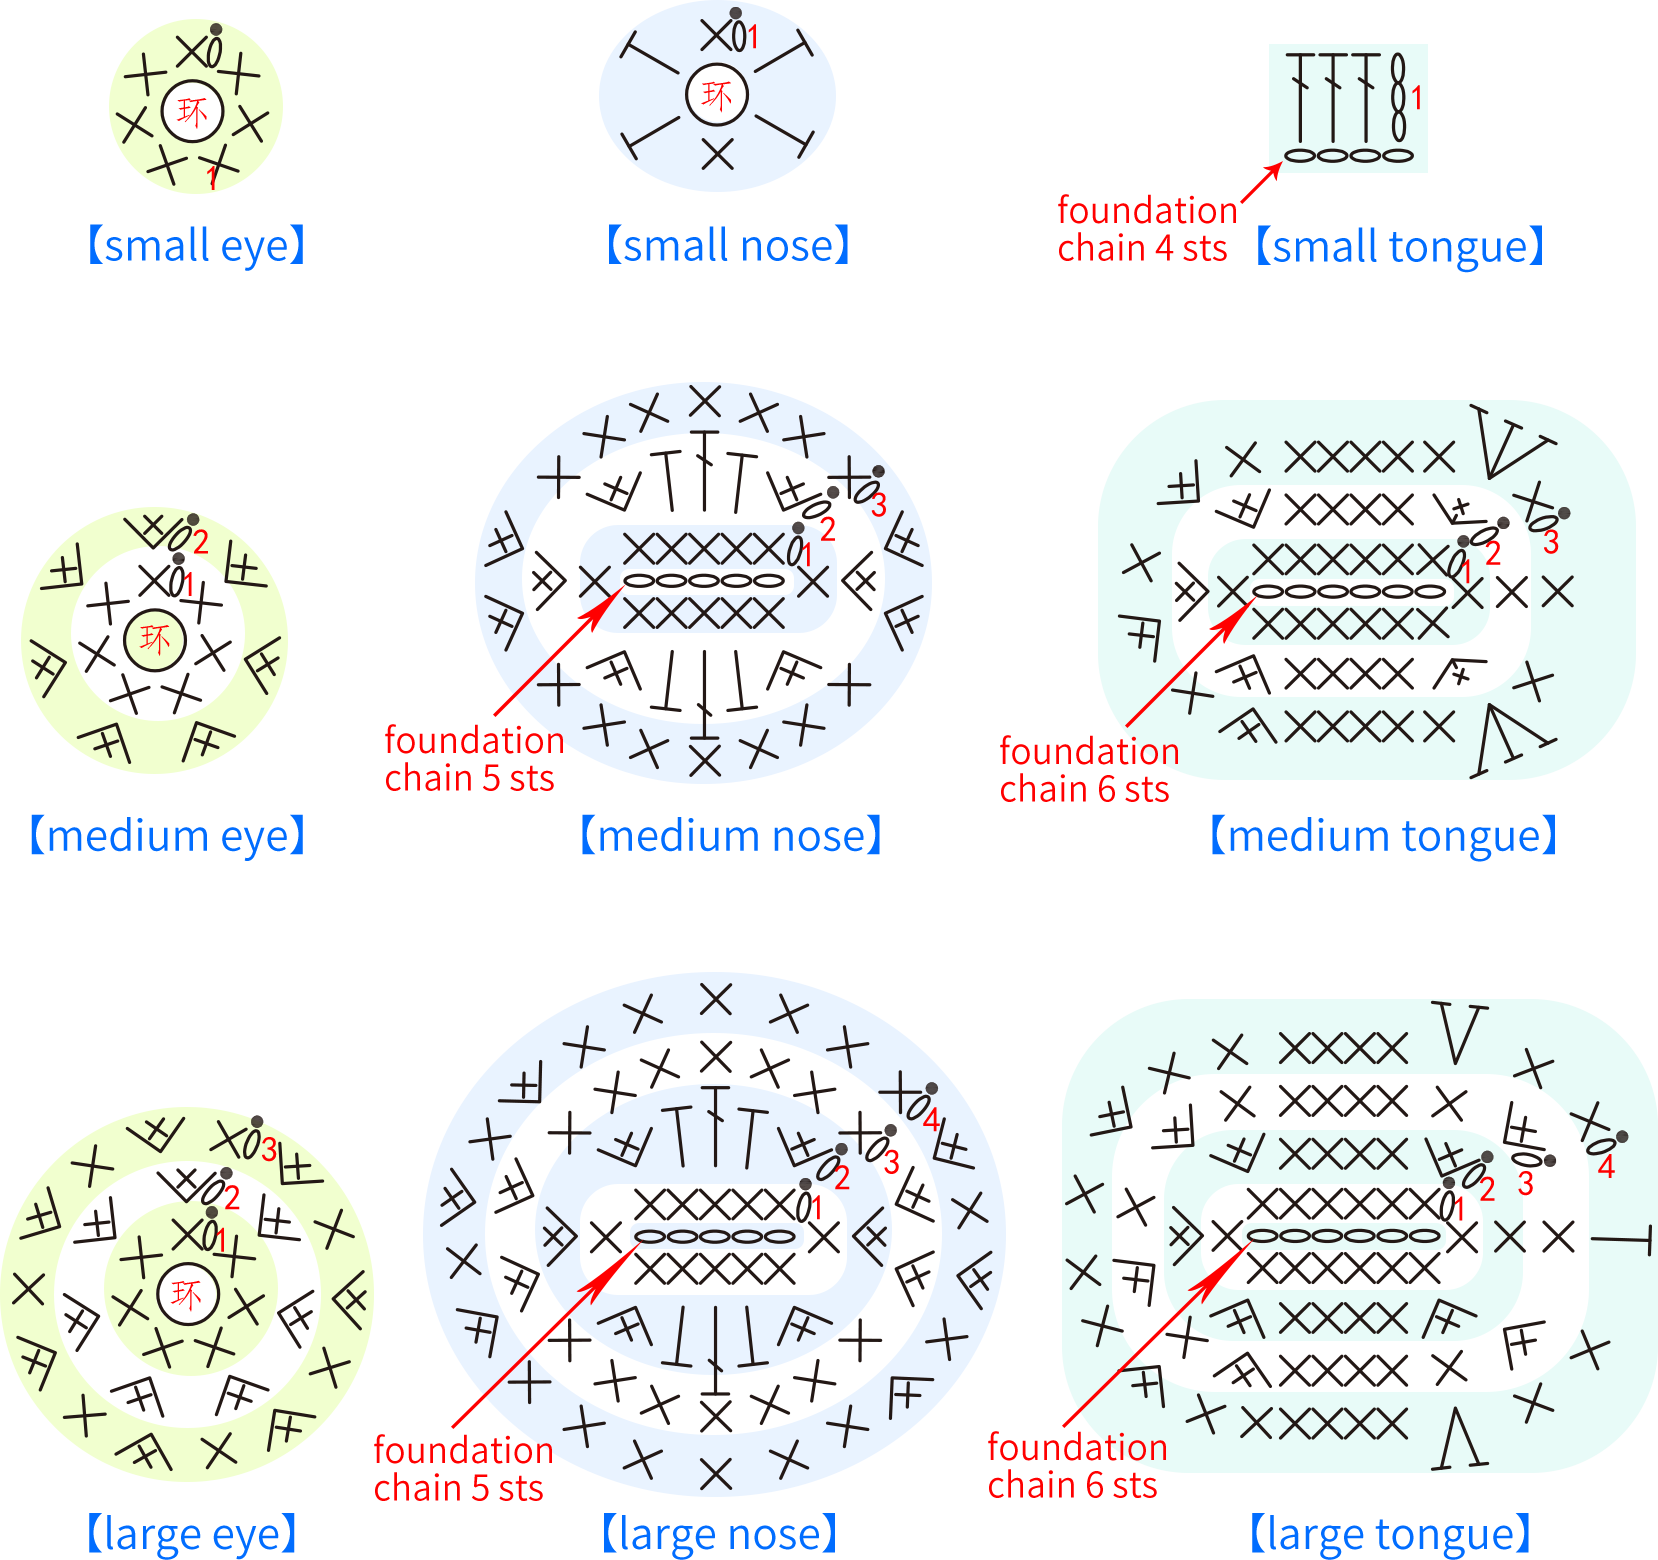
Note:
① For the small eyes, fasten off with a 10 cm yarn tail after done; for the medium and large eyes, fasten off with a 20 cm yarn tail after done separately.
② For the small nose, fasten off with a 15 cm yarn tail after done; for the medium and large noses, fasten off with a 30 cm yarn tail after done separately.
③ For the small tongue, fasten off with a 15 cm yarn tail after done; for the medium and large tongues, fasten off with a 30 cm yarn tail after done.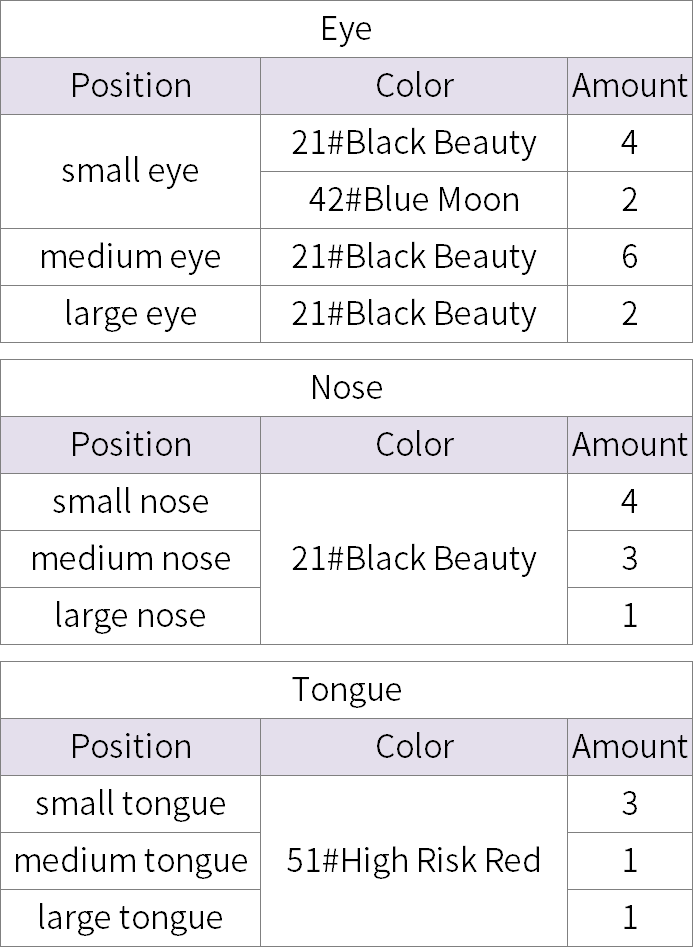
Step 3 BlusherB5, BowB6 36' 17'' (Part 2)
The blusher comes in two sizes, large and small. The bow has only one, divided into the main body and the tie. Start by crocheting the main body with a foundation chain, first one side in rows, then pick up the other side to work in rows too. Once completed, make the tie and assemble. Please refer to the video demonstration for specifics.
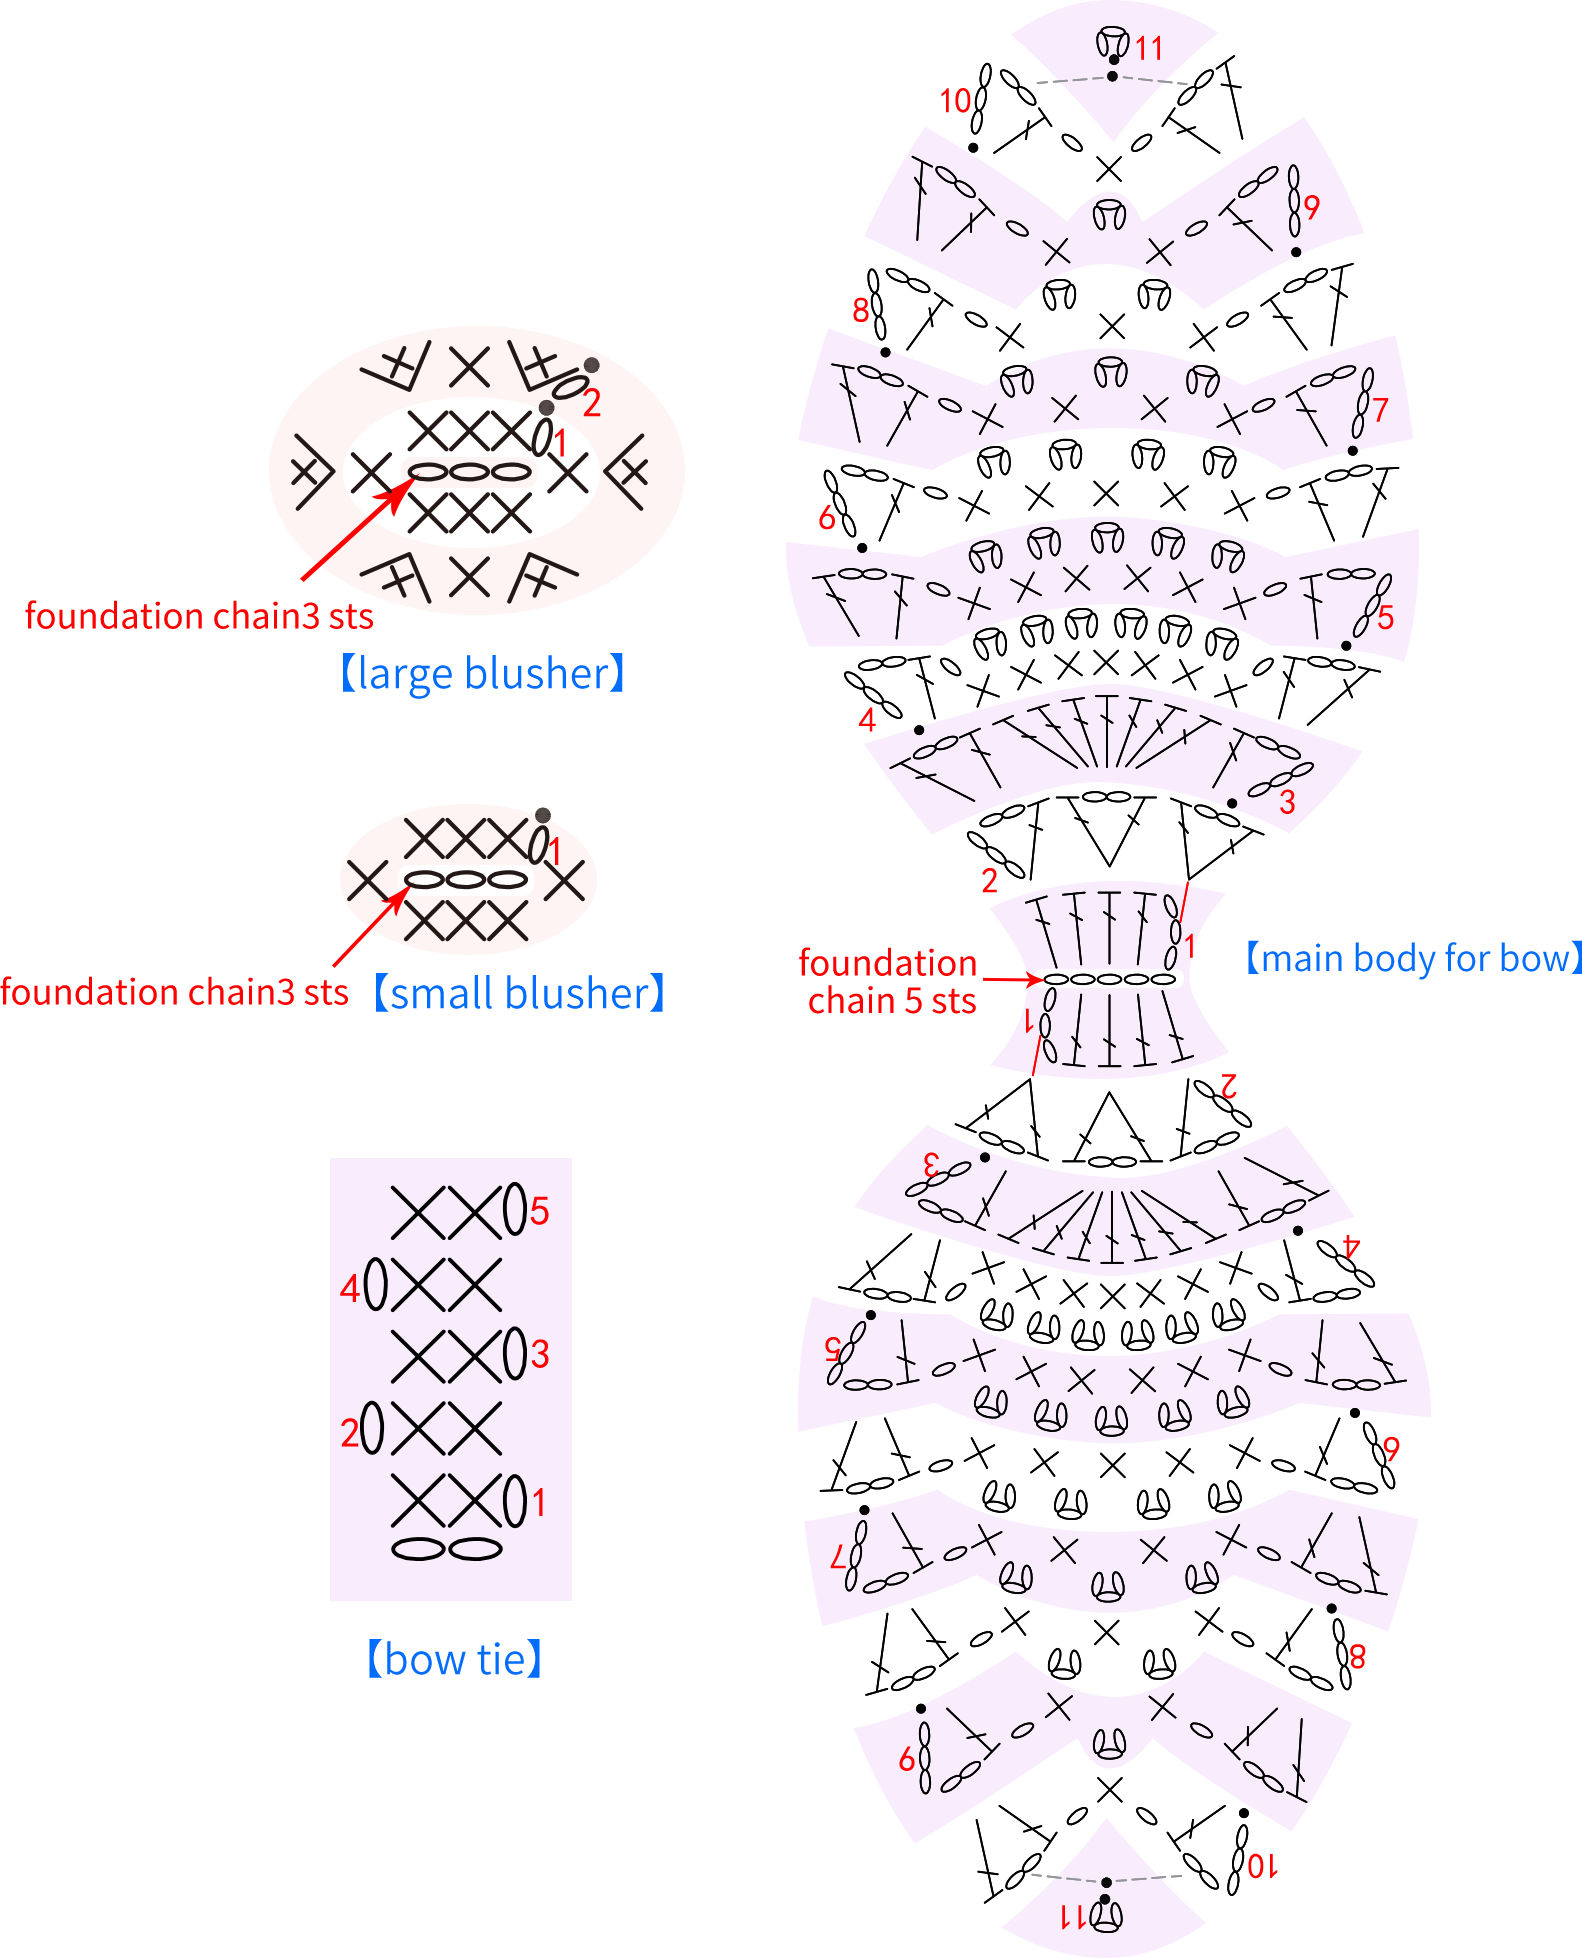
Note:
① For the small blusher, fasten off with a 15 cm yarn tail; for the large blush, fasten off with a 25 cm yarn tail.
② For the bow's main body, fasten off the yarn normally after completing it; for the ties, fasten off with a 15 cm yarn tail.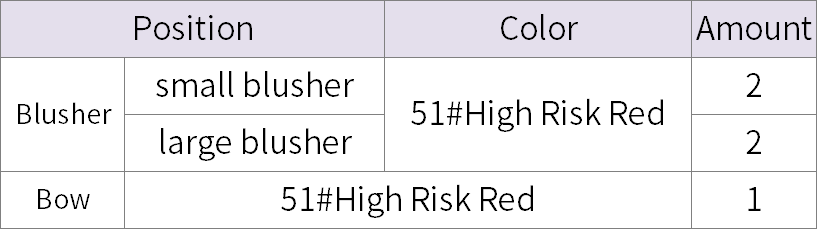
Step 4 Paw printB7, Bow tieB8, Circular piecesB9 50' 53'' (Part 2)
Each paw print is made up of one large pad and four small pads. The bow ties and circular pieces come in both large and small sizes. The bow tie method is similar to making a bow. Please refer to the video demonstration for details.
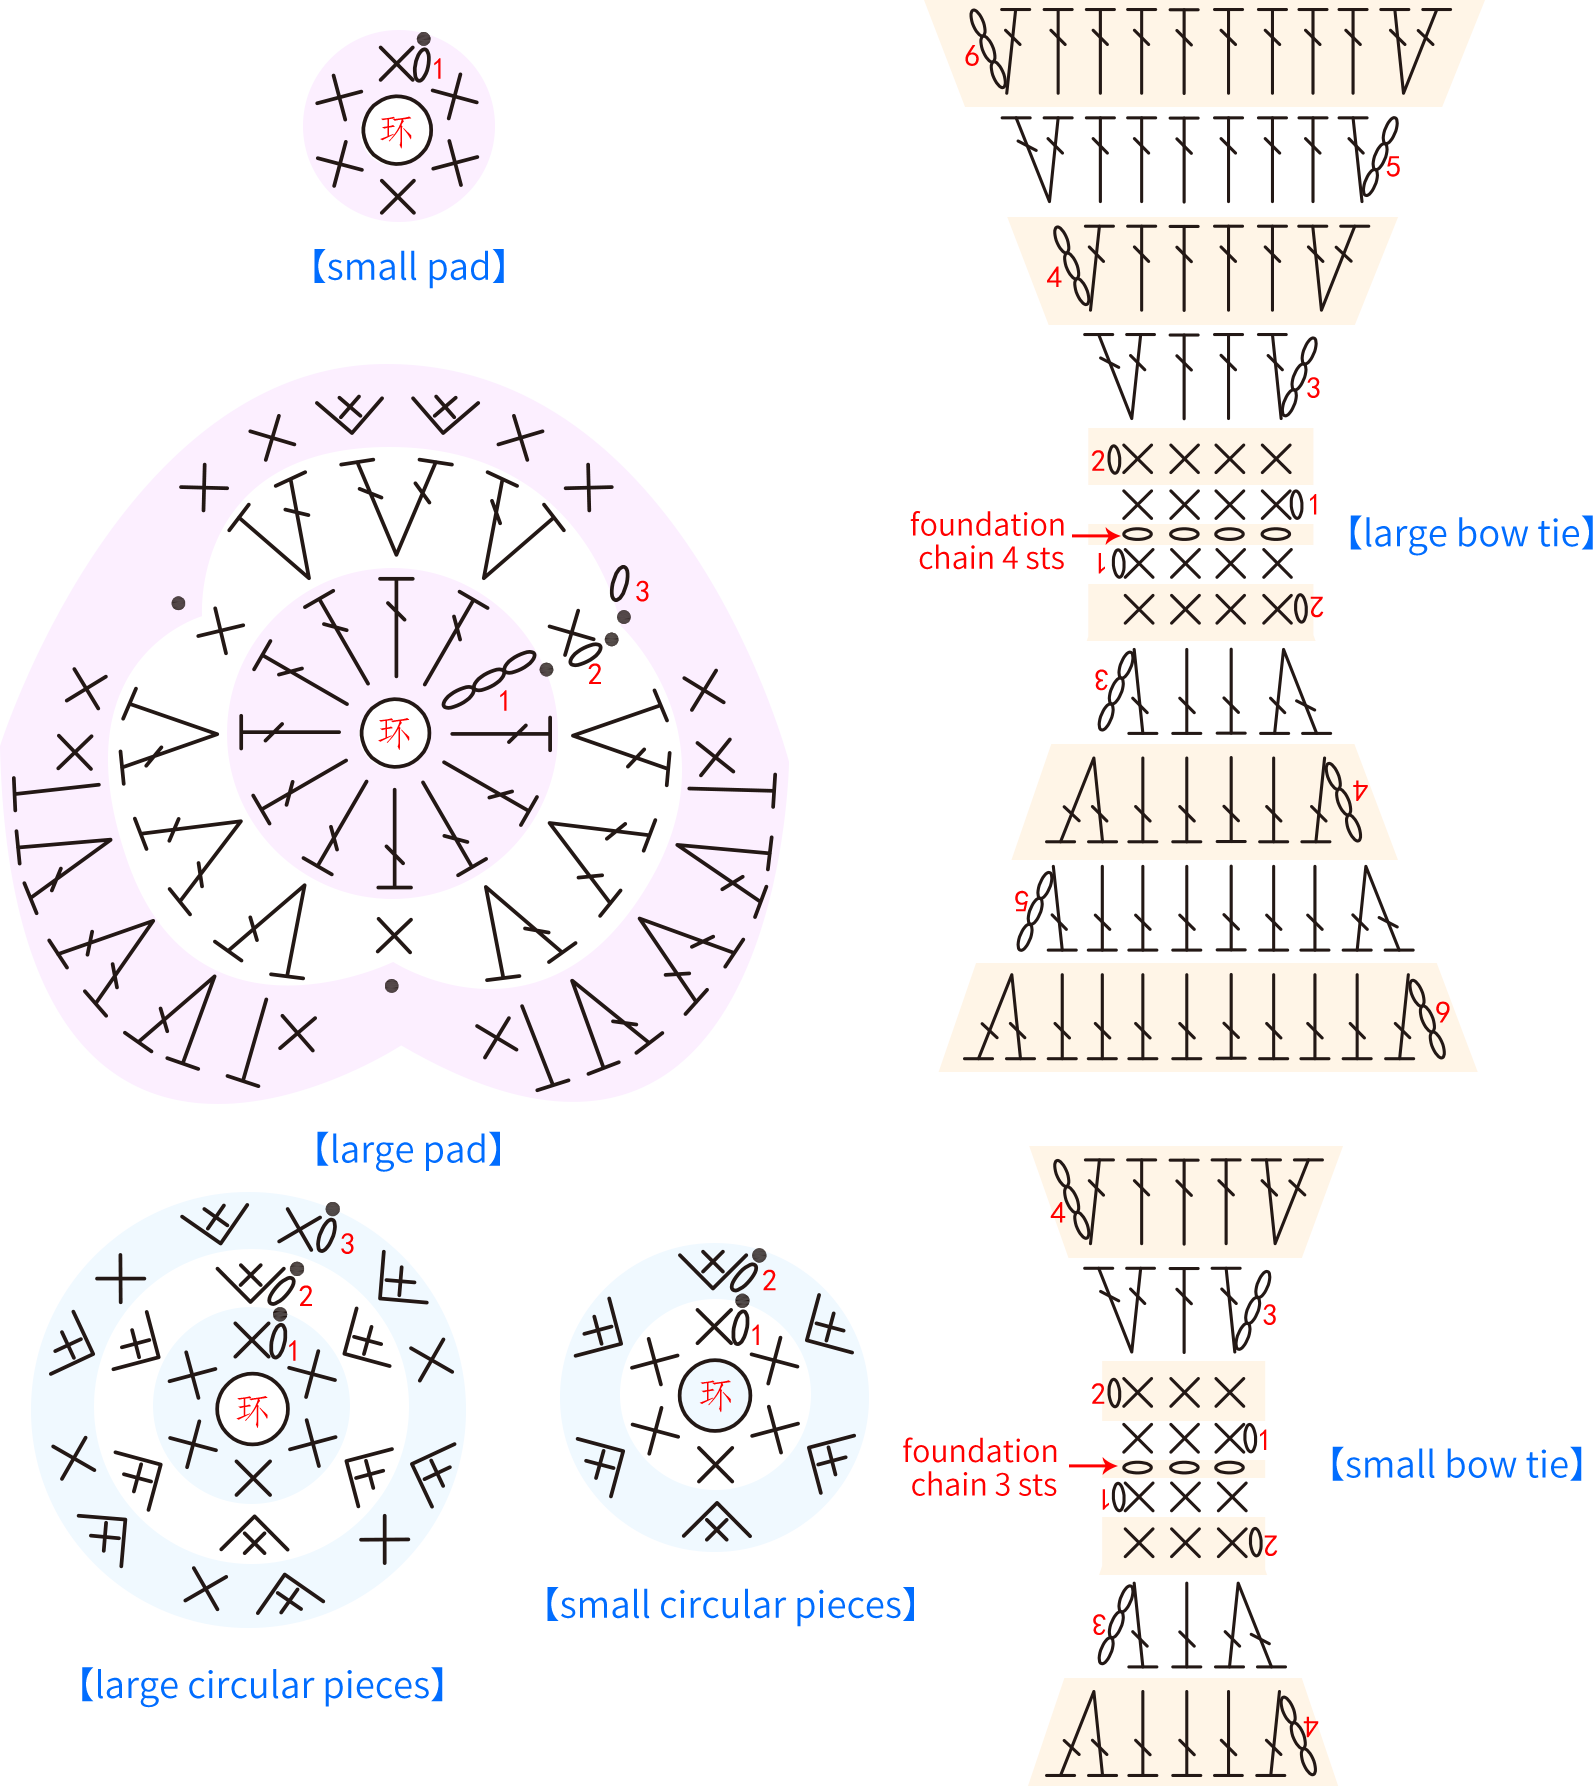
Note:
① Fasten off with a yarn tail of 40 cm for the large paw pad, and a yarn tail of 15 cm after for the small pads;
② Fasten off with a yarn tail of 40 cm for one side of the small bow tie, and a yarn tail of 60 cm for one side of the large bow tie;
③ Fasten off with a yarn tail of 20 cm for the small circular pieces, and a yarn tail of 30 cm for the large circular pieces.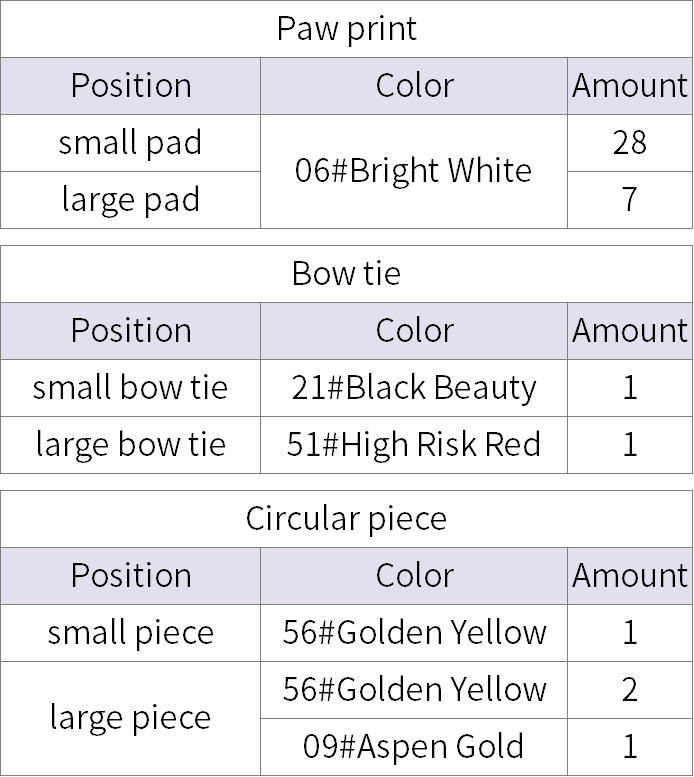
Part 3 Accessories attaching and remaining accessory
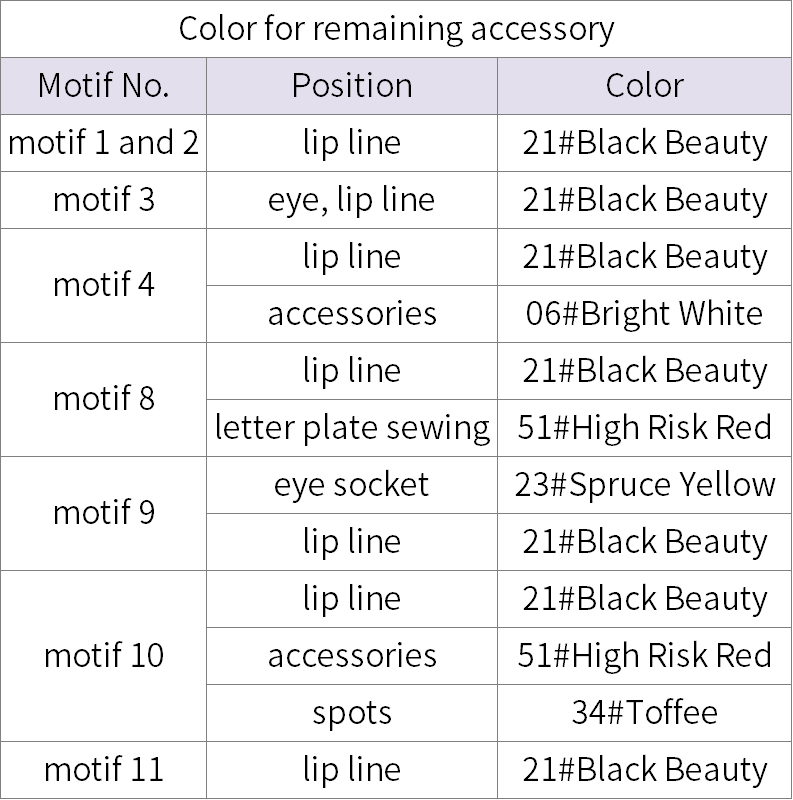
Some motifs have accessories, some do not, and each motif's accessories is different. Follow the numbering of the motifs to attach the corresponding accessories, and complete the remaining accessories as well. Please refer to the video demonstration for specifics.
【for motif 1】C1 61' 43'' (Part 2)
【for motif 2】C2 80' 19'' (Part 2)
【for motif 3】C3 83' 55'' (Part 2)
【for motif 4】C4 93' 09'' (Part 2)
【for motif 5】C5 96' 22'' (Part 2)
【for motif 8】C6 96' 49'' (Part 2)
【for motif 9】C7 99' 11'' (Part 2)
【for motif 10】C8 102' 49'' (Part 2)
【for motif 11】C9 110' 57'' (Part 2)
Made by the community