Doll
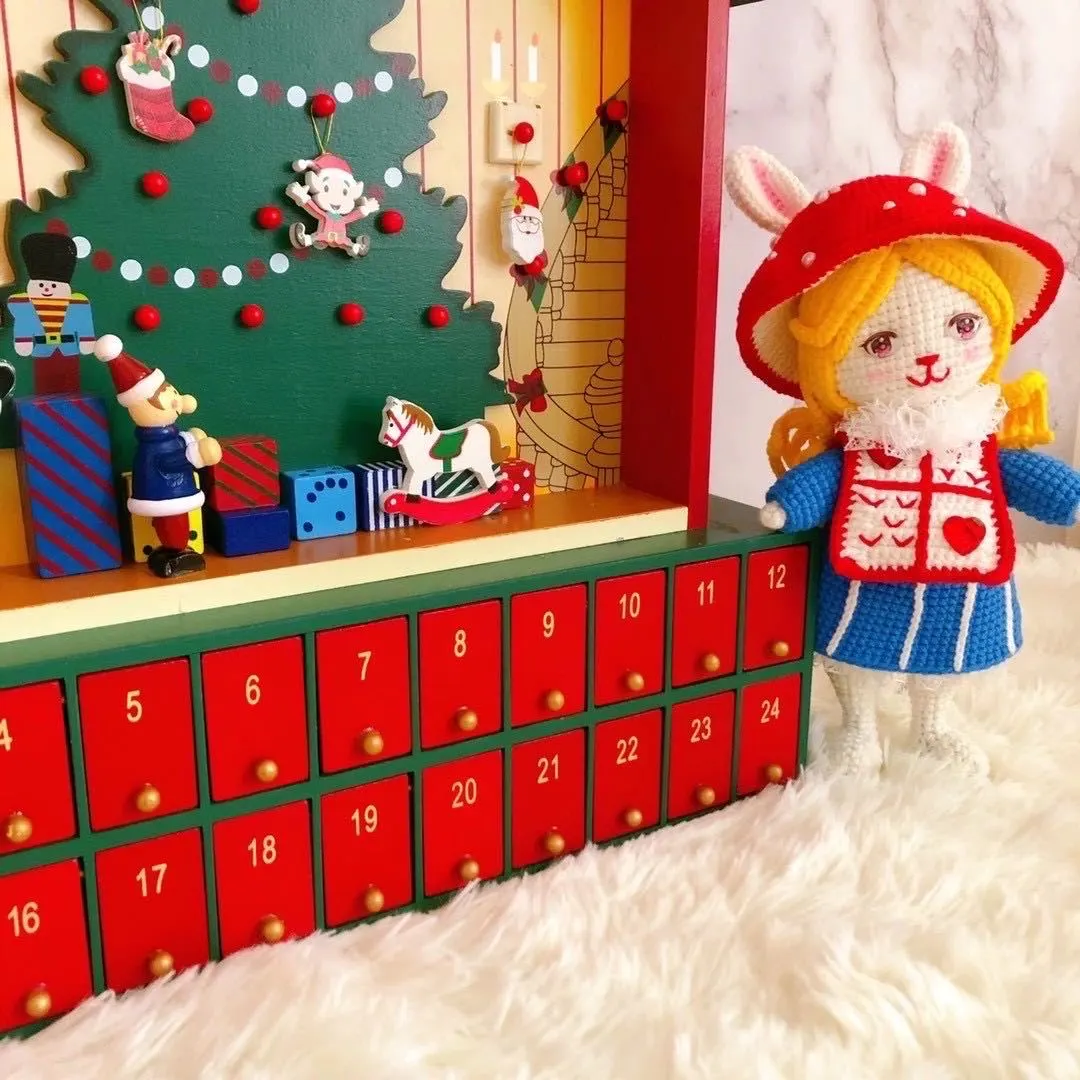
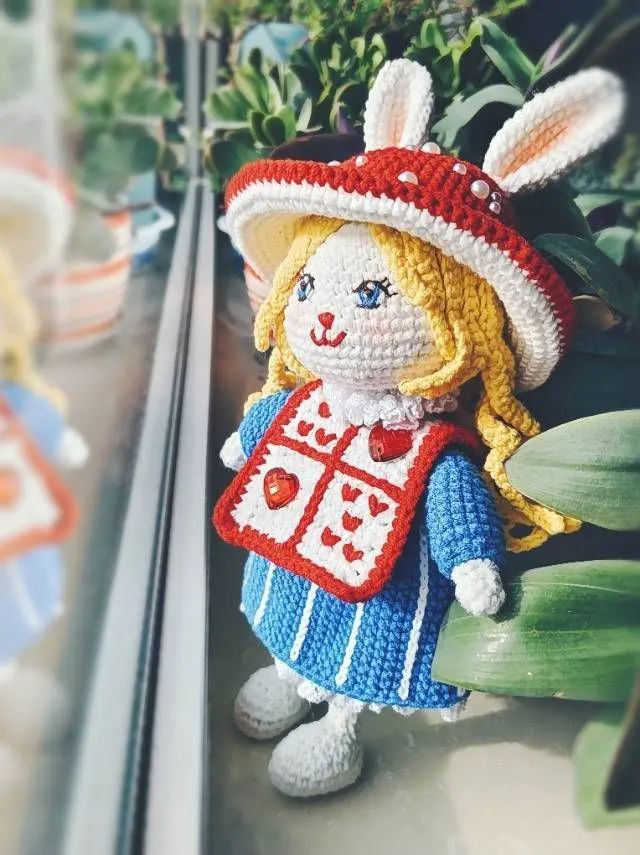
Alice's Curious Bunny
Project preview
See the finished project
Pattern format
Instructions
Watch and follow
Video tutorial
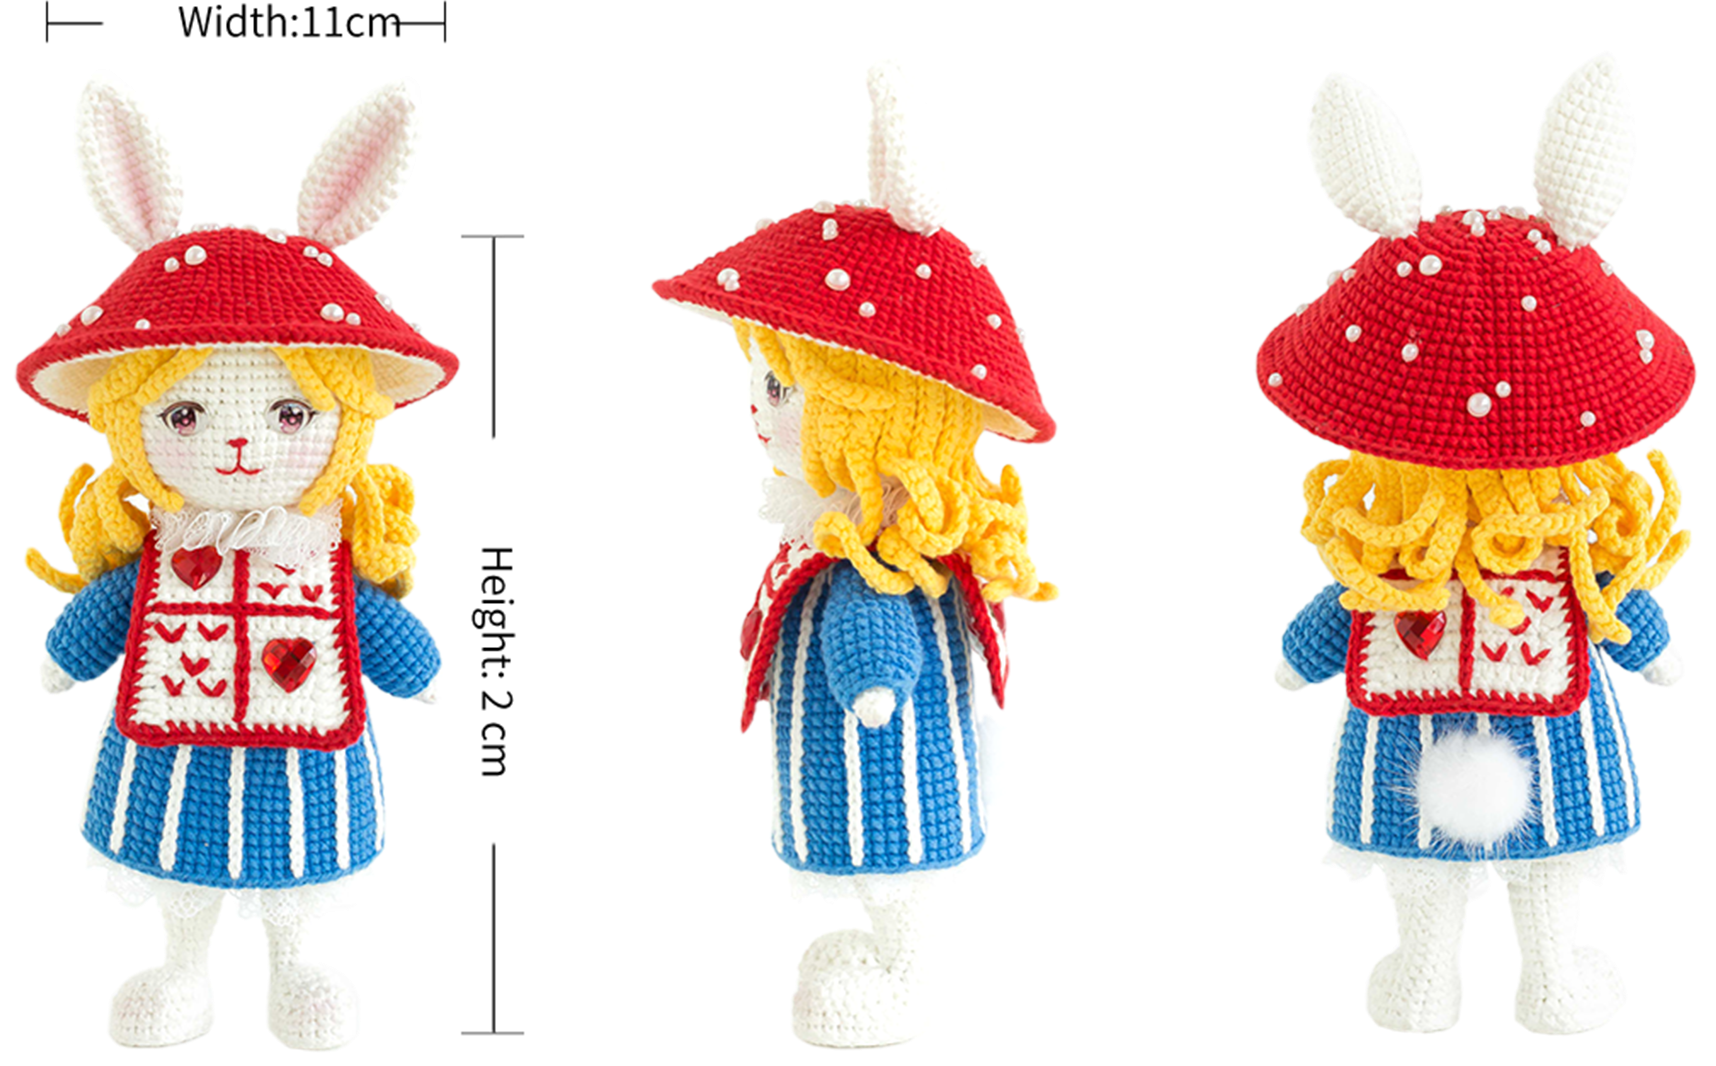
Due to variations in individual tension, the size of the sample is for reference only.
Materials: Susan's Family 4-Ply Combed Cotton & Acrylic Fibre Hand Knitting Yarn
Hook: 2.00 mm crochet hook

ABBREVIATIONS
MRadjustable magic ring
Dao2start in 2nd CH from the hook
turnturn the piece
CHchain
V = sc2-in-12 single crochets into the same stitch
A = sc2toginvisible single crochet 2 stitches together
(...)×6crochet item in the parentheses six times
RRound
[...]in the same stitch
W = sc3-in-13 single crochets into the same stitch
Sslip stitch
Fdouble crochet
Thalf double crochet
XX stitch single crochet
Note:
1. This pattern is making in Chinese crochet pattern terms, and the stitch name is written using American terminology. All measurements in charts are in cm.
2. Working in joined round: When crocheting in rounds without further guidance, working in closed rounds, start each round with a set number of beginning chains and close with a slip stitch. The beginning chain preceding a single crochet and the slip stitch used for joining rounds are not included in the total stitches.

Part 1 Main piece
Step 1 Arms (06#Bright White)A1 00' 49'' (Part 1)
Start with the magic ring and work in rounds . Please refer to the video demonstration for specifics.
| Arm * 2 pieces | ||
| Round | Stitch Instructions | Stitch Count |
| Cast on & R1 | Magic Ring, 5X | 5 |
| R2 | 4X, V | 6 |
| R3 | V, 5X | 7 |
| R4-R14 | Even 7X | 7 |
| Leave a tail of about 15cm. | ||
Step 2 LegsA2 And BodyA3 (06#Bright White) 13' 18'' (Part 1)
Start with a foundation chain, crochet in rounds for 2 legs, add a hanging tag and shaping wire to the feet, and stuff them as you go, especially towards the back. Once completed, join them together and crochet the body while attaching the arms, adding shaping wire to the arms as well. Please refer to the video demonstration for specifics.
| Leg * 2 pieces | ||
| Round | Stitch Instructions | Stitch Count |
| Cast on & R1 | 8CH, Dao 2, 6X, W, 5X, V | 16 |
| R2 | V, 5X, 3V, 5X, 2V | 22 |
| R3 | turn, 22S, | 22 |
| R4 | turn, Even 22X | 22 |
| R5 | Even 22X, weave in ends | 22 |
| R6 | Starting from the 8th stitch of R5, 5X, 5CH, Starting from the 7th stitch of R5, 7X, 7CH, Starting from the 6th stitch of R5, 2X, A, X, A, 2X, 8CH, Starting from the 5th stitch of R5, 9X, 8CH, Starting from the 3rd stitch of R5, 2A, 5X, 2A, 8CH, Starting from the 2nd stitch of R5, X, 2A, X, 2A, 6X | 12 |
| R7 | X, 4A, 3X | 8 |
| R8 | X, 3X Front loop, 4X | 8 |
| R9 | Even 8X | 8 |
| R10 | 2X, V, 5X | 9 |
| R11 | (2X, V)*3 | 12 |
| R12 | Even 12X | 12 |
| R13 | 3X, 2V, 7X | 14 |
| R14 | 4X, V, X, V, 7X | 16 |
| R15 | Even 16X | 16 |
| R16 | 6X, V, 9X | 17 |
| R17 | Even 17X | 17 |
| R18 | 5X, V, 2X, V, 8X | 19 |
| R19 | Even 19X | 19 |
| R20 | 18X, V | 20 |
| R21 | Even 20X | 20 |
| R22 | 8X, V, 11X | 21 |
| R23 | Even 21X | 21 |
| When crocheting R6, add the label and shaping wire, and start stuffing. Continue to stuff as you go on the back side. Once completed, fasten off normally. |
||
| Body | ||
| Round | Stitch Instructions | Stitch Count |
| R1 | Right leg 2CH, connect to left leg, 21X, 2X, 21X, 2X |
46 |
| R2-R3 | Even 46X | 46 |
| R4 | 22X, V, 22X, V | 48 |
| R5-R6 | Even 48X | 48 |
| R7 | (6X, A)*6 | 42 |
| R8-R9 | Even 42X | 42 |
| R10 | (5X, A)*6 | 36 |
| R11-R12 | Even 36X | 36 |
| R13 | (4X, A)*6 | 30 |
| R14-R15 | Even 30X | 30 |
| R16 | (3X, A)*6 | 24 |
| R17 (connect to arm) |
5X (stitch count needs adjustment, refer to the video demonstration for specifics), X (connect to arm), 11X, X (connect to arm), 6X (stitch count needs adjustment, refer to the video demonstration for specifics) | 24 |
| R18 (connect to arm) |
(4X, A)*6 | 30 |
| R19 | (3X, A)*6 | 24 |
| R20 | (X, A)*8 | 16 |
| R21 | 8A | 8 |
| R22 | (2X, A)*2 | 6 |
| R23-R33 | Even 6X | 6 |
| Stuff the body as you go, but do not stuff after R22. When done, leave a 15cm yarn tail for closing. |
||
Step 3 Head (06#Bright White)A4 63' 03'' (Part 1)
The head is also start with a magic ring, crocheting in rounds. Please refer to the video demonstration for specifics.
| Head | ||
| Round | Stitch Instructions | Stitch Count |
| Cast on & R1 | Magic Ring, 6X | 6 |
| R2 | 6V | 12 |
| R3 | (X, V)*6 | 18 |
| R4 | (X, V, X)*6 | 24 |
| R5 | (V, 3X)*6 | 30 |
| R6 | (2X, V, 2X)*6 | 36 |
| R7 | (5X, V)*6 | 42 |
| R8 | (3X, V, 3X)*6 | 48 |
| R9-R13 | Even 48X | 48 |
| R14 | (7X, V)*6 | 54 |
| R15-R18 | Even 54X | 54 |
| R19 | (7X, A)*6 | 48 |
| R20 | (3X, A, 3X)*6 | 42 |
| R21 | (5X, A)*6 | 36 |
| R22 | (2X, A, 2X)*6 | 30 |
| R23 | (A, 3X)*6 | 24 |
| R24 | (X, A, X)*6 | 18 |
| R25 | 9A | 9 |
| R26-R28 | Even 9X | 9 |
| After completing round 24, stuff the piece, then finish the remaining rounds and fasten off normally. |
||
Part 2 Accessories
Step 1 Facial features And BlushB1 00' 12'' (Part 2)
Step 2 Hair (09#Aspen Gold)B2 08' 37'' (Part 2)
The hair consists of two parts: the scalp and the hair strands. The scalp is crocheted in rounds using the magic ring method. Then, crochet the hairspring, which are divided into two layers. After completion, secure it to the head. Please refer to the video demonstration for specifics.
| Scalp | ||
| Round | Stitch Instructions | Stitch Count |
| Cast on & R1 | Magic Ring, 8X | 8 |
| R2 | 8V in Front loop | 16 |
| R3 | (X, V)*8 in front loop | 24 |
| First layer hair strands | |
| Number of hair spring | Stitch Instructions |
| 1 | 14CH, Dao 2, 5S, 8X, skip 1 st, S |
| 2 | 14CH, Dao 2, 5S, 8X, S |
| 3 | 21CH, Dao 2, 5S, 10X, 5T, S |
| 4 | 21CH, Dao 2, 5S, 10X, 5T, skip1 st, S |
| 5-12 | 41CH, Dao 2, 10S, 15X, 15T, skip1 st, S |
| 13-14 | 21CH, Dao 2, 5S, 10X, 5T, S |
| Second layer hair strands (work in the remain loops of the stitches in scalp R2, the joining position corresponds to the 13th stitch of the first layer) |
|
| Number of hair spring | Stitch Instructions |
| 1-2 | 20CH, Dao 2, 5S, 5X, 9T, skip1 st, S |
| 3-8 | 45CH, Dao 2, 10S, 15X, 19T, skip1 st, S |
Step 3 Clothes (55#French Blue)B3 27' 14'' (Part 2)
The garment consists of several parts: the skirt, sleeves, slip stitch stripes, lace trim, and pom-poms. For the skirt, start with a chain ring method, then crochet in rounds around the starting point, leaving openings for the armholes while crocheting. After that, pick up stitches at the armhole positions to crochet the sleeves. Finally, add the slip stitch stripes (06#Bright White), lace trim, and pom-poms. Please refer to the video demonstration for specifics.
| Sleeve * 2 pieces | ||
| Round | Stitch Instructions | Stitch Count |
| R1 | Work 13X along one armhole. | 13 |
| R2 | Even 13X | 13 |
| R3 | 6X, 2V, 5X | 15 |
| R4 | Even 15X | 15 |
| R5 | (4X, V)*3 | 18 |
| R6-R10 | Even 18X | 18 |
| R11 | (X, A)*6 | 12 |
| Clothes | ||
| Round | Stitch Instructions | Stitch Count |
| Cast on & R1 | 18CH, slip stitch to the first stitch, 18X | 18 |
| R2 | 18V | 36 |
| R3 | (2X, V)*12 | 48 |
| R4 | 8X, 3CH, skip 8, 16X, 3CH, skip 8 sts, 8X | 38 |
| R5-R6 | Even 38X | 38 |
| R7 | 9X, V, 18X, V, 9X | 40 |
| R8 | (4X, V)*8 | 48 |
| R9-R11 | Even 48X | 48 |
| R12 | (5X, V)*8 | 56 |
| R13-16 | Even 56X | 56 |
| R17 | (6X, V)*8 | 64 |
| R18-R25 | Even 64X | 64 |
Step 4 ScarfB4 48' 33'' (Part 2)
It consists of three parts: the scarf fabric piece, decorations, and a lace trim collar. First, make the scarf fabric piece, which is divided into three sections: Section 1, Section 2, and Section 3, with Section 3 crocheted on both sides of Section 1 and Section 2 separately. After completing it, add the decorations, and lastly, make the lace trim collar. Please refer to the video demonstration for specifics.
| Scarf section 1 | ||
| Row | Stitch Instructions | Stitch Count |
| Cast on & R1 | 12CH, Dao 2, 3X, 5CH, skip 5 sts, 3X | 11 |
| R2-R16 | CH, turn, 11X | 11 |
| Scarf section 2 | ||
| Row | Stitch Instructions | Stitch Count |
| R1 | Cast on at the starting point in Section 1, 11X |
11 |
| R2-R15 | CH, turn, 11X | 11 |
| Scarf section 3 * 2 pieces | ||
| Row | Stitch Instructions | Stitch Count |
| R1 | 3CH, 5F, 4T, 14X, 4T, 5F, 3CH, S | - |
| Edging (51#High Risk Red) | ||
| Row | Stitch Instructions | Stitch Count |
| R1 | 33X, CH, 15X, CH, 34X, CH, 15X, CH, X | 102 |
Step 5 HatB5 77' 24'' (Part 2)
The hat consists of several parts: Section 1, Section 2, ears, and half bead decorations. The colors and number of stitches in Section 1 and Section 2 are different. First, crochet Section 1, then crochet Section 2, and match up with Section 1 at the final round of Section 2. Then crochet the ears and sew them on to the corresponding position, and finally add the half bead decorations. Please refer to the video demonstration for specifics.
| Hat section 1 (06#Bright White) | ||
| Round | Stitch Instructions | Stitch Count |
| Cast on & R1 | Magic Ring, 7X | 7 |
| R2 | 7V | 14 |
| R3 | (X, V)*7 | 21 |
| R4 | (X, V, X)*7 | 28 |
| R5 | (V, 3X)*7 | 35 |
| R6 | (2X, V, 2X)*7 | 42 |
| R7 | (5X, V)*7 | 49 |
| R8 | (3X, V, 3X)*7 | 56 |
| R9-R10 | Even 56X | 56 |
| R11 | (7X, V)*7 | 63 |
| R12-R13 | Even 63X | 63 |
| R14 | (4X, V, 4X)*7 | 70 |
| R15 | (9X, V)*7 | 77 |
| R16 | (5X, V, 5X)*7 | 84 |
| R17 | Even 84X | 84 |
| R18 | (11X, V)*7 | 91 |
| R19 | Even 91X | 91 |
| Hat section 2 (51#High Risk Red) | ||
| Round | Stitch Instructions | Stitch Count |
| Cast on & R1 | Magic Ring, 8X | 8 |
| R2 | 8V | 16 |
| R3 | (X, V)*8 | 24 |
| R4 | (X, V, X)*8 | 32 |
| R5 | (V, 3X)*8 | 40 |
| R6 | (2X, V, 2X)*8 | 48 |
| R7 | (5X, V)*8 | 56 |
| R8-R9 | Even 56X | 56 |
| R10 | (3X, V, 3X)*8 | 64 |
| R11 | Even 64X | 64 |
| R12 | (7X, V)*8 | 72 |
| R13 | Even 72X | 72 |
| R14 | (4X, V, 4X)*8 | 80 |
| R15 | Even 80X | 80 |
| R16 | (9X, V)*8 | 88 |
| R17 | Even 88X | 88 |
| R18 | (5X, V, 5X)*8 | 96 |
| R19 | Even 96X | 96 |
| R20 | (11X, V)*8 | 104 |
| R21 | Join with section 1, Even 104X | 104 |
| Ear * 2 pieces(06#Bright White) | ||
| Round | Stitch Instructions | Stitch Count |
| Cast on & R1 | Magic Ring, 6X | 6 |
| R2 | (X, V)*3 | 9 |
| R3 | (X, V, X)*3 | 12 |
| R4 | (V, 3X)*3 | 15 |
| R5 | Even 15X | 15 |
| R6 | (2X, V, 2X)*3 | 18 |
| R7-R11 | Even 18X | 18 |
| R12 | (2X, A, 2X)*3 | 15 |
| R13 | Even 15X | 15 |
| R14 | (X, A)*5 | 10 |
| Leave a tail of about 30 centimeters when completed for sewing. | ||
Made by the community