Doll
Bouncy Bouncy
Project preview
See the finished project
Pattern format
Instructions
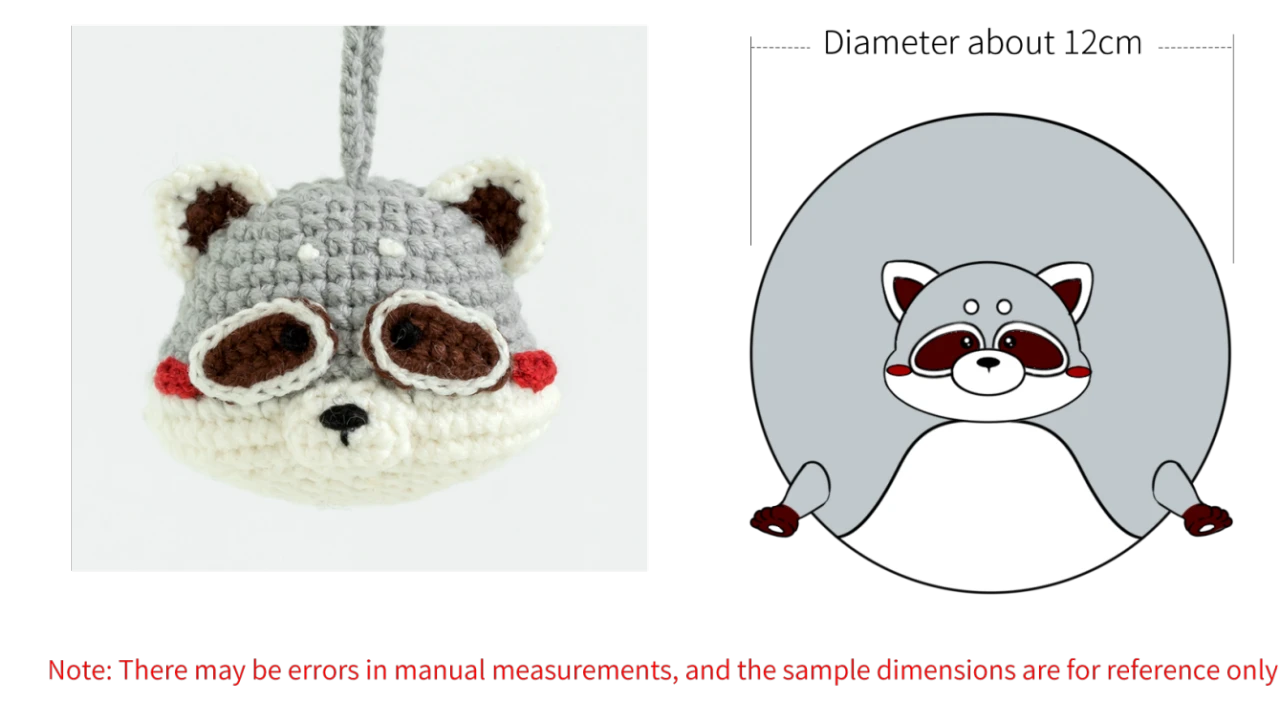
Due to variations in individual tension, the size of the sample is for reference only.
Materials: Susan's Family Handcrafted No.4 Ply Combed Cotton & Acrylic Fibre Hand Knitting Yarn
Hook: 2.0 mm crochet hook
Note: When crocheting in rounds without special instructions, a turning chain and a slip stitch are made at the beginning and end of each round, respectively. The turning chains do not count towards the total stitch count.

ABBREVIATIONS
CHchain
W = sc3-in-13 single crochets into the same stitch
V = sc2-in-12 single crochets into the same stitch
MRadjustable magic ring
A = sc2togsingle crochet 2 stitches together
XX stitch single crochet
Kskip
SLslip stitch
[...]in the same stitch
RRound
(...)×6crochet item in the parentheses six times
Thalf double crochet
TV = hdc2-in-12 half double crochets into the same stitch
This toy consists of two parts: the main body and accessories. First, crochet the main body part, then make and attach each accessory.
Part 1 Main part
The main part includes an inner layer and an outer layer. Crochet them separately and then assemble.
Step 1 Inner layer
The inner layer is divided into Section 1 and Section 2. Section 1 uses the magic ring method, crocheting in rounds counterclockwise from the starting chain. Section 2 is crocheted in rounds at the opening left by Section 1.
| Inner layer | ||||
| Area | Round | Sts Instructions | Total Sts | Color |
| Section1 | cast on, R1 | MR , 7X | 7 | 06#Bright White |
| R2 | 7V | 14 | ||
| R3 | (X, V)×7 | 21 | ||
| R4 | (X, V, X)×7 | 28 | ||
| R5 | (3X, V)×7 | 35 | ||
| R6 | (2X, V, 2X)×7 | 42 | ||
| R7 | (3X, V, 3X)×6 | 48 | ||
| R8 | (7X, V)×6 | 54 | ||
| R9 | even 54X | 54 | ||
| R10 | (4X, V, 4X)×6 | 60 | ||
| R11 | even 60X | 60 | ||
| R12 | (9X, V)×6 | 66 | ||
| R13—R18 | even 66X | 66 | ||
| R19 | 31X, 35CH, K35 | 66 | ||
| R20 | 31X, 35X | 66 | ||
| R21 | even 66X | 66 | ||
| R22 | 43X, 10CH, K10, 13X | 66 | ||
| R23—R26 | even 66X | 66 | ||
| R27 | (9X, A)×6 | 60 | ||
| R28 | even 60X | 60 | ||
| R29 | (4X, A, 4X)×6 | 54 | ||
| R30 | even 54X | 54 | ||
| R31 | (7X, A)×6 | 48 | ||
| R32 | (3X, A, 3X)×6 | 42 | ||
| R33 | (2X, A, 2X)×7 | 35 | ||
| R34 | (3X, A)×7 | 28 | ||
| R35 | (X, A, X)×7 | 21 | ||
| R36 | (X, A)×7 | 14 | ||
| R37 | 7A | 7 | ||
| Section2 | R1 | (6X, V)×10 | 80 | |
| R2 | even 80X | 80 | ||
Step 2 Outer layer
The outer layer is also divided into Section 1 and Section 2. Section 1 uses the magic ring method, crocheting in rounds counterclockwise from the starting point. Section 2 is crocheted in rounds at the smaller opening of Section 1.
| Outer layer | ||||
| Area | Round | Sts Instructions | Total Sts | Color |
| Section1 | cast on, R1 | MR , 7X | 7 | 11#Quiet Gray |
| R2 | 7V | 14 | ||
| R3 | (X, V)×7 | 21 | ||
| R4 | (X, V, X)×7 | 28 | ||
| R5 | (3X, V)×7 | 35 | ||
| R6 | (2X, V, 2X)×7 | 42 | ||
| R7 | (3X, V, 3X)×6 | 48 | ||
| R8 | (7X, V)×6 | 54 | ||
| R9 | (4X, V, 4X)×6 | 60 | ||
| R10 | (9X, V)×6 | 66 | ||
| R11 | (5X, V, 5X)×6 | 72 | ||
| R12 | even 72X | 72 | ||
| R13 | (11X, V)×6 | 78 | ||
| R14 | (6X, V, 6X)×6 | 84 | ||
| R15 | even 84X | 84 | ||
| R16 | (13X, V)×6 | 90 | ||
| R17 | (7X, V, 7X)×6 | 96 | ||
| R18—R26 | even 96X | 96 | ||
| R27 | 40CH, K40, 56X | 96 | ||
| R28—R29 | even 96X | 96 | ||
| R30 | 15X, 10CH, K10, 71X | 96 | ||
| R31 | even 96X | 96 | ||
| R32 | (7X, A, 7X)×6 | 90 | ||
| R33 | (13X, A)×6 | 84 | ||
| R34 | even 84X | 84 | ||
| R35 | (6X, A, 6X)×6 | 78 | ||
| R36 | (11X, A)×6 | 72 | ||
| R37 | even 72X | 72 | ||
| R38 | (5X, A, 5X)×6 | 66 | ||
| R39 | (9X, A)×6 | 60 | ||
| R40 | (4X, A, 4X)×6 | 54 | ||
| R41 | (7X, A)×6 | 48 | ||
| R42 | (3X, A, 3X)×6 | 42 | ||
| R43 | (2X, A, 2X)×7 | 35 | ||
| R44 | (3X, A)×7 | 28 | ||
| R45 | (X, A, X)×7 | 21 | ||
| R46 | (X, A)×7 | 14 | ||
| R47 | 7A | 7 | ||
| Section2 | R1 | 10X, 10X | 20 | |
| R2 | even 20X | 20 | ||
| Note: After completing section 2, leave a yarn tail of about 30 cm. | ||||
Step 3 Assemble
The crocheted inner and outer layers are assembled together, and during this process, fiberfill needs to be added, and a zipper (sewing thread) should be installed.
Part 2 Accessories
The accessories include the tail, head, face, belly, and legs.
Step 1 Tail
The tail is started with an adjustable magic ring, and crocheted in rounds counter-clockwise from the beginning. There are color changes during the process. After completing it, add the stuffing and sew it onto the corresponding position of the main part.
| Tail | |||
| Round | Sts Instructions | Total Sts | Color |
| cast on, R1 | MR , 9X | 9 | 11#Quiet Gray |
| R2—R3 | even 9X | 9 | |
| R4 | even 9X | 9 | 61#Cappuccino |
| R5—R6 | even 9X | 9 | 11#Quiet Gray |
| R7 | (X, A)×3 | 6 | |
| R8 | even 6X | 6 | 61#Cappuccino |
| R9—R11 | even 6X | 6 | 11#Quiet Gray |
| Note: leave a tail of about 20 cm. | |||
Step 2 Head
We will start from the head with a foundation chain, then crochet in rounds counterclockwise. During the process, color changes are needed, and fiberfill should be added.
| Head | |||
| Round | Sts Instructions | Total Sts | Color |
| cast on, R1 | 7CH, dao 2, 5X, W, 4X, V | 14 | 11#Quiet Gray |
| R2 | V, 4X, 3V, 4X, 2V | 20 | |
| R3 | X, V, 4X, (X, V)×3, 4X, (X, V)×2 | 26 | |
| R4 | 10X, (V, 2X)×2, 2X, (2X, V)×2, 2X | 30 | |
| R5 | 11X, (V, 2X)×2, 4X, (2X, V)×2, 3X | 34 | |
| R6—R7 | even 34X | 34 | |
| R8 | 18X, A, 4X, A, 8X | 32 | |
| R9 | 12X, 3V, 4TV, 4X, 4TV, 3V, 2X | 46 | |
| R10 | 14X, (V, X)×4, 12X, (X, V)×4, 4X | 54 | 06#Bright White |
| R11 | even 54X | 54 | |
| R12 | 14X, (A, X)×4, 12X, (X, A)×4, 4X | 46 | |
| R13 | 12X, 7A, 4X, 7A, 2X | 32 | |
| R14 | 11X, (A, 2X)×2, 4X, (2X, A)×2, X | 28 | |
| R15 | 9X, (A, 2X)×2, 2X, (2X, A)×2, X | 24 | |
| R16 | X, A, 3X, (X, A)×3, 3X, (X, A)×2 | 18 | |
| R17 | A, 3X, 3A, 3X, 2A | 12 | |
| Note: While crocheting the edging, add the stuffing. Leave a yarn tail of about 25 cm for sewing. | |||
Step 3 Face
The face includes the ears, nose, eyes, eyebrows, and blush. After completing these, sew the head onto the corresponding position of the main piece (using the same color yarn as the outer layer of the main piece).
| Ear×2 | |||
| Round | Sts Instructions | Total Sts | Color |
| cast on, R1 | MR , 3X | 3 | 61#Cappuccino |
| R2 | turn, V, [X, 2CH, X], V | 6 | |
| R3 | turn, V, 2X, [X, 2CH, X], 2X, V | 10 | 06#Bright White |
| Note: leave a tail of about 15 cm. | |||
| Nose | |||
| Round | Sts Instructions | Total Sts | Color |
| cast on, R1 | 6CH, dao 2, 4X, W, 3X, V | 12 | 06#Bright White |
| R2 | even 12X | 12 | |
| Note: leave a tail of about 20 cm. The tip of nose:21#Black Beauty, take 1 strand. | |||
| Eye socket×2 | |||
| Round | Sts Instructions | Total Sts | Color |
| cast on, R1 | 7CH, dao 2, 4X, 3V, 4X | 11 | 61#Cappuccino |
| Note: leave a 15cm yarn tail; pick the back loops only and make 1 round of slip stitches.06#Bright White, take 2 strands;eyeball 21#Black Beauty. | |||
| blush×2:4CH, dao 2, 3X(29#Aurora Red, take 2 strands) | |||
Step 4 Belly
The belly is divided into Section 1, Section 2, Section 3, and the edging. For Section 1, we will start with a foundation chain and work in rounds back and forth along the starting chain. Sections 2 and 3 are worked back and forth based on Section 1. After completing these sections, crochet a round of edging. Finally, sew it onto the bottom of the main piece.
| Belly | ||||
| Area | Round | Sts Instructions | Total Sts | Color |
| Section1 | cast on, R1 | 25CH, dao 2, 23X, W, 22X, V | 50 | 06#Bright White |
| R2 | CH, turn, 2V, 22X, 3V, 22X, V | 56 | ||
| R3 | CH, turn, X, V, 22X, (X, V)×3, 22X, (X, V)×2 | 62 | ||
| R4 | CH, turn, (X, V, X)×2, 22X, (X, V, X)×3, 22X, X, V, X | 68 | ||
| R5 | CH, turn, 3X, V, 22X, (3X, V)×3, 22X, (3X, V)×2 | 74 | ||
| R6 | CH, turn, (2X, V, 2X)×2, 22X, (2X, V, 2X)×3, 24X, V, 2X | 80 | ||
| R7 | CH, turn, 5X, V, 22X, (5X, V)×3, 22X, (5X, V)×2, break the yarn | 86 | ||
| Section2 | R1 | turn, join the yarn at the 15th sts, CH, Start from the left side with 1 stitch 20, SL | 20 | |
| R2 | CH, turn, K, 17X, SL, K | 17 | ||
| R3 | CH, turn, K, 3X, 8T, 3X, SL, K | 14 | ||
| Section3 | R1 | In section 1, join the yarn to the left at the 22nd stitch, CH, Start from the left side with 1 stitch 20X, SL | 20 | |
| R2 | CH, turn, K, 17X, SL, K | 17 | ||
| R3 | CH, turn, K, 3X, 8T, 3X, SL, K | 14 | ||
| Edging | work 1 round of single crochet | / | ||
| Note: When skipping a stitch, the slip stitch doesn't count as 1 stitch; leave a yarn tail of about 40 cm. | ||||
Step 5 Legs
There are a total of 4 legs, all worked as the same. They are all started with an adjustable magic ring and crocheted in rounds counterclockwise. There need to change colors during the process. After completion, add stuffing and sew the legs onto the corresponding position of the main part.
| Leg×4 | |||
| Round | Sts Instructions | Total Sts | Color |
| cast on, R1 | MR , 6X | 6 | 06#Bright White |
| R2 | 6V | 12 | 61#Cappuccino |
| R3 | even 12X | 12 | |
| R4 | A, X, 4A, X | 7 | |
| R5 | even 7X | 7 | 11#Quiet Gray |
| R6 | (V, X)×3, V | 11 | |
| R7—R8 | even 11X | 11 | |
| Note: leave a tail of about 20 cm. | |||
Note: After completing everything, if there is any leftover yarn, you can crochet one more head as a hanging ornament. The hanging string is a chain stitched onto the top of the head (the length is determined by actual needs).
Made by the community