Doll
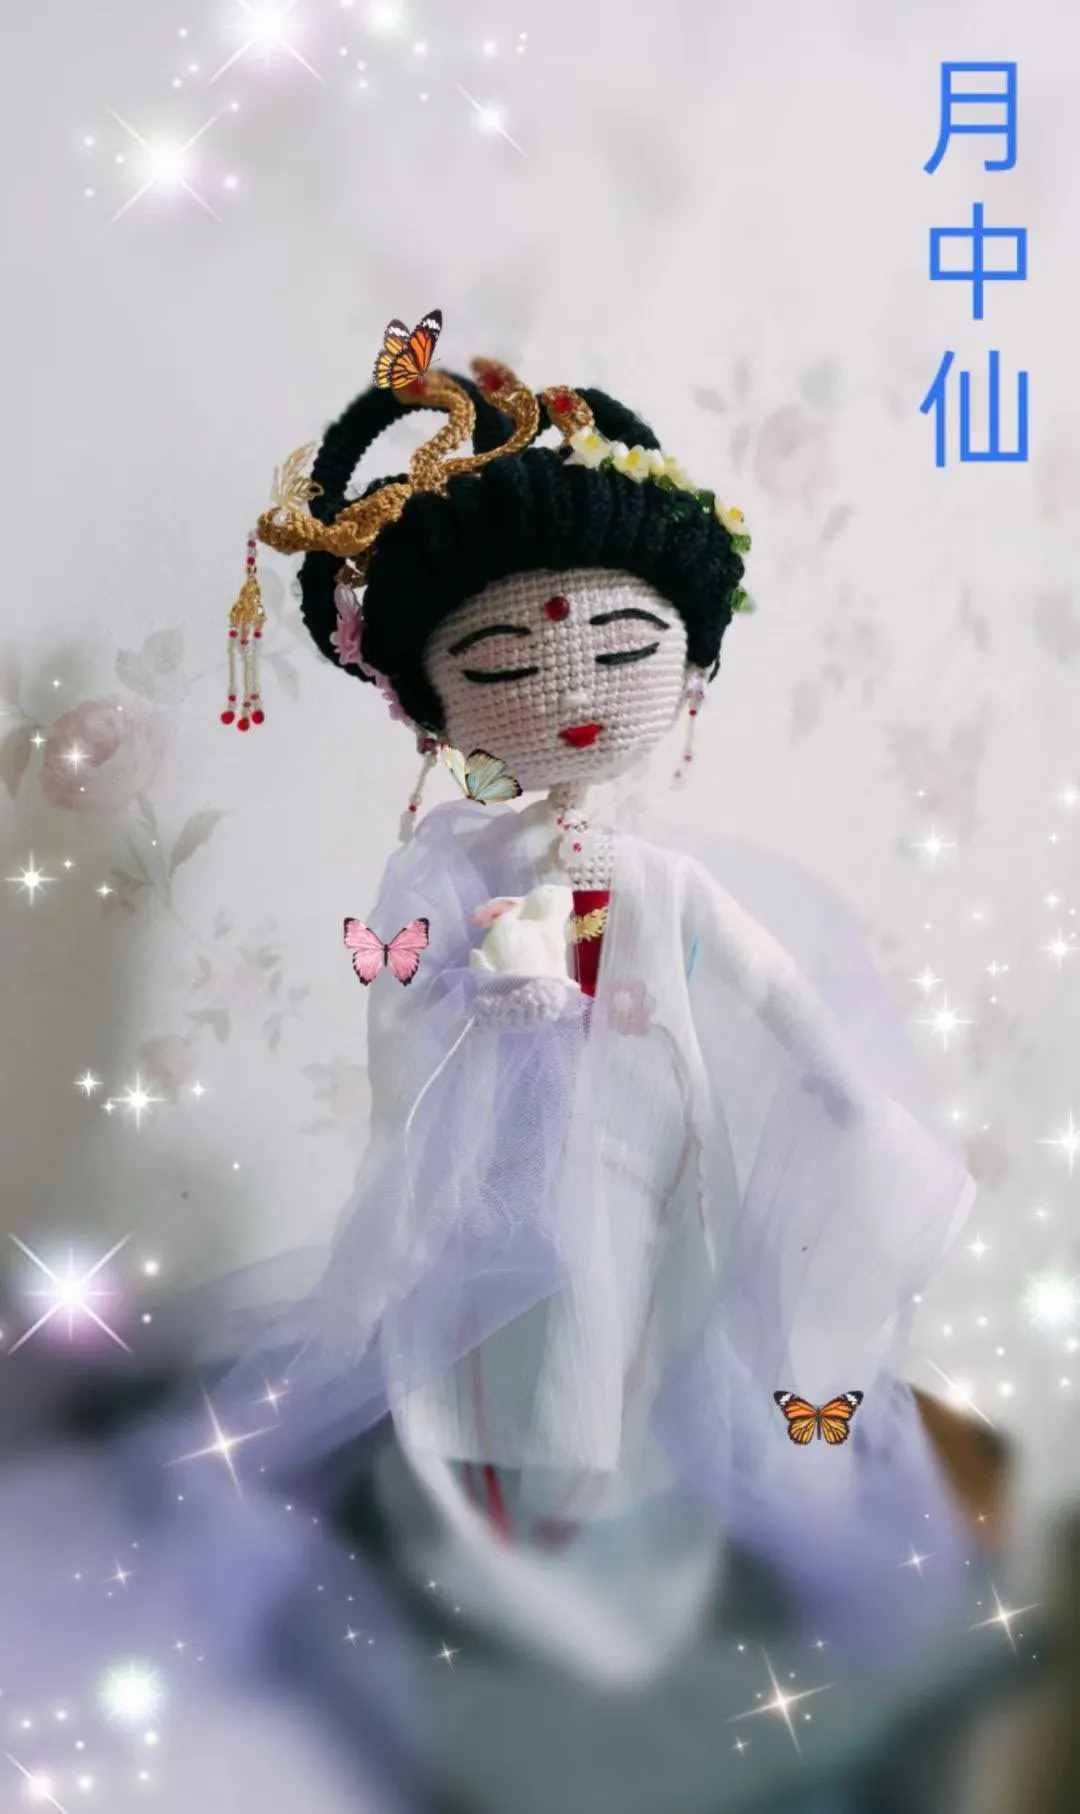
Chang'e Doll
Project preview
See the finished project
Pattern format
Instructions
Watch and follow
Video tutorial
This doll consists of the main piece, clothing, hair, facial features and decorations.
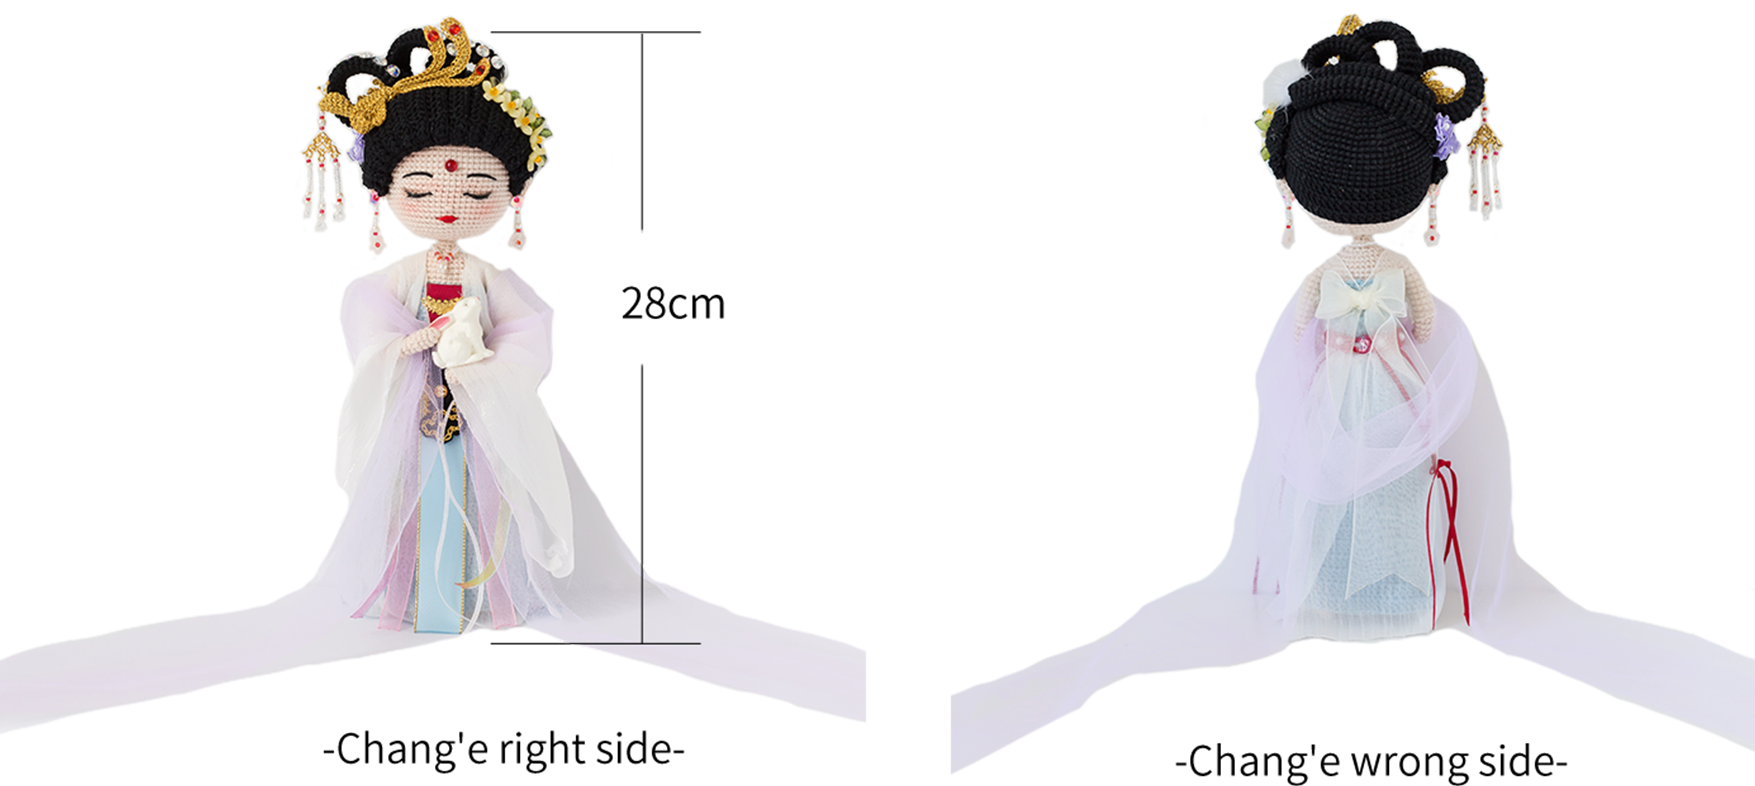
Due to variations in individual tension, the size of the sample is for reference only.
Materials: Combed 3# Lace
Hook: 1.75 mm crochet hook
Note: When working in spiral round, mark the beginning of each round with yarn. When working in joined round, start each round with a turning chain and always finish by joining with a slip stitch. The turning chain of single crochet and the joining slip stitch don't count as 1 stitch.

ABBREVIATIONS
MRadjustable magic ring
Dao2start in 2nd CH from the hook
turnturn the piece
CHchain
V = sc2-in-12 single crochets into the same stitch
A = sc2toginvisible single crochet 2 stitches together
(...)×6crochet item in the parentheses six times
RRound
[...]in the same stitch
Sslip stitch
Fdouble crochet
Thalf double crochet
XX stitch single crochet
TW = hdc3-in-13 half double crochets into the same stitch
TV = hdc2-in-12 half double crochets into the same stitch
FV = dc2-in-12 double crochets into the same stitch
Kskip
HRow
Note:
1. This pattern is making in Chinese crochet pattern terms, and the stitch name is written using American terminology. All measurements in charts are in cm.
2. Working in joined round: When crocheting in rounds without further guidance, working in closed rounds, start each round with a set number of beginning chains and close with a slip stitch. The beginning chain preceding a single crochet and the slip stitch used for joining rounds are not included in the total stitches.

Part 1 Main pieceA
The main part includes: head, arms, legs, body, and ears.
Step 1 HeadA1 00' 53'' (Part 1)
The head is worked in spirals using the magic ring method, and stuffing needs to be added during the process. Please refer to the video demonstration for more details.
| Head | |||
| Rounds | Stitch Instructions | Total Stitches | Color |
| Cast on and R1 | MR, 6X | 6 | 25#Sheer Pink |
| R2 | 6V | 12 | |
| R3 | (X, V)×6 | 18 | |
| R4 | (X, V, X)×6 | 24 | |
| R5 | (3X, V)×6 | 30 | |
| R6 | (2X, V, 2X)×6 | 36 | |
| R7 | (5X, V)×6 | 42 | |
| R8 | (3X, V, 3X)×6 | 48 | |
| R9 | (7X, V)×6 | 54 | |
| R10 | (4X, V, 4X)×6 | 60 | |
| R11 | (9X, V)×6 | 66 | |
| R12 | even 66X | 66 | |
| R13 | (5X, V, 5X)×6 | 72 | |
| R14—R21 | even 72X | 72 | |
| R22 | (5X, A, 5X)×6 | 66 | |
| R23 | (10X, A, 10X)×3 | 63 | |
| R24—R28 | even 63X | 63 | |
| R29 | (19X, A)×3 | 60 | |
| R30 | even 60X | 60 | |
| R31 | (4X, A, 4X)×6 | 54 | |
| R32 | (2X, A, 2X)×9 | 45 | |
| R33 | (3X, A)×9 | 36 | |
| R34 | (X, A, X)×9 | 27 | |
| R35 | (X, A)×9 | 18 | |
| R36 | (X, A)×6 | 12 | |
| R37—R38 | even 12X | 12 | |
Step 2 ArmA2 19' 33'' (Part 1)
For the fifth round of the arm, you need to crochet out the thumb, without adding any stuffing. Please refer to the video demonstration for more details.
| Arm×2 | |||
| Rounds | Stitch Instructions | Total Stitches | Color |
| Cast on and R1 | MR, 6X | 6 | 25#Sheer Pink |
| R2 | (X, V, X)×2 | 8 | |
| R3—R4 | even 8X | 8 | |
| R5 | 6X, [X, 3CH, Dao2, 2X, SL], X | 8 | |
| R6 | (X, A)×2, 2X | 6 | |
| R7 | (X, V, X)×2 | 8 | |
| R8 | even 8X | 8 | |
| R9 | (3X, V)×2 | 10 | |
| R10—R27 | even 10X | 10 | |
| Note: [] means to work in the same stitch; leave a 15cm yarn tail for sewing underarm. | |||
Step 3 LegsA3 25' 41'' (Part 1)
The last round of the two legs has different stitch counts. The left and right legs refer to the doll's own left and right. While crocheting, add shaping wire and fiberfill. Please refer to the video demonstration for more details.
| Leg×2 | |||
| Rounds | Stitch Instructions | Total Stitches | Color |
| Cast on and R1 | MR, 6X | 6 | 25#Sheer Pink |
| R2 | X, V, 2X, V, X | 8 | |
| R3—R4 | even 8X | 8 | |
| R5 | 6X, TW, X | 10 | |
| R6 | 7X, 2TV, X | 12 | |
| R7 | even 12X | 12 | |
| R8 | 6X, 3A | 9 | |
| R9 | 6X, A, X | 8 | |
| R10 | even 8X | 8 | |
| R11 | 6X, V, X | 9 | |
| R12 | 7X, V, X | 10 | |
| R13 | 8X, V, X | 11 | |
| R14 | 8X, V, 2X | 12 | |
| R15 | 9X, V, 2X | 13 | |
| R16—R22 | even 13X | 13 | |
| R23 | 9X, A, 2X | 12 | |
| R24 | 9X, A, X | 11 | |
| R25 | 2X, 3V, 6X | 14 | |
| R26 | 2X, 3A, 4X, V, X | 12 | |
| R27 | 10X, V, X | 13 | |
| R28 | 10X, V, 2X | 14 | |
| R29 | 11X, V, 2X | 15 | |
| R30 | 11X, V, 3X | 16 | |
| R31 | 12X, V, 3X | 17 | |
| R32 | 12X, 2V, 3X | 19 | |
| R33 | even 19X | 19 | |
| R34 | 14X, V, 4X | 20 | |
| R35 | 14X, V, 5X | 21 | |
| R36 | 15X, V, 5X | 22 | |
| R37—R41 | even 22X | 22 | |
| Left Leg | 10X(cut the yarn) | ||
| Right Leg | don't cut the yarn | ||
| Note: While crocheting the edging, add the stuffing and approximately 100cm of shaping wire. | |||
Step 4 BodyA4 35' 09'' (Part 1)
Join the two legs together and continue crocheting upwards along the two legs. During this process, attach the arms while crocheting, and add stuffing and shaping wire as you go. Please refer to the video demonstration for more details.
| Body | |||
| Rounds | Stitch Instructions | Total Stitches | Color |
| R1 | Connect the right leg to the left leg, 44X | 44 | 25#Sheer Pink |
| R2 | 5X, A, 30X, A, 5X | 42 | |
| R3 | A, 7X, A, 19X, A, 8X, A | 38 | |
| R4 | 8X, A, 17X, A, 9X | 36 | |
| R5 | (2X, A, 2X)×6 | 30 | |
| R6 | even 30X | 30 | |
| R7 | (6X, A)×3, 6X | 27 | |
| R8 | 6X, A, 11X, A, 6X | 25 | |
| R9—R13 | even 25X | 25 | |
| R14 | 6X, V, 11X, V, 6X | 27 | |
| R15 | even 27X | 27 | |
| R16 | 7X, V, 11X, V, 7X | 29 | |
| R17 | even 29X | 29 | |
| R18 | 7X, V, 13X, V, 7X | 31 | |
| R19—R21 | even 31X | 31 | |
| R22 | 9X, connected hands10X, 15X, connected hands 10X, 7X | 51 | |
| R23 | 11X, 3A, 19X, 3A, 9X | 45 | |
| R24 | 8X, A, 5X, A, 13X, A, 5X, A, 6X | 41 | |
| R25 | 7X, 2A, X, 2A, 11X, 2A, X, 2A, 5X | 33 | |
| R26 | 7X, A, X, A, 11X, A, X, A, 5X | 29 | |
| R27 | 6X, A, X, A, 9X, A, X, A, 4X | 25 | |
| R28 | (X, A)*8, X | 17 | |
| R29 | 8A, X | 9 | |
| R30—R40 | even 9X | 9 | |
| Note: In R23, add an approximately 44cm shaping wire to the arm. | |||
Step 5 EarsA5 52' 48'' (Part 1)
After crocheting the ears, sew them symmetrically on both sides of the head. Please refer to the video demonstration for more details.
| Ear×2 | Stitch Instructions | Color |
| 6CH, Dao3, 3T, [T, 2CH, SL] | 25#Sheer Pink | |
| Note: [] means to work in the same stitch; leave a 15cm yarn tail for sewing. | ||
Part 2 ClothingB
The clothing includes: a skirt, a belt, and a coat.
Step 1 SkirtB1 00' 37'' (Part 2)
The skirt is divided into two parts: the main piece and the decorations. For the main piece, we will start with a foundation chain and work back and forth in rows. When you reach round 14, join with a slip stitch to begin crocheting in rounds. After completing this section, sew together the back seam. The fabric and accessories are collectively referred to as the decorative elements of the dress. Please refer to the video demonstration for more details.
| Skirt | |||
| Rounds | Stitch Instructions | Total Stitches | Color |
| Cast on and H1 | (Leave a tail of about 20cm)31CH, Dao2, 30X | 30 | 15#Sky Blue |
| H2—H4 | CH, turn, even 30X | 30 | |
| H5 | CH, turn, 6X, K, 16X, K, 6X | 28 | |
| H6—H8 | CH, turn, even 28X | 28 | |
| H9 | CH, turn, 6X, K, 14X, K, 6X | 26 | |
| H10—H12 | CH, turn, even 26X | 26 | |
| H13 | 3CH, turn, 5F, FV, 12F, FV, 6F | 28 | |
| R14 | 3CH, 2F, FV, (3F, FV)×6 | 35 | |
| R15 | 3CH, F, FV, 2F, (2F, FV, 2F)×6 | 42 | |
| R16 | 3CH, 4F, FV, (5F, FV)×6 | 49 | |
| R17—R26 | 3CH, even 48F | 49 | |
| R27 | 3CH, 2F, FV, 3F, (3F, FV, 3F)×6 | 56 | |
| R28—R31 | 3CH, even 55F | 56 | |
Step 2 Black And Red Waist BeltB2 43' 02'' (Part 2)
Both belts are divided into two parts: crocheted sections and decorations. Complete the crocheted part first, then work on the decorations. Please refer to the video demonstration for more details.
| Black Waist Belt | ||||
| Part | Rounds | Stitch Instructions | Total Stitches | Color |
| Piece 1 | Cast on and H1 | 30CH, Dao2, 29X | 29 | 24#Black Beauty |
| H2—H4 | CH, turn, even 29X | 29 | ||
| Work one round of single crochets on each side with gold thread. | ||||
| Piece 2 | H1 | Crochet on the 13th stitch of piece 1, 4X | 4 | 24#Black Beauty |
| H2—H11 | CH, turn, even 4X | 4 | ||
| Work a round of single crochets around the edge with gold yarn. | ||||
| Piece 3 | MR, 2T, SL, 2CH, 2F, 2CH, SL, 2T, SL, 2CH, 2F, 2CH, SL |
24#Black Beauty | ||
| Work a round with gold thread around the edge and slip stitch. | ||||
| Button Loop | 6CH, S | 24#Black Beauty | ||
| Note: After completion, make decorations. Refer to the video demonstration formore details. | ||||
| Red Waist Belt | |||
| Part | Rounds | Stitch Instructions | Color |
| Waist Belt | Cast on and H1 | 29CH, Dao2, 28X | 08#High Risk Red |
| H2 | CH, turn, even 28X | ||
| Button Loop | 6CH, S | ||
| Note: After completion, make decorations. Refer to the video demonstration formore details. | |||
Step 3 CoatB3 76' 01'' (Part 2)
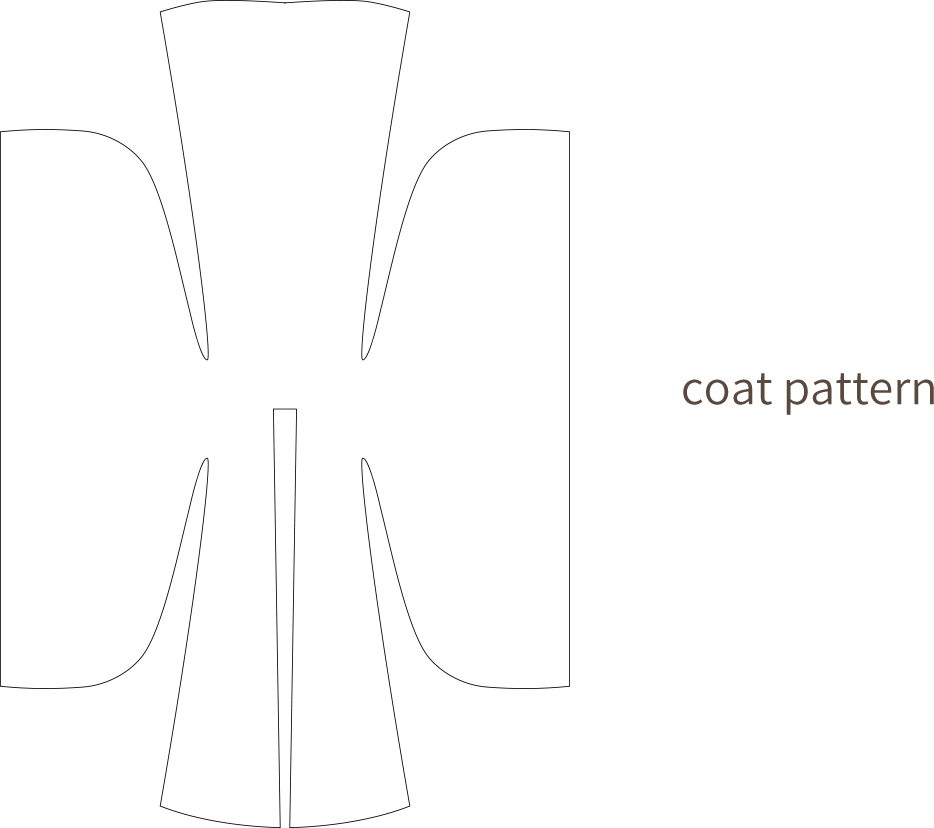
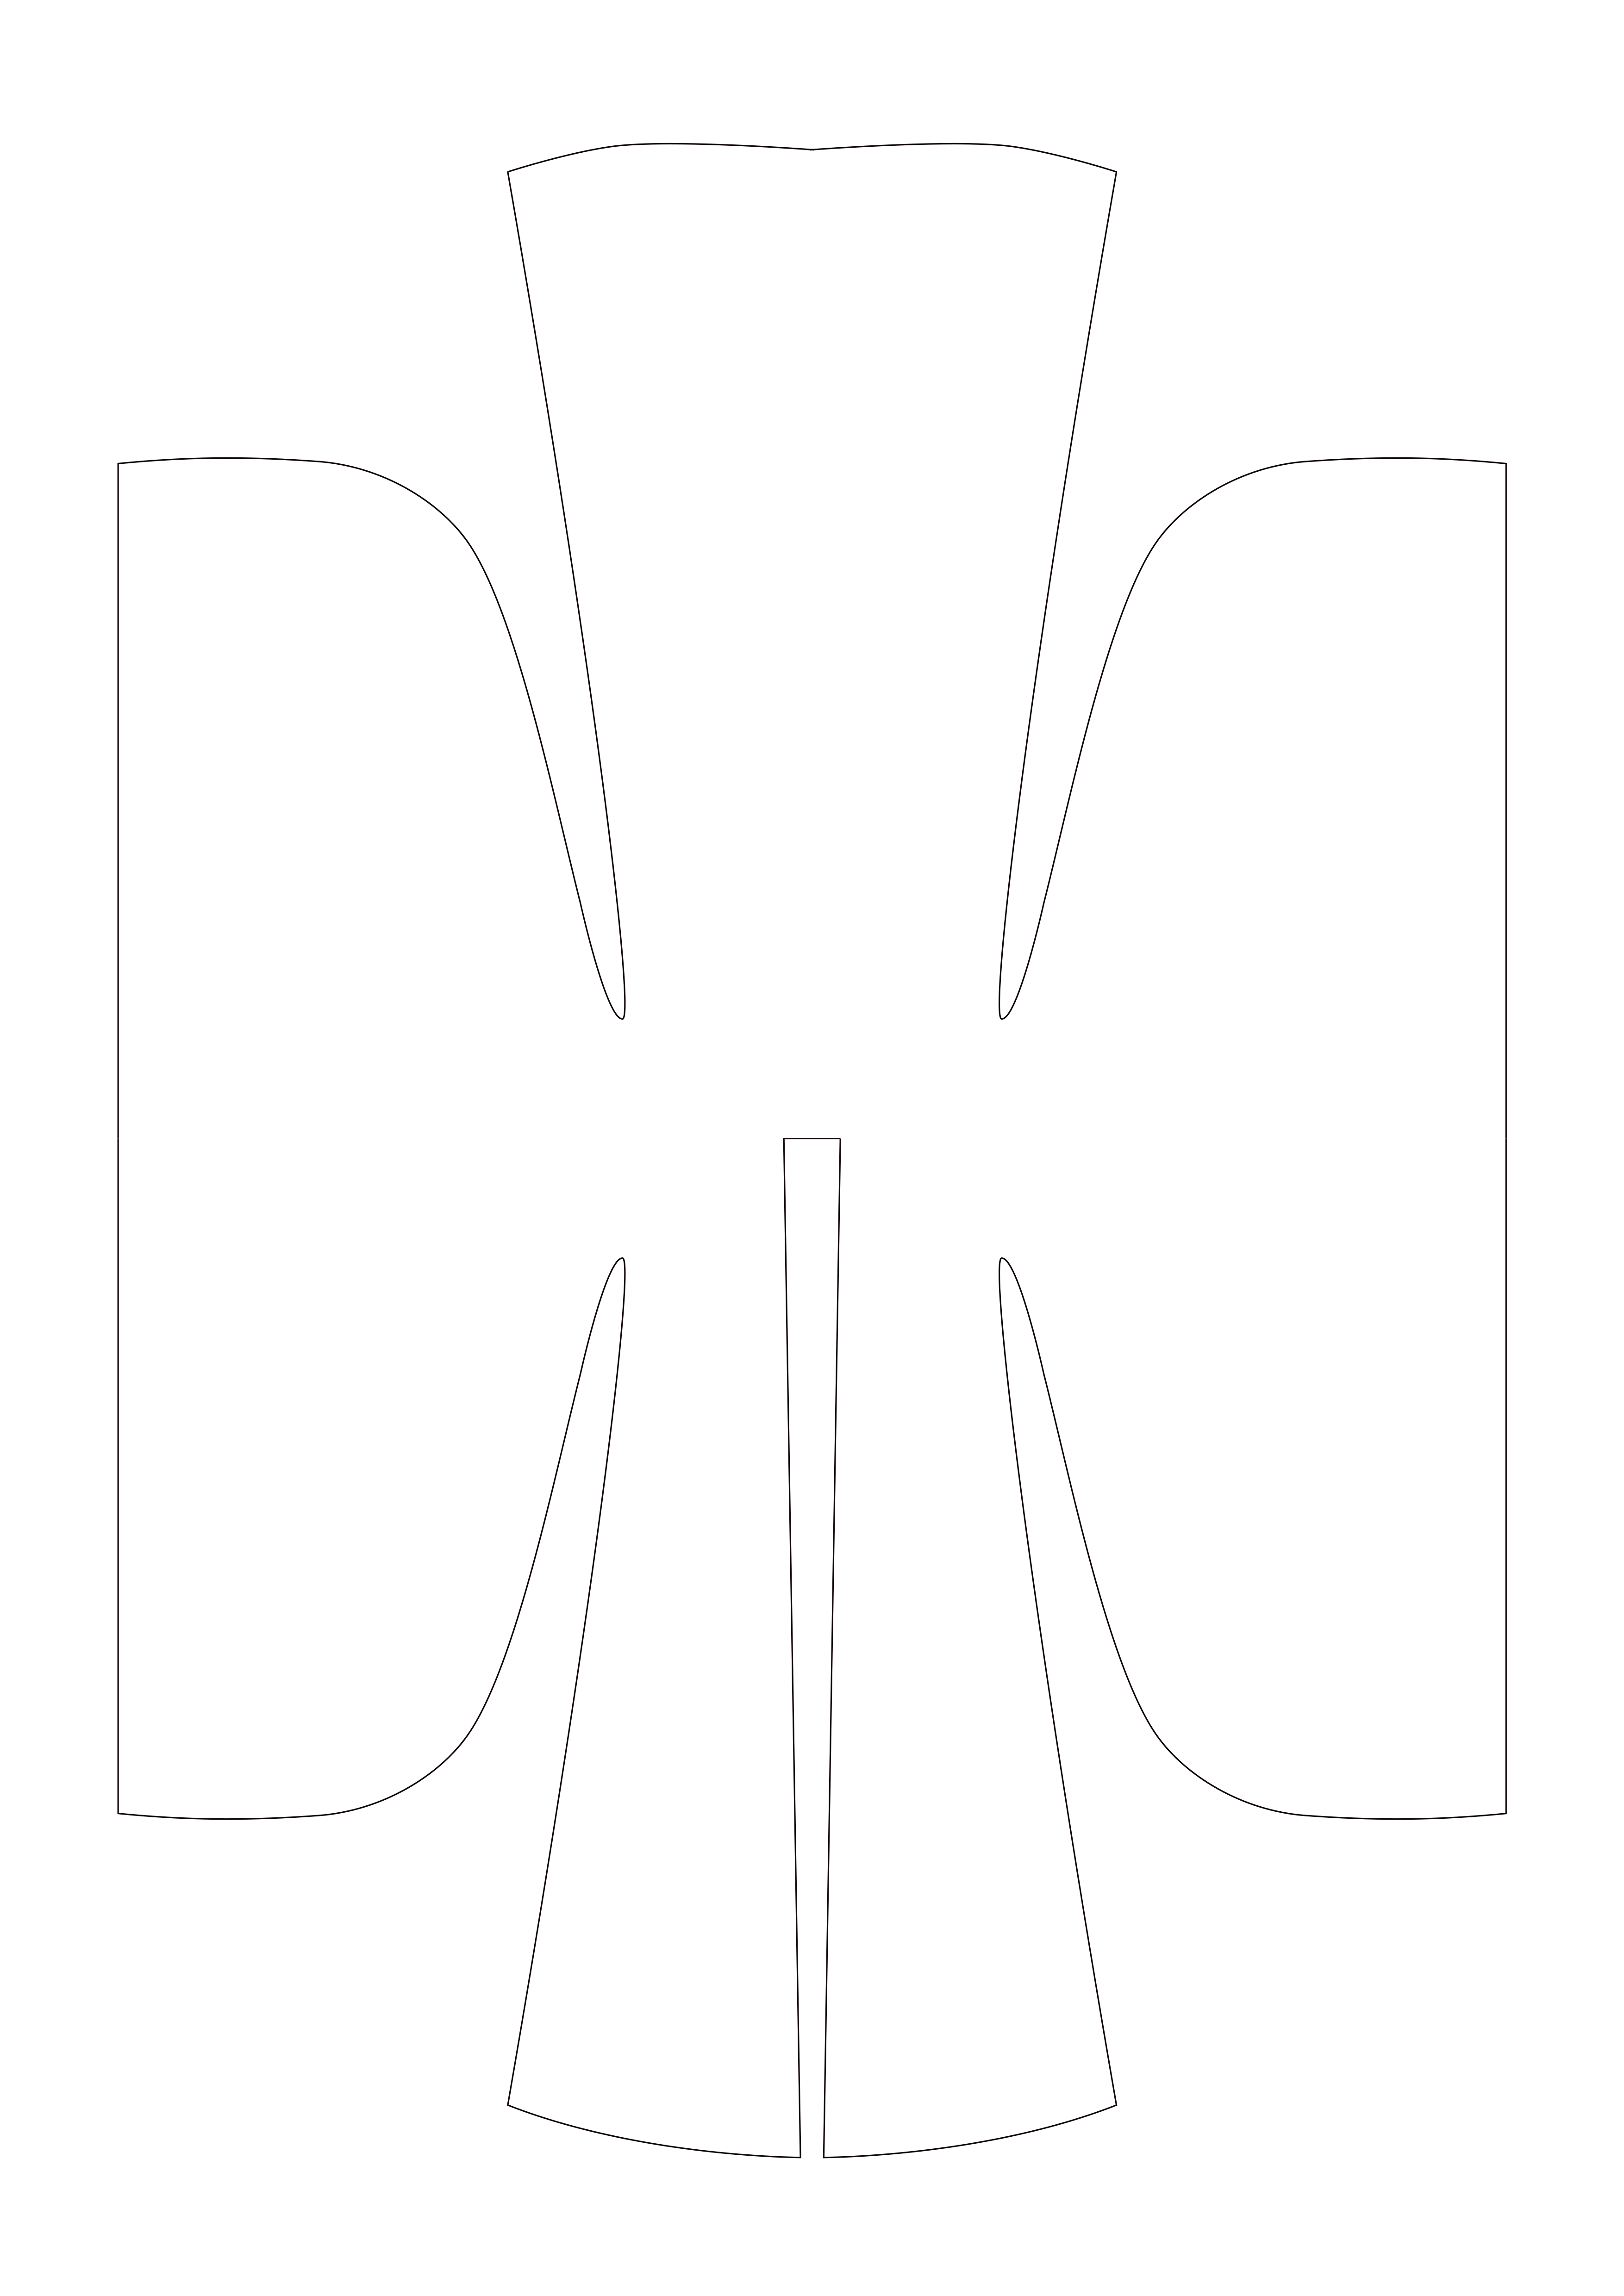
First, cut out the required sections according to the paper pattern, then sew them together, and finally sew on the ties. Please refer to the video demonstration for more details.
Note: The paper pattern size is for reference only; please refer to the accompanying pattern for more details.
Part 3 HairC
The hair is divided into a wig, hair strands, hair bun, chignon, and phoenix head ornament. After crocheting is finished, assemble and add decorations.
Step 1 WigC1, Hair StrandsC2, Hair Bun, ChignonC3 00' 38'' (Part 3)
The wig cap is crocheted in rounds using the slip stitch ring method; the hair strands is worked back and forth on the wig cap starting with a chain; both the bun and the chignon are crocheted in rounds using the slip stitch ring method. Please refer to the video demonstration for more details.
| Hair | |||
| Part | Rounds | Stitch Instructions | Color |
| Wig | Cast on and R1 | MR, 6X | 24#Black Beauty |
| R2 | 6V | ||
| R3 | (X, V)×6 | ||
| R4 | (X, V, X)×6 | ||
| R5 | (3X, V)×6 | ||
| R6 | (2X, V, 2X)×6 | ||
| R7 | (5X, V)×6 | ||
| R8 | (3X, V, 3X)×6 | ||
| R9 | (7X, V)×6 | ||
| R10 | (4X, V, 4X)×6 | ||
| R11 | (9X, V)×6 | ||
| R12—R18 | even 66X | ||
| R19—R21 | 36X, 3T, 21F, 3T, 3X | ||
| Hair Strand | Quantity | Stitch Instructions | |
| 1—16 | (Start from the first stitch of R21 of the wig)22CH, Dao4, 13F, 3T, 3X, K, SL |
||
| Hair Bun | Rounds | Stitch Instructions | |
| Cast on and R1 | MR, 6X | ||
| R2 | (X, V)×3 | ||
| R3 | (X, V, X)×3 | ||
| R4 | (3X, V)×3 | ||
| R5—R38 | even 15X | ||
| R39 | (3X, A)×3 | ||
| R40 | (X, A, X)×3 | ||
| R41 | (X, A)×3 | ||
| Chignon | Rounds | Stitch Instructions | |
| Cast on and R1 | MR, 6X | ||
| R2 | (X, V)×3 | ||
| R3—R160 | even 9X | ||
Step 2 Phoenix Head OrnamentC4 10' 07'' (Part 3)
The head accessory is divided into two parts: crocheting and decorations. First, complete the crocheted section, then assemble all parts and add decorations. Please refer to the video demonstration for more details.
| Phoenix Head Ornament | ||||
| Part | Rounds | Stitch Instructions | Total Stitches | Color |
| Body | Cast on and R1 | MR, 6X | 6 | golden yarn |
| R2 | even 6X | 6 | ||
| R3 | 6V | 12 | ||
| R4—R5 | even 12X | 12 | ||
| R6 | V, X, 4A, X, V | 10 | ||
| R7 | X, 4A, X | 6 | ||
| R8 | 2X, A, 2X | 5 | ||
| R9 | 5V | 10 | ||
| R10 | (2X, V, 2X)×2 | 12 | ||
| R11—R16 | even 12X | 12 | ||
| R17 | (2X, A, 2X)×2 | 10 | ||
| R18 | 5A | 5 | ||
| Note: The body needs to be filled with shaping wire and filling cotton. | ||||
| Left Wing | 15CH, Dao2, 10X, K, SL, 9CH, Dao2, 8X, S, 7CH, Dao2, 6X, SL |
|||
| Right Wing | 7CH, Dao2, 6X, 9CH, Dao2, 8X, 11CH, Dao2, 10X, CH, 3X |
|||
| Note: Leave about 20cm of yarn tail for sewing. | ||||
| Tail 1 | 20CH, Dao4, 4F, TV, 6T, 6X | |||
| Tail 2 | 24CH, Dao4, 4F, TV, 6T, 10X | |||
| Tail 3 | 22CH, Dao4, 4F, TV, 6T, 8X | |||
| Note: Crochet with thin wire included; leave a yarn tail of about 15cm for sewing. | ||||
Step 3 Hair Assembly and DecorationsC5 40' 25'' (Part 3)
First, assemble the different parts of the hair, secure the bun, and then proceed to make the hair decorations. Please refer to the video demonstration for more details.
Part 4 Facial Features and Remaining Decorations D 62' 42'' (Part 3)
The creation of facial features includes: nose, eyes, eyebrows, and lips. The remaining decorative elements include: necklace, earrings, and shawl. Please refer to the video demonstration for more details.
Made by the community