Doll
Christmas Dolls Set
Project preview
See the finished project
Pattern format
Instructions
Watch and follow
Video tutorial
| Style | Yarn | Color |
|---|---|---|
| Style #1 | 4-Ply Combed Cotton & Acrylic Fibre Hand Knitting Yarn | 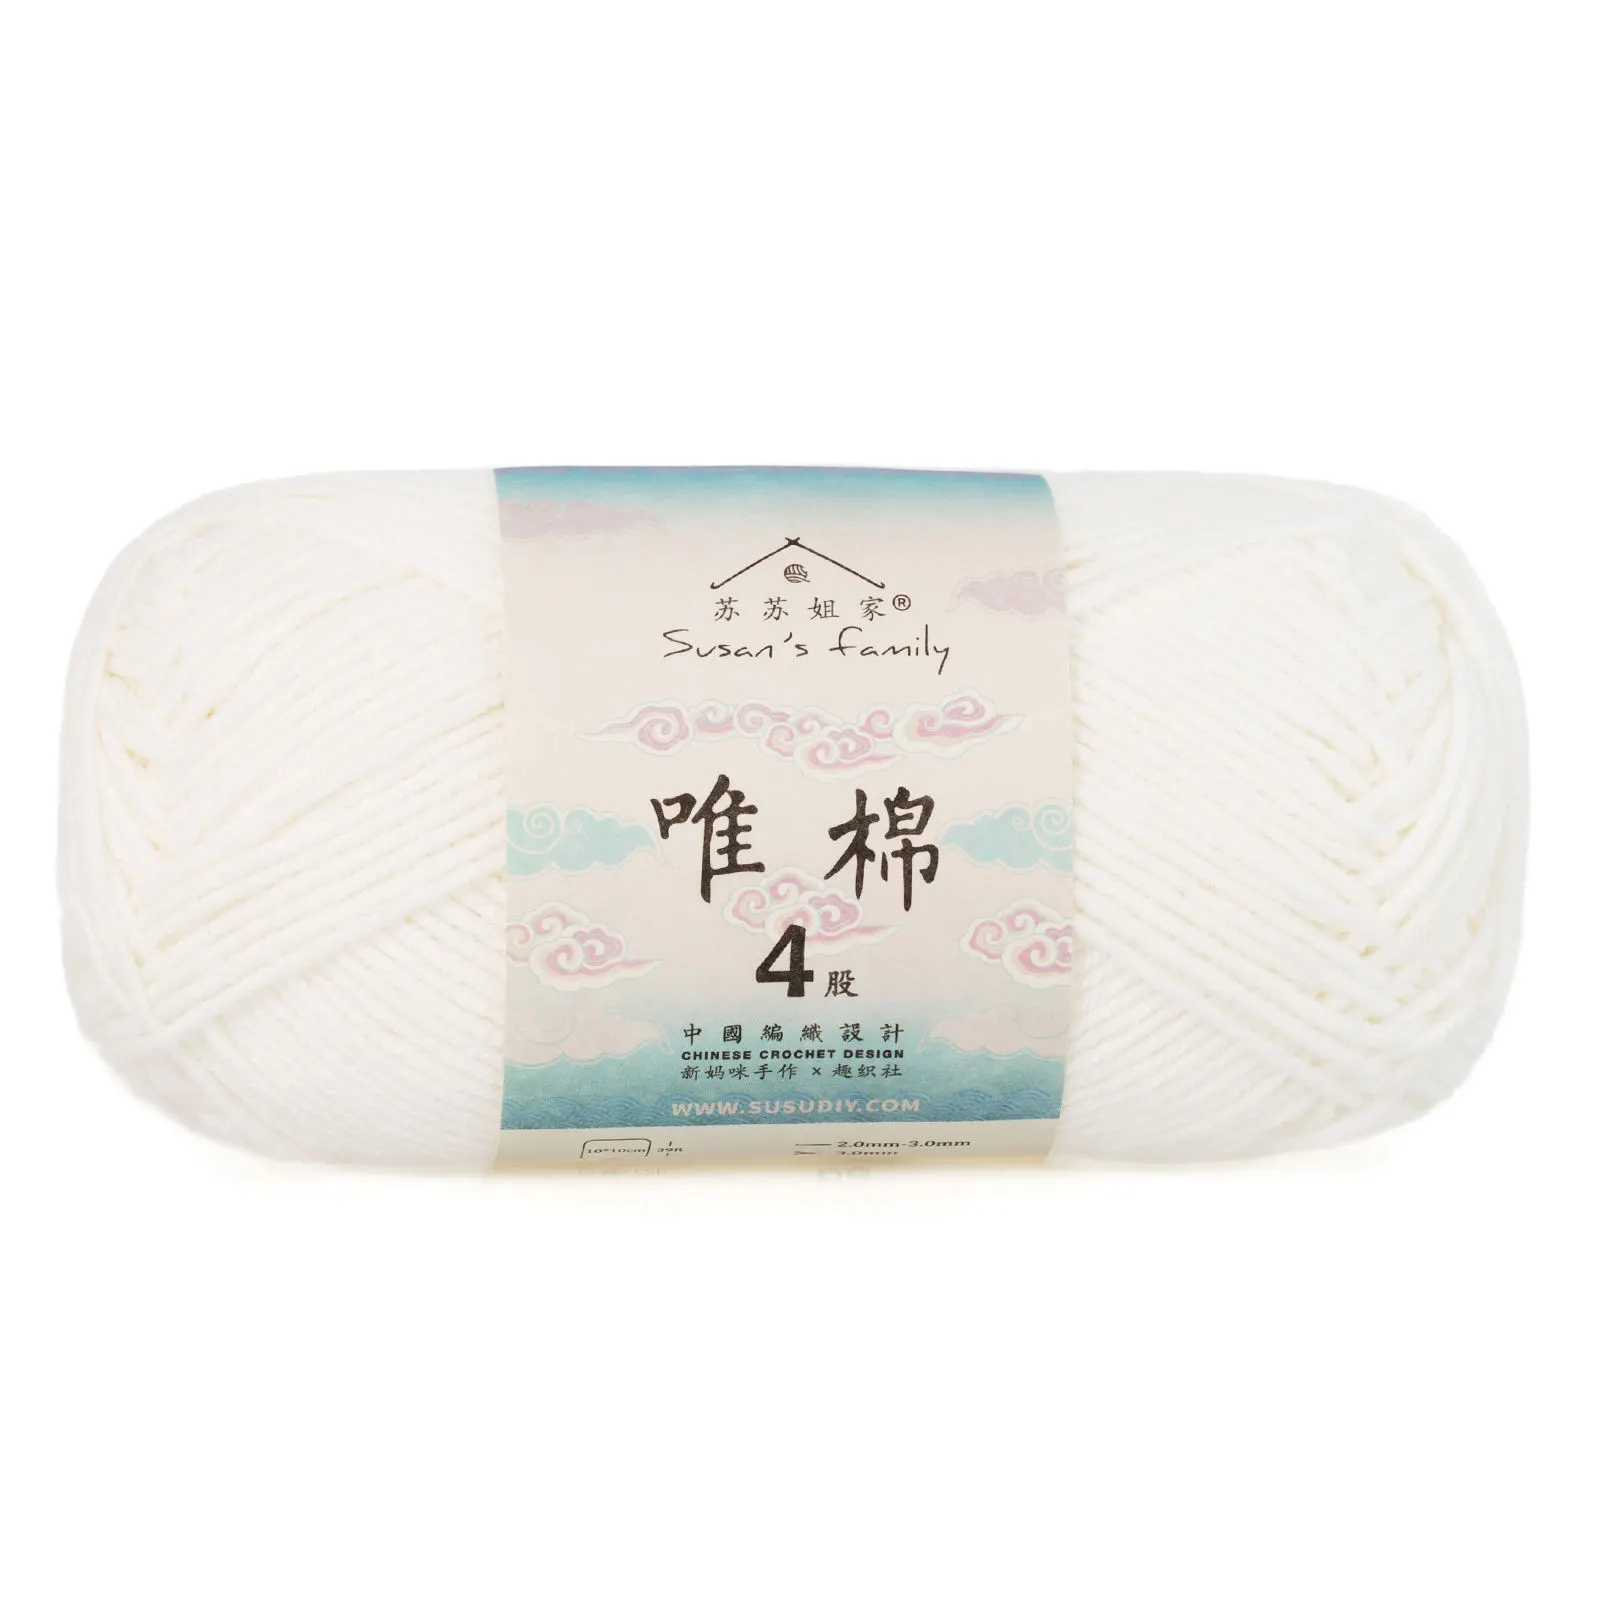 06#Bright White x 1 06#Bright White x 1 07#Sheer Pink x 2 07#Sheer Pink x 2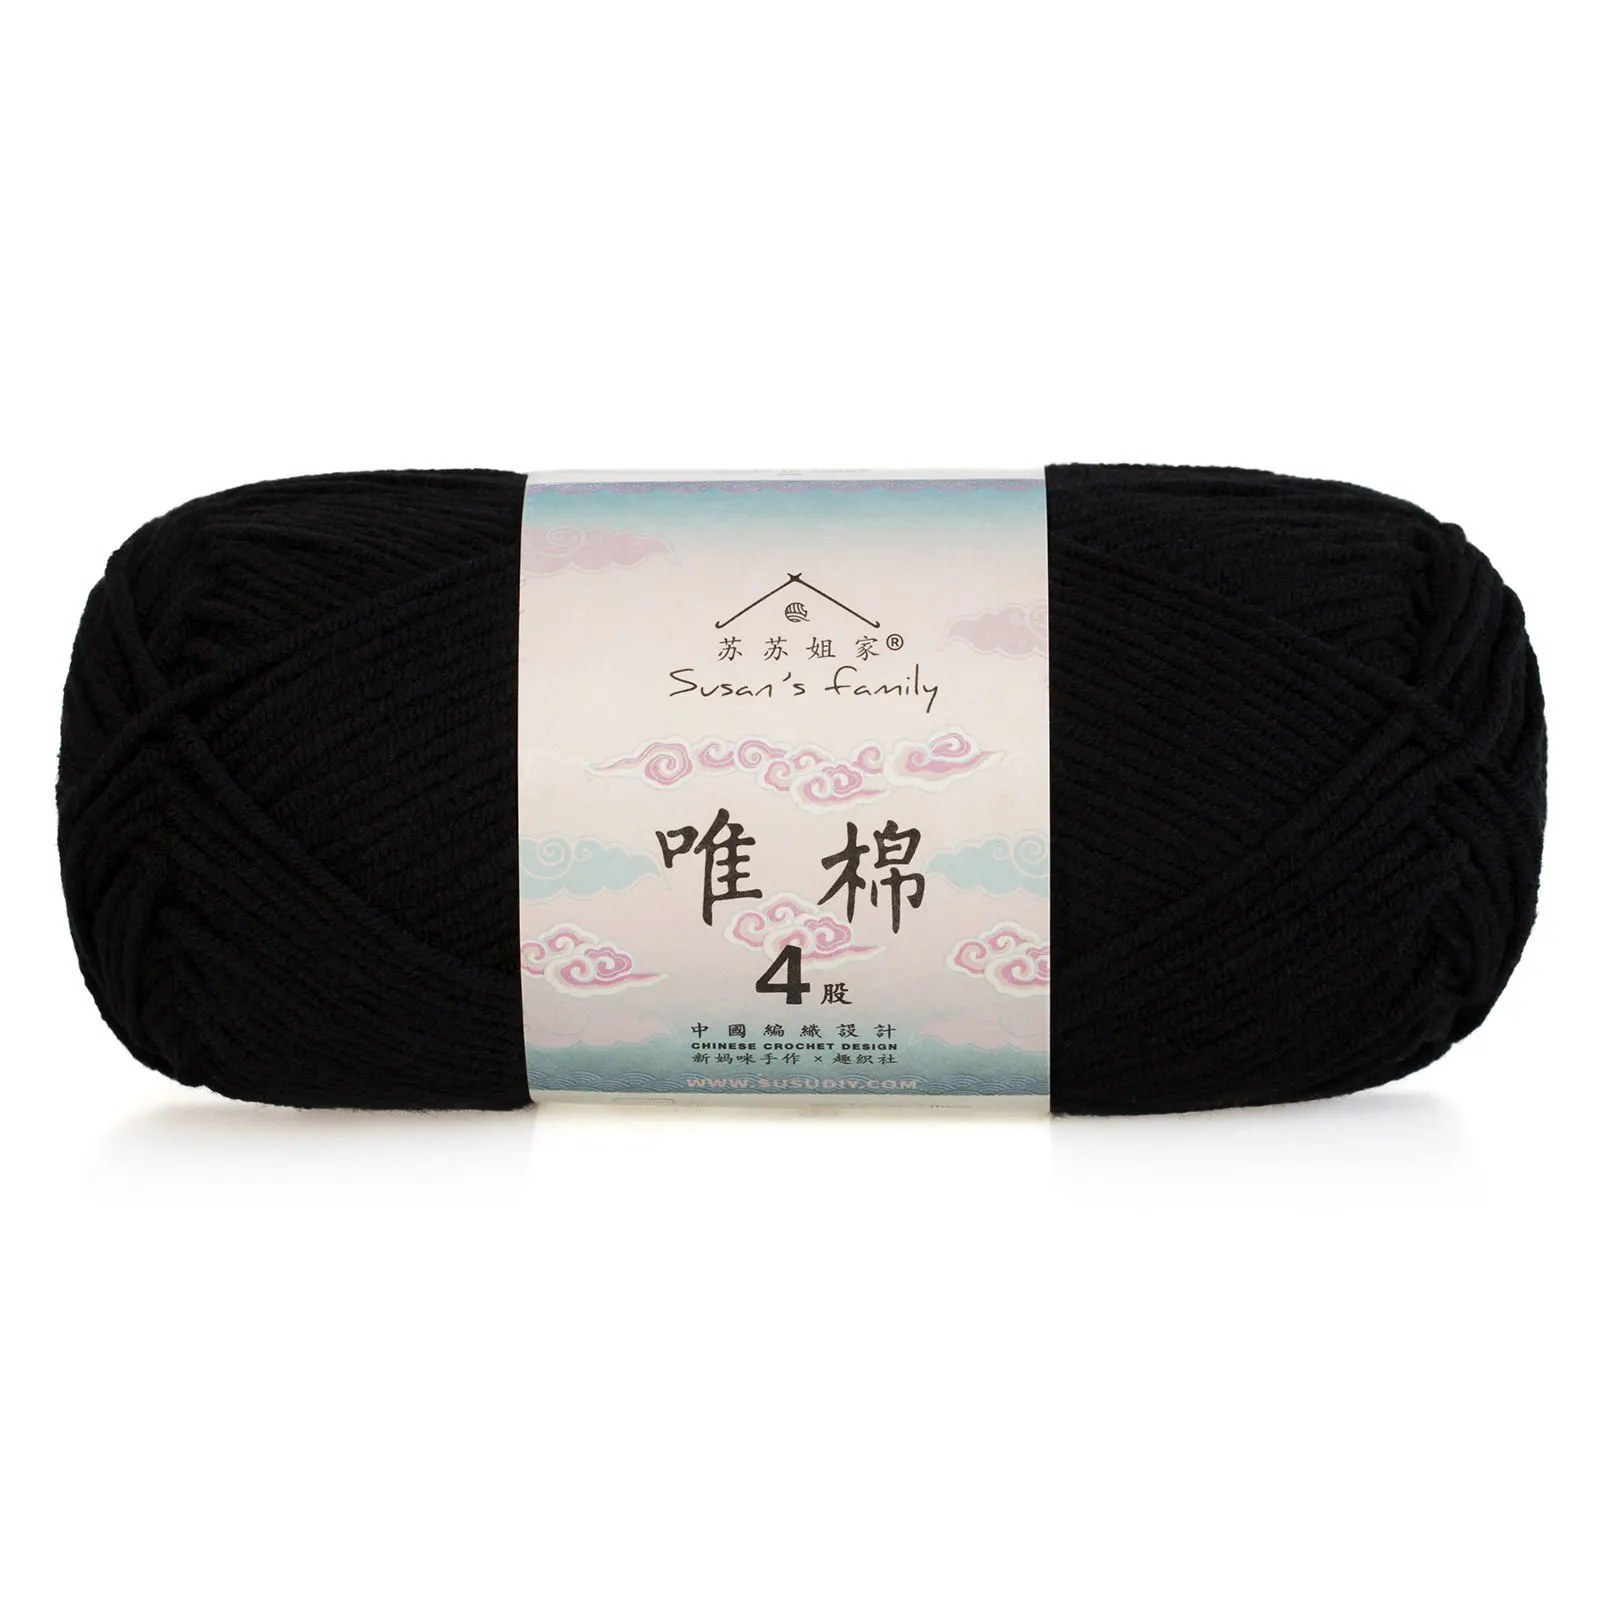 21#Black Beauty x 1 21#Black Beauty x 1 23#Spruce Yellow x 1 23#Spruce Yellow x 1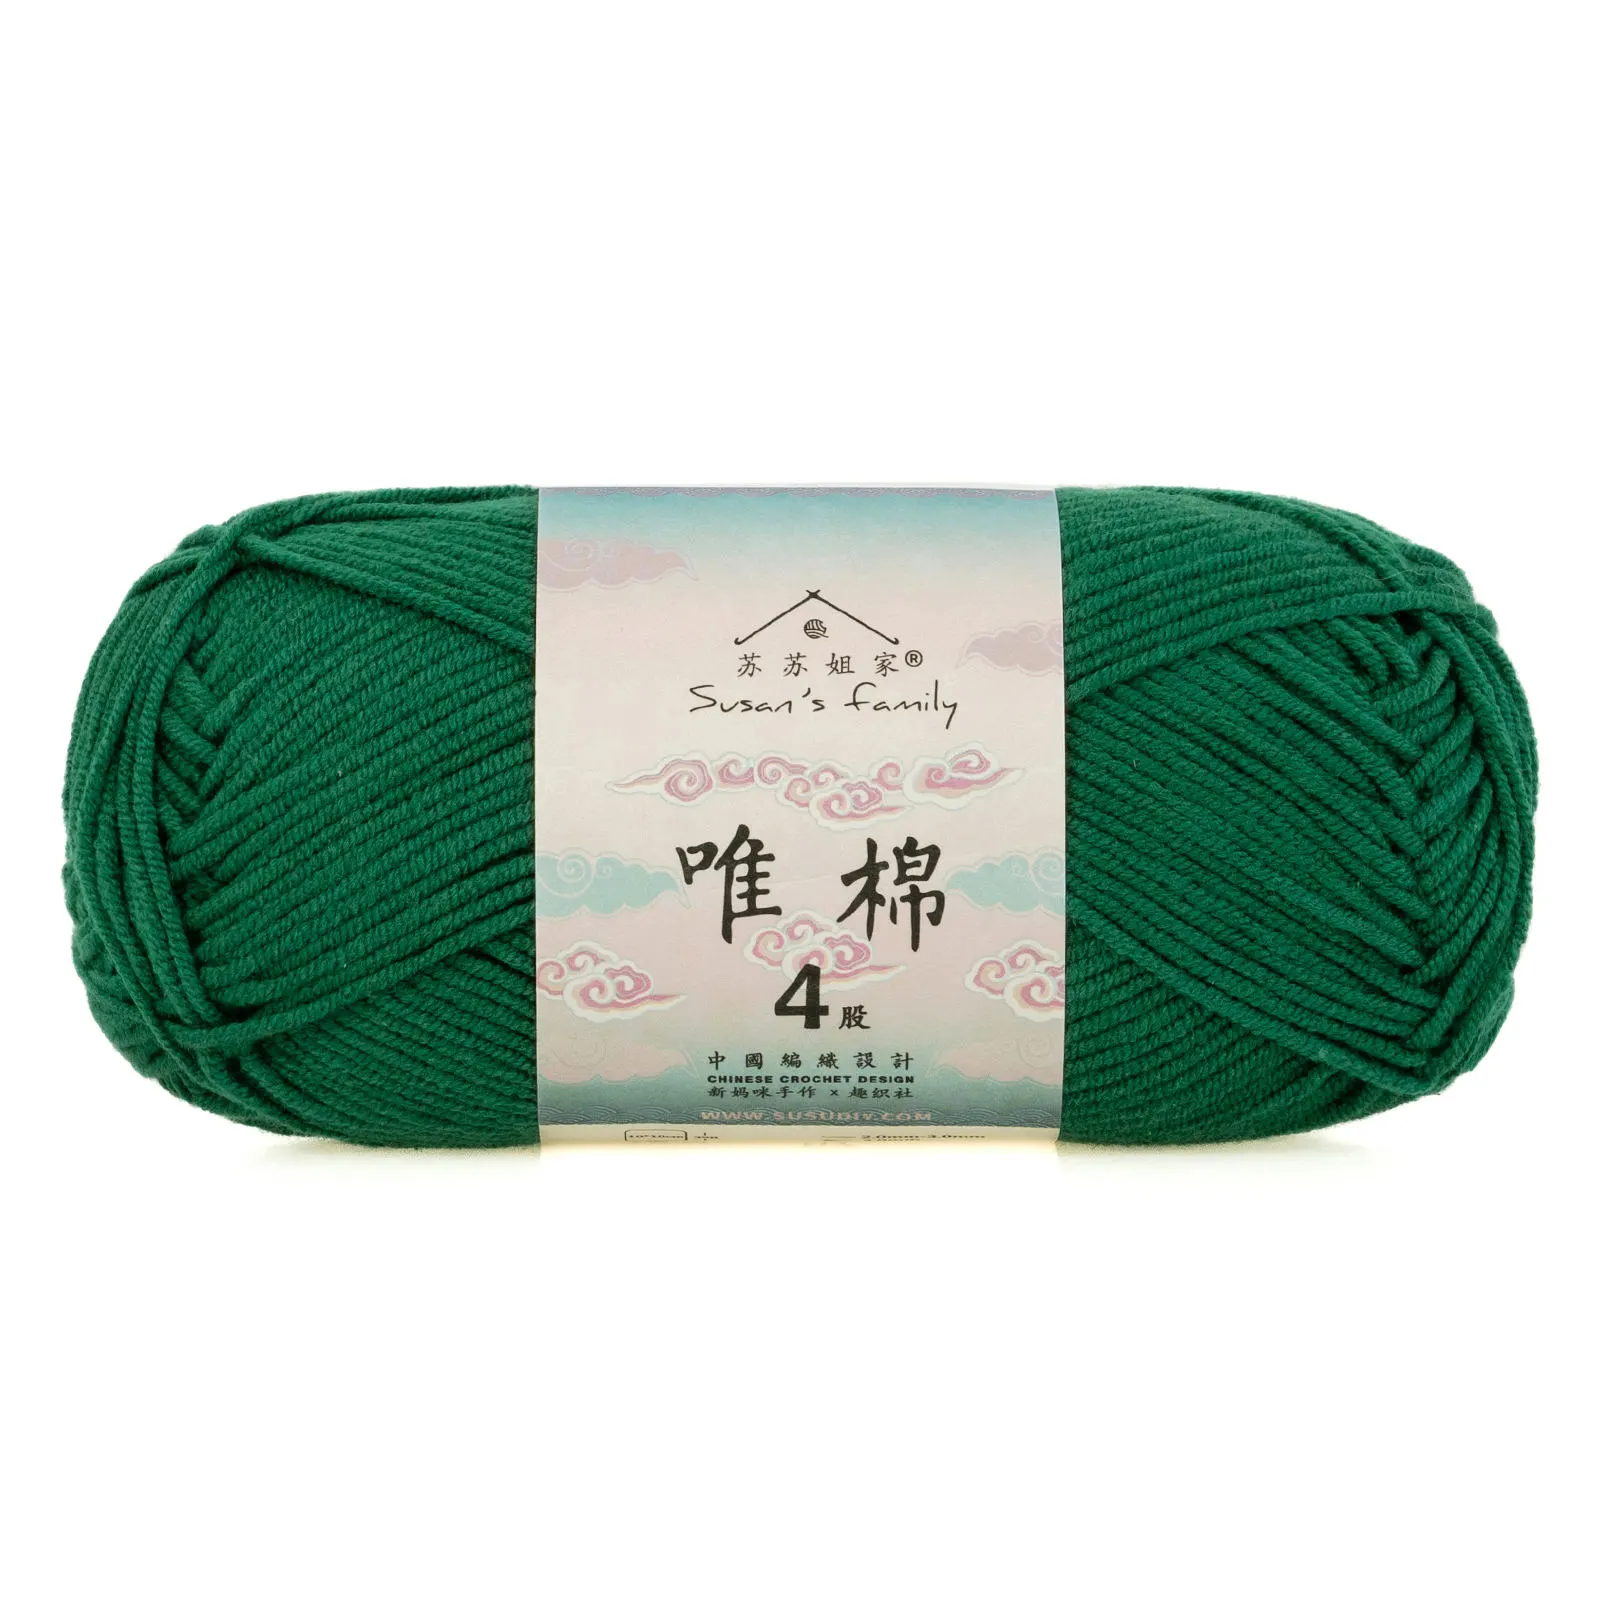 41#Foliage Green x 1 41#Foliage Green x 1 51#High Risk Red x 2 51#High Risk Red x 2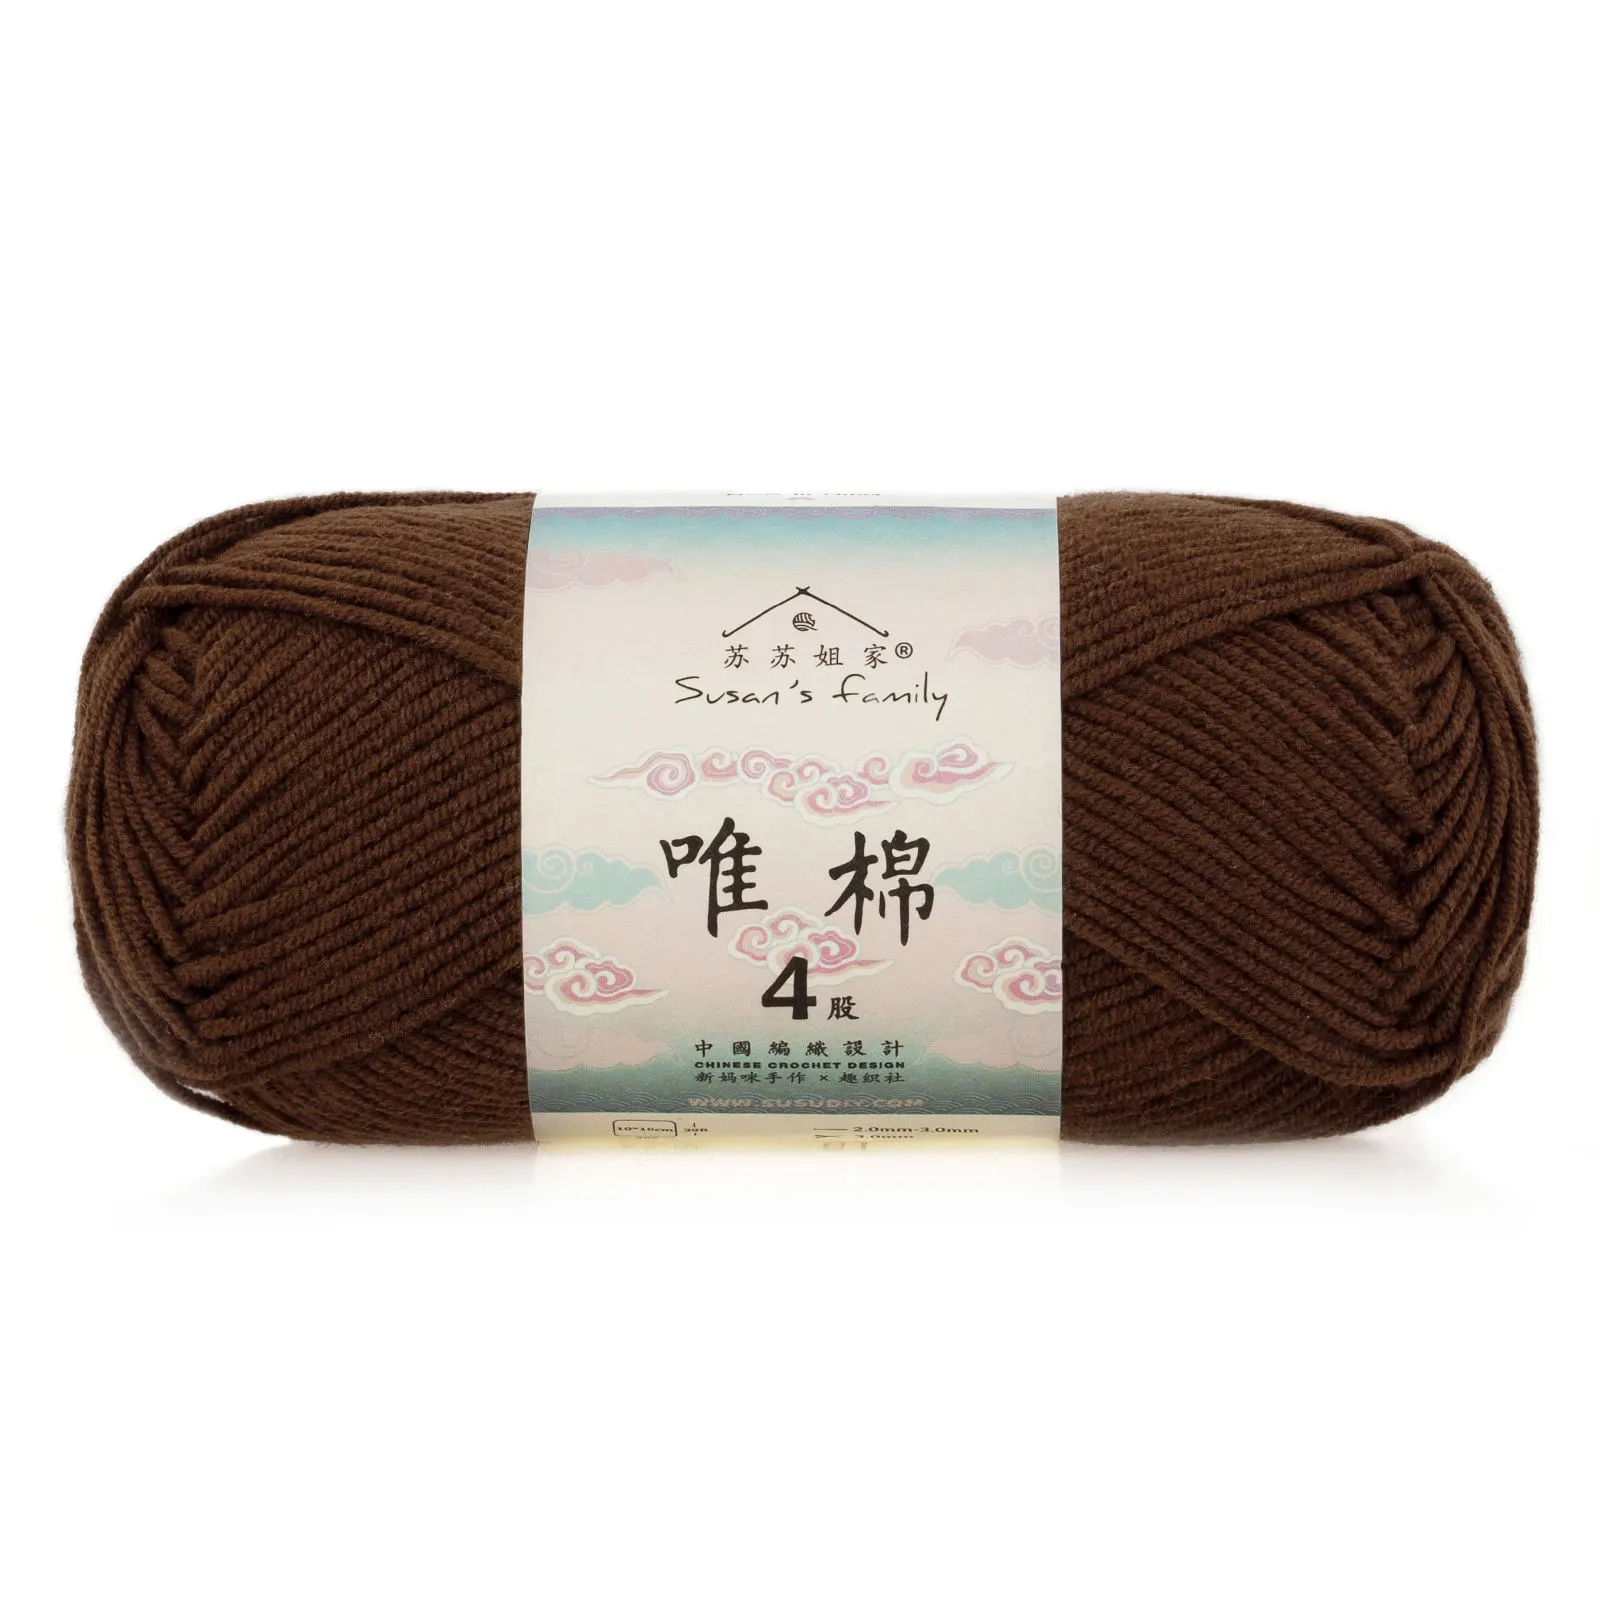 61#Cappuccino x 1 61#Cappuccino x 1 |
| Sheep Curly |  01#Whisper White x 1 01#Whisper White x 1 09#Spruce Yellow x 1 09#Spruce Yellow x 1 10#Mocha Brown x 1 10#Mocha Brown x 1 |
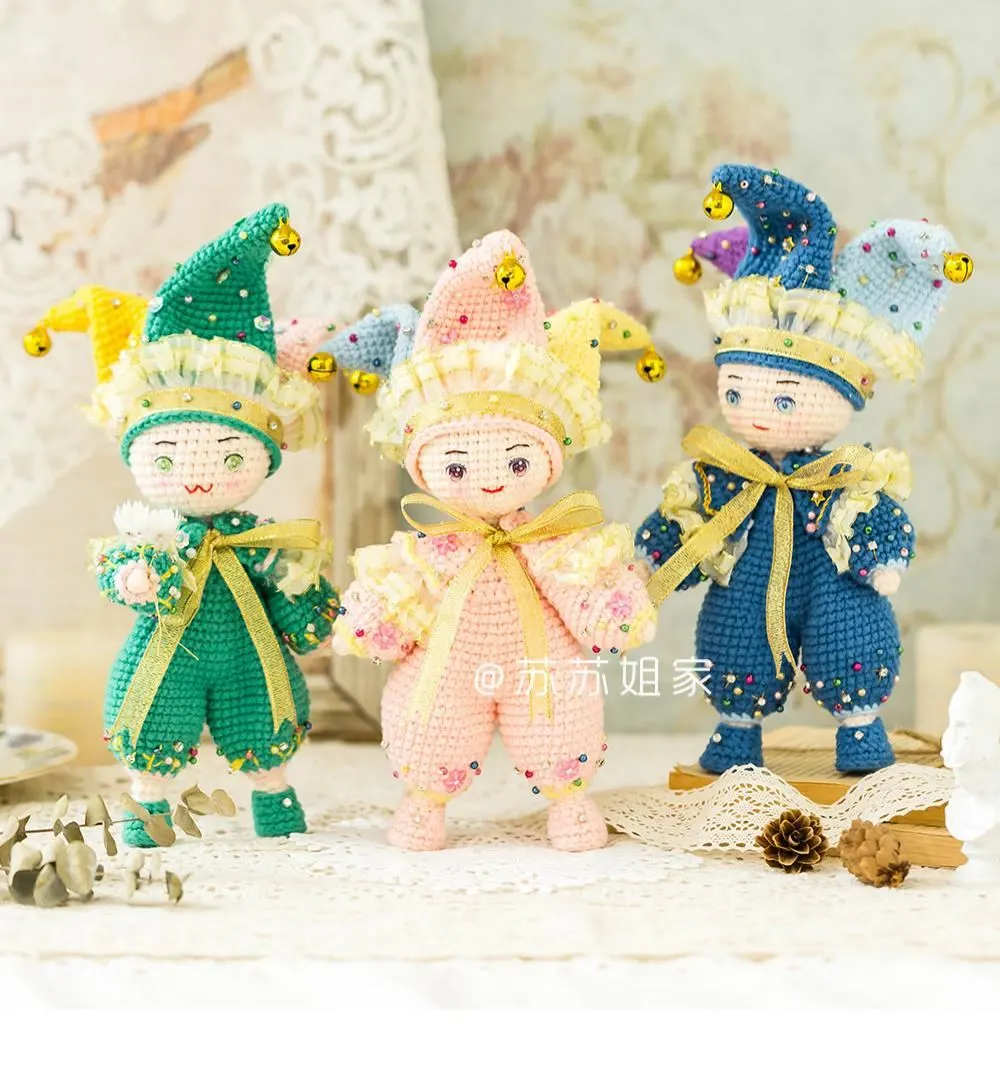
There are two versions of the Dolls, both consisting of a base body and accessories. First, complete the making of the base body, then create and attach the corresponding accessories.
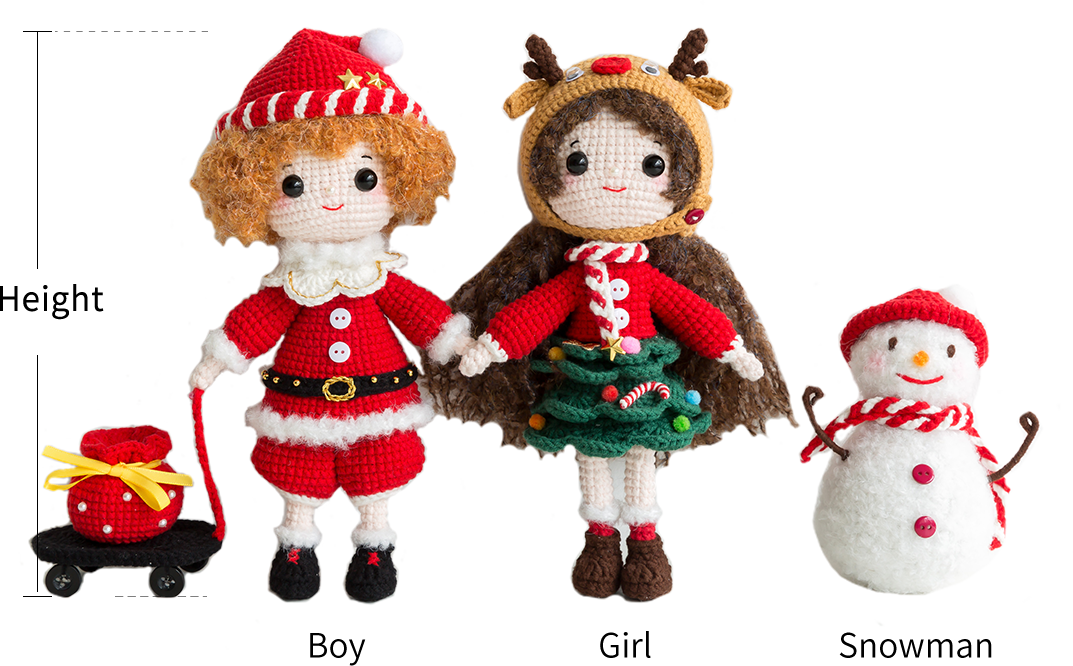
Boy height: 25 cm, Girl height: 23 cm, Snowman height: 13 cm.
The handcrafted measurements may have an error of 1 to 2 cm. Due to variations in individual tension, the size of the sample is for reference only.
Materials: Susan's family 4-Ply Combed Cotton & Acrylic Fibre Hand Knitting Yarn, Sheep Curly
Hook: 1.75 mm crochet hook

ABBREVIATIONS
Note:
1. This pattern is making in Chinese crochet pattern terms, and the stitch name is written using American terminology. All measurements in charts are in cm.
2. Working in spiral round
When crocheting in spiral rounds, each round working without beginning chain and slip stitch to joining the rounds. instead, work directly into the next stitch.
3. Working in joined round
When crocheting in rounds without further guidance, working in closed rounds, start each round with a set number of beginning chains and close with a slip stitch. The beginning chain preceding a single crochet and the slip stitch used for joining rounds are not included in the total stitches.

Part 1 Base body
The basic body is worked from bottom-up, dividing into the shoes, socks, sock edge, legs, body, arms, and head. The female version includes an additional sock edge.
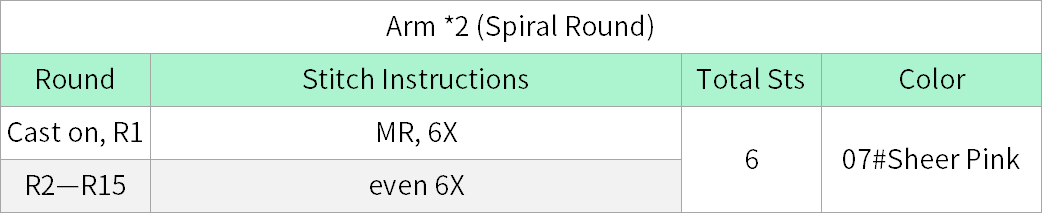
Step 1 ArmsA1 01' 12'' (Part 1)
The arm is started with the magic ring, crocheting in a spiral round counterclockwise. Please refer to the video demonstration for specifics.
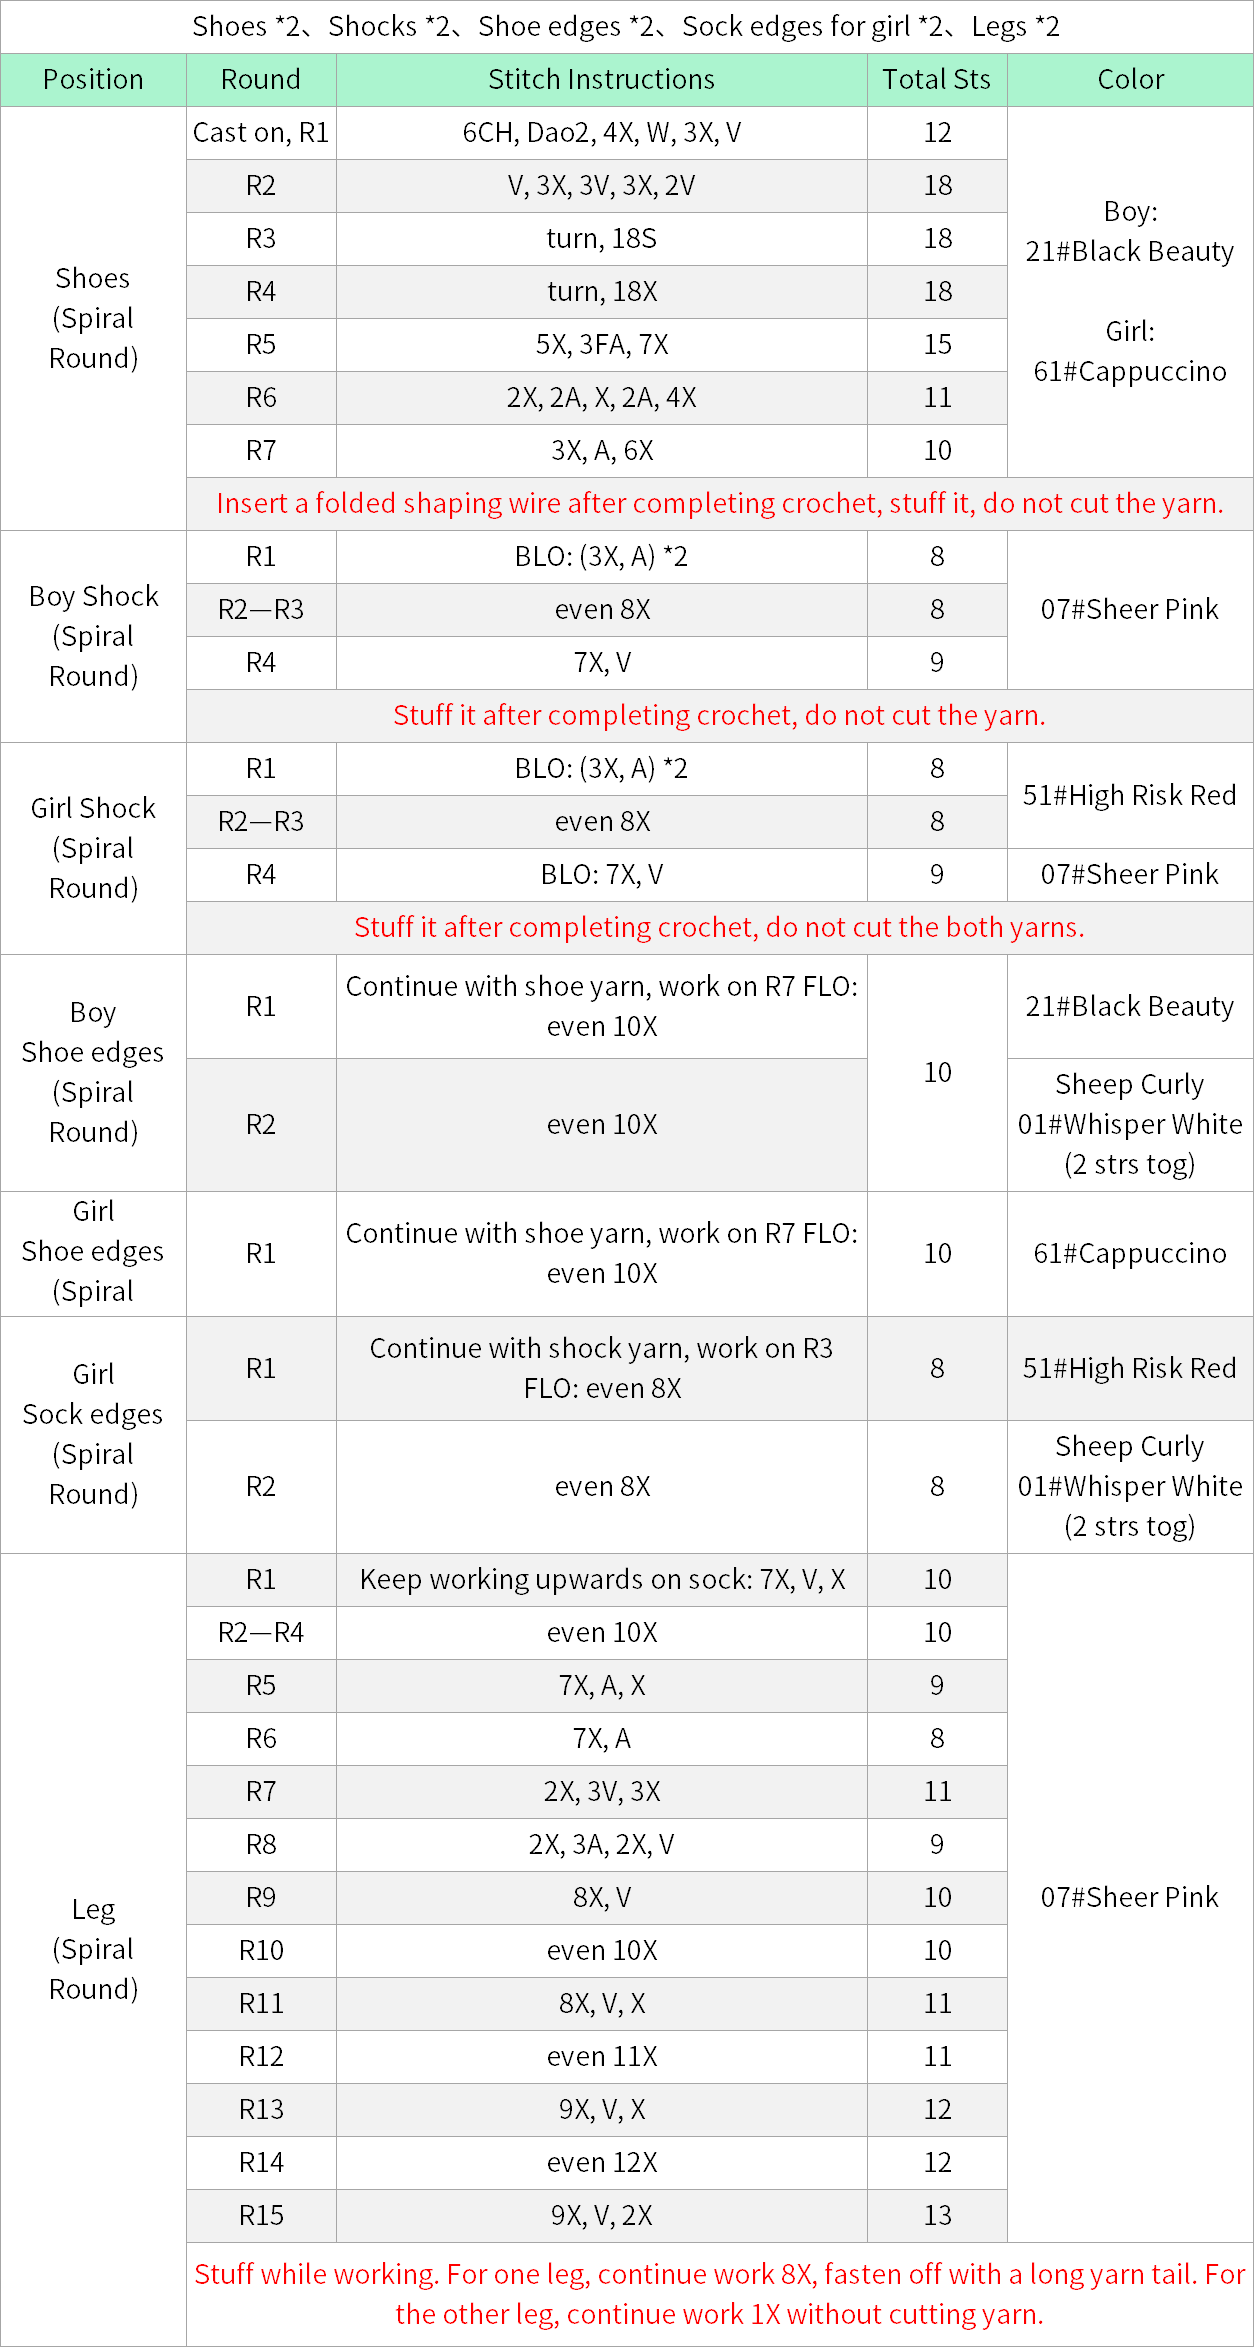
Step 2 Shoes, Socks, Shoe edges, Sock edges for girl and Legs 12' 43'' (Part 1)
First, crochet the shoes, then continue crocheting upwards for the rest of the parts. Please refer to the video demonstration for details.

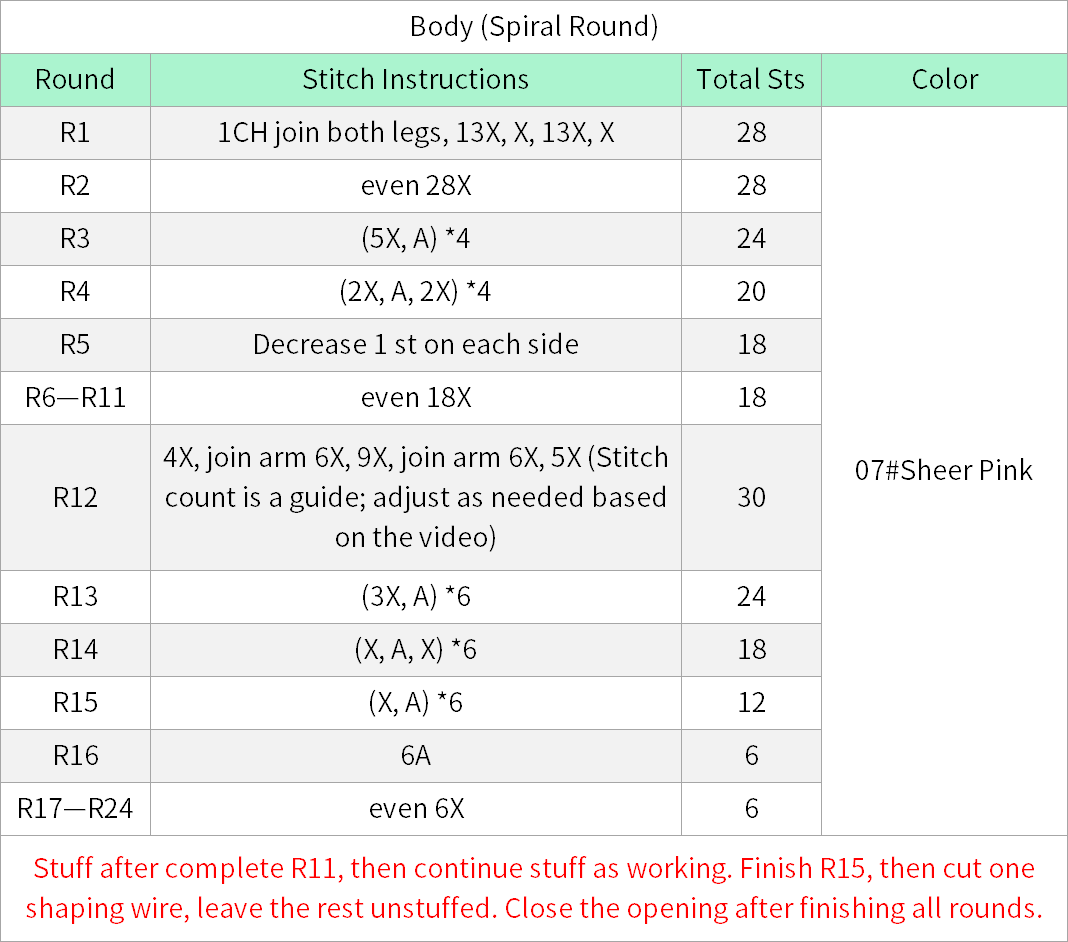
Step 3 BodyA7 50' 43'' (Part 1)
First, connect the two legs together, then crochet upwards for the body. While crocheting, you need to attach the arms, and finally, close up the opening. Please refer to the video demonstration for specifics.
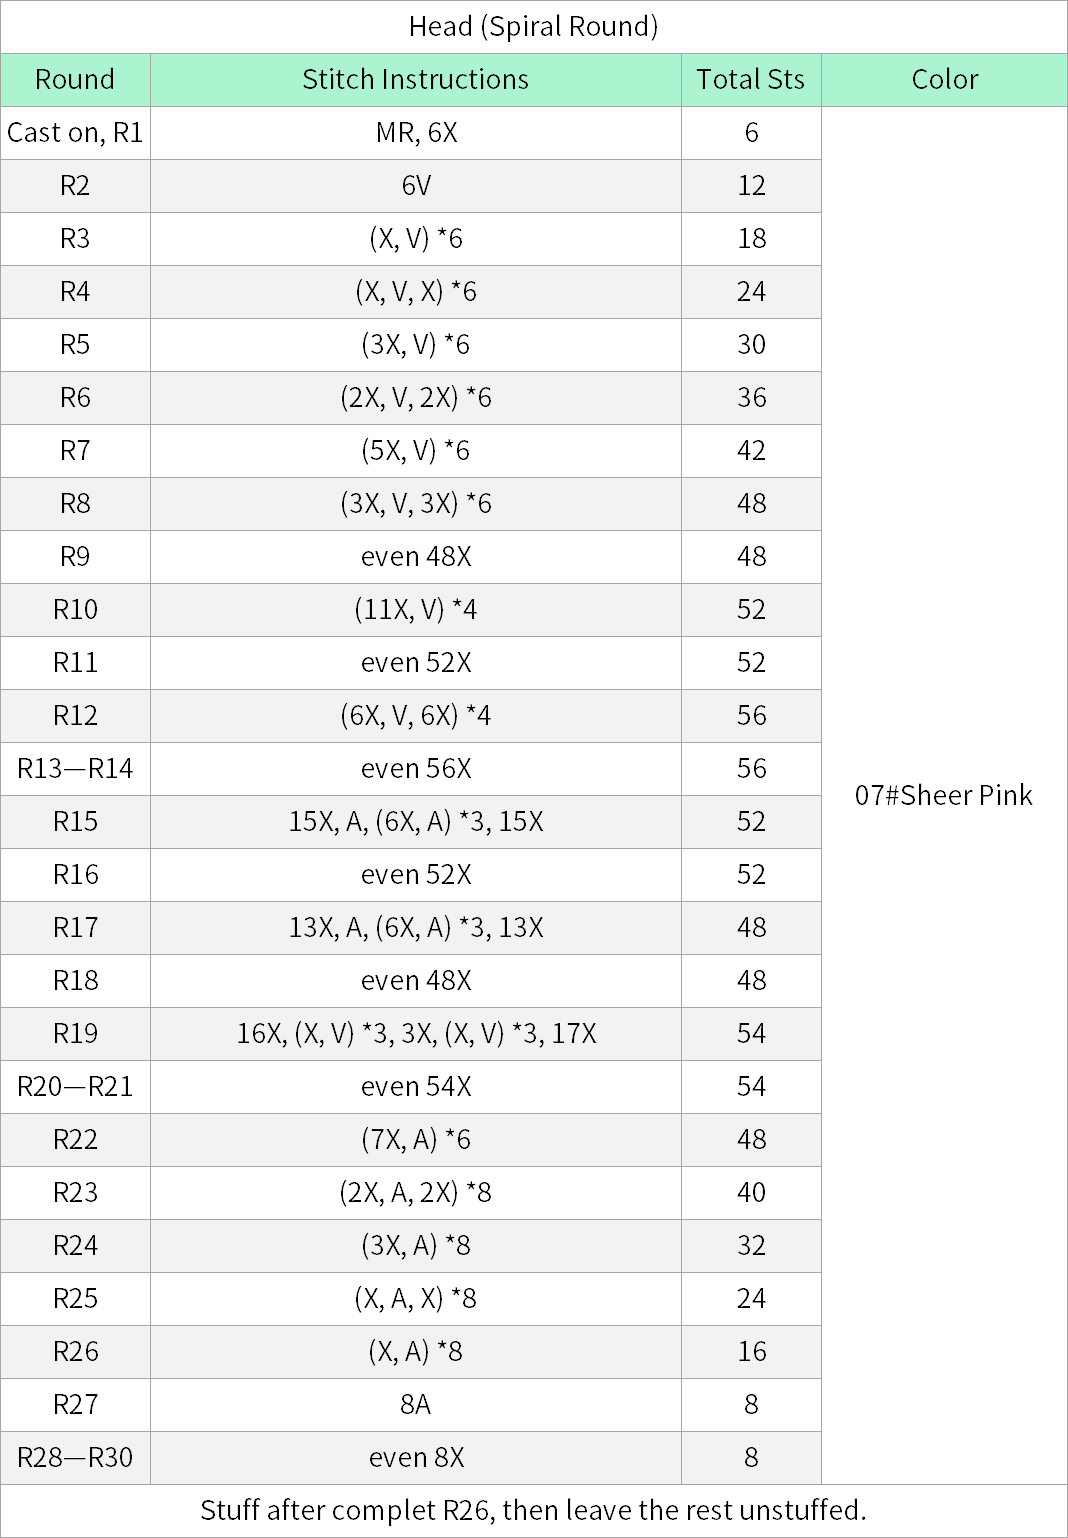
Step 4 HeadA8 71' 17'' (Part 1)
The head is started with the magic ring, crocheting in a spiral round counterclockwise. Please refer to the video demonstration for specifics.
Part 2 Accessories
The accessories are divided into hair, facial features, costume, a scooter, a fortune bag, and a traction rope. The two designs have identical positions for the facial features and clothing sections, but everything else is different.
Step 1 Facial featuresB1 73' 53'' (Part 1)
Attach the eyes and nose in the corresponding positions, then embroider the eyebrows and mouth, and finally apply the blush. Please refer to the video demonstration for specifics.
Step 2 Hair 81' 01'' (Part 1)
Using the corresponding yarn, sew together at the top of the head first, then make the shape. Please refer to the video demonstration for specifics.

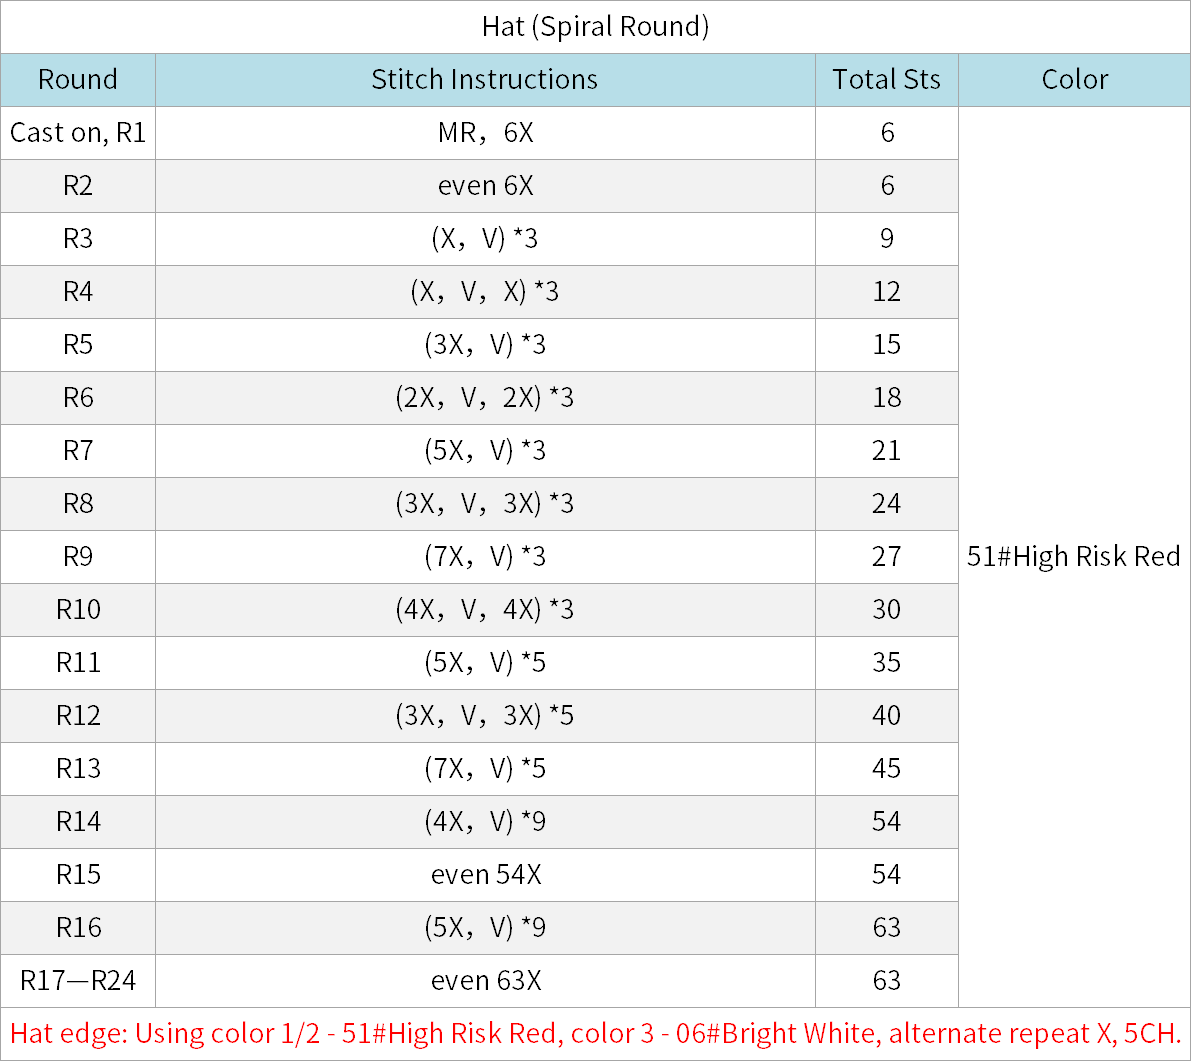
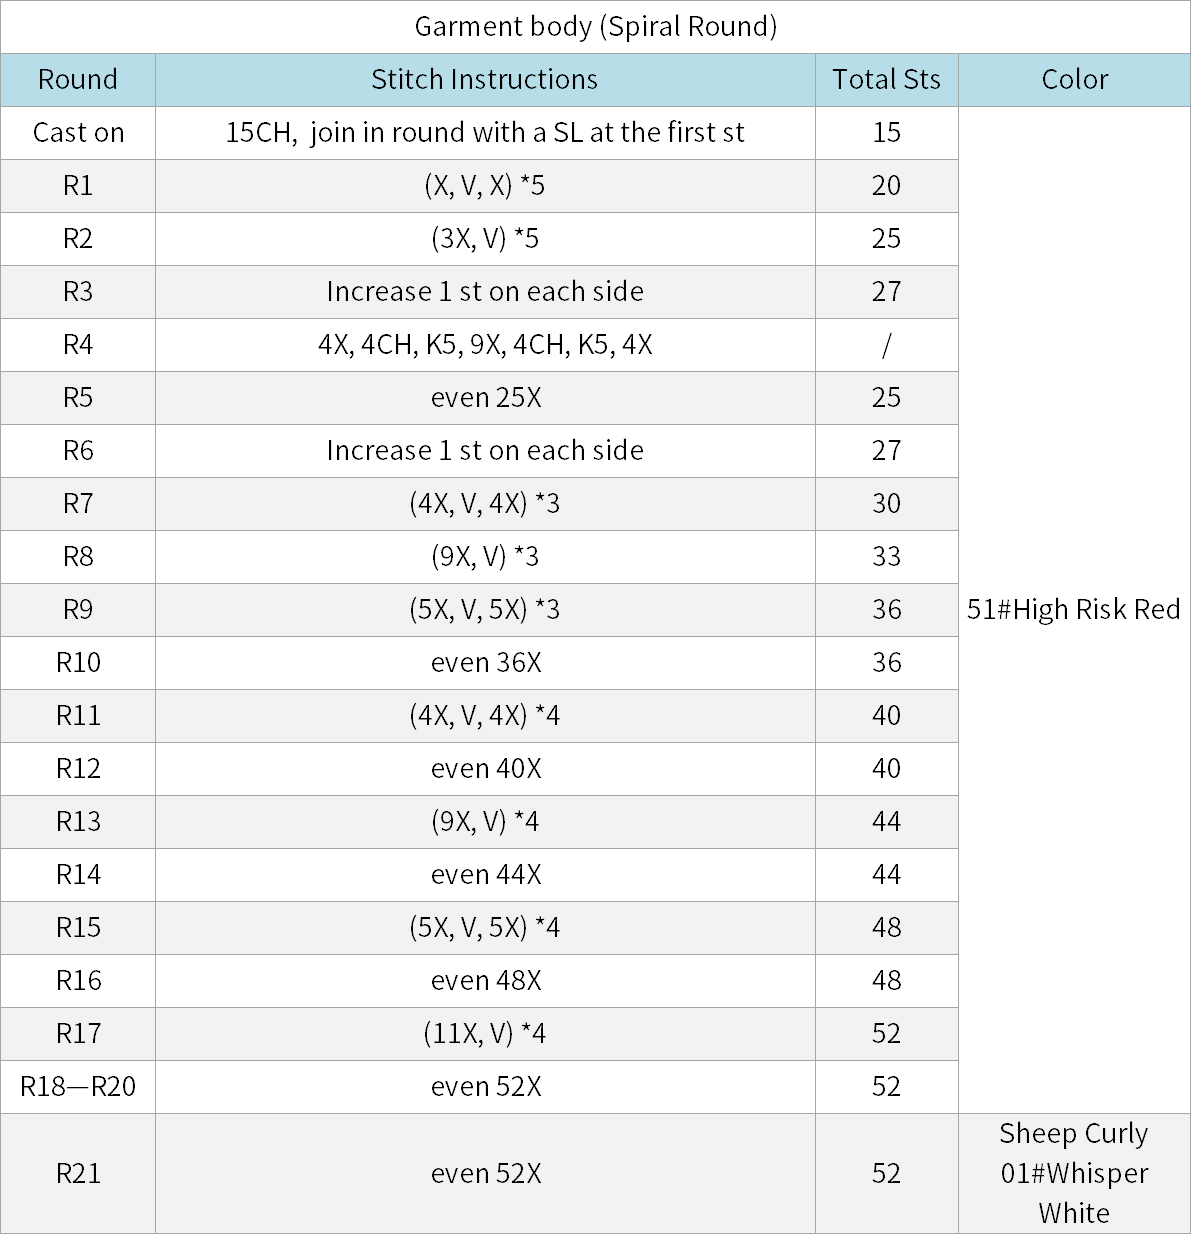
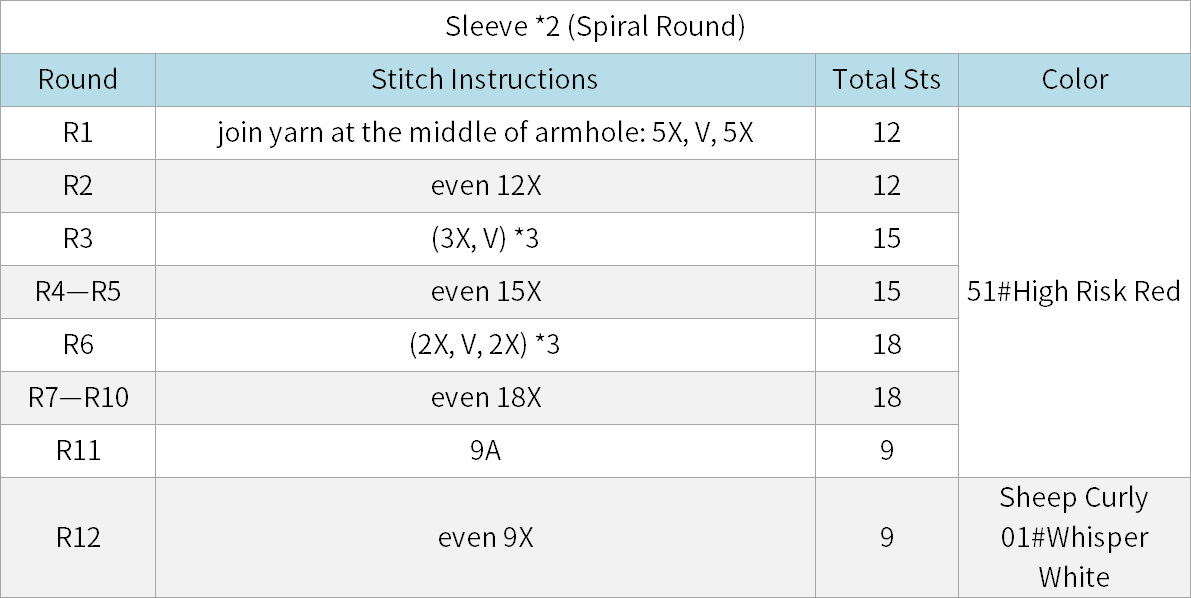
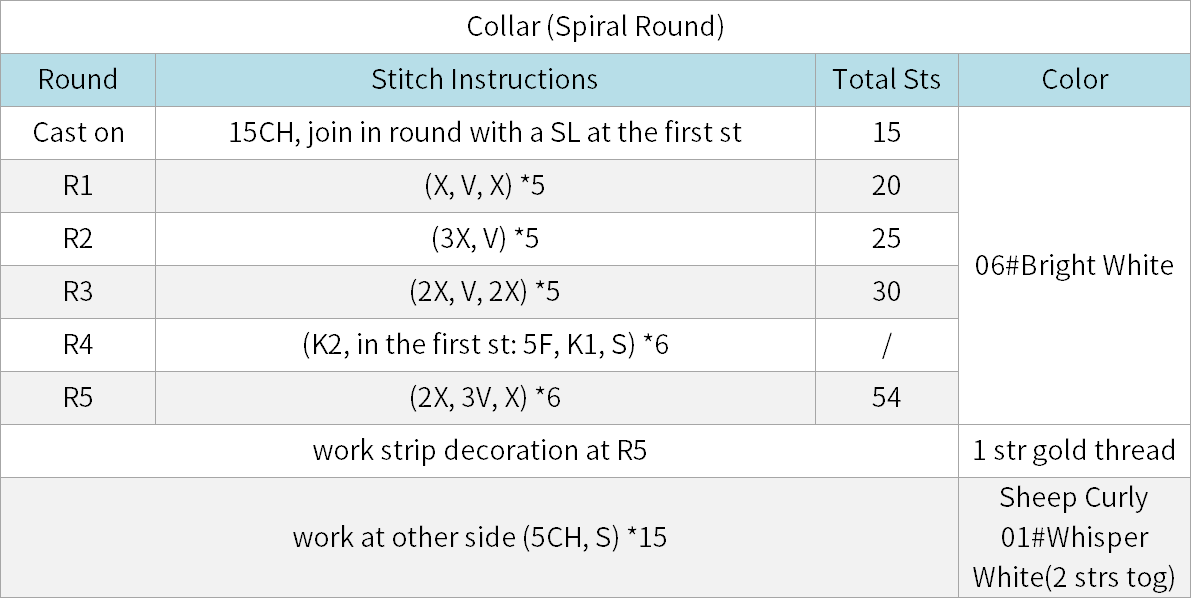
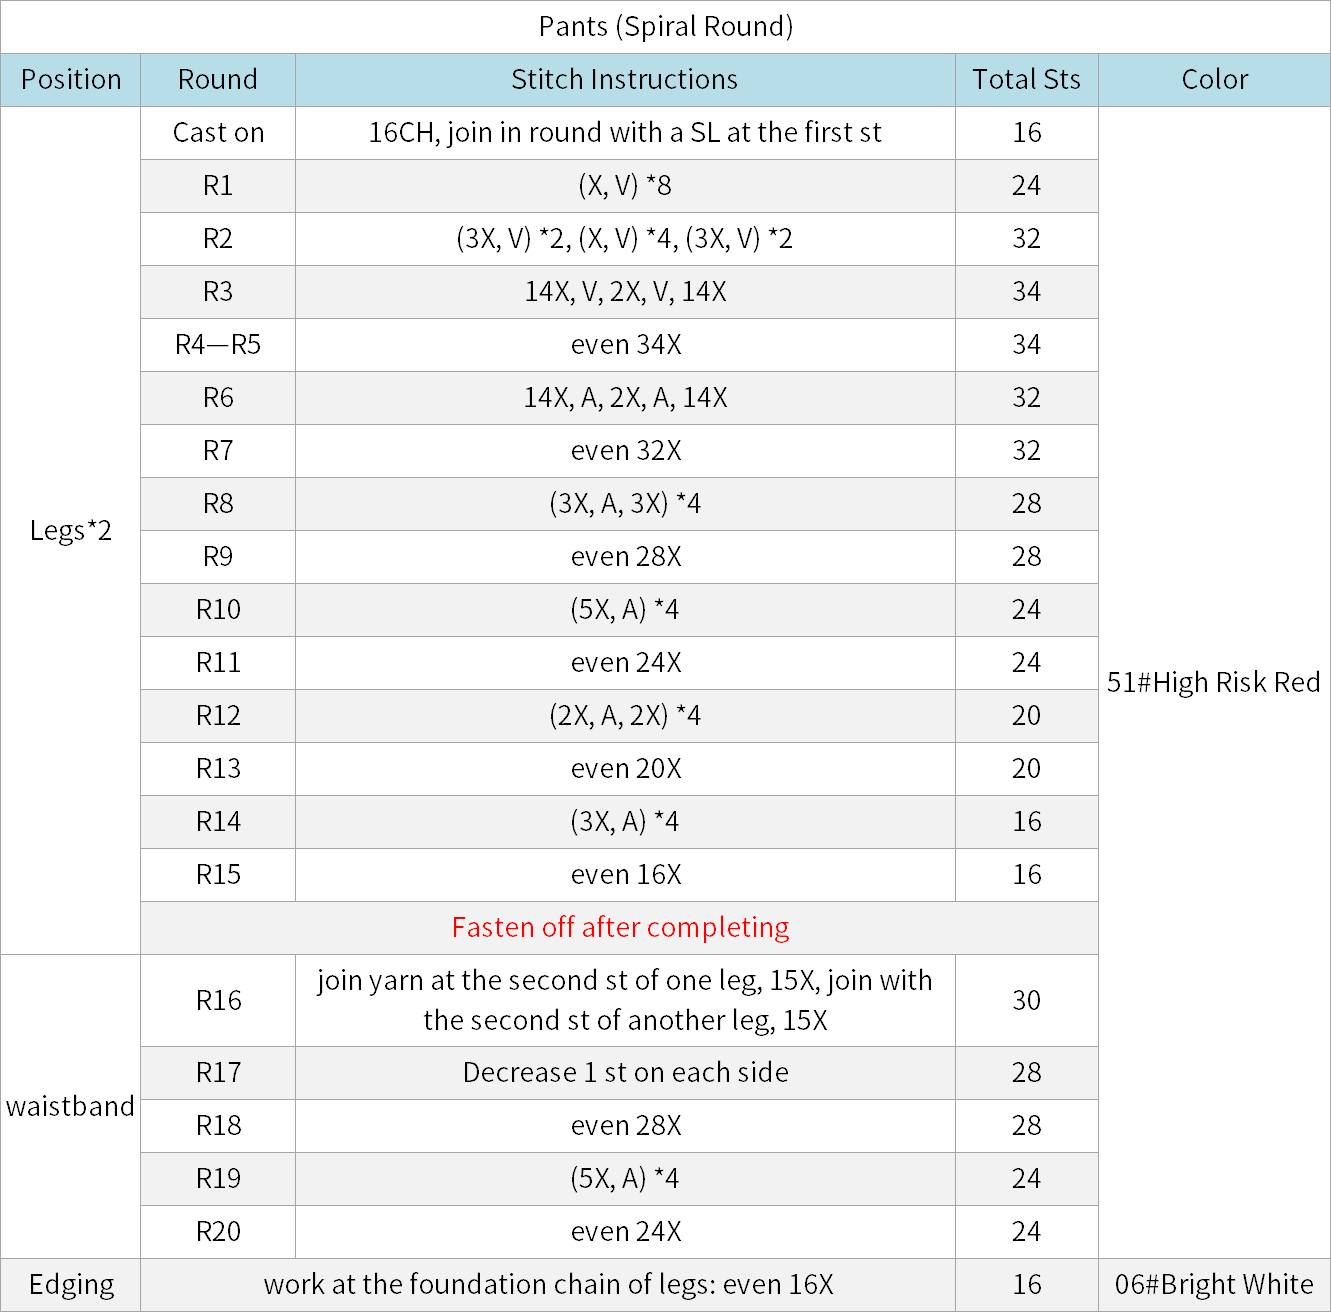
Step 3 The male costume 00' 12'' (Part 2)
Including the hat, garment, collar, pants, and shoelaces, make and attach them in sequence. Please refer to the video demonstration for specifics.


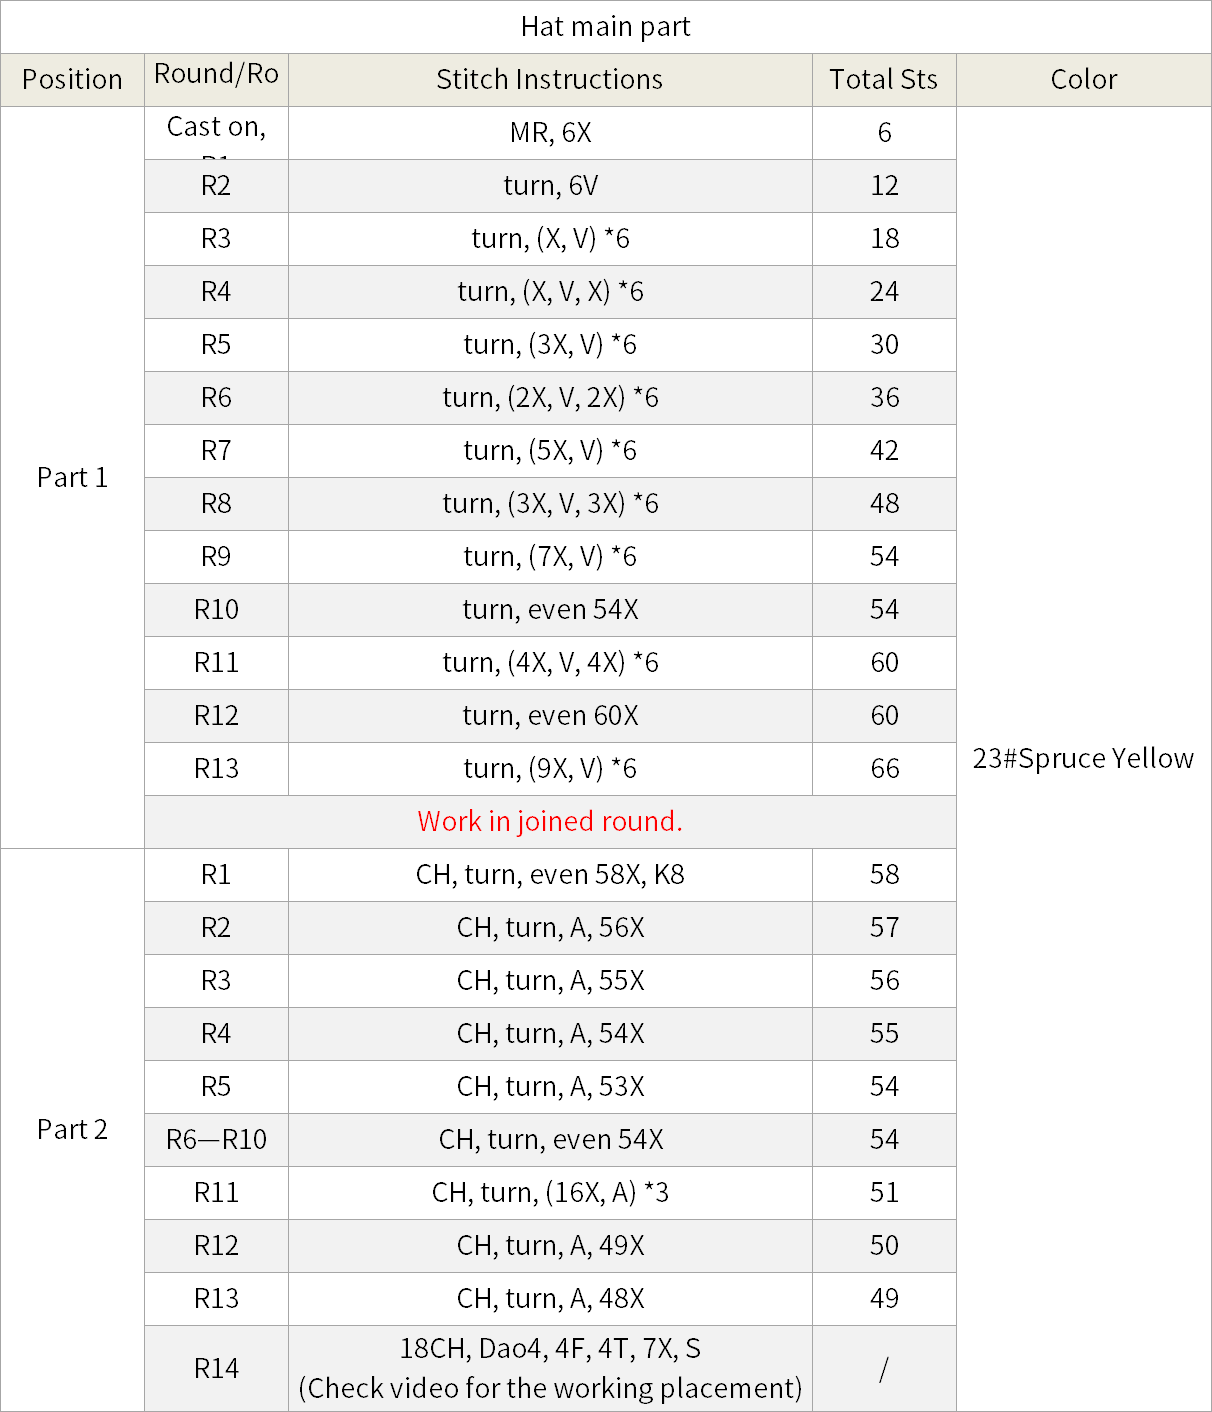
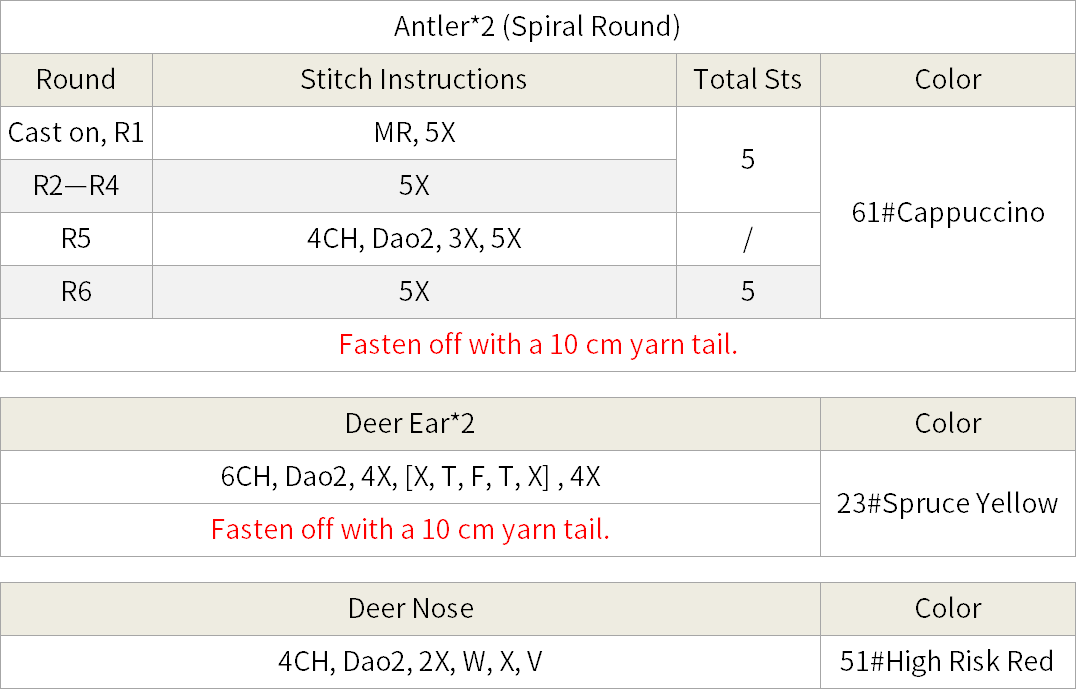
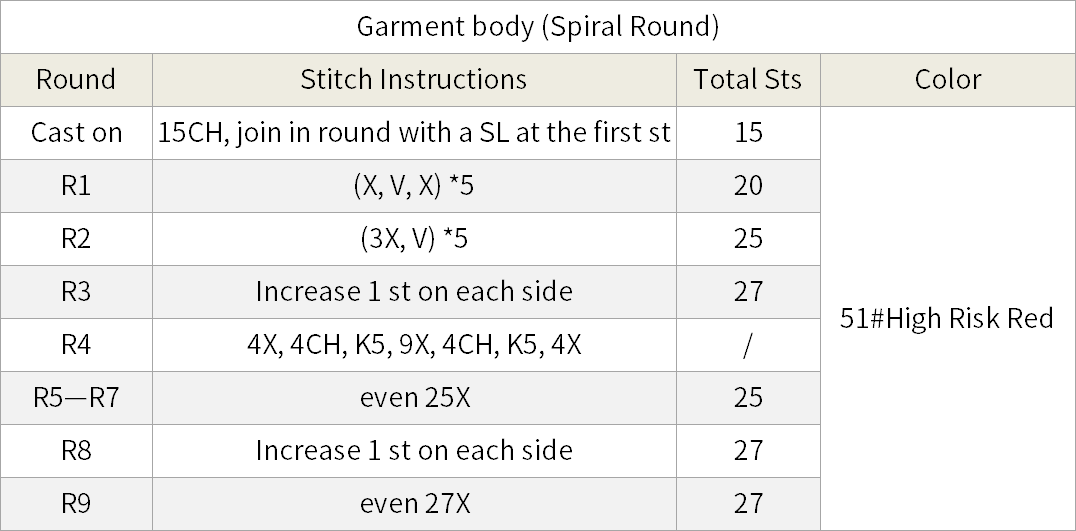
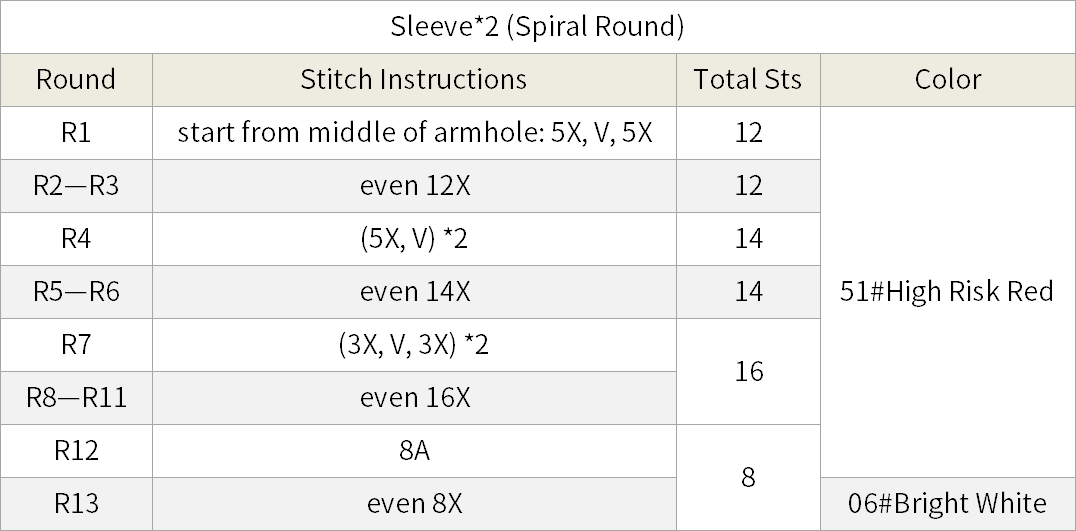
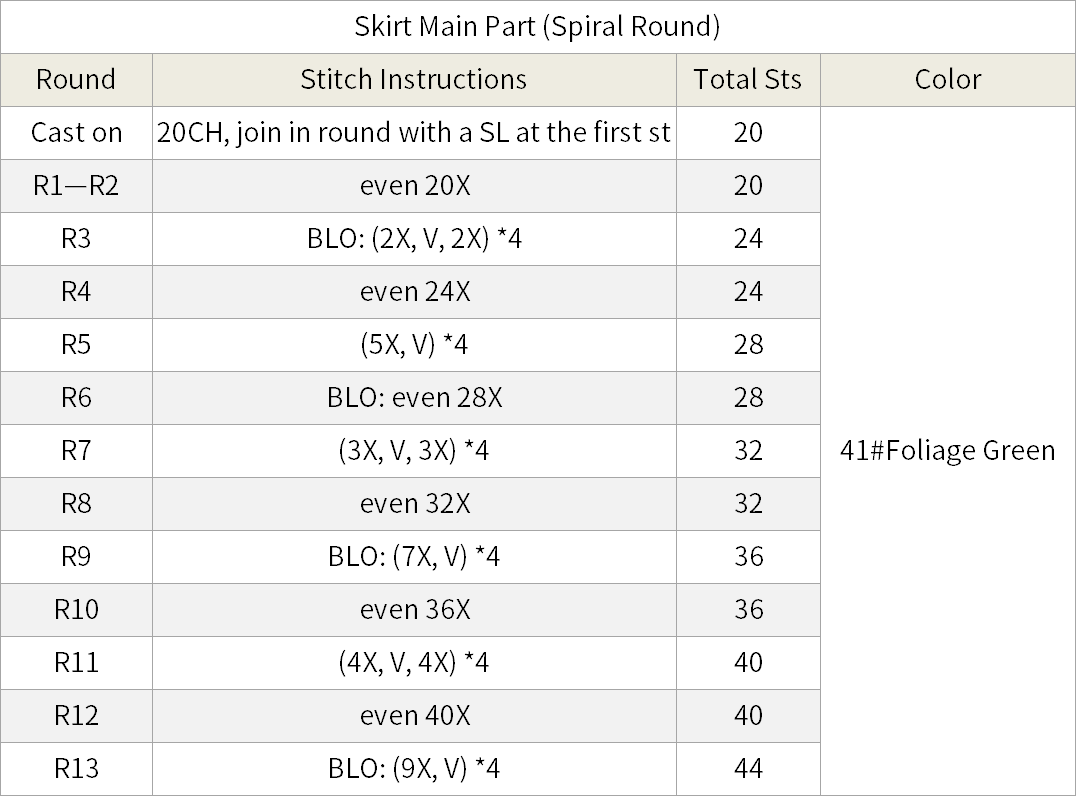
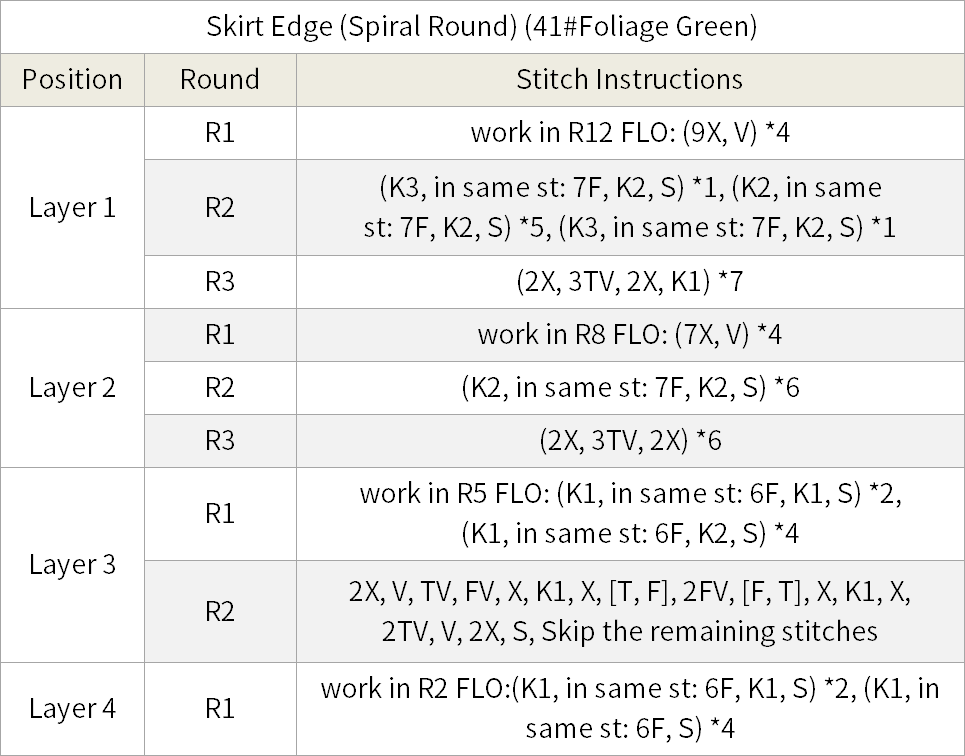
Step 4 The female costume 54' 57'' (Part 2)
Composed of a hat, a sweater, a skirt, and a scarf, they are made and assembled in sequence. Please refer to the video demonstration for details.


Step 5 ScooterF 96' 32'' (Part 2)
It consists of three parts: the scooter pieces, assembly, and wheels. First, crochet two scooter pieces. After completing them, you need to assemble the two pieces together. Finally, make and attach the wheels underneath. Please refer to the video demonstration for details.
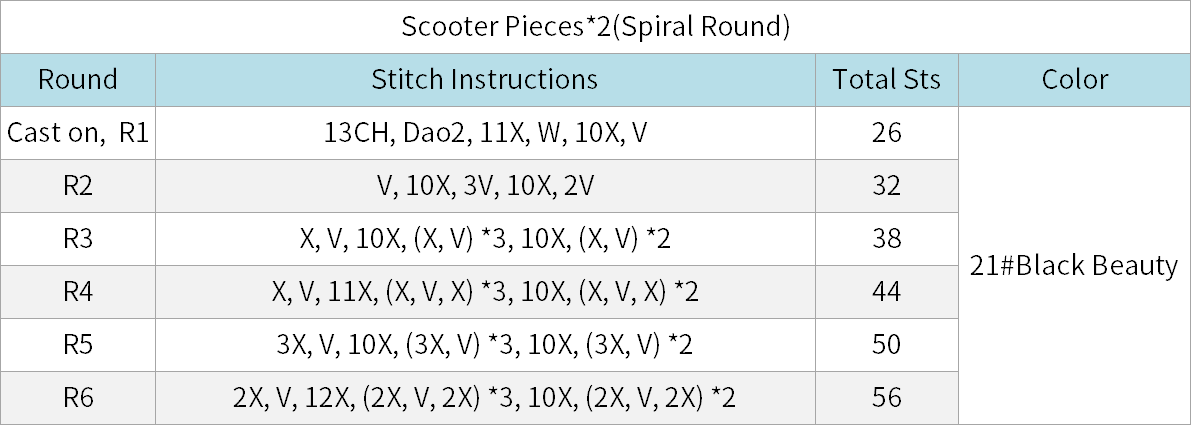
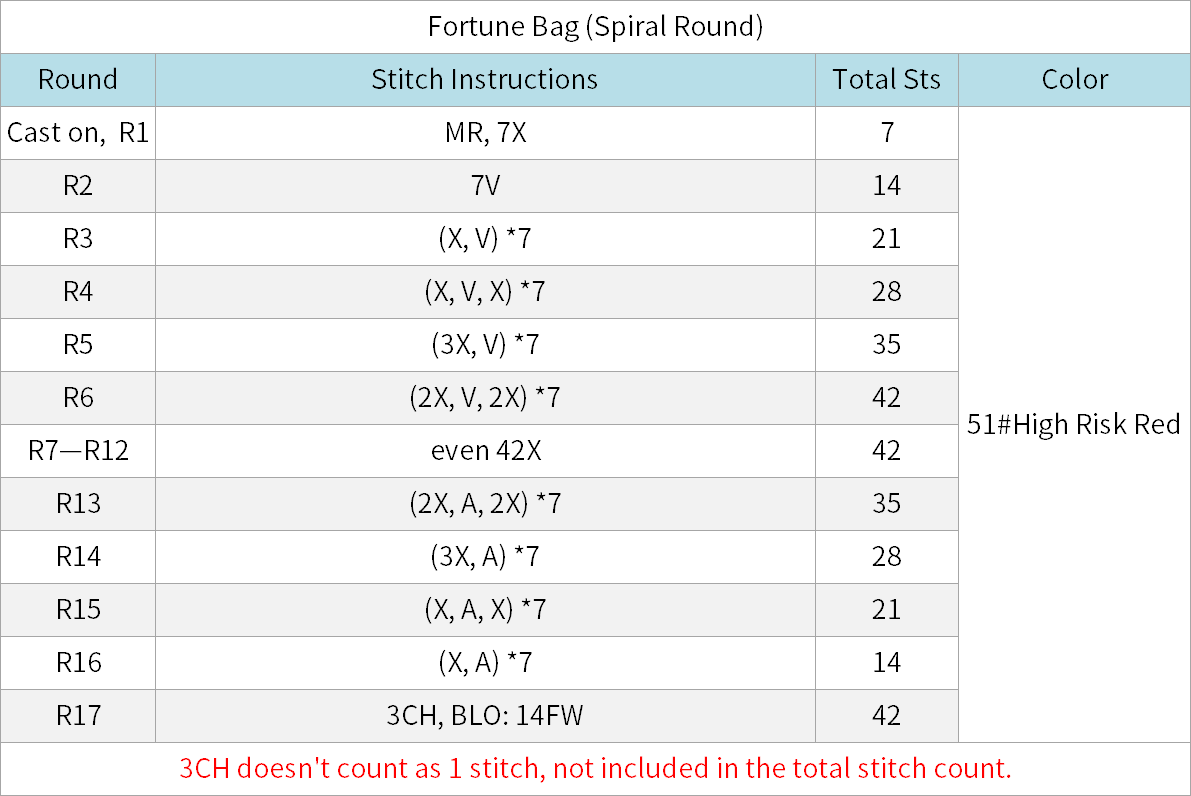
Step 6 Fortune bagG and Traction ropeH 110' 14'' (Part 2)
First, start making the Fortune bag. Begin by crocheting it, then attach the decorations once it's completed. Next, install it onto the skateboard. Finally, pick up and crochet the leash (51# bright red) at the corresponding position on the skateboard. Please refer to the video demonstration for specifics.

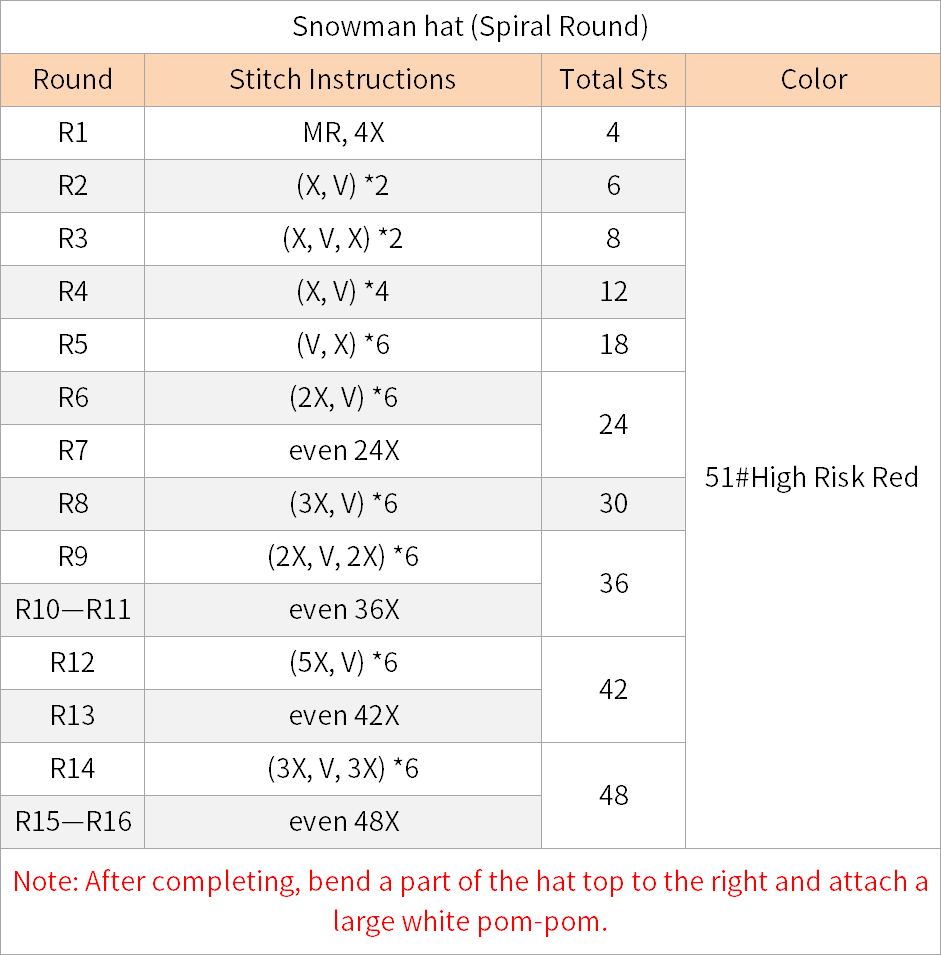
First, crochet the head, body, snowman hat, and scarf, adding appropriate stuffing while crocheting. After completing these parts, sew the body to the head, then make the facial features and hands. Finally, glue on the buttons and hat securely.
Note: The head and body can be crocheted in Spirals or Joined round depending on your preference.
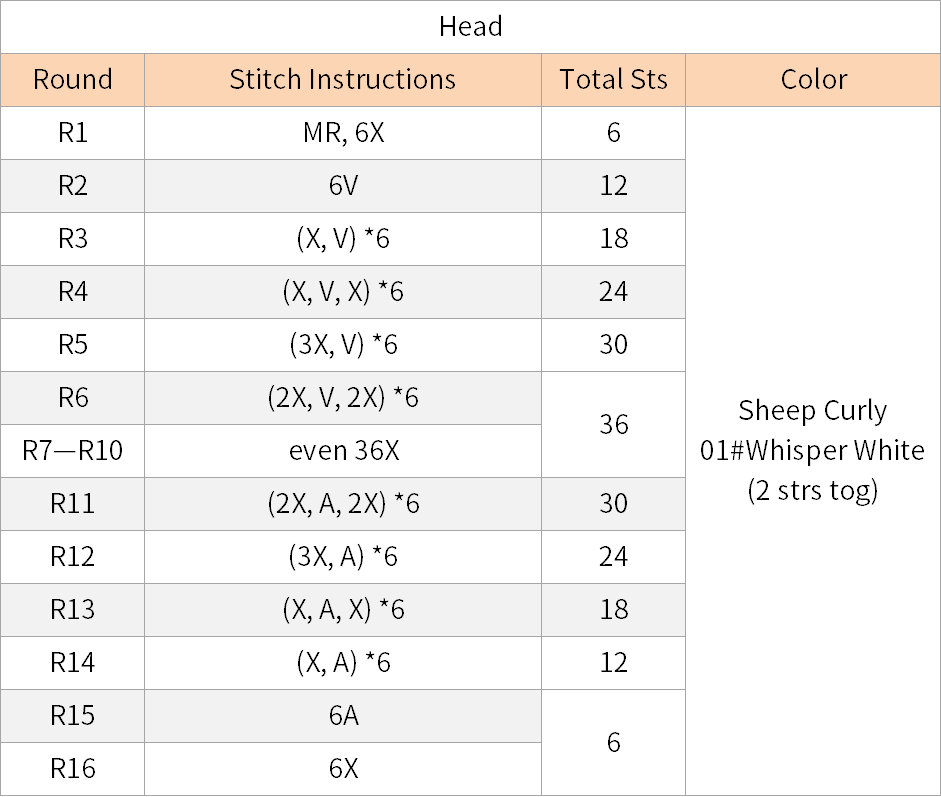
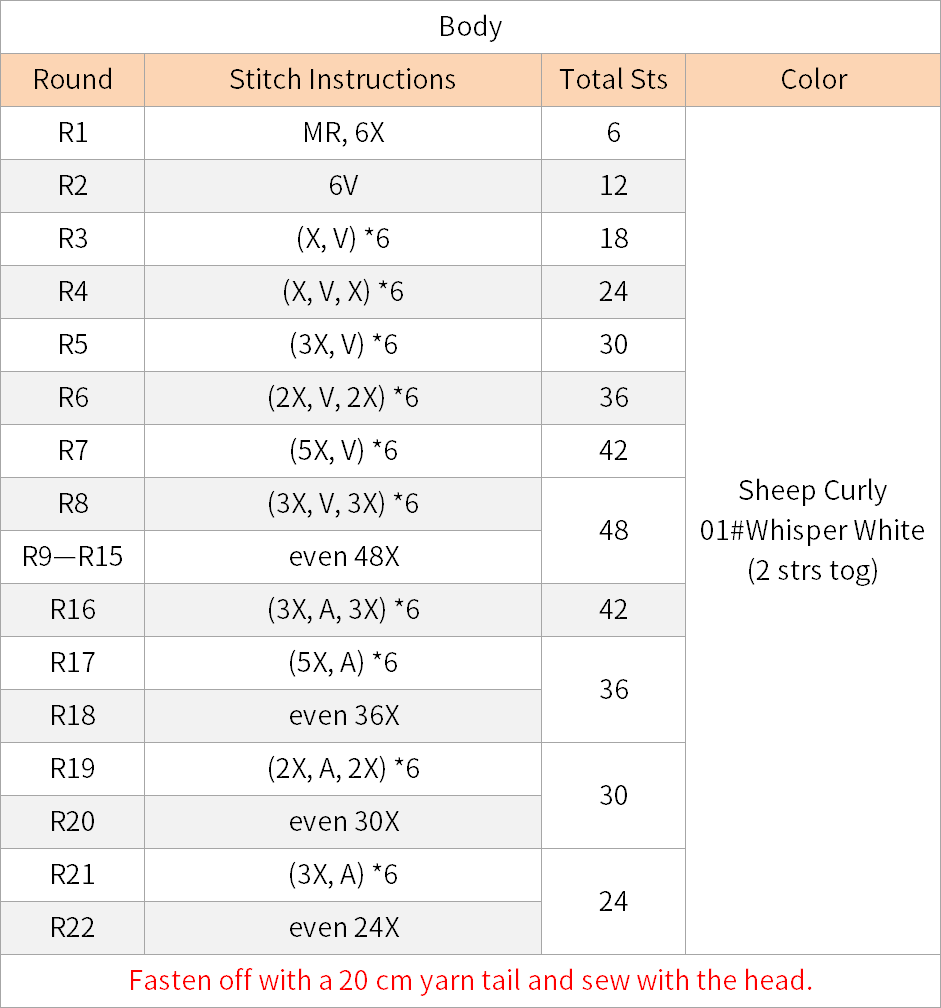
Hands: Take a shaping wire about 16 cm long and insert it horizontally at a position 3-3.5 cm from the top of the body. Use color 61#Cappuccino to wrap the yarn around the wire, applying glue as you go. You can refer to the method used for the candy cane in the female version dress. Finally, bend both ends inward.
Facial features: Embroider the eyes (using color 61#Cappuccino) in roughly the corresponding position as the finished product, then glue on an orange pom-pom centered below for the nose. Next, embroider the mouth (using color 51#High Risk Red) below the nose, and finally apply blush in the approximate position.
Scarf: The crochet method for the scarf is identical to the female version, and there's no need to attach stars to both ends.
Made by the community