Flowers
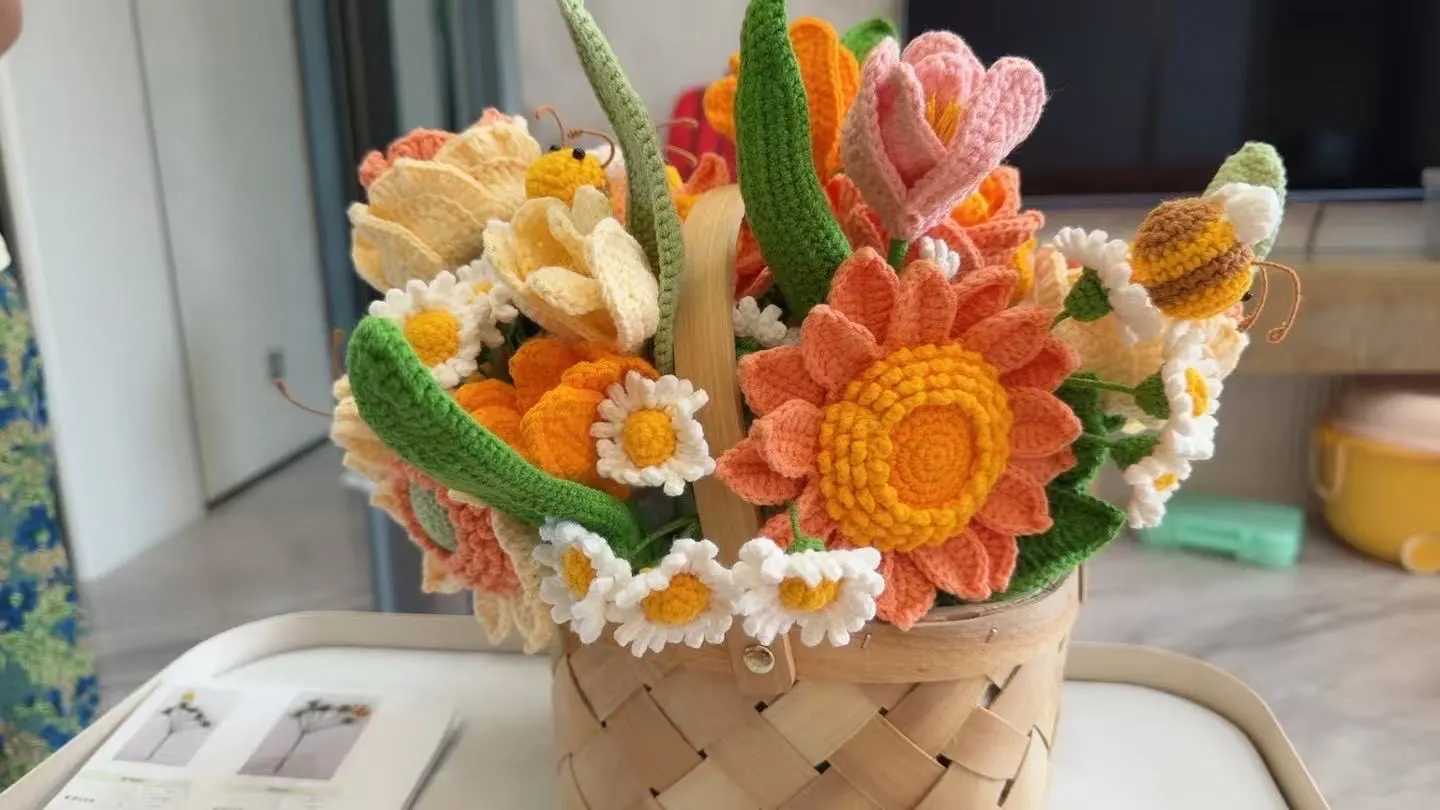
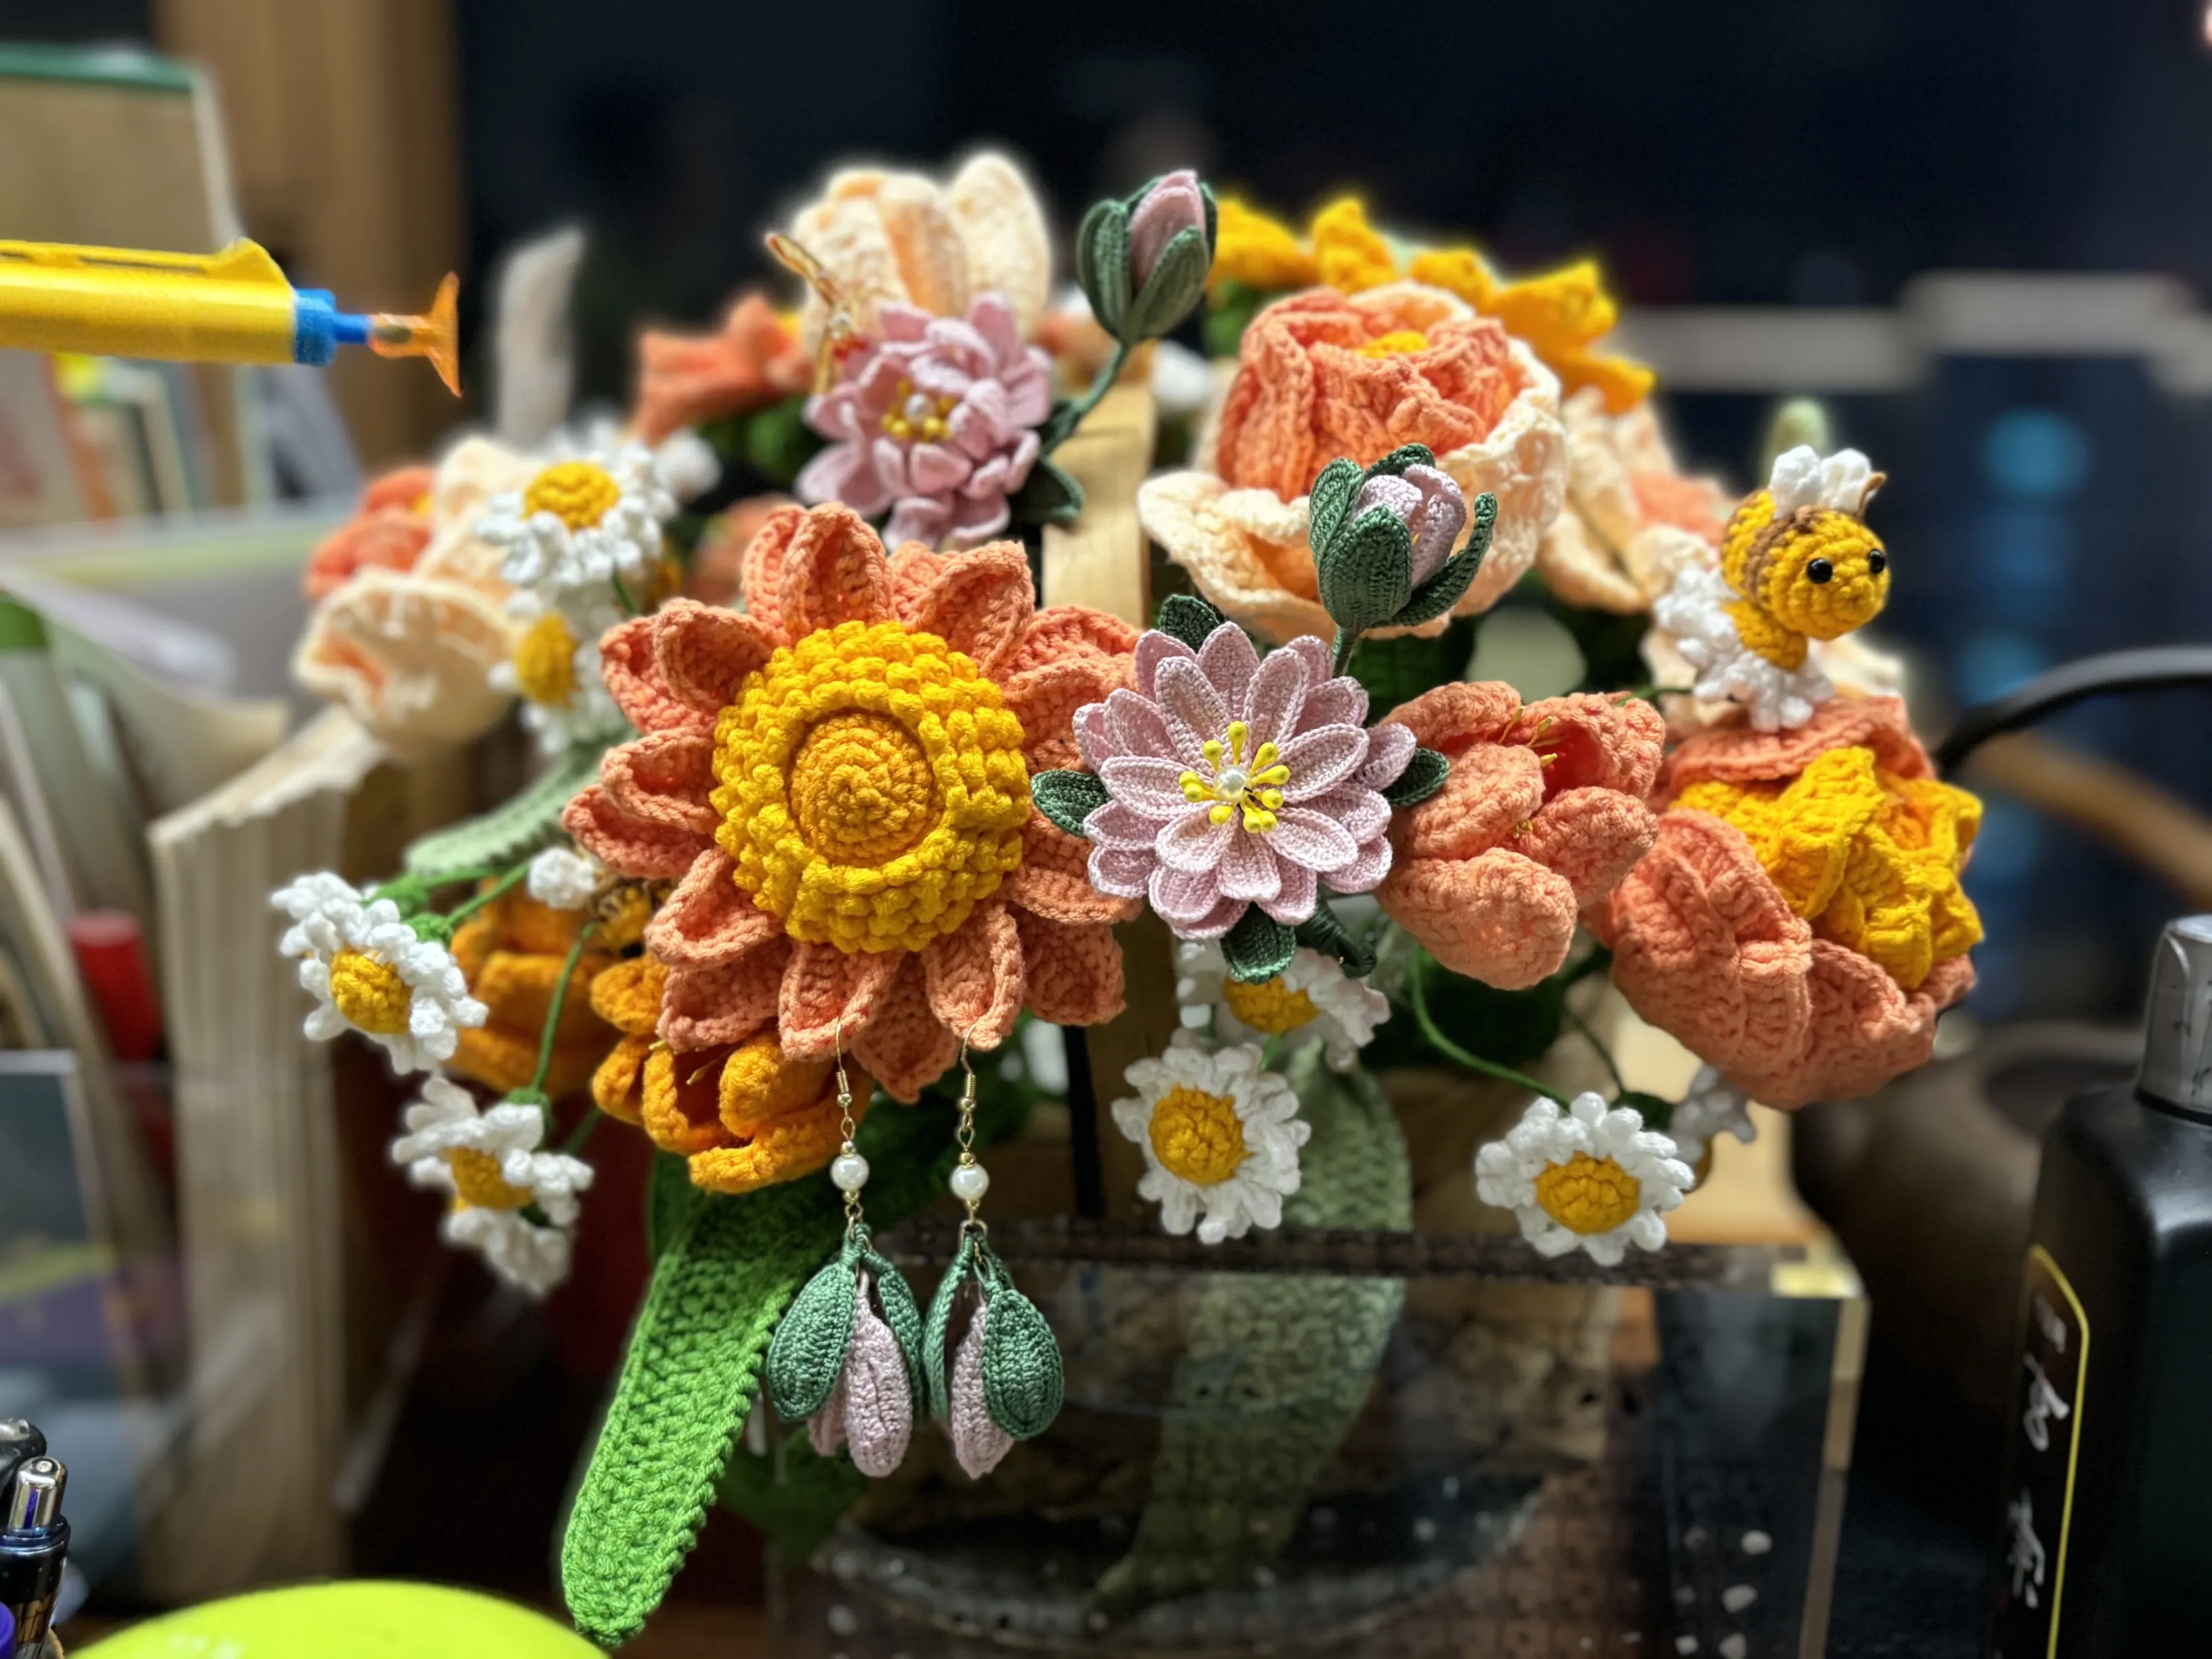
Courtyard Small Flower Basket
Project preview
See the finished project
Pattern format
Instructions
Watch and follow
Video tutorial
This product is divided into tulips, poppies, little bees, daisies, roses, and overall assembly. First, learn the crocheting and assembly method of each flower branch separately, then combine them together for overall assembly.
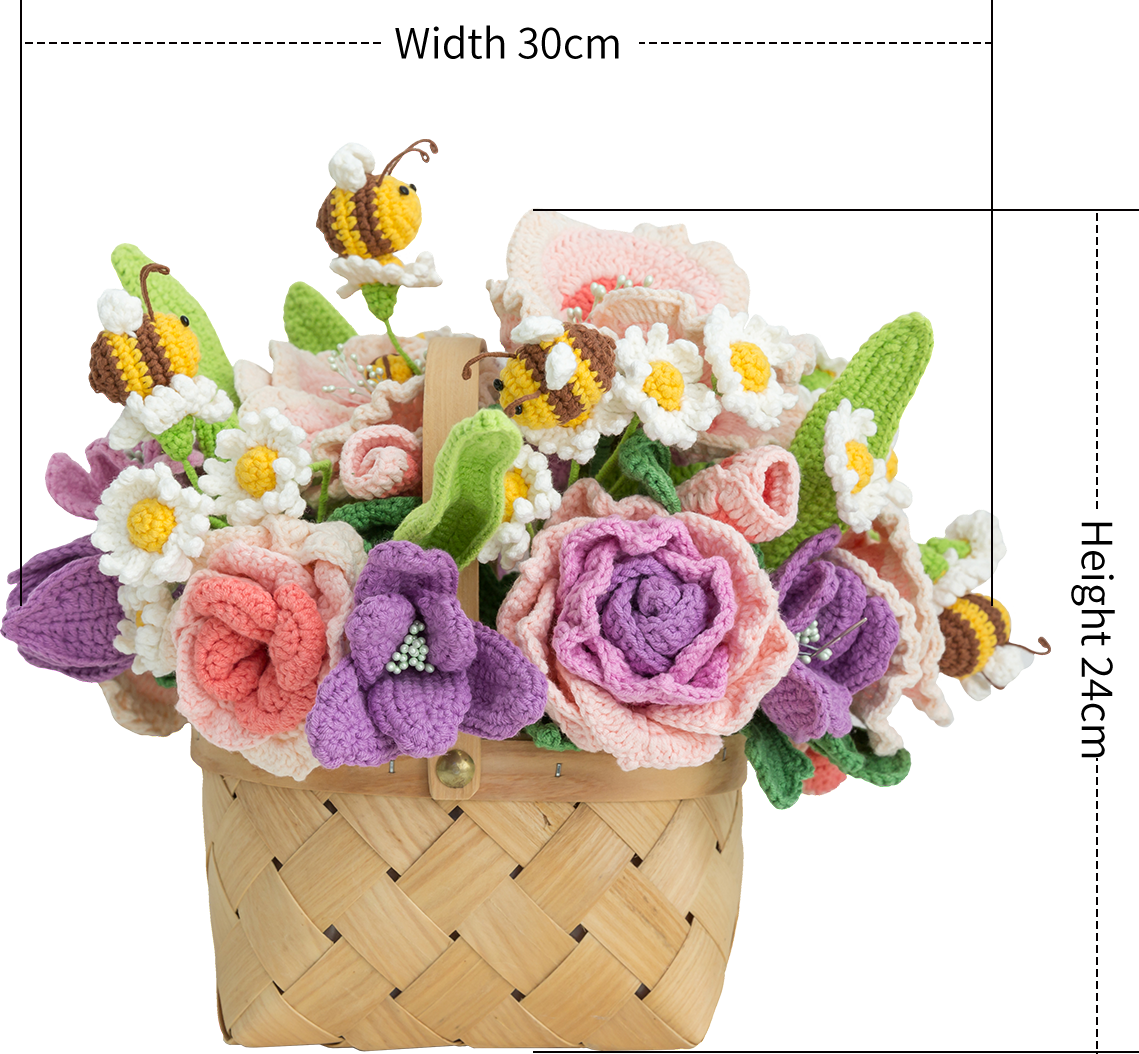
Due to variations in individual tension, the size of the sample is for reference only.
Materials: Morandi 4#& Lamb Wool & Gem Twist
Crochet Hook: 2.00 mm & 3.5.00 mm Crochet Hook
Note: When encountering 08#Sheer Lilac and 43#Begonia Pink,
48#Lime Green and 78#Mediun Green, the colors can be paired randomly.

Chart Key

















ABBREVIATIONS
RRound
SLslip stitch
Xsingle crochet
CHchain
V = sc2-in-12 single crochets into the same stitch
Fdouble crochet
FLOfront loop only
BLOback loop only
Kskip
[...]in the same stitch
Thalf double crochet
Etreble crochet
A = sc2togsingle crochet 2 stitches together
HRow
MRadjustable magic ring
Note:
1. This pattern is making in Chinese crochet pattern terms, and the stitch name is written using American terminology. All measurements in charts are in cm.
2. Working in joined round: When crocheting in rounds without further guidance, working in closed rounds, start each round with a set number of beginning chains and close with a slip stitch. The beginning chain preceding a single crochet and the slip stitch used for joining rounds are not included in the total stitches.

Part 1 Tulip×8A
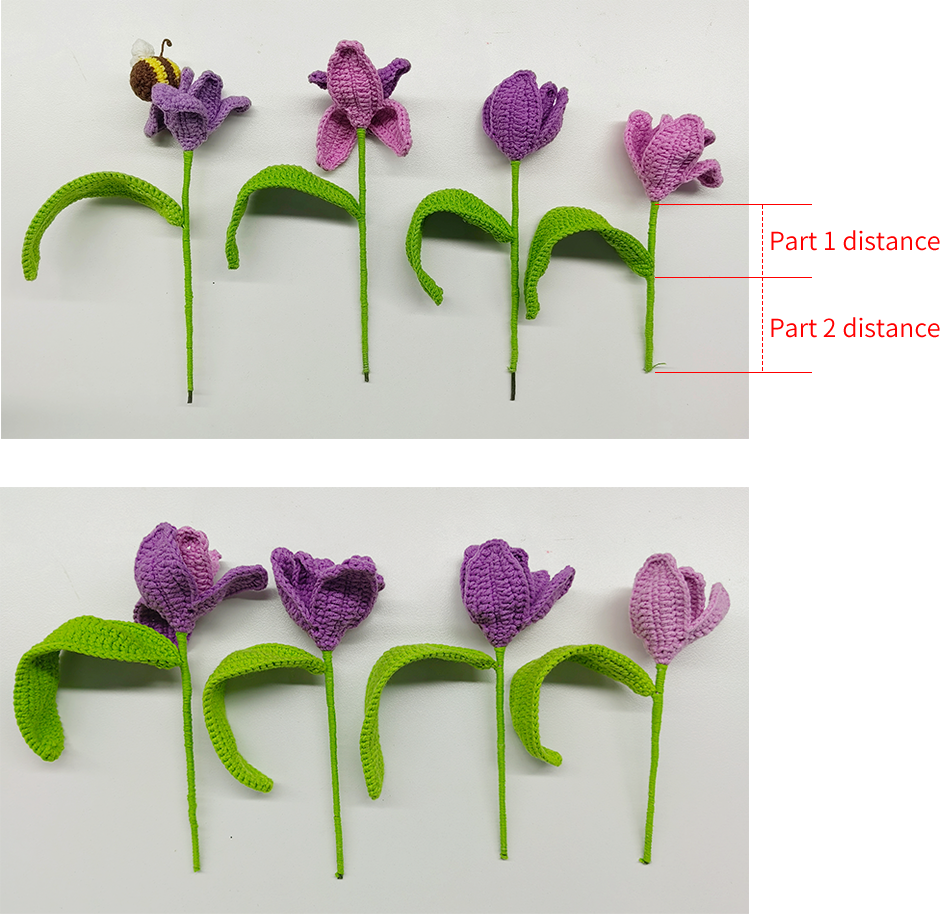
A single flower branch includes 2 layers of petals, 1 leaf, pistils (10 pre-made pistils), and a stem. First, complete the crocheting of the petals and the leaf, then proceed with the assembly.
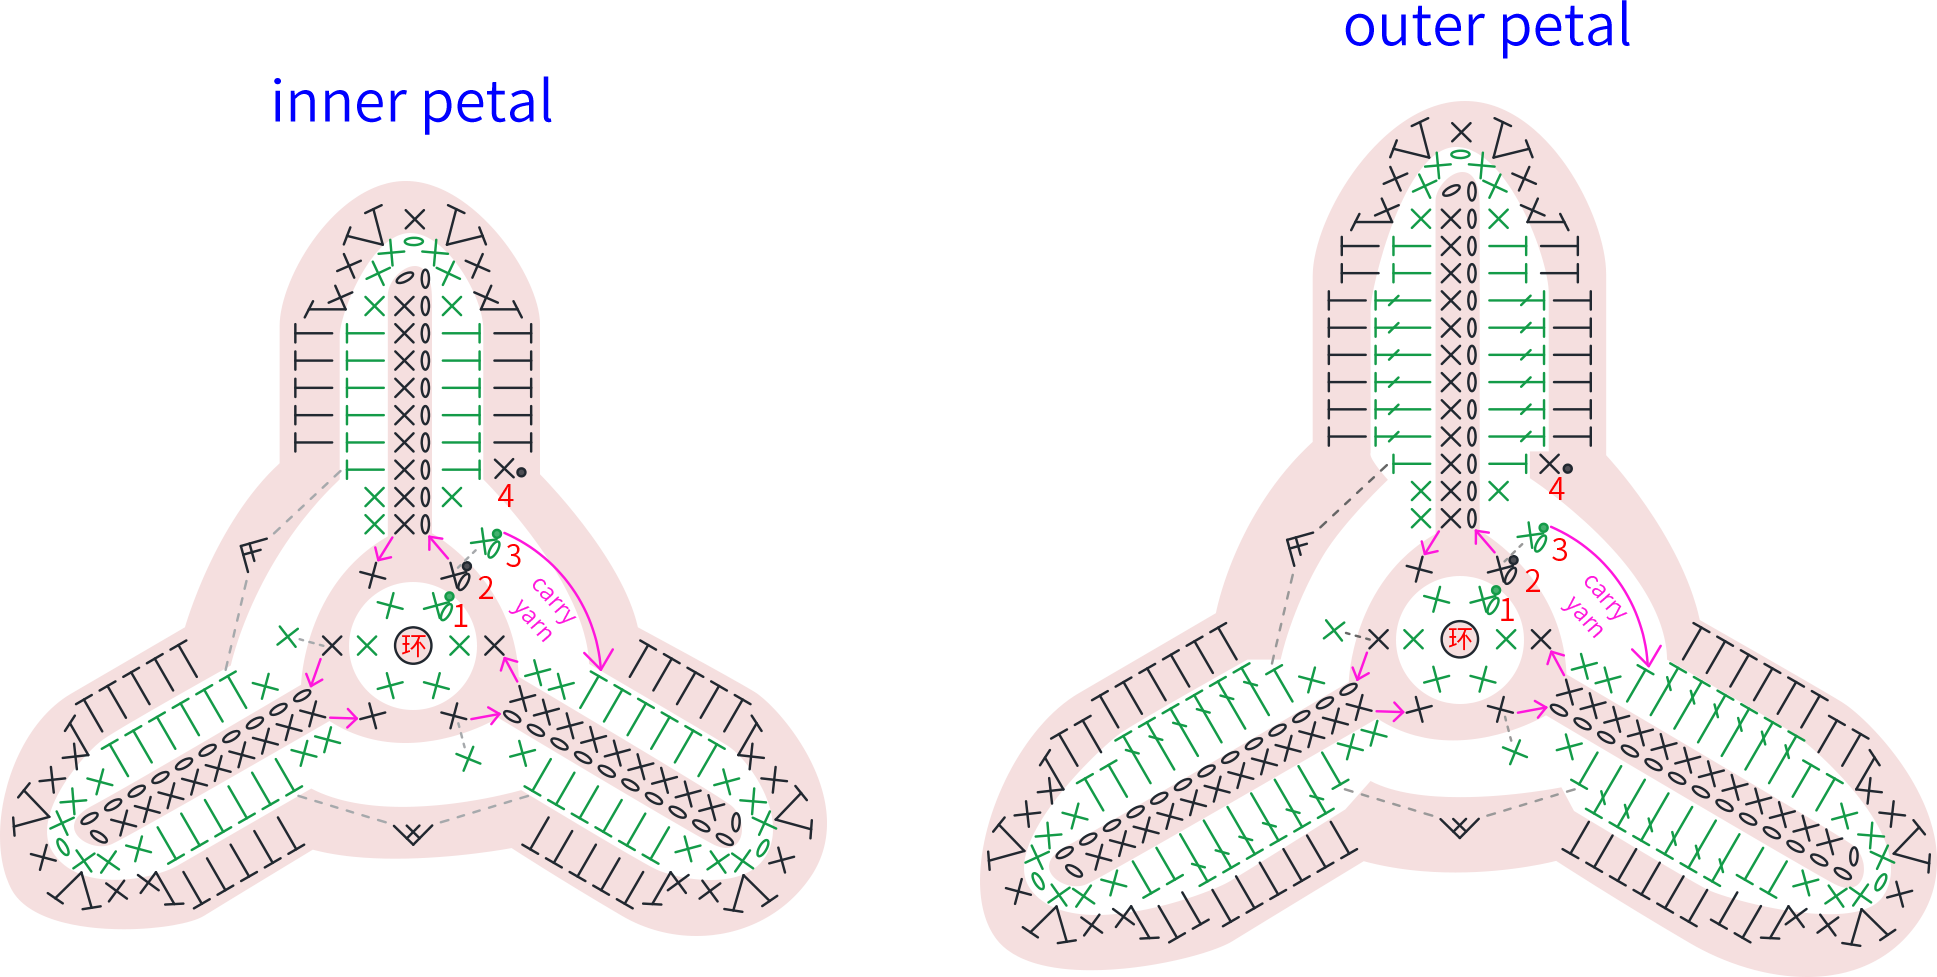
Step 1 PetalA1 01' 12'' (Part 1)
The petals consist of an inner layer and an outer layer. Both layers of petals are crocheted separately, starting with a magic ring and working in rounds along the ring. Please refer to the video demonstration for more details.
Note: Do not tighten the starting loops for the petals yet, as it will be more convenient for assembly later.
Step 2 LeavesA2 and Assembly A3 35' 46'' (Part 1)
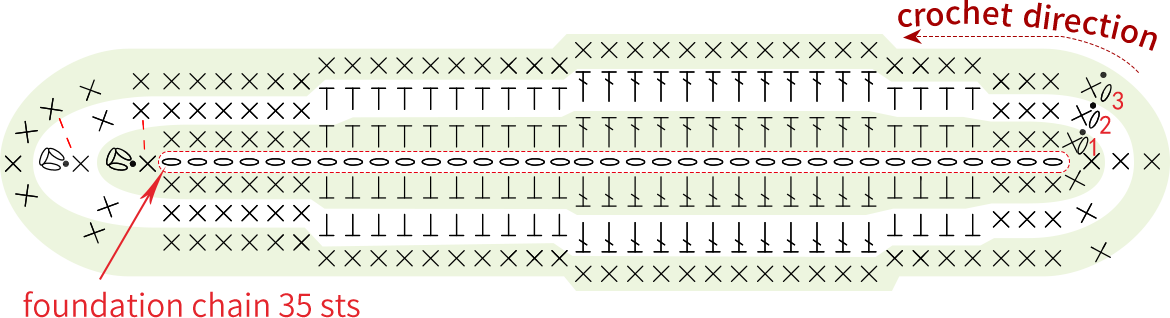
The leaf starts with a chain stitch, and is crocheted in rounds along the foundation chain. In the last round , edge crochet while wrapping thin wire . After completing the leaf, proceed with assembly. Please refer to the video demonstration for more details.
| Tulip | |||
| Version | Color | Petal | Leaf |
| Spring Version | Color1(4flowers) | 08#Sheer Lilac | 48#Lime Green |
| Color2(2flowers) | 43#Begonia Pink | ||
| Color3(2flowers) | in the following text mentioned | 48#Lime Green | |
| 78#Mediun Green | |||
| Note: 1. Color3 (Petal is crocheted with the remaining yarn of Color1 and Color2, the colors of large and small Petals are random.) 2. The flower consists of 1 large Petal, 1 small Petal, and 10 pistils. |
|||
| The First Picture | Part 1 Distance | Part 2 Distance |
| The order of the flowers from left to right | 5cm | 16.5cm |
| 5.5cm | 17cm | |
| 5cm | 16cm | |
| 5cm | 11.5cm | |
| The Second Picture | Part 1 Distance | Part 2 Distance |
| The order of the flowers from left to right | 1.5cm | 13.5cm |
| 1cm | 13cm | |
| 1cm | 12cm | |
| 1.5cm | 11cm |
Part 2 Corn Poppy ×4B 00' 08'' (Part 2)
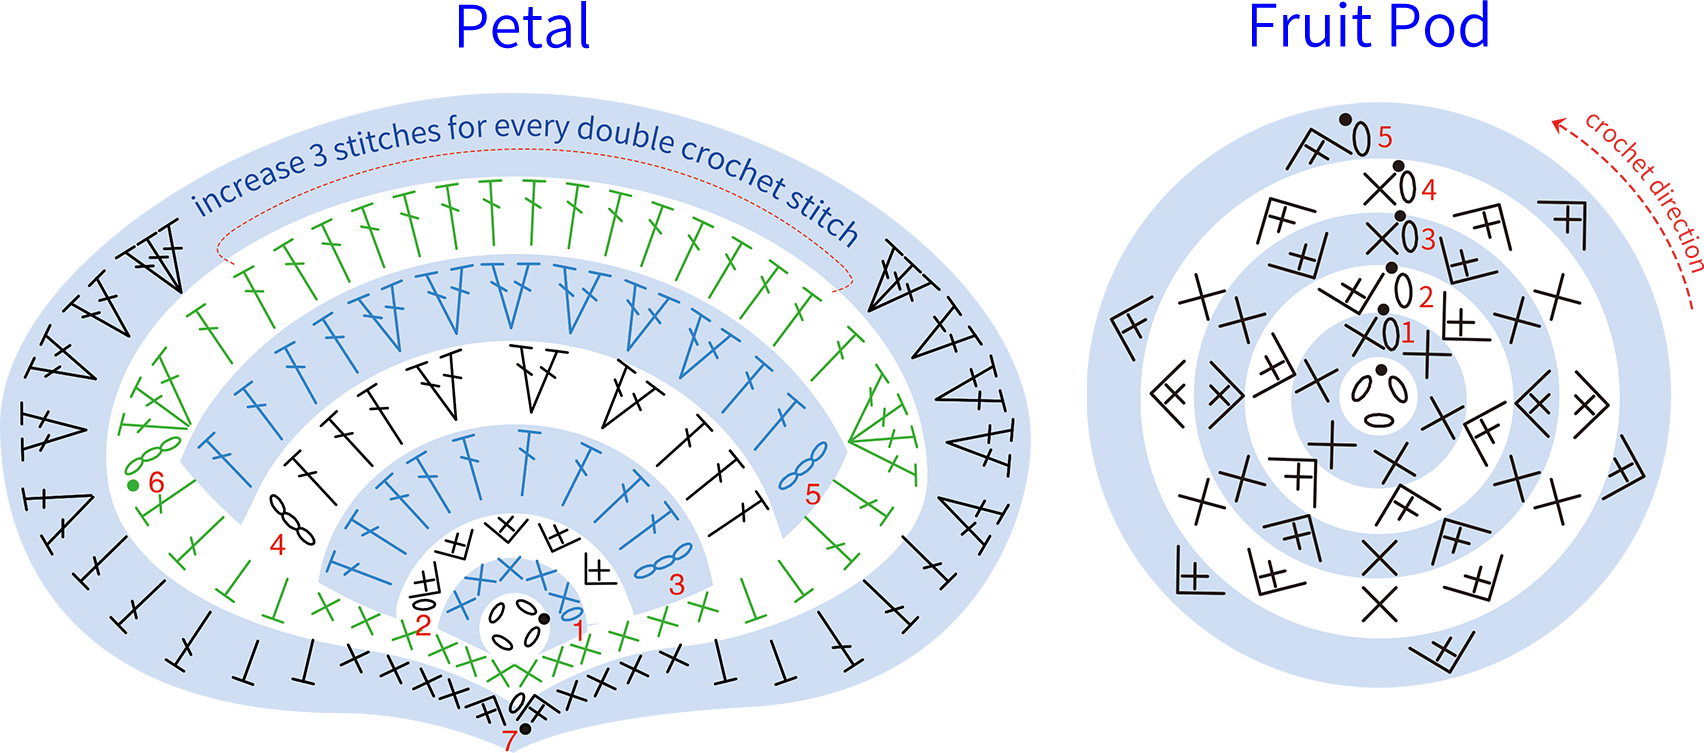
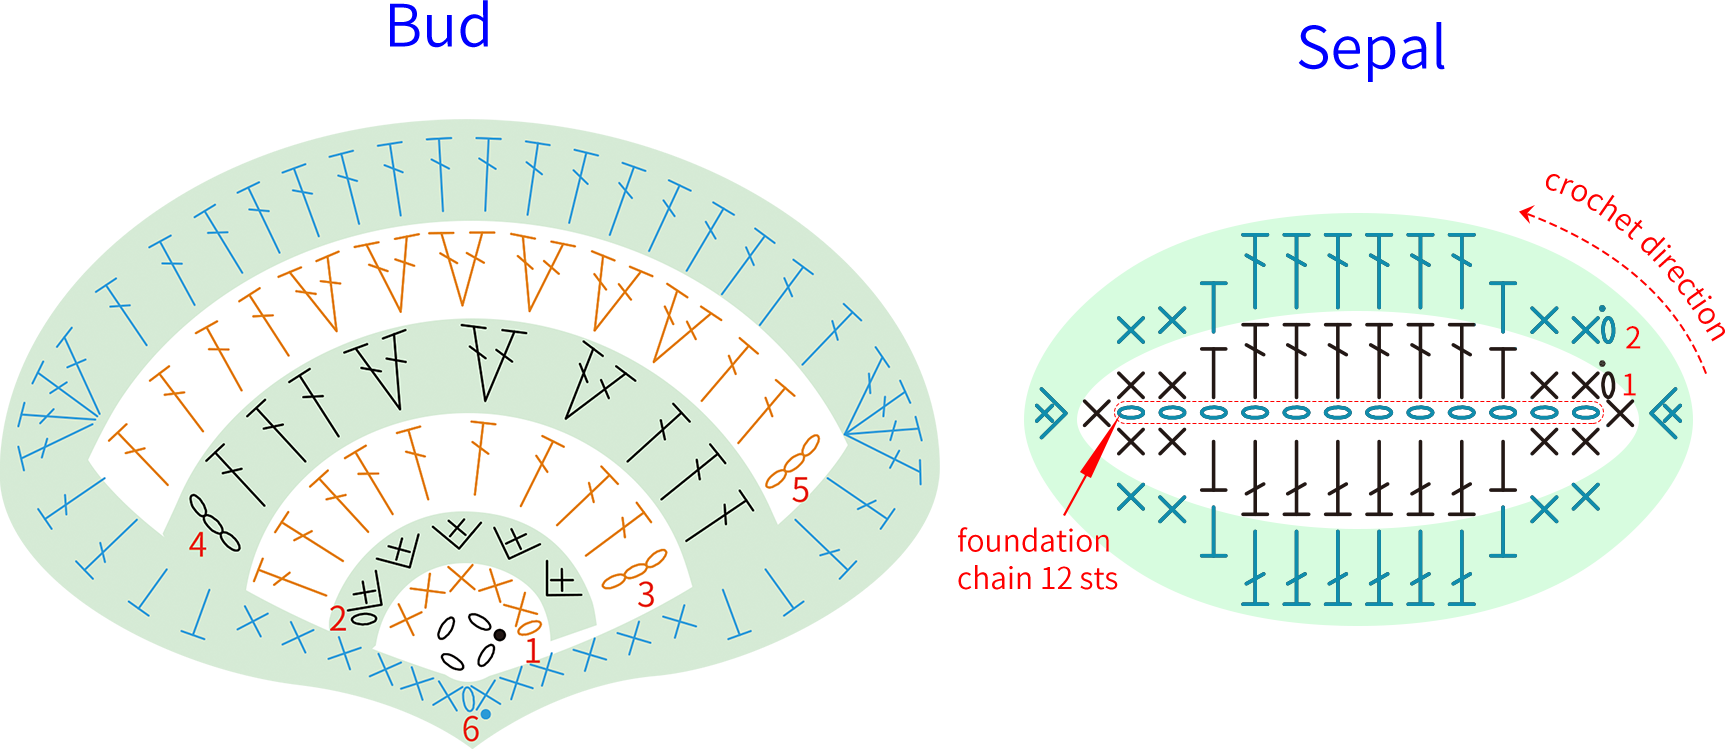
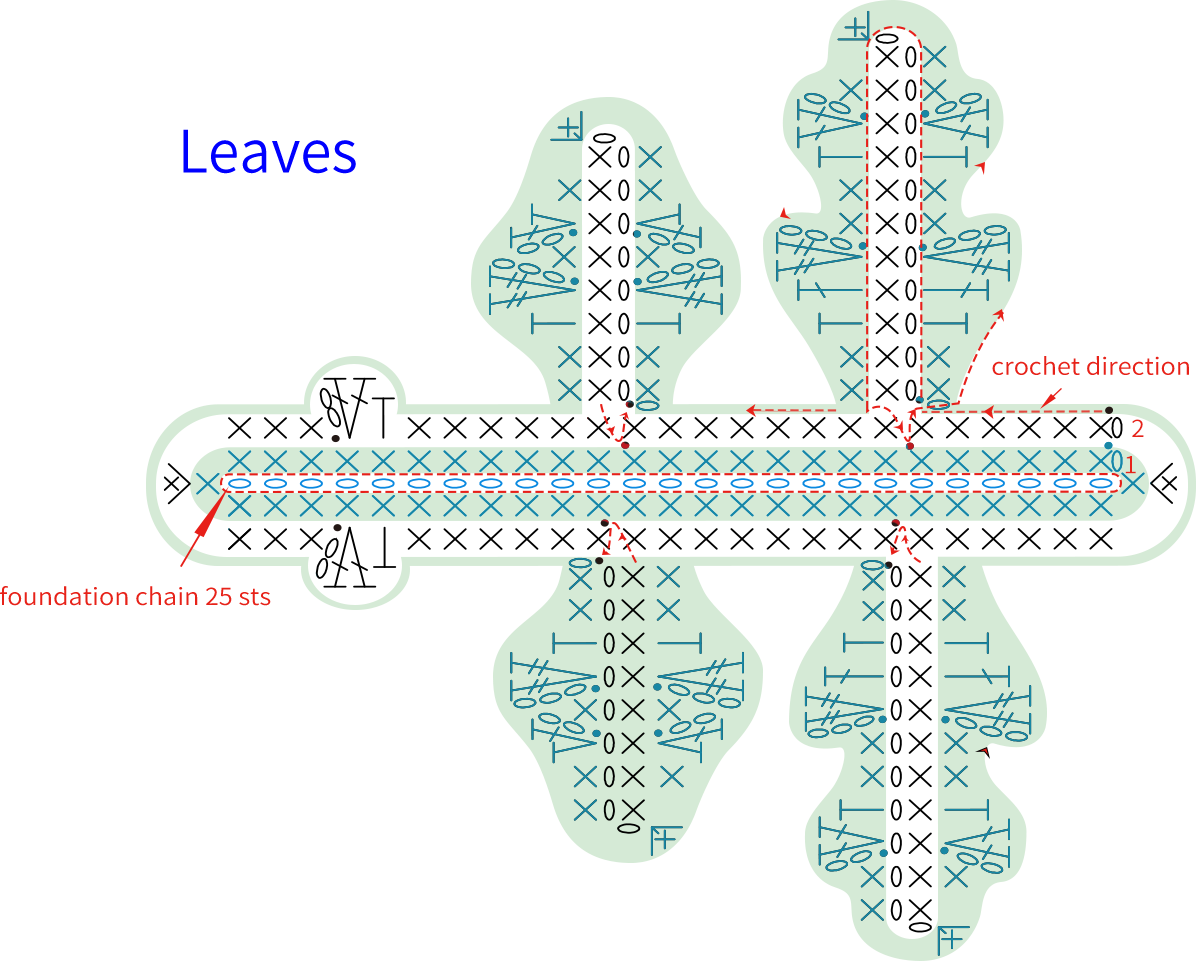
A single poppy consists of petals, fruit pod, bud, sepals, and leaves. First, complete each part separately, and then assemble them. For the petals and calyx, start with a magic ring for casting on, work back and forth initially, then crochet in rounds counterclockwise. For the last round of petals, calyx, leaves, and sepals, thin wire needs to be added. Please refer to the video demonstration for more details.
| Petal | |
| H1—H4 | 12#Shell Pink |
| H5 and R6 | 49#Pearl |
| R7 | 07#Sheer Pink |
| Fruit Pod | |
| Main Body | 09#Aspen Gold |
| Decoration Line | 34#Toffee |
| Bud | |
| H1—H5 | 12#Shell Pink |
| R6 | 49#Pearl |
| Leaf | 78#Mediun Green |
| Sepal |
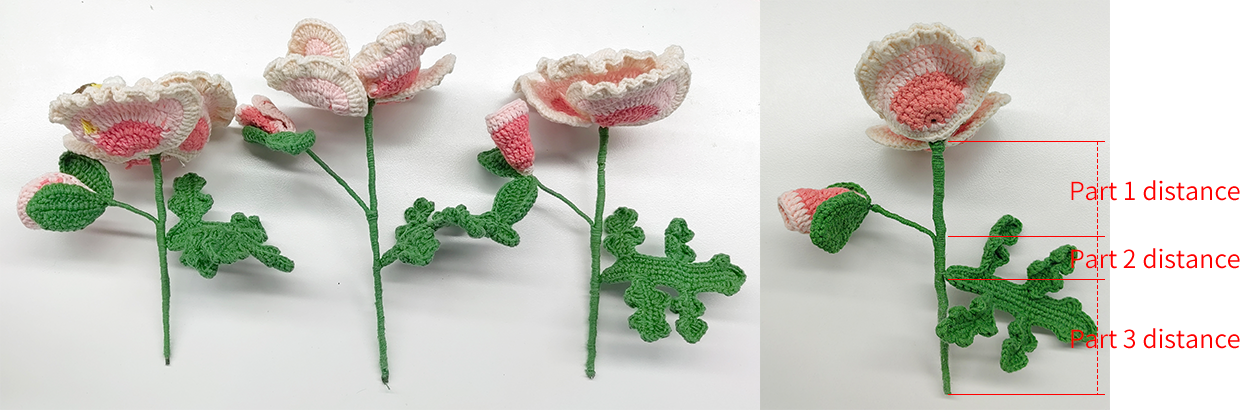
| / | Part 1 Distance | Part 2 Distance | Part 3 Distance |
| The order of the flowers from left to right | 4.5cm | 1.5cm | 8cm |
| 8cm | 4cm | 7cm | |
| 7cm | 3.5cm | 6.5cm | |
| 5cm | 2cm | 7cm |
Part 3 Little BeeC 33' 22'' (Part 2)
It's divided into the main body, wings, eyes, and antennae. The main body is started with an adjustable magic ring and crocheted in rounds counterclockwise, with color changes needed midway through. After completing it, make the wings and antennae. The eyes are pre-made, so no crocheting is needed for them. Finally, assemble all parts. Please refer to the video demonstration for more details.
Note: The tentacles are made by cutting 1 piece of wire 4-5cm long and 1 piece of coffee-brown thread 30cm long, taking 2 strands, and wrapping them around the wire. Make a total of 2, and attach them to the main body.
| Little Bee×6 | ||||
| Part | Rounds/Rows | Stitch Instructions | Total Stitches | Color |
| Main Body | Cast on and R1 | MR, 6X | 6 | 09#Aspen Gold |
| R2 | 6V | 12 | ||
| R3 | (X, V)×6 | 18 | ||
| R4 | even 18X | 18 | ||
| R5—R6 | even 18X | 18 | 34#Toffee | |
| R7—R8 | even 18X | 18 | 09#Aspen Gold | |
| R9 | even 18X | 18 | 34#Toffee | |
| R10 | (X, A)×6 | 12 | ||
| R11 | 6A | 6 | ||
| Wing×2 | Cast on and H1 | MR, X, T, F, E, F, T, X, SL | 8 | 06#Bright White |
| Note: 1. Add stuffing when there is 1 round left for the main body, and leave a 20cm tail end. 2. Leave about a 30cm tail at the end of the wings. Sew this tail on either side of the middle 2 stitches of Row 7 of the main body. After completion, attach the eyes and antennae. |
||||
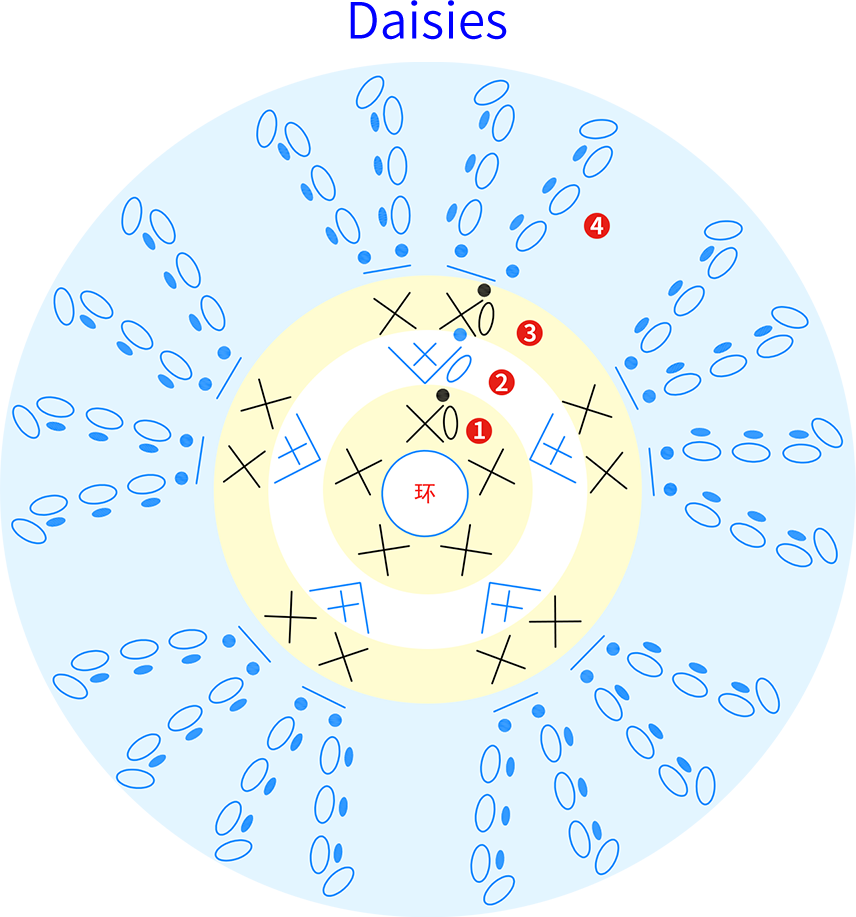
Part 4 Daisies × 4D 00' 08'' (Part 3)
Divide into daisies and calyxes. After completing them separately, proceed with the assembly. Please refer to the video demonstration for more details.
Note: Each branch has 5 flowers, for a total of 20 flowers.
| Calyx | |||
| Rounds | Stitch Instructions | Total Stitches | Color |
| Cast on and R1 | MR, 6X | 6 | 48#Lime Green |
| R2 | 6X | 6 | |
| R3 | 6V | 12 | |
| Note: In R3, wrap the wire, and leave a 30cm yarn tail at the end. | |||
| Daisies | |
| Cast on and R3 | 60#Lemon Chrome |
| R4 | 06#Bright White |
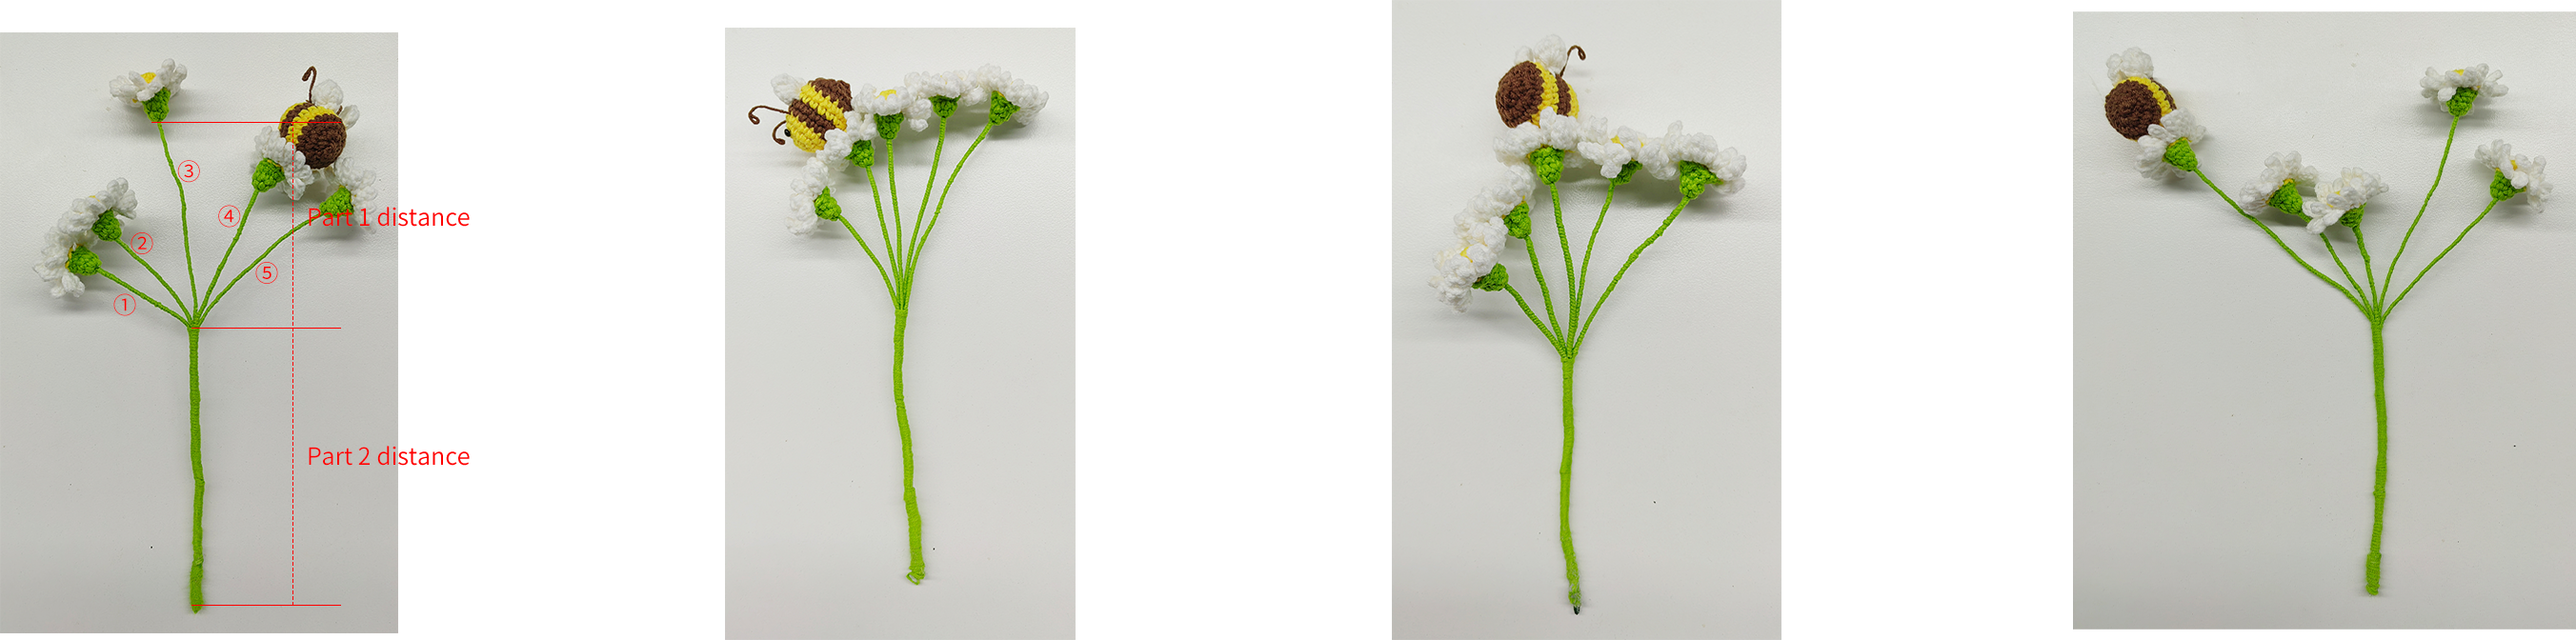
| The First Picture×2 | ||
| Part 1 Distance | ① | 5cm |
| ② | ||
| ③ | 10cm | |
| ④ | 7cm | |
| ⑤ | 8cm | |
| Part 2 Distance | 13.5cm | |
| The Second Picture | ||
| Part 1 Distance | ① | 5cm |
| ② | 7cm | |
| ③ | 8cm | |
| ④ | 9.5cm | |
| ⑤ | 10.5cm | |
| Part 2 Distance | 12.5cm | |
| The Third Picture | ||
| Part 1 Distance | ① | 4cm |
| ② | 5cm | |
| ③ | 7cm | |
| ④ | ||
| ⑤ | 8cm | |
| Part 2 Distance | 10.5cm | |
| The Forth Picture | ||
| Part 1 Distance | ① | 11cm |
| ② | 6cm | |
| ③ | 4.5cm | |
| ④ | 10cm | |
| ⑤ | 8cm | |
| Part 2 Distance | 12cm | |
Note: When working the first round, weave in the thin wire, with a length of about 30cm.
Part 5 Rose BranchE
The rose branch includes leaves, calyx, flowers, and branch assembly. Complete the crocheting of each part first, and then assemble them last.
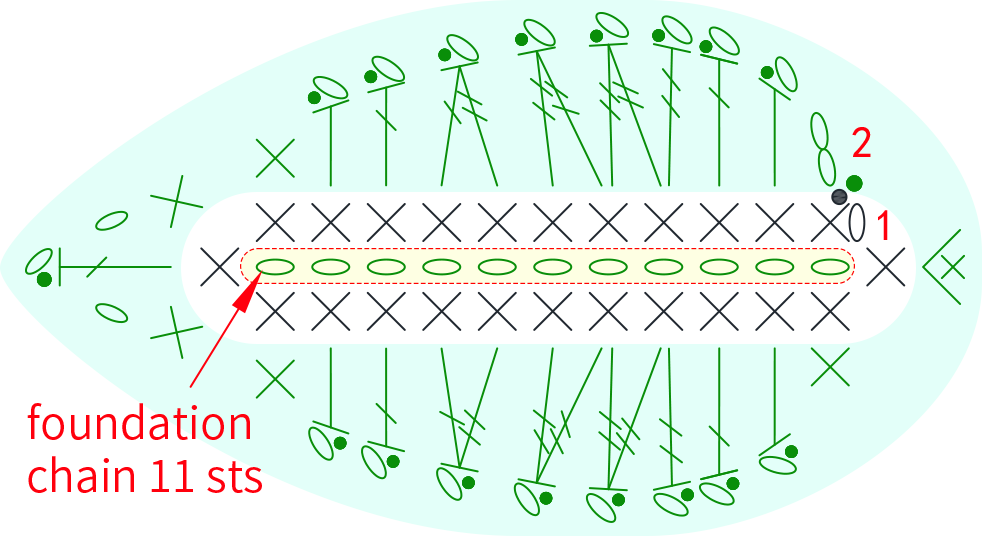
Step 1 Leaf×8E1 20' 47'' (Part 3) (Color:78#Mediun Green)
The leaf starts with a foundation chain, and is crocheted in rounds counter clockwise along the starting chain, with thin wire added in the process. Please refer to the video demonstration for more details.
Step 2 CalyxE2 37' 27'' (Part 3) (Color:78#Mediun Green)
The calyx is worked using the magic ring method, crocheting in rounds counter clockwise from the ring. Please refer to the video demonstration for more details.
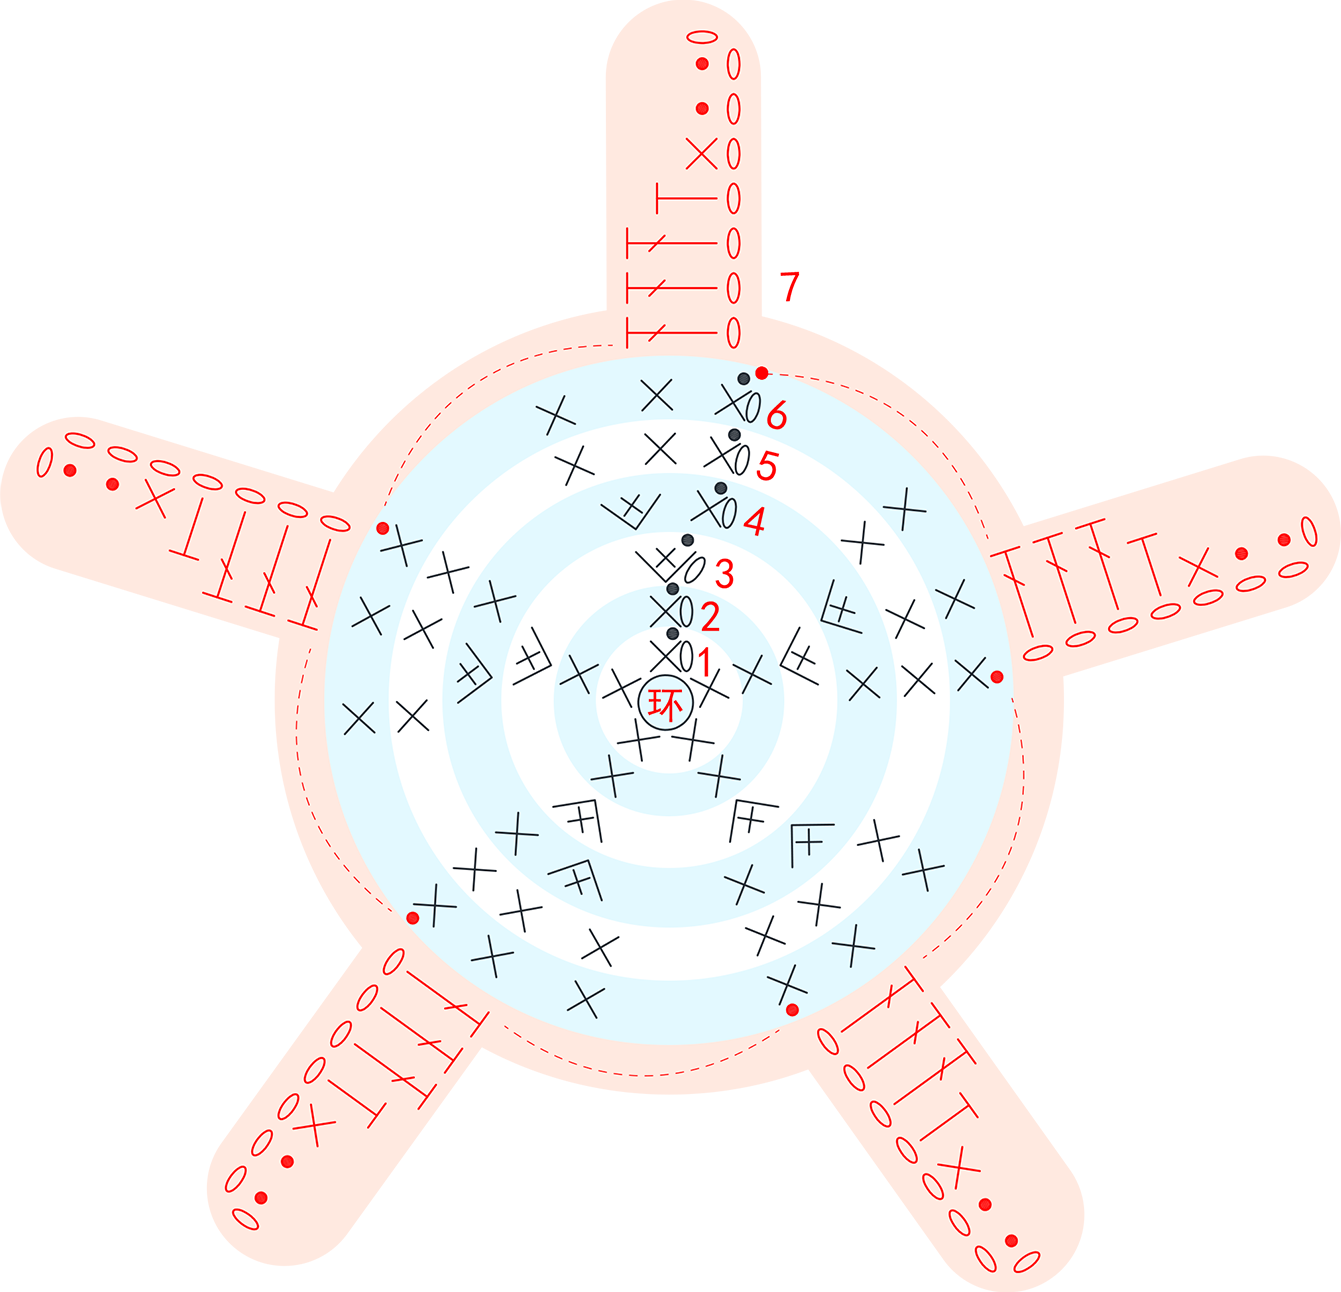
Note: After completing the crocheting, leave a yarn tail of about 20cm.
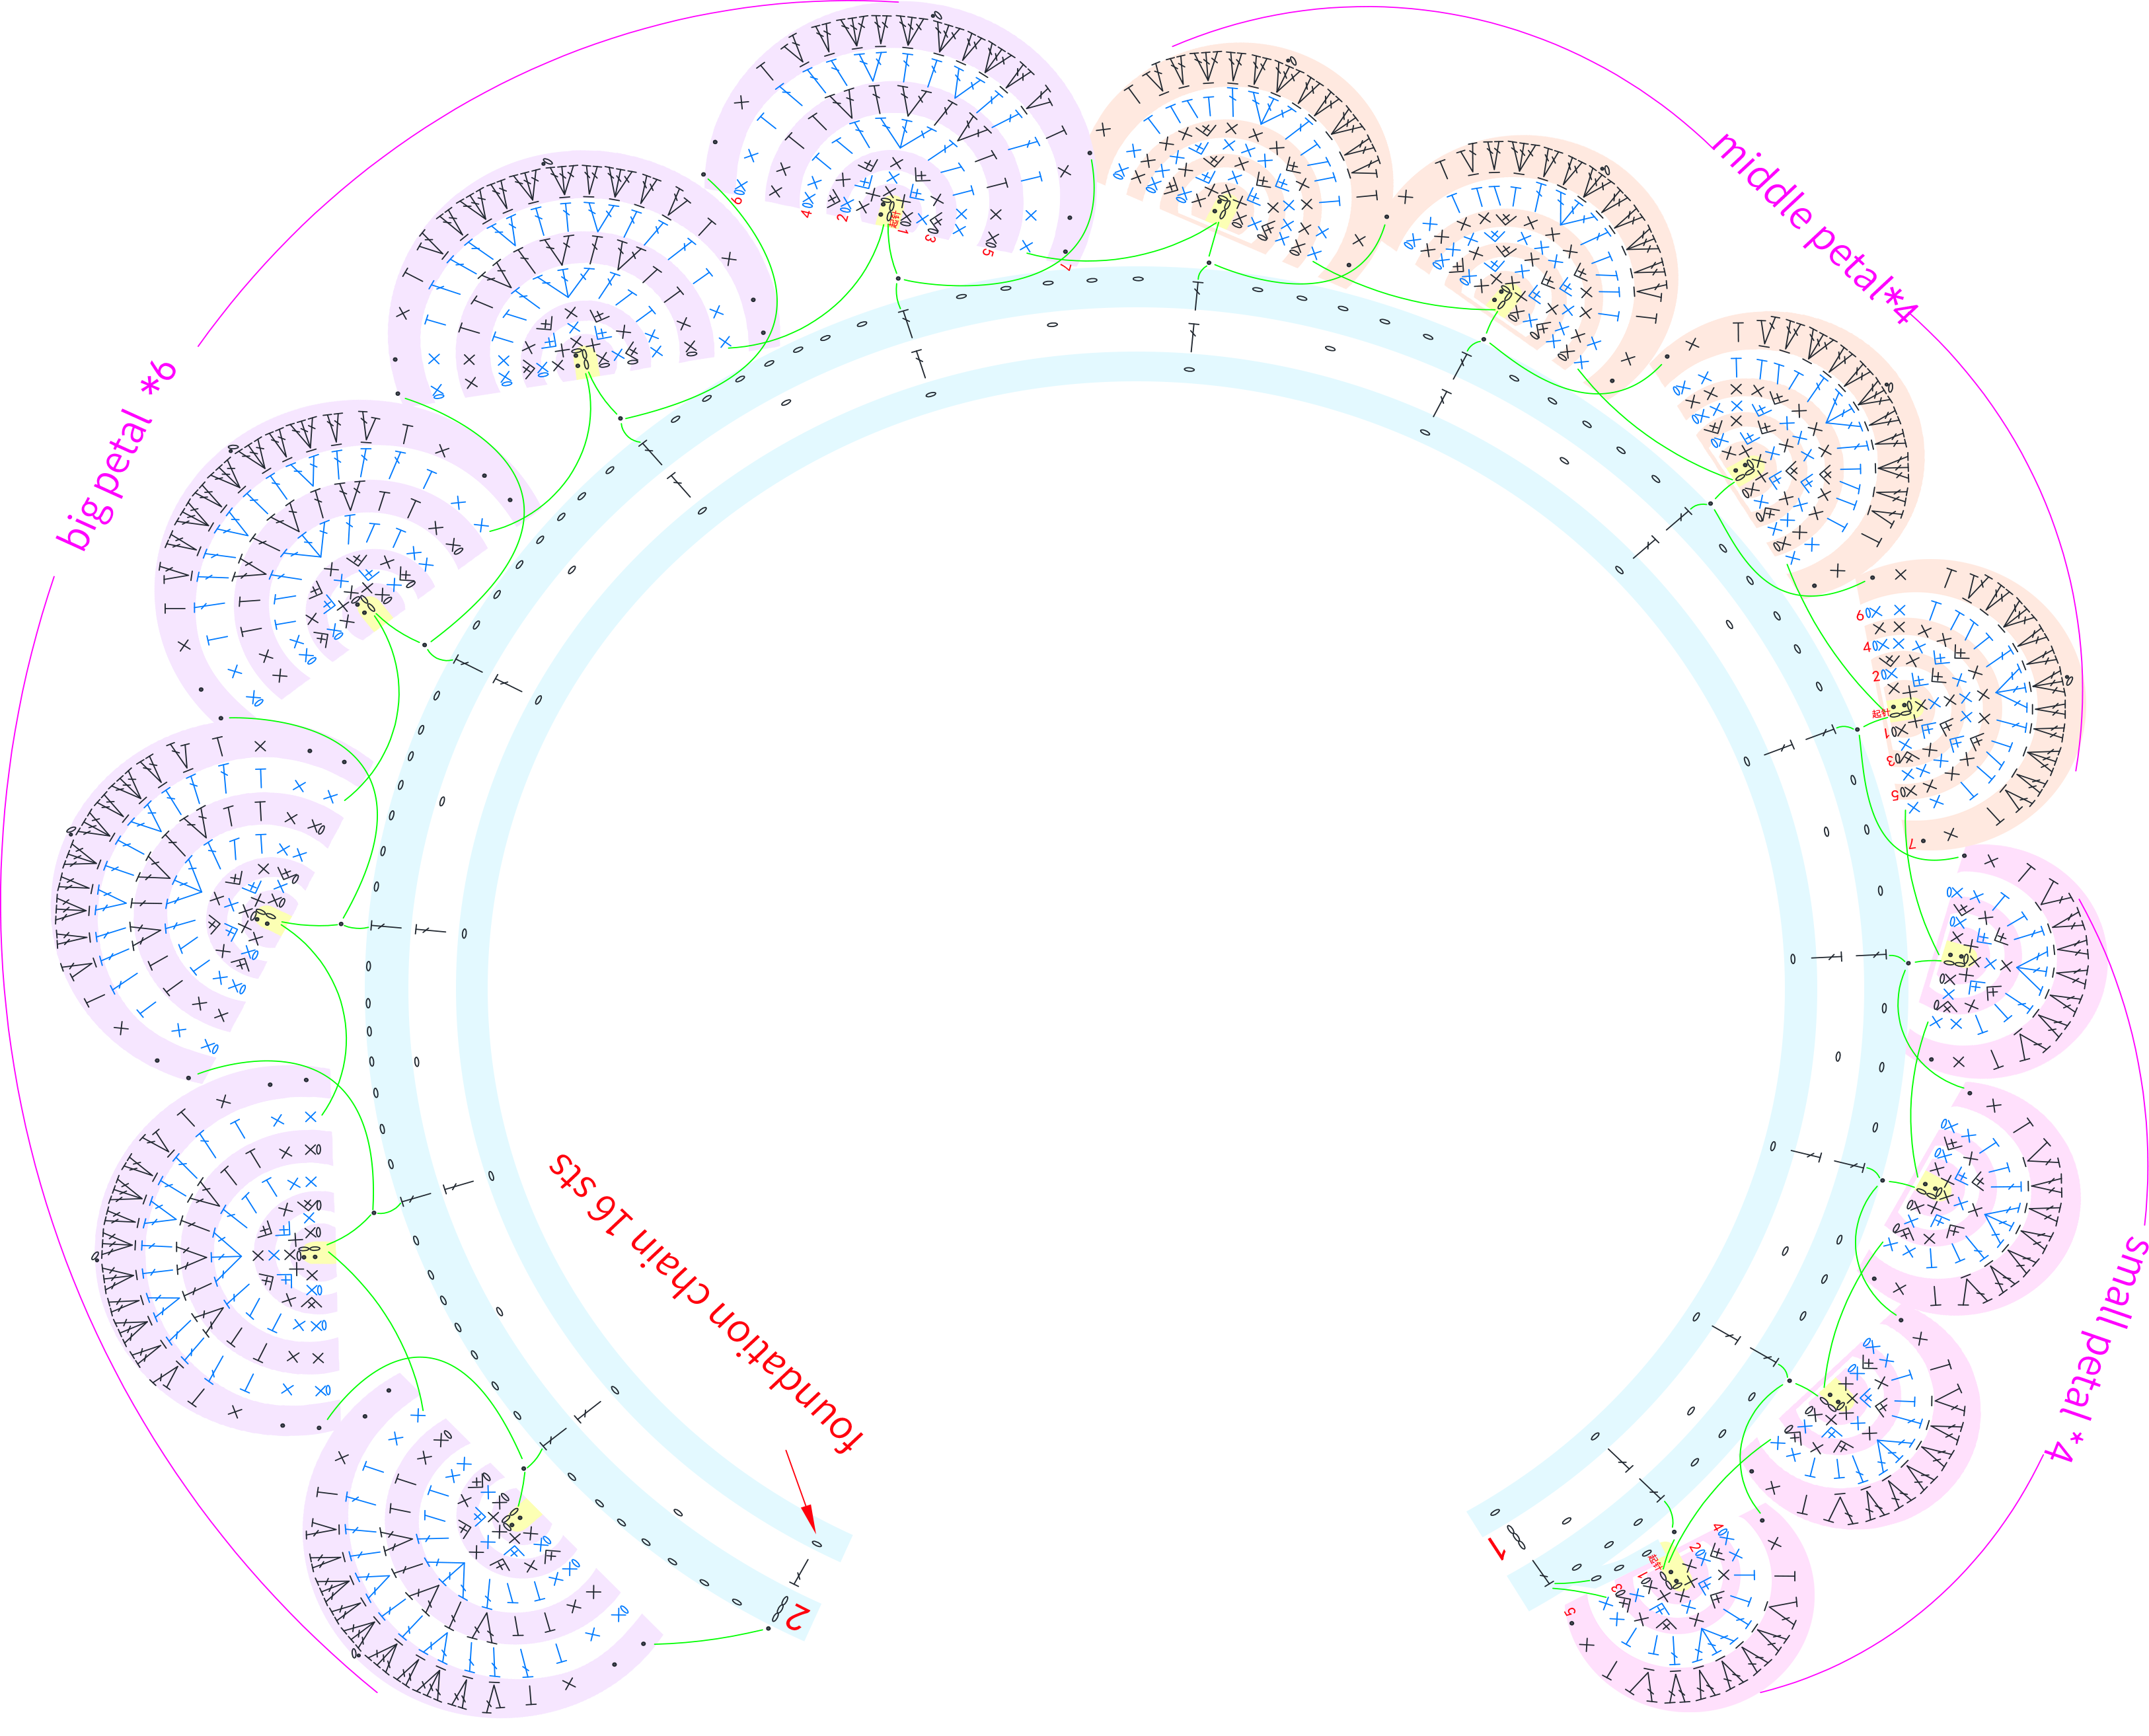
Step 3 Flower×4E3 46' 54'' (Part 3)
The flower starts with a foundation chain, works back and forth along the starting chain, then crochets the petals separately. Once completed, roll it up and sew it together to form the shape of a flower. Please refer to the video demonstration for more details.
| Rose | ||||
| Version | Color | Small Petal | Middle Petal | Big Petal |
| Spring Version | Color1(2 flowers) | 12#Shell Pink | 49#Pearl | 07#Sheer Pink |
| Color2(2 flowers) | 08#Sheer Lilac | 43#Begonia Pink | 49#Pearl | |
Step 4 Flower Branch AssemblyE4 73' 26'' (Part 3)
Assemble the flower branches after completing all the crocheting. Please refer to the video demonstration for more details.
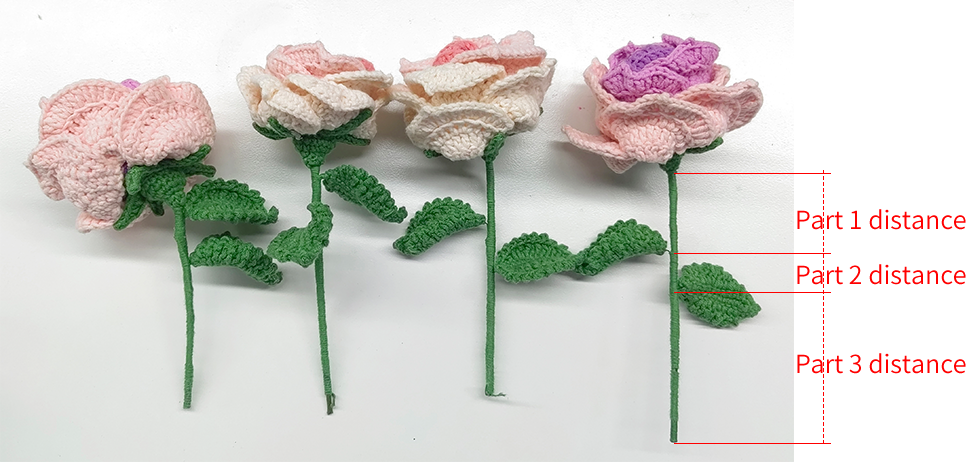
| / | Part 1 Distance | Part 2 Distance | Part 3 Distance |
| The order of the flowers from left to right | 0.5cm | 2.5cm | 11cm |
| 0.5cm | 2.5cm | 13.5cm | |
| 3.5cm | 2.5cm | 13cm | |
| 4cm | 2cm | 14cm |
Part 6 Overall AssemblyF 79' 05'' (Part 3)
First, trim the floral foam to fit the shape of the flower basket (just enough to fit inside), then take out the wax paper and wrap it around the floral foam, placing them together into the basket. Next, insert the flower branches according to your preference. Finally, sew the bees onto your preferred flower branches.
Made by the community