Doll
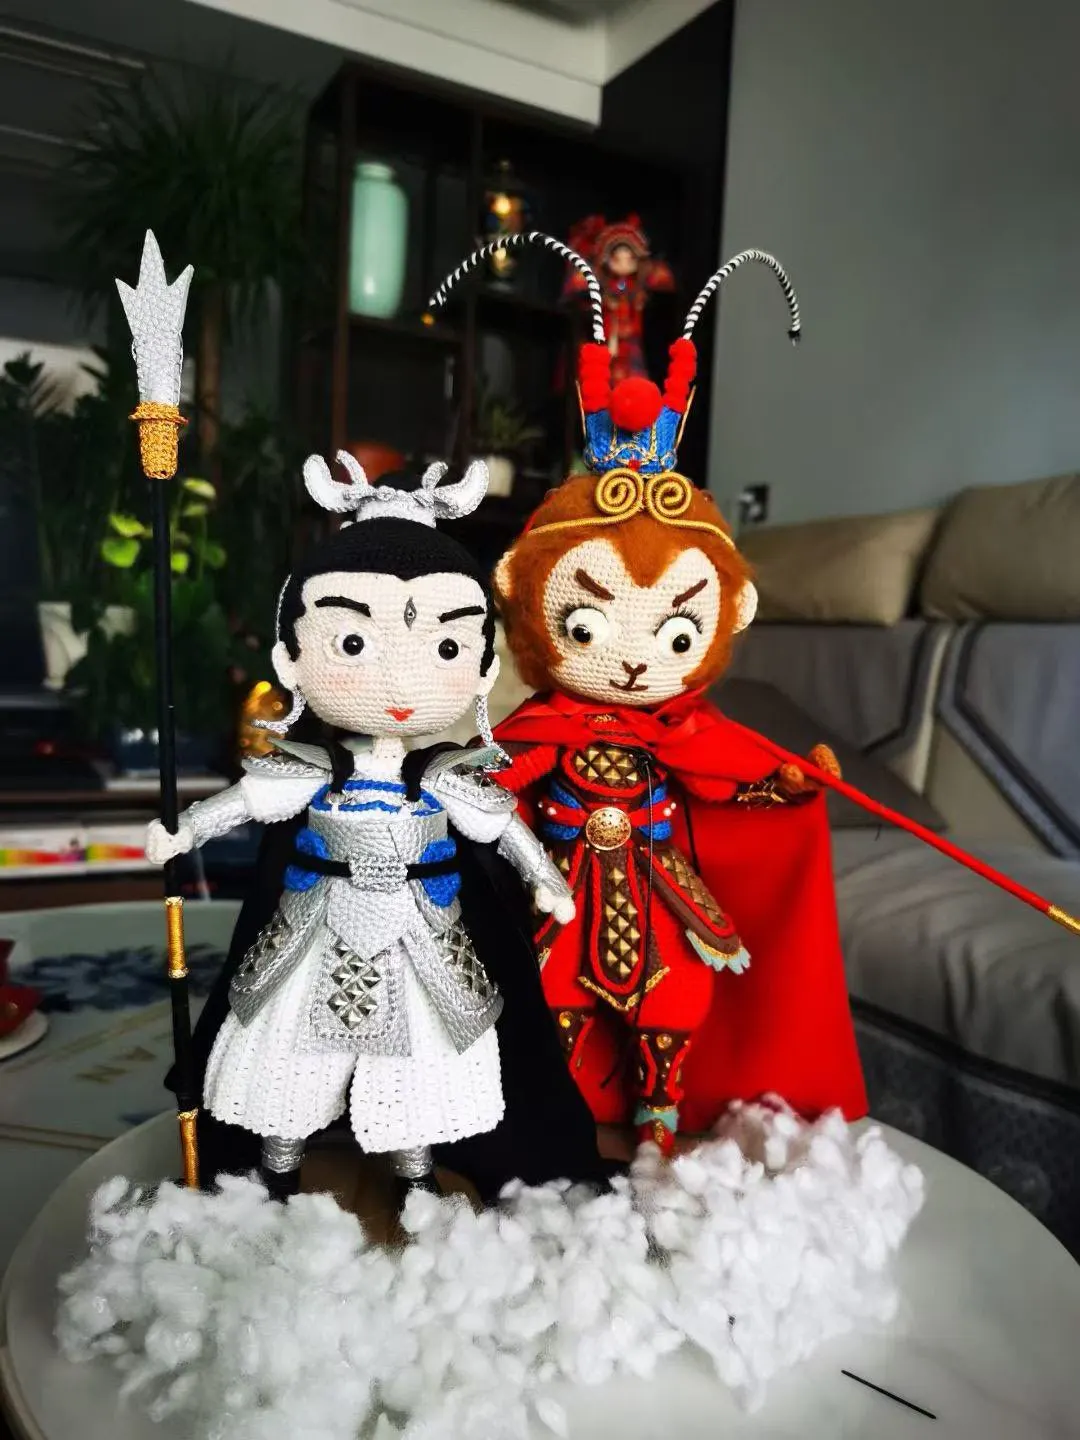
Erlang Zhenjun
Project preview
See the finished project
Pattern format
Instructions
Watch and follow
Video tutorial
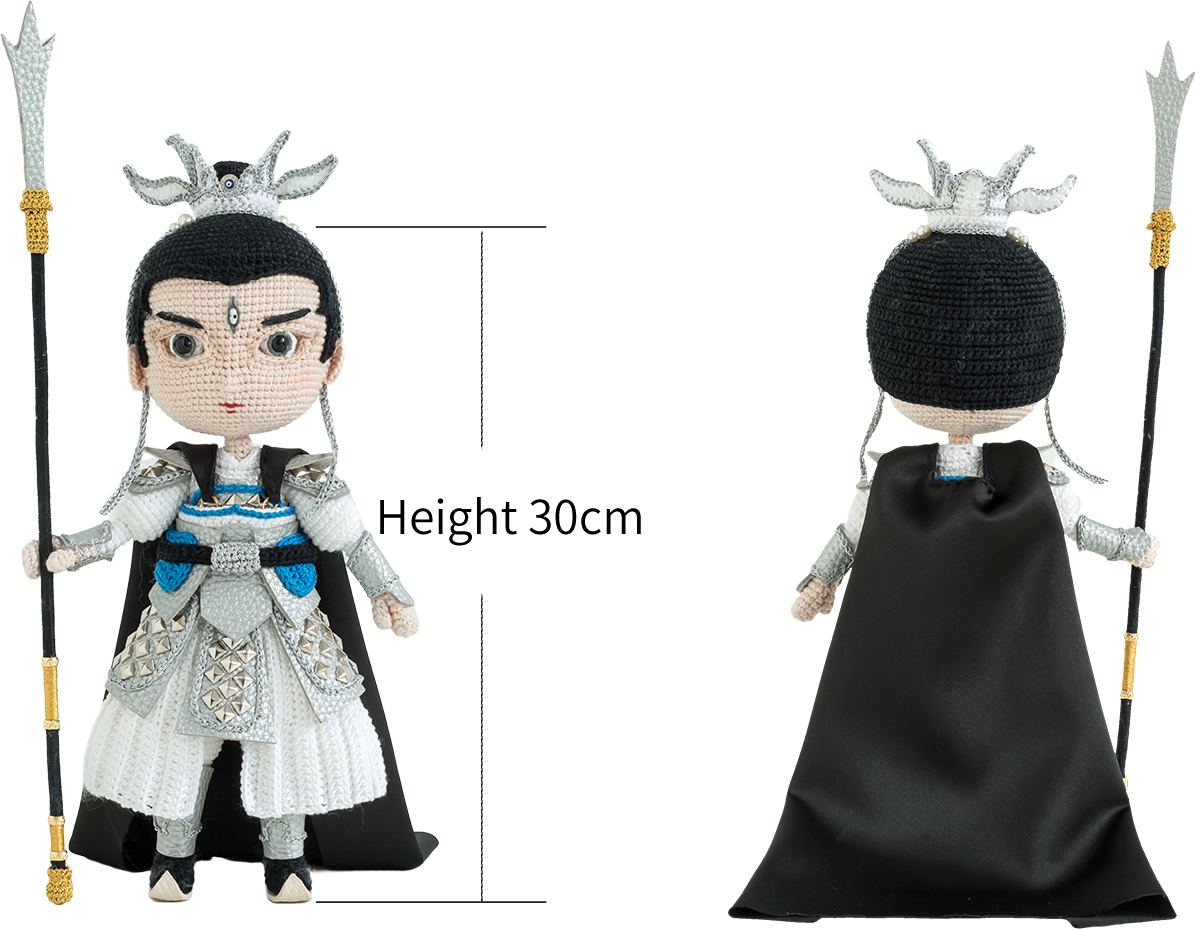
Due to variations in individual tension, the size of the sample is for reference only.
Materials: Combed 3# Lace
Hook: 1.75 mm crochet hook

ABBREVIATIONS
MRadjustable magic ring
Dao2start in 2nd CH from the hook
turnturn the piece
CHchain
V = sc2-in-12 single crochets into the same stitch
A = sc2toginvisible single crochet 2 stitches together
(...)×6crochet item in the parentheses six times
RRound
[...]in the same stitch
Fdouble crochet
Thalf double crochet
XX stitch single crochet
Kskip
FLOfront loop only
BLOback loop only
M = sc3togsingle crochet 3 stitches together
TA = hdc2toghalf double crochet 2 stitches together
W = sc3-in-13 single crochets into the same stitch
FA = dc2togdouble crochet 2 stitches together
SLslip stitch
HRow
Note:
1. This pattern is making in Chinese crochet pattern terms, and the stitch name is written using American terminology. All measurements in charts are in cm.
2. Working in joined round: When crocheting in rounds without further guidance, working in closed rounds, start each round with a set number of beginning chains and close with a slip stitch. The beginning chain preceding a single crochet and the slip stitch used for joining rounds are not included in the total stitches.

Part 1 Main pieceA
The main part includes: arms, legs, body, head, and ears.
Step 1 ArmsA1 00' 51'' (Part 1)
The arm includes the thumb and the arm itself. First, crochet the thumb separately, then crochet the arm, and during this process, you need to connect the thumb. Please refer to the video demonstration for more details.
| Arm×2 | ||||
| Part | Rounds | Stitch Instructions | Total Stitches | Color |
| Thumb | Cast on and R1 | MR, 5X | 5 |
25#Shee r Pink |
| R2—R3 | even 5X | 5 | ||
| Note: After completing, leave a 15cm yarn tail for sewing the thumb. | ||||
| Arm | Cast on and R1 | 5CH, Dao2, 3X, W, 2X, V | 10 | |
| R2—R6 | even 10X | 10 | ||
| R7 | X, connected to the thumb 2X, (K3, K3), 6X | 9 | ||
| R8 | even 9X | 9 | ||
| R9 | 5X, A, 2X | 8 | ||
| R10—R15 | even 8X | 8 | 01#Brilliant White | |
| R16 | FLO:8V | 16 | ||
| R17 | (X, V)×8 | 24 | ||
| R18—R19 | even 24X | 24 | ||
| R20 | (2X, A, 2X)×4 | 20 | ||
| R21—R22 | even 20X | 20 | ||
| R23 | (3X, A)×4 | 16 | ||
| R24—R25 | even 16X | 16 | ||
| R26 | (X, A, X)×4 | 12 | ||
| Note: Change colors at R10 while crocheting; after completion, leave a 15cm yarn tail for sewing underarm. | ||||
Step 2 LegsA2 23' 43'' (Part 1)
The legs include the calf and pant leg. Work in rounds using the magic ring method. Please refer to the video demonstration for more details.
| Leg×2 | ||||
| Part | Rounds | Stitch Instructions | Total Stitches | Color |
| Calf | Cast on and R1 | MR, 8X | 8 | 01#Brilliant White |
| R2—R3 | even 8X | 8 | ||
| R4 | (3X, V)×2 | 10 | ||
| R5—R7 | even 10X | 10 | ||
| R8 | (2X, V, 2X)×2 | 12 | ||
| R9—R11 | even 12X | 12 | ||
| R12 | (5X, V)×2 | 14 | ||
| Pant Leg | R13—R15 | even 14X | 14 | |
| R16 | FLO:(X, V)×7 | 21 | ||
| R17 | (X, V, X)×7 | 28 | ||
| R18 | (3X, V, 3X)×4 | 32 | ||
| R19 | (7X, V)×4 | 36 | ||
| R20 | (4X, V, 4X)×4 | 40 | ||
| R21—R23 | even 40X | 40 | ||
| R24 | 19X, A, 19X | 39 | ||
| R25 | even 39X | 39 | ||
| R26 | 18X, A, 19X | 38 | ||
| R27 | even 38X | 38 | ||
| R28 | 18X, A, 18X | 37 | ||
| R29 | even 37X | 37 | ||
| R30 | 16X, A, X, A, 16X | 35 | ||
| R31 | even 35X | 35 | ||
| R32 | 15X, A, X, A, 15X | 33 | ||
| R33 | even 33X | 33 | ||
| R34 | 15X, A, 16X | 32 | ||
| R35 | even 32X | 32 | ||
| R36 | 14X, 2A, 14X | 30 | ||
| R37 | even 30X | 30 | ||
| R38 | 14X, A, 14X | 29 | ||
| Note: After completing one leg, break the yarn. Don't cut the yarn for the other leg, continue crocheting. | ||||
Step 3 BodyA3 26' 37'' (Part 1)
Join the two legs together and continue crocheting upwards along the two legs. During this process, attach the arms while crocheting, and you need to add stuffing and shaping wire as you go. Please refer to the video demonstration for more details.
| Body | |||
| Rounds | Stitch Instructions | Total Stitches | Color |
| R1 | Connect the two legs, (12X, 2A, 13X)×2 | 54 | 01#Brilliant White |
| R2 | 12X, A, 25X, A, 13X | 52 | |
| R3 | (11X, A)×4 | 48 | |
| R4 | (5X, A, 5X)×4 | 44 | |
| R5 | (9X, A)×4 | 40 | |
| R6 | (4X, A, 4X)×4 | 36 | |
| R7 | (7X, A)×4 | 32 | |
| R8—R14 | even 32X | 32 | |
| R15 | 9X, V, 15X, V, 6X | 34 | |
| R16 | even 34X | 34 | |
| R17 | 9X, V, 17X, V, 6X | 36 | |
| R18 | even 36X | 36 | |
| R19 | 9X, Work 9 stitches across the 5th stitch on the arm, K3, K3, 16X, Work 9 stitches across the 5th stitch on the arm, K3, K3, 5X |
48 | |
| R20 | (3X, A, 3X)×6 | 42 | |
| R21 | (5X, A)×6 | 36 | |
| R22 | (2X, A, 2X)×6 | 30 | |
| R23 | (3X, A)×6 | 24 | |
| R24 | BLO:(X, K, 2X)×6 | 18 | 25#Sheer Pink |
| R25 | (X, A)×6 | 12 | |
| R26 | (X, A)×4 | 8 | |
| R27—R36 | 8X | 8 | |
| Note: After completing R6, stuff and add a shaping wire of about 120cm, then continue to stuff as you go while crocheting; after R19, attach the arms, add a shaping wire of about 40cm and stuff. Refer to the video demonstration for specifics. | |||
Step 4 HeadA4 50' 10'' (Part 1)
The head is crocheted in rounds starting with a magic ring, and stuffing needs to be added during the process. Please refer to the video demonstration for more details.
| Head | |||
| Rounds | Stitch Instructions | Total Stitches | Color |
| Cast on and R1 | MR, 6X | 6 | 25#Sheer Pink |
| R2 | 6V | 12 | |
| R3 | (X, V)×6 | 18 | |
| R4 | (X, V, X)×6 | 24 | |
| R5 | (3X, V)×6 | 30 | |
| R6 | (2X, V, 2X)×6 | 36 | |
| R7 | (5X, V)×6 | 42 | |
| R8 | (3X, V, 3X)×6 | 48 | |
| R9 | (7X, V)×6 | 54 | |
| R10 | (4X, V, 4X)×6 | 60 | |
| R11 | (9X, V)×6 | 66 | |
| R12 | (5X, V, 5X)×6 | 72 | |
| R13 | (11X, V)×6 | 78 | |
| R14—R21 | even 78X | 78 | |
| R22 | (37X, A)×2 | 76 | |
| R23 | 26X, K4, BLO:[12F], K4, 6X, K4, BLO:[12F], K4, 26X |
82 | |
| R24—R25 | even 82X | 82 | |
| R26 | 26X, 3CH, double crochet 12 stitches together, 3CH, 6X, 3CH, double crochet 12 stitches together, 3CH, 26X |
72 | |
| R27 | 26X, 3X, BLO:X, 3X, 6X, 3X, BLO:X, 3X, 26X |
72 | |
| R28 | 32X, A, X, [X, FLO:X], [FLO:X, X], X, A, 32X |
72 | |
| R29 | 35X, [X, FLO:X], [FLO:X, X], 35X | 74 | |
| R30 | 10X, A, 14X, V, X, V, 16X, V, X, V, 14X, A, 10X |
76 | |
| R31 | 36X, sc4-in-1, 36X | 73 | |
| R32 | 20X, (X, A, X)×3, 9X, (X, A, X)×3, 20X |
67 | |
| R33 | (A, 9X)×3, X, (9X, A)×3 | 61 | |
| R34 | even 61X | 61 | |
| R35 | (5X, A)×4, 5X, (A, 5X)×4 | 53 | |
| R36 | (3X, A, 3X)×3, 5X, (3X, A, 3X)×3 | 47 | |
| R37 | (5X, A)×3, 2X, W, 2X, (A, 5X)×3 | 43 | |
| R38 | (A, 3X)×4, 3X, (3X, A)×4 | 35 | |
| R39 | (3X, A)×3, X, M, X, (A, 3X)×3 | 27 | |
| R40 | (X, A)×9 | 18 | |
| R41 | (X, A)×6 | 12 | |
| R42—R43 | even 12X | 12 | |
| Eye Socket | refer to the video demonstration | ||
| Note: [] indicates stitches worked in the same stitch; stuffing needs to be added while crocheting; after completion, threads need to be pulled at the eye socket area, refer to the video demonstration for more details. |
|||
Step 5 EarsA5 94' 21'' (Part 1)
After crocheting the ears, sew them symmetrically on both sides of the head. Please refer to the video demonstration formore details.
| Ear×2 | Stitch Instructions | Color | |
| 7CH, Dao3, 4T, [T, 2CH, SL] | 25#Sheer Pink | ||
| Note: [] indicates stitches worked in the same stitch; after completing, leave a 15cm yarn tail for sewing. | |||
Part 2 Hair accessoriesB
Hair accessories include: hair and hair crown.
Step 1 HairB1 101' 11'' (Part 1)
The hair is divided into a wig and a bun. The wig starts with a magic ring, crocheting in rounds counterclockwise until round 16, then begins crocheting back and forth in rows. It's finally assembled. Please refer to the video demonstration for more details.
| Hair | ||||
| Part | Rounds/Rows | Stitch Instructions | Total Stitches | Color |
| Wig | Cast on and R1 | MR, 6X | 6 | 4#Black Beauty |
| R2 | 6V | 12 | ||
| R3 | (X, V)×6 | 18 | ||
| R4 | (X, V, X)×6 | 24 | ||
| R5 | (3X, V)×6 | 30 | ||
| R6 | (2X, V, 2X)×6 | 36 | ||
| R7 | (5X, V)×6 | 42 | ||
| R8 | (3X, V, 3X)×6 | 48 | ||
| R9 | (7X, V)×6 | 54 | ||
| R10 | (4X, V, 4X)×6 | 60 | ||
| R11 | (9X, V)×6 | 66 | ||
| R12 | (5X, V, 5X)×6 | 72 | ||
| R13 | (11X, V)×6 | 78 | ||
| R14—R16 | even 78X | 78 | ||
| H17 | even 50X | 50 | ||
| H18—H21 | CH, turn, even 50X(break the yarn) | 50 | ||
| H22 | turn, K3, 44X, K3 | 44 | ||
| H23 | CH, turn, K, 41X, K, X | 42 | ||
| H24 | CH, turn, K, 39X, K, X | 40 | ||
| H25 | CH, turn, K, 37X, K, X | 38 | ||
| H26 | CH, turn, K, 35X, K, X | 36 | ||
| H27 | CH, turn, K, 33X, K, X | 34 | ||
| H28 | CH, turn, K, 31X, K, X | 32 | ||
| H29 | CH, turn, K, 29X, K, X | 30 | ||
| H30 | CH, turn, K, 27X, K, X | 28 | ||
| R31 edging | CH, turn, 51X, 5T, 2F, 5T, 23X | 86 | ||
| R32 edging | 36X, [T, 5CH, Dao2, SL, 3T, TA], X, [X, 3CH, Dao3, X, X], 11X, 5T, FA, 5T, 11X, [X, 3CH, Dao3, X, X], X, [TA, 5CH, Dao2, SL, 3T, T], 8X | |||
| Note: [] indicates stitches worked in the same stitch; [] counts as 2 single crochet stitches. Please refer to the video demonstration for specifics. |
||||
| Ponytail | Cast on and R1 | MR, 6X | 6 | |
| R2 | 6V | 12 | ||
| R3 | (X, V)×6 | 18 | ||
| R4 | (X, V, X)×6 | 24 | ||
| R5—R6 | even 24X | 24 | ||
| R7 | (2X, A, 2X)×4 | 20 | ||
| R8—R9 | even 20X | 20 | ||
| Note: After completion, leave a 30cm yarn tail for sewing and to add stuffing. | ||||
Step 2 Hair CrownB2 15' 52'' (Part 2)
The hair crown consists of four parts: Piece One, Piece Two, Piece Three, and ties. Complete each part separately first, then assemble them together. Please refer to the video demonstration for more details.
| Headband | ||||
| Part | Rows | Stitch Instructions | Total Stitches | Color |
| Piece 1 | Cast on and H1 | 25CH, Dao2, 24X | 24 | 01#Brilliant White |
| H2 | CH, turn, even 24X | 24 | ||
| H3 | 4CH, Dao2, SL, 2X, turn, K, SL, 7CH, Dao2, SL, 5X, K, SL, 11CH, Dao2, SL, 2X, 3T, 4F, K2, SL, 7CH, Dao2, SL, 5X, K, SL, 5CH, Dao2, SL, 3X, K, 2SL, 5CH, Dao2, SL, 3X, K, SL, 7CH, Dao2, SL, 5X, K, SL, 11CH, Dao2, SL, 2X, 3T, 4F, K2, SL, 7CH, Dao2, SL, 5X, K, SL, 4CH, Dao2, SL, 2X, K, SL | |||
| Piece 2×2 | 13CH, Dao2, SL, 2X, V, 2T, FA, CH, F, T, X, SL | |||
| Piece 3 | Cast on and H1 | 28CH, Dao2, 27X | 27 | |
| H2 | CH, turn, 5X, (carrying the yarn across)K3, 19X(break the yarn) | 24 | ||
| H3 | Work from the 20th stitch of R2, 3X | 3 | ||
| H4—H9 | CH, turn, even 3X | 3 | ||
| H10 | CH, turn, K, X, SL | 2 | ||
| Note: After completing, leave yarn tails for sewing and use a single strand of silver yarn to wrap the thin wire for edging decoration.Please refer to the video demonstration for more details. | ||||
| Ties | For the ties, use two strands of silver yarn. Refer to the video demonstration for the specific making method. | |||
| Belt | ||||
| Part | Rows | Stitch Instructions | Total Stitches | Color |
| Piece 1 | Cast on and H1 | 7CH, Dao2, 6X | 6 | 16#French Blue |
| H2 | CH, turn, even 6X | 6 | ||
| H3 | CH, turn, K, 3X, K, X | 4 | ||
| H4—H30 | CH, turn, even 4X | 4 | ||
| H31 | CH, turn, V, 2X, V | 6 | ||
| H32 | CH, turn, even 6X | 6 | ||
| Edging | CH, turn, 5X, V, 31X, V, 4X, V, 31X, X | |||
| Piece 2 | Cast on and H1 | 46CH, Dao2, 45X | 45 | 24#Black Beauty |
| H2 | CH, turn, even 45X | 45 | ||
| Note: After completing, leave a 15cm yarn tail for sewing. | ||||
| Piece 3 | Cast on and H1 | 7CH, Dao2, 6X | 6 | two strands of silver yarn |
| H2—H7 | CH, turn, even 6X | 6 | ||
| Note: After completing, leave a 15cm yarn tail for sewing. | ||||
Part 3 ClothingC
The clothing section includes: garments, collars, shoes, armor, and capes.
Step 1 GarmentC1 54' 43'' (Part 2)
Divide into three parts: waist section one, waist section two, and hem. The hem is further divided into hem one and hem two. Both waist section one and waist section two are worked back and forth. The hem requires crocheting two pieces, both of which involve picking up strands from the last row of waist section two to crochet. After crocheting is finished, sew together the back seam. Please refer to the video demonstration for more details.
| Garment | ||||
| Part | Rows | Stitch Instructions | Total Stitches | Color |
| Waist 1 | Cast on and H1 | 33CH, Dao2, 32X | 32 | 01#Brilliant White |
| H2 | CH, turn, even 32X | 32 | ||
| H3 | CH, turn, 2X, (3X, V, 3X)×4, 2X | 36 | ||
| H4 | CH, turn, even 36X | 36 | ||
| H5 | CH, turn, 3X, (2X, V, 2X)×6, 3X | 42 | ||
| H6 | CH, turn, even 42X | 42 | ||
| H7 | CH, turn, 20X, 2V, 20X | 44 | ||
| Note: After completing, leave a 20cm yarn tail for sewing together the back; blue lace yarn for decorative elements with slip stitch. | ||||
| Waist 2 | H1 | (Work from the waist 1, crochet on the chain stitches cast on together )32X | 32 | |
| H2 | CH, turn, even 32X | 32 | ||
| H3 | CH, turn, 2X, (3X, V, 3X)×4, 2X | 36 | ||
| H4 | CH, turn, even 36X | 36 | ||
| H5 | CH, turn, 3X, (2X, V, 2X)×6, 3X | 42 | ||
| H6 | CH, turn, even 42X | 42 | ||
| H7 | CH, turn, (3X, V, 3X)×6 | 48 | ||
| H8 | CH, turn, even 48X(break the yarn) | 48 | ||
| Hem 1 | H1 | (Work from the 3rd hook of the second H8 on the waist 2) 24CH, make 3CH, Dao4, 10F, 7T, 7X |
25 | |
| H2 | BLO:CH, turn, 7X, 7T, 11F, | 25 | ||
| H3 | BLO:3CH, turn, 10F, 7T, 7X | 25 | ||
| H4—H19 | Referring to the stitch patterns of H2 and H3, crochet following their sequence, with a slip stitch Join at the ending of each row, skipping 1 stitch in between. | |||
| Hem 2 | Cast on and H1 | (Work from the 27th stitch of section H8 at the waist) 24CH, make 3CH, Dao4, 10F, 7T, 7X |
25 | |
| H2 | BLO:CH, turn, 7X, 7T, 11F, | 25 | ||
| H3 | BLO:3CH, turn, 10F, 7T, 7X | 25 | ||
| H4—H19 | Referring to the stitch patterns of H2 and H3, crochet following their sequence, and at the end of each row, Join with a slip stitch with an interval of 1 stitch. | |||
| Note: 3CH counts as 1 double crochet stitch; refer to the video demonstration for more details. | ||||
Step 2 CollarC1, ShoesC2 64' 59'' (Part 2)
The collar is crocheted by picking up half loops from the body. The shoes are divided into the main part and decorations. Crochet the main part first, then make the sole decorations. Please refer to the video demonstration for more details.
| Collar | Stitch Instructions | Color | |
| (Start at the center position of the front loop on row 23 of the body.) CH, X, 2T, 4FA, F, 4FA, 2T, X | 01#Brilliant White | ||
| Shoe×2 | |||
| Rounds | Stitch Instructions | Total Stitches | Color |
| Cast on and R1 | 8CH, Dao2, 6X, W, 5X, V | 16 | 24#Black Beauty |
| R2 | V, 5X, 3V, 5X, 2V | 22 | |
| R3 | BLO:7X, T, 2FA, T, 9X | 20 | |
| R4 | 6X, 3A, 6X, A | 16 | |
| R5 | 4X, A, M, A, 5X | 12 | |
| R6 | 4X, A, 6X | 11 | |
| Note: After completion, add stuffing and make the shoe sole, refer to the video demonstration for details. | |||
Step 3 ArmorC3, CloakC4 71' 54'' (Part 2)
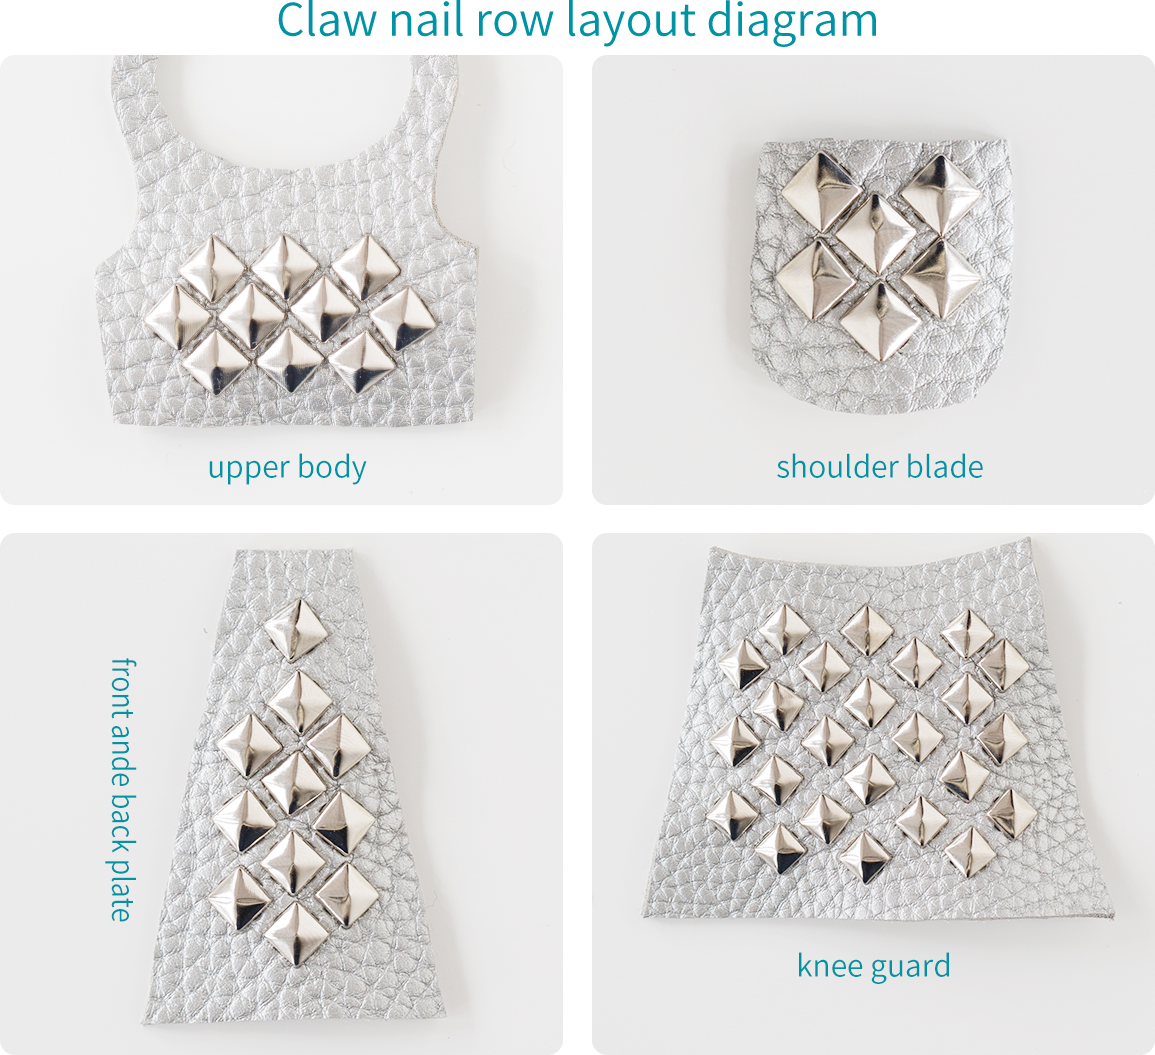
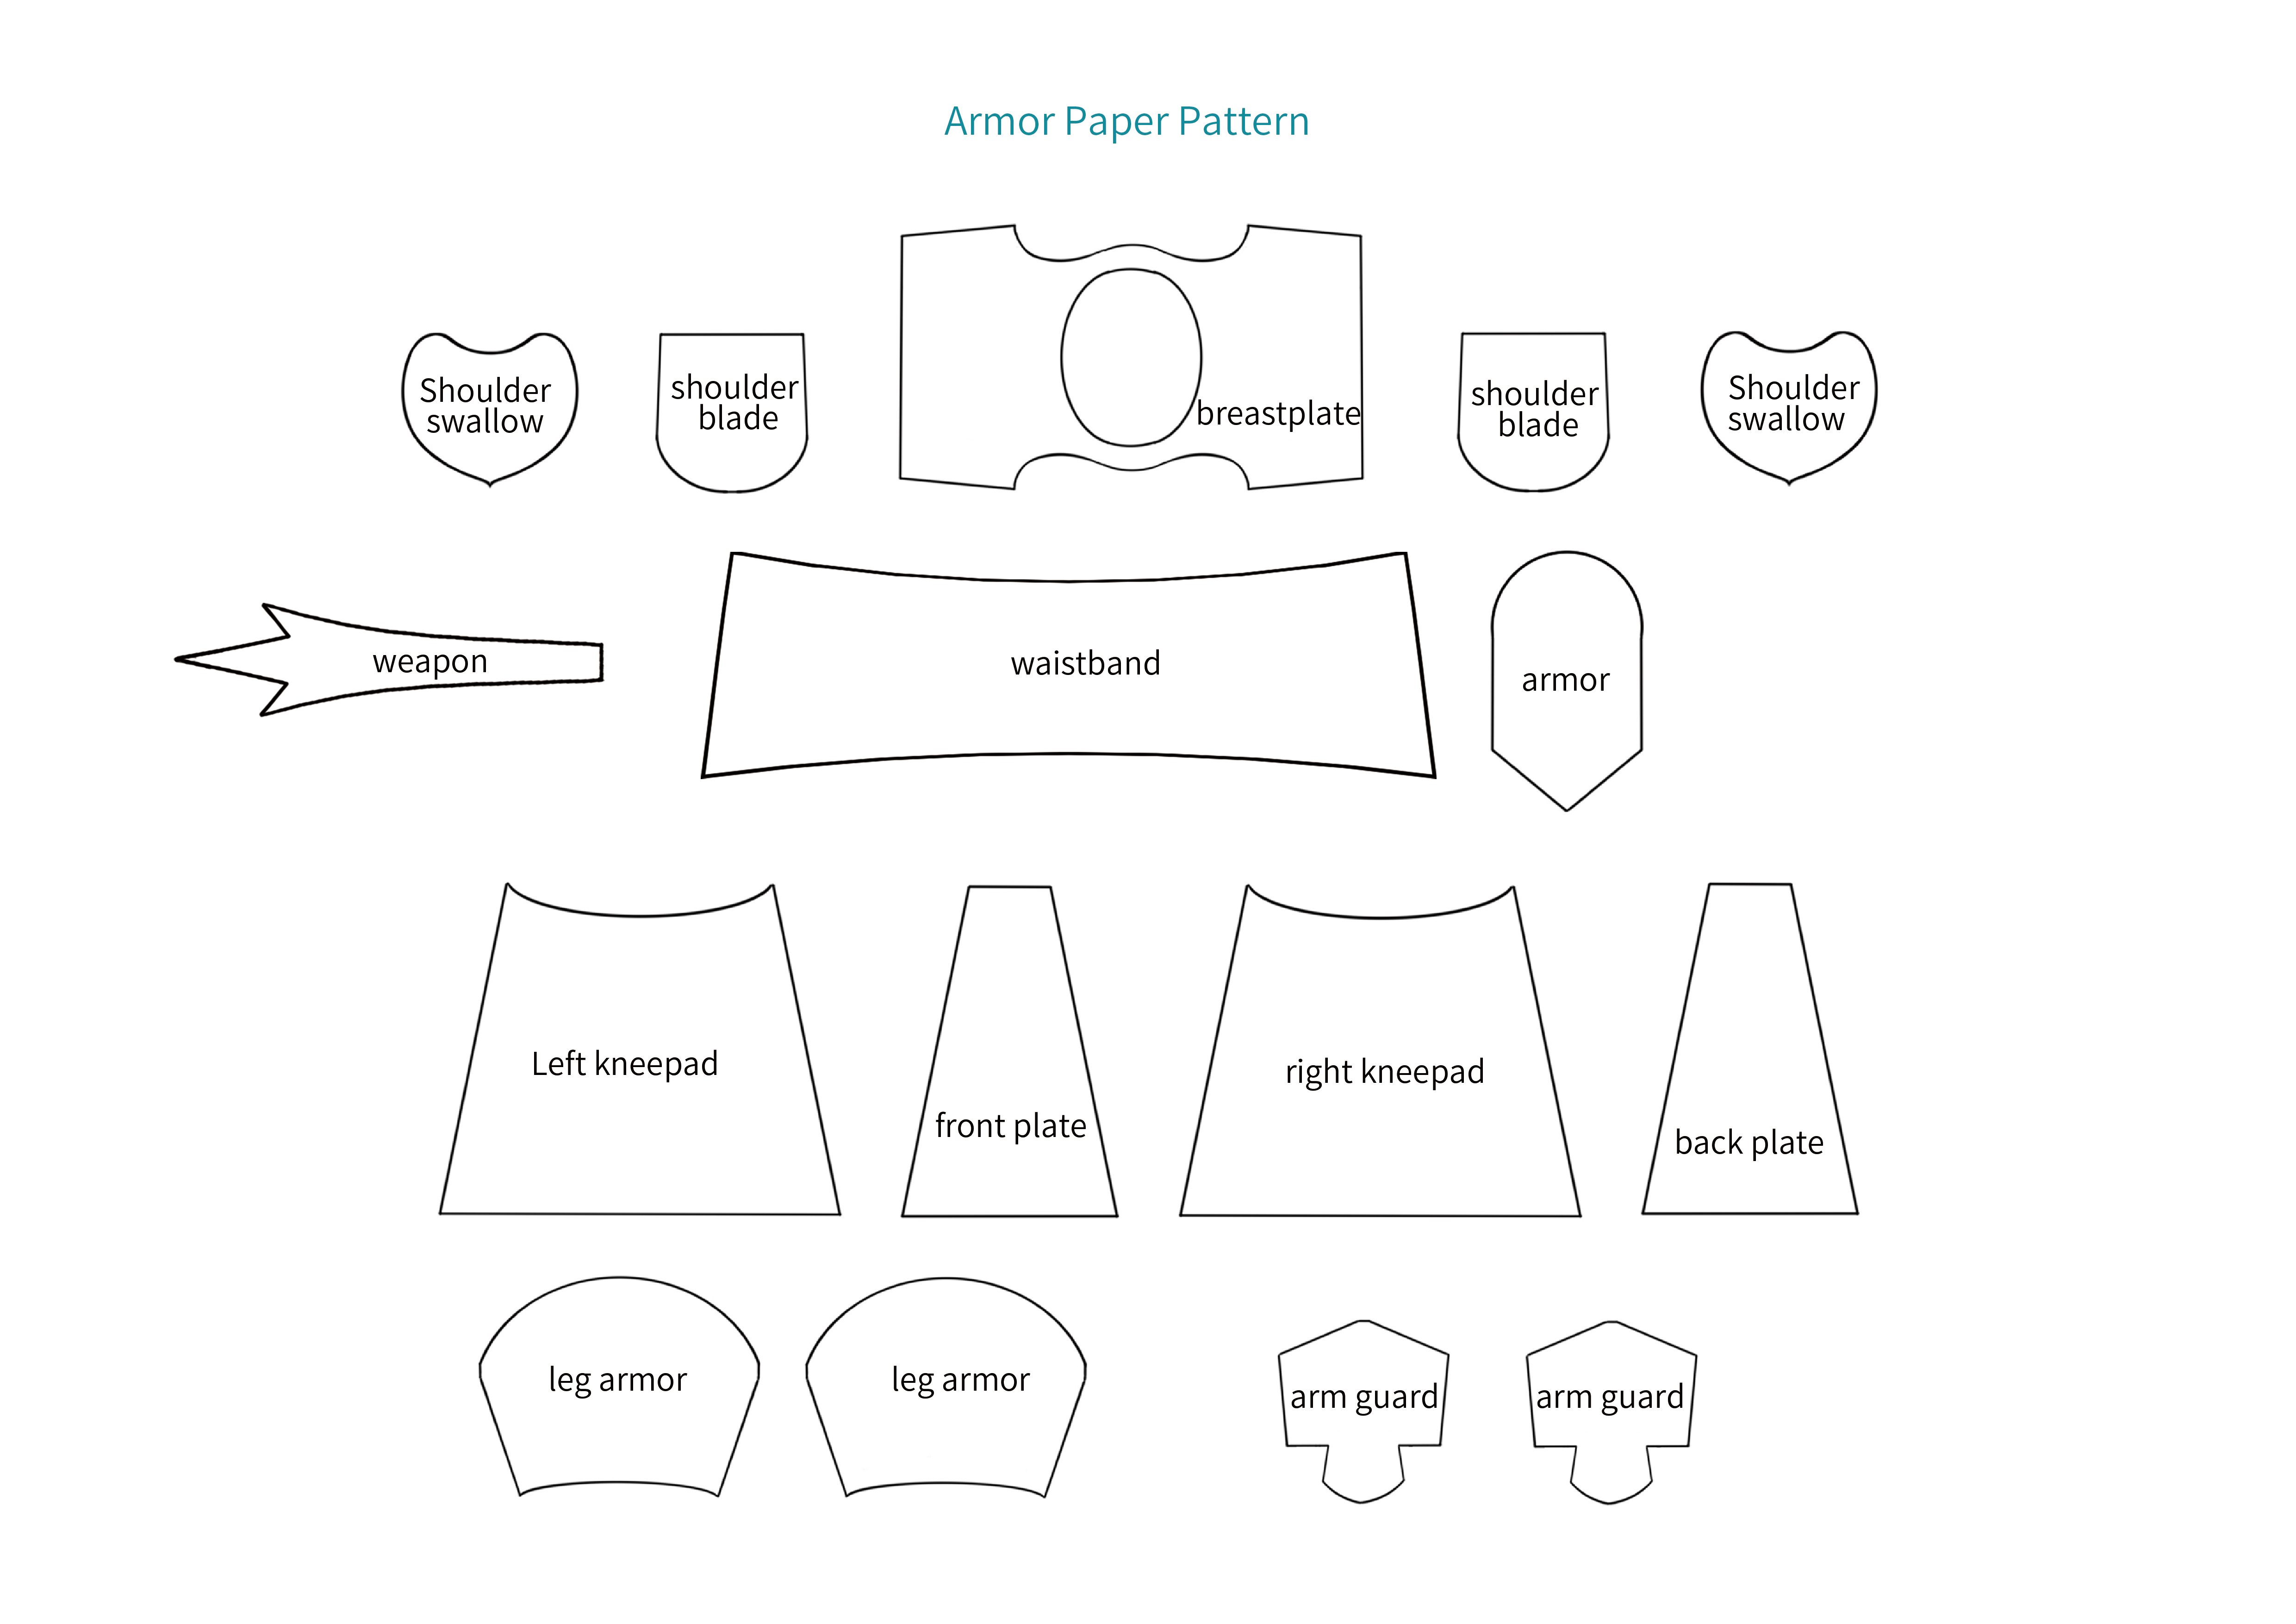
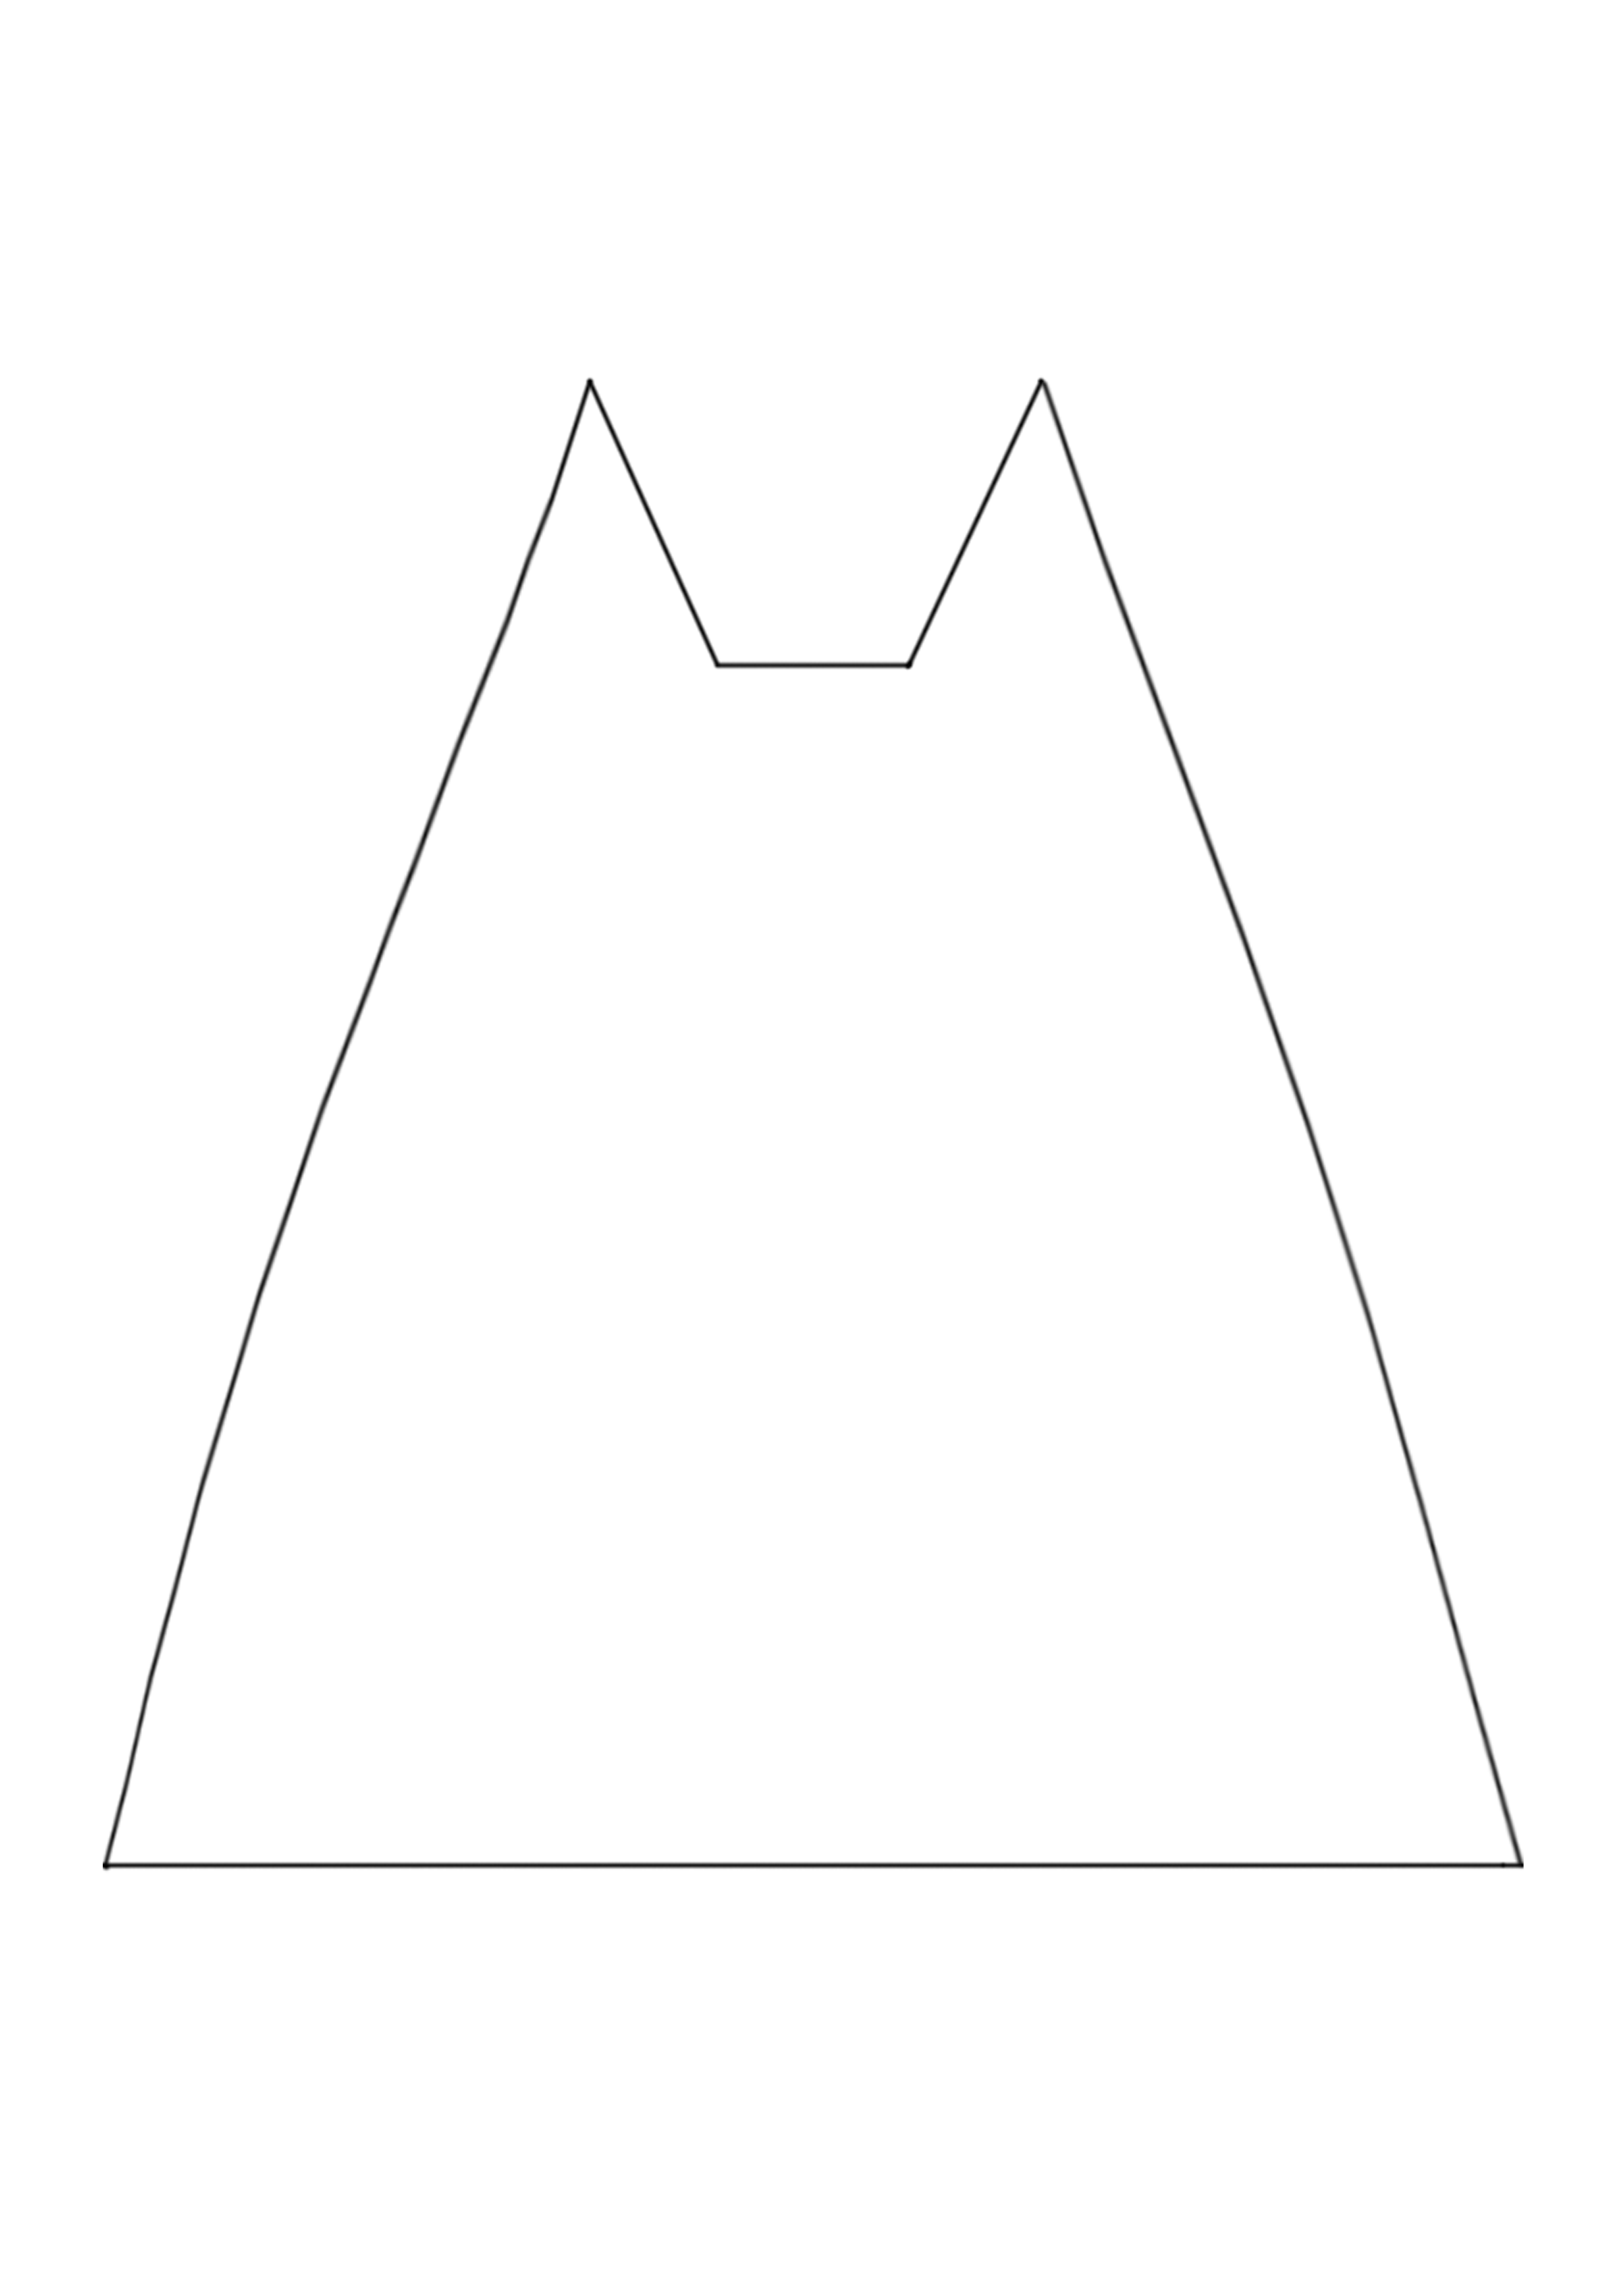
Cut out each section of the armor according to the paper pattern, then attach the surface decorations, arranging the studs according to the diagram. Next, crochet the belt section, and finally secure all parts to the body. For the cloak, cut it out according to the pattern first, then sew it together, and attach it to the garment. Please refer to the video demonstration for more details.
Part 4 Facial Decorations and WeaponsD
Step 1 Facial DecorationsD1 99' 52'' (Part 2)
Facial decorations, including the eyeballs and the eyes on the forehead, mouth, eyebrows, and finally apply blush and eyeshadow. Please refer to the video demonstration for more details.
| Eyeball×2 | |||
| Rounds | Stitch Instructions | Total Stitches | Color |
| Cast on and R1 | MR, 6X | 6 | 01#Brilliant White |
| R2 | 6V | 12 | |
| R3 | (2X, V)×4 | 16 | |
| R4 | 8A | 8 | |
| Note: After completion, add stuffing and decorations. Refer to the video demonstration for more details. | |||
Step 2 WeaponD2 111' 18'' (Part 2)
First, complete the crocheted sections, then cut out the required pieces according to the pattern, and finally wrap and assemble the parts with shaping wire. Please refer to the video demonstration for more details.
| Weapon | ||||
| Part | Rows/Rounds | Stitch Instructions | Total Stitches | Color |
| Part 1 | Cast on and H1 | 10CH, Dao2, 9X | 2 | a single strand of gold thread |
| H2—H8 | CH, turn, even 9X | 9 | ||
| H9 | BLO:CH, turn, even 9X | 9 | ||
| H10 | CH, turn, even 9X | 9 | ||
| H11 | H8(FLO):9V | 18 | ||
| Note: Leave a 15cm tail for sewing. | ||||
| Part 2 | Cast on and R1 | MR, 7X | 7 | |
| R2 | 7V | 14 | ||
| R3—R4 | even 14X | 14 | ||
| R5 | 7A | 7 | ||
| R6 | FLO:7V | 14 | ||
| Note: After completion, add the stuffing. | ||||
Made by the community