Doll
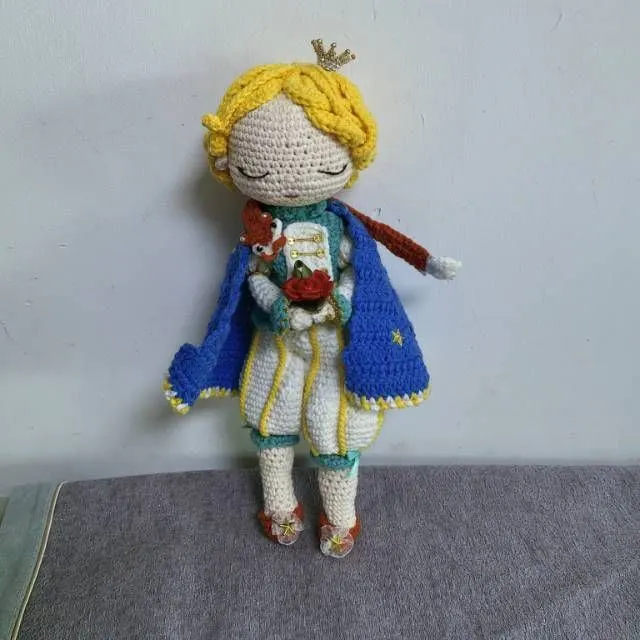
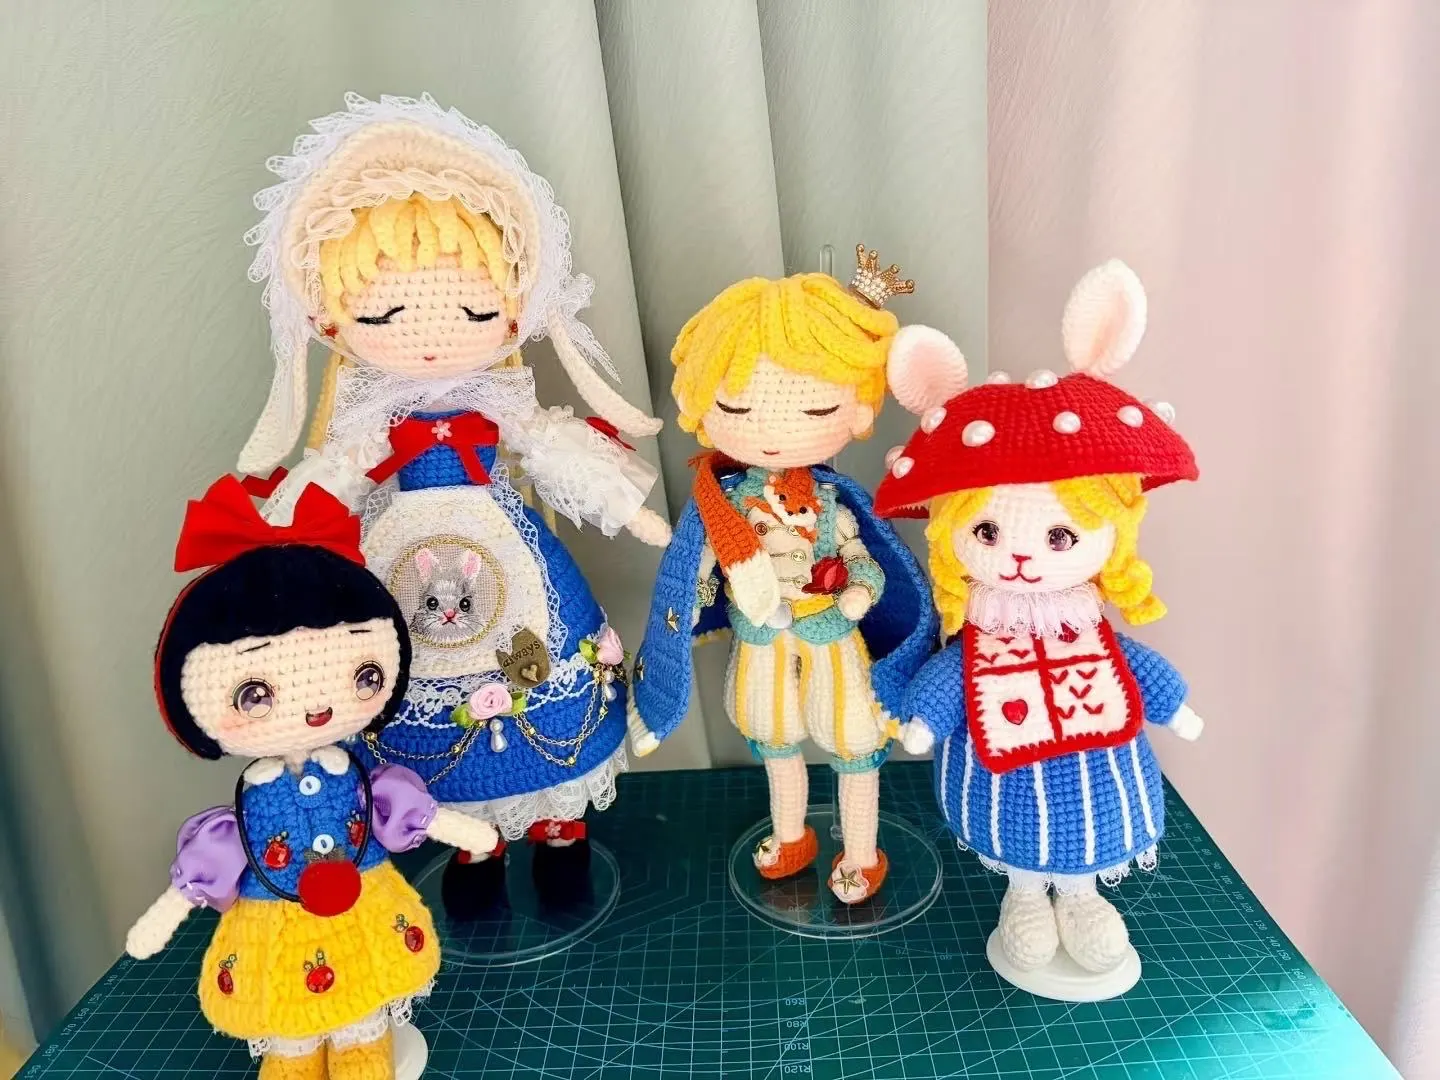
Little Prince Doll
Project preview
See the finished project
Pattern format
Instructions
Watch and follow
Video tutorial
This doll consists of the arms, legs, body, head, facial features, hair, cloak, scarf, pants, shoes, top and decorations.
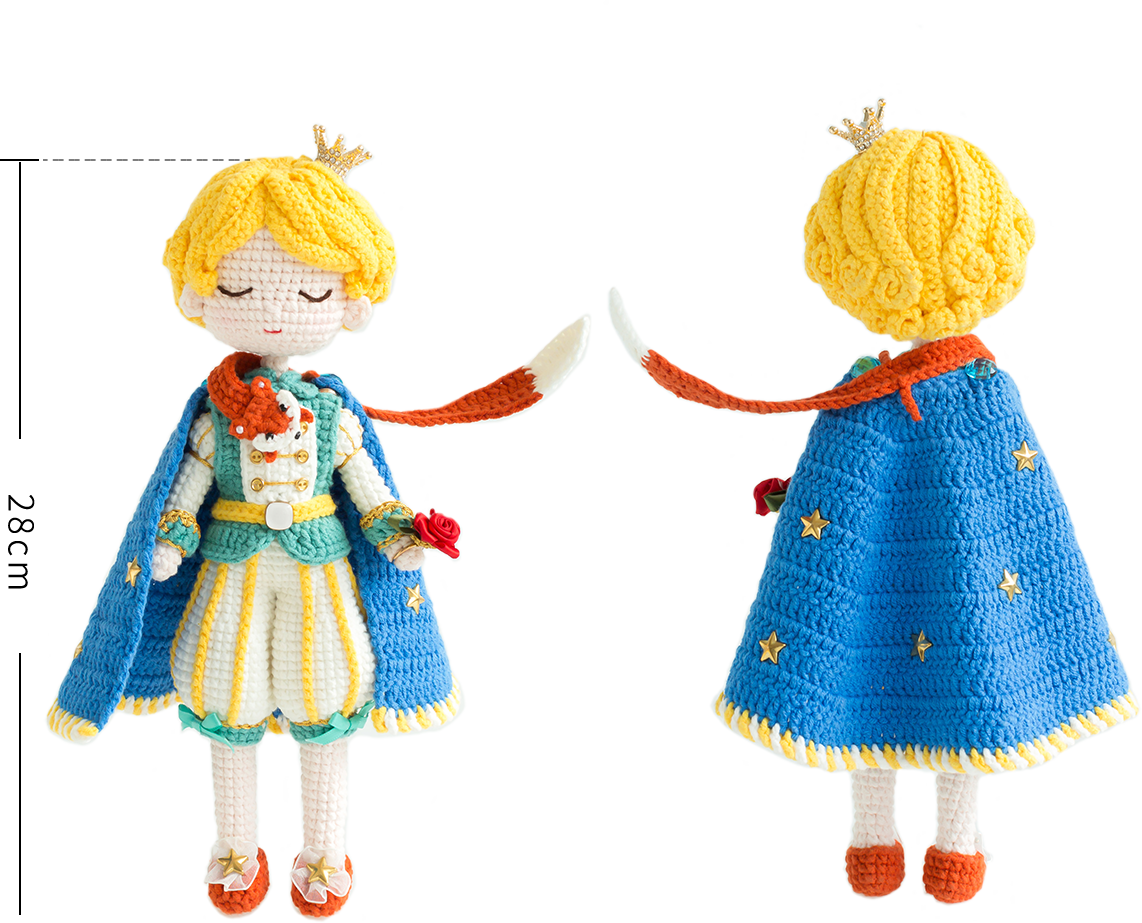
The handcrafted measurements may have an error of 1 to 2cm. Due to variations in individual tension, the size of the sample is for reference only.
Materials: 4-Ply Combed Cotton & Acrylic Fibre Hand Knitting Yarn
Hook: 2.00mm crochet hook
Note:
1.This pattern is making in Chinese crochet pattern terms, and the stitch name is written using American terminology. All measurements in charts are in cm.
2.Working in spiral round When crocheting in spiral rounds, each round working without beginning chain and slip stitch to joining the rounds. instead, work directly into the next stitch.
3.Working in joined round When crocheting in joined rounds, working in closed rounds, start each round with a set number of beginning chains and close with a slip stitch. The beginning chain preceding a single crochet and the slip stitch used for joining rounds are not included in the total stitches.
ABBREVIATIONS
MRadjustable magic ring
CHchain
Sslip stitch
XX stitch single crochet
A = sc2toginvisible single crochet 2 stitches together
V = sc2-in-12 single crochets into the same stitch
W = sc3-in-13 single crochets into the same stitch
Thalf double crochet
TV = hdc2-in-12 half double crochets into the same stitch
Fdouble crochet
FA = dc2togdouble crochet 2 stitches together
FW = dc3-in-13 double crochets into the same stitch
Kskip
BLOback loop only
FLOfront loop only
(...)×6crochet item in the parentheses six times
[...]in the same stitch
[2CH, SL]CH2-picot:chain 2, and then join with one slip stitch into both the front loop of the previous stitch and the front leg strand of the previous stitch.
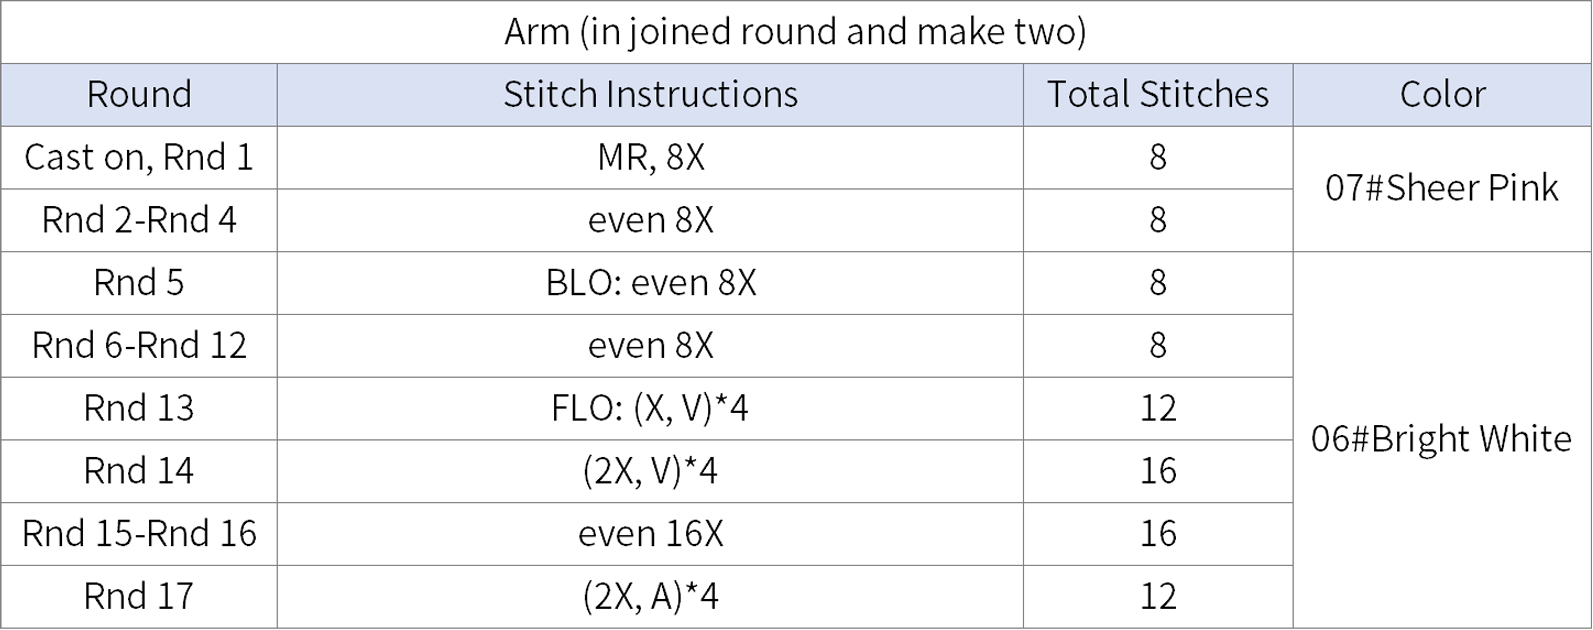
Part 1 ArmsA1 01' 02'' (Part 1)
The Arm is started with a magic ring. Crochet in rounds counterclockwise. Please refer to the video demonstration for more details.
Part 2 LegsA2 20' 08'' (Part 1)
The leg is divided into the left leg and the right leg. Both legs begin with a foundation chain. Starting from the chain crochet in spirals, add in the shaping wire as you go. All previous steps remain the same, only the final round slightly different. Please refer to the video demonstration for more details.
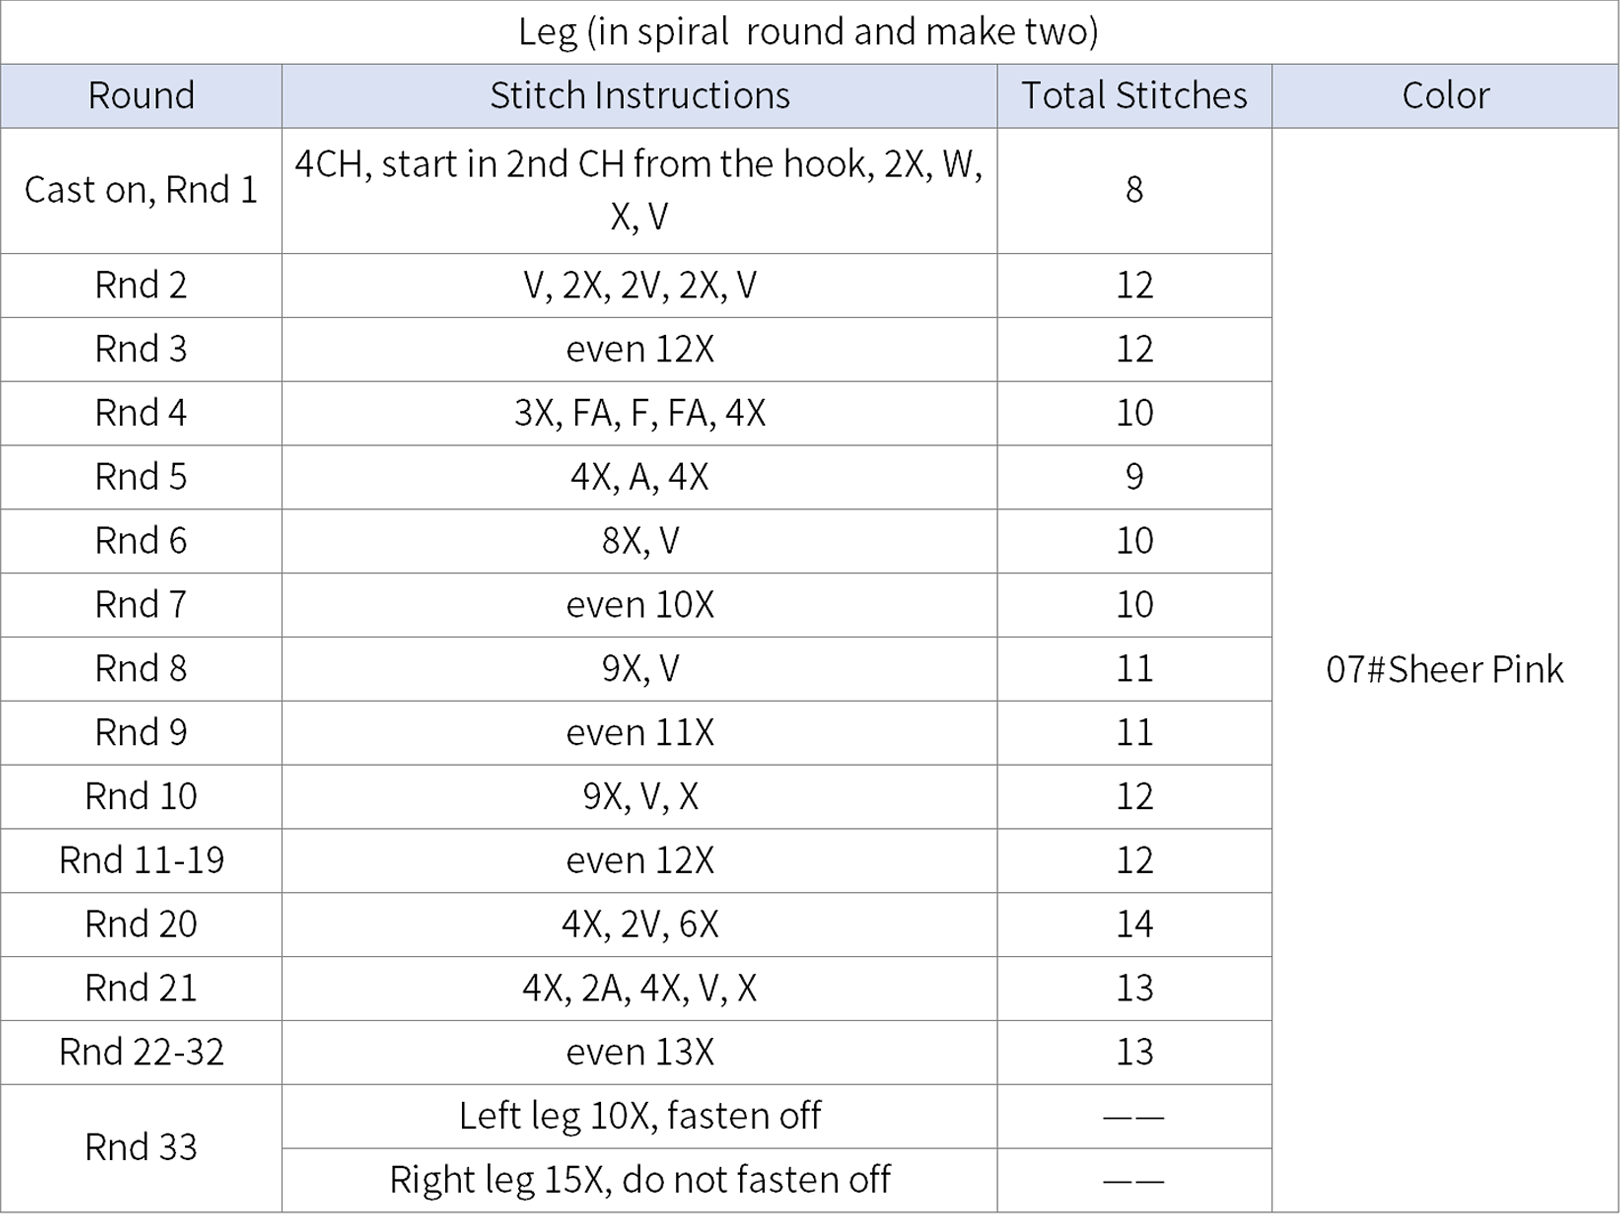
Part 3 BodyA3 35' 33'' (Part 1)
Join the two legs together, continue crocheting upwards. Work until you reach the point, then attach the arms. Please refer to the video demonstration for more details.
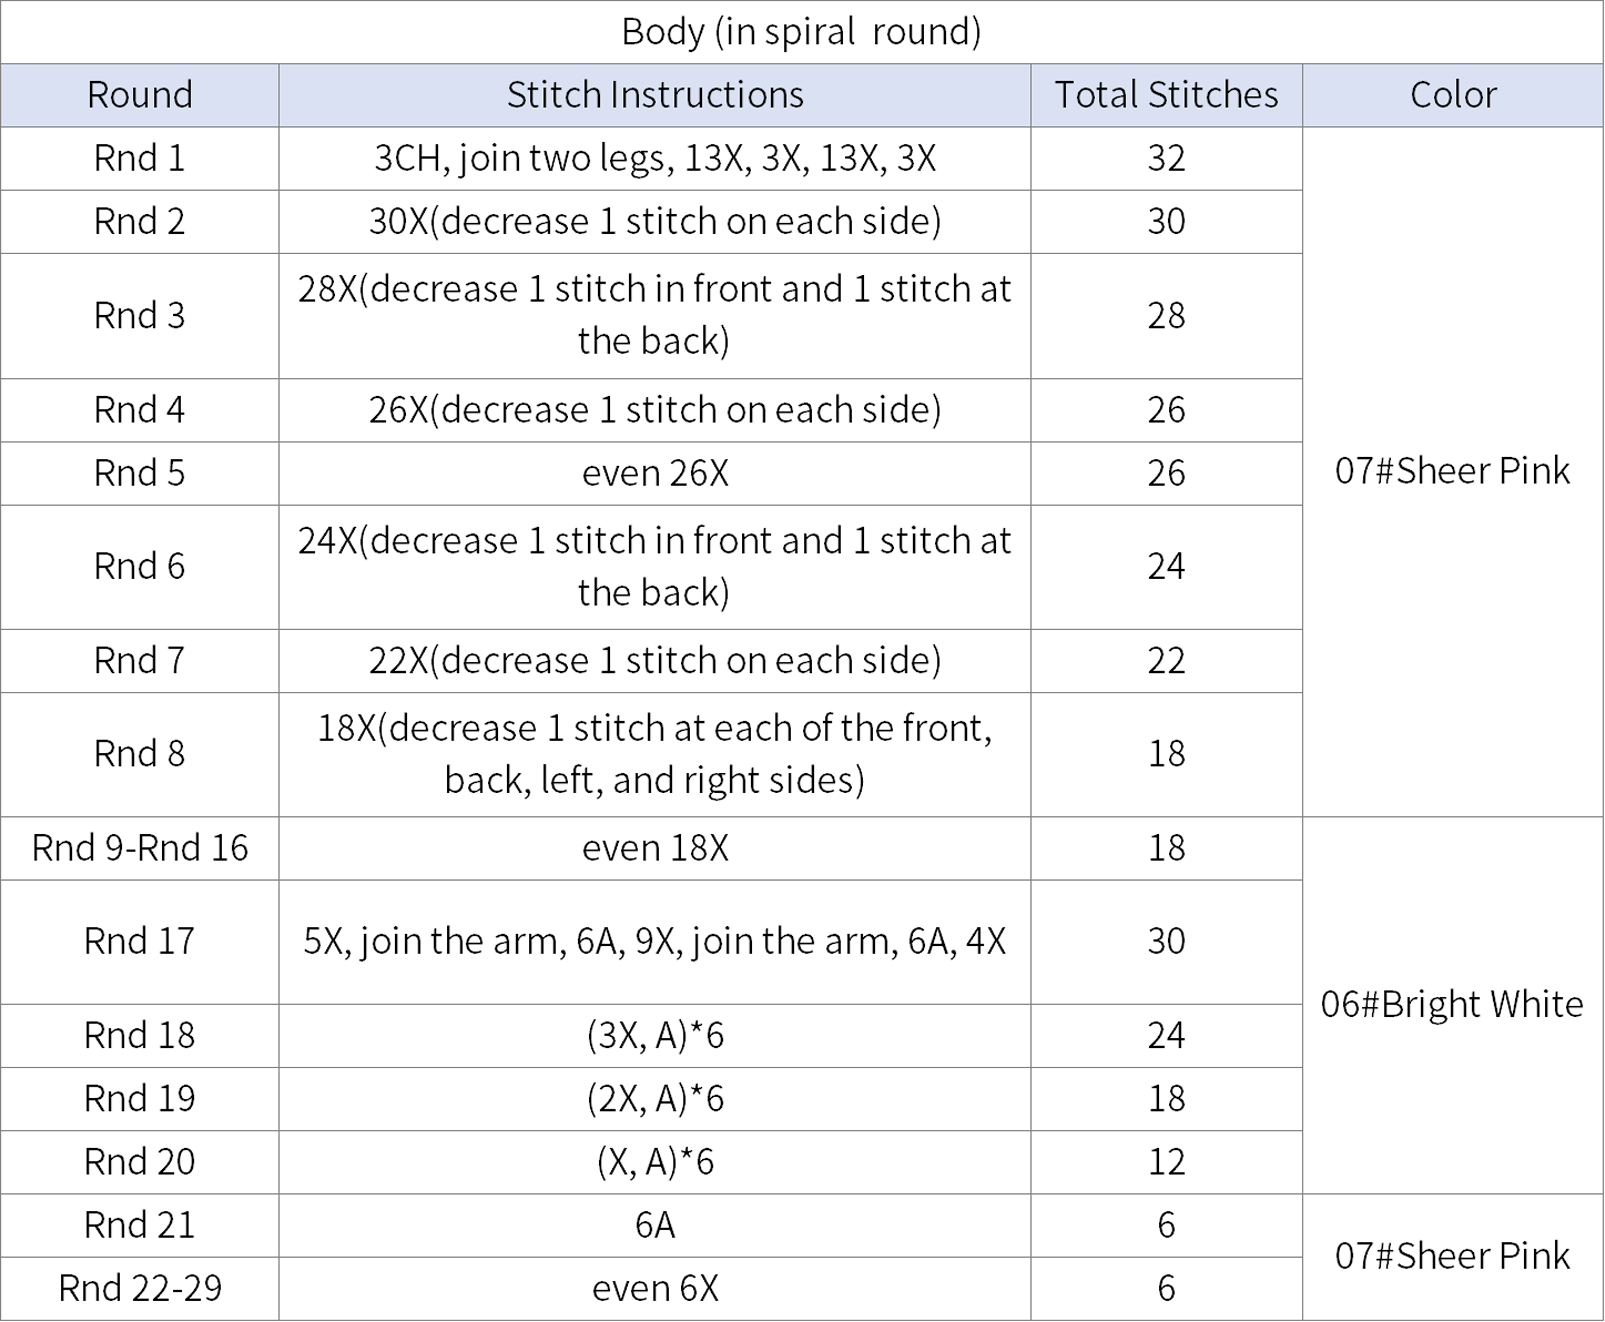
Part 4 HeadA4 55' 41'' (Part 1)
The head start with a magic ring and crochet in rounds, stuff with fiberfill as you go, then attach the arms. Please refer to the video demonstration for more details.
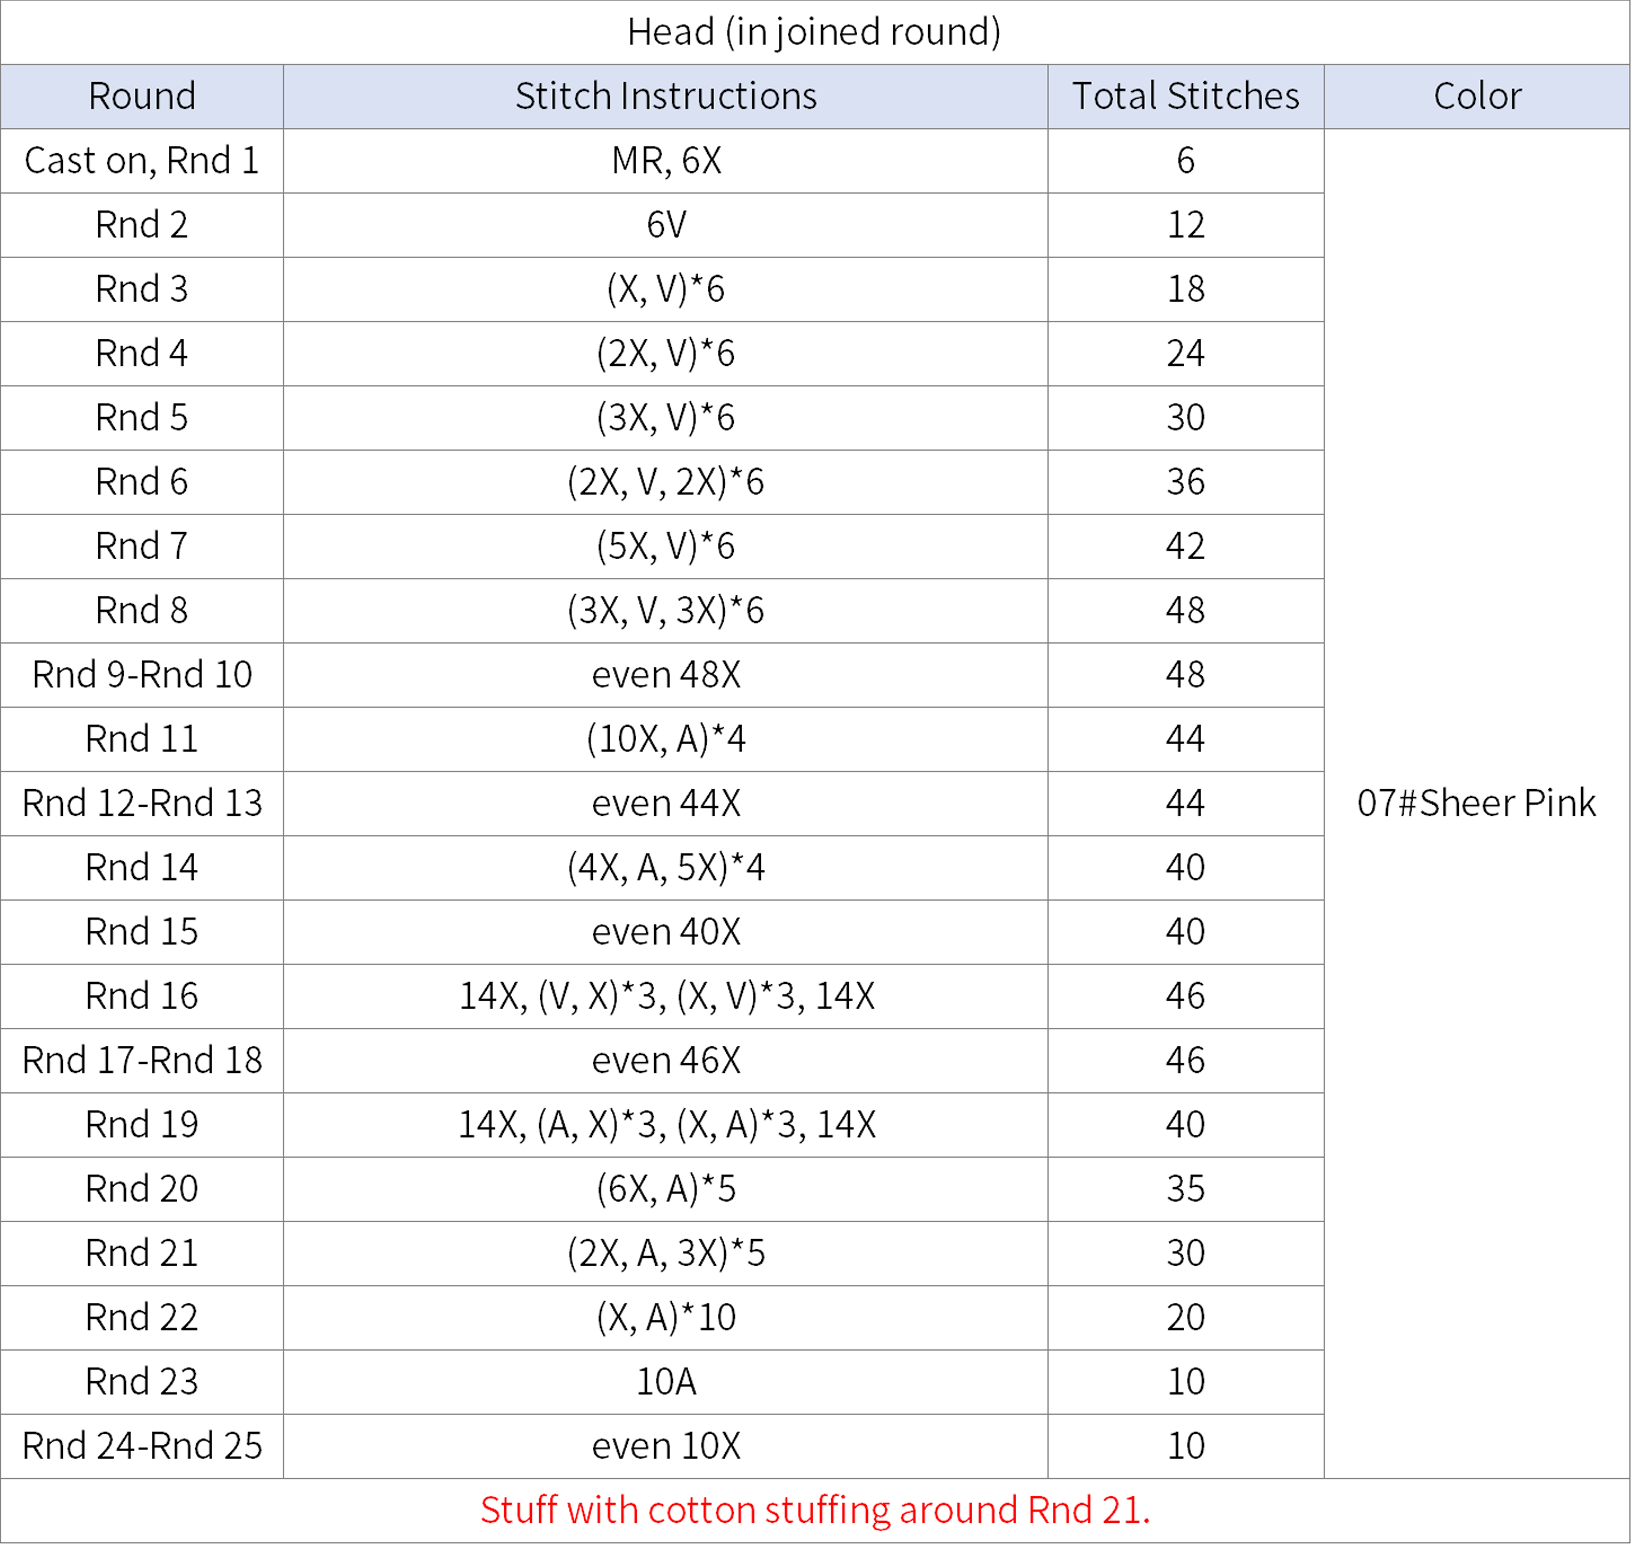
Part 5 Facial featuresB1 57' 10'' (Part 1)
The facial features include nose (07#Sheer Pink), eyes (2 strands of 61#Cappuccino), mouth (1 strand of 51#High Risk Red) and ears. After finishing, Add some blush. Please refer to the video demonstration for more details.

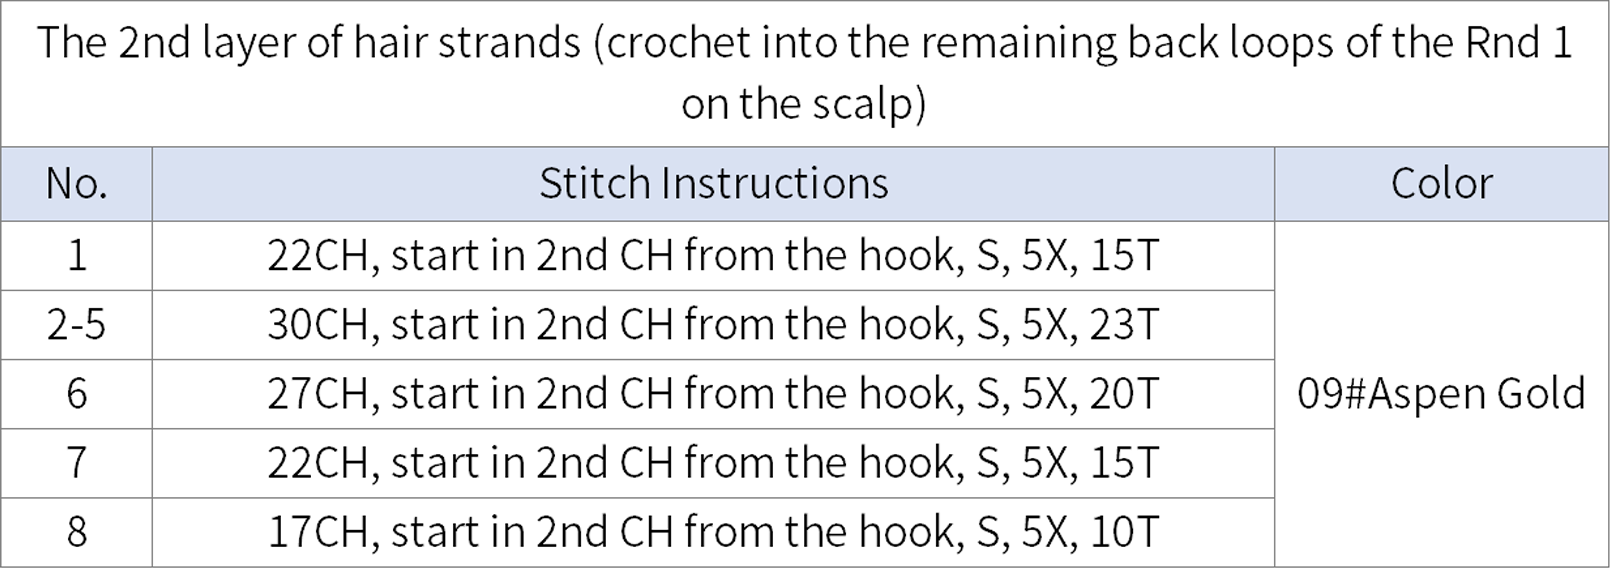
Part 6 HairB2 72' 05'' (Part 1)
The hair consists of the scalp and two layers of hair strands. For the scalp, we start with a magic ring and crochet in rounds counterclockwise. Then crochet the hair strands and attach the hair to the head. Finally, apply glue on the bottom of the crown. Please refer to the video demonstration for more details.
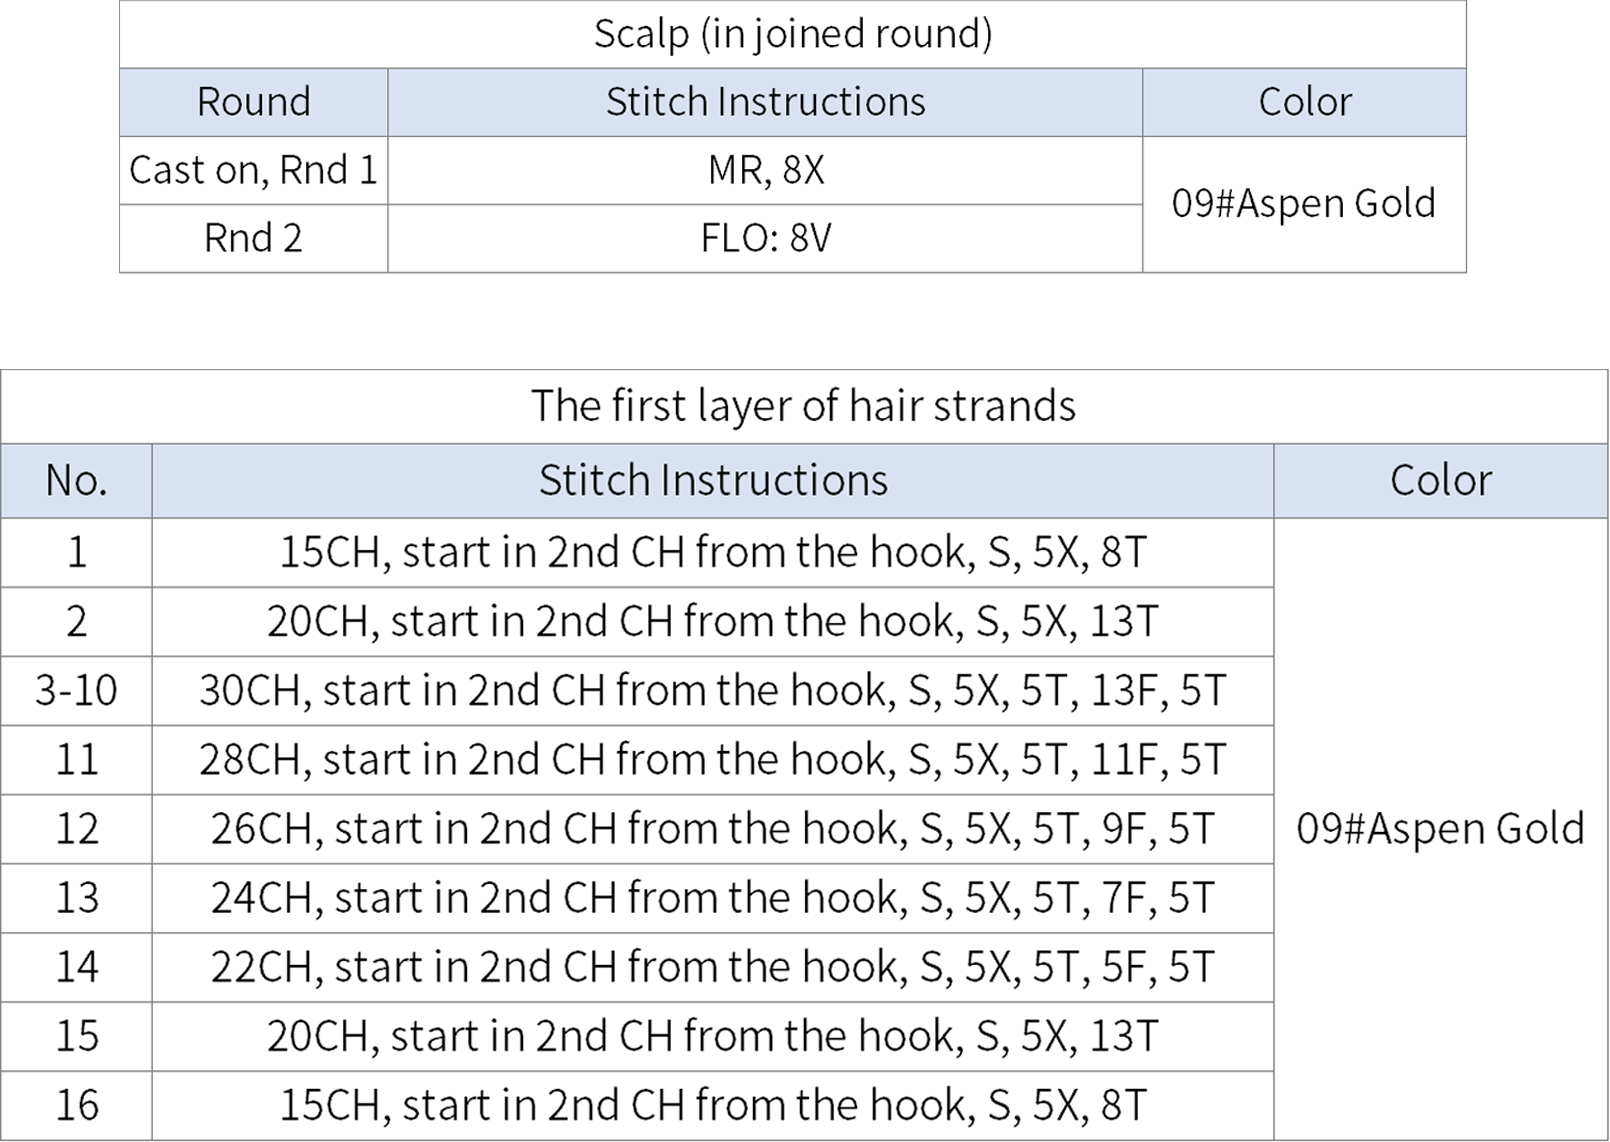
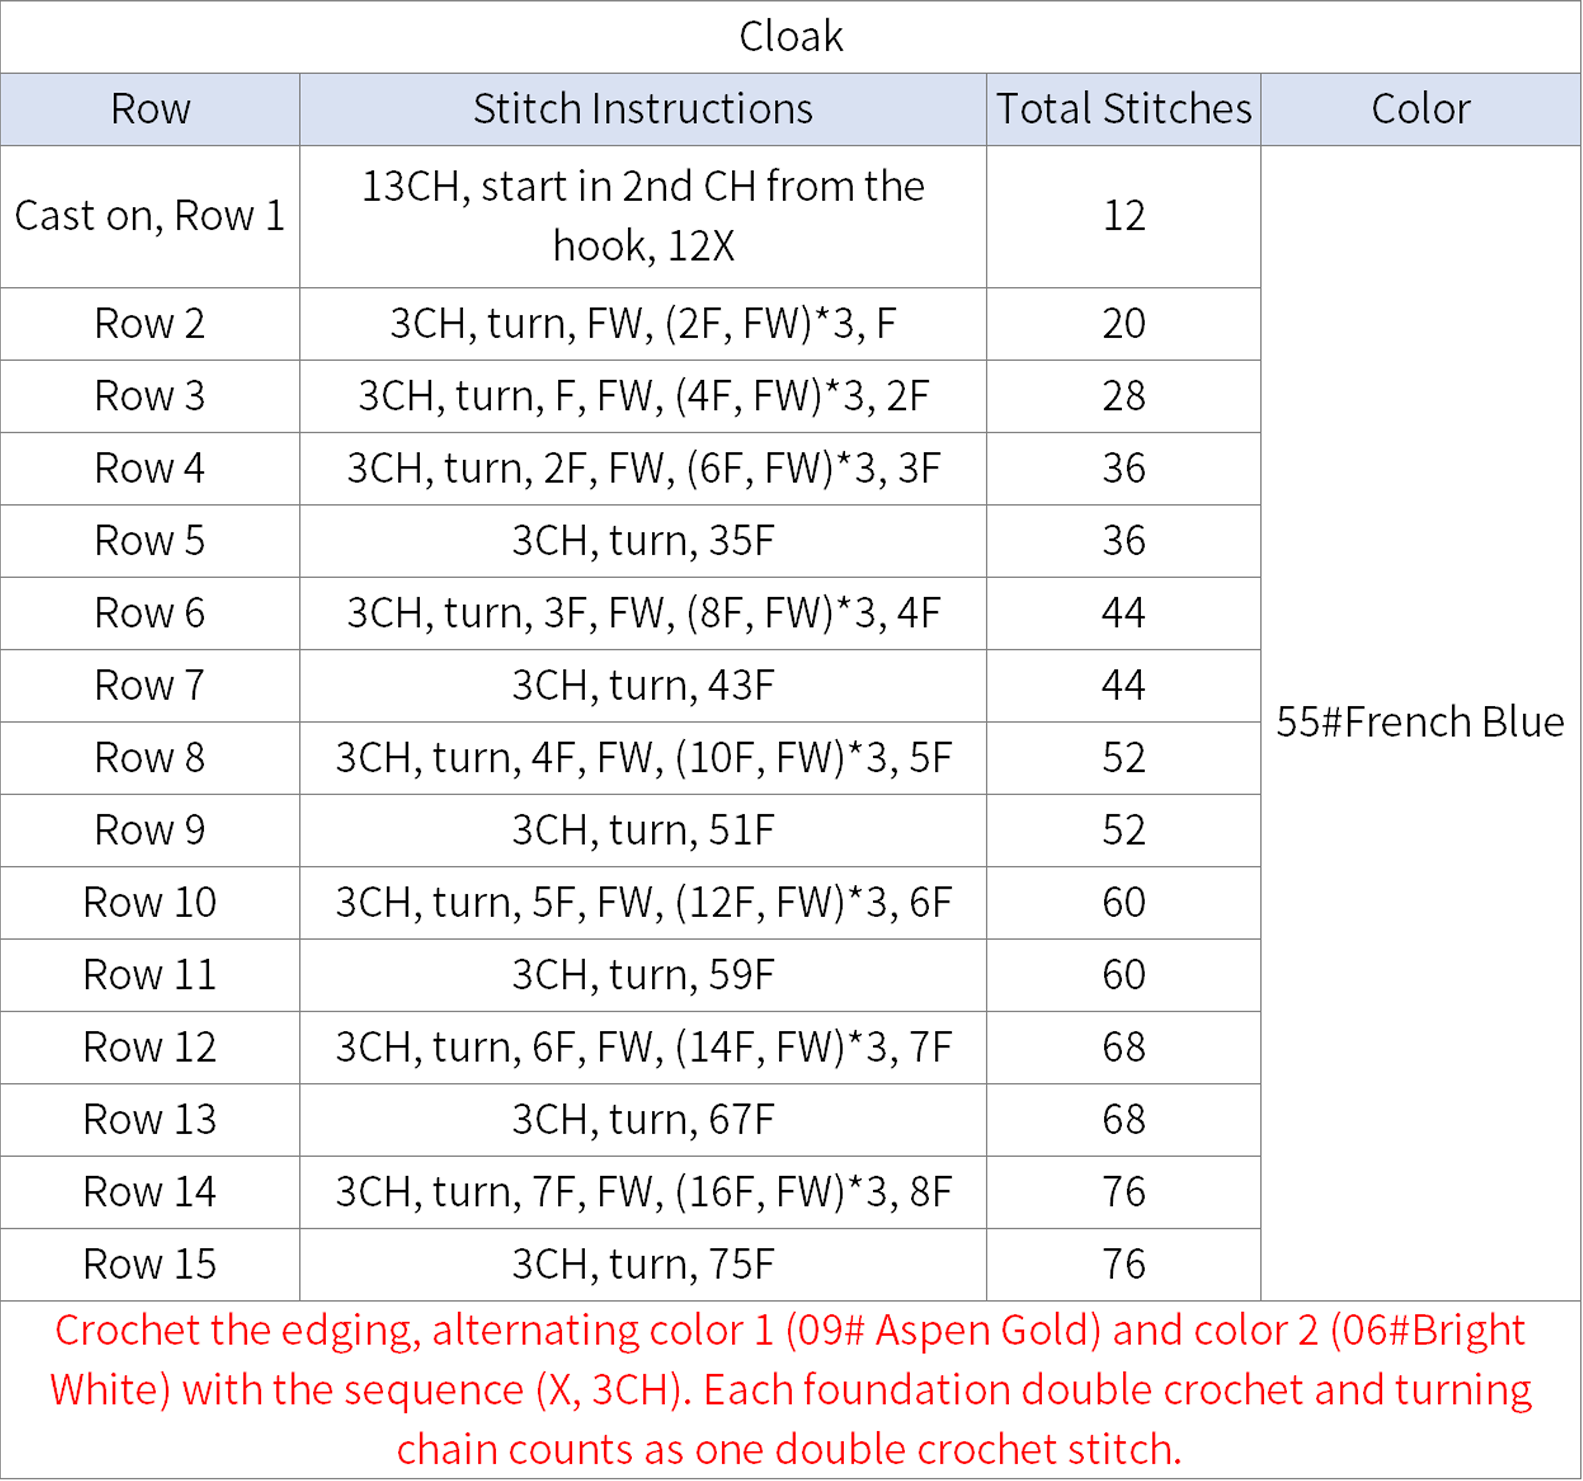
Part 7 CloakB3 92' 00'' (Part 1)
The cloak start with a foundation chain and work upward back and forth in rows. After completing, attach the magnetic snap button, blue acrylic gems and stars. Please refer to the video demonstration for more details.
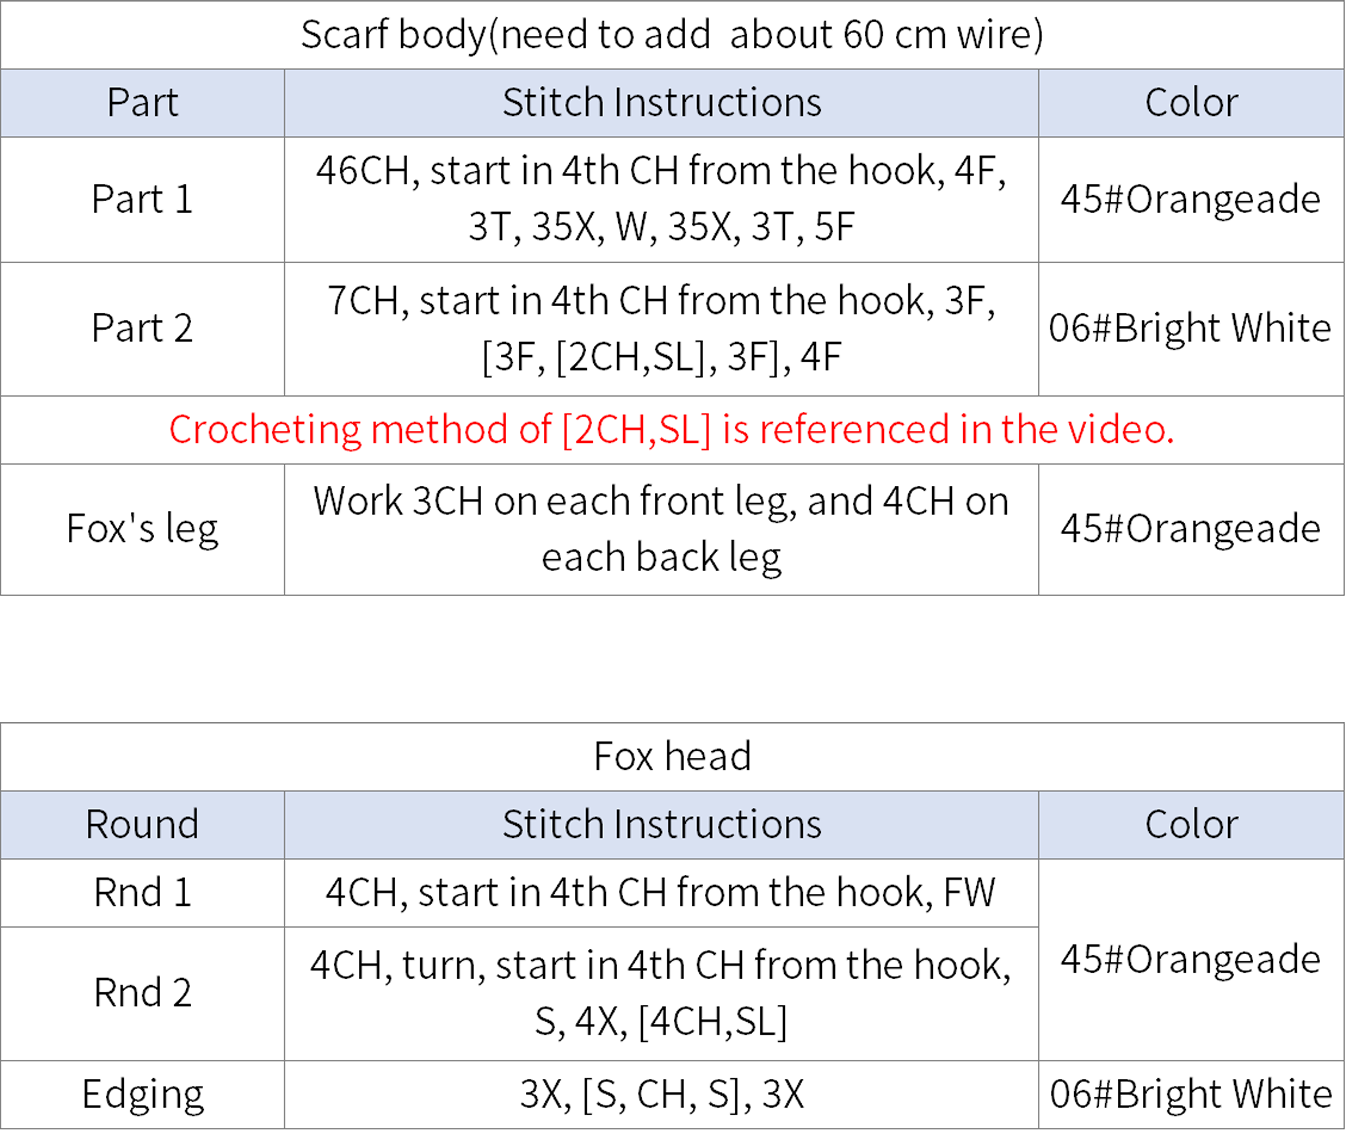
Part 8 ScarfB4 00' 11'' (Part 2)
The scarf consists of the scarf body and the fox head. The scarf body is started with a foundation chain. While crocheting, wrap thin wire along it. After that, we'll crochet the fox head. Once done, add some small seed beads for decoration. Finally, attach them to the top of the scarf. Please refer to the video demonstration for more details.
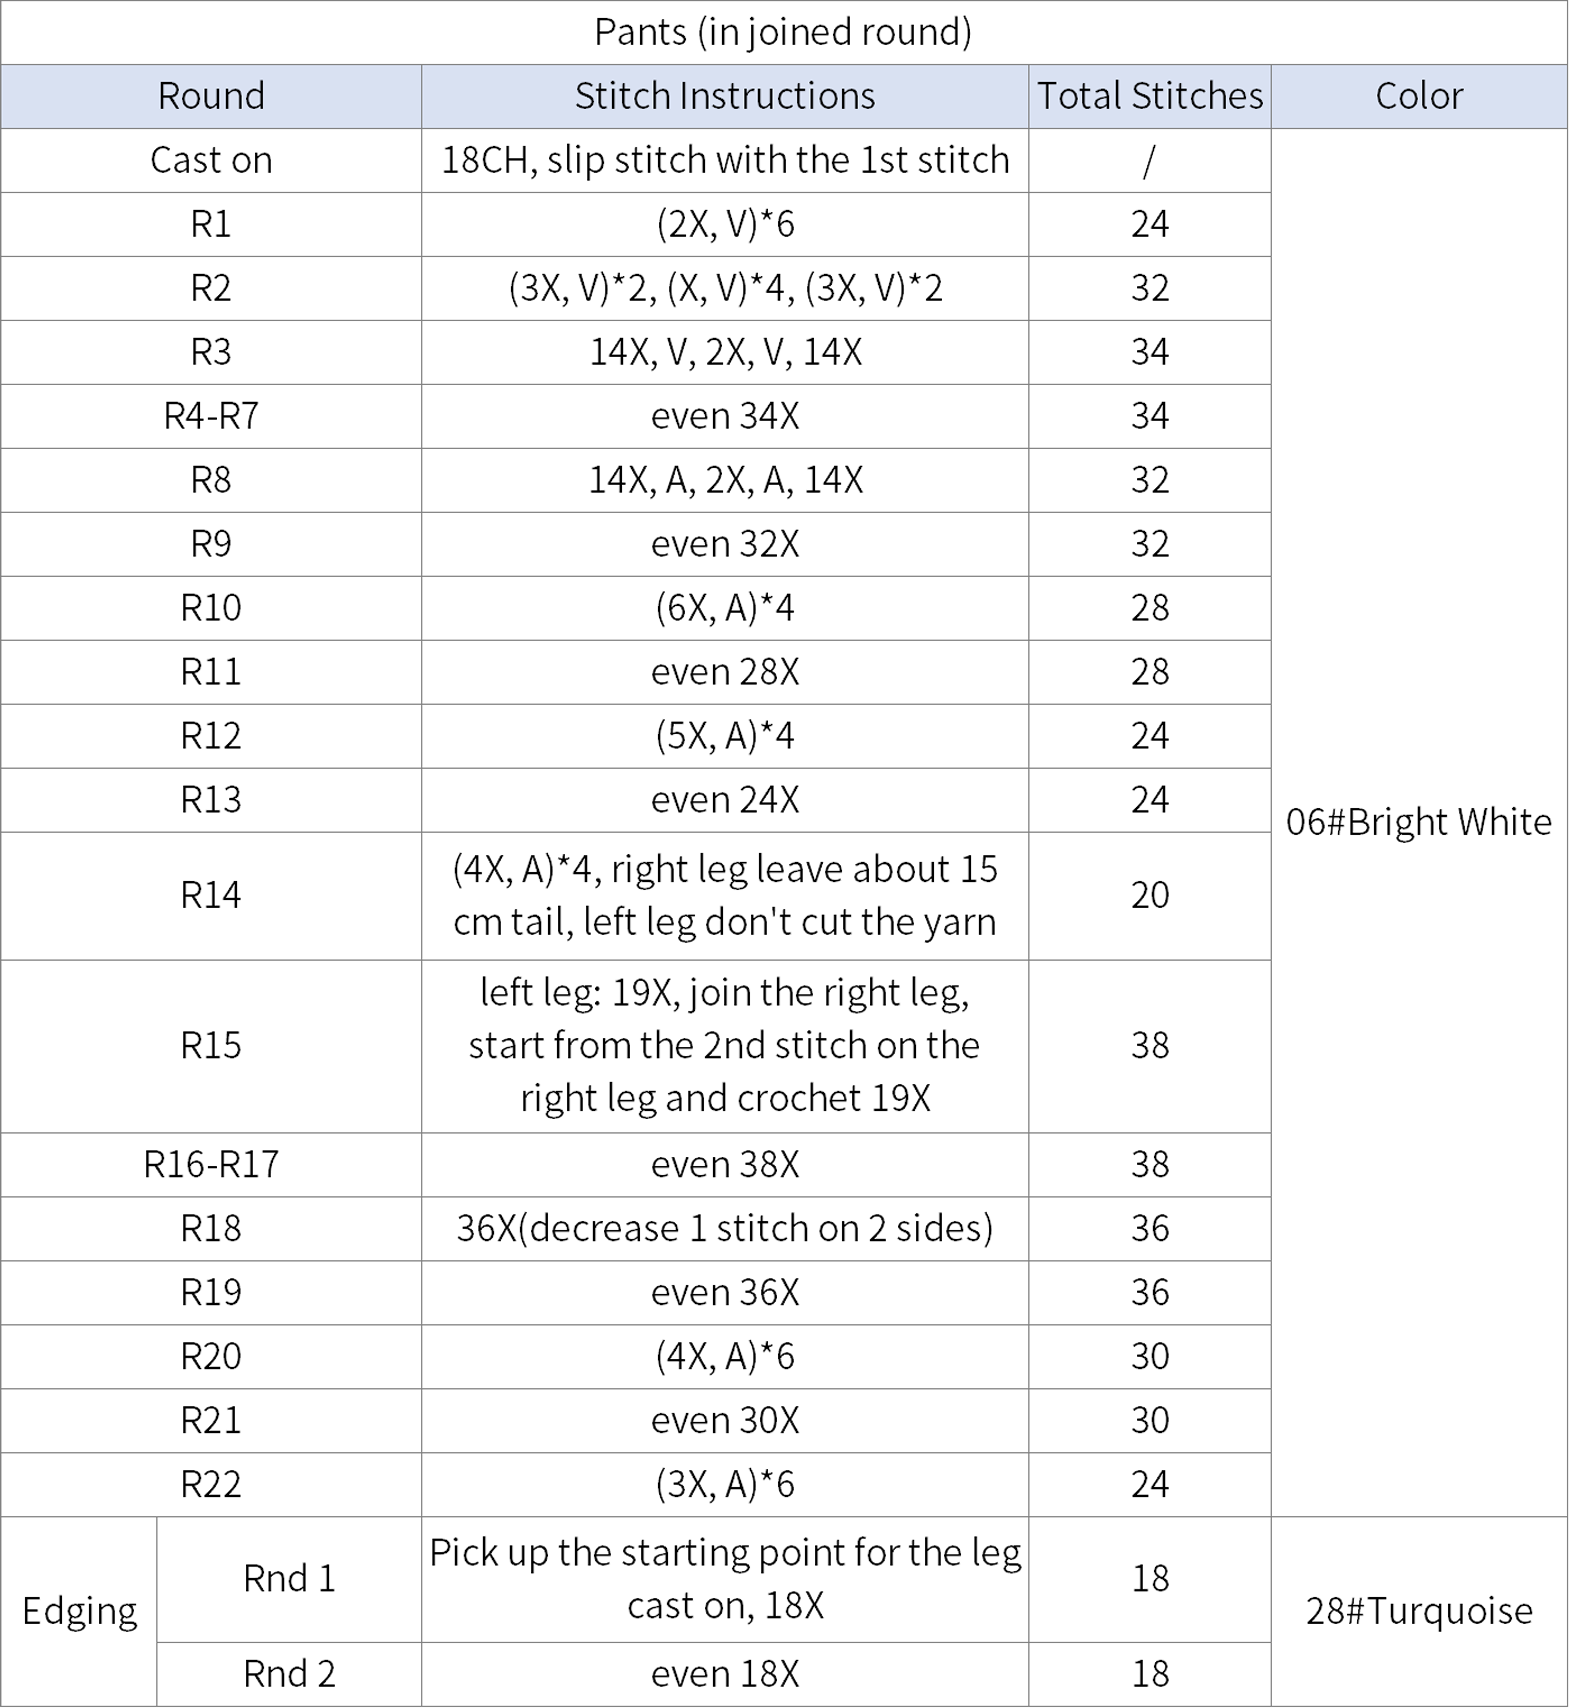
Part 9 PantsB5 25' 30'' (Part 2)
The pants start with a chain ring and crochet upwards in rounds. Firstly, make 2 legs. Then, join them together and continue crocheting. After that, add decorations (stripes: 09#Aspen Gold, gold thread embellishment: cut two 60cm lengths of gold thread combine them into 1 strand for crocheting, bow) to the pants. Please refer to the video demonstration for more details.
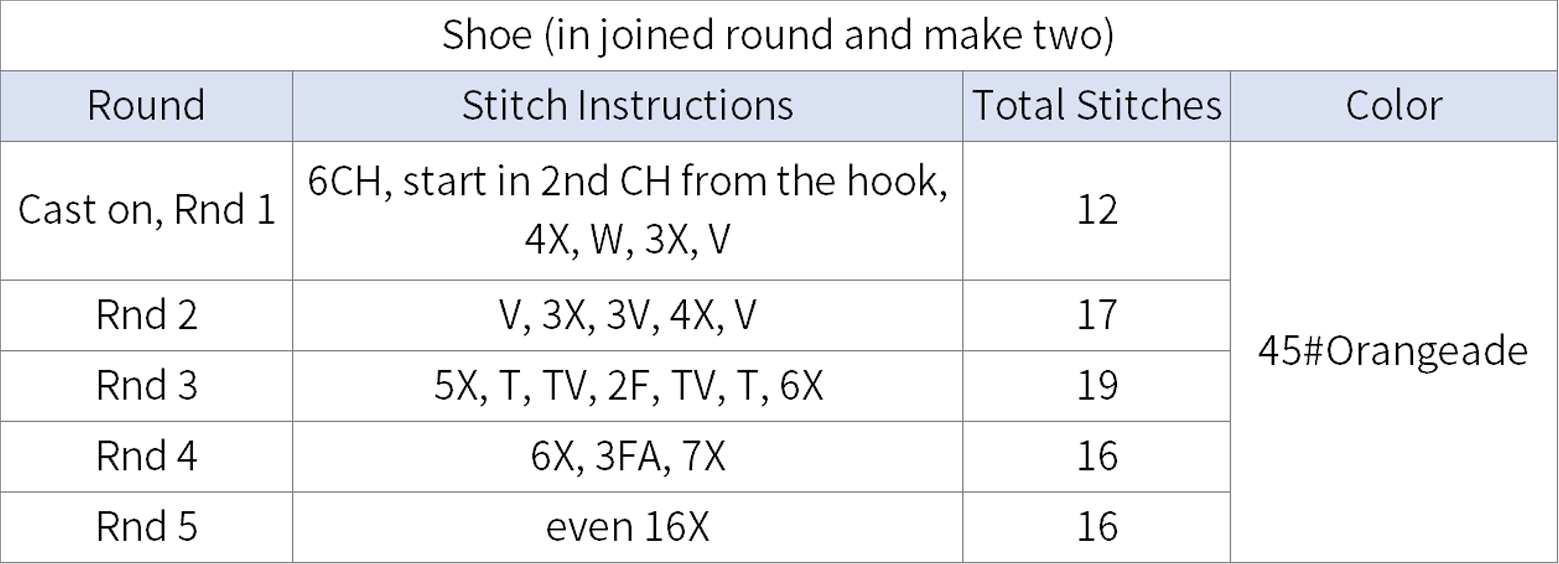
Part 10 ShoesB6 42' 02'' (Part 2)
There are two shoes in total. The process is identical. Start with a chain stitch, work in rounds, increasing outward. Once finished, add decorative ribbons and stars. Please refer to the video demonstration for more details.
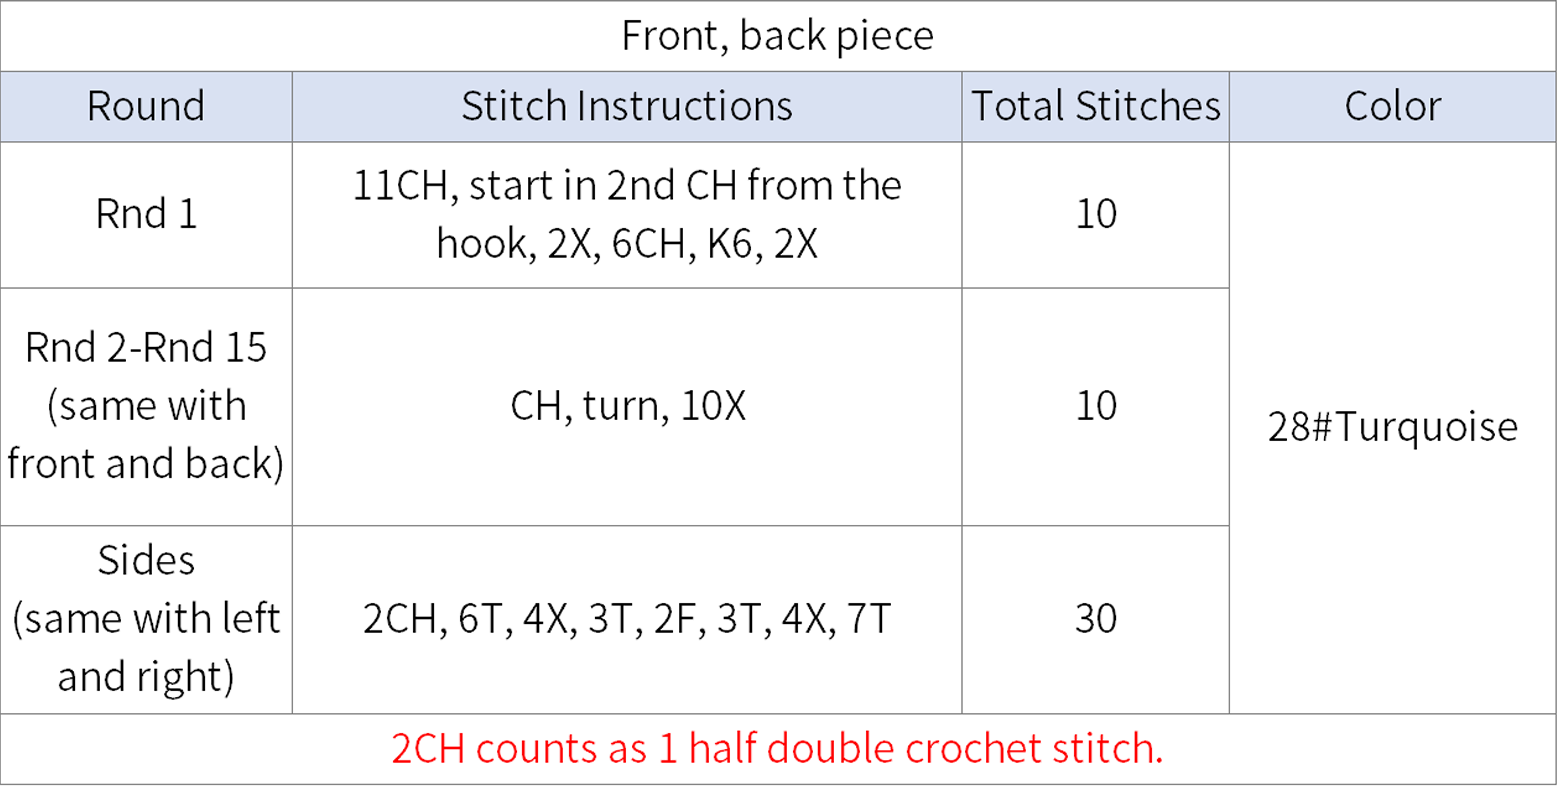
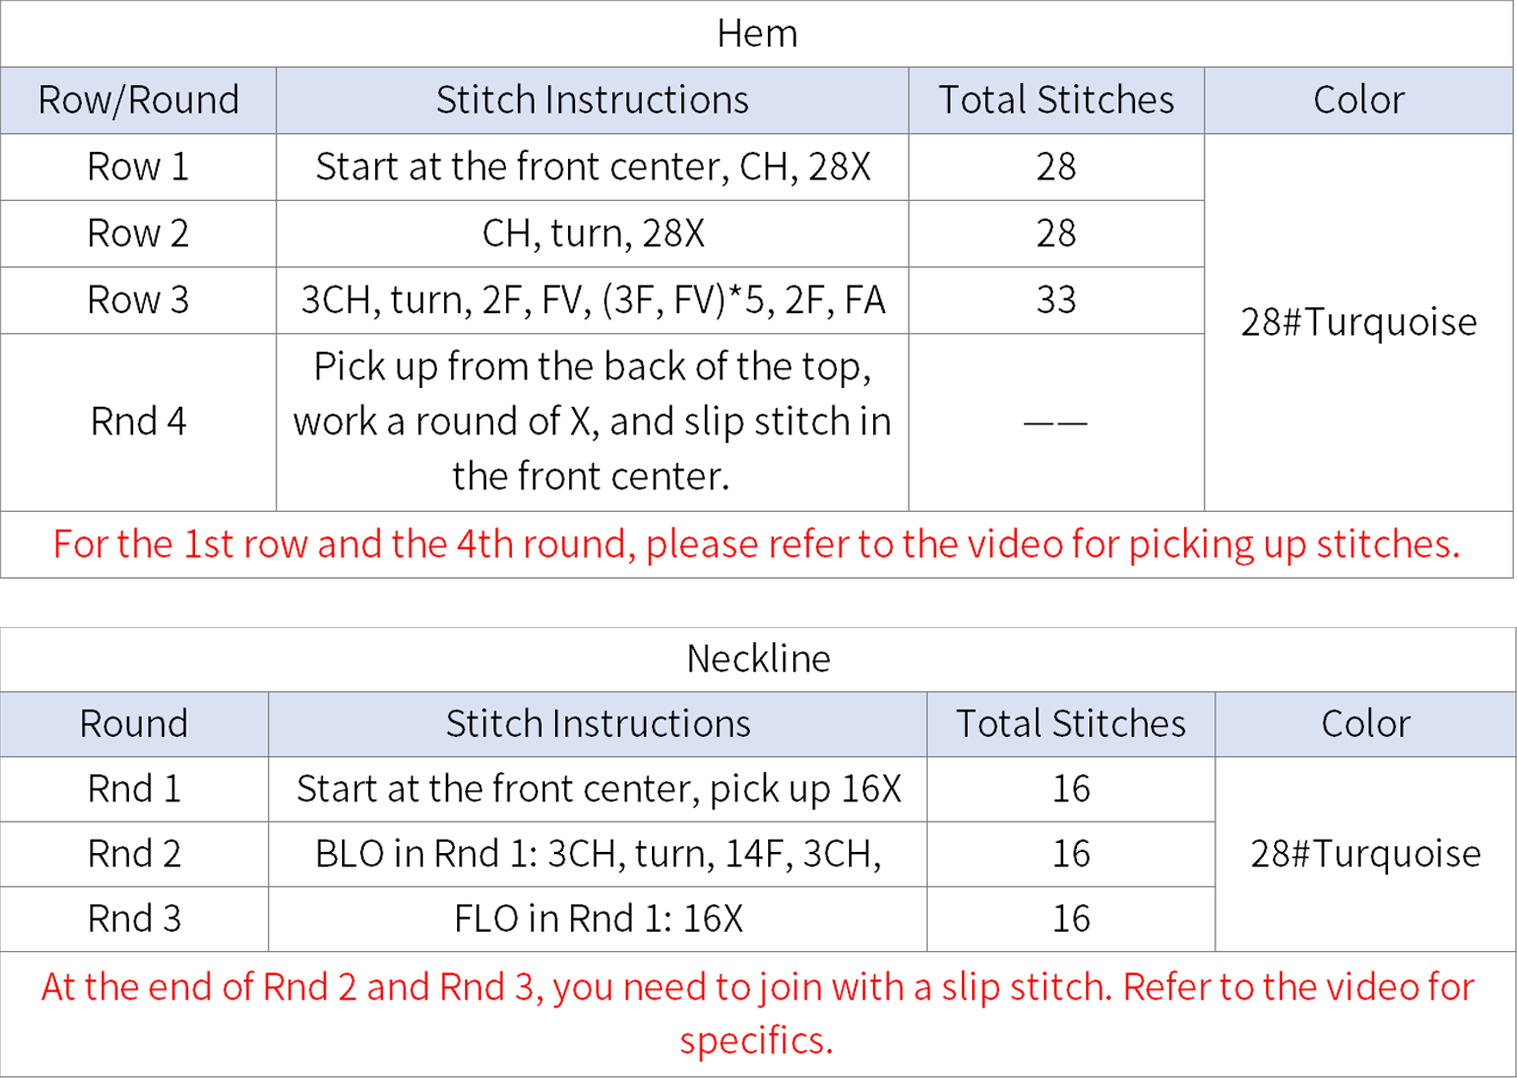
Part 11 TopB7 48' 30'' (Part 2)
There top includes the front piece, back piece, the sides, hem and neckline. After completing, attach the female magnetic snap button. Finally, sew the bottom edge of the sides slightly (the same color yarn for the top). Please refer to the video demonstration for more details.
Part 12 DecorationsB8
There decorations include arm decorations, chest decoration panel, belt, cuffs and rose flower.
Step 1 Arm decorations 67' 48'' (Part 2)
Cut two lengths of gold thread, about 70cm each. Please refer to the video demonstration for more details.
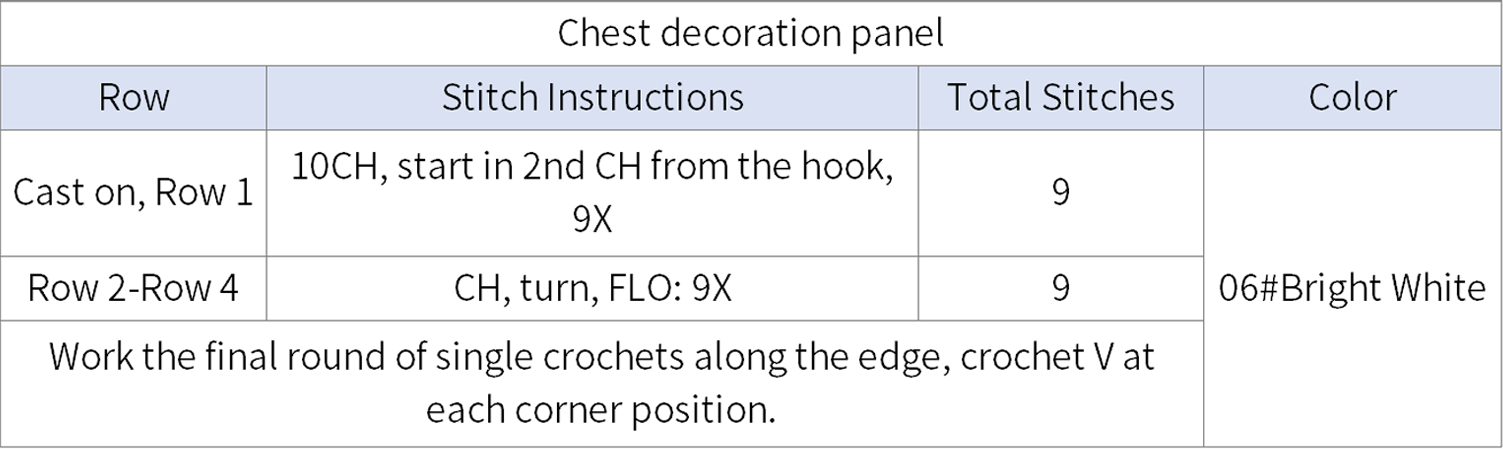
Step 2 Chest decoration panel 72' 58'' (Part 2)
Refer to the chart and crochet 4 rows, then crochet one round of edging. Next, sew on the gold thread (about 40 cm), and finally attach the buttons to both ends of the gold thread. Once done, adhere the fabric piece to the front of the top. Please refer to the video demonstration for more details.
Step 3 Belt 78' 27'' (Part 2)
Belt (09#Aspen Gold) : Start by making a foundation chain. The number of chains is flexible. It should be long enough to wrap around the waist of the top. Once the chain is finished, crochet a round single crochet until you reach the halfway point of the chain. Chain 1, and skip the next chain below. Keep working single crochets in the following chains. Complete this round. After completing, attach the belt to the hem of the top. Note that the hole for the belt should be right in front. Glue the decorative button at the hole location. Please refer to the video demonstration for more details.
Step 4 Cuffs 82' 25'' (Part 2)
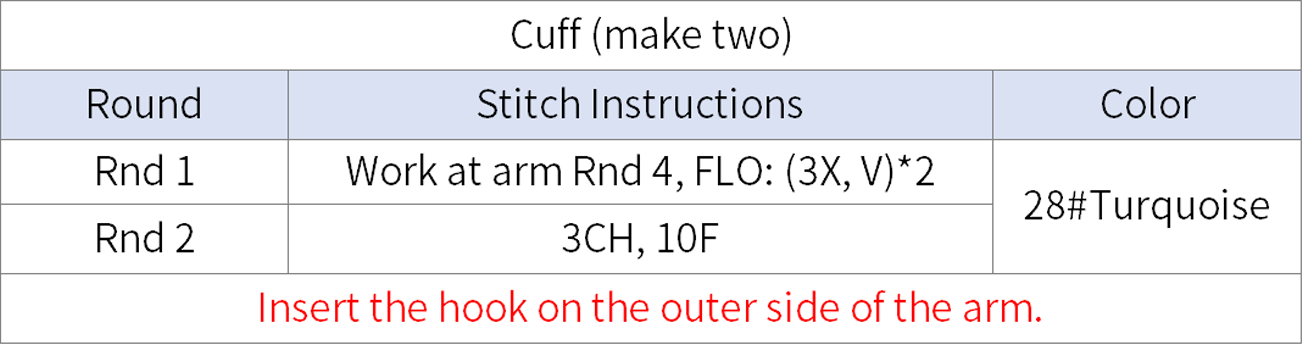
The cuffs are crocheted with the remaining strands from the fourth round of the arms. Start by crocheting the first round, then add gold thread embellishment. Please refer to the video demonstration for more details.
Step 5 Rose flower 90' 32'' (Part 2)
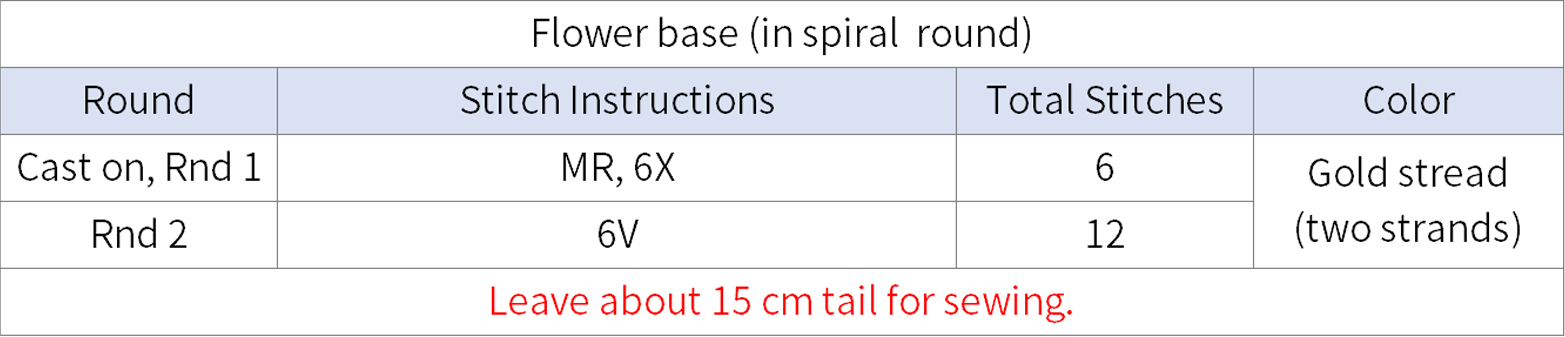
First, crochet the flower base. Once completed, attach the metal ring to the bottom of the flower base. Next, apply glue to the right side, attach it to the bottom of the rose. Please refer to the video demonstration for more details.

Made by the community