
Clothes
Mushroom Vest
Project preview
See the finished project
Pattern format
Instructions

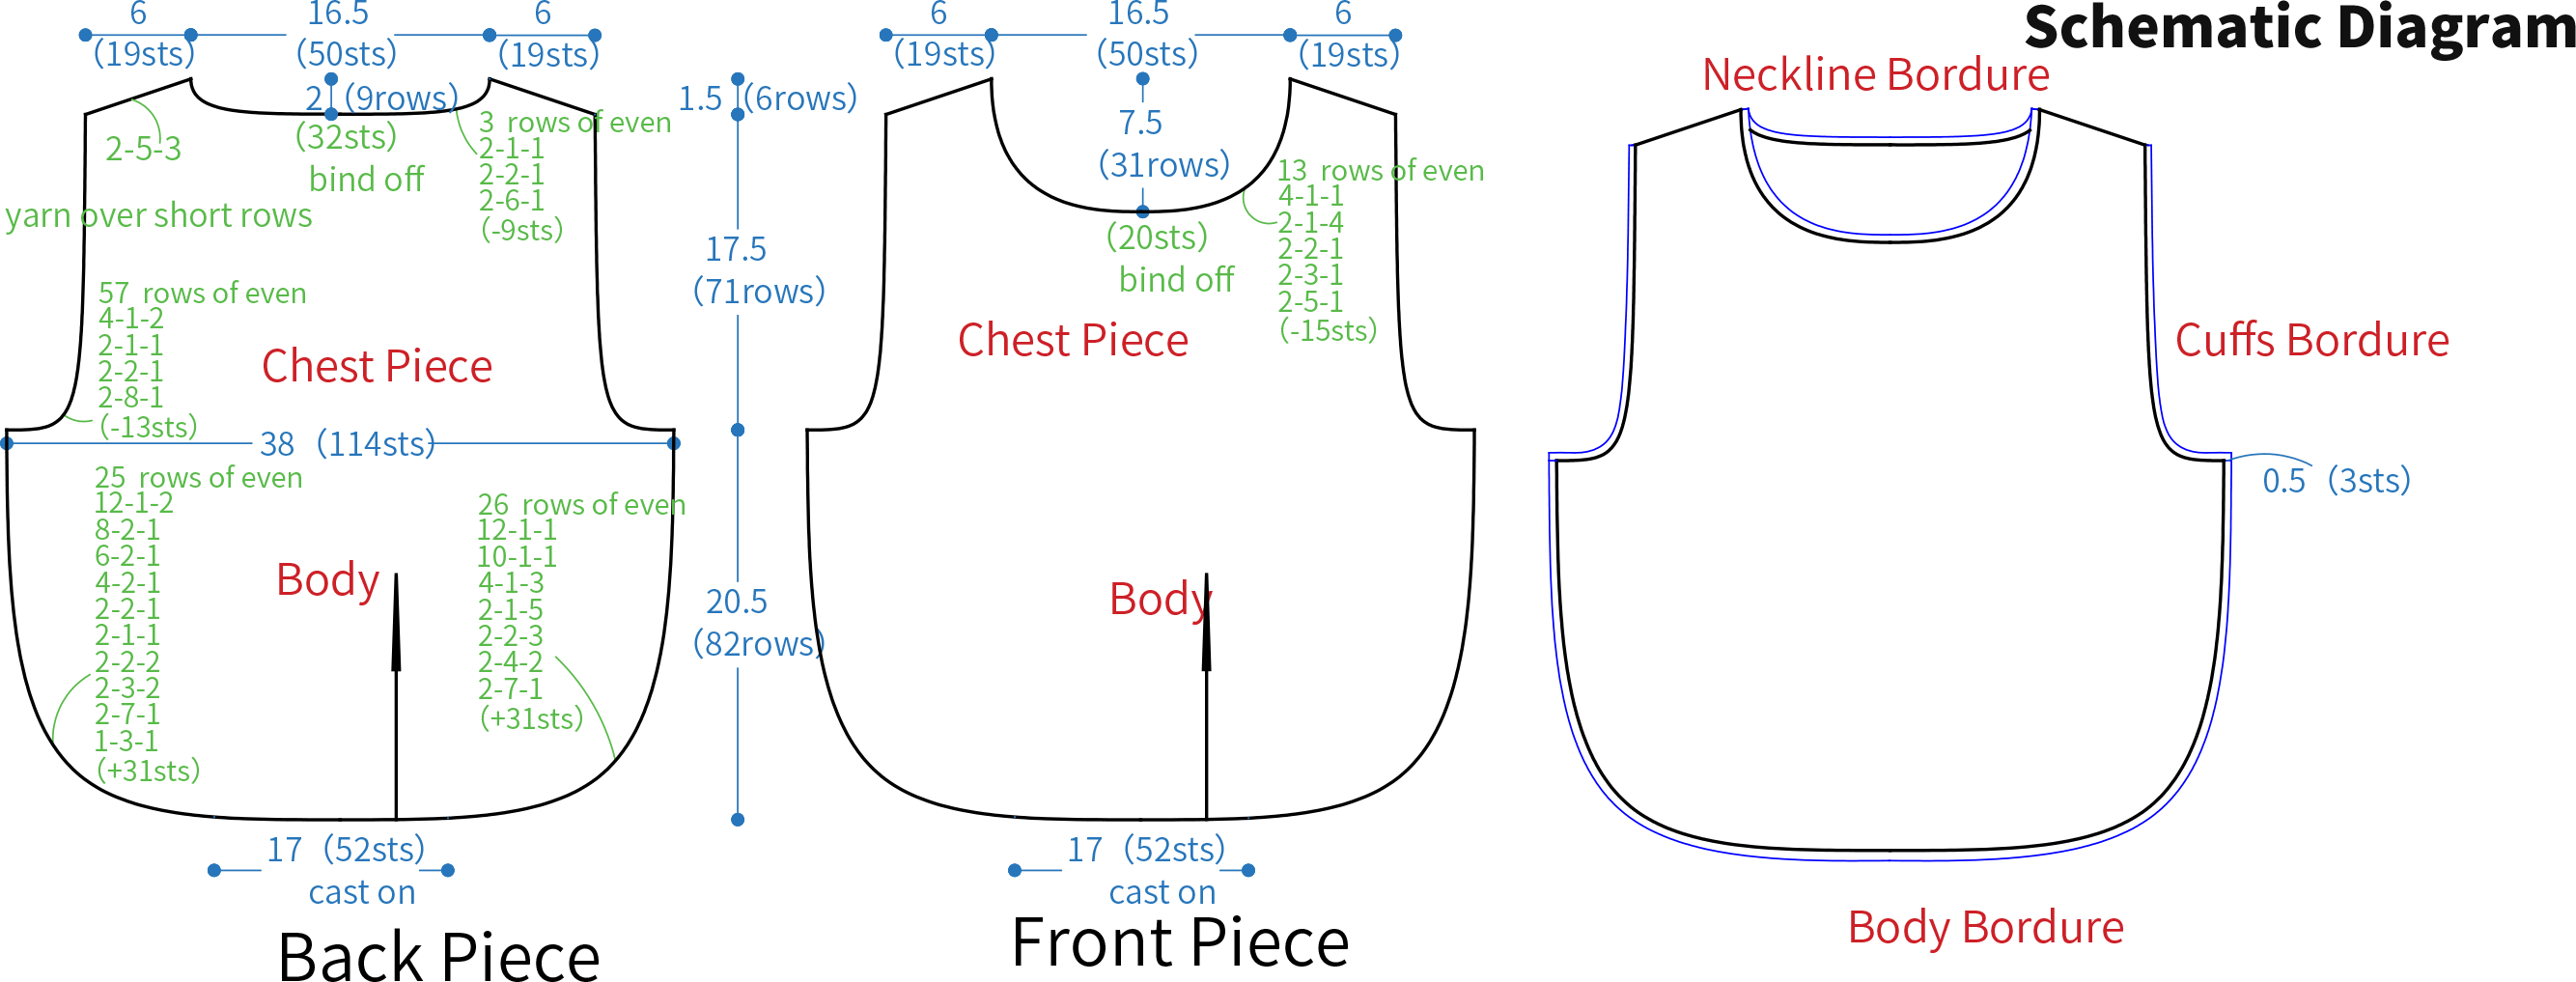
This garment comes in multiple sizes, all divided into front piece, back piece, bordure and decorative elements sections.
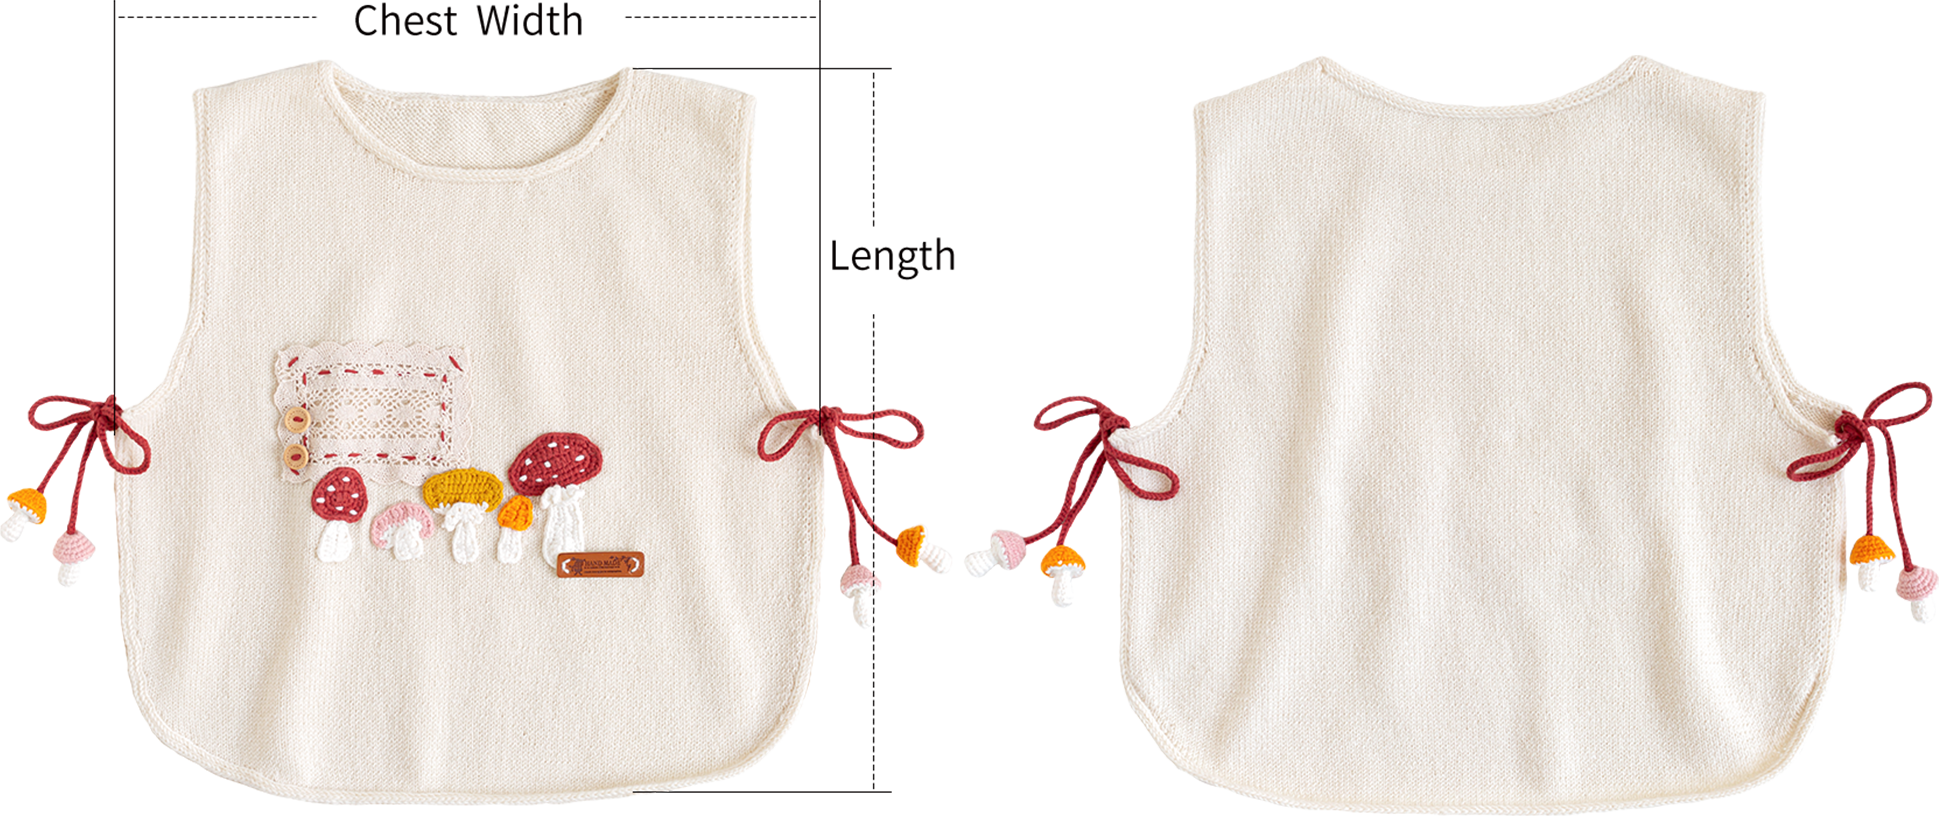
| Unit:cm | Chest Width | Length |
| 90-110 | 38 cm | 40 cm |
The handcrafted measurements may have an error, the size of the sample is for reference only.
Materials: Morandi 4# & 4-Ply Combed Cotton & Acrylic Fibre Hand Knitting Yarn
Notions: 11# - 3.00 mm Circular Needle & Short Straight Needle , 2.00 mm Crochet Hook
Note:
1. Please note that "left" and "right" here refer to the left and right sides of the garment when it is being worn.
2. When knitting back and forth, on the wrong side you need to work the stitches opposite to what is shown in the chart.

Chart Key











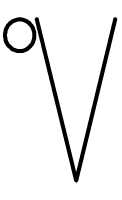
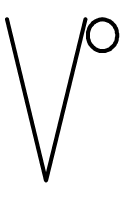

Note:
1. This pattern is making in Chinese crochet pattern terms, and the stitch name is written using American terminology. All measurements in charts are in cm.
2. The left and right on the charts refer to the actual wearing position.
3. The chart represent the right side of fabric, so check the key to see how to work a certain symbol on the right side and on the wrong side.
Part 1 Front Piece A 00' 30''
Front piece is using the Cable cast on method, and worked back and forth in stocking stitch. It is divided into body and bust sections from bottom up. Please refer to the video demonstration for more details.
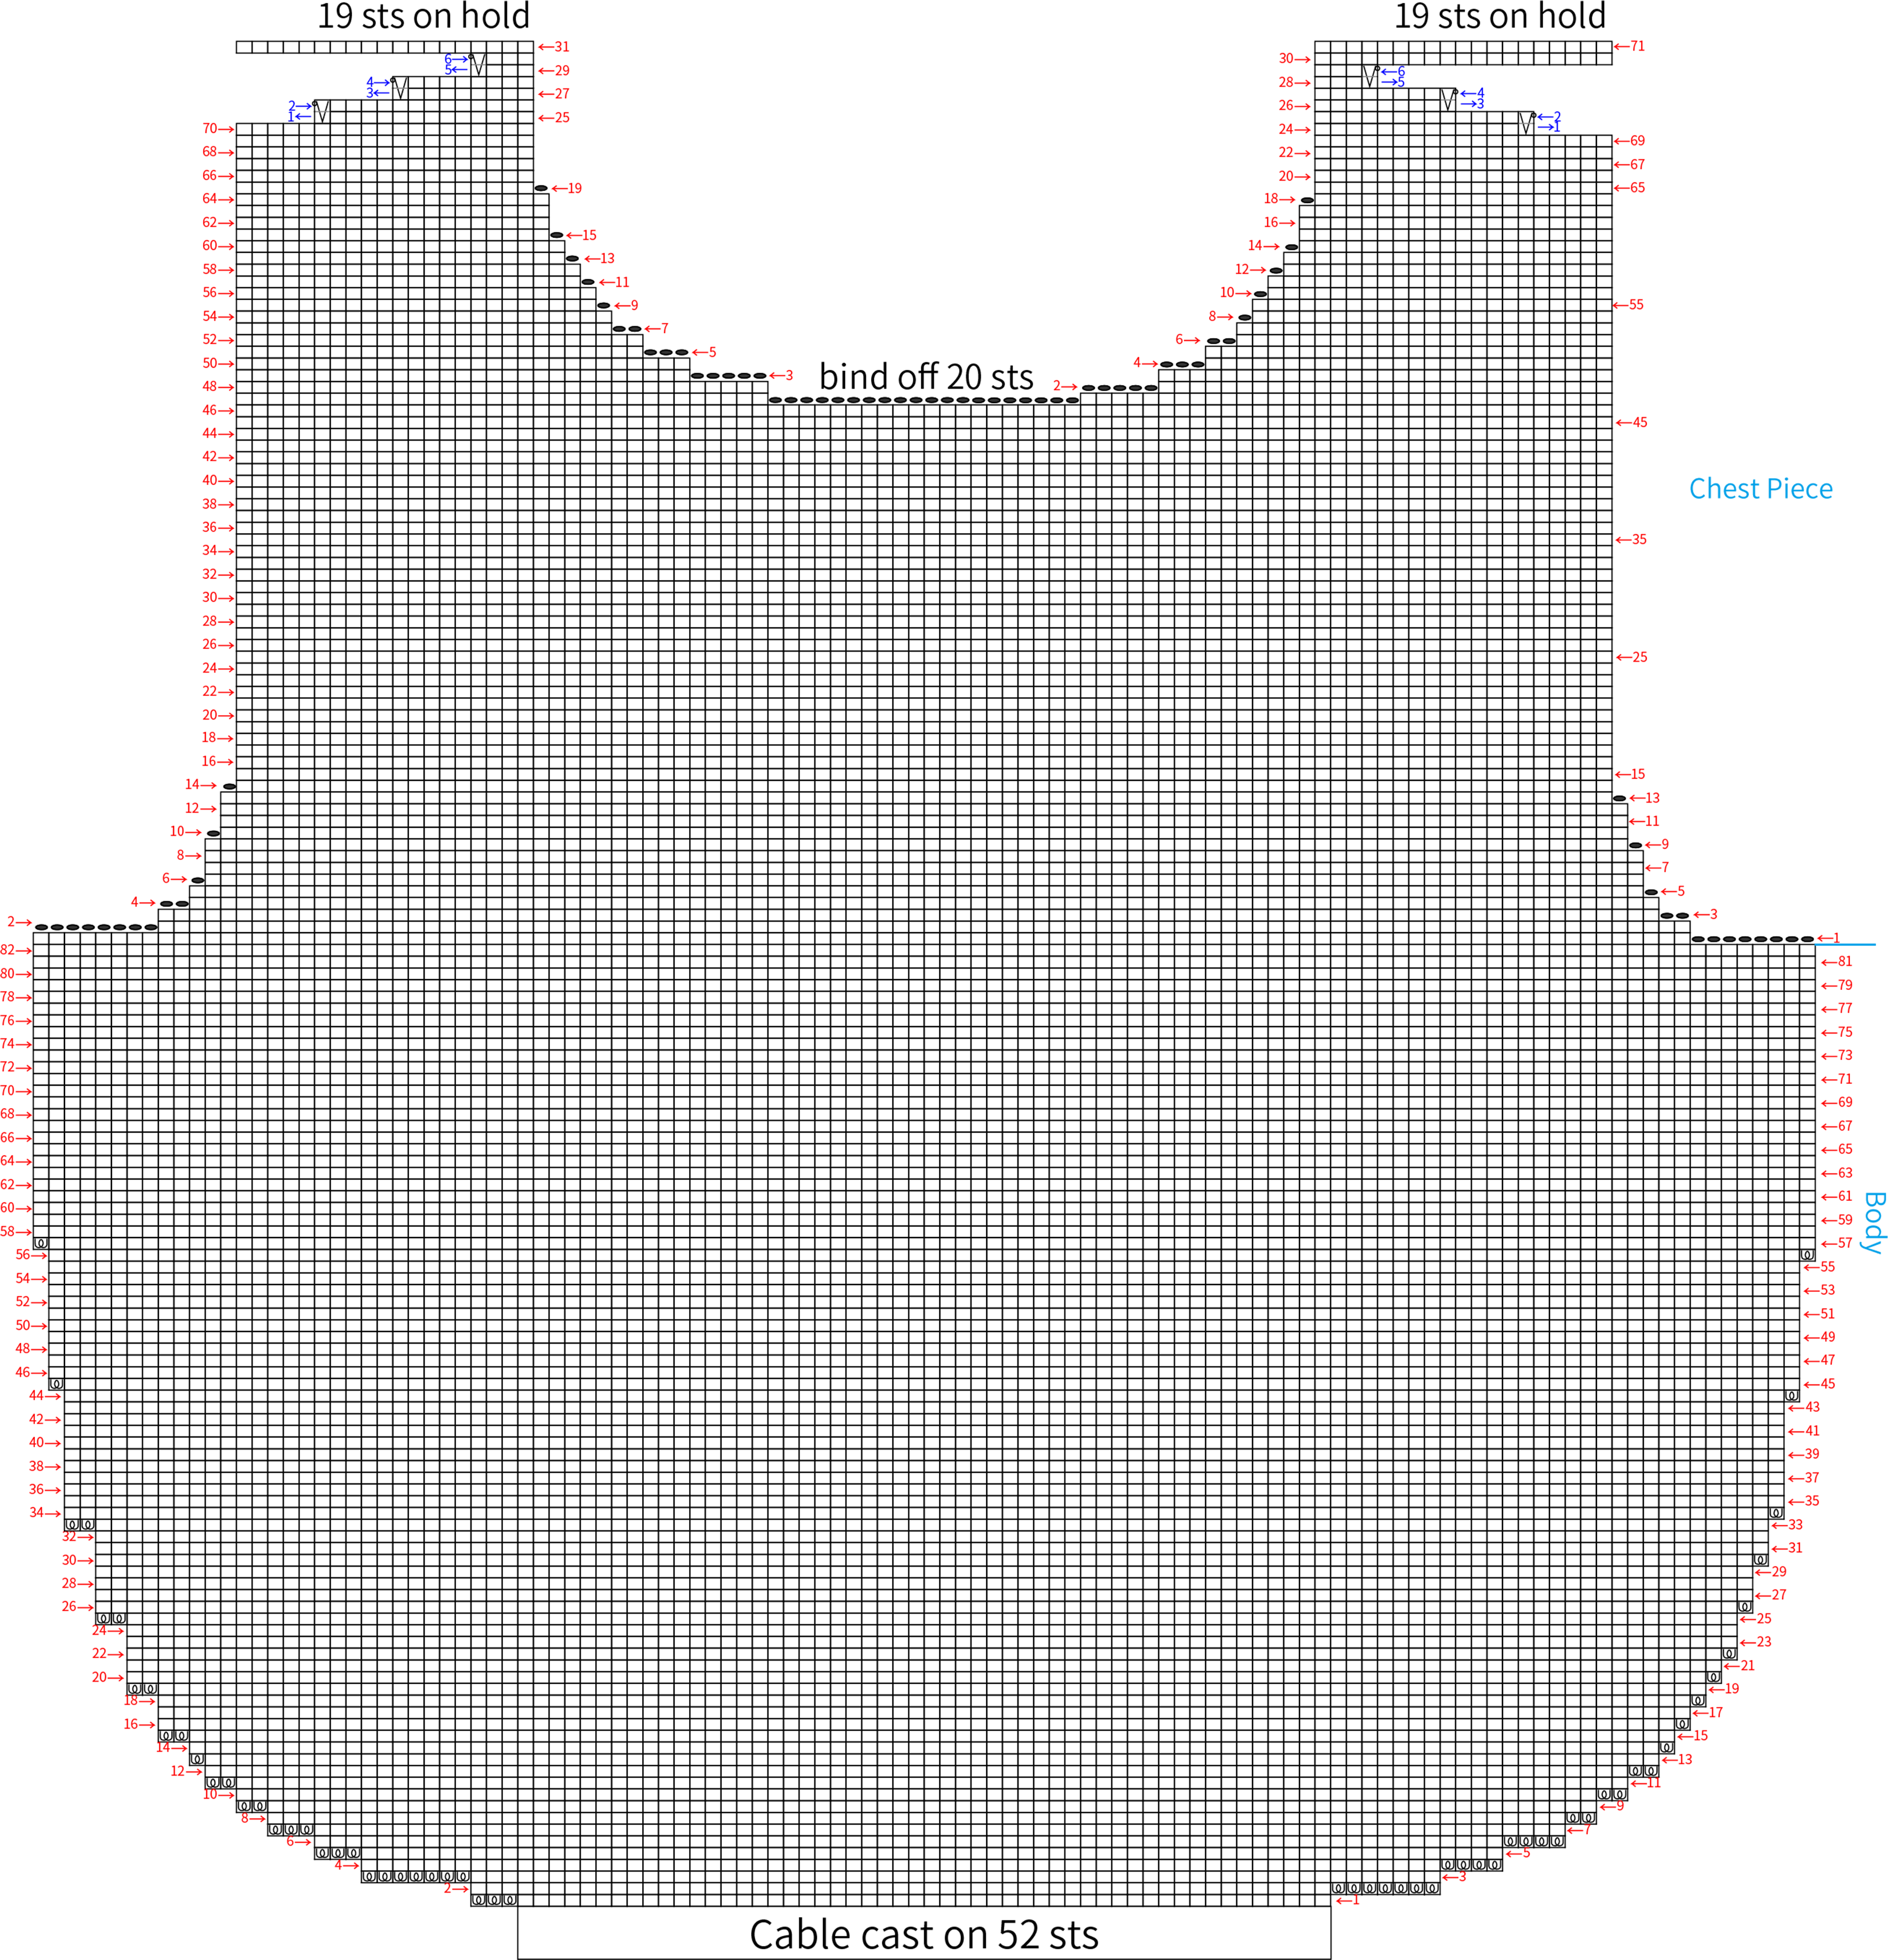
| Part | Antique White Version | Praline Version | Green Tea Version | Aragon Version |
| Front and Back Pieces, Bordure | Morandi 4# Antique White |
Morandi 4# 04#Praline |
Morandi 4# 20#Green Tea |
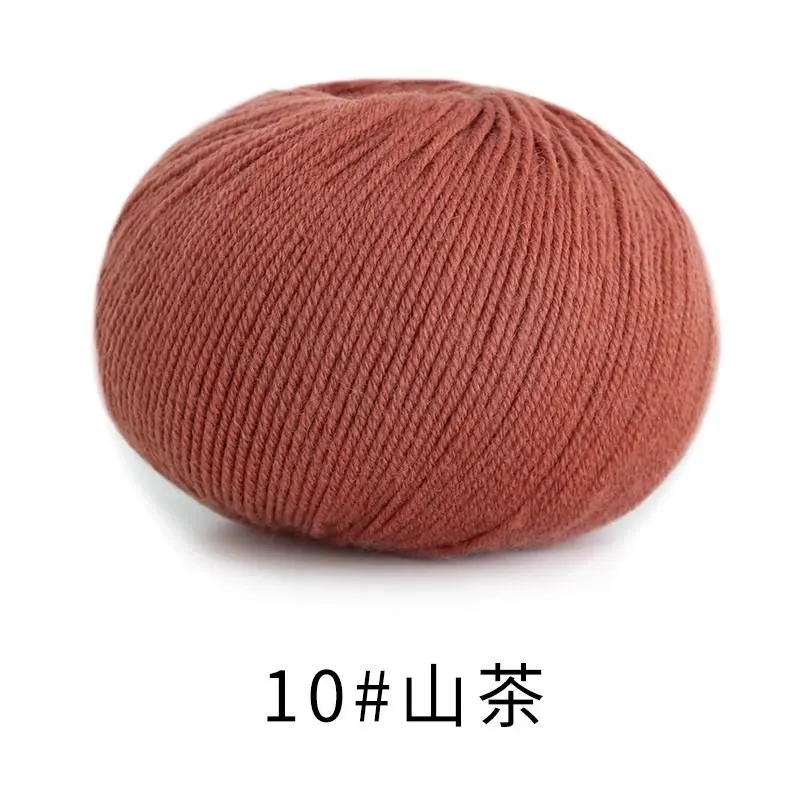
Morandi 4# 10#Aragon |
Part 2 Back Piece B 49' 26''
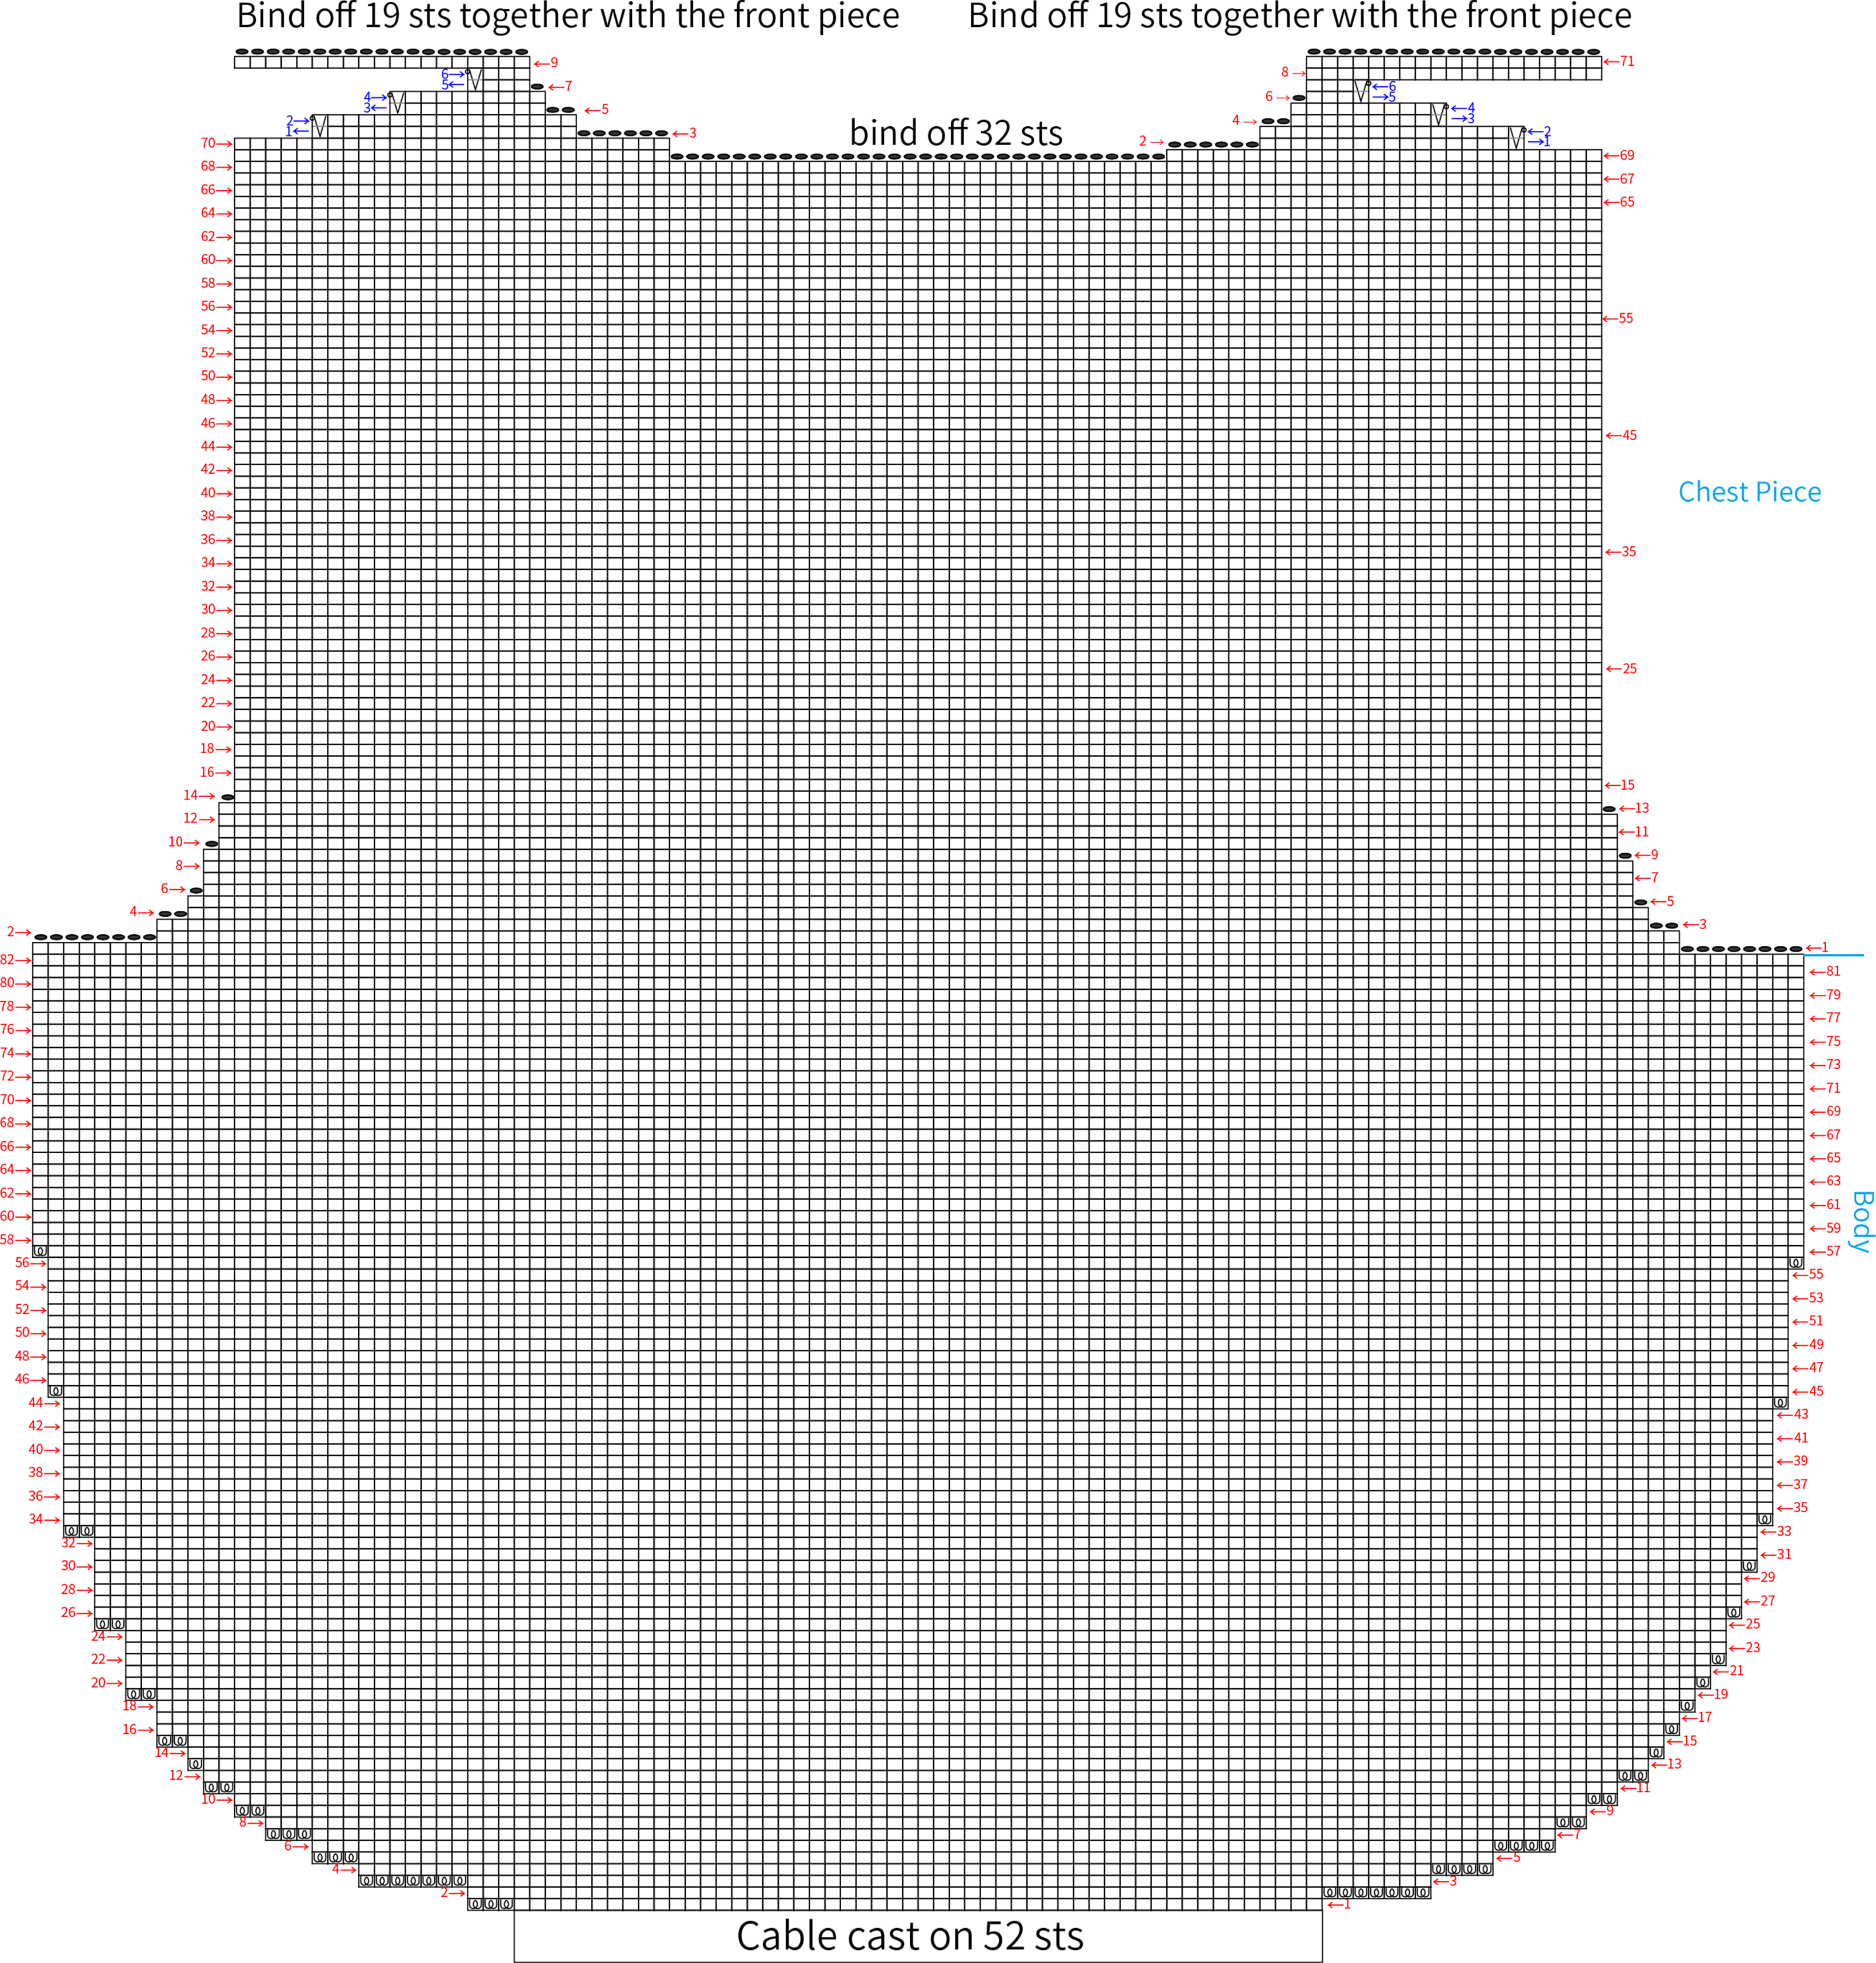
The back piece is using the cable cast on method and worked back and forth in stocking stitch. It's also divided into the body and chest sections, and finally, the shoulders are joined and bound off with the corresponding front piece shoulders. Please refer to the video demonstration for more details.
Part 3 Bordure C 54' 16''
The edging is done by first working on the front and back piece sections separately. Start by picking up stitches along the cast-on edge and both sides of the body to work the body edging. Then, pick up stitches around the armholes for the sleeve edging, and finally pick up stitches around the neckline for the neck edging. Please refer to the video demonstration for more details.
Note: The edging should be knitted first. Leave a yarn tail that's a bit more than three times the length of the area where you'll be picking up stitches. Adjust the placement of your hook according to the actual situation, to ensure the edge of the fabric stays flat and looks nice.
| Part | Antique White Version | Praline Version | Green Tea Version | Aragon Version |
| Sew lace trim | 4-Ply Combed Cotton & Acrylic Fibre Hand Knitting Yarn 24#Red Clay | |||
| Sew leather label | Morandi 4# Antique White |
Morandi 4# 04#Praline |
Morandi 4# 20#Green Tea |
Morandi 4# 10#Aragon |
Part 4 Decorations D
The decorations include lace trim, mushroom patches, laces, and a leather label. For sewing on the lace and leather label, Please refer to the video demonstration for more details.
Step 1 Lace Trim 66' 38''
Step 2 Mushroom Patch 73' 49''
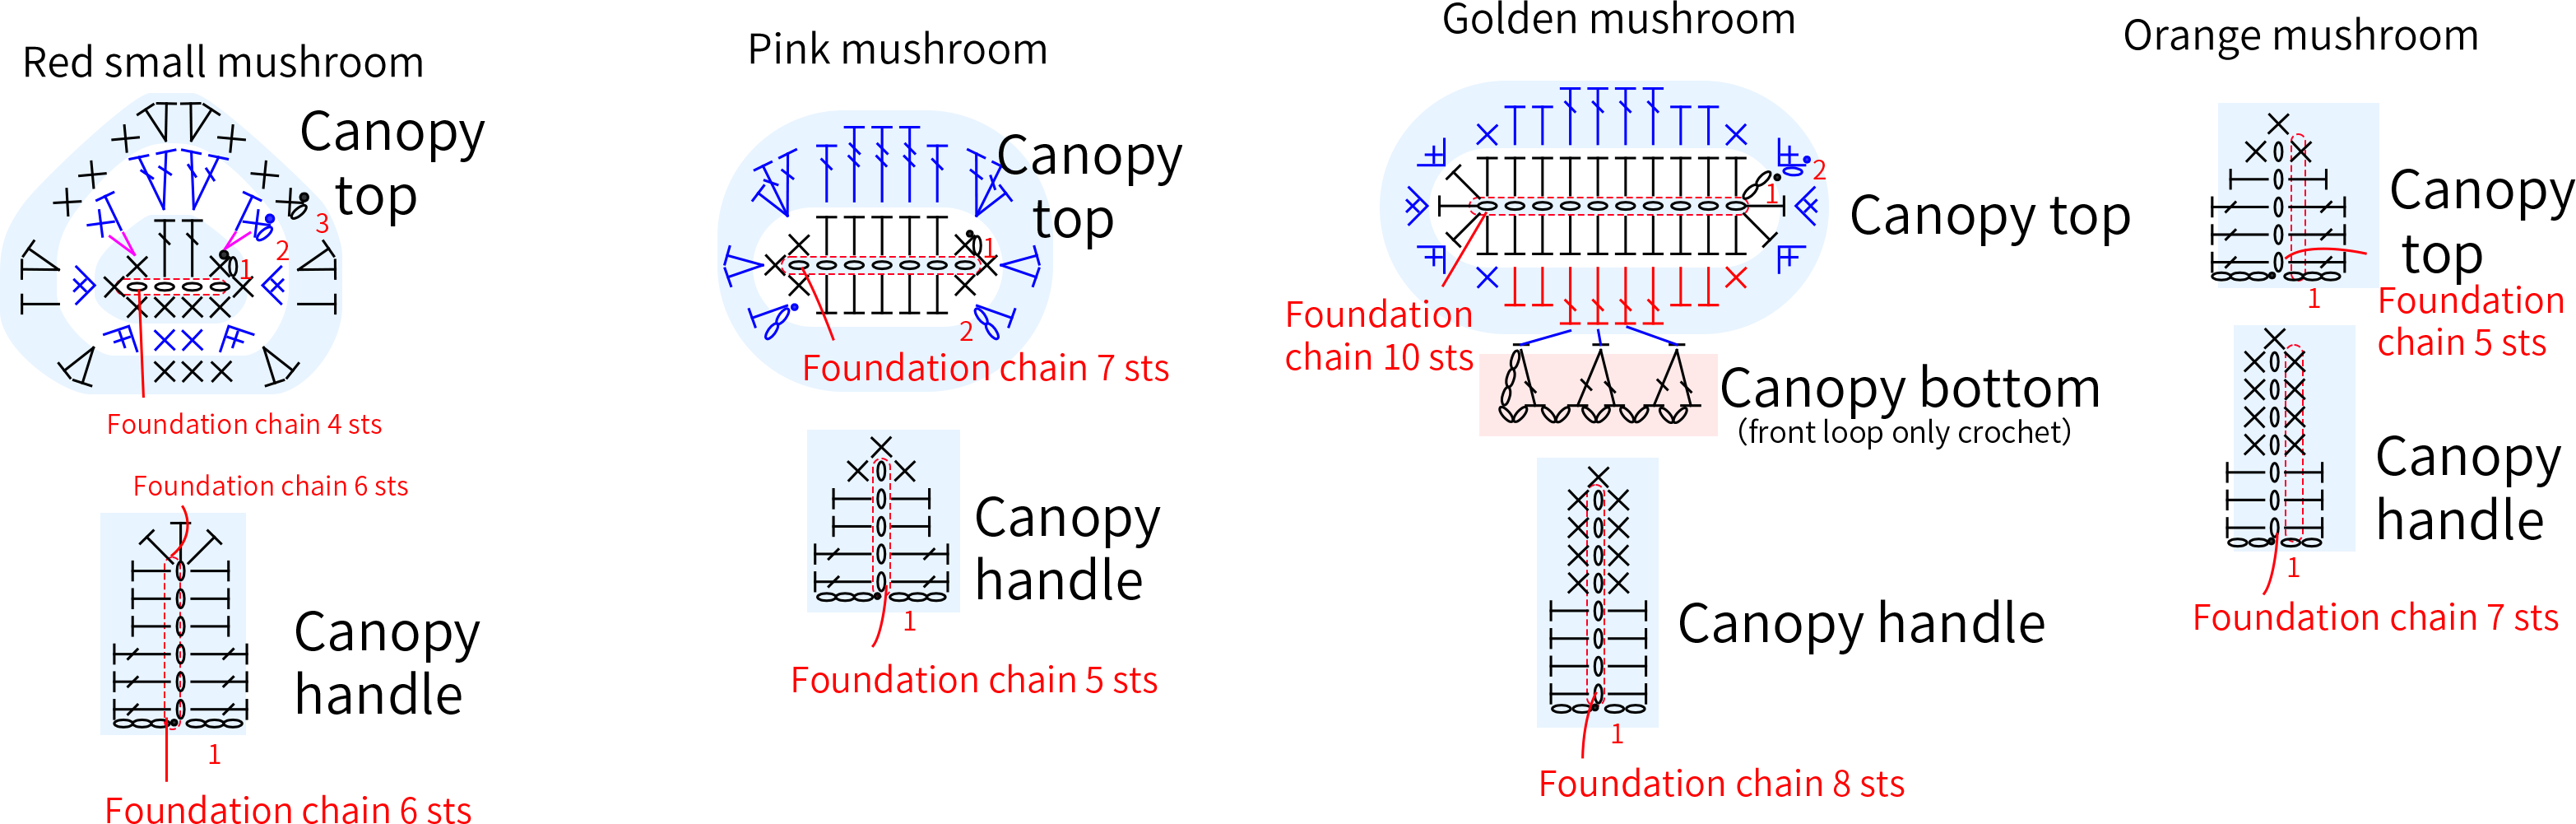
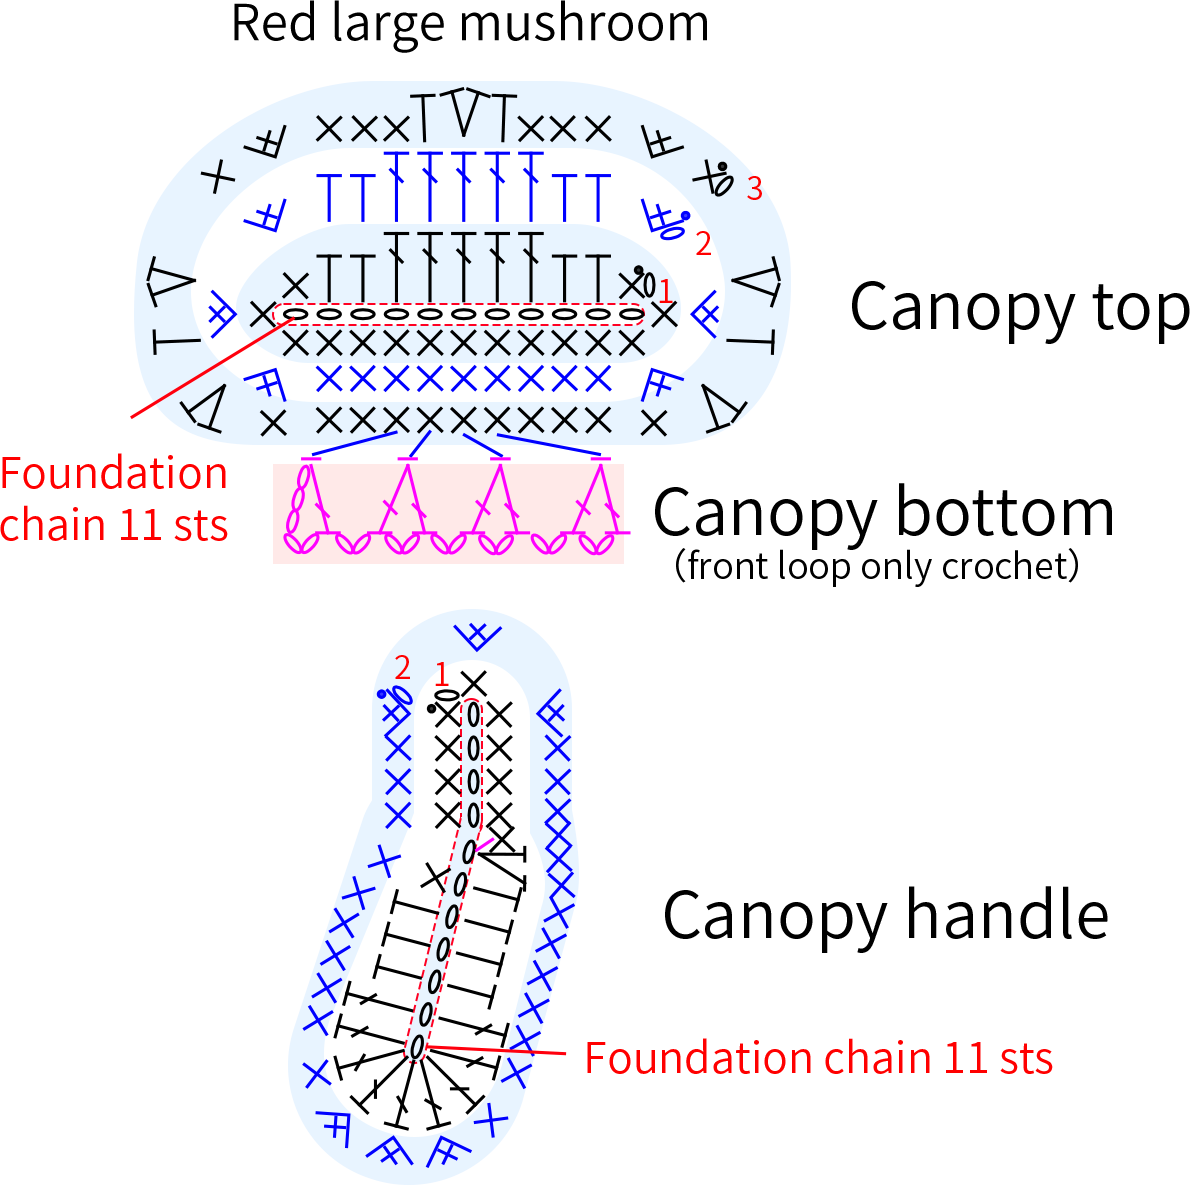
The mushroom patches from left to right are a red small mushroom, a pink mushroom, a golden mushroom, an orange mushroom, and a red large mushroom. Crochet each separately, then sew them together.Please refer to the video demonstration for more details.
Note: Leave a 20-30 cm yarn tail at both the top and handle of the umbrella for sewing.
| Mushroom Patch | Antique White Version | Praline Version | Green Tea Version | Aragon Version | |
| Red small mushroom | Canopy top | 4-Ply Combed Cotton & Acrylic Fibre Hand Knitting Yarn 24#Red Clay | |||
| Canopy top spots, canopy handle | 4-Ply Combed Cotton & Acrylic Fibre Hand Knitting Yarn 06#Bright White | ||||
| Pink mushroom | Canopy top cast on and the first round | 4-Ply Combed Cotton & Acrylic Fibre Hand Knitting Yarn 06#Bright White | |||
| Canopy top second row | 4-Ply Combed Cotton & Acrylic Fibre Hand Knitting Yarn 02#Quartz Pink | ||||
| Canopy handle | 4-Ply Combed Cotton & Acrylic Fibre Hand Knitting Yarn 06#Bright White | ||||
Golden mushroom |
Canopy top cast on and the first round | 4-Ply Combed Cotton & Acrylic Fibre Hand Knitting Yarn 56#Golden Yellow | |||
| Canopy top second round | 4-Ply Combed Cotton & Acrylic Fibre Hand Knitting Yarn 56#Golden Yellow,red stitches06#Bright White | ||||
| Canopy bottom, canopy handle | 4-Ply Combed Cotton & Acrylic Fibre Hand Knitting Yarn 06#Bright White | ||||
| Orange mushroom | Canopy top | 4-Ply Combed Cotton & Acrylic Fibre Hand Knitting Yarn 30#Zinnia | |||
| Canopy handle | 4-Ply Combed Cotton & Acrylic Fibre Hand Knitting Yarn 06#Bright White | ||||
| Red large mushroom | Canopy top | 4-Ply Combed Cotton & Acrylic Fibre Hand Knitting Yarn 24#Red Clay | |||
| Canopy top spots, canopy bottom, canopy handle | 4-Ply Combed Cotton & Acrylic Fibre Hand Knitting Yarn 06#Bright White | ||||
Step 3 Tie the straps, Leather label 94' 19''
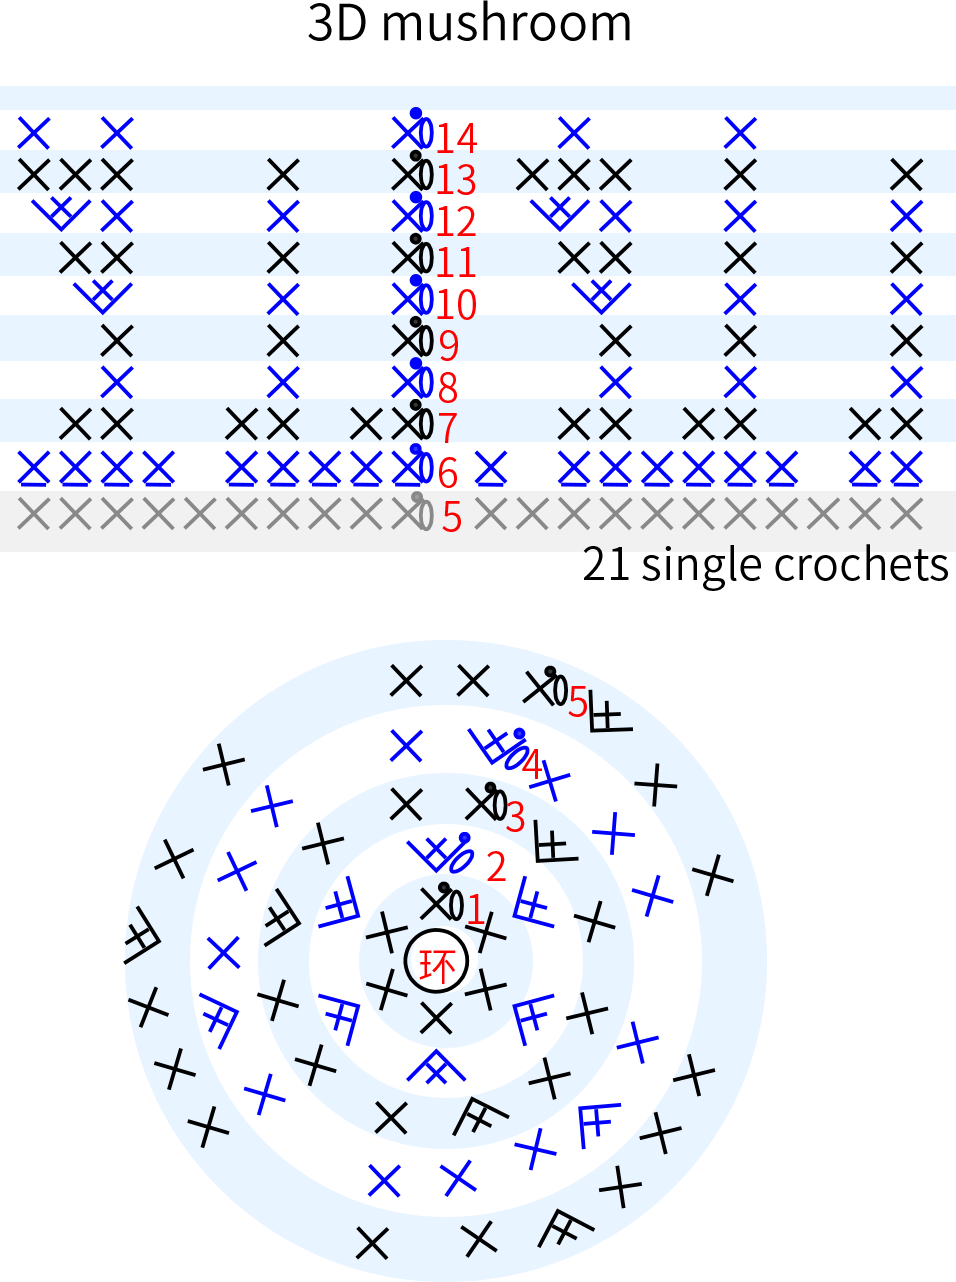
There are a total of 4 drawstrings. Each drawstring is divided into a 3D mushroom and a rope part.
The rope part is crocheted using the chain stitch method (each about 24 cm long, adjustable as needed, leave a 20 cm yarn tail at the end for sewing).
The 3D mushrooms are started with a foundation chain, then crocheted in rounds counterclockwise.
Once completed, assemble the mushrooms onto the ropes, and sew the drawstrings up to the underarm area. Please refer to the video demonstration for more details.
Note:
1. On the sixth round, crochet through the back loops of the fifth round only.
2. While crocheting the 3D mushroom, add yarn scraps for stuffing as you go.
3. Leave a 30 cm yarn tail at the end to close the opening and sew the ends together.
| Tie Strap | Antique White Version | Praline Version | Green Tea Version | Aragon Version | |
| Rope ×4 | 4-Ply Combed Cotton & Acrylic Fibre Hand Knitting Yarn 24#Red Clay |
4-Ply Combed Cotton & Acrylic Fibre Hand Knitting Yarn 06#Bright White |
|||
| 3D mushroom ×4 |
Cast on and R 1-5 | Two 4-Ply Combed Cotton & Acrylic Fibre Hand Knitting Yarn 02#Quartz Pink/Two 4-Ply Combed Cotton & Acrylic Fibre Hand Knitting Yarn 30#Zinnia | |||
| Remaining rounds | 4-Ply Combed Cotton & Acrylic Fibre Hand Knitting Yarn 06#Bright White | ||||
Made by the community





