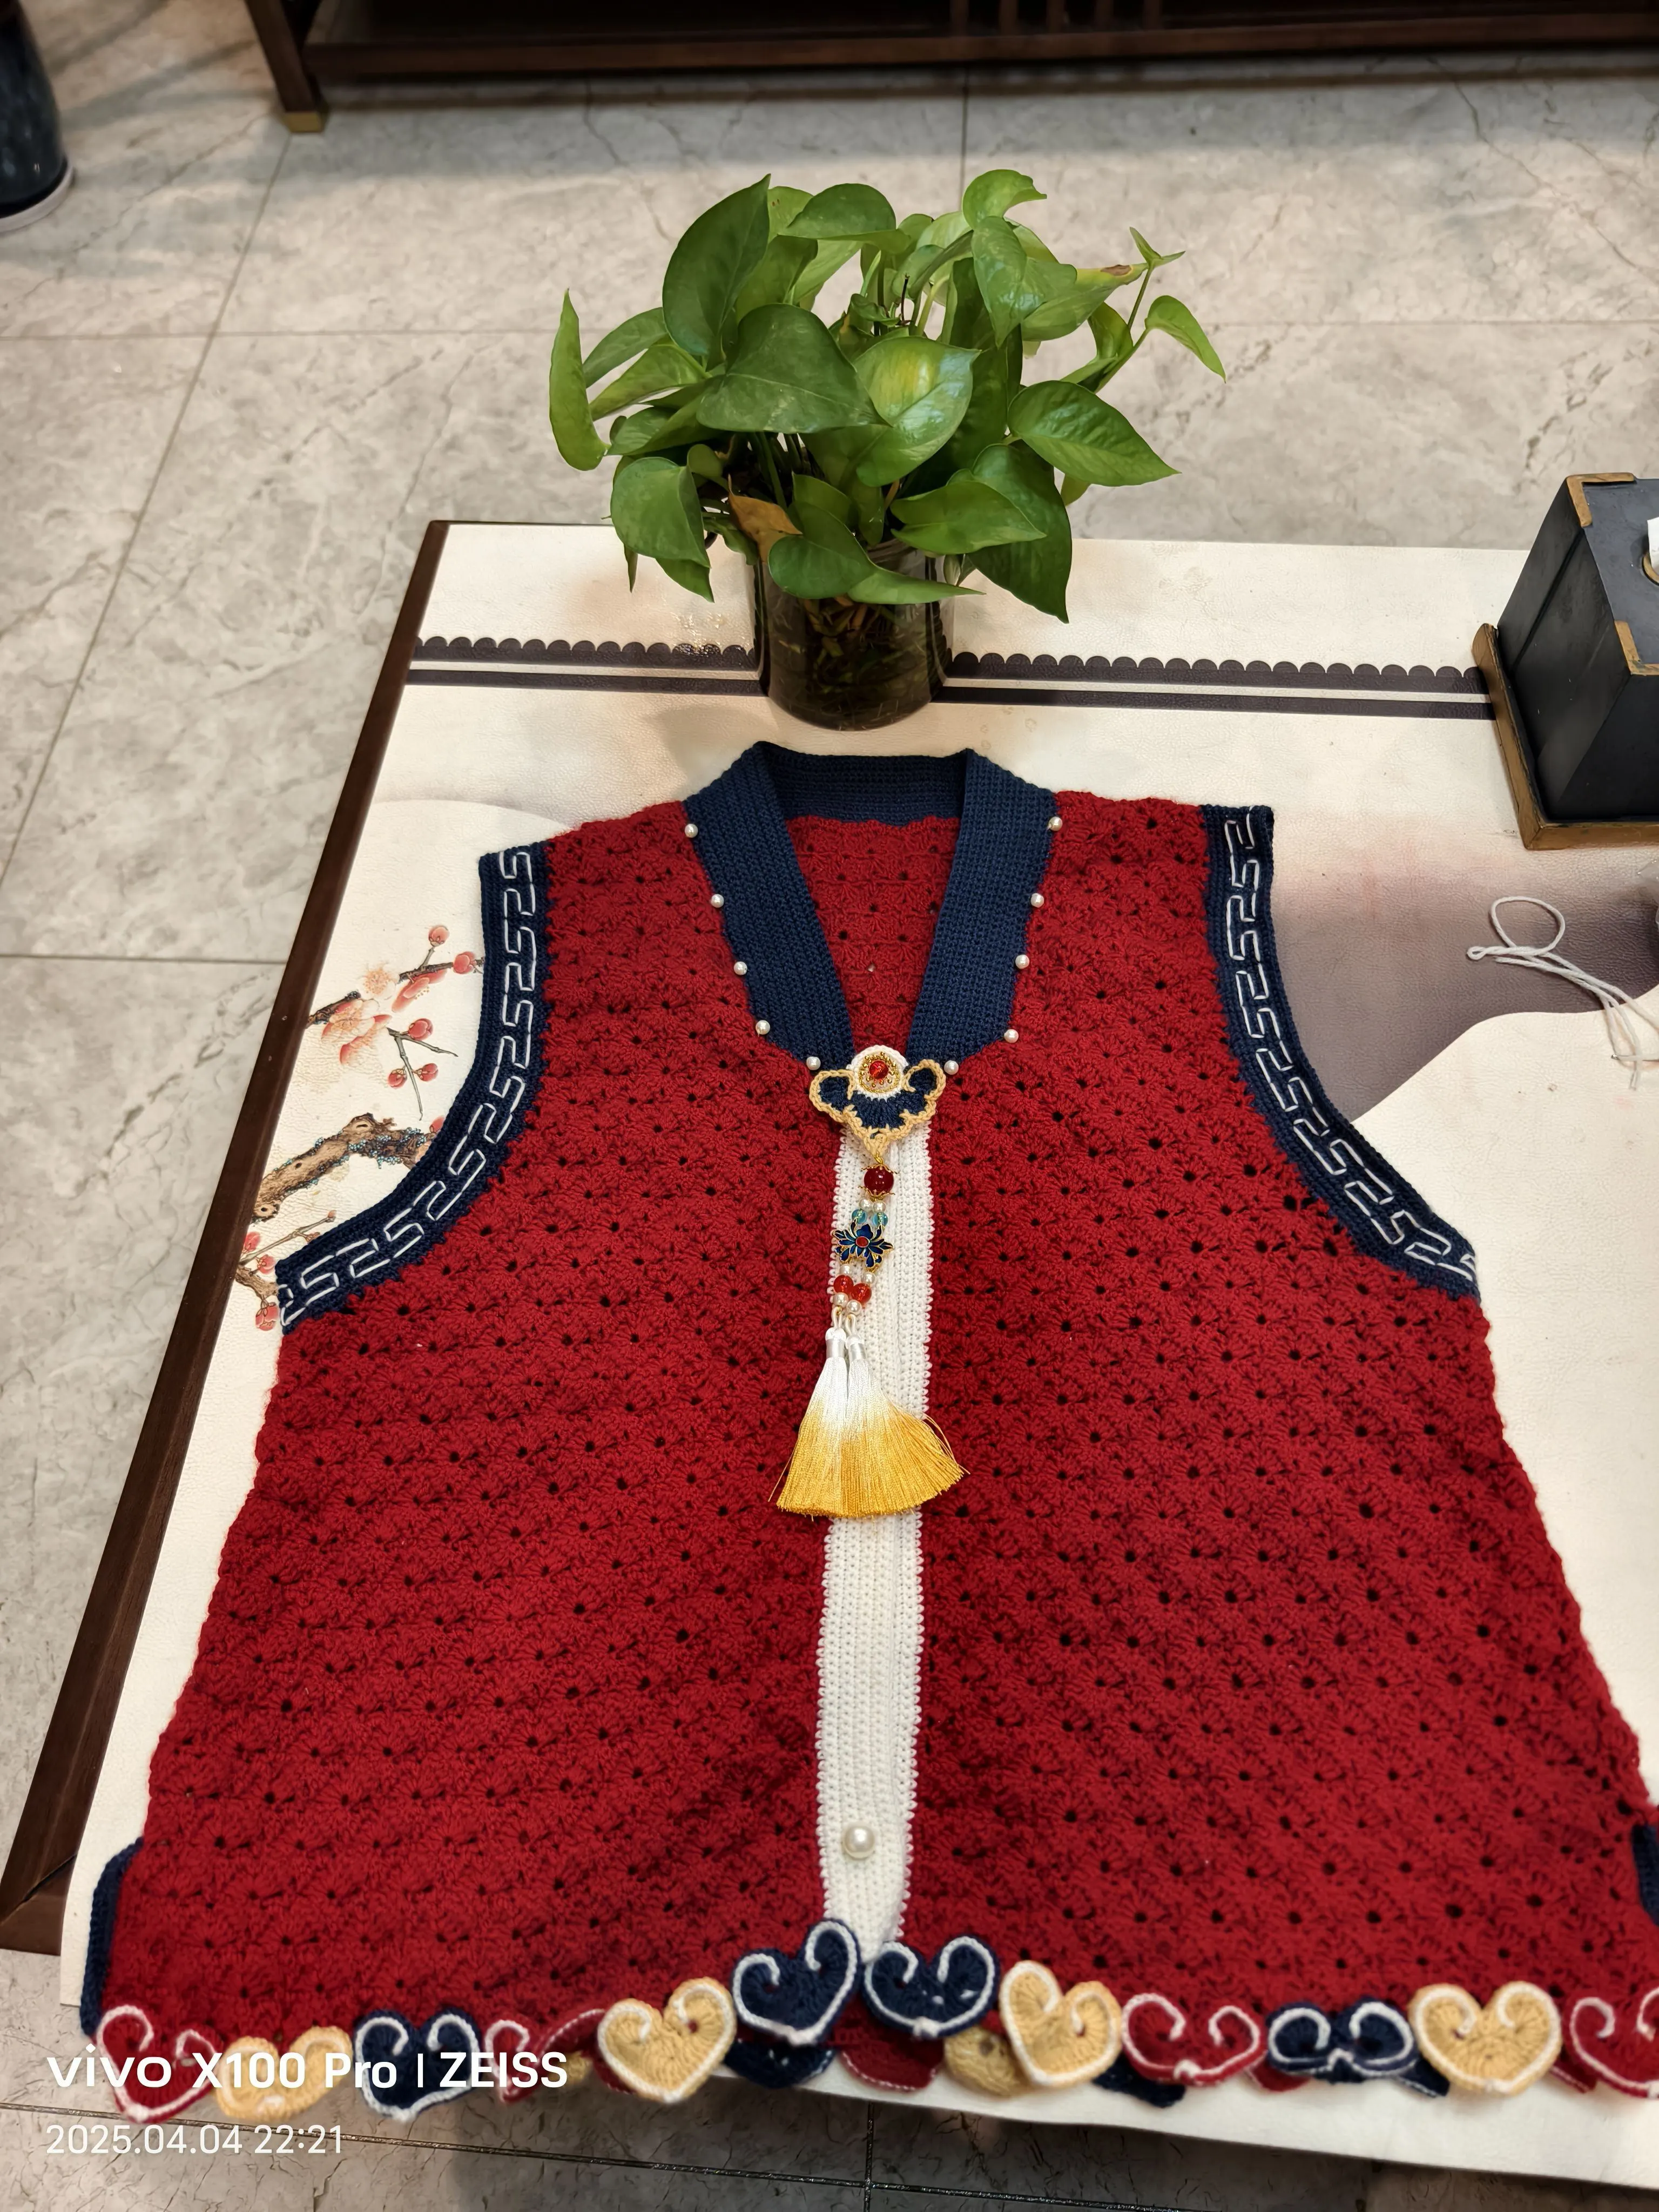
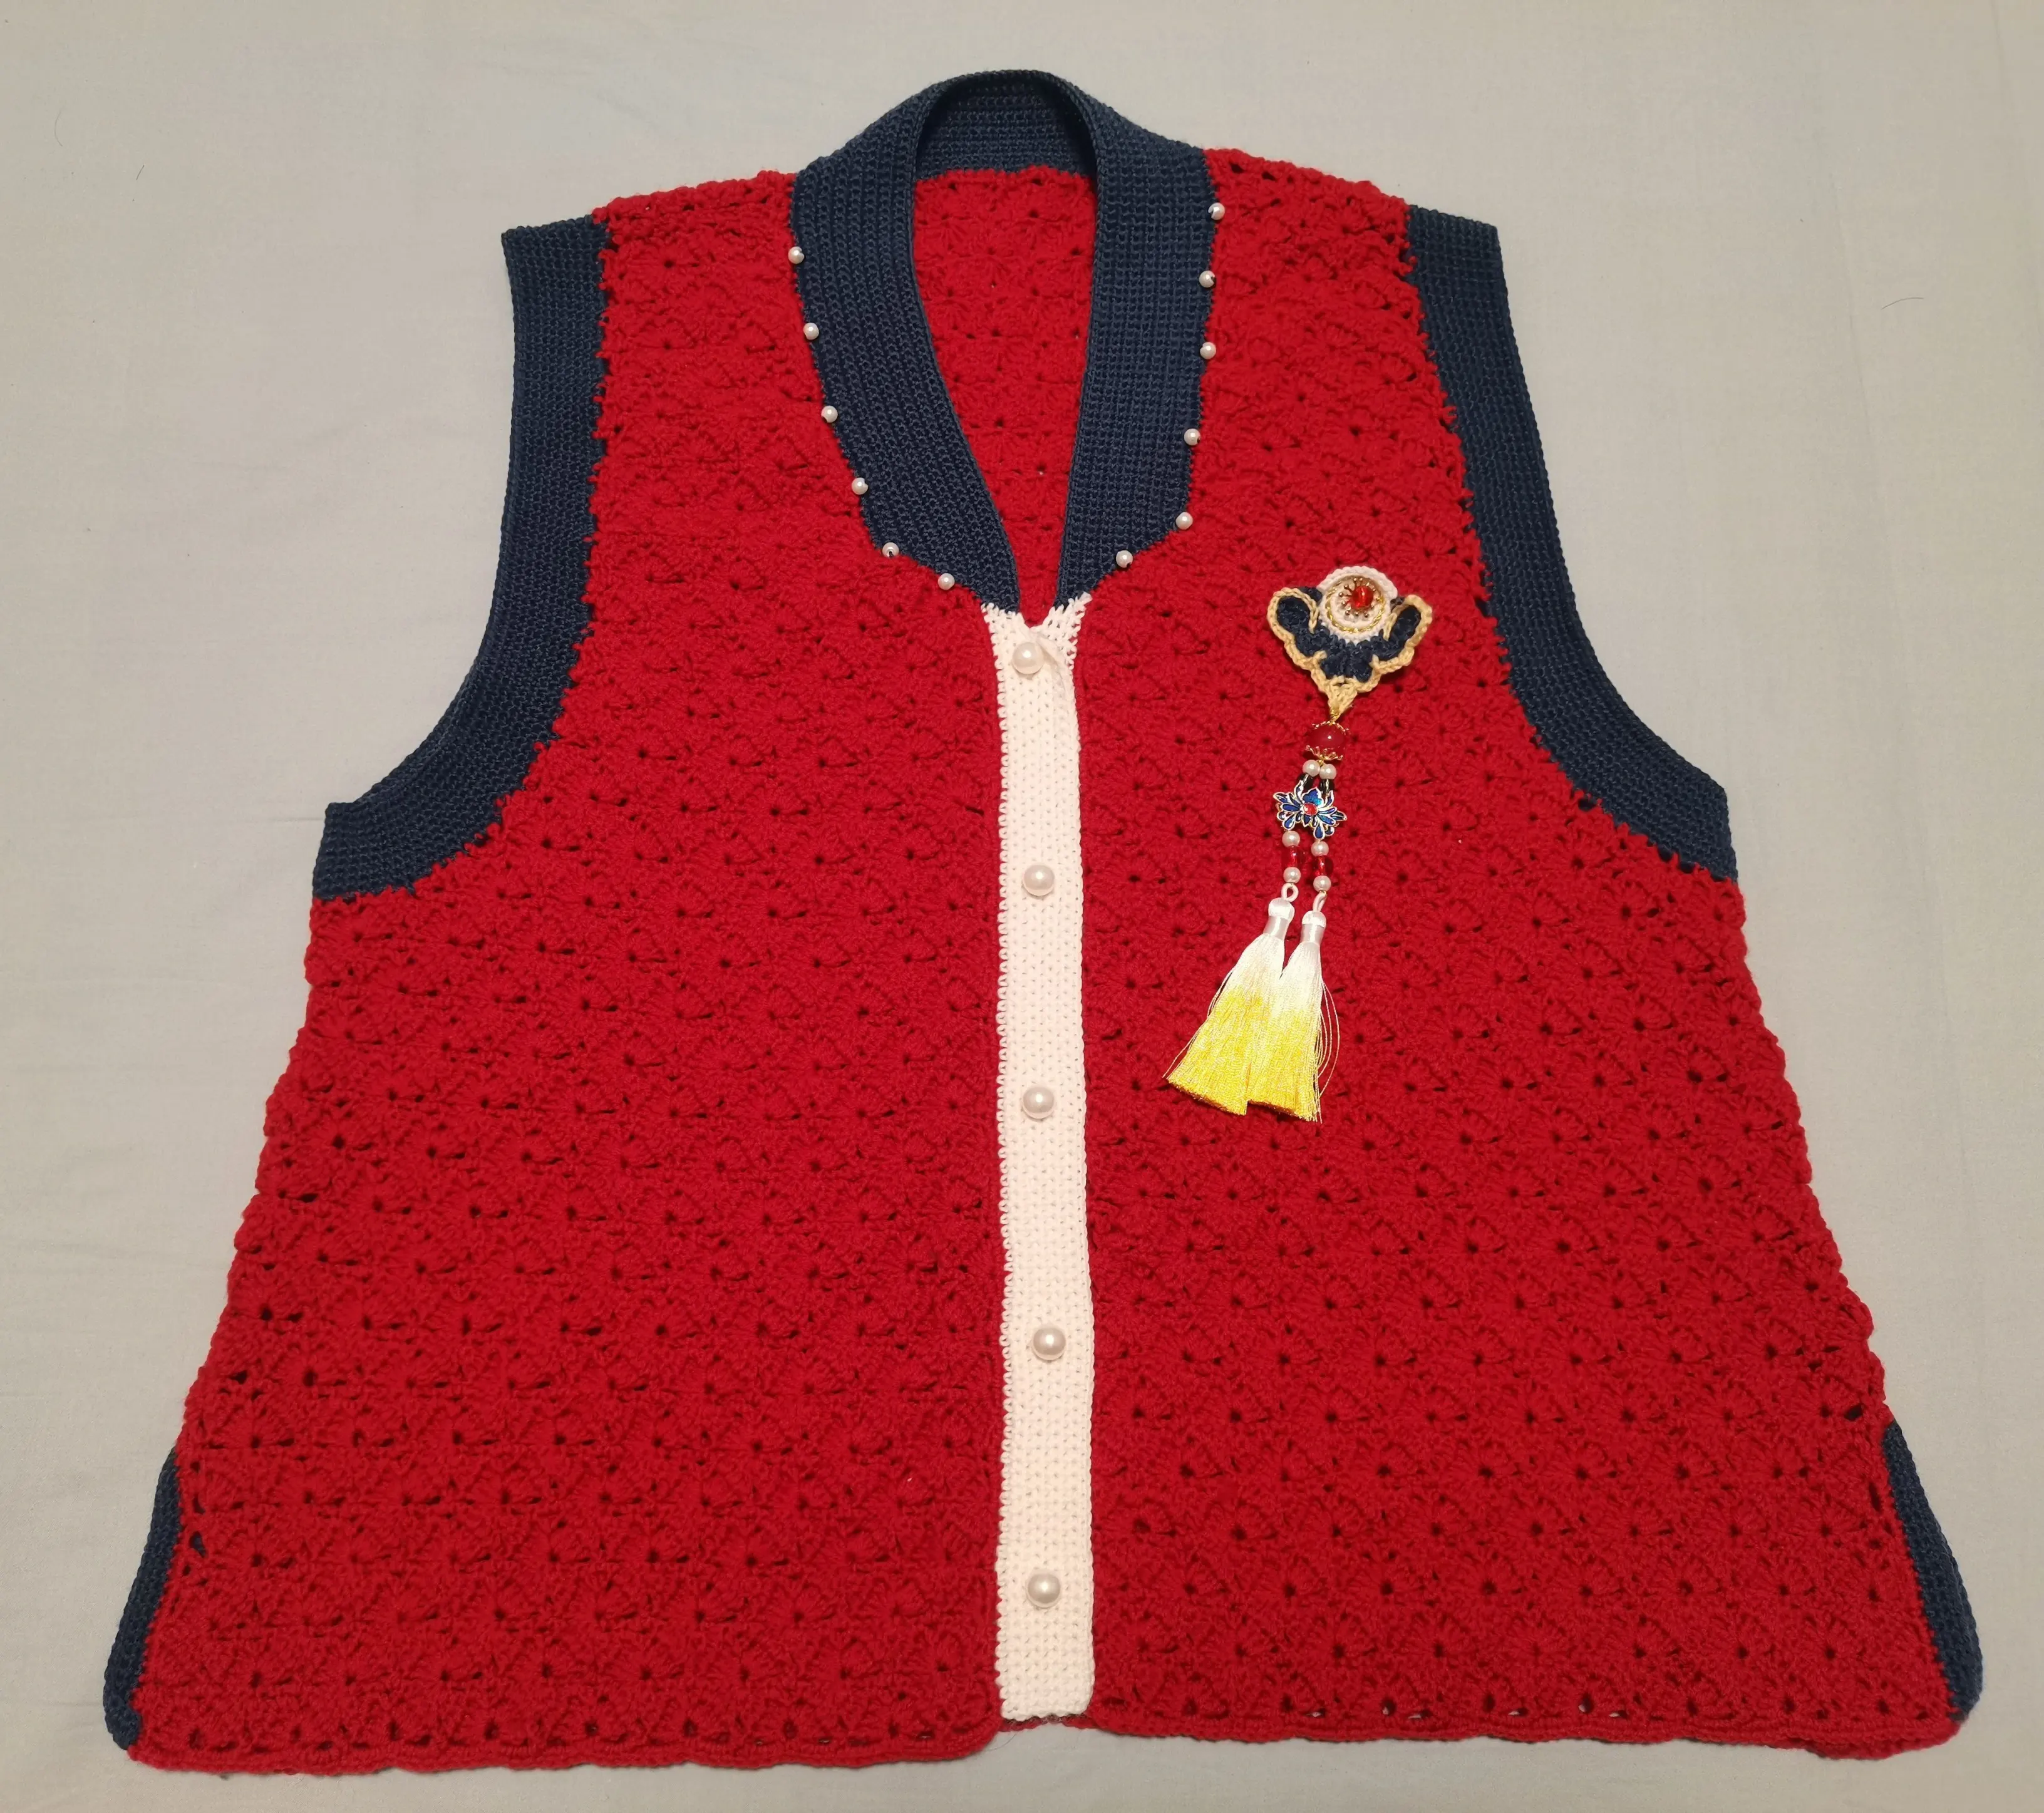
Clothes
Peony Pavilion
Project preview
See the finished project
Pattern format
Instructions
Watch and follow
Video tutorial
| Style | Yarn | Color |
|---|---|---|
| Red Dahlia Version | Morandi 4# |  01#Whisper White x 1 01#Whisper White x 1 21#Buff Yellow x 1 21#Buff Yellow x 1 37#Majolica Blue x 2 37#Majolica Blue x 2 41#Red Dahlia x 6 41#Red Dahlia x 6 |
| Zen Blue Version | Morandi 4# | 01#Whisper White x 1 08#Linen x 1 08#Linen x 1 26#Zen Blue x 6 26#Zen Blue x 6 31#Indigo Blue x 2 31#Indigo Blue x 2 |
| Silver Peony Version | Morandi 4# | 01#Whisper White x 1 06#Milky Blue x 2 06#Milky Blue x 2 09#Pastel Yellow x 1 09#Pastel Yellow x 1 14#Silver Peony x 6 14#Silver Peony x 6 |
Red Dahlia Version
Zen Blue Version
Silver Peony Version
This vest consists of the front piece, back piece, connections, edging, front band, collar, cuffs, and decorations. First, crochet the front and back pieces, then join them together and crochet the edging. After completing that, work on the front band, collar, and cuffs. Finally, make the decorations.
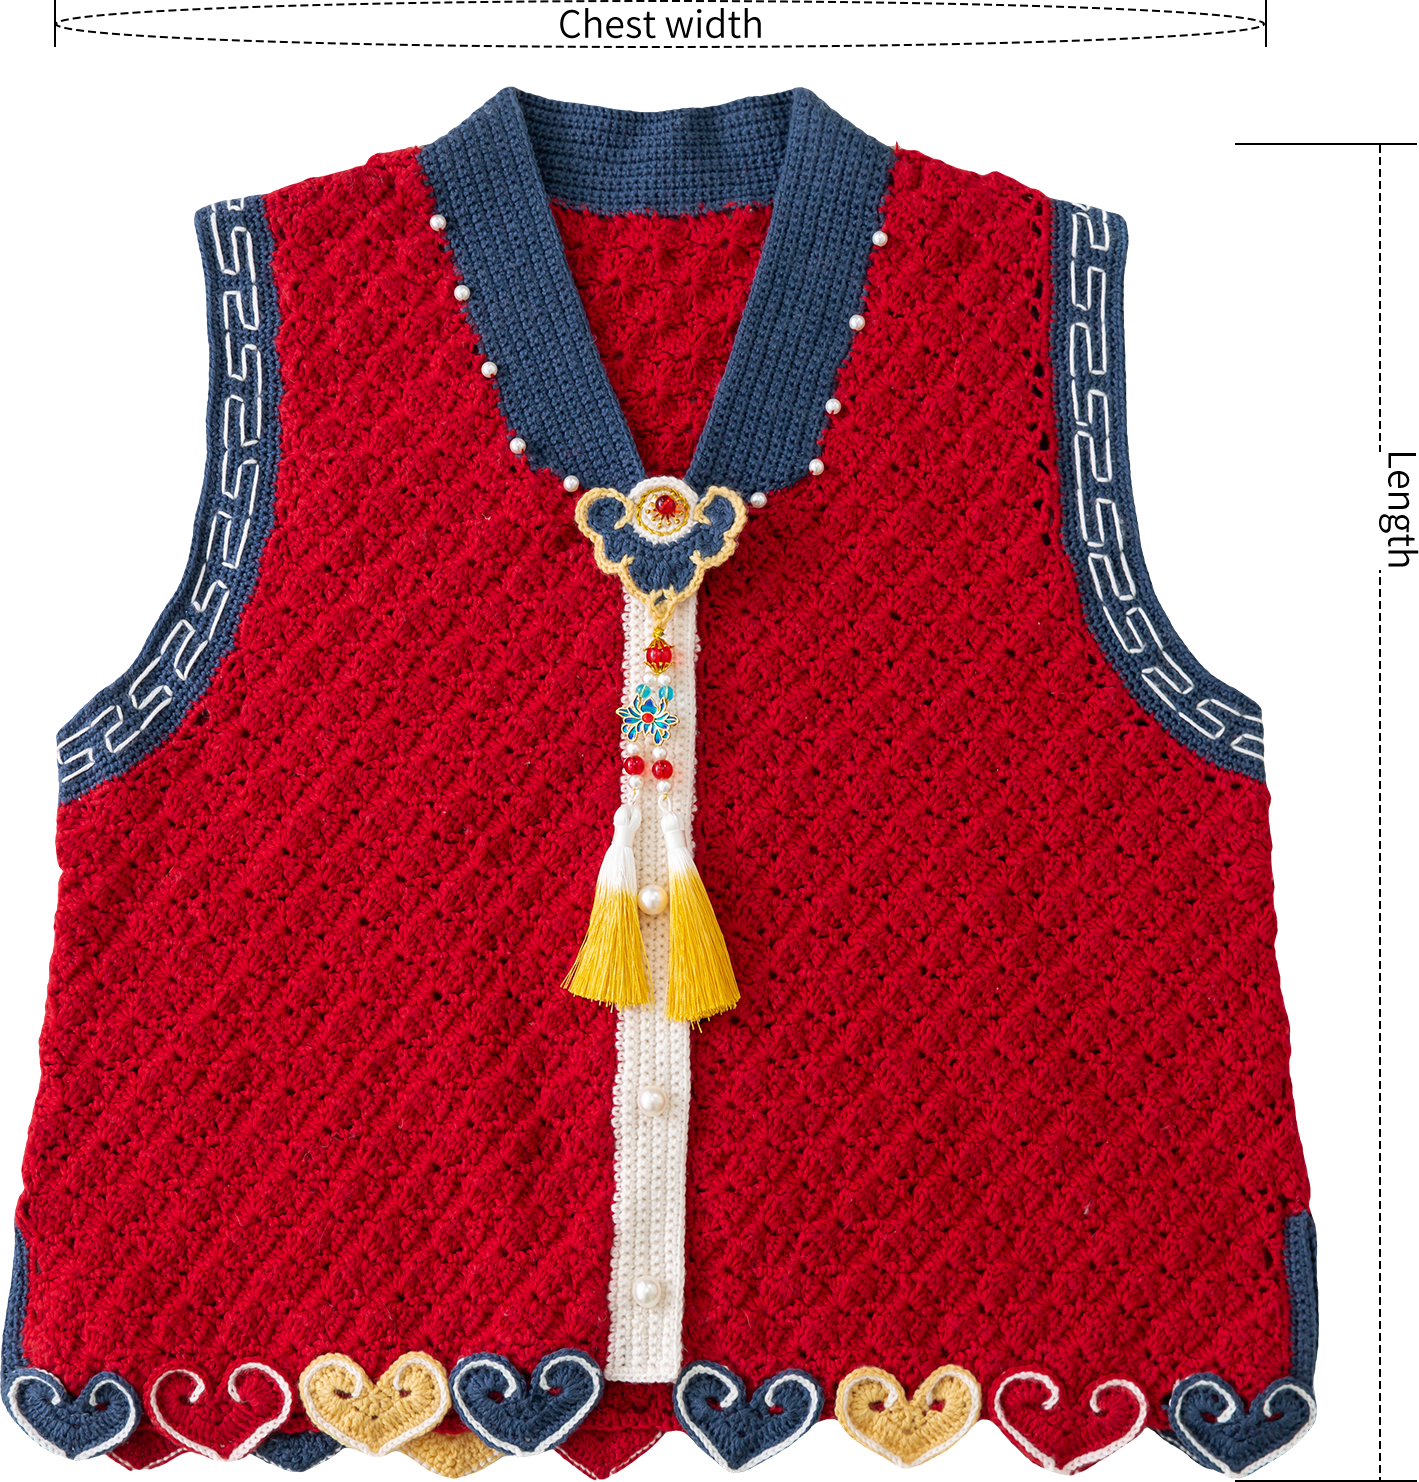
| Size | Chest width | Length |
| Small | 92 cm | 50 cm |
Due to variations in individual tension, the size of the sample is for reference only.
Materials: Morandi 4#
Crochet Hook: 2.50 mm Crochet Hook
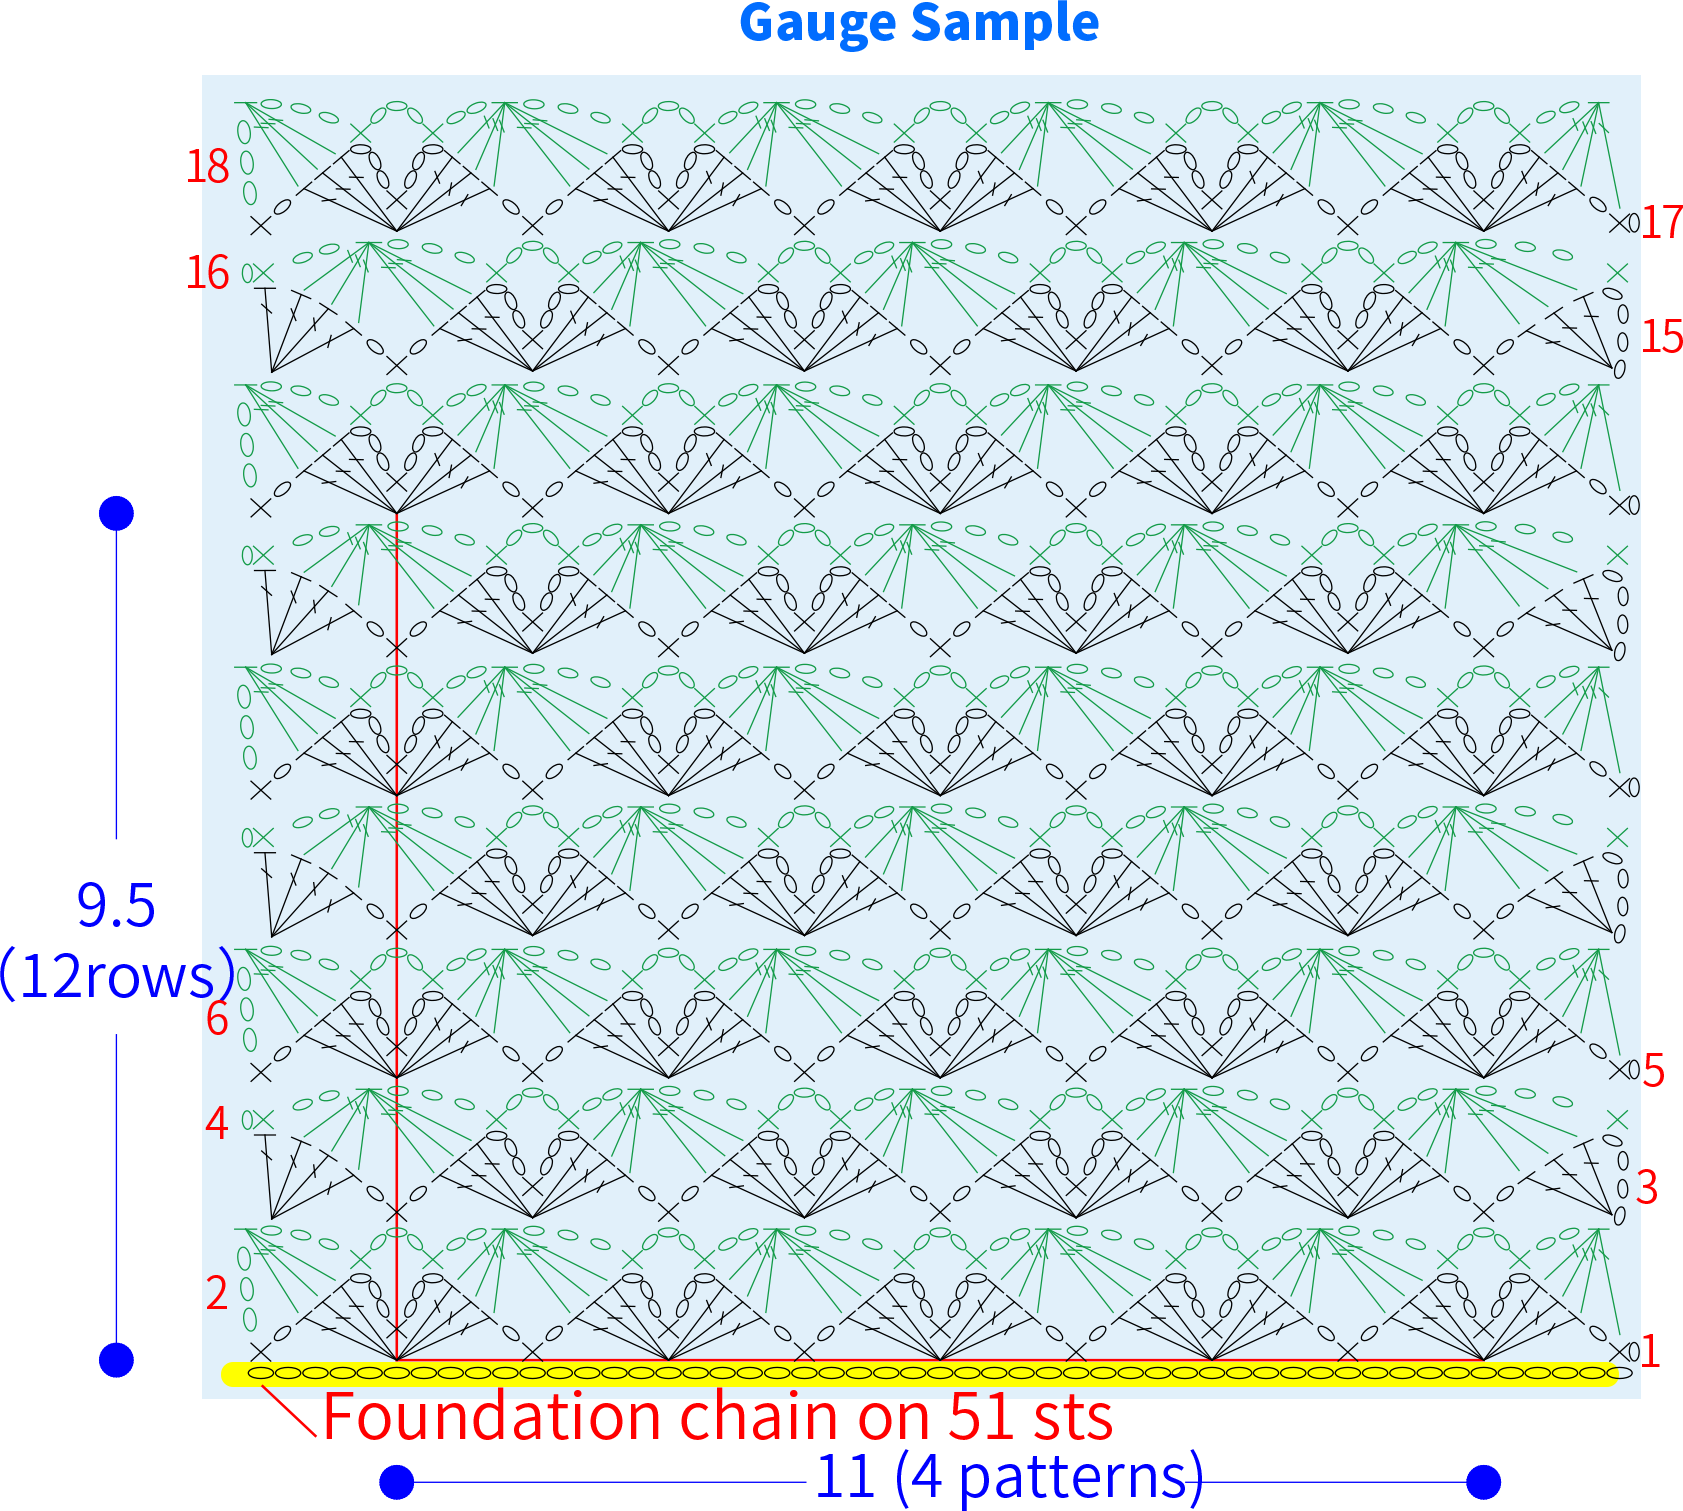
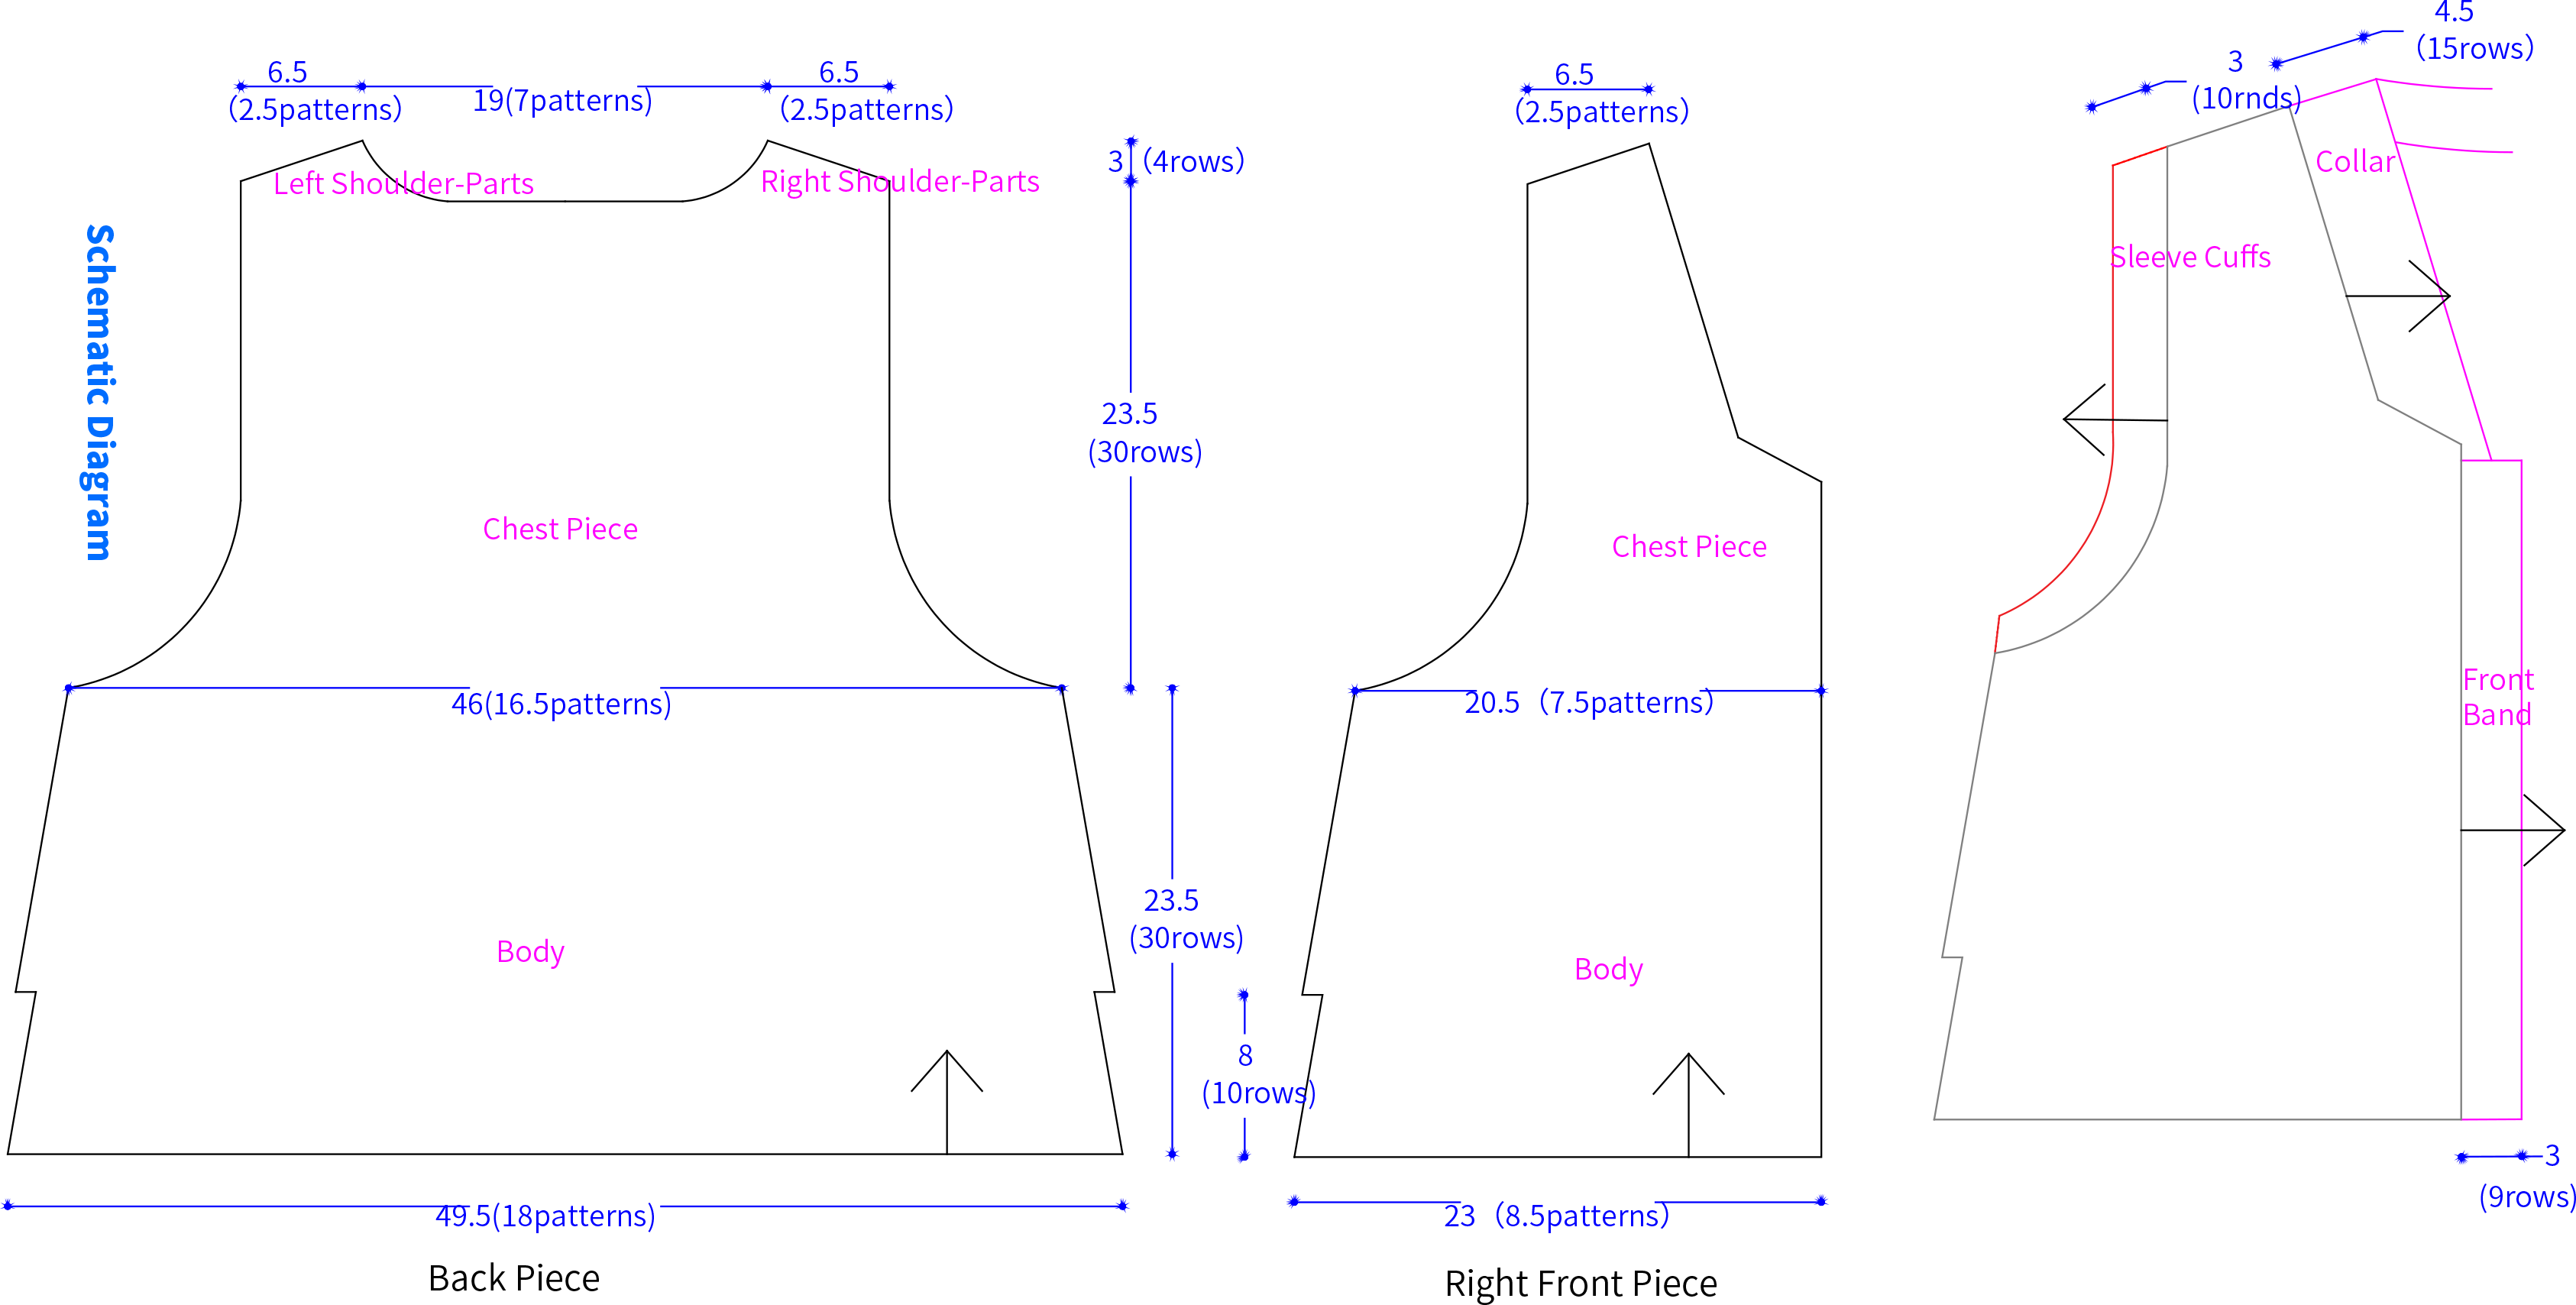

Chart Key














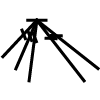
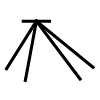

Note:
This pattern is making in Chinese crochet pattern terms, and the stitch name is written using American terminology. All measurements in charts are in cm.
Part 1 The Back Piece A 01' 01''
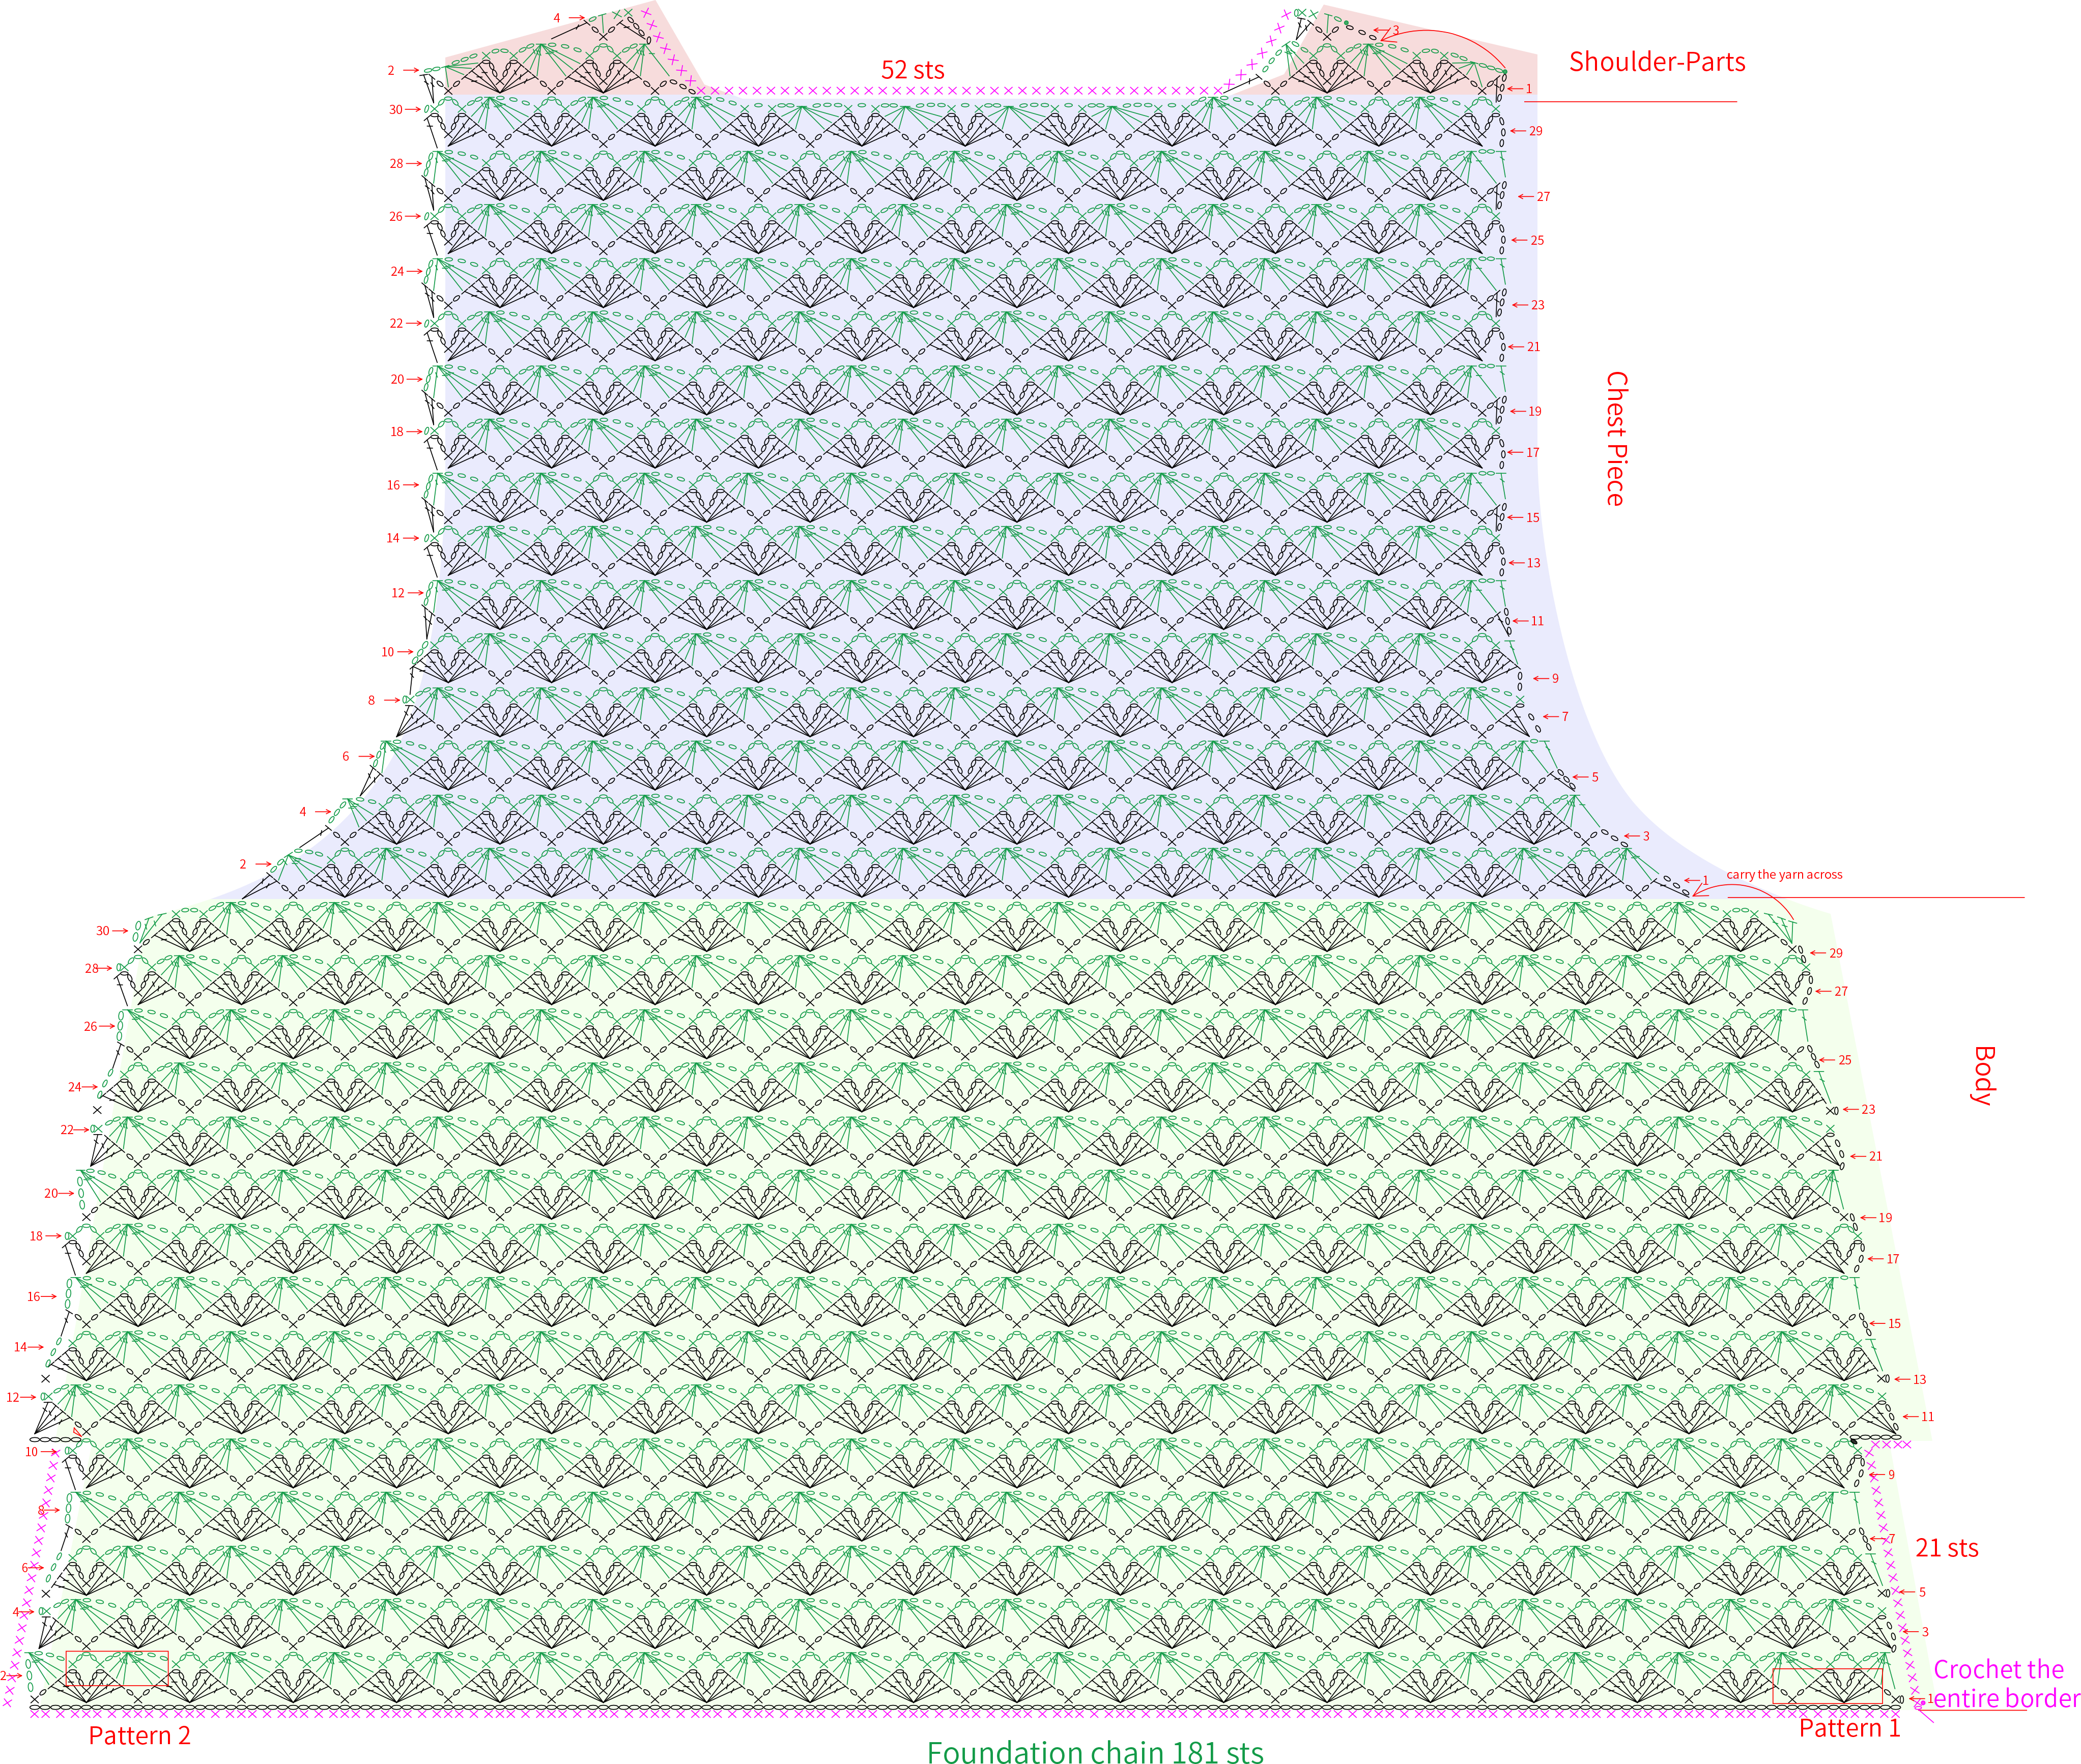
Divide into body, front piece, and shoulder-parts. Start with the body, using the foundation chain method to cast on, then work back and forth along the starting chain. Please refer to the video demonstration for more details.
| Part | Red Dahlia Version | Zen Blue Version | Silver Peony Version |
| Front and Back pieces, Joining Together | 41#Red Dahlia | 26#Zen Blue | 14#Silver Peony |
| Overall Edging | |||
| Side Edging | 37#Majolica Blue | 31#Indigo Blue | 06#Milky Blue |
| Front Band | 01#Whisper White | 01#Whisper White | 01#Whisper White |
| Collar | 37#Majolica Blue | 31#Indigo Blue | 06#Milky Blue |
| Cuff Edges |
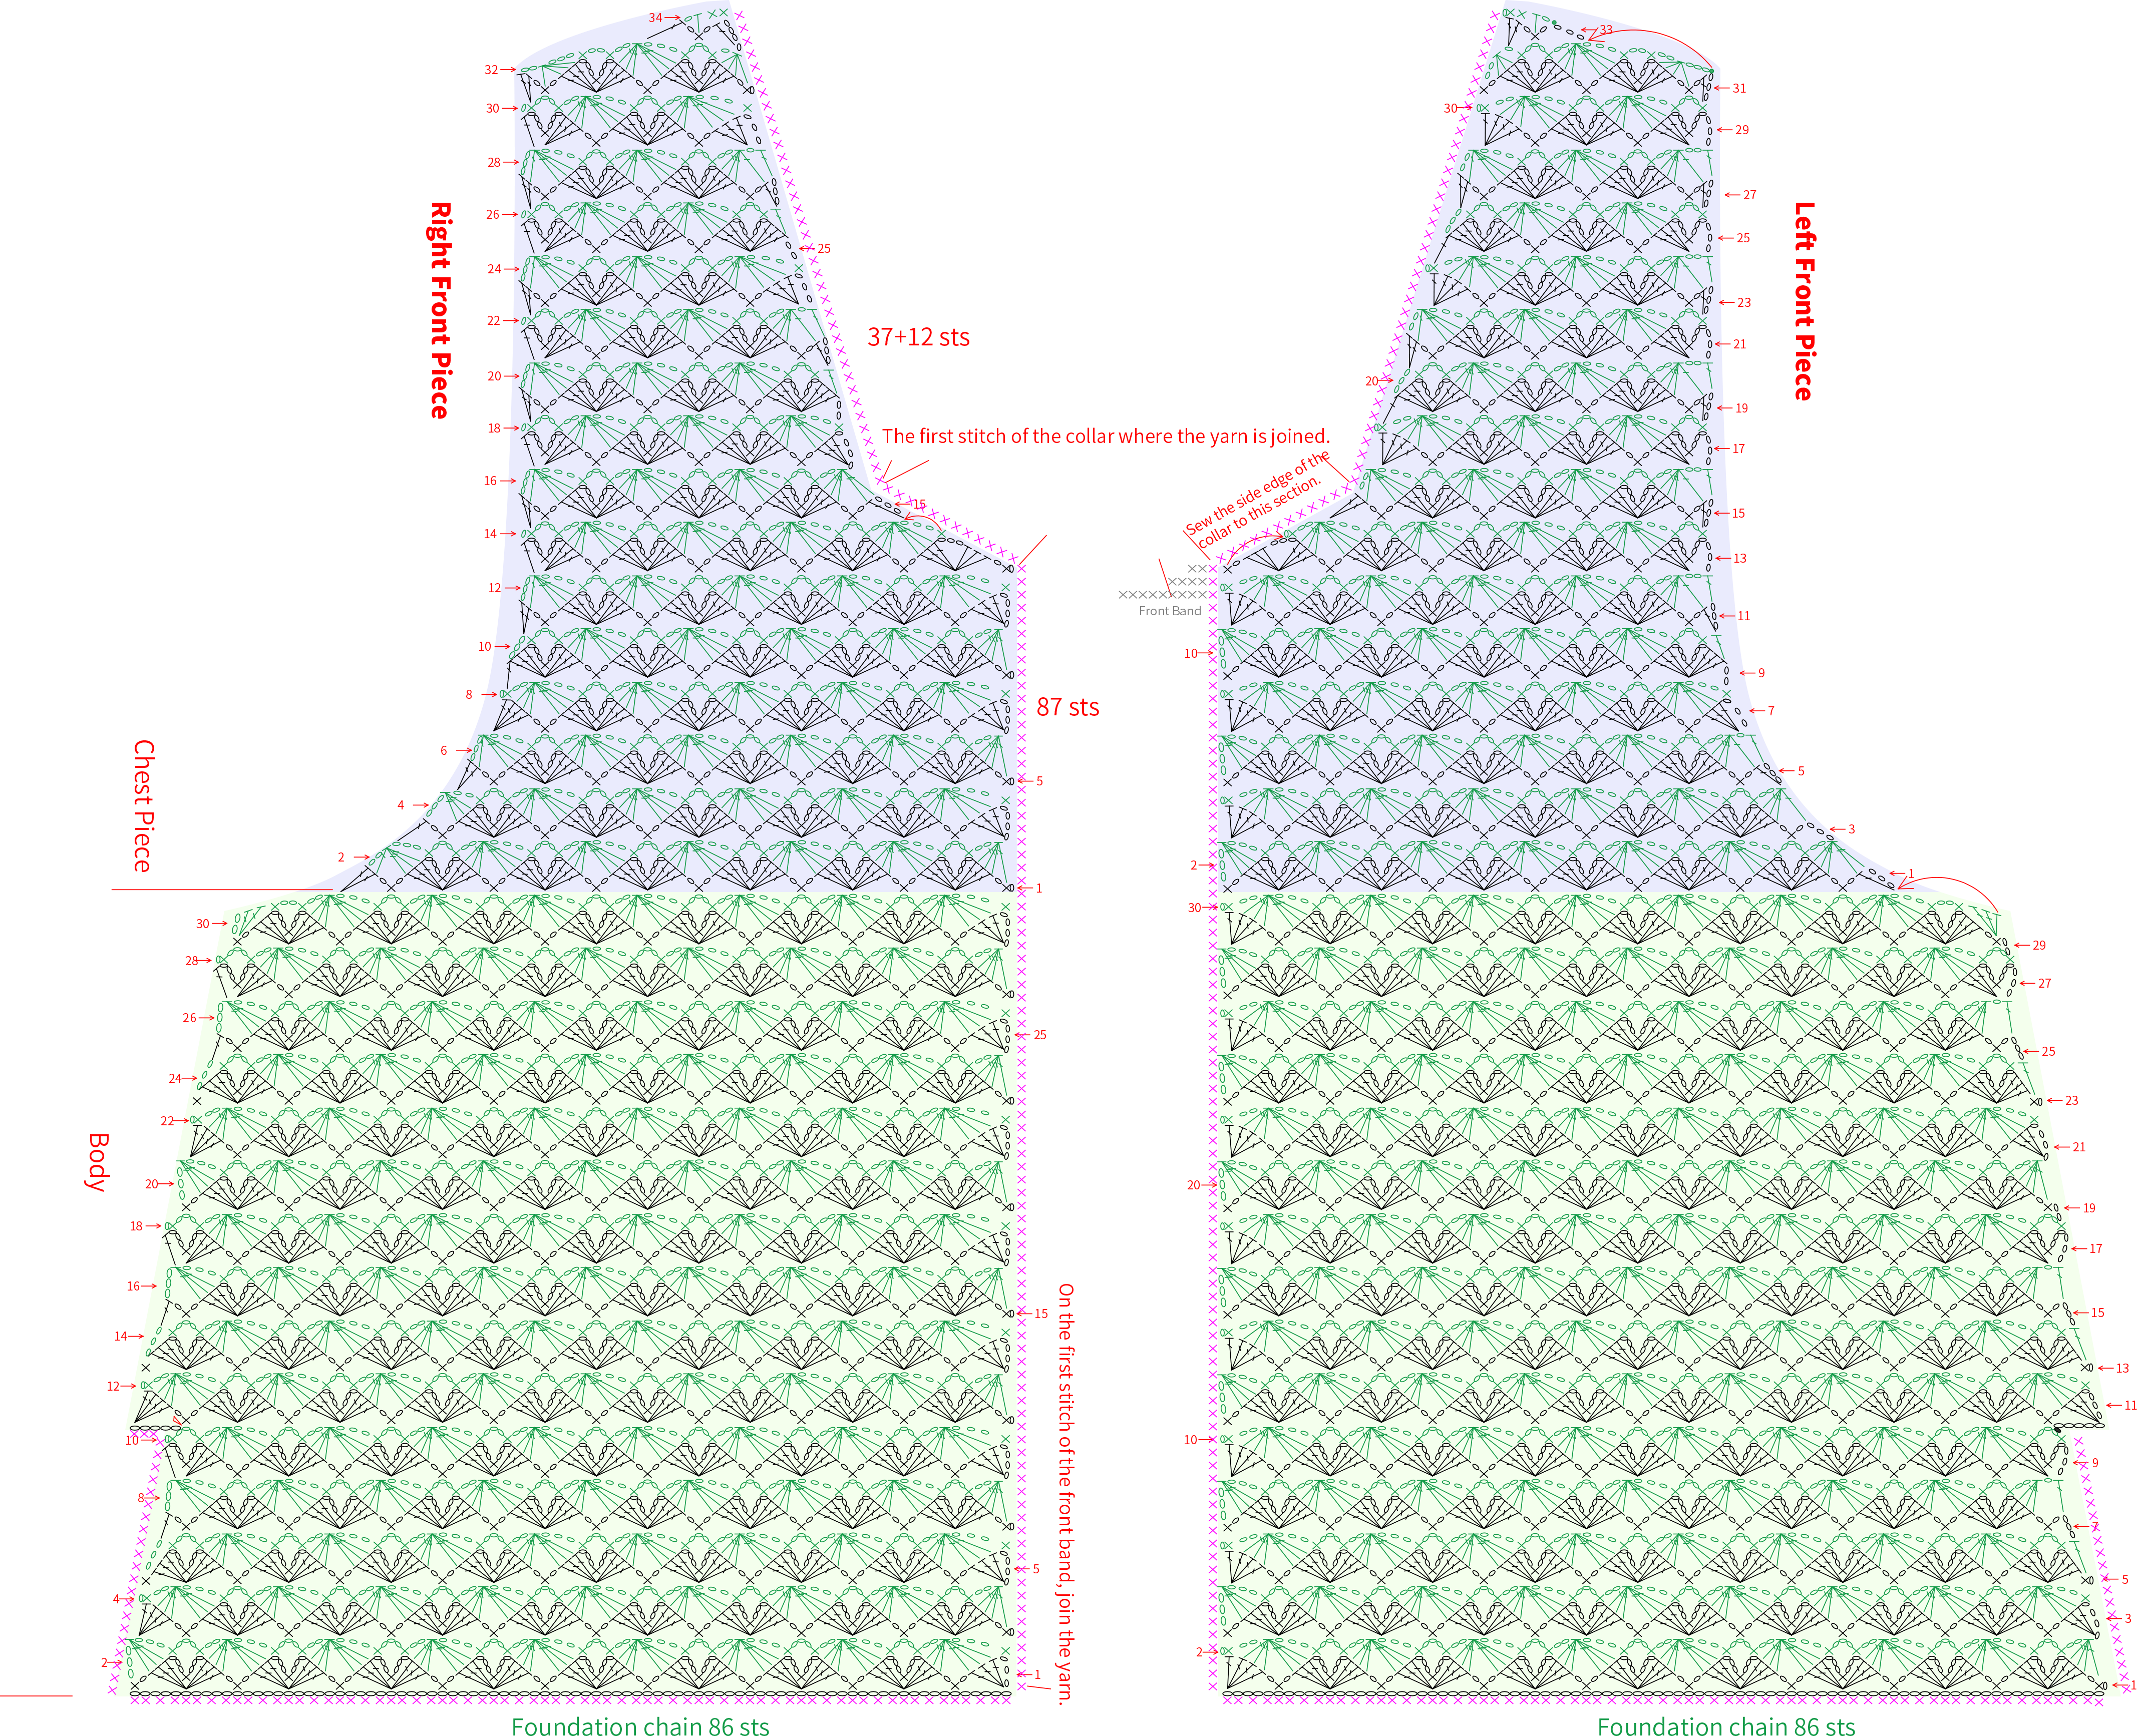
Part 2 The Front Piece B 28' 44''
Part 3 Connections C 28' 59''
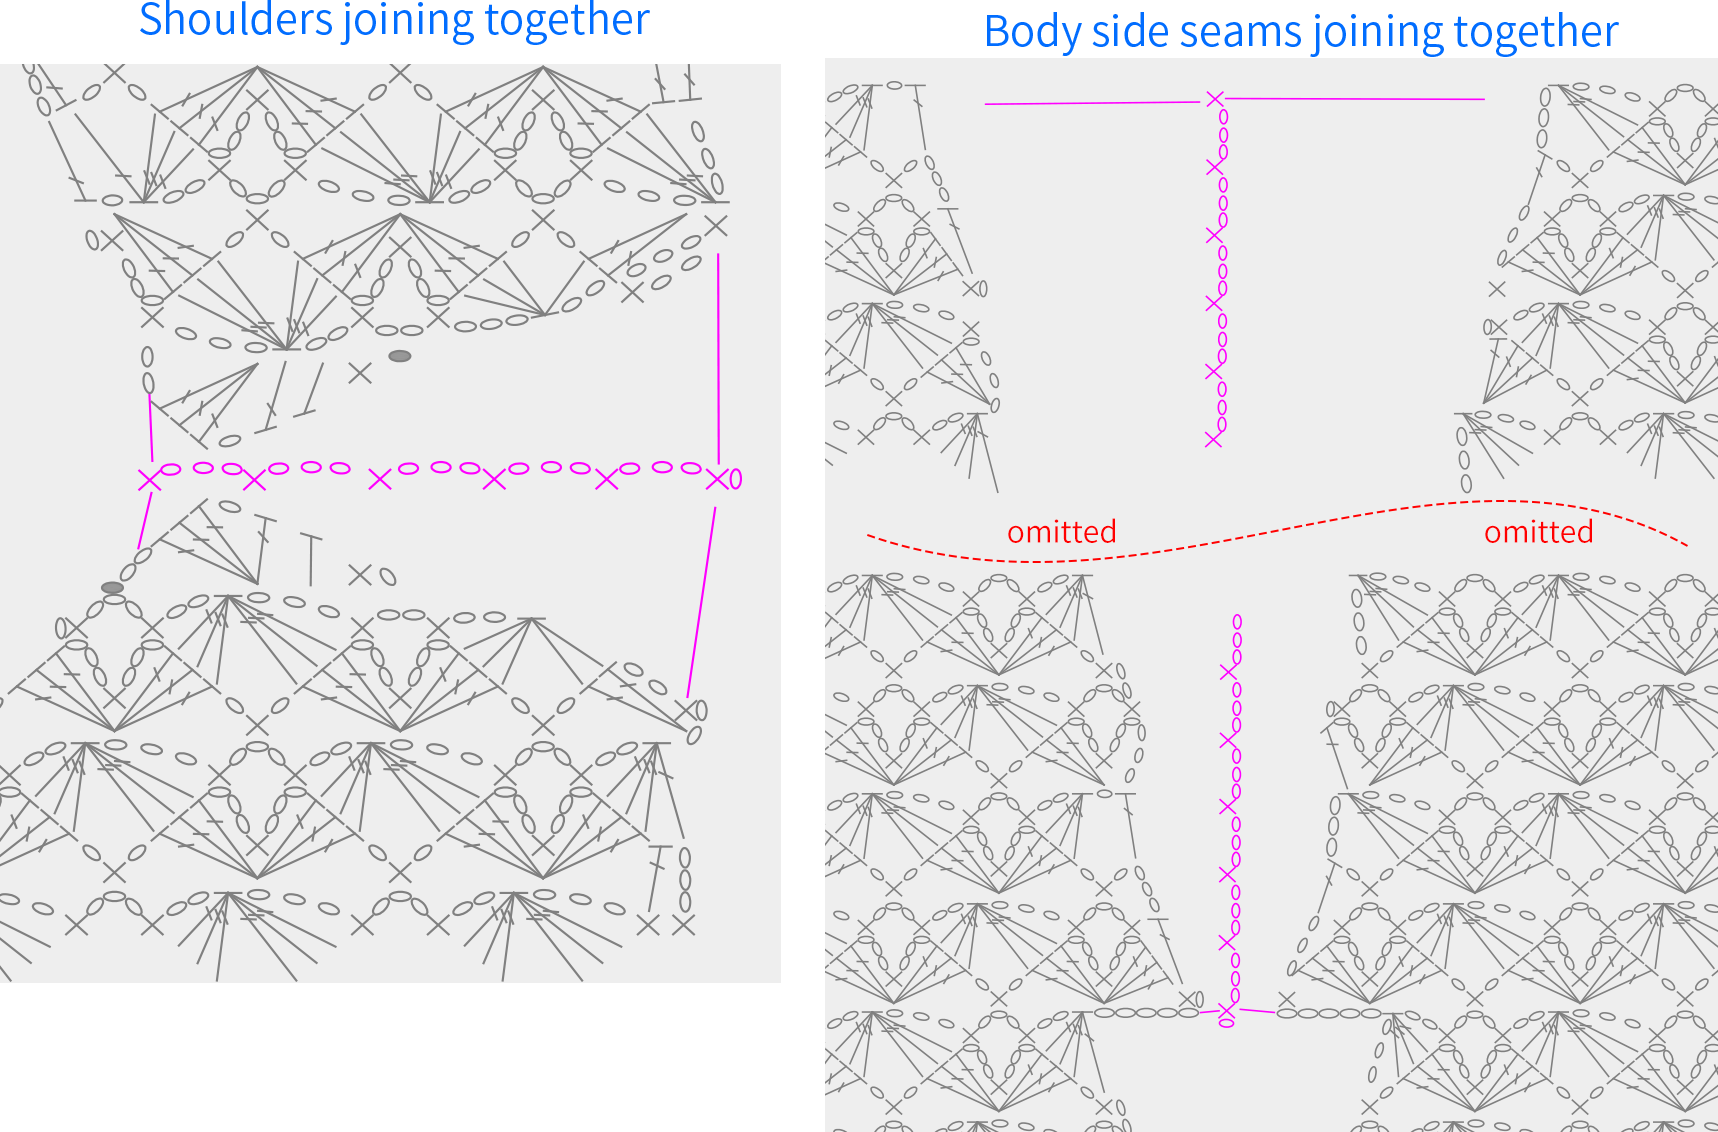
Divide into shoulder joining and body side seam joining. Join the shoulders first, then join the body sides. Please refer to the video demonstration for more details.
Note: Start attaching from either end. The single crochet can be inserted approximately at the right position, and the number of chains in between can also be adjusted according to crochet tension. After connecting, ensure the fabric piece lays flat.
Part 4 Edging D 33' 21''
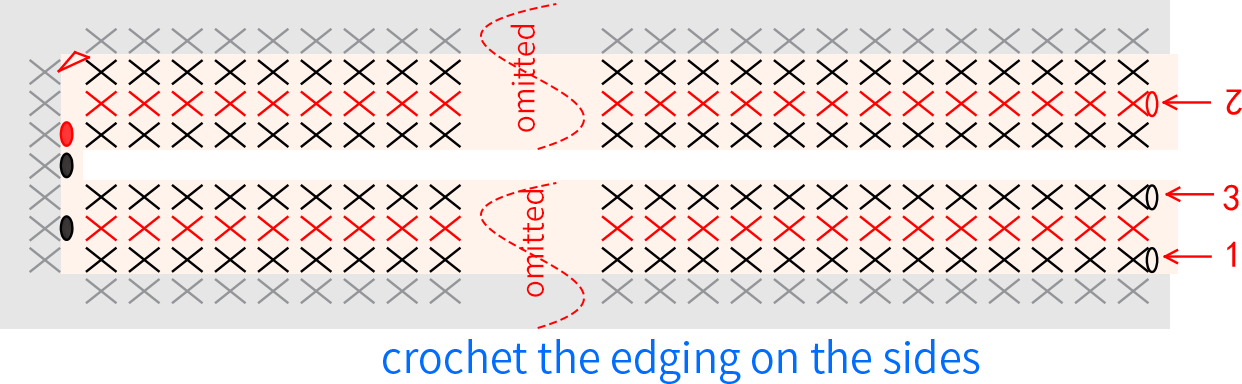
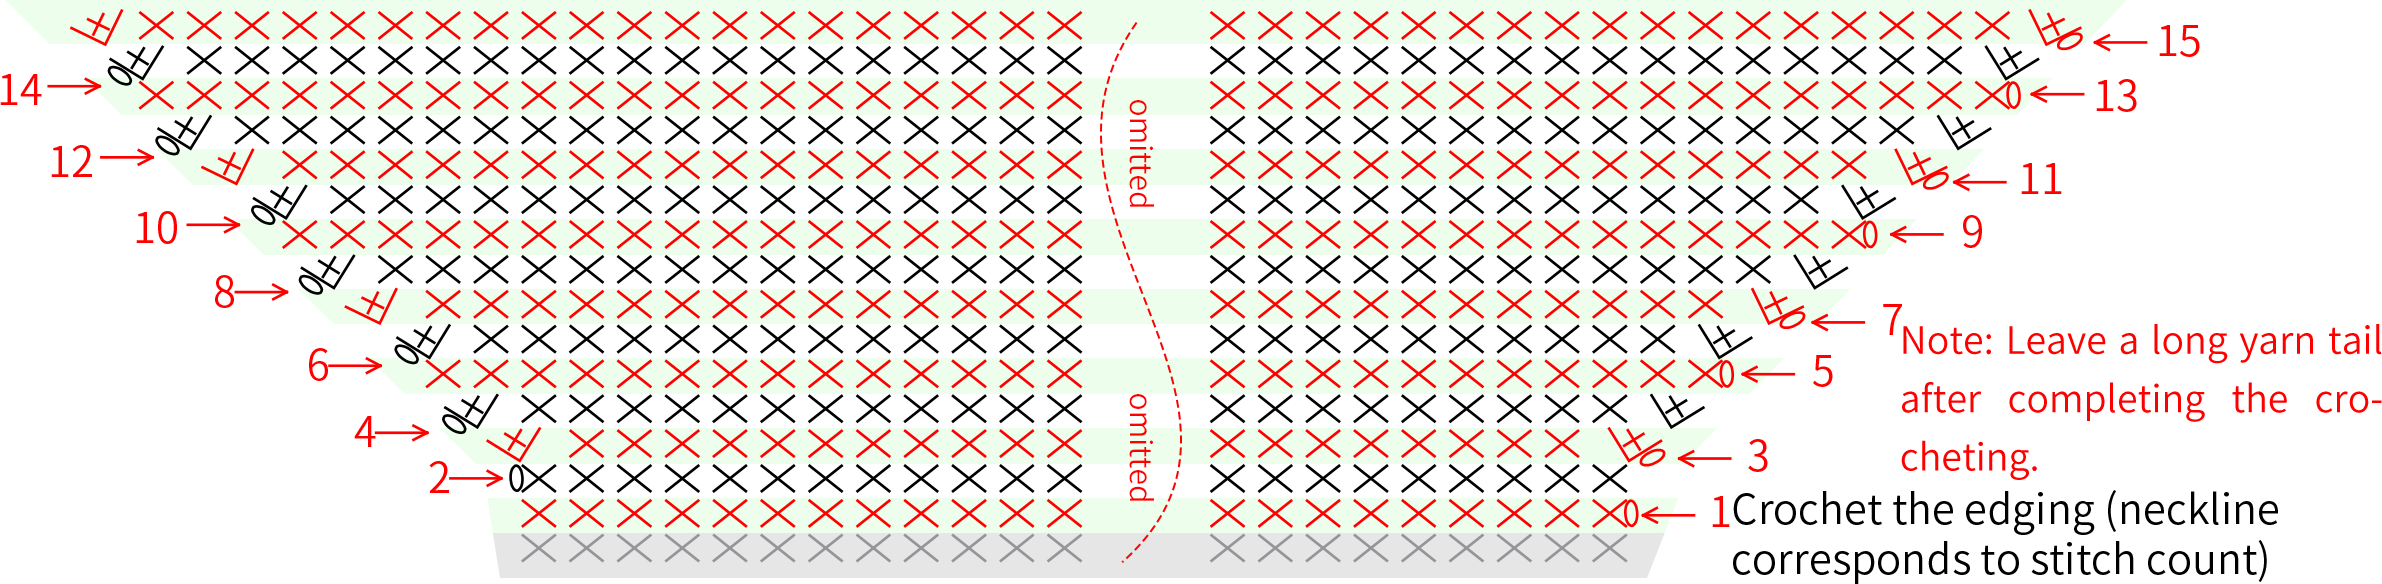
It consists of the overall edging and side edging. First, crochet the overall edging, working all around the edge of the fabric. Please refer to the video demonstration for more details.
Note: Refer to the front and back pieces chart for the overall edging pattern.
Part 5 Front Band E 43' 45''
Part 6 Collar F 47' 07''
Work back and forth along the neckline. Please refer to the video demonstration for more details.
Part 7 Cuffs G 51' 09''
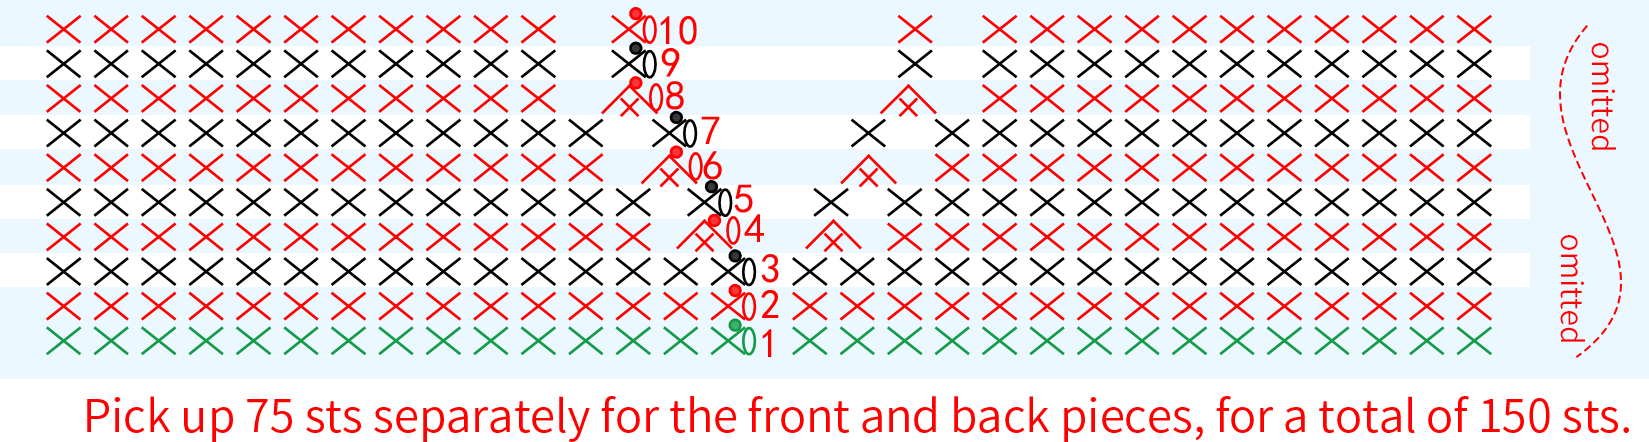
Crochet in rounds along the cuffs. Please refer to the video demonstration for more details.
Part 8 Decorations H
Composed of hem decorations, placket, neckline decoration, cuff decorations, and buttons.
Step 1 Hem decoration 54' 11''
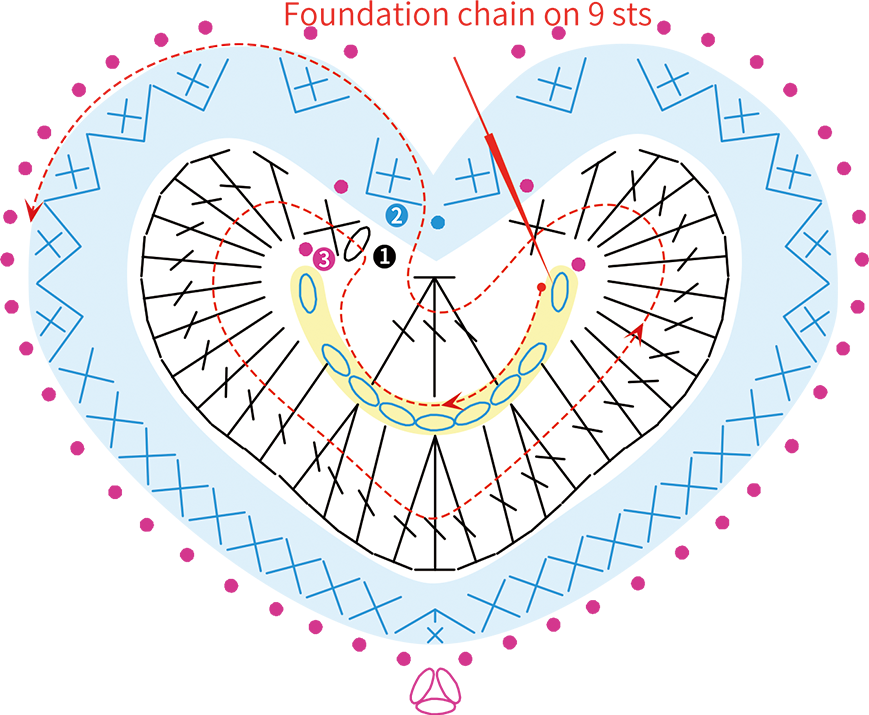
First, crochet the Ruyi motif, then sew it on separately at the front and back piece positions. Please refer to the video demonstration for more details.
Note: After completing the second round of crocheting, leave a long yarn tail. Evenly sew 5 pieces at the hem of the front body and 11 pieces at the hem of the back body. When sewing, alternate different color schemes for the stitches, or arrange them according to your preference.
| Hem decoration | Red Dahlia Version | |||
| Rounds | Color 1 ×7 | Color 2 ×4 | Color 3 ×5 | |
| Cast on-R 2 | 37#Majolica Blue | 21#Buff Yellow | 41#Red Dahlia | |
| R 3 | 01#Whisper White | |||
| Zen Blue Version | ||||
| Rounds | Color 1 ×7 | Color 2 ×4 | Color 3 ×5 | |
| Cast on-R 2 | 31#Indigo Blue | 08#Linen | 26#Zen Blue | |
| R 3 | 01#Whisper White | |||
| Silver Peony Version | ||||
| Rounds | Color 1 ×7 | Color 2 ×4 | Color 3 ×5 | |
| Cast on-R 2 | 06#Milky Blue | 09#Pastel Yellow | 14#Silver Peony | |
| R 3 | 01#Whisper White | |||
Step 2 Placket 66' 07''
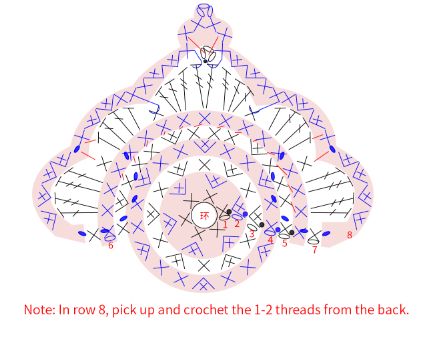
It is composed of fabric pieces and decorations. First, crochet the fabric piece using the magic ring method, and crochet along the starting chain. Please refer to the video demonstration for more details.
| Part | Rounds | Red Dahlia Version | Zen Blue Version | Silver Peony Version |
| Placket | Cast on-R 4 | 01#Whisper White | 01#Whisper White | 01#Whisper White |
| R 5-R 7 | 37#Majolica Blue | 31#Indigo Blue | 06#Milky Blue | |
| R 8 | 21#Buff Yellow | 08#Linen | 09#Pastel Yellow | |
| Crochet along the slip stitches of the third round with gold thread; all decorations are also sewn on with gold thread. | ||||
Step 3 Neckline Decoration, Cuff Decorations, and Buttons 94' 23''
Sew pearls evenly on the neckline, and decorate the cuff edges by embroidering corresponding patterns along them. Finally, sew buttons at the corresponding buttonhole positions. Please refer to the video demonstration for more details.
Neckline decoration: sew 6 buttons on each front piece and 7 buttons on the back piece. The specific amount of sewing can also be arranged according to your preference.
| Part | Red Dahlia Version | Zen Blue Version | Silver Peony Version |
| Neckline Decoration | 41#Red Dahlia (Split into 2 strands.) |
26#Zen Blue (Split into 2 strands.) |
14#Silver Peony (Split into 2 strands.) |
| Cuff Decoration | 01#Whisper White | ||
| Button | |||

Made by the community