Doll
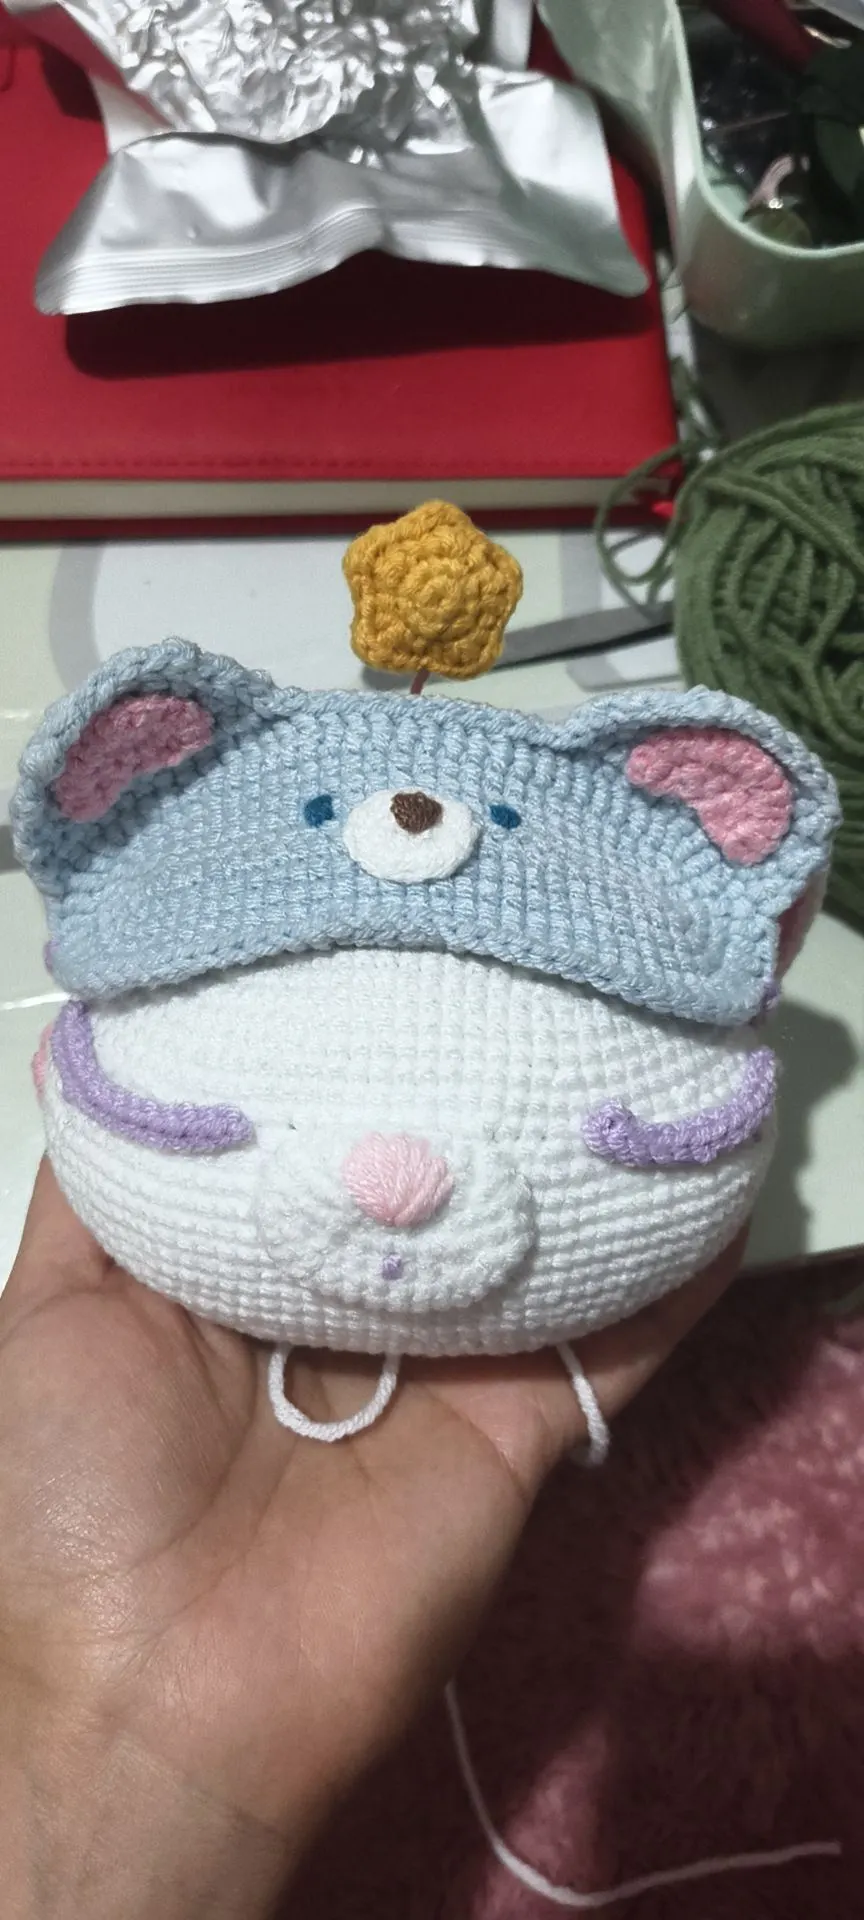
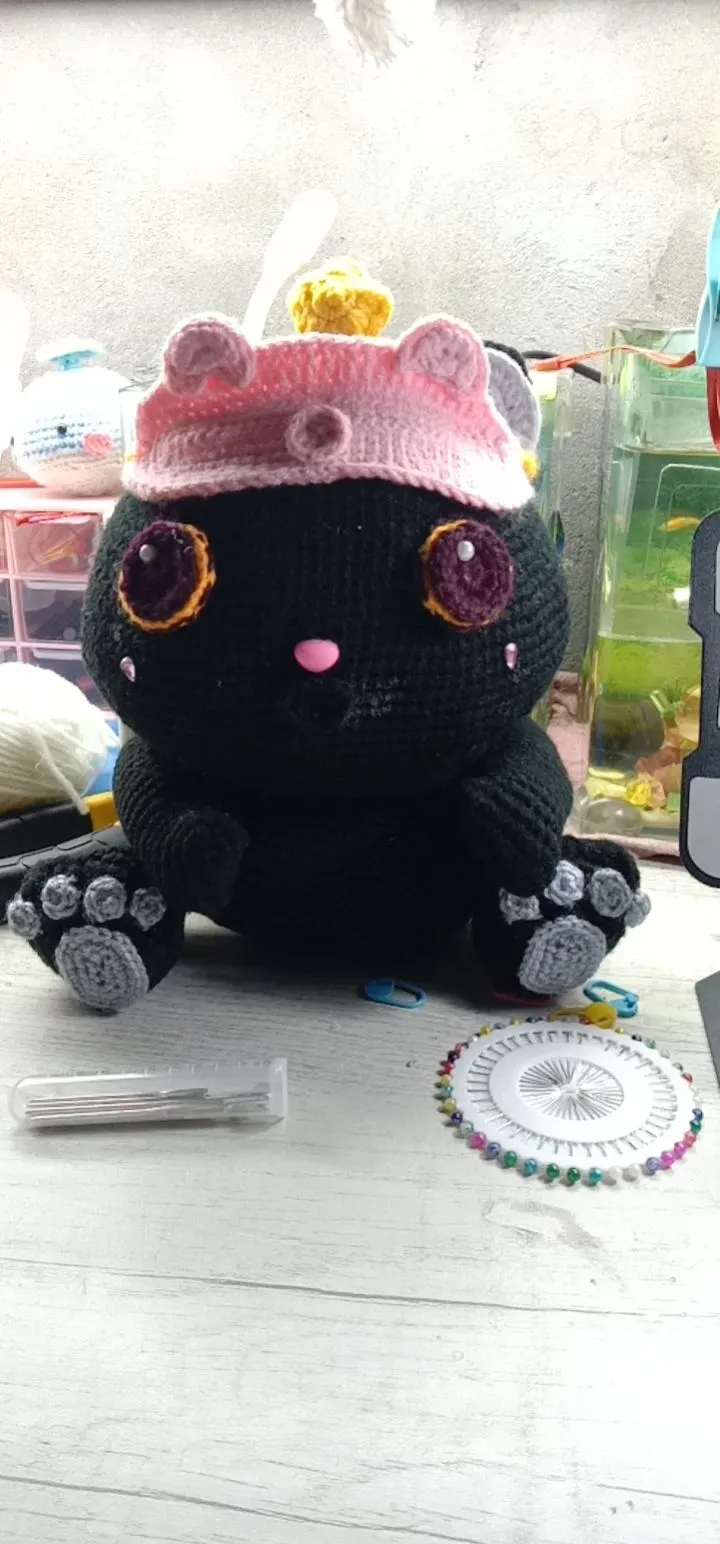
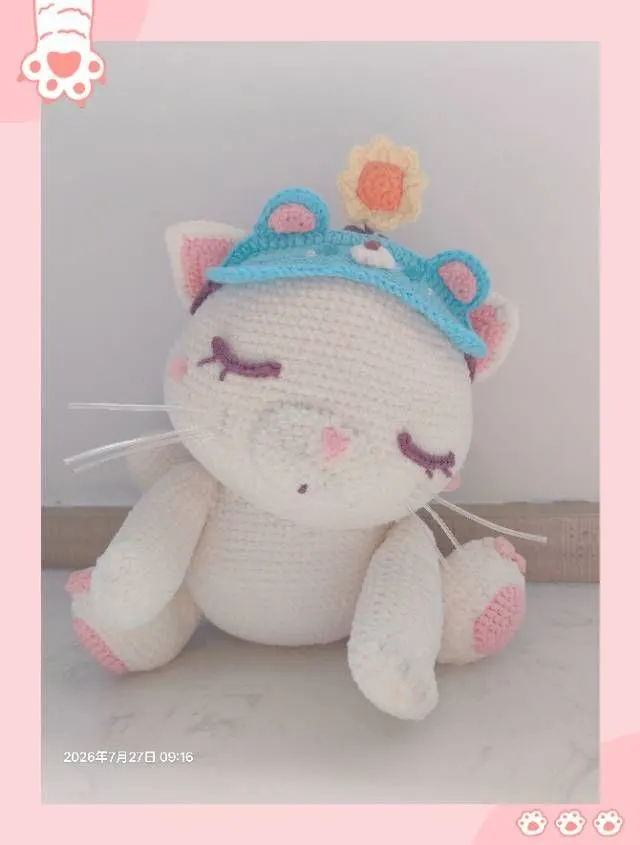
Sleepy Kitty
Project preview
See the finished project
Pattern format
Instructions


This toy is divided into feet, body, hands, head, facial features, tail, and decorations.
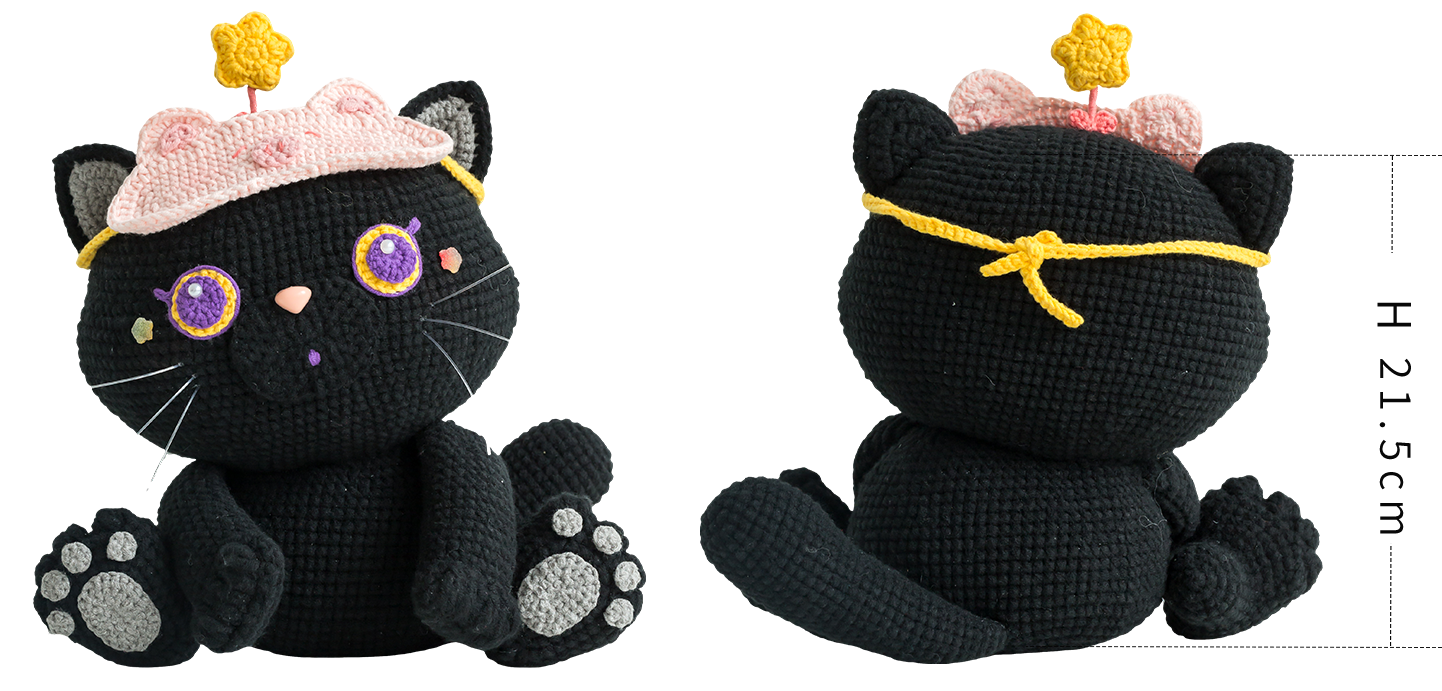
Due to variations in individual tension, the size of the sample is for reference only.
Materials: Susan`s Family Handcrafted No.2 Knit Thread, 4-Ply Combed Cotton & Acrylic Fibre Hand Knitting Yarn
Crochet Hook: 3.00 mm Crochet Hook

ABBREVIATIONS
MRadjustable magic ring
RRound
SLslip stitch
V = sc2-in-12 single crochets into the same stitch
Thalf double crochet
Fdouble crochet
Kskip
CHchain
HRow
W = sc3-in-13 single crochets into the same stitch
TV = hdc2-in-12 half double crochets into the same stitch
[...]in the same stitch
(...)×6crochet item in the parentheses six times
{...}a group of big loops
XX stitch single crochet
A = sc2toginvisible single crochet 2 stitches together
M = sc3togsingle crochet 3 stitches together
FV = dc2-in-12 double crochets into the same stitch
Dao2start in 2nd CH from the hook
Note:
1, This pattern is making in Chinese crochet pattern terms, and the stitch name is written using American terminology. All measurements in charts are in cm.
2, Working in joined round: When crocheting in rounds without further guidance, working in closed rounds, start each round with a set number of beginning chains and close with a slip stitch. The beginning chain preceding a single crochet and the slip stitch used for joining rounds are not included in the total stitches.
3, This toy is crocheted entirely using X-shaped single crochet (cross stitch).
4, When crocheting in rounds, start with a turning chain, end with a slip stitch join and pull tight, the turning chain for single crochet and the joining slip stitch do not count as 1 stitch.
Part 1 Foot
| Right Foot | |||
| Rounds | Stitch Instructions | Total stitches | Color |
| CO and R1 | 6CH, Dao2, SL, 2X, T, [5T], 3X, SL | 13 | 13#Black Beauty(Handcrafted No.2 Knit Thread) |
| R2 | V, 3X, 5V, 3X, V | 20 | |
| R3 | X, V, 3X, (X, V)×2, 2X, (X, V)×2, 4X, V | 26 | |
| R4 | [3CH, F], TV, T, 7X, V, 2X, V, X, V, 7X, T, TV, F | 32 | |
| R5 | 2X, V, 9X, TV, T, V, X, V, 2X, V, X, V, 9X, V | 39 | |
| R6—R7 | Even 39X | ||
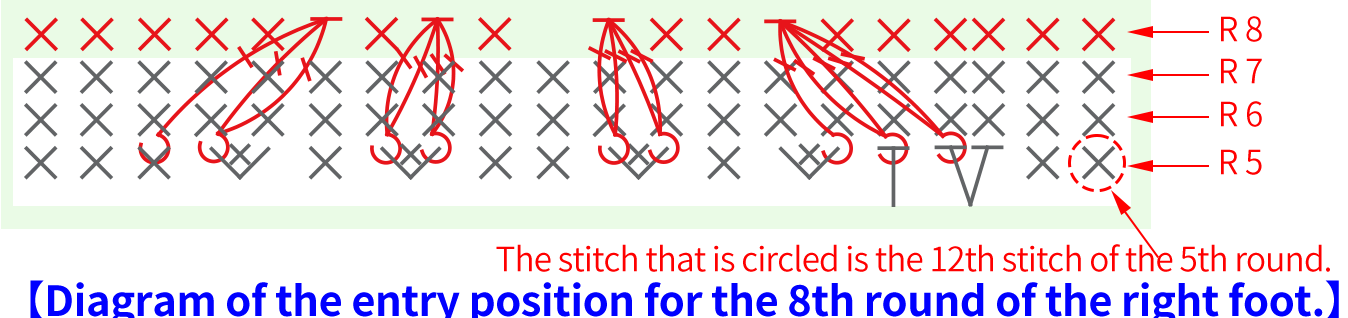
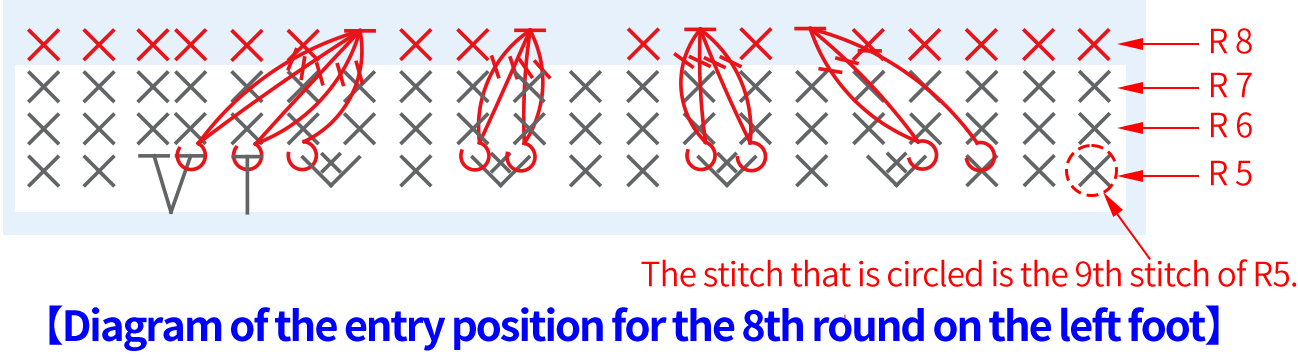
| R8 | 17X, front post double crochet 5 sts together, K, 2X, front post double crochet 4 sts together, K2, X, front post double crochet 4 sts together, K, X, front post double crochet 3 sts together, K, 13X | 38 | |
| Note: The insertion point for the front post double crochet is shown in the diagram. | |||
| R9 | Carry the yarn across to the 14th st of R8, A, M, 5X, K, X, 2A, 9CH, R8 the 12th st, A, 11X, 9CH, R8 the 10th st, 2A, 8X, A, X, 9CH, R8 the 7th st, X, 2A, 8X, A, X, 9CH, R8 the 6th st, X, A, 3X, M, 3X, A, 11X |
/ | |
| R10 | (5X, A)×3 | 18 | |
| R11—R15 | Even 18X | ||
| R16 | (X, A)×6 | 12 | |
| R17 | 6A | 6 | |
| Note: Count 3 chain stitches as 1 stitch. Start adding the fiberfill while crocheting from R9, and fold the 35cm shaping wire in half to place inside. Finally, leave about a 20cm yarn tail for sewing. | |||
| Left Foot | |||
| Rounds | Stitch Instructions | Total stitches | Color |
| CO and R1 | 6CH, Dao2, SL, 3X, [5T], T, 2X, SL | 13 | 13#Black Beauty(Handcrafted No.2 Knit Thread) |
| R2 | V, 3X, 5V, 3X, V | 20 | |
| R3 | X, V, 3X, (X, V)×2, 2X, (X, V)×2, 4X, V | 26 | |
| R4 | 3CH, TV, T, 7X, V, X, V, 2X, V, 7X, T, TV, FV | 32 | |
| R5 | V, 9X, V, X, V, 2X, V, X, V, T, TV, 9X, V, 2X | 39 | |
| R6—R7 | Even 39X | ||
| R8 | 13X, front post double crochet of double crochet 3 sts together, K, X, front post double crochet of double crochet 4 sts together, K, X, front post double crochet of double crochet 4 sts together, K2, 2X, front post double crochet of double crochet 5 sts together, K, 17X | 38 | |
| Note: The insertion point for the front post double crochet is shown in the diagram. | |||
| R9 | Carry the yarn across to the 10th st of R8, 2A, X, K, 5X, M, A, 9CH, R8 the 9th st, 11X, A, 9CH, R8 the 8th st, X, A, 8X, 2A, 9CH, R8 the 7th st, X, A, 8X, 2A, X, 9CH, R8 the 6th st, X, A, 3X, M, 3X, A, 11X |
/ | |
| R10 | (5X, A)×3 | 18 | |
| R11—R15 | Even 18X | ||
| R16 | (X, A)×6 | 12 | |
| R17 | 6A | 6 | |
| Note: Count 3CH as one stitch. Start adding fiberfill while crocheting from R9, and fold a 35cm shaping wire in half to insert. Finally, leave about 20cm yarn tail for sewing. | |||
Part 2 Body
| Body | |||
| Rounds | Stitch Instructions | Total stitches | Color |
| CO and R1 | 8CH, Dao2, 6X, W, 5X, V | 16 | 13#Black Beauty(Handcrafted No.2 Knit Thread) |
| R2 | V, 5X, 3V, 5X, 2V | 22 | |
| R3 | V, 7X, 4V, 7X, 3V | 30 | |
| R4 | X, V, 7X, (X, V)×4, 7X, (X, V)×3 | 38 | |
| R5 | X, V, 8X, (X, V, X)×4, 7X, (X, V, X)×3 | 46 | |
| R6 | 3X, V, 7X, (3X, V)×4, 7X, (3X, V)×3 | 54 | |
| R7 | 2X, V, 9X, (2X, V, 2X)×4, 7X, (2X, V, 2X)×3 | 62 | |
| R8 | 5X, V, 7X, (5X, V)×4, 7X, (5X, V)×3 | 70 | |
| R9 | Even 70X | ||
| R10 | 3X, V, 10X, (3X, V, 3X)×4, 7X, (3X, V, 3X)×3 | 78 | |
| R11—R15 | Even 78X | ||
| R16 | 3X, A, 21X, A, 14X, A, 21X, A, 11X | 74 | |
| R17 | Even 74X | ||
| R18 | 17X, A, 13X, A, 20X, A, 13X, A, 3X | 70 | |
| R19 | Even 70X | ||
| R20 | 5X, A, 19X, A, 12X, A, 19X, A, 7X | 66 | |
| R21 | 18X, A, 11X, A, 18X, A, 11X, A | 62 | |
| R22 | Even 62X | ||
| R23 | Carry the yarn across to the 20th st of R22, 4X, 2A, 21X, 11CH, K16, 17X | 44 | |
| R24 | A, 6X, A, 11X, K6, 15CH, K6, 11X | 30 | |
| R25 | A, 4X, A, 7X, K4, 15CH, K4, 7X | 20 | |
| R26 | 4X, A, 5X, K2, 11CH, K2, 3X, A | 14 | |
| R27 | A, 2X, A, 2X, K2, 9CH, K2, 2X | 8 | |
| R28 | 2A, X, K, 5CH, K, X | 4 | |
| Note: The transition chains starting from R23 are not counted in the Total stitches, start adding fiberfill from R27, and leave a tail of about 55cm for sewing. |
|||
Part 3 Hands
| Hand×2 | |||
| Rounds | Stitch Instructions | Total stitches | Color |
| CO and R1 | 9CH, Dao2, 7X, W, 6X, V | 18 | 13#Black Beauty(Handcrafted No.2 Knit Thread) |
| R2 | V, 6X, 3V, 6X, 2V | 24 | |
| R3 | Even 24X | ||
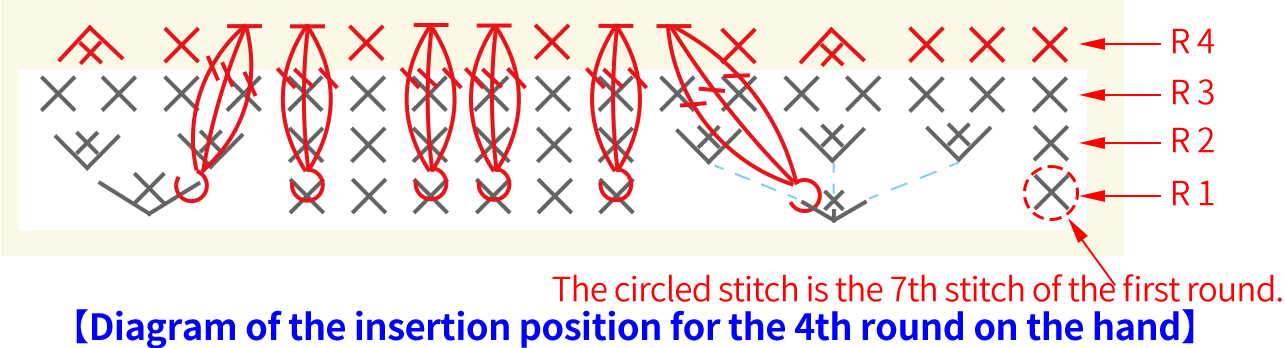
| R4 | 10X, A, X, front post double crochet 3 sts together×2, K2, X, front post double crochet 3 sts together×2, K2, X, front post double crochet 3 sts together×2, K2, X, A | 22 | |
| Note: The insertion point for the front post double crochet (fpdc) is shown in the diagram. | |||
| R5 | 12X, (A, X)×2, A, 2X | 19 | |
| R6 | 12X, (V, 2X)×2, V, 2X | 22 | |
| R7—R10 | Even 22X | ||
| R11 | A, 8X, A, 10X | 20 | |
| R12—R16 | Even 20X | ||
| R17 | (8X, A)×2 | 18 | |
| R18—R20 | Even 18X | ||
| R21 | (X, A)×6 | 12 | |
| R22 | Even 12X | ||
| R23 | 6A | 6 | |
| Note: Before sewing, add a small amount of stuffing, and fold the 35cm shaping wire in half to place inside. Finally, leave a tail of about 20cm for sewing. | |||
Part 4 Head
| Head | |||
| Rounds | Stitch Instructions | Total stitches | Color |
| CO and R1 | 8CH, Dao2, 6X, W, 5X, V | 16 | 13#Black Beauty(Handcrafted No.2 Knit Thread) |
| R2 | V, 5X, 3V, 5X, 2V | 22 | |
| R3 | V, 7X, 4V, 7X, 3V | 30 | |
| R4 | X, V, 7X, (X, V)×4, 7X, (X, V)×3 | 38 | |
| R5 | X, V, 8X, (X, V, X)×4, 7X, (X, V, X)×3 | 46 | |
| R6 | 3X, V, 7X, (3X, V)×4, 7X, (3X, V)×3 | 54 | |
| R7 | Even 54X | 54 | |
| R8 | 2X, V, 9X, (2X, V, 2X)×4, 7X, (2X, V, 2X)×3 | 62 | |
| R9 | 5X, V, 7X, (5X, V)×4, 7X, (5X, V)×3 | 70 | |
| R10 | Even 70X | ||
| R11 | 3X, V, 10X, (3X, V, 3X)×4, 7X, (3X, V, 3X)×3 | 78 | |
| R12 | 7X, V, 7X, (7X, V)×4, 7X, (7X, V)×3 | 86 | |
| R13—R14 | Even 86X | ||
| R15 | 4X, V, 11X, (4X, V, 4X)×4, 7X, (4X, V, 4X)×3 | 94 | |
| R16 | Even 94X | ||
| R17 | 37X, (3X, A)×4, 7X, (A, 3X)×4, 10X | 86 | |
| R18 | 37X, (V, X)×7, 11X, (X, V)×7, 10X | 100 | |
| R19 | 37X, (3X, V, 3X)×3, 11X, (3X, V, 3X)×3, 10X | 106 | |
| R20—R25 | Even 106X | ||
| R26 | 37X, (3X, A, 3X)×3, 11X, (3X, A, 3X)×3, 10X | 100 | |
| R27 | Even 100X | ||
| R28 | 37X, (A, X)×7, 11X, (X, A)×7, 10X | 86 | |
| R29 | 37X, (3X, V)×4, 7X, (V, 3X)×4, 10X | 94 | |
| R30 | 4X, A, 11X, (4X, A, 4X)×4, 7X, (4X, A, 4X)×3 | 86 | |
| R31 | 7X, A, 7X, (7X, A)×4, 7X, (7X, A)×3 | 78 | |
| R32 | Even 78X | ||
| R33 | 3X, A, 10X, (3X, A, 3X)×4, 7X, (3X, A, 3X)×3 | 70 | |
| R34 | 5X, A, 7X, (5X, A)×4, 7X, (5X, A)×3 | 62 | |
| R35 | Even 62X | ||
| R36 | 2X, A, 9X, (2X, A, 2X)×4, 7X, (2X, A, 2X)×3 | 54 | |
| R37 | 3X, A, 7X, (3X, A)×4, 7X, (3X, A)×3 | 46 | |
| R38 | X, A, 8X, (X, A, X)×4, 7X, (X, A, X)×3 | 38 | |
| R39 | X, A, 7X, (X, A)×4, 7X, (X, A)×3 | 30 | |
| R40 | A, 7X, 4A, 7X, 3A | 22 | |
| R41 | A, 5X, 3A, 5X, 2A | 16 | |
| Note: Start stuffing fiberfill from R35, and leave a yarn tail of about 15cm for closing the opening. | |||
Part 5 Facial Features
Facial features include eyes, nose, whiskers, and ears.
Step 1 Eyes
| Eye ×2(4-Ply Combed Cotton & Acrylic Fibre Hand Knitting Yarn) | ||||
| Part | Rounds | Stitch Instructions | Total stitches | Color |
| Eyelet 1 | CO and R1 | MR, 8X | 8 | 08#Sheer Lilac |
| R2 | 8V | 16 | ||
| Note: Leave a yarn tail of about 15cm to sew. | ||||
| Eyelet 2 | CO and R1 | MR, 6X | 6 | 09#Aspen Gold |
| R2 | 6V | 12 | ||
| R3 | (X, V)×6 | 18 | ||
| Note: Leave a yarn tail of about 15cm to sew. | ||||
Step 2 Nose, Ears
After completing the crocheting of the nose, take another 20cm of 4-ply cotton in 62#Sparkling Grape and embroider a few line segments. Once the sewing is finished, take out the pre-made triangular nose and attach it to the nose fabric piece.
Note: Whiskers: Cut 6 pieces of shaping wire about 10cm long and attach them to the corresponding positions.
| Nose | |||
| Rounds | Stitch Instructions | Total stitches | Color |
| CO and R1 | 6CH, Dao2, 4X, W, 3X, V | 12 | 13#Black Beauty(Handcrafted No.2 Knit Thread) |
| R2 | V, 3X, 3V, 3X, 2V | 18 | |
| R3 | X, V, 3X, (X, V)×3, 3X, (X, V)×2 | 24 | |
| R4 | X, V, 4X, (X, V, X)×3, 3X, (X, V, X)×2 | 30 | |
| Note: Leave a yarn tail of about 20cm to sew, Sew it with the wrong side facing out onto the face. | |||
| Ear ×2 | ||||
| Part | Rows | Stitch Instructions | Total stitches | Color |
| Inner ear | CO and H1 | MR, 5X | 5 | 36#Steeple Gray (4-Ply Combed Cotton & Acrylic Fibre Hand Knitting Yarn) |
| H2 | CH, Turn, V, X, [X, 2CH, X], X, V | 8 | ||
| H3 | CH, Turn, V, 3X, [X, 2CH, X], 3X, V | 12 | ||
| H4 | CH, Turn, V, 5X, [X, 2CH, X], 5X, V | 16 | ||
| H5 | CH, Turn, 7X, K, [X, 2CH, X], K, 7X | |||
| Outer ear | CO and H1 | MR, 5X | 5 | 13#Black Beauty(Handcrafted No.2 Knit Thread) |
| H2 | CH, Turn, V, X, [X, 2CH, X], X, V | 8 | ||
| H3 | CH, Turn, V, 3X, [X, 2CH, X], 3X, V | 12 | ||
| H4 | CH, Turn, V, 5X, [X, 2CH, X], 5X, V | 16 | ||
| H5 | This row needs to be crocheted overlapping with the Inner ear, CH, Turn, V, 7X, [X, 2CH, X], 7X, V |
20 | ||
| Note: Leave a yarn tail of about 20cm to sew. | ||||
Part 6 Tail
| Tail | |||
| Rounds | Stitch Instructions | Total stitches | Color |
| CO and R1 | MR, 6X | 6 | 13#Black Beauty(Handcrafted No.2 Knit Thread) |
| R2 | 6V | 12 | |
| R3 | (X, V)×6 | 18 | |
| R4 | (X, V, X)×6 | 24 | |
| R5—R6 | Even 24X | ||
| R7 | (7X, V)×3 | 27 | |
| R8—R10 | Even 27X | ||
| R11 | 13X, A, 12X | 26 | |
| R12 | 12X, A, 12X | 25 | |
| R13 | 12X, A, 11X | 24 | |
| R14 | Even 24X | ||
| R15 | (3X, A, 3X)×3 | 21 | |
| R16—R20 | Even 21X | ||
| R21 | (5X, A)×3 | 18 | |
| R22—R24 | Even 18X | ||
| R25 | (2X, A, 2X)×3 | 15 | |
| R26—R27 | Even 15X | ||
| R28 | (3X, A)×3 | 12 | |
| R29 | Even 12X | ||
| R30 | (X, A, X)×3 | 9 | |
| R31 | Even 9X | ||
| R32 | (X, A)×3 | 6 | |
| Note: While crocheting the edging, add the stuffing. At the same time, fold the 40cm shaping wire in half and place it inside. Finally, leave a tail of about 20cm for sewing. | |||
Part 7 Decorations.
The decorations include star decorations, paw pads, and eye masks.
Step 1 Star Decorations, Paw Pads
| Star Decoration(4-Ply Combed Cotton & Acrylic Fibre Hand Knitting Yarn) | ||||
| Part | Rounds | Stitch Instructions | Total stitches | Color |
| Leaf | CO and R1 | 3CH, Dao3, F, 2CH, SL, 3CH, Dao3, F, 2CH, SL | / | 12#Shell Pink |
| Star ×2 | CO and R1 | MR, 5X | 5 | 09#Aspen Gold |
| R2 | 5V | 10 | ||
| R3 | {X, [T, CH, F, CH, T]}×5 | / | ||
| Sew Star with the right side facing out, add a small amount of stuffing in the middle, and place the shaping wire (8cm), with one end bent, inside. | ||||
| Paw Pad(4-Ply Combed Cotton & Acrylic Fibre Hand Knitting Yarn) | ||||
| Part | Rounds | Stitch Instructions | Total stitches | Color |
| Big Paw Pad ×2 |
CO and R1 | 5CH, Dao2, 3X, W, 2X, V | 10 | 36#Steeple Gray |
| R2 | V, 2X, 3V, 2X, 2V | 16 | ||
| R3 | X, V, 2X, (X, V)×3, 2X, (X, V)×2 | 22 | ||
| Note: Leave a yarn tail of about 20cm to sew the wrong side out on the sole. | ||||
| Small Paw Pad ×8 |
CO and R1 | MR, 6X | 6 | |
| Note: Leave a yarn tail of about 15cm and sew it with the wrong side facing out on the sole. | ||||
Step 2 Eye Masks
The eye mask is divided into the main part, ears, nose, tie straps, and eyes. After assembly is completed, take 20cm of 4-ply cotton in light red #12, and extract one strand to sew two line segments on the nose and two slightly above the sides of the nose for the nostrils and eyes.
| Eye mask (4-Ply Combed Cotton & Acrylic Fibre Hand Knitting Yarn) | ||||
| Part | Rounds/Rows | Stitch Instructions | Total stitches | Color |
| Main Part | CO and R1 | 26CH, Dao2, 24X, W, 23X, V | 52 | 49#Pearl |
| R2 | V, 23X, 3V, 23X, 2V | 58 | ||
| R3 | X, V, 23X, (X, V)×3, 23X, (X, V)×2 | 64 | ||
| R4 | X, V, 24X, (X, V, X)×3, 23X, (X, V, X)×2 | 70 | ||
| R5 | 2CH, 2T, TV, 23X, 3T, TV, (3F, FV)×2, 3F, 3T, 3X, 5SL, 3X, 3T, 3F, (3F, FV)×2 | 76 | ||
| Note: 2CH counts as 1 st. | ||||
| Outer ear ×2 | CO and H1 | MR, 4X | 4 | |
| H2 | CH, Turn, 4V | 8 | ||
| H3 | 2CH, Turn, TV, (T, TV)×3 | 12 | ||
| Note: Leave a yarn tail of about 15cm to sew. | ||||
| Inner ear×2 | CO and H1 | MR, 4X | 4 | 02#Quartz Pink |
| H2 | CH, Turn, 4V | 8 | ||
| Note: Leave a yarn tail of about 15cm to sew. | ||||
| Nose | CO and R1 | 4CH, Dao2, 2X, V, 2X | 6 | |
| R2 | V, X, 2V, X, V | 10 | ||
| Note: Leave a yarn tail of about 15cm to sew. | ||||
| Tie Strap×2 | CO and R1 | 50CH, Dao2, 49X | 49 | 09#Aspen Gold |
| Note: Leave a yarn tail of about 15cm to sew. | ||||
Made by the community