
Accessories / Ornament
Versatile Brooch
Project preview
See the finished project
Pattern format
Instructions
Watch and follow
Video tutorial
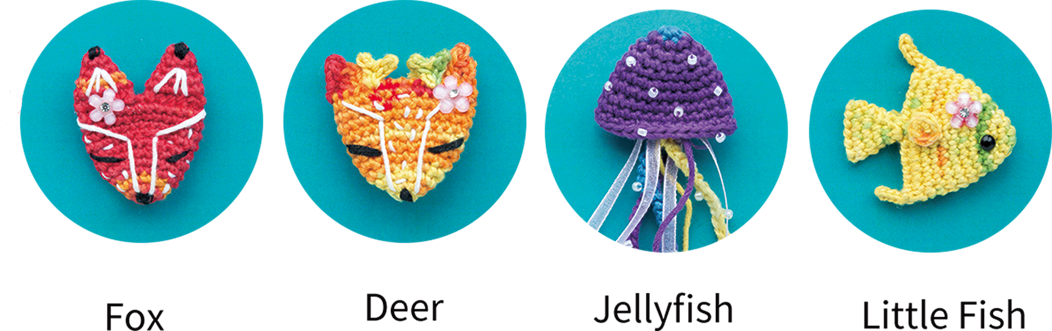
The finished measurement is approximately 3 to 5 centimeters.
Due to variations in individual tension, the size of the sample is for reference only.
Materials: Fancy Dyed Lace & 4-Ply Combed Cotton & Acrylic Fibre Hand Knitting Yarn
Hook: 1.75 mm crochet hook
ABBREVIATIONS
MRadjustable magic ring
Dao2start in 2nd CH from the hook
turnturn the piece
CHchain
V = sc2-in-12 single crochets into the same stitch
A = sc2toginvisible single crochet 2 stitches together
(...)×6crochet item in the parentheses six times
RRound
[...]in the same stitch
Xsingle crochet
Chart Key




Note:
1. This pattern is making in Chinese crochet pattern terms, and the stitch name is written using American terminology. All measurements in charts are in cm.
2. Working in joined round
When crocheting in rounds without further guidance, working in closed rounds, start each round with a set number of beginning chains and close with a slip stitch. The beginning chain preceding a single crochet and the slip stitch used for joining rounds are not included in the total stitches.


1. The starting position of the Fancy Dyed Lace has different tail colors, which will result in different final product colors. You can refer to the finished product or choose your favorite color to start crocheting;
2. The kit comes with three types of functional accessories: brooch clips, magnets, and leather cords. You can also add safety pins and thumbtacks to enable more functions.
Fish
The making of the little fish is divided into the main body and accessories. First, crochet the main body, then attach the accessories and sew together the main body after it's completed.
Step 1 Main part 01' 53''
The main part is divided into the body, dorsal fin, and tail fin. It's worked with a magic ring and crocheted in rounds counterclockwise. Please refer to the video demonstration for more details.
| Body | ||
| Round | Stitch instruction | Total stitches |
| Cast on | Start with a magic ring. | |
| R 1 | 6X | 6 |
| R 2 | (X, V)*3 | 9 |
| R 3 | (V, 2X)*3 | 12 |
| R 4 | (3X, V)*3 | 15 |
| R 5 | (2X, V, 2X)*3 | 18 |
| R 6 | (5X, V)*3 | 21 |
| R 7 | (3X, V, 3X)*3 | 24 |
| R 8-R 9 | 24X | 24 |
| R 10 | (7X, V)*3 | 27 |
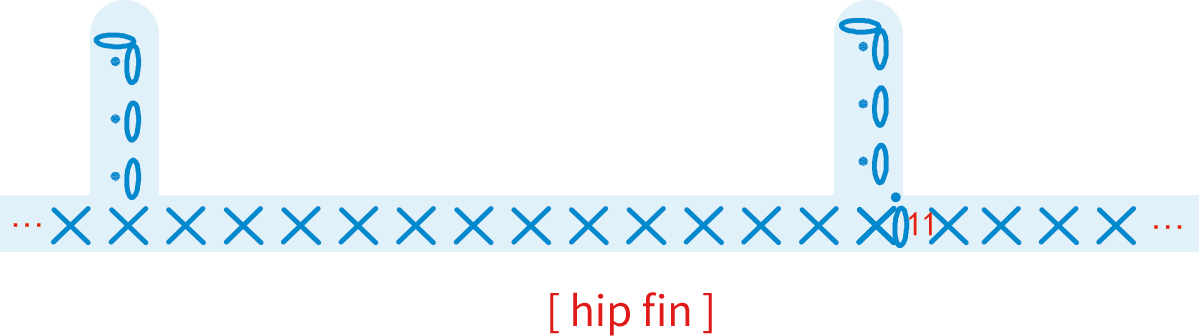
| R 11 | Refer to the chart [hip fin ] | |
| After crocheting, leave a yarn tail of about 30 centimeters for sewing. |
||
| Dorsal fin | ||
| Round | Stitch instruction | Total stitches |
| Cast on | Start with a magic ring. | |
| R 1 | 6X | 6 |
| After crocheting, leave a yarn tail of about 20 centimeters for sewing. |
||
| Tail fin | ||
| Round | Stitch instruction | Total stitches |
| Cast on | Start with a magic ring. | |
| R 1-R 2 | 6X | 6 |
| R 3 | (V, X)*3 | 9 |
| R 4 | (2X, V)*3 | 12 |
| R 5 | 12X | 12 |
| At the beginning, leave a yarn tail of about 10 centimeters on the right side, and at the end, leave a yarn tail of about 20 centimeters. | ||
Step 2 Accessories 20' 22''
First, attach decorative elements, including eyes and flowers. Once done, attach functional accessories according to your preference. Please refer to the video demonstration for more details.
Step 3 Sewing of the main part 27' 07''
Then, using the whip stitch method, sew the body and tail fin separately, and then sew the dorsal fin to the body. Finally, sew the beginning of the tail fin to the body. Please refer to the video demonstration for more details.
Jellyfish 33' 54''
The jellyfish is divided into the main body and decorations. When making, crochet the main body first. Once completed, attach decorative elements (seed beads, ribbons). Finally, install functional accessories according to the purpose. Please refer to the video demonstration for more details.
| Body | ||
| Round | Stitch instruction | Total stitches |
| Cast on | Start with a magic ring. | |
| R 1 | 6X | 6 |
| R 2 | (X, V)*3 | 9 |
| R 3 | (V, 2X)*3 | 12 |
| R 4 | (3X, V)*3 | 15 |
| R 5 | (2X, V, 2X)*3 | 18 |
| R 6 | (5X, V)*3 | 21 |
| R 7 | (3X, V, 3X)*3 | 24 |
| R 8-R 9 | 24X | 24 |
| R 10 | (7X, V)*3 | 27 |
| After the body is crocheted, you need to cast on again to make 3 tentacles. Each tentacle consists of 15 chain stitches. When finished, leave a tail of about 10 centimeters. |
||
Fox 44' 30''
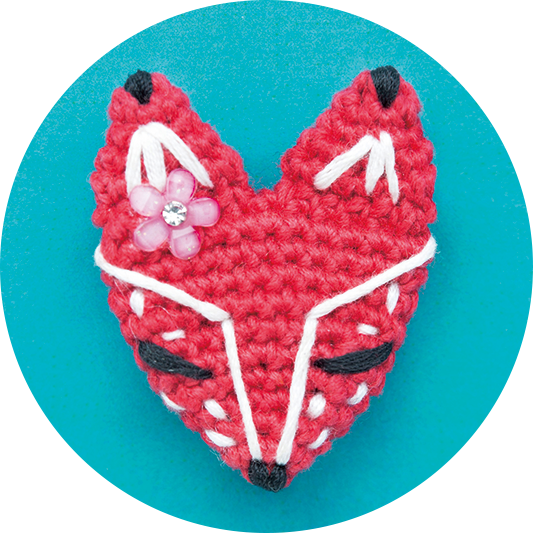
The project is divided into the main part and accessories, where the main part includes the face and ears. When making, crochet the main part first, and after completing it, sew together the main part while attaching the accessories. Please refer to the video demonstration for more details.
| Face | ||
| Round | Stitch instruction | Total stitches |
| Cast on | Start with a magic ring. | |
| R 1 | 6X | 6 |
| R 2 | (X, V)*3 | 9 |
| R 3 | (V, 2X)*3 | 12 |
| R 4 | (3X, V)*3 | 15 |
| R 5 | (2X, V, 2X)*3 | 18 |
| R 6 | (5X, V)*3 | 21 |
| R 7 | (3X, V, 3X)*3 | 24 |
| R 8-R 11 | 24X | 24 |
| After crocheting, leave a yarn tail of about 30 centimeters for sewing. |
||
| Ear x2 | ||
| Round | Stitch instruction | Total stitches |
| Cast on | Start with a magic ring. | |
| R 1-R 2 | 6X | 6 |
| R 3 | (V, X)*3 | 9 |
| R 4 | (2X, V)*3 | 12 |
| R 5 | 12X | 12 |
Note:
1. The fox can be crocheted using red Fancy Dyed Lace yarn, which looks more beautiful.
2. The white decorative strands are made from 4-Ply Combed Cotton 06#Bright White (using two plies for sewing), and the black decorative strands use black sewing thread.
3. The attachment of flowers and decorative elements can be referenced from the finished product images and video demonstrations.
Deer
Divide into the main part and accessories, the main part includes the face, ears, and antlers. When making, crochet the main part first, then attach the accessories after it's completed, and finally sew together the main part.
Step 1 Face 64' 27''
Work in rounds using the magic ring method, crocheting in a circular counterclockwise direction. Please refer to the video demonstration for more details.
| Face (You can choose orange yarn for crocheting, which looks more beautiful.) | ||
| Round | Stitch instruction | Total stitches |
| Cast on | Start with a magic ring. | |
| R 1 | 6X | 6 |
| R 2 | (X, V)*3 | 9 |
| R 3 | (V, 2X)*3 | 12 |
| R 4 | (3X, V)*3 | 15 |
| R 5 | (2X, V, 2X)*3 | 18 |
| R 6 | (5X, V)*3 | 21 |
| R 7 | (3X, V, 3X)*3 | 24 |
| R 8-R 11 | 24X | 24 |
| After crocheting, leave a yarn tail of about 30 centimeters for sewing. |
||
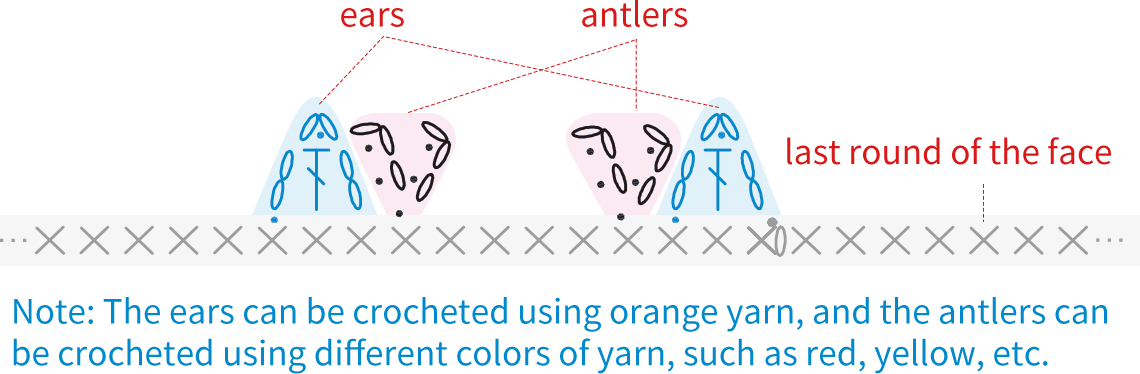
Step 2 Ears and antlers 64' 56''
The ears are crocheted on the sides of the face at the front, while the antlers are crocheted on the stitches right next to the ears on the inside of the face. Please refer to the video demonstration for more details.
Step 3 Accessories 78' 29''
Accessories include decorative elements and functional accessories. Please refer to the video demonstration for more details.
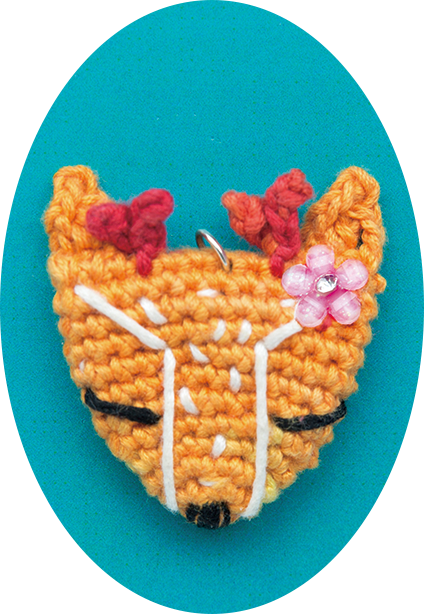
Note:
1. The white decorative strand is made from 4-Ply Combed Cotton 06#Bright White (using two plies for sewing), and the black decorative strand uses black sewing thread.
2. For attaching the flowers and decorative strands, refer to the finished product images and video demonstrations.
Step 4 Sewing of the main part 80' 03''
When sewing, have the front of the face facing you and use the whip stitch method to sew. Please refer to the video demonstration for more details.
Made by the community


